1
Bluemove User Manual
are represented by a green rhombus. You should ”Console” tab and set the debug level to ”ALL”.
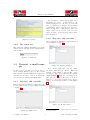
end with a window similiar to Figure 1.14.
Retry this step and look at the console.
1.3.9
Conclusion
We briefly looked at the basic operations of
Bluemove. There are a lot of other features that
were not described in this tutorial. However,
you should be able to discover them on your
own. Do not forget to periodically check the
help website [3]. Lots of information on Bluemove are available there.
Figure 1.14: The second curve with linear keys
1.3.7
Step seven: save the project
Before going further, it is high time to save your
project. Click on the menu named ”File” and
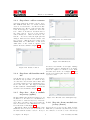
select the item ”Save As...”. A file chooser dialog appears. Choose the directory you want and
name your project ”first bluemove.zip” like on
Figure 1.15. You probably noticed that Bluemove projects are simply ZIP archives.
Figure 1.15: Saving a project
1.3.8
Step eight: play
We arrive at the last step of this tutorial. Power
on the modules and program the YaMoR FPGA.
This operation is described at section 7.3.3 of
[6]. Build the modular robot as shown on Figure \ref{fig:step-10}. Click on the ”Play”
button located at the bottom of the timelines
tab. After a few seconds, the modules should
start to move. If so, congratulations, you have
successfully completed this tutorial. If nothing
is moving then maybe your Bluetooth device is
not correctly initialised. You can switch to the
C. Jaquier - K. Drapel
7
v1.0 - February 14, 2005