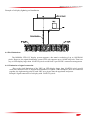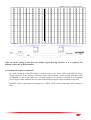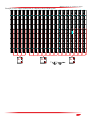
1
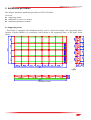
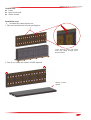
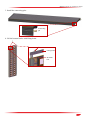
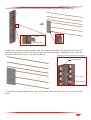
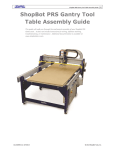
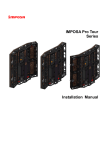
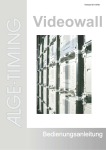
IMPOSA VELO SERIES
User’s Manual
CHAINZONE TECHNOLOGY (FOSHAN) CO.,LTD.
IMPOSA VELO IV installation manual
Version
Ver1.0
Ver1.1
Revised Content
First Edition
The specification table is modified.
File NO. WI/CZ-PM-M0004 Ver1.1
Editor
WJF
WJF
Date
2013-09-30
2014-01-16
1
IMPOSA VELO IV installation manual
Content
Content---------------------------------------------------------------------------------------------------------------------------------------- 1
1 Safety---------------------------------------------------------------------------------------------------------------------------------------- 2
2.
1.1 Guidelines------------------------------------------------------------------------------------------------------------------------2
1.2 Safety instructions-------------------------------------------------------------------------------------------------------------- 2
Installation Requirements------------------------------------------------------------------------------------------------------------- 4
2.1 Mechanical requirements of VELO IV display-----------------------------------------------------------------------------4
2.2 Electrical requirements---------------------------------------------------------------------------------------------------------4
2.3 System requirements of VELO IV control software-----------------------------------------------------------------------5
3. IMPOSA VELO IV module and cabinet---------------------------------------------------------------------------------------------- 6
3.1 IMPOSA VELO IV module--------------------------------------------------------------------------------------------------- 6
3.2 IMPOSA VELO IV cabinet--------------------------------------------------------------------------------------------------- 7
3.3 Control box---------------------------------------------------------------------------------------------------------------------- 9
3.4 IMPOSA VELO IV Block--------------------------------------------------------------------------------------------------- 10
3.5 IMPOSA VELO IV display-------------------------------------------------------------------------------------------------- 12
4 Peripheral equipments and accessories of the display------------------------------------------------------------------------------ 13
4.1 Power Supply Unit (PSU)----------------------------------------------------------------------------------------------------13
4.2 Logic Distribution Unit (LDU)----------------------------------------------------------------------------------------------14
4.3 Video Processing Unit (VPU)----------------------------------------------------------------------------------------------- 14
4.4 Cables--------------------------------------------------------------------------------------------------------------------------- 15
4.5 Control software--------------------------------------------------------------------------------------------------------------- 15
4.6 Others--------------------------------------------------------------------------------------------------------------------------- 18
5. Installation procedure-------------------------------------------------------------------------------------------------------------------21
6.
5.1 Supporting frame-------------------------------------------------------------------------------------------------------------- 21
5.2 Display Installation------------------------------------------------------------------------------------------------------------22
Cabling an IMPOSA VELO IV display-------------------------------------------------------------------------------------------30
6.1
6.2
Cabling between Units--------------------------------------------------------------------------------------------------------30
System cabling-----------------------------------------------------------------------------------------------------------------31
6.2.1 Cabling an on-line IMPOSA VELO IV display-------------------------------------------------------------------- 31
6.2.2 Cabling an off-line IMPOSA VELO IV display-------------------------------------------------------------------- 32
6.3 Grounding---------------------------------------------------------------------------------------------------------------------- 33
6.4 Pixel limitations--------------------------------------------------------------------------------------------------------------- 34
6.4.1 Limitation of signal connection--------------------------------------------------------------------------------------- 34
6.4.2 Limitation of power connection---------------------------------------------------------------------------------------35
7. Display care------------------------------------------------------------------------------------------------------------------------------ 37
8
Maintenance---------------------------------------------------------------------------------------------------------------------------- 38
8.1 Firmware update----------------------------------------------------------------------------------------------------------------- 38
8.1.1 LDU firmware update-------------------------------------------------------------------------------------------------- 38
8.1.2 Updating the display unit controller firmware---------------------------------------------------------------------- 38
8.2 Replacing a tile of an IMPOSA VELO IV display----------------------------------------------------------------------- 38
8.3 Replacing a power supply of the display unit----------------------------------------------------------------------------- 39
8.4 Replacing a display unit control board------------------------------------------------------------------------------------- 41
8.5 Replacing an LDU control board------------------------------------------------------------------------------------------- 42
8.6 Trouble shooting---------------------------------------------------------------------------------------------------------------43
9 Appendix I Dimension------------------------------------------------------------------------------------------------------------------ 45
9.1 Module dimension-------------------------------------------------------------------------------------------------------------45
9.2 LDU3000 dimension----------------------------------------------------------------------------------------------------------45
9.3 VPU3400 dimension---------------------------------------------------------------------------------------------------------- 46
9.4 PSU40 dimension------------------------------------------------------------------------------------------------------------- 46
9.5 PSU40 dimension------------------------------------------------------------------------------------------------------------- 47
1 Safety
Before installing an IMPOSA VELO IV display, one is required to read this chapter carefully to
obtain important information as to how to prevent personal injury and to protect the display from damage
File NO. WI/CZ-PM-M0004 Ver1.1
2
IMPOSA VELO IV installation manual
during installation.
Overview
Guidelines
Safety instructions
1.1 Guidelines
Before installing the display, make sure you have read the User’s Manual with full understanding.
Installation must be performed by authorized and qualified technical personnel only.
The installation site must be solid and without any chance of sinking, tumbling or falling. It must be
at the same time free of over-heat, radiation, pollution, corrosion or gas release.
Only use components provided by the Manufacturer or those approved or specified by the
Manufacturer during installation of IMPOSA VELO IV series displays.
Do not modify and/or replicate any component or accessory without permit from the Manufacturer.
Always follow all installation instructions. Please contact the Manufacture if any problem arises.
Special attention should be paid to all “CAUTION” and “TIPS” mentioned in this User’s Manual which
respectively intends:
CAUTION: to draw operators’ attention to an important instruction or to remind them of what
might happen.
TIPS: to give advice on how to perform an operation better.
1.2 Safety instructions
Product care
All parts must be fully protected and packed in good order during transportation, storage, etc. No
external pressure shall be applied on them.
No part of the product can come into contact with rain before or during installation. Keep them in dry
and clean places.
All parts must be prevented from being trampled, stroke or dropped. Follow all instructions while
carrying or moving the parts. Otherwise the product can be subject to terminal damage.
Installation
Before installation, ensure that the supporting structure or frame has sufficient strength to hold the
display firm and safe.
For hoist installation, the operator must follow all instructions given in this User’s Manual, including
where the hoist brackets should be located, that the crane used must come with sufficient capability to
hoist the product, and that the operating ground must have the strength to sustain the crane, etc.
Most components of the product are heavy. Therefore high attention should be paid to personnel
safety during installation.
All connection bolts must be fastened firmly and securely.
Power
An IMPOSA VELO IV display is to be powered by a 3-phase power with 5 lines. That is, it must
come with an independent neutral line and an independent ground line.
File NO. WI/CZ-PM-M0004 Ver1.1
3
IMPOSA VELO IV installation manual
Provide the power and power supply circuits in accordance with the power consumption of the
display. All circuits must come with protection tubes and confirm with the local electrical safety
standards.
The LDU and PSU must be installed near the display. Cables from the LDU and PSU to the display
cannot be stretched or impaired. Power distribution from the PSU to the display cannot exceed what
is required by this User’s Manual.
The input voltage of an IMPOSA VELO IV display can be set at 120VAC or 220VAC. But ensure to
set it right before power connection.
Do not attempt to fix an impaired cable. Replace it with a new one.
A big current is produced the moment a display is powered on. Therefore an air breaker that can
sustain big currents should be used as the master power switch.
Grounding
IMPOSA VELO IV displays must be grounded with an INDEPENDENT ground wire.
Displays to be installed independently from any architectural structure must be equipped with an
independent ground wire and, if necessary, a lightning rod. The down lead of the lightning rod should
be insulated with the frame of the display. Set the earth electrode of the lightning rod and that of the
ground wire away from each other.
Usage
LEDs on the display cannot be pressured at any time. Otherwise they can be damaged for good.
Follow the steps mentioned in this User’s Manual while cleaning the front side of the display. Only
soft clothing or brush, neutral detergent and water are to be applied to the display.
Power must be cut off before dismantling any part for maintenance.
2.
Installation Requirements
This Chapter introduces mechanical requirements, electrical requirements and system requirements of
control software of VELO IV.
File NO. WI/CZ-PM-M0004 Ver1.1
4
IMPOSA VELO IV installation manual
Overview
Mechanical requirements of VELO IV display
Electrical requirements of VELO IV display
System requirements of control software of VELO IV display
2.1 Mechanical requirements of VELO IV display
Each VELO IV display is equipped with a frame for installation. Besides, a strong and reliable supporting
frame is required. No matter where the supporting frame is installed, attention should be paid to the
following points:
1 Display should be installed in the place where people can see the whole screen clearly.
2 Supporting frame should be strong enough to hold the screen firmly.
3 Keep the fitting surface of supporting frame level. Never install a display on a slope.
Installation frame of VELO IV display
2.2 Electrical requirements
Power supply requirements
The required input voltage of a VELO IV cabinet is 100-240VAC,50/60Hz,500W-600W.
Manufacturer provides matched power box for VELO IV display. Please contact the manufacturer for
more information about VELO IV power supply requirements.
Power Supply System
The power supply system of VELO IV display should include rated breaking switch, breaker and ground
fault interrupter. Installation should conform to local power installation rules.
2.3 System requirements of VELO IV control software
Operating system requirements
File NO. WI/CZ-PM-M0004 Ver1.1
5
IMPOSA VELO IV installation manual
Take Windows as an example.
Minimum Configuration:
Hardware
- PC Pentium Ⅲ 1GHz processor
- 512Mb memory
- Free hard disk space 300M
- Resolution:1024x768
Software
- Window XP,Win7
Recommend configuration:
Hardware
- PC Pentium Ⅳ 2.4GHz processor or higher
- 2GB memory
- Free hard disk space 100G
- Resolution:1920x1080
Software
- Windows 7
3. IMPOSA VELO IV module and cabinet
This chapter introduces the main components of VELO IV display and its installation instructions.
Overview
File NO. WI/CZ-PM-M0004 Ver1.1
6
IMPOSA VELO IV installation manual
VELO IV module
VELO IV cabinet
VELO IV block
Packing box
3.1 IMPOSA VELO IV module
Front view and back view of VELO IV module are shown as below. .The front of module is comprised of
LED lamps and hollowed-out PC masks and the back cover is a plastic article. There is a thin aluminum
plate for heat dissipation attached to the led board. On the back of the module, there is a handle that helps
installation and handling.
Specifications of VELO IV module
Model
VFO16
VFO19.2
VFO27.4
Pixel Pitch
16mm
19.2mm
27.4mm
1R1G1B
1R1G1B
1R1G1B
12X24
10X20
7X14
Pixel Configuration
Model Information
Resolution of Module
Size of Module(mm)(HXW)
192 X 384
Cabinet Information
Resolution of Cabinet(HXW)
60X48
Size of Cabinet (mm)(HXW)
50X40
35X28
960X768x125
Weight of Cabinet(KG)
30
Display Information
Power Consumption of Cabinet (W)
Brightness(cd/㎡)
Viewing Angle
IP Rate
7500
6000
120°/ 60°
100°/ 50°
IP67(Front)
Grey Level
IP54(Back)
16 bit Per Color
Frame Frequency(Hz)
Refresh Frequency(Hz)
Brightness
500
Control
>60
>3000
100
Nominal LED Working Life
Up to 100,000 Hours
Note: non-standard cabinet 960x1536mm (fixed installation) 768X768mm
3.2 IMPOSA VELO IV cabinet
There are two kinds of cabinets with discrete LED: 5x2 and 5x4. Cabinet dimensions are 960x768mm
and 960X1536mm respectively, the figures shows as below.
File NO. WI/CZ-PM-M0004 Ver1.1
7
IMPOSA VELO IV installation manual
Small
hub
小分
线board
板
5×2 Cabinet
Module
模块
电
Power
源
底板
Bottom
plate
Cabinet箱体框架
frame
Small
hub board
小分线板
Rear
后
cover
盖
Main
主板board
Control
控制盒
box
File NO. WI/CZ-PM-M0004 Ver1.1
8
IMPOSA VELO IV installation manual
5X4 Cabinet
Small小分线板
hub board
模块
Module
电
Power
源
后盖
Rear
底板
Bottom
plate
小分线板
Small hub
board
箱体框架
Cabinet
frame
File NO. WI/CZ-PM-M0004 Ver1.1
cover
Main 主板
board
控制盒
Control
box
9
IMPOSA VELO IV installation manual
3.3 Control box
To match the wiring routing, four different control boxes are designed. The main difference is the
position of wiring hole on the both sides of the control box frame.
Control
box 4
Control
box 2
Control box 4
Control
box 2
Control
box 3
Power in
Control box 3
Control
box 2
Control
box 2
Control box 2
Control
box 2
Control
box 2
Control
box 1
Signal in
Control box 1
Power in
File NO. WI/CZ-PM-M0004 Ver1.1
10
IMPOSA VELO IV installation manual
3.4 IMPOSA VELO IV Block
An IMPOSA VELO IV Block is composed of a certain number of cabinets and an installation frame
which is the largest installation unit of IMPOSA VELO IV display. The front and rear views are as the
figures below show.
.
Blocks composed of 5x4 cabinets
File NO. WI/CZ-PM-M0004 Ver1.1
Blocks composed of 5x2 cabinets
11
IMPOSA VELO IV installation manual
安装框端板
Frame
end plate
Corner
拐角
Installation
安装框 frame
Hook
安装钩
Strut
撑条
Cabine
箱体
Package
IMPOSA VELO IV display is packed in blocks rather than in individual cabinets. 4 blocks packed in one
case for easy transportation and installation, as the figure below shows.
File NO. WI/CZ-PM-M0004 Ver1.1
12
IMPOSA VELO IV installation manual
3.5 IMPOSA VELO IV display
Featuring simple structure and quick and easy installation, the IMPOSA VELO IV display is usually
composed of a certain number of IMPOSA VELO IV blocks, which greatly reduces the installation time
on the spot.
If there is a non-standard block (the resolution is different from others), clients need to be careful in
installation. Non-standard blocks should be placed at the left side of the screen, viewed from the back. If
placed at wrong place, the screen won’t show correctly.
5×2 block
5×4 block
Rear view
File NO. WI/CZ-PM-M0004 Ver1.1
13
IMPOSA VELO IV installation manual
4 Peripheral equipments and accessories of the display
This chapter introduces the peripheral equipments and accessories of the display.
Overview
PSU
LDU
Cables
Control software
4.1
Power Supply Unit (PSU)
The PSU, short for Power Supply Unit, is the power control center for an IMPOSA VELO IV display.
Power to each Block can be directly connected to the PSU in order. Each channel on the PSU connects
one Block.
A PSU is inbuilt with a surge protector so as to prevent the display from being disturbed by lighting.
The PSU can also be connected with the LDU to realize remote display on/off control.
Parts and Part Numbers
NO.
Parts
1
Output socket
2
Single-pole switch(Circuit breaker)
3
Master Input Switch
4
AC contactor
Remark
There are 3 kinds of standard Power Supply Units: PSU10, PSU25, and PSU40. Their power is 10KW,
25KW, and 40KW respectively.
File NO. WI/CZ-PM-M0004 Ver1.1
14
IMPOSA VELO IV installation manual
4.2
Logic Distribution Unit (LDU)
The LDU is the central controller for an IMPOSA VELO IV display. It mainly includes the control
board QS5800 or QS5003.
Parts and Part Numbers
NO.
Parts
Remark
1
LDU3000
2
Control board (QS5800)
QS5800
3
Power supply (5V)
5V
4
Fan
4.3 Video Processing Unit (VPU)
The VPU, short for Video Processing Unit, is the video and DVI sync processor in the IMPOSA
synchronous control system. It is compatible with various video signal inputs as well as the DVI signal
input. These signals are then transmitted to the LDU via an optic fiber and shown on the display.
Introduction
File NO. WI/CZ-PM-M0004 Ver1.1
15
IMPOSA VELO IV installation manual
Parts
4.4
1
Power switch
2
LCD screen
3
Menu
4
Shortcut key to other Video
Sources
5
Shortcut key to DVI Input
Cables
Signal cable between LDU and Blocks
DVI cable
Fiber cable
File NO. WI/CZ-PM-M0004 Ver1.1
Power cable between PSU and Blocks
Network cable
USB cable
16
IMPOSA VELO IV installation manual
4.5
Control software
The series of control software developed by Chainzone itself are meant for system setting, test and
display control of an IMPOSA VELO IV display.
TIPS: Please refer to the user’s manual of each control software for more information about their
functions and use guidance.
IMPOSA Tool
IMPOSA Tool is the tool software for the LDU to set up, configure, manage and test the display.
Sigma 3000
Sigma 3000 is a powerful control software for an offline system. It can be used to set up, configure the
display as well as control, manage, test and record what is shown offline on the display.
File NO. WI/CZ-PM-M0004 Ver1.1
17
IMPOSA VELO IV installation manual
LED Net
LED Net is another functional offline control software that controls via the Web. It’s embedded in the
control board QS5800 and is meant for use on this board only.
File NO. WI/CZ-PM-M0004 Ver1.1
18
IMPOSA VELO IV installation manual
IMPOSA play
IMPOSA play is the sync control software for an IMPOSA VELO IV display. It’s used to control
synchronous display of video files on the display as well as for system setup.
VPU 3400
VPU 3400 is the setup and control software for the VPU. It’s used to manage and control the
synchronous display of various videos inputs on the display and as always, system setup.
File NO. WI/CZ-PM-M0004 Ver1.1
19
IMPOSA VELO IV installation manual
4.6
Others
There are some other accessories that may be required whether for the offline or synchronous system.
Clients can provide such accessories on their own according to actual application or to their
preferences.
DSL Modem
A DSL Modem is required for an offline
IMPOSA VELO IV display that is to be
controlled remotely or via the Internet.
Users can easily get this item from the
market by themselves. The user also needs
to apply for the DSL route at the local
telecom bureau.
Wireless Access Point
However, when the offline IMPOSA
VELO IV display is not far away from the
control center, the user can simply use a
wireless AP or wireless Router to integrate
the display into the Wi-Fi network. The
display shall then be able to
communication with the computer in the
network. If the display can even be seen
in the straight direction, the use is advised
to use a directed wireless AP instead
whose com distance can go up to 1km.
Router
Besides the display itself, some other
accessories c/w the display, say the
Network Camera, also require access to
network. Therefore a network port,
usually a Router, should be built in the
display.
If the display is a double-sided one
embodied in 2 cabinets, the Router shall
have to integrate both sides into the
communication network.
Of course, the user can directly use a
wireless AP that comes with the Router
function as well.
Network Camera
Most displays that are controlled remotely
are equipped with a Network Camera in
front of the top of the display. By doing so,
the user can watch over the running
condition as well as what’s being shown
on the display in real time.
A camera that can live up to such an
application must be waterproof and come
File NO. WI/CZ-PM-M0004 Ver1.1
20
IMPOSA VELO IV installation manual
with wide-angle lens. As far as we know,
the MOBOTIX M22M can be a good
choice.
Others
To complete the control system, a computer installed with various video or picture tailoring or editing
software is also required.
If the synchronous system is in question, extra video devices say a Camera, a Record disc, etc. are
requires as well.
All the accessories mentioned above are to be provided by the user on their own based on actual
applications.
An IMPOSA VELO IV display with offline system
Ethernet
RS232
USB
RS485/RS232
3G/
GPRS
Note
1
Display
2
Brightness/temperature/humidity sensor
3
LDU
4
PSU
5
USBRS485/RS232 Convertor
6
3G Modem/GPRS Modem
7
PC
8
3GModem/GPRS Modem
An IMPOSA VELO IV display with synchronous system
File NO. WI/CZ-PM-M0004 Ver1.1
21
IMPOSA VELO IV installation manual
CVBS
SDI
HDMI
Optic Fiber
DVI
Net
Power supply
Note
1
Display
2
LDU
3
PSU
4
PC
5
VPU
6
Camera
7
Player
8
Cable TV
File NO. WI/CZ-PM-M0004 Ver1.1
22
IMPOSA VELO IV installation manual
5. Installation procedure
This chapter introduces installation procedure of VELO IV blocks.
Overview
Supporting frame
Installation of VELO IV display
Standard installation of blocks
5.1 Supporting frame
Each block is equipped with installation hooks, used to connect the display with supporting frame.
Position of hooks should be in conformity with H-beam of the supporting frame, as the figure below
shows.
H 型钢
Installation frame
File NO. WI/CZ-PM-M0004 Ver1.1
23
IMPOSA VELO IV installation manual
A block
Supporting
frame
Installation hook
Supporting H-beam
5.2
Display Installation
In case that the blocks are overlong, the installation is usually realized by segments. The blocks at the
bottom of the display are called bottom blocks, and the ones on the top of the display are called top
blocks.
Top blocks
Bottom blocks
Viewed from the front, the display is installed from left to right and bottom to top.
File NO. WI/CZ-PM-M0004 Ver1.1
24
IMPOSA VELO IV installation manual
Needed tools:
Crane
Open end wrench
Socket wrench
Installation steps:
Assemble the bottom blocks first.
1. Take out bottom blocks from the packing box.
Create hoisting points with tough
cloth strap going through space
between blocks.
2. Turn it over (make the surface of LEDs upward).
Surface of LEDs
upward.
File NO. WI/CZ-PM-M0004 Ver1.1
25
IMPOSA VELO IV installation manual
3. Install the connecting pins
Connecting
pin
4. Lift the bottom blocks with lifting beam.
Lifting beam
M10X80
bolt
File NO. WI/CZ-PM-M0004 Ver1.1
26
IMPOSA VELO IV installation manual
5. Place the installation hooks, and install the first block from the left side of supporting frame.
Hook
M12X30 bolt
6. Adjust the verticality and horizontality of the first installed bottom block and then have the second one
installed. Fasten the two blocks with M12×90 bolts and connecting plates, ensuring they are in the same
horizontal plate and the screen is in perfect smoothness.
Horizontal connection between two blocks
M12×90 bolt
Hex screw
Connecting plate
7. Install the rest bottom blocks in the same way. Install a protection chuck plate to prevent offset of the
hooks.
File NO. WI/CZ-PM-M0004 Ver1.1
27
IMPOSA VELO IV installation manual
Protection chuck plate
Start installing the top blocks after all bottom blocks installation is finished.
1. Take out the top blocks.
2. Turn it over (make the surface of LEDs upward).
Surface of LEDs
upward.
File NO. WI/CZ-PM-M0004 Ver1.1
28
IMPOSA VELO IV installation manual
3. Install the hoisting rings
M16 hoisting ring
4. Lift a top block with crane.
5. Install the installation hooks.
File NO. WI/CZ-PM-M0004 Ver1.1
29
IMPOSA VELO IV installation manual
Connect the top and bottom blocks with hoisting codes.
Connect
the plug
Please make sure the first top block installed is in the same verticality and horizontality with the
bottom ones. And then start installing next top block.
The following steps are same as the installation of bottom blocks. Connect two top blocks with
M12×80 bolts and connecting plates.
Install the rest top blocks in the same way until the whole screen is completely installed.
Install the protection chuck plate after adjusting all blocks to the right position, so that offset of the
protection chuck plate can be avoided.
Protection chuck plate
File NO. WI/CZ-PM-M0004 Ver1.1
30
IMPOSA VELO IV installation manual
Install decorative edges on the right side and the left side
Fix the decorative edges on the left and right sides of the display with M12×60 bolts.
Right decorative
edge
Left decorative
edge
Caution:
1.The LED blocks are heavy. Please pay attention to personal safety in the process of installation.
2. Please prevent the LED panel from crash, extruding, abrasion and so on. Otherwise, LED lamps may
be damaged and fail to display.
3. Lift the blocks with the surface of LEDs downward is strictly forbidden, as the figure below shows.
File NO. WI/CZ-PM-M0004 Ver1.1
31
IMPOSA VELO IV installation manual
6.
Cabling an IMPOSA VELO IV display
This chapter covers the system cabling and ground protection of an IMPOSA VELO IV display.
Overview
Cabling between Units
System cabling
Grounding
Pixel limitations
Necessary tools
6mm Cross head screw driver
6mm hexagonal key
6.1
Cabling between Units
An IMPOSA VELO IV display is usually shipped in blocks. All inner cables are well connected
before delivery. Client only needs to plug the power cables and signal cables on the bottom of each
block, as the figure below shows.
signal cables
power cables
The inner cabling of IMPOSA VELO IV cabinet goes as follows:
File NO. WI/CZ-PM-M0004 Ver1.1
32
IMPOSA VELO IV installation manual
6365
SP-320-5
GNL
Signal in
Signal out
6364
SP-320-5
GNL
power cable
5837
Power out
Power in
Signal out
Signal in
6366
6.2
System cabling
An IMPOSA VELO IV display, when configured properly, can be used either as an on-line display
system or off-line display system。
6.2.1 Cabling an on-line IMPOSA VELO IV display
An on-line IMPOSA VELO IV display can display various kinds of video files, such as AVI,
MPEG2, etc., or can be directly connected to various kinds of live video sources.
An on-line IMPOSA VELO IV display system wiring diagram
File NO. WI/CZ-PM-M0004 Ver1.1
33
IMPOSA VELO IV installation manual
Example of an on-line IMPOSA VELO IV display
Camera
Cable TV
Player
CVBS
SDI
HDMI
Optic Fiber
LDU
DVI
Net
PSU
PC
Power supply
6.2.2 Cabling an off-line IMPOSA VELO IV display
An off-line IMPOSA VELO IV display system is usually used to display graphic or image, or even
video files for advertising purposes. It is especially useful for an interconnected digital billboard
network.
An off-line IMPOSA VELO IV display system wiring diagram
Example of an off-line IMPOSA VELO IV display
File NO. WI/CZ-PM-M0004 Ver1.1
34
IMPOSA VELO IV installation manual
Net Camera
DSL
DSL Modem
Router
or
Wireless AP
LDU
PSU
Net
Power Supply
6.3 Grounding
All displays, especially outdoor displays, MUST be grounded. Those displays installed on top or
attached to a building can be connected to the earth line of the commercial power grid. However, for
those displays that stand alone in the open, apart from grounding connection to the commercial
power grid, an independent grounding system for the LED display MUST ALSO be equipped.
Example Grounding of a display
If the LED display is installed in an area where lightning strikes are frequent, and if the display
is installed on a stand-alone structure in the open ground, a lightning rod is absolutely required on top
of the LED display.
The lightning rod of the LED display should be 2~3 meters higher than the display, and the rod
metal and its lead MUST be insulated from the installation structure of the display. The lightning rod
must be grounded independently and must be strictly isolated from the power supply.
File NO. WI/CZ-PM-M0004 Ver1.1
35
IMPOSA VELO IV installation manual
Example of a display lightning rod installation
6.4 Pixel limitations
The IMPOSA VELO IV display system supports a dot matrix resolution of up to 1920X1080
pixels. However, the signal distribution system LDU only supports up to 1024X768 pixels. That is to
say, an LED display larger than 1024X768 pixels would need a special LDU connection arrangement.
6.4.1 Limitation of signal connection
Due to the pixel limitation of the LDU, an LED display larger than 1024X768 pixels would
need more than one LDU to support the distribution of signals. When multiple LDUs are connected
together, the right starting point of each LDU on a picture must be appointed and preset.
Example: Signal connection of a display with 1280X576 pixels
File NO. WI/CZ-PM-M0004 Ver1.1
36
IMPOSA VELO IV installation manual
Tips: the above wiring system does not include signal back-up function. If it is required, the
number of the LDU shall be doubled.
6.4.2 Limitation of power connection
As a rule, one block of an LED display is connected by an AC power cable to the PSU for power
supply. However, if the display is extremely large and comprises of more display tiles than could
be supplied by one power cable due to current restriction, it becomes necessary to use multiple
power supply cables which need to be connected to different power output terminals at the PSU.
Each PSU cable’s output power consumption is 2.5KW. A PSU can be connected with 5 cabinets at
most.
File NO. WI/CZ-PM-M0004 Ver1.1
37
IMPOSA VELO IV installation manual
Example: Power supply connection of a display with 912X540 pixels
#3
#2
PSU40
File NO. WI/CZ-PM-M0004 Ver1.1
#1
PSU40
PSU40
38
IMPOSA VELO IV installation manual
7. Display care
Why module cleaning is necessary?
After a long-term work, sands, dust, smoke and other rubbish will adhere to modules, which will
influence the normal operation of the modules. Therefore, it’s advised that the VELO IV modules should
be regularly cleaned.
Clean the LED lamps and the lamp cover of VELO IV modules
Frequently cleaning all modules of the LED display can effectively avoid modules brightness difference
caused by dust sticking.
Needed tools:
Sprayer with non-corrosive detergent
Long-hair soft brush
Garden watering hose with nozzle
Air compressor
How to clean outdoor VELO IV modules?
1. Dismantle power supply, data connecting cables and the socket for data and power of the sealed
control box.
2. Ensure the unused output port of the control box is covered and sealed.
Spay modules’ front side with non-corrosive detergent from various angles ad directions.
3. Wipe off all rubbish and dirt on LED lamps and the lamp cover with soft brush.
Note: Please do not use bristly brush.
4. Wash away the excess foam.
Tips: Partially or completely immersing the modules into water or other liquids is strictly forbidden.
5. Repeat from Step 3 until all modules are neat and tidy.
6. Dry the modules with air compressor.
How to clean indoor VELO IV modules?
Indoor VELO IV modules are different from indoor ones as they are not waterproof. Please clean
them with air compressor instead of with water.
File NO. WI/CZ-PM-M0004 Ver1.1
39
IMPOSA VELO IV installation manual
8
Maintenance
This chapter introduces how to perform display maintenance.
Overview
Firmware update
Replacing a tile of an IMPOSA VELO IV display
Replacing a power supply of the display unit
Replacing a display unit control board
Replacing an LDU control board
Trouble shooting
8.1 Firmware update
Control boards in both LDU and display unit may need firmware updating in actual use.
8.1.1 LDU firmware update
1. Use the update package QS5800_update packet_verxx.xx_(year/month/date).rar to update the
firmware
Steps: connect the display to a PC via an Ethernet cable, decompress the package in the PC, and
double click the update.bat in the file to start the automatic update process.
2. Use the update file xxxx.cpu.
Steps: Log onto the software Sigma 3000, choose Tool---Update---Update CPU and then select
the file xxxx.cpu to start the update process.
8.1.2 Updating the display unit controller firmware
There is a 5837 control board inside the power box of each Unit. Following steps shall be
observed to update the firmware on these control boards:
Log on the software IMPOSA Tools and choose “Maintenance” where you can choose a certain Unit
address or choose All Units for updating the firmware on their control boards.
Select the following files in sequence for updating:
File xxx.bin -----the CPU program for the control board. You can find it in the File Style menu
presented as “CPU program for tiles”;
File xxx.bin -----the data file of the control board. It can be found in the File Style menu presented
as “Drive Board data”;
File xxx.rbf -----the FPGA program for the control board, presented as “FPGA for tiles” in the File
Style menu;
File xxx.rbf -----the gamma data of the control board which can be seen as “Gamma Data for tiles”
in the File Style menu;
File xxx.bin -----the brightness data of the control board, presented as “Brightness Block of tiles” in
the File Style menu.
8.2
Replacing a tile of an IMPOSA VELO IV display
Necessary tools
Philips screw driver
Process to remove a tile:
File NO. WI/CZ-PM-M0004 Ver1.1
40
IMPOSA VELO IV installation manual
1. Remove six screws on the rear side of the module
2. Slightly move out the module from the back of the cabinet.
The process of installing a tile:
1. Aligning at the D-shaped interface, then fit the module on.
2. Fasten the six screws of the module.
8.3
Replacing a power supply of the display unit
Necessary tools
Philips screw driver
CAUTION : The replacement work must be done AFTER all power supplies to the LED display
have been completely disconnected.
Process to remove a power supply:
1. Remove the eight screws on the back of the power supply unit.
2. Move out the power supply unit
3. Remove the screws on the both sides of the power supply unit
4. Open the cover of PSU, and take out the power supply.
File NO. WI/CZ-PM-M0004 Ver1.1
41
IMPOSA VELO IV installation manual
Process to install a power supply:
Install the power supply in a reverse order of removing it, with special attention to be paid to the
File NO. WI/CZ-PM-M0004 Ver1.1
42
IMPOSA VELO IV installation manual
proper connection of the cables to the power supply.
8.4 Replacing a display unit control board
Necessary tools
Philips screw driver
CAUITION : The replacement work must be done AFTER all power supplies to the LED display
have been completely disconnected.
Process to remove a display unit control board:
1. Remove the eight screws on the control box
2. Open the control box cover
3. Remove the four screws on the main board
4. Take out the main board
File NO. WI/CZ-PM-M0004 Ver1.1
43
IMPOSA VELO IV installation manual
The process to remove the display unit control board:
Remove the board in the reverse process order to the installation process. Screws on the power box
door must be firmly and securely fastened.
8.5
Replacing an LDU control board
Necessary tools
6mm hexagonal key.
6mm cross head screw driver
CAUTION : The replacement work must be done AFTER all power supplies to the LED display
have been completely disconnected.
Process to remove an LDU control board:
1. Use a 6mm hexagonal key to open the open the door on the LDU box.
2. Disconnect the wires to the QS5800 control board. Check if the signal output wires are marked
with numbers. If no mark is seen, please label the output signal wires with numbers.
3. Remove the 4 screws on the control board with a 6mm cross head screw driver, and then take out
the control board.
File NO. WI/CZ-PM-M0004 Ver1.1
44
IMPOSA VELO IV installation manual
Process to install an LDU control board:
Install the LDU board in the reverse process order of removing it. Special attention should be paid to
the location and method of connection of the signal output wires.
8.6 Trouble shooting
This chapter introduces some possible trouble symptoms and their remedial treatment to the IMPOSA
VELO IV display.
TIPS:
:If a problem is seen on an LED display and its cause is hard to diagnose, please write down a
description of the symptom as detailed as possible, take some pictures and report to the
Manufacturer for help.
CAUTION : Before any operation on the PCB or any wire connection is carried out, all power
supplies to the LED display MUST be completely disconnected. When doing wire
connection, please make sure all wires have been connected properly and securely.
Symptom
Cause Analysis
Remedy
One tile is not displaying or
is not displaying properly.
Cables connected to the tile get
loose.
Connect the cables properly.
The signal cable inside the Change the connectors on the
power box of the tile hasn’t
tile and those inside the power
been properly connected.
box, if necessary.
Something is wrong with the Replace the tile.
tile itself.
A small segment of the tile
is not displaying the right
color, or the segment is
uncontrollable.
Something is wrong with the
Replace the tile.
tile itself.
One unit cannot display
properly.
A unit keeps displaying the
address number.
One unit shows a different
color or brightness from
other units.
A whole patch above a
certain unit in a master
File NO. WI/CZ-PM-M0004 Ver1.1
Firmware or data on the Unit controller get lost.
Tile controller is broken.
Signal cables between Units
are not connected well.
Firmware
on
the
Unit
controller is impaired.
Unit controller is broken.
The gamma data on the Unit
controller have been set
differently from those on other
Unit controllers.
The brightness data on the Unit
controller are different from
those on other Unit controllers.
Update the CPU program or
data on the Unit controller.
Replace the Unit controller.
Connect the signal cables
between Units properly and
securely.
Update the CPU program or
data on the Unit.
Replace the Unit controller.
Check the gamma data of the
Unit in IMPOSA Tools and set
them same as those on other
controllers.
Update the brightness data on
the Unit controller or set them
to be same as those on other
controllers.
Either the power supply or the Check the power supply and
cable connection of the failed
the power cable of the Unit.
45
IMPOSA VELO IV installation manual
block goes completely dark.
Unit at the lowest position
Replace them if necessary.
needs to be fixed.
Check the cable connection on
The signal cable connecting to
the Unit controller. Connect
the failed Unit at the lowest
them properly.
position hasn’t been properly Replace the Unit controller.
connected.
The control board of the failed
Unit at the lowest position may
be impaired.
Check the power cable and
There is no power into this
power connector of the Block.
Block.
One block cannot light on.
Check the connectors at both
There is no signal into this
ends of the signal cables of the
Block.
Block.
Check the connectors at both
One master block keeps
The signal cables on this Block
ends of the signal cables of the
showing random contents.
are not connected well.
Block.
The power supply or the Check the power supply and
control board in the LDU
the control board in the LDU.
The whole display keeps
failed to work properly.
Replace them if necessary.
displaying random contents.
There is no display content Send display contents to the
available.
display.
File NO. WI/CZ-PM-M0004 Ver1.1
46
IMPOSA VELO IV installation manual
9 Appendix I Dimension
9.1 Module dimension
9.2 LDU3000 dimension
Front View
Rear View
Left view
Top view
Front View
Rear View
Left view
Top view
File NO. WI/CZ-PM-M0004 Ver1.1
47
IMPOSA VELO IV installation manual
9.3 VPU3400 dimension
POWER
LDU3000
RUN
9.4
PSU40 dimension
+
POWER
Exit
VPU3400
Select
Video 1
File NO. WI/CZ-PM-M0004 Ver1.1
Video 2
Video 3
Video 4
DVI
48
IMPOSA VELO IV installation manual
600
PSU40 dimension
360
9.5
PSU40
450
File NO. WI/CZ-PM-M0004 Ver1.1
200
49