1
Table of Contents
END USER LICENSE AGREEMENT
2
SOFTWARE INSTALLATION
3
LAUNCHING THE SHARP VA SOFTWARE
11
DIGITAL VISUAL ACUITY MODULE
13
COLOR VISION TESTING MODULE
16
PATIENT EDUCATION MODULE
19
CLINICAL DATA MODULE
22
MACULAR FUNCTION & INTEGRITY MODULE
24
VISION THERAPY/SPORTS VISION MODULE
25
ASTIGMATIC TESTING MODULE
31
LOW VISION MODULE
32
MISCELLANEOUS TESTS AND CHARTS
34
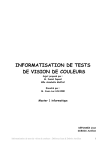
Thank you for purchasing the Sharp VA version 4 software system for
Windows/PC and Macintosh computers!
1
Please take a moment to review your new End User License Agreement:
END USER LICENSE AGREEMENT
LICENSE AGREEMENT FOR SHARP VA DIGITAL ACUITY SOFTWARE VERSION(s) FOUR (and THREE).
The copyright owner of the Sharp VA software, ("the Software"), the User's Manual, the installation instructions, and associated media is McPartland Medical,
LLC, as well as dba Sharp VA.
Ownership
You do not own the Software, nor the User's Manual, included media, or installation instructions. The Sharp VA version 4 software is a registered copyright, and
trademark. Under copyright law, McPartland Medical, LLC owns the Software and the incorporated literary work(s). Copyright of the Software is protected
worldwide under the Berne Convention and the Universal Copyright Convention. McPartland Medical, LLC also owns all other title and intellectual property rights
in and to the Software, the installation instructions, User's Manual, and associated media.
License
McPartland Medical, LLC hereby grants you the non-exclusive right to use the Software and the installation instructions for your personal use on a single
computer at a single location (that is, a single exam room) as long as you comply with the terms of this license.
Single User
The Licensed Materials and the information included therein are subject to change without notice. McPartland Medical, LLC disclaims any responsibility or
obligation to update you with regard to any such change.
You agree to install and use the Software on one computer only, so that at any time, the maximum number of computers that can be executing the Software is
one. The Software may be installed only into a single computer. You agree to strictly follow the installation instructions, when installing the Software. You agree
to use the software on one computer in one room at a single location (site). You agree to register your acquired copy of the Software by following such
instructions in the User's Manual and/or software application.
You agree not to:
(a) use the Software on more than one terminal or workstation of any network of computers or any Multi-user system. The maximum number of computers that
can be executing the Software at any one time is one.
(b) use the Software on any time-sharing or interactive cable system. You may allow another person to use the Software on your computer, provided that
person agrees to all of the terms of this license.
No modification.
Neither the Software, nor the User's Manual, included media, and/or installation instructions may be modified, adapted, translated, rented, leased, loaned, sold,
sublicensed, transferred, distributed or networked, either temporarily or permanently, without the prior written consent of McPartland Medical, LLC. You may not
create derivative works of the Software nor the data in it. You agree to take all reasonable steps to safeguard the Software and the installation instructions and
to ensure that no one else shall have unauthorized access to them. Any unauthorized act or transfer is a serious crime, and may be punishable by fine or jail
sentence. You may not reverse engineer, decompile or disassemble the Software or any portion thereof.
The software may not be made available to any other person or organization without the consent of McPartland Medical, LLC. Re-sale is strictly prohibited. Any
questions should be directed to McPartland Medical, LLC.
Termination of License
This license is effective from the day you pay for the Software license, until terminated. You may terminate this license at any time, and must notify McPartland
Medical, LLC in any such event. Notwithstanding anything to the contrary herein, the license rights granted herein are subject to your registering and paying for
the Software license, unless you pay for the Software license (purchased only from McPartland Medical, LLC, or a McPartland Medical licensed distributor), and as
a result of such payment, your receiving a Sharp VA Customer Identification/Serial Number/Installation Password. This license is granted in perpetuity, but may
be terminated if you are in breach of any of the terms of this agreement. Upon termination, you will destroy all hard and soft copies of the User's Manual,
installation instructions, associated media, and all copies of the Software. McPartland Medical, LLC may additionally require the completion of our Affidavit of
Software Destruction. All the provisions of this Agreement, which operate to protect the rights and interests of McPartland Medical, LLC, shall continue after
termination.
Limited Warranty
If any law implies terms into this agreement which cannot be excluded, then they apply, except the liability of McPartland Medical, LLC for breach of such implied
term will be limited at the exclusive option of McPartland Medical, LLC to the replacement of the Sharp VA software. Except as specifically provided above,
McPartland Medical, LLC makes no warranty either express or implied with respect to the Software.
Limited Liability
McPartland Medical, LLC is not liable for any indirect or consequential or special damages nor for loss of profits or revenue or business interruption arising out of
the breach of the terms of this license or arising out of defective Software, or improper use of software. User assumes all responsibility and liability. It is the
responsibility of the end-user to verify proper optotype/stimulus size and accuracy of color(s) for purposes of color vision &/or binocular/retinal testing before
and during examination and testing.
Independent Judgment
You acknowledge that you have exercised your independent judgment in acquiring Sharp VA and have not relied on any representation not stated expressly
herein.
All questions concerning this Agreement should be directed to McPartland Medical, LLC ([email protected]).
Copyright 2004-2010. All Rights Reserved. MCPARTLAND MEDICAL, LLC.
2
Software Installation
Windows/PC
Step 1: Insert the Sharp VA CD-ROM. The Setup Menu should launch (if it does not
auto-run within two minutes, you can manually start the setup by going to Computer
and clicking on the CD-ROM drive icon).
Step 2: Once the Setup Menu appears, click on the “Install Sharp VA Digital Acuity
Software” button (pictured below), and follow the on-screen instructions.
You will be presented with two on-screen steps. Click on “Install Remote Control Driver”
to complete step 1. Please note, if you have Windows 7 (or a 64-bit version of Windows
Vista), you may require a remote control driver patch in order to complete step 1.
These patches may be downloaded here:
Windows Vista (64-bit only):
Windows 7 (all versions):
http://sharpva.com/remote/Windows_Vista_64-bit.pdf
http://sharpva.com/remote/Windows_7_64-bit.pdf
Once you complete the remote control driver installation, a remote control test screen
will appear. This will allow you to test every button on the remote control and will
ensure a proper installation of the remote control driver. With the remote control test
screen displayed, please take your mouse and click on some of the buttons on the
image of the remote control. You will see them turn red. Next, take your remote control
and hold down a button—watch for the corresponding button on the screen to turn
red (just as it did when you used the mouse). If you have downloaded a remote control
driver from the Streamzap website, then you have the incorrect remote control driver
installed. This is not our remote control driver; only our custom remote control driver will
work with the Sharp VA software. Again, please install the proper remote control driver
directly from the Sharp VA CD-ROM. If at any time during the installation process you
are asked to connect to Windows Update to search for software, please select No.
3
Once the remote has been properly installed, you will see the following icon in the
system tray:
Continue reading for additional Remote Control Guide and Button Functions.
*Note: If you are using the old Keyspan remote control and Windows operating system, please go to
remote.sharpva.com for a detailed remote setup guide.
4
Next, please click on “Launch Calibration Wizard”. Please note, an Internet connection
is required to complete this step. If the computer you intend to use the Sharp VA
software on does not have a live Internet connection, you can easily complete this step
on a separate computer, and then transfer the downloaded software to the intended
computer via USB thumb/flash drive.
Please enter your unique Installation Password.
Next, simply answer the on-screen questions
regarding your exam room setup. The online
Calibration Wizard will automatically compile
a custom software download specifically for
your exam room, and will add this information
to your account on file.
Next, click the download button.
Step 3: Now that your custom calibration has been downloaded, please double-click
on the “setup” icon to run the installation. Please follow all on-screen instructions in
order to complete the installation process. Remember, it is the responsibility of the
doctor/user to ensure and make certain that proper calibration has been achieved
and verified.
You are now ready to go!
5
6
Macintosh
Step 1: Insert the Sharp VA CD-ROM and double-click on the CD-ROM icon on your
desktop. Next, open the folder titled Macintosh and double click on the file titled START.
This will launch the Sharp VA Installer. Please note that an Internet connection is
required to complete this step. If the computer you intend to use the Sharp VA
software on does not have a live Internet connection, you can easily complete this step
on a separate computer, and then transfer the downloaded software to the intended
computer via USB thumb/flash drive.
Step 2: Once the Setup Menu appears, click on the “Install Sharp VA Digital Acuity
Software” button (pictured below), and follow the on-screen instructions.
Next, please click on “Launch Calibration Wizard”.
Please enter
Password.
your
unique
Installation
Next, simply answer the on-screen questions
regarding your exam room setup. The online
Calibration Wizard will automatically compile
a custom software download specifically for
your exam room, and will add this information
to your account on file.
Next, click the download button.
Step 3: Please note that in order to install the Sharp VA software on a Macintosh, you
will need to unzip the SVA.hqx file. This can be done by utilizing the free Macintosh
application Stuffit. Remember, it is the responsibility of the doctor/user to ensure and
make certain that proper calibration has been achieved and verified.
7
Step 4: Remote Control Setup: Follow These Directions Carefully!
First, install the included Keyspan Remote control software. Once the Remote Control
software has been installed, see the following instructions:
A. Insert the Sharp VA disc; open the folder titled “Other”. Next, open the folder titled
“Mac Remote” and copy the file titled “sharpsystem.map”.
This file will need to be pasted in the following directory:
Macintosh HD > “Your Computer‟s Name” > Library > Preferences > Keyspan DMR
Preferences
B. Open the KeyspanDMR software application. Click on Configure. Then on the menu
bar, go to Settings > Map File > sharpsystem.map
C. Next, on the menu bar, go to Edit > New Application > and from here, select the
Sharp VA application (most likely on your Desktop, titled “SVA”).
Having Keyspan Remote Difficulties? See next page.
8
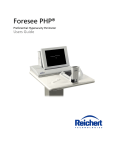
Please open the Keyspan DMR application and click Configure. Use the following
image to edit your remote settings:
Now that your Map Editor matches the image above, save your Map
file by going to File > Save Map (i.e., sharpsystem.map).
Be sure that the box titled “iTunes Mode” is unchecked.
Still having setup difficulties: http://remote.sharpva.com/KeyspanHelp.pdf
9
Using the Keyspan Remote Control to Operate Sharp VA v4
10
Launching the Sharp VA software
The Sharp VA software is programmed to automatically display on „Monitor 2‟ when
used in a dual monitor setup. If you are only using a single monitor setup, simply click
“OK” when the “Monitor No. 2 not found!” notice appears (this is a normal part of the
launch sequence).
When you launch the Sharp VA software, you will first be taken to the Module Selection
Menu:
Pictured above is the MAIN Sharp VA menu (aka Module Selection Menu), which can
be accessed by pressing the MAIN button from any screen/chart within the Sharp VA
software.
11
It is from this menu that you can access each of the nine Sharp VA modules:
Digital Visual Acuity Module
Color Vision Testing Module
Patient Education Module
Clinical Data Module
Macular Function & Integrity Module
Vision Therapy/Sports Vision Module
Astigmatic Testing Module
Low Vision Module
Miscellaneous Tests and Charts
In the picture to the left, please notice the
mouse pointer.
By clicking on this
downward oriented triangle, you can
access the drop-down sub-menu.
This menu will allow you to access the Children‟s Cartoon Fixation Menu, the Screen
Saver, contact Tech Support/Customer Service, check for software updates (both
Sharp VA and Ocuport), obtain remote control driver patches (if needed), and more.
12
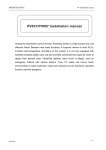
Digital Visual Acuity Module
Once you select the Digital Visual Acuity Testing Module, you will be taken to the
Snellen three line acuity chart (S3 button) pictured below.
From this point, several shortcuts exist to
change how letters are displayed. See
below:
Press for Snellen Single Letter Isolation (press the Left Arrow to show Contour Bars)
Press Once for Snellen Single Line Isolation, Horizontal
Press Twice for Single Line Isolation, Vertical
Press Once for Snellen Three Line Presentation
Press Twice for Snellen Three Line Presentation with red underline
Press Three Times for Snellen Five Line Presentation
Shifting from Three Line to Single Line Isolation to Single Letter Isolation with and without contour bars.
13
Press to display Number Charts.
Press Left to isolate a single line, Left again to isolate a single number. Press Right to cycle back.
Press to display Pediatric (Kindergarten) Symbols.
Press Left to isolate a single line, Left again to isolate a single symbol, Left again to add crowding bars.
Press Right to cycle back.
Press to display Contrast Sensitivity Charts (see Contrast Sensitivity Testing below).
Press Right and Left to cycle between contrast tests.
Press to display Red-Green Overlay (duo-chrome). Press again to remove.
Only available on select charts (Snellen Three Line, Pediatric Three Line, Es multi-line presentation).
Press once to display Es. Press twice to display Cs.
Press Left to isolate a single line, Left again to isolate a single letter. Press Right to cycle back.
Press to display and cycle through Other Charts:
Fixation Disparity (red-blue and red-green, with and without fusion lock), 4-Dot test (red-blue and redgreen), Maddox Rod test, Red-Green balance circles. Press the Right and Left buttons to cycle through.
Press to go to the Low Vision Module Menu.
Press to display the Chart Selection Menu.
Once you have selected the Digital
Visual Acuity Testing Module, you
can switch between any of the
Sharp VA charts/tests quickly and
easily by accessing the Sharp VA
Chart Selection Menu. This can be
accessed by pressing the yellow
Menu button on your remote control
or by pressing the m key on your
keyboard.
Chart Options Include: Snellen, Tumbling Es/Cs, Pediatric Symbols, Speed Acuity, RedGreen Overlay, ETDRS, HOTV, Numbers, Contrast Testing, Other Tests/Charts, Main Menu,
and Exit Menu.
14
Randomization
Press the OK button to randomize the optotypes (all Snellen letter charts, all Pediatric Symbol
charts, all HOTV charts, all Tumbling E charts, Rolling C single line and single letter charts, Number
single line and single number charts).
Easy Pointing Arrow
Some charts (HOTV and Pediatric/Kindergarten Single Line
charts) contain an enlarged red pointing arrow (controlled
by the mouse), as pictured to the right:
Contrast Sensitivity Testing
Sharp VA includes two methods to assess the contrast
sensitivity of a patient. The first consists of two charts—of
equal optotype size—and varying levels of contrast. Each
contrast level contains exactly three optotypes as is
notated as a percentage on the left or right side of the
screen.
For example, in the chart above the first three optotypes are T Z V; all of which are at a 90%
contrast level (as notated by the “90” to the left of the three optotypes). The second group of
three optotypes is D O X; all of which are at a contrast level of 80%. This contrast chart continues
in this progression (in 10% increments, and then in 1% increments).
Press the Right and Left Arrows to cycle between Contrast Tests. Press the Up and Down Arrows to increase or decrease optotype size.
The second method of contrast testing is in the form of a standard eye chart containing varying
levels of acuity in descending order. The optotypes of this chart can be increased or decreased
in size by pressing the Up and Down Arrow Buttons (or Up and Down keys on the keyboard). To
alter the contrast levels, simply press the Right (to decrease) or Left (to increase) Arrow buttons
(or Right and Left keys on the keyboard).
15
Color Vision Testing Module
The Color Vision Testing Module is comprised of two main tests:
Pseudo-Isochromatic Color Test Plates
Anomaloscope
Pseudo-Isochromatic Color Test Plates
In addition to displaying an individual plate,
you can also easily cycle through all ten
plates. On the color plate selection menu
(pictured here), you can click on the Results
button (located in the lower left corner of
the screen) to quickly interpret your color
vision screening findings.
16
Anomaloscope
An anomaloscope is used to characterize
color-matching behavior in patients. In our
rendition of the anomaloscope, the
patient views a hemi-bipartite field. The
upper
hemisphere
can
be
varied
continuously from pure green to pure red,
while the lower hemisphere can be
adjusted in brightness within the yellow
spectrum.
This will help differentiate
between tri- and dichromats. This test
requires the patient to use only two primary colors (instead of the normal three) to
make a color match. Abnormal color matches indicate anomalous color vision. With
this, one can distinguish between a protan and a deutan. A deutan will require more
green to match, whereas a protan will require more red to match.
The first screen you will be taken to is the Anomaloscope Menu. From this menu you
can select which test to administer:
Test 1: Variable Hue (standard test)
In this test, the patient is able to subjectively vary the upper hemisphere continuously
from pure green to pure red. Only the upper hemisphere can be adjusted. The
objective of this test is to have the patient make a color match.
Test 1 is the recommended, most efficient, and most commonly used test with an
anomaloscope.
Test 2: Variable Hue and Brightness
In this test, the patient is able to subjectively vary both the upper and lower
hemispheres. The upper hemisphere can be varied continuously from pure green to
pure red, while the lower hemisphere can be adjusted in brightness within the yellow
spectrum.
In both Test 1 and Test 2, please notice the Results
tab located in the bottom right-hand corner of the
screen. By clicking on this tab, you can reveal the
outcome of each color match.
17
Anomaloscope Results Tab: Interpretation
G:R
Green to Red ratio of subjective color match
Expressed as a percentage. For example, 48:52 indicates a color match consisting of
48% green and 52% red. A ratio of 50:50 would indicate a perfect color match.
An assumed color normal patient will fall within the following color match range: 59:41
to 43:57.
AQ
Anomaloquotient
Calculated based on patient‟s subjective color match, relative to unity (product of a
calculated result for a perfect color match).
Values within the range of 0.754 to 1.44 are assumed color normal.
Values greater than 1.44 are probable deutans.
Values less than 0.754 are probable protans.
Y
Yellow Brightness (%)
This feature is found only in Test 2, and indicates the brightness level of the lower
hemisphere of spectral yellow (expressed as a percentage).
A perfect match can be achieved with a 50% yellow brightness (Test 2).
An assumed color normal will fall within the following color match range: 40% to 60%
N
Normal
A capital “N” will appear in the results if the subjective green-red color ratio is between
59% green (41% red) and 43% green (57% red).
P
Protan
A capital “P” will appear in the results if the subjective green-red color ratio is less than
43% green (greater than 57% red).
D
Deutan
A capital “D” will appear in the results if the subjective green-red color ratio is greater
than 59% green (less than 41% red).
In Test 2, a perfect color match is achieved with a 50% yellow brightness, a green-red
ratio of 50:50, and an anomaloquotient of unity (1.00).
18
Patient Education Module
Pictured is the first screen you will see in the Patient Education module. From this screen
you have a number of options.
Aside from Images, Video/Animation,
Simulations, and Patient Handouts, you can
also use the Quick Menu (bottom of screen)
to demonstrate to patients the normal
fundus, myopia, hyperopia, astigmatism,
emmetropia, and the effects of pupillary
dilation.
Note: the Patient Education Module requires the use of a mouse, and some features require a
live Internet connection.
19
Images
The Patient Education Module comes preloaded with over 100 images. For those who
are exceedingly proficient with a computer,
additional images can be quickly added to the
Patient Education Module. For instructions on
how this can be done, please go to the drop
down sub-menu on the Module Selection Menu,
and select Tech Support/Customer Service.
Next click on Video Support for help.
Video/Animation
Contains a handful of educational videos that
may be played on demand.
Ocuport TM TV: Internet Connection Required
The Patient Education Module now features an
immediate and direct connection to Ocuport TM
TV. Ocuport TM TV is a web-based resource to
help entertain and educate your patients (in the
exam room, and while they wait).
Mac: Please go to www.Ocuport.com/tv.html, make your browser full screen, and then click "Go to Ocuport TV" to start.
Ocuport TM Video: Internet Connection Required
In addition to Ocuport TM TV, the Sharp VA Patient Education Module also features an Ocuport TM
Video system launch button. This can be used to access additional video and animated
content for supplementing patient education. Ocuport TM Video content is frequently updated.
This feature will only work if you have the Ocuport software installed on your computer.
Simulations
This portion of the Patient Education Module
contains images and tools that are effective in
demonstrating the natural history of ocular
pathology as it applies to vision. Effective
demonstrations of refractive error and the
polarization of ophthalmic lenses can also be
found here. The Cataract simulation can also
be used to show the visual effects of trace, mild,
moderate, and severe cataracts.
20
Patient Handouts
The Patient Education Module now features
a database of dozens of patient education
PDF handouts that may be instantly printed
and handed to your patients.
This feature will only work if you have Adobe TM
Reader installed on your computer, and may
not work as intended with web browsers other
than Internet Explorer (e.g. Firefox).
In addition to the dozens of topics already covered, you can also add up to 20 of your
own PDF handouts. Located on the bottom of the Patient Handouts screen, notice the
box titled myMedia.
Naming custom PDF files:
As noted above, you can add up to 20 of your own PDF files. These must be named
properly in order for them to be accessible via the Patient Education Module. Proper
naming is as follows:
1.pdf
2.pdf
……
19.pdf
20.pdf
To add PDF files to myMedia, simply go to
Computer > C: > Program Files > Sharp VA > PDF
Once you have located the PDF folder, drag-and-drop (or paste) your PDF file(s) into
this folder.
Note: For Macintosh users, simply locate the PDF folder on your desktop to access PDF files.
21
Clinical Data Module
The Clinical Data Module features several useful resources:
Glaucoma Risk Calculator
Aids in determining a patient's predicted five-year risk of developing glaucoma. To use
this tool, simply select the patient‟s age range, IOP, vertical C/D, CCT, PSD from visual
fields, and whether or not your patient has an official diagnosis of diabetes. Once this is
done, click the Calculate Risk button located in the lower right corner of the screen.
This will give you a number. Next, click on “what’s this mean >>” to determine what a
given patient‟s 5-year risk of glaucoma development is (expressed as a percentage).
IOP/CCT Nomogram
This can be quickly accessed to determine if an adjustment to measured IOPs is
necessary based on measured central corneal thickness.
Drug Facts
The Drug Facts tool covers most ocular medications and several popular systemic
medications. This guide can be used to obtain side effects, contraindications, trade
and generic names, dispensed volumes, mechanisms of action, drug classifications,
potency index, and more.
22
Contact Lens Calculators
Contact lens calculators include RGP center thickness, LASIK estimation, mm-to-diopter
conversion, and vertex distance. Additionally, a RGP default parameter guide is
included for those who rarely utilize rigid lens designs.
Binocular Visual Field Defects Guide
This guide provides a great reference for less common visual field defects, and their
possible origins.
Vertical Deviation Determination Tool
Helps determine the neurological cause of a patient‟s hypertropia.
23
Macular Function & Integrity Module
The Macular Function & Integrity Module features six different types of macular grids:
Standard, Negative/High-Contrast, Central Fixation Aid, Optic Nerve/Chiasmal/Toxic,
Random Dot (Anti-Suppression), Scotoma Plot/Take Home
The Random Dot (Anti-Suppression) macular grid by McPartland Medical, LLC (patent
pending) is a new and highly effective macular grid. With this grid, patients report
increased retinal awareness; and thus, more precisely outlined and identifiable
scotomas.
The Scotoma Plot/Take Home macular grid
can be used to plot a patient‟s scotoma (or
metamorphopsia), and thus, monitored
over time. Once you select this grid, the
mouse pointer becomes a small red dot—
which can be used to localize abnormal
macular areas. Additionally, this grid can
be quickly printed for the patient to take
home for self-monitoring.
24
Vision Therapy/Sports Vision Module
3D Fusion Vergences
3D Fusion offers six different sets of stimuli that vary in both target size and demand.
Target demand may be increased and decreased by pressing the right and left arrow
keys, respectively. These targets provide a strong fusional stimulus, and when fused,
provide exceptional cues to depth. Some may also be used for facility tasks.
Random Dot Stereogram (RDS) Vergences
RDS Vergences are to be used with the red-blue
glasses. Random dot stereogram demand may
be increased and decreased by pressing the
right and left arrow keys, respectively.
25
Concentric Circles for orthopic and chiascopic fusion.
Similar to the above tasks, these concentric circles may be used to monitor for
suppression (red-blue) while providing ample cues to stereopsis.
Note: For all fusional vergence tasks, an arbitrary number is located in the lower left
corner of the screen. These numbers are to be used as a reference/benchmark.
Actual demand can be calculated using the Vergence Demand Calculator (located on
the Vision Therapy/Sports Vision Module menu page (lower right corner of the screen).
Pursuit Targets
With each of the three pursuit targets (horizontal/vertical, star, circle) the patient should
be directed to point their nose toward the cross in the center of the screen while
maintaining fixation with the moving target (“Point your nose toward the cross in the
center of the screen, and follow the target using only your eyes.”).
Saccadic Targets
The Vision Therapy/Sports Vision module includes four saccadic eye movement tasks.
With all four, the patient should be directed to point their nose toward the cross in the
center of the screen while making quick and accurate saccades between targets (any
head movement is discouraged). Gross, medium, and fine saccades may be targeted
by decreasing and increasing the patient‟s working distance, respectively. The
magnitude of saccades can also be increased and decreased by pressing the up and
down arrow keys, respectively, for Corner, vertical, and horizontal saccadic targets. A
flash gun (or camera flash) can easily be used to give the patient feedback on their
saccadic accuracy by way of a foveal after-image tag. Additionally, a web-cam can
easily be utilized to record saccadic inaccuracies for purposes of feedback and
demonstration.
Sequential/Color saccades are used to increase the difficulty level by adding
additional stimuli (“loading”). In this task, the patient can be directed to do a variety of
things (make saccadic eye movements only to a single color, between colors,
excluding a specific color, even numbers only, odd numbers only, etc).
26
Directionality (BDPQ)
With this task, direct the patient to use the mouse to click on all of a given letter (all of
the Bs, Ds, Ps, or Qs), or letters (e.g. all of the Ps and Qs, but not Bs and Ds). A time limit
may be imposed to increase difficulty.
When the patient has completed the given
task, click on the Results button (located in
the lower right-hand corner of the screen).
This will calculate the number of correct
and incorrect responses (as an absolute
number, and as a percentage) for a given
letter.
Visual Memory
The patient‟s fixation should be directed at the center of the black band in the top half
of the screen. The practitioner will then select a duration of exposure (from 2 seconds
to 1/12 th of a second) for one of the ten targets. Visual memory targets increase in
complexity from Target One (green) to Target Ten (red). In total, 130 different
combinations are available. The difficulty of this task is easily increased by requesting
that the patient select the target after he/she mentally rotates the target a given
number of degrees (“After viewing the target presentation, I want you to select the
option that has been rotated 90 degrees clockwise from that of the observed target
presentation.”).
27
Dynamic Accommodation Chart
The Dynamic Accommodation Chart can be used to improve accommodative facility,
and the accuracy of saccades (gross, medium, and fine).
You may press the Right and Left Arrows to highlight column sets (e.g. 1 and 10, or 2
and 9, 3 and 8, etc). You may then press the up and down arrows to increase and
decrease the contrast level of the non-selected columns.
Accommodative Facility Therapy (near-far rock): Direct the patient to hold the
Dynamic Accommodation near card at their measured near point of accommodation
(the near viewing distance just before blur). Have the patient read a single letter on the
distance chart. Next, have the patient shift their focus to read the next letter on the
near card. Typically, practitioners will have the patient continue to relax their
accommodation in order to “clear” the next consecutive letter on the distance chart,
and then focus to “clear” the next consecutive letter on the near chart. Therapy is
typically initiated with the use of a patch, and then completed binocularly.
Saccadic Therapy: Typical saccadic training utilizing this chart involves having the
patient read the first and last letter of each row (in the 1 and 10 position). This task can
easily be made increasingly difficult by having the patient make saccadic eye
movements between the letters in positions 2 and 9, 3 and 8, etc, in a given row. This
task often proves difficult, and may be made increasingly easy by pressing the right
and left arrows to highlight a given column set (such as 1 and 10, 2 and 9, etc). To
further make this task easier, you may press the up and down arrows to increase and
decrease the relative contrast of the highlighted column sets.
28
Dynamic Reaction Time Testing
This test can be used to measure simple reaction time, recognition reaction time (color
or orientation), and compound recognition reaction time (color and orientation).
Lastly, a sports specific (baseball) variable contrast reaction time test is available. In
total, 14 stimuli are available for measuring reaction time. To select and start a reaction
time test, simply click on the stimulus icon below the word “Target” (see image below, in
lower left corner of screen).
In each reaction time test, the patient‟s fixation should be directed to the presentation
box in the center of the screen. With each of these tests, the user is to react by pressing
the specified button (see below) once a given stimulus is presented. Each stimulus will
be presented after a variable period of time has lapsed (six seconds or less). The
reaction time will then be displayed in the lower right-hand corner of the screen.
Basic Reaction Time: The user is to react to a single stimulus by pressing the Up, Down,
Right, or Left button. The single stimulus for Basic Reaction Time is a black +.
Variable Color Reaction Time: The user is to react only to the specified color stimulus by
pressing the Up, Down, Right, or Left button. Color options include a blue +, green +,
and red +.
Variable Orientation Reaction Time: The user is to react only to the specified stimulus
orientation (left tilt +, zero tilt +, or right tilt +) by pressing the Up, Down, Right, or Left
button.
Compound Reaction Time: The user is to react only to the specified stimulus color and
orientation (blue left tilt +, green zero tilt +, or red right tilt +). In this test, the user can
only record a reaction time by pressing the Left Arrow for a left tilt +, Right Arrow for a
right tilt +, and Up or Down Arrow for a zero tilt +.
29
Baseball Reaction Time: The user is to react to a single stimulus (baseball) by pressing
the Up, Down, Right, or Left Arrow button. This reaction time test has four contrast levels
to select from (100%, 50%, 25%, and 10%), each of which may be selected by clicking
on the corresponding button located under the word “Target”.
Aniseikonia Determination Tool
Two stimulus options are available: red-green and red-blue. Use the Up, Down, Right,
and Left arrows to increase and decrease each of the hemi-bipartite stimuli until a
relative size match is obtained. Next, click on the Results tab to reveal the match
numbers. You can then plug these numbers into the Retinal Image Size Calculator on
the stimulus selection menu to calculate the relative difference in retinal image size.
Amblyopia Treatment
Located at the bottom of the Vision Therapy/Sports Vision Module menu you will find a
purple button titled “Amblyopia Treatment”. Use this button to download a software
trial of the Amblyopia RxTx software. The Amblyopia RxTx software features 8 key
activities that are designed for use with and without a patch at near working distances.
Each of the 8 key activities introduces a visual stimulus to the user—which can be varied
in size and/or contrast—to best treat the magnitude of the user‟s amblyopia.
The Amblyopia RxTx software is ideal for both office and home-based therapy.
Additionally, Revenue Copies may be purchased to re-sell to your patients for homebased therapy and maintenance. Revenue copies are typically sold to patients at a 3x
markup. Download the trial here: http://www.sharpva.com/amblyopia.html.
30
Astigmatic Testing Module
This module contains five charts used for determining the axis of astigmatism. The last
astigmatic chart on the menu features a rotating dial. This dial can be rotated to the
right and left by pressing the Right and Left Arrow buttons (or the Right and Left Arrow
keys on the keyboard).
The patient should be directed to stop the dial when the
three parallel lines appear darkest and/or boldest.
Three Parallel Lines
31
Low Vision Module
The Low Vision Testing module allows the clinician to measure visual acuities up to
20/1200 in size. Due to the fact that large optotype sizes are limited by monitor size, the
Low Vision Testing Module requires a fixed testing distance of 10 feet (3 meters).
Optotypes include Letters, Numbers, and Pediatric Symbols.
include an ETDRS chart, in addition to the following:
Other tests and charts
Edge Test
The Edge Test provides the clinician with a means of measuring contrast sensitivity
exclusive of spatial frequency (visual acuity).
32
Continuous Text
The Continuous Text chart provides a functional measure of visual acuity for the low
vision or partially sighted patient. Additionally, this chart can help determine if a patient
will respond well to using a CCTV low vision aid.
Left Arrow: scrolls text left
Right Arrow: scrolls text right
Up Arrow: increases optotype size (maximum measured acuity is 20/200 at 10ft).
Down Arrow: decreases optotype size (minimum measured acuity is 20/40 at 10ft).
Note: The effective optotype size can easily be increased or decreased by decreasing
(moving closer) or increasing (moving further away) the viewing distance, respectively.
Eccentric Viewing Training
This tool can be quite effective in
determining the retinal location of best
functional visual acuity.
The patient‟s
inherent fixation should be directed to each
green dot.
Use the Up and Down arrows to increase
and decrease target size, respectively.
33
Miscellaneous Tests and Charts
Courtesy Screens
Designed to entertain your patients,
advertise the optical dispensary, and
promote your professional services. These
are ideal for displaying on the screen
before you enter the exam room.
These courtesy screens can also be used to discourage cell phone use in the exam
room, and encourage word-of-mouth referrals.
From any courtesy screen, press “OK” to return to the Courtesy Screen selection menu.
34
Vernier/Hyperacuity
This test is offered in two visual psychophysical methods.
In both tests, the top line is variable in location, while the bottom line is stationary.
This test is calibrated for a 10 foot working distance.
Reveal the current hyperacuity level by clicking on the upward oriented grey triangle-shaped wedge (pictured above).
Auto Test (method of descending limits)
The objective of this test is to threshold the
subject‟s hyperacuity, and is measured in
seconds of arc. The subject should be
directed to press the Right Arrow (or click
the on-screen Right Button) when the top
line appears to the right of the bottom line,
and the Left Arrow when the top line
appears to the left of the bottom line.
Patient Control (method of adjustment)
The objective of this test is to use the Right
and Left Arrows to align the top and
bottom lines to perfect alignment. This test
measures one‟s ability to align two line
segments, and is measured in seconds of
arc.
Note: Research suggests that Vernier/Hyperacuity is a function of the visual cortex rather than the retina.
35
Visual Evoked Potential Stimulus
The Sharp VA software now features a VEP stimulus with a 25.00 second timeline. This
has been designed for use with neuro-diagnostic systems to observe evoked potentials
using electroencephalography. Over the course of the 25.00 second timeline, the
spatial frequency decreases until the MAR is determined. Each eye should be tested
monocularly.
Night Myopia Demonstration
This demonstration can be used to show the effects of night myopia. This chart features
a dark green background (similar to that of an interstate freeway sign), and has proven
to be effective at eliciting a positive response in those with night myopia.
Mire Distortion Education
This screen can be used to demonstrate to patients the effects of poor tear film, etc.
Near Demonstration
This screen provides a great way to
demonstrate a new reading and/or
computer/intermediate add. Additionally,
this can be used to determine a patient‟s
computer add.
36
Other
Exiting the Sharp VA v3 Software
To close the Sharp VA software from any screen within the software, simply push the EXIT
button. This will then take you to a screen to confirm your request to exit.
Multi-Monitor/Dual-Monitor Setup Options
For peak Sharp VA performance, a dedicated computer is recommended.
When establishing a multi- or dual-monitor setup in your exam room, you have several
options. Below are a few of the most common multi-monitor setup options.
Option One: Monitor Cloning
In this option, a second monitor may be added to a single computer. Each monitor will
display identical screens (i.e. the Sharp VA software will appear on both monitors). For
this option to work, you do not need to add a special video card to your computer. If
your computer only has a single monitor hookup, you can purchase a monitor splitter
cable which will allow you to connect a second monitor.
Option Two: Separate Screens
In this option, a second monitor may be added to a single computer only if your
computer has two monitor hookups. If your computer only has a single monitor hookup,
you can easily add a second connection by installing a special video card. This special
video card is called a dual head video card. Now that you have two monitor hookups,
simply connect both of your monitors to your computer. Now you can use your
computer‟s Display Settings to configure your dual monitor setup. Please note that the
Sharp VA digital acuity software has been programmed to display on Monitor 2. For this
reason, it is important to ensure that your patient view monitor is designated as Monitor
2.
EMR + Sharp VA Software
Option two will be the best option for displaying the Sharp VA software on one monitor,
and EMR or EHR software on the other monitor. It is important to keep in mind that the
Sharp VA remote control works just like any other input device (such as your mouse or
keyboard). These input devices all control the "active window" only. Please keep in
mind that you will need to make the Sharp VA software "active" before pushing the
Sharp VA remote buttons (or else you are essentially attempting to control another
application with the Sharp VA remote control). To ensure that the Sharp VA application
is the active window, you will need to either click on the Sharp VA program or use the
Alt+Tab function to swap between open computer applications.
37
Sharp VA Customer Service and Technical Support
Please use the following to resolve any issues that arise:
http://sharpva.com/video_support.html
Video Support web site.
Best option for Tech Support issues (e.g. setting up the remote control, installation, etc)!
ask.sharpva.com
Online 24/7 Support Ticket. Best Option for Customer Service!
[email protected]
Sharp VA e-mail Support.
1-801-348-6561
Phone Customer Service and Technical Support. Due to low demand, this number will connect
you to a voice mailbox. All support is via email response and call-back basis.
www.sharpva.com
Sharp VA Website.
Additional Sharp VA Resources
update.sharpva.com
Check for Sharp VA software updates.
remote.sharpva.com
Obtain remote control drivers, patches, and other remote control information.
demo.sharpva.com
Sharp VA Demo Site.
www.sharpva.com/order.html
Order additional exam room packages, etc.
Sharp VA version 4, and Sharp System (Sharp System 20/20 version 1, version 2, Sharp System version 3, and
Sharp VA version 3) are products of McPartland Medical, LLC. All Rights Reserved. Numerous Patents Pending.
Copyright 2004-2010. McPartland Medical, LLC.
38