1
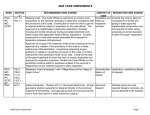
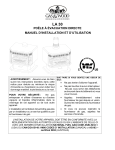
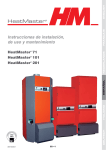
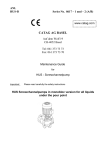
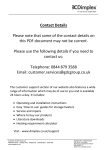
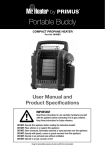
HEATMASTER PTY LTD
HEATMASTER
“ ENVIRO”
High Efficiency gas log space
heater
Inbuilt Model
Customer Operating information
&
Installation instructions
ENVIRO gas heaters : Are Manufactured By
Heatmaster Pty Ltd
2 / 9 Nicole Close
Bayswater, Vic 3153
P: (03) 9761 7130 F: (03) 9761 7134
CONTENTS
PRODUCT FEATURES…………………………………………………3
SAFETY PRECAUTIONS………………………………………………4
CUSTOMER OPERATING INSTRUCTIONS..………………………5
SAFETY FEATURES……………………………………………………7
GAS VALVE ADJUSTMENT…………………………………………..8
INSTALLATION INSTRUCTIONS…………………………………..10
DIMENSIONS…………………………………………………………...16
WIRING DIAGRAM………….………………………………………..17
TROUBLE SHOOTING GUIDE……………………………………...18
SERVICING…………………….………………………………………..19
SPARE PARTS…………………………………………………………..20
CARE OF APPLIANCE & WARRANTY……………………………..21
SERVICE CONTACT INFORMATION………………………………21
PLEASE STORE THIS MANUAL IN A SAFE PLACE
FOR FUTURE REFERENCE
2
Product Features
HEATMASTER “ ENVIRO “ INBUILT GAS LOG HEATER
NAME PLATE
MODEL-ENVIRO
GAS TYPE
MODEL TYPE
GAS INPUT
HIGH
LOW
HEAT OUTPUT
HIGH
LOW
Efficiency
Injector Size
Manifold Pressure
High
Low
SAI GLOBAL
Approval No
No to Code AG103
NATURAL
LPG
Inbuilt
Inbuilt
44.0 MJ/h
23 MJ/h
44.0 MJ/h
23 MJ/h
10.55 kW
4.3 kW
84 %
3.7 mm
10.55 kW
4.3 kW
84 %
2.0 mm
0.69 kPa
0.22 KPa
2.25 kPa
0.63 KPa
GSCS20118
GSCS20118
Electrical Conform to AS3100
Air Pressure Switch
Cut in Pressure
240V 50 Hz
Cleveland
Manufacturer
Heatmaster
(Pty.Ltd.
41-45 Bendix Drv.
Clayton,
VIC. 3168
To be installed by
an authorized
person in
accordance with
installation
instructions
provided with the
appliance.
160 Watts Max
100 Pa
Cut out Pressure
91 Pa
Electrical Connection
Standard Flex. 2 Mt. 3 Pin Plug
POWER FLUED
ZERO CLEARENCES TO COMBUSTIBLES WALLS
ENERGY RATE
4.6 Stars
AUTOMATIC ELECTRONIC IGNITION
MANUAL OR REMOTE OPERATED CONTROLS
MODULATED HEAT SETTINGS
MODULATED FAN SPEED
EXTERNAL COMBUSTION AIR PREVENT DE-OXIGENATION OF ROOM AIR
DELAYED START FAN PREVENT COLD AIR BEING CIRCULATED AT START UP
HEAT DUCTED TO ANY NEIGHBOURING ROOM IN YOUR HOME
3
SAFETY PRECAUTIONS
!
DO NOT
DO NOT
DO NOT
DO NOT
DO NOT
OPERATE THIS APPLIANCE BEFORE READING
THE INSTRUCTION BOOKLET
PLACE ARTICLES ON OR AGAINST THIS
APPLIANCE
STORE CHEMICALS OR FLAMMABLE
MATERIALS OR SPRAY AEROSOLS NEAR THIS
APPLIANCE
OPERATE WITH PANELS COVERS OR GUARDS
REMOVED FROM THIS APPLIANCE
ENCLOSED THIS APPLIANCE
THE GUARD IN THE GLASS DOOR IS FITTED TO THIS APPLIANCE TO
REDUCE THE RISKOF FIRE OR INJURY FROM BURNS AND NO PART OF IT
SHOULD BE PERMANENTLY REMOVED.
FOR PROTECTION OF YOUNG CHILDREN OR THE INFIRM , A SECONDARY
GUARD IS REQUIRED.
THIS APPLIANCE SHALL ONLY BE INSTALLED BY AN AUTHORIZED PERSON
IN ACCORDANCE TO AS 5601/AG 601 (GAS INSTALLATION CODE)
MANUFACTURER’S INSTALLATION INSTRUCTIONS
LOCAL GAS FITTING REGULATIONS AND MUNICIPAL BUILDING CODES
4
Customer Operating Instructions
The Heatmaster Enviro Gas log space Heater has been designed for simple and
efficient operation to provide you with an efficient, high heat output. With dual
operation system (manual or remote controlled) at a touch of a button your heater
will provide you with a fully controlled modulated supply of heat, from a pleasant
and steady warmth to the strongest heat output to
reach almost any corner of your home by using the heat optional transfer kit.
PRE OPERATIONS CHECKS
Prior to operating the heater, ensure that the flue terminal is not obstructed
Furthermore, make sure there are no combustible objects leaning against, resting on,
Or within the immediate vicinity of the unit . Check that the heater main power and
gas supply are connected and switched on .
OPERATING THE HEATER
The Heatmaster Enviro can be operated by two different modes, manually or by the
remote controlled thermostat wall unit .
For the manual mode: the controls are located in the left of the front bottom grill
panel. And the operation of the buttons are described in the picture as follow:
MANUAL OPERATED`SWITCHES IN BOTTOM FRONT PANEL
1.-To ignite your heater press the Ignition ON/OFF Button and the heater will
automatically start the ignition sequence. After approximately 30 seconds of
purging the air from inside the unit the heater will ignite.
2.-The heater always starts in the low heat setting and the heater will warm-up for
at least 2 minutes before automatically going to the maximum flame setting.
3.-The fan will not start until the heater has reached the minimum operating
temperature. In the Maximum heat setting the fan speed will be locked in high
and cannot be set to medium or low speed unless you change the heat
setting to medium or low. To select fan speed or the heat setting press the flame
or fan marked buttons in the + or - at side of the switches to increase or
decrease as desired.
DO NOT MODIFY THIS APPLIANCE
5
For the remote programmable thermostat mode:
To use this feature refer to attached Thermostat manual included with this heater.
But here are some basic instructions so you can override some functions to operate
your heater.
1.-To ignite your heater simply press the ON/OFF power button and the heater
automatically will start the ignition sequence within approximated 30 second of
self checking the heater will ignite.
2.-The heater will always start in the low heat setting and the heater will warm-up
for at least 2 minutes before automatically going to the higher flame setting.
3.-The fan will not start until the heater has reached the minimum operating
temperature. To select fan speed or the heat setting press the up or Down
buttons in the remote controller, to decrease or increase differential temperature
between room and thermostat and flame and fan speed will increase or decrease
as desired. (The bigger the temperature differential the bigger the flame and fan
speed
Note: In the Maximum heat setting the fan speed will be locked in high and can
not allow to be set to medium or low speed , at least your change the heat
setting to medium or low.
TURNING THE APPLIANCE OFF
For either manual or remote mode press the on/ off switch once. The room fan will
continue to operate for a short period while the heater cools down.
Please note:
1.- This appliance can not be operated without the fan running
2.- Due to the performance and efficiency of the heater, steam may be noticed coming
from the flue terminal on cool days
3.- As this appliance has a luminous effect some slight carbon deposition may
Occur in the logs.
4.- During first time firing of this appliance, an odour may be noticed for a short
period as the paint cures. It is advisable to leave the windows open during the first
few hours of the very first operation only.
SAFETY PRECAUTIONS
IMPORTANT POINTS
! DO NOT place articles or clothing on or against this appliance
! DO NOT use or store flammable materials near this heater
! DO NOT place any item containing liquid on the heater
! DO NOT spray aerosol in the vicinity of this appliance when it is in operation
! ALWAYS supervise young children near the appliance
It is recommended that a secondary guard be used,to prevent access to appliance by
children, as outer panels of this appliance may reach high temperatures.
NOTE: In the event the electricity supply cord is damaged it must be replaced with
the original Heatmaster part obtainable from your authorized dealer.
6
SAFETY FEATURES:
Automatic Pre-purge: Before heater ignition this operation is done to evacuate any
remains of gas or flue products from inside the firebox that could be the cause of a
mishap
Automatic Shut-off: Should the flame extinguish for any reason there is an
automatic shut off of the gas supply.
Over temperature protection: In the event of the room fan failing , blockage of
airways ,or incorrect gas installation ,the gas supply will automatically shut off to
prevent the appliance from over-heating .
Warning : This appliance must be installed to comply to AS 5601/AG601 codes
and regulations and only by an authorized person who is responsible
for its correct operation at the time of installation and final
commissioning .
7
Pressure adjustment .
Your Enviro Heater has been factory preset and does not need to be readjusted during
installation. But there will be some situations where some service has to be done and
gas pressure may need to be readjusted as per followingInstructions:.
8
Please for your own convenience record the following information in the space
Provided:
Purchased from:
Name…………………………………………………………………………
Address………………………………………………………………………
Phone No…………………………………..Date of purchase … ….. ………
Serial No of appliance…………………………………………………………..
To be completed by the installer:
Name……………………………………………..License No……………………..
Address……………………………………………………………………………..
Phone No……………………………………. Installation Date…………………
9
INSTALLATION:
ONLY TO BE CARRIED OUT BY AN AUTHORIZED PERSON!
The Heatmaster Enviro inbuilt Heater is a zero clearance appliance
which can be optionally installed in a false fireplace or wall cavity made
of combustible materials such as wood or chipboard. Heatmaster provide
the heater with a flue kit of flexible pipes of 65mm and 50mm diameter
for the inlet and exhaust. For the gas supply a flexible stainless steel pipe
with a ½ “ BSP male connector is supplied with the heater and can be
arranged by the installer to be located at the side or rear of the heater.
This easy access connection system allows the heater to be quickly
serviced and replaced by one person when ever maintenance will be
required in the future.
LOGS INSTALLATION:
!ONLY TO BE CARRIED OUT BY AN AUTHORIZED PERSON
Front view of empty tray no logs
10
Front View with the 2 Rear logs in position
Front View with Rear and Middle logs in position
11
Front view of Rear, Middle and the two front logs positioning
Front view of Rear, Middle, 2 Front logs and Cross twig positioning
12
INSTALLATION OPTION 1:
EXISTING FIREPLACE OR ROOF PENETRATION
WITH ENVIRO VERTICAL FLUE KIT
13
INSTALLATION OPTION 2:
FALSE FIREPLACE ON STUMP FLOOR AND WALL
PENETRATION WITH ENVIRO HORIZONTAL FLUE KIT.
14
INSTALLATION OPTION 3:
INTERNAL WALL ON STUMPS AND HORIZONTAL FLUE
UNDER THE FLOOR.
15
DIMENSIONS OF ENVIRO INBUILT MODEL
16
Wiring diagram:
17
T ROUBLESHOOTING G UIDE
PROBLEM
POSSIBLE CAUSE
REMEDY
Appliance fails
to ignite.
No gas or supply pressure
insufficient.
Ensure gas supply connected, purged, and pressure
appropriate.
Ensure unit plugged in and switch is on, check supply fuse.
Check supply. Active, neutral, & earth must be correctly
orientated and connected.
No electrical supply.
Incorrectly wired power point.
Adjust valve pressures.
Incorrect gas valve adjustment.
Wait at least 30 seconds for unit to purge combustion
chamber after switching on.
Insufficient time allowed
between attempts.
Unit will not
operate on
Low.
Room fan not
operating.
Unit cuts out
after a period
of time then
cycles on and
off.
Excessive
carbon (soot)
deposits on
inside of
firebox, logs,
and/or glass.
Excessive flame
height.
Excessive flame
“lift off”
Unit fails to
heat.
Internal wiring disconnected.
Check all plugs inside appliance are connected properly and
correctly located, Ensure operation of combustion fan & air
pressure switch.
Incorrect gas valve adjustment.
Adjust valve.
Incorrect or loose wiring.
Insufficient time allowed.
Loose wiring.
Check wiring.
Fan has a delayed start and will not start until unit warmsup.
Check wiring.
Fan not located correctly.
Install fan in correct location.
Fan blocked.
See “Room fan not operating”
Remove and clean fan.
See “Room fan not operating”
Heat exchanger blockage.
Clean heat exchanger.
Excessive pressure or incorrect
gas type.
Incorrect gas type or pressure
setting.
Ensure correct gas type, injector size, and pressure setting.
Ensure correct gas type, injector size, and pressure setting.
Adjust primary air shutter.
Primary air shutter incorrectly
adjusted for gas type.
Incorrect gas type or pressure
setting.
Ensure correct gas type, injector size, and pressure setting.
Flue or inlet blockage.
Clear blockage.
Recirculation of flue gases.
See “Room fan not operating”
Ensure flue is installed correctly.
See “Room fan not operating”
Incorrect gas type or pressure
setting.
Ensure correct gas type, injector size, and pressure setting.
Check injector, burner supply pipe, & valve for foreign
matter.
Gas supply blockage.
All service work to be carried out by a qualified & authorised person.
18
All service work to be carried out by a qualified & authorised person.
SERVICING INSTRUCTIONS:
Warning; before you attempt to service the heater be sure that
electric power plug has been disconnected.
Your heater should be serviced at least once a year to clean the Room
Fans from lint and dust accumulated in the bottom compartment.
This heater does not require to be removed to service and maintain any
items such as logs , PES, room fan , electronic components. To service
this items follow the next step:
1.- To access the logs and burner components undo the four screws that
hold the door . Two at the top of door frame where the hot air outlet
is and two at the bottom of door where room air inlet is.
2.- To access the gas valve and electrical components and fans, remove
front fascia surround by simultaneously lifting and pulling it
outwards so the catch hooks in this part can be released from the
heater.
3.- Once the surround has been removed, unplug the electrical lead
connector from the manual control switches located in the front of side
panel ( left hand in the bottom of panel). Then the front fascia panel can
be Put aside from heater .
NOTE:
The heater needs to be removed partially from its installed cavity to
access the following components :
Flue fan, Over Temperature Switch, and Heat Exchanger.
DO NOT MODIFY THIS APPLIANCE
19
SPARE PART COMPONENT LIST OF ENVIRO GAS HEATER
Comp. No.
1
2
3
4
5
6
7
8
9
10
11
12
13
14
15
16
17
Comp. Name
Gas Valve
Electronic PES
Modulation
Box
Digital
Thermostat
Air switch
Flame sensor
Spark igniter
Flue Fan
Room Fan
Fan Resistor
Gas Burner
OverTemp
Switch
Ceramic Glass
Door rope seal
Log set
Injector Nat
Injector LP
Part No
00-ST-845
00-ST-579
00-ML- 03
00-ML-032
00-CL-91
00-CS-110
00-CS-111
00-FM-47
00-MS-50
00-RH-80
00-HM-44
00-HM-140
00-HM-820
00-HM-2200
00-HM-60
00-HM-37
00-HM-20
20
CARE OF YOUR ENVIRO GAS HEATER
This appliance requires minimal maintenance, however it is
recommended that a full service and check be made by a qualified person
annually. For more details Please contact your Heatmaster dealer .
The Bottom fascia air grill should be removed by unscrewing the two
screws and the fan vacuumed annually.
To clean the appliance, simply wipe over with a dry cloth . Do not use
solvents or abrasive cleaning agents.
Before calling check that:
1.- Electrical power is on
2.-Gas is turned on
3.-There are no obstruction /blockages of the flue terminal
WARRANTY
As a purchaser of this Enviro product, Heatmaster (Aust.) Pty.Ltd.
provide you with the following warranty:
Heat Exchanger ___________10 Years _____________1 Year free
labour
All other Parts____________2 Years _______________1Year free
labour
This Warranty is in addition to all other rights and remedies, which the
purchaser may have under statute.
Note: Glass or logs are not covered against accidental breakage
For more information about your nearest dealer contact:
Heatmaster Pty Ltd.
2/9 Nicole Close – Bayswater,
Victoria – 3153
Or visit our website: www.heatmaster.com.au
21