1
UNIVERSITY DEVELOPMENT
Information Management for Philanthropy,
Alumni, Communication and Tracking
USER'S MANUAL
Created on 12/31/2002 2:56:00 PM
User's Manual
TABLE OF CONTENTS
I.
INTRODUCTION
A. What is IMPACT?
B. System Requirements
C. How to Use This Manual
II. SYSTEM OVERVIEW
A. Logging In
B. IMPACT View's Initial Display
¾ Using the Banner Frame
¾ Using the Menu Frame
¾ Using the Data Frame
¾ Adjusting the Frame Sizes
¾ Adjusting the Text Size
C. Locating Data in IMPACT View
¾ Individual Search
¾ Organization Search
¾ OSU President's Event Search
¾ Project Fund Search
D. Printing Data from IMPACT View
¾ Single Screen
¾ Full Record
¾ Printing Hints
E. Customizing IMPACT View
F. Displaying Mapping Tables
G. Using IMPACT View's On-Line Help
User's Manual
INTRODUCTION
What is IMPACT?
IMPACT stands for "Information Management for Philanthropy, Alumni, Communication,
and Tracking," and the IMPACT project has been undertaken by University Development
in cooperation with the Alumni Association and the Office of Information Technology in
order to replace the AlmaMater database system.
IMPACT View is the first release of this replacement information system, and provides
view-only access to existing data. IMPACT View is not a data entry application; this first
phase replaces only the AlmaMater screens accessible through the Research Information
System ("RIS") and "AV**" transactions.
System Requirements
IMPACT View is a web-based application. For optimum performance, it's recommended
that the workstation you use to access IMPACT View meet or exceed the following
configuration recommendations:
Processor:
Memory:
Operating System:
Monitor:
Web Browser:
Pentium II 233 Mhz
32 Mb (64 Mb recommended)
Windows 95 or later; MAC OS 7.6.1 or later
17" screen or larger
Internet Explorer 5.5 or later
If your workstation does not currently meet these minimum standards, consult with your
technical support representative; the newest version of the Internet Explorer web
browser software can be downloaded and installed directly from Microsoft at this URL:
http://www.microsoft.com/windows/ie/downloads/
How to Use This Manual
This manual is intended to provide general instructions concerning the use of the
IMPACT View application. It does not
° explain how data is entered into the database;
° articulate the policies governing the use of data; or
° provide job-specific procedures or examples.
The manual is divided into sections that will describe what IMPACT View looks like, the
features it includes, and the behaviors users should expect. Sections are identified at
the bottom of each page.
Introduction
User's Manual
LOGGING IN
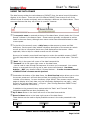
Go to https://impact.osu.edu
The following window will appear:
q
w
e
r
q This login screen is administered by the Office of Information Technology (OIT).
It
safeguards not only IMPACT View, but also a number of other University web-based
resources; it is used to ensure that only authorized University staff and affiliates will be
permitted to view the specific site requested.
w Because OIT's login screen safeguards many different sites, the specific site address
being requested will be listed.
e Your Username for IMPACT View will always be "lastname-dot-number" format, for
example, "pines.1" or "bertolini.2"; OIT refers to this login ID as an "OSU Internet
username," or the "name.n."
r If you're not sure what your name.n login ID is, and/or do not know the password
connected to your login ID, you can follow the links on this login screen for additional
information, or just contact OIT directly; any questions or concerns about the OSU
Internet username or this screen will need to be addressed to OIT, since IMPACT View
administrators do not maintain this level of security. (OIT's Help Desk can be reached
via phone [688-HELP] or e-mail [[email protected]].)
Logging In
Page 4 of 46
User's Manual
If your IMPACT View session remains idle for an hour (or more), you'll be required to log in
again before you can access records again.
Since IMPACT View uses frames to display different parts of information (see "IMPACT
View's Initial Display," below), the re-authentication frame may appear more than once:
q
w
You will not need to log in to each frame again separately, however. Use one of the
authentication pages, and then press the F5 key (or click the browser's "Refresh" button) to
update the browser's entire display.
Logging In
Page 5 of 46
User's Manual
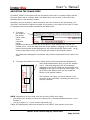
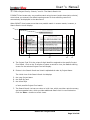
IMPACT VIEW'S INITIAL DISPLAY
After you log in, you'll be able to use the IMPACT View site. IMPACT View is divided into
three separate panes; the default settings for each pane are shown below:
q
e
w
q The Banner Frame
IMPACT View's banner extends all the way across the top of the display. The default
starting banner includes the system icon and name at the left-hand side and the Search
screen options at the right-hand side. The banner changes as you use IMPACT View to
include a "Current Record" indicator which provides information to help identify the data
displayed in the Data Frame. See "Using the Banner Frame," below, for additional
information and instructions.
w The Menu Frame
IMPACT View's menu appears at the left side of the screen below the banner, and
provides a listing of the data screens available when viewing a record. The specific
screens listed will vary depending on the kind of record being viewed (for example,
whether you're viewing an individual's or an organization's record) and your access
level. See "Using the Menu Frame," below, for additional information and instructions.
e The Data Frame
IMPACT View's specific screens display in the data frame next to the menu and below
the banner. Most screens are designed to display actual record data, and correspond to
entries listed in the menu frame, but some, like the default starting screen, Search for:
Individual, allow you to locate and customize information in IMPACT View. See "Using
the Data Frame," below, for additional information and instructions.
IMPACT View's Initial Display
Page 6 of 46
User's Manual
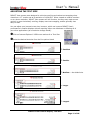
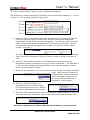
USING THE BANNER FRAME
IMPACT View's banner serves three (3) distinct functions:
1. provides general system information
2. initiates new record searches
3. identifies the record currently displayed in the Data frame
When you first log on to IMPACT View, the default starting Banner displays:
q
w
q Click once on the IMPACT View icon to open a window displaying general system
information.
w IMPACT View's default data frame screen is Search for: Individual, but the default
starting banner allows you to select a different Search for: screen.
A. Use the pull-down menu to
select the kind of record to
search for and then…
B. …click the Go! button to
load a blank search screen.
NOTE: You'll only be able to
search for records that you're
authorized to view. If you're
A
not authorized to view OSU
President's Event data, for
example, "Event" will not be listed in the Search for menu.
B
The banner also offers you a shortcut to locate records using ID numbers.
A. Use the pull-down menu to
select the kind of record to
find…
B. …enter the ID number you're
looking for in the ID box, and then…
C. …click the Go! button (or press Enter).
A
B
C
e Once a specific record has been located and its data is being displayed in the data
frame, the banner contents are updated to show identifying information about the record
being displayed:
e
IMPACT View's Initial Display: the Banner Frame
Page 7 of 46
User's Manual
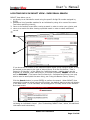
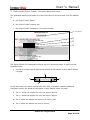
USING THE MENU FRAME
While the banner frame includes the options to search for new records, the menu frame
governs navigation within the record currently being viewed. IMPACT View's default starting
point is the Search for: Individual screen, so the default menu display is the Individual
Menu, listing the screens of individual data that you're authorized to view.
The screens listed in any menu reflect groupings of similar kinds of
data in IMPACT View. One group of screens, for example, displays
giving history, while another displays biographic details; each group
includes a Summary or Overview screen, and, in many cases, a
number of elaborating Detail screens as well. Each group creates a
hierarchy of information in the menu.
By default, a menu group's hierarchy will be
expanded only when a screen in that group is
being viewed in the data frame. When you
switch to view a screen in a different group,
the original menu hierarchy will contract, and
the new one will expand.
The Menu entry
displayed in Bold
indicates the screen
currently viewed in
the Data frame.
If you prefer that the Menu hierarchies not contract when you
switch from one screen group to another, use the Default Options
screen to have the Menu hierarchies expanded all the time.
See "Customizing IMPACT View," below, for additional information
and instructions.
IMPACT View's Initial Display: the Menu Frame
Page 8 of 46
User's Manual
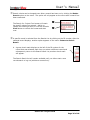
USING THE DATA FRAME
The data frame provides the real substance of IMPACT View; the actual record information
displays in this frame. There are over 100 different IMPACT View screens for all of the
different kinds of records combined; each one displays a different set of data values. There
are some features that they will all have in common, however:
e
w
q
r
q The screen's name is centered at the top of the data frame, directly below the "Current
Record" indicator in the banner frame. Screen names generally correspond to entries
listed in the menu frame, although some menu entries have been abbreviated in order
to save space.
w To the left of the screen's name, a Help icon provides access to screen and field
definitions. Each screen's Help window includes a description of the screen as a whole
as well as links to information about every field displayed on that screen. When
applicable, links to Help for related screens are also included.
Once you've located a record and have begun to review the available screens, IMPACT
View will keep track of which data screens you've viewed, and in what order. The builtin…
e "Back" link in the upper-left corner of the data frame and the
r "Forward" link in the upper-right corner or the data frame
…can be used to trace through the sequence of screens you've accessed. Your screen
history is re-set each time you log out or start a new record search. Use these
buttons -- NOT your browser's Back / Forward buttons -- in order to ensure that all
of IMPACT View's frames remain synched.
t Centered at the bottom of the data frame, the Print Preview button allows you to view
the current screen as it will look when printed; the resulting Print Preview window
includes a Print button. In some instances, single IMPACT View screens require multiple
pages to display all of their data; only the information displayed on one page -- what
shows in the current data frame -- will print. (See "Printing Data from IMPACT View,"
below, for additional information.)
In addition to the personal history tracked with the "Back" and "Forward" links,
navigation capabilities are also provided by the
y Up in Menu button in the lower-left corner of the data frame and the
u Down in Menu button in the lower-right corner of the data frame.
These buttons can be used to display available screens in the order presented in the
menu.
y
t
IMPACT View's Initial Display: the Data Frame
u
Page 9 of 46
User's Manual
ADJUSTING THE FRAME SIZES
By default, IMPACT View opens with the top banner frame set to a certain height, and the
left menu frame set to a certain width; the data frame is set to take up the rest of the
available space in the browser window.
Depending on your monitor's overall resolution and your browser's text size display, you
may find it convenient to adjust the height of the banner or the width of the menu in order
to change the amount of space available to the data frame.
A. To change
A
the height of
the banner
frame, point
at the
horizontal
border
between the banner and the rest of the IMPACT View window until you see a 2headed arrow. Click and drag when the arrow appears; dragging up will make the
banner frame shorter and dragging down will make the banner frame taller. Let go
of the mouse button when you've moved the border to the desired location.
The information displayed in the banner may become inaccessible if the frame is too
small.
B. To change the width of the menu frame, point at the vertical border between the
menu and the data frame until you see a 2-headed
B arrow. Click and drag when the arrow appears;
dragging to the left will make the menu smaller and
dragging to the right will make the menu larger. Let
go of the mouse button when you've moved the
border to the desired location.
The narrower the frame, the more the text in the
menu will wrap, potentially increasing the amount of
scrolling required.
NOTE: Adjustments to the frame sizes will remain in effect until either
° you refresh your browser window (by pressing F5 or clicking the Refresh button on the
toolbar) or
° you log in again (i.e., if your session has timed out).
Frame size adjustments cannot be saved from one IMPACT View session to the next.
IMPACT View's Initial Display: Frame Sizes
Page 10 of 46
User's Manual
ADJUSTING THE TEXT SIZE
IMPACT View screens were designed to minimize scrolling and reduce text wrapping when
viewed on a 17" monitor set at a resolution of 1024x764. When viewed on smaller monitors
or at a lower resolution, IMPACT View screens will still function, but they may require more
vertical (or even horizontal) scrolling, display more text wrapping, and be generally less
easy to read.
You can adjust your browser's text size, however, which can improve IMPACT View's
performance in smaller displays without requiring either new hardware or affecting all of
your other applications (as a resolution change would).
q Click on Internet Explorer's VIEW menu and scroll to Text Size:
w Select the desired text size from the five options listed:
A
Smallest
B
Smaller
C
Medium -- the default size
D
Larger
E
Largest
IMPACT View's Initial Display: Text Size
Page 11 of 46
User's Manual
LOCATING DATA IN IMPACT VIEW - INDIVIDUAL SEARCH
IMPACT View allows you to
1. go directly to an individual's record using the specific 8-digit ID number assigned by
A/DIS;
2. generate a list of possible matches for an individual by using all or some of the name
(and other qualifying criteria);
3. return to the search screen after running a search in order to revise your criteria; and
4. return to a results list after viewing a possible match in order to select a different
record.
q
q
w
If you know the ID number of the individual whose record you're trying to locate, it may
be entered in the space to the right of Alumni/Donor ID in the first section, "Find a
Person by ID Number," of the Search for: Individual screen. Leading zeros may be
dropped; for example, when searching for ID number 00564863, 564863 will work as
well as 00564863. (The banner frame's Search for: Individual and ID entry box may
also be used to accomplish the same thing; see "Using the Banner Frame," above.)
Click the Search button (or press ENTER) to perform the search. When IMPACT View
successfully locates a record using the ID number, the default starting screen will display
in the data frame. For an individual, this starting point is initially set to be the General
Overview screen:
You can use the Default Options screen to choose a different screen to display first when
reviewing an individual's record. (See "Customizing IMPACT View," below, for additional
information and instructions.)
Search for: Individual
Page 12 of 46
User's Manual
w If you do not know the ID number of the individual whose record you're trying to locate,
use IMPACT View's "Find a Person by Name" section to generate a list of possible record
matches.
A. Name searches can consist of Last, First, and Middle name information; the Last
Name information is required.
•
•
•
If you know the full last name, character for character, enter it in the space, and
make sure that the "Exact" search option is selected.
If you only know part of the last name, character for character, enter what you
know and use a wildcard character (*) to substitute for any characters you don't know
(e.g., enter "John*" to locate "John," "Johns," "Johnson," etc). Make sure that the
"Similar To" search option is selected.
To account for spelling variations in the last name ("Pierce" vs "Peirce," for example, or
"Kelley" vs "Kelly," "McDonald" vs "MacDonald" etc), enter one variant without a wildcard
character and make sure that the "Similar To" search option is selected.
B. First Name information is optional but recommended, particularly when looking
for more common last names.
•
•
Enter the full first name or only
the first initial in order to perform
A
an "Exact" search.
Partial first names may be
B
entered, character for character, but
wildcard characters cannot be used
in the first name field (e.g., entering
"Jo*" will find nothing; entering "Jo"
will find "John," "Joe," "Jodi," etc and
C
entering "Joh" would find only
"John"). Make sure that the "Similar
To" search option is selected when working with partial names.
D
C. Middle Name information is optional, and only recommended when looking for
particularly common names.
•
•
Enter the full middle name or only the first initial in order to perform an "Exact"
search.
Partial middle names may be entered, character for character, but wildcard characters
cannot be used in the middle name field (e.g., entering "Jo*" will find nothing; entering
"Jo" will find "John," "Joe," "Jodi," etc and entering "Joh" would find only "John"). Make
sure that the "Similar To" search option is selected when working with partial names.
D. Name searches may be either "Exact" or approximate ("Similar To").
•
•
An Exact search looks for precise and literal matches for the information entered in the
name fields; in order to be included in the result list of an Exact search, the name in the
database must be exactly the same, character for character, as the name entered on the
screen. The Exact search is particularly useful if you know exactly how the name is
spelled.
An approximate search allows IMPACT View to search for possible partial matches for the
information entered in the name fields; in order to be included in the result list of a
"Similar To" search, the name in the database must be at least a little like the name
entered on the screen.
As indicated above, Similar To may be used in connection with a wildcard character (*) in the
Last Name field (only) to indicate the specific letters that a name begins or ends with while
still not providing the full and exact name. When used without a wildcard character, the
Similar To option allows IMPACT View to look for possible matches using just the consonants in
the last name, which can account for spelling variations and provide much broader results.
Search for: Individual
Page 13 of 46
User's Manual
w "Find a Person by Name," cont'd.: Name Search Examples
A
In this Exact search, a
full last name and a full
first name have been
entered.
IMPACT View locates only one possible match,
and displays the default starting screen.
B
A more inclusive, but still Exact, search
can be performed by entering a full last
name without any first or middle name
information.
IMPACT View locates four (4) possible matches, and displays
them in a Results List for selection. In order to be included,
each entry's last name must match, character for character,
what was entered in the search.
C
Still more inclusive, this "Similar to" search uses a wildcard character (*) to tell IMPACT View to
look for any last names beginning with "bertolin,"
character for character, but ending with anything -any letter or letters.
The Results List has doubled in size with this search; all
entries begin with B-E-R-T-O-L-I-N, but they end with a
variety of characters.
D
The search to the right is the same as (C), except without
the wildcard (*) character; instead of eight possible
matches, IMPACT View has now found too many matches to
manage. So what's the difference?
With the wildcard character, IMPACT View had to match
every single letter entered in the search, with variations possible only in place of the wildcard.
Without the wildcard character, IMPACT View considers the information entered, strips away the
vowels, and uses a mathematical algorithm to compare the sequence of consonants in the search
with sequences of consonants in the database. The algorithm does not require letter-for-letter
matches; consonants with similar sounds are considered equivalent in this kind of "Similar to"
search.
E
The addition of a
first initial narrows
(D) enough to
produce a Results
List of 28 entries. To be listed, a record must include a
last name "Similar to" B-R-T-L-N (the sequence of
consonants entered), and a first name beginning with
"E."
Search for: Individual
Page 14 of 46
User's Manual
w "Find a Person by Name," cont'd.: Additional Search Criteria
In addition to the various Exact and Similar to search options for name information, you can
further define your record search by
A.
B.
C.
D.
E.
Limiting your search to Alumni;
Limiting your search to Presidents Club Members;
Excluding deceased individuals;
Including address information; and/or
Including OSU degree information
These additional criteria can be used along with a name in any combination; records will
have to meet all criteria entered in order for IMPACT View to include them in a Results List.
A
When this box is checked, individuals listed in the Results
must be alumni of The Ohio State University.
B
When this box is checked, individuals listed in the Results
must be current members of a Presidents Club.
C
When this box is checked, IMPACT View will exclude deceased individuals from
your Search Result List. This box is unchecked by default.
D
Any or all of the address fields may be used in a single search:
•
City
As in the First and Middle name fields, you can enter either a
full or partial City name -- without a wildcard character.
•
State
A two-character state abbreviation can be selected from the
pull-down menu.
•
ZIP
Enter a 5-digit ZIP code.
•
Geo Code
A Geo Code is assigned to each address to identify
geographical areas; the 3-digit code can be entered to
help narrow your search. (If you're not sure what
code to enter, click on the field label to open a Help
window displaying the Geo Code Mapping Table.)
E
Use the checkboxes to
indicate in which
address(es) your criteria
can appear.
By default, IMPACT View
will search in all address
types; at least one of the
Search in boxes must be
checked in order for the
search to run.
Either specify the 4-digit year in
which an individual earned a degree
at OSU and/or select a College from
the pull-down menu.
Once you've entered your criteria, click the Search button to run the search.
Search for: Individual
Page 15 of 46
User's Manual
w "Find a Person by Name," cont'd.: The Search Result List
If IMPACT View locates only one possible match for the name (and additional) criteria that
you entered, the default starting screen for that matching record will automatically be
displayed in the data frame.
When IMPACT View locates more than one possible match in a name search, however, a
Search Result List will display:
F
A
B
C
D
E
A. The ID is the unique 8-digit identifier assigned to the specific individual listed. Click
on the ID number to select a record to view; the default starting screen for the
selected individual will display.
B. Entries in the Search Result are listed in alphabetical order, descending, by last
name. Each individual's formal name displays in the Name field. Alternate
(preferred, historical) name information is stored in the database and is accessed
during a search, but does not display in the Search Result List. (You can select a
record and access the Name History screen to review alternate name information.)
The initial view of the Search Result List displays
C. the first street line and
D. the city, state, and ZIP Code
of the individual's home address. Additional (business, alternate) address
information may be used in a search, and displays on the expanded Results List view
(see below).
E. The initial view of the Search Result list displays the month and year in which the
individual earned his/her first degree from OSU. All OSU degree information may be
used in a search, but 2nd, 3rd, 4th, etc. degrees display only on the expanded Results
List (see below). If an individual listed is not an OSU alumnus, the field will be blank.
F. The Search Result List has two views: a brief view, which provides a quick summary,
and an expanded view, which provides some additional detail to aid in record
selection. Click the View … button to switch views.
Search for: Individual
Page 16 of 46
User's Manual
w "Find a Person by Name," The Search Result List, cont'd.
The expanded Results List displays all of the information on the brief view, with the addition
of
G. the individual's Spouse's formal name;
H. the Home, Business, and Additional addresses, with Geo Codes;
I.
the Current Presidents Club membership, if applicable; and
J. a list of all degrees earned at OSU, including degree code, date, and academic
major.
F
(see above)
G
H
I
J
The Search Result List is designed to display up to 15 entries per page, in both brief and
expanded views.
K. A count of possible record matches will display at the bottom of each Search Result
List page.
K
L
M
N
O
In the event that your search criteria have more than 15 possible matches, additional
navigation buttons will appear at the bottom of each Search Result List page:
L. The << button will display the very first page of entries;
M. The >> button will display the very last page of entries;
N. The < button will display the previous 15 entries; and
O. The > button will display the next 15 entries.
Search for: Individual
Page 17 of 46
User's Manual
e Search criteria can be changed even after a search has been run by clicking the Revise
Search option on the menu. The option will only appear on the menu after a search has
been conducted.
The Search for: Individual screen will retain the
specific values you entered. Add to or change
the existing criteria, or click the screen's Clear
button to refresh the screen and start over.
e
r
r A specific record is selected from the Results List by clicking on the ID number; after the
selected record displays, another option appears on the menu: Return to Search
Result.
A. A green check-mark displays to the left of the ID number for the
record that was selected; each time you select a different record
and subsequently return to the Search Result List, another
check-mark will appear.
A
The Search Result List will remain available until you either start a
new record search or log out (whichever comes first).
Individual Record Search Suggestions
¾
Start with an Exact search using the full last name and first name initial, and
progressively broaden your search using various partial name and Similar to options as
necessary if an Exact search doesn't yield the desired results.
•
•
•
•
¾
Remember that nicknames are often not shown on the system. "Doug Plummer" may only appear in the
database as "Douglas Plummer."
Remember that the Search Result List only displays formal name information, although IMPACT View
uses preferred and historical names in searches. Once a record has been selected, additional name data
can be reviewed on the Name History Detail screen.
In general, married women's maiden names are entered in the middle name field (and married names in
the last name field) of the database. For this reason, there are often discrepancies in married women's
names between source documents and the database, particularly in the middle name field.
Don't assume that because one member of a couple is not in records that the other is not as well. Try a
name search for both names.
Use additional search criteria to help narrow a common-name search.
•
•
•
Consider both City and ZIP Code information when using addresses to narrow a search. An address with
a ZIP Code of 43221 may indicate "Upper Arlington" on a source document while the database displays
"Columbus."
If you do not know an individual's exact graduation date, consider his/her age when reviewing the
Results List to help eliminate unlikely matches.
If you've located a good possible match, but the address on your source doesn't match that on the
database, look at the phone number. If the phone numbers match, the individual has likely just moved
within the same area and only needs an address update.
Search for: Individual
Page 18 of 46
User's Manual
LOCATING DATA IN IMPACT VIEW - ORGANIZATION SEARCH
IMPACT View allows you to
1. go directly to an organization's record using the specific 8-digit ID number assigned by
A/DIS;
2. generate a list of possible matches for an organization by using all or some of the name
(and other qualifying criteria);
3. return to the search screen after running a search in order to revise your criteria; and
4. return to a results list after viewing a possible match in order to select a different
record.
q
w
q If you know the ID number of the organization whose record you're trying to locate, it
may be entered in the space to the right of Organization ID in the first section, "Find an
Organization by ID Number," of the Search for: Organization screen. The full 8-digit
number must be entered. (The banner frame's Search for: Organization and ID entry
box may also be used to accomplish the same thing; see "Using the Banner Frame,"
above.)
Click the Search button (or press ENTER) to perform the search. When IMPACT View
successfully locates a record using the ID number, the default starting screen will display
in the data frame. For an organization, this starting point is initially set to be the
General Overview screen:
You can use the Default Options screen to choose a different screen to display first when
reviewing an organization's record. (See "Customizing IMPACT View," below, for
additional information and instructions.)
Search for: Organization
Page 19 of 46
User's Manual
w If you do not know the ID number of the organization whose record you're trying to
locate, use IMPACT View's "Find an Organization by Name" section to generate a list of
possible record matches.
Enter the text to search for in the space to the right of Organization Name.
Do not use wildcard characters; IMPACT View will apply the following rules,
effectively assuming that the text you enter could appear just about anywhere in the
organization's full name:
°
°
°
The text you enter must appear, character for character, in the organization's name;
The text you enter must appear either at the very beginning of the first word of the
name, or at the beginning of an intermediate word (i.e., preceded by a space)
elsewhere in the name; and
the organization name may include additional characters after those entered in the
search.
For example, this search for "houghton" returns 4 possible matches which present the
characters H-O-U-G-H-T-O-N
in three different positions
within the organization name:
A
A. "HOUGHTON" appears as the last word in
the name, at the very end and preceded
by a space.
B
B. "HOUGHTON" appears as the very first
word in the name.
C
C. "HOUGHTON" appears as the second word
in the name, in the middle and preceded
by a space.
A more inclusive search takes advantage of IMPACT View's implied wildcard at the end
of the search as entered:
D. Searching for H-O-U-G-H returns the
D
same four records as above, and also
includes one additional record -HOUGHTEN; all meet the criteria which tell
IMPACT View, in effect, "Find any records
containing the characters H-O-U-G-H followed by
anything, so long as 'HOUGH' appears at the
beginning of a word."
Search for: Organization
Page 20 of 46
User's Manual
w "Find an Organization by Name," cont'd.: Additional Search Criteria
In addition to the text you enter in the Organization Name field, your search can be further
defined by including location information:
A
B
C
D
These additional criteria can be used along with a name in any combination; records will
have to meet all criteria entered in order for IMPACT View to include them in a Result List.
A. A full or partial City name may be entered.
B. The two-character State abbreviation can be selected using the pull-down menu.
C. A five-digit ZIP code can be included.
D. A Geo Code is assigned to each address to identify geographical areas; the 3-digit
code can be entered to help narrow your search. (If you're not sure what code to
enter, click on the field label to open a Help window displaying the Geo Code
Mapping Table.)
Search for: Organization
Page 21 of 46
User's Manual
w "Find an Organization by Name," cont'd.: The Search Result List
If IMPACT View locates only one possible match for the name (and additional) criteria that
you entered, the default starting screen for that matching record will automatically be
displayed in the data frame.
When IMPACT View locates more than one possible match in a name search, however, a
Search Result List will display:
F
A
B
C
D
E
A. The ID number is the unique 8-digit identifier assigned to the specific organization
listed. Click on the ID number to select a record to view; the default starting screen
for the selected individual will display.
B. Entries in the Search Result are listed in alphabetical order, descending, by
organization Name. Each organization's current name displays in the Name field;
alternate (also known as, historical, "sort") name information is stored in the
database and is accessed during a search, but does not display in the Search Result
List. (You can select a record and access the Name History screen to review
alternate name information.)
The initial view of the Search Result List displays the organization's
C. Street 1 and Street 2 and
D. City, State, and ZIP code.
E. Each organization's Relation Type code is also listed on the initial Search Result List
view; the Relation Type code is displayed along with its mapped-out value on the
Result List's expanded view (see below).
F. The Search Result List has two views: a brief view, which provides a quick summary,
and an expanded view, which provides some additional detail to aid in record
selection. Click the View … button to switch views.
Search for: Organization
Page 22 of 46
User's Manual
w "Find an Organization by Name," The Search Result List, cont'd.
The expanded Result List displays all of the information on the brief view, with the addition
of
G. the organization's current Presidents Club membership, if applicable; and
H. the number of the organization's Employees on Database.
F
(see P 21)
G
H
The Search Result List is designed to display up to 15 entries per page, in both brief and
expanded views.
I.
A count of possible record matches will display at the bottom of each Search Result
List page.
I
J
K
L
M
In the event that your search criteria have more than 15 possible matches, additional
navigation buttons will appear at the bottom of each Search Result List page:
J. The << button will display the very first page of entries;
K. The >> button will display the very last page of entries;
L. The < button will display the previous 15 entries; and
M. The > button will display the next 15 entries.
Search for: Organization
Page 23 of 46
User's Manual
e Search criteria can be changed even after a search has been run by clicking the Revise
Search option on the menu. The option will only appear on the menu after a search has
been conducted.
The Search for: Organization screen will retain
the specific values you entered. Add to or
change the existing criteria, or click the screen's
Clear button to refresh the screen and start
over.
e
r
r A specific record is selected from the Results List by clicking on the ID number; after the
selected record displays, another option appears on the menu: Return to Search
Result.
A. A green check-mark displays to the left of the ID number for the record
that was selected; each time you select a different record and
subsequently return to the Search Result List, another check-mark will
appear.
A
The Search Result List will remain available until you either start a new
record search or log out (whichever comes first).
Search for: Organization
Page 24 of 46
User's Manual
LOCATING DATA IN IMPACT VIEW-OSU PRESIDENT'S EVENT SEARCH
IMPACT View allows you to
1. go directly to an OSU President's Event record using the specific 4-digit ID number
assigned by the Events Tracking Office;
2. generate a list of possible matches for an Event by using more descriptive criteria;
3. view a list of all OSU President's Events, independent of any specific search criteria;
4. return to the search screen after running a search in order to revise your criteria; and
5. return to a results list after viewing a possible match in order to select a different
record.
q
w
e
q If you know the 4-digit ID number of the Event you're trying to locate, it may be entered
in the space to the right of Event Number in the first section, "Find an Event by ID
Number," of the Search for: OSU President's Event screen. (The banner frame's Search
for: Event and ID entry box may also be used to accomplish the same thing; see "Using
the Banner Frame," above.)
Search for: OSU President's Event
Page 25 of 46
User's Manual
Click the Search button (or press ENTER) to perform the search. When IMPACT View
successfully locates a record using the ID number, the default starting screen will display
in the data frame. For an Event, this starting point is initially set to be the General
Overview screen:
You can use the Default Options to choose a different screen to display first when
reviewing an OSU President's Event's record. (See "Customizing IMPACT View," below,
for additional information and instructions.)
Search for: OSU President's Event
Page 26 of 46
User's Manual
w If you do not know the exact 4-digit ID number of the OSU President's Event that you're
trying to locate, use IMPACT View's "Find an Event by Criteria" section to generate a list
of possible record matches. Up to six different types of criteria can be used:
A
B
C
D
E
F
A. The Event Date pull-down menu allows you to locate Events either on, before or after a
specific date, or between a date range. After you select the desired option using the
pull-down, the screen will refresh with an
appropriate data-entry space -- one box to allow
a specific date or two to allow the beginning
and ending dates in a range. Date values must be entered in MM/DD/YYYY format.
B. The Event Type pull-down menu allows you search for a
specific kind of Event. It provides, in alphabetical order by
code, a list of all possible Event types stored in the database;
scroll through the list and click on the desired Event Type to
use it in a search. Only one Event Type may be selected in a
given search.
C. The Event Location pull-down menu allows you to search
for an Event according to where it was held. The menu
provides a list of all possible Event Locations stored in the
database. Listed in alphabetical order by code, a single
Location can be included in your search by clicking on it.
D. The Event Sponsor pull-down menu allows you to locate an
Event according to the office or University agency
responsible for backing it. Click to select a specific Sponsor
from the list, which displays all Sponsors in alphabetical
order by code.
E. The Event Host pull-down menu allows you to find an Event
by indicating its originator or purpose. The list displays all
Hosts in alphabetical order by code; include a specific Host in
your search by clicking on it.
F. The Individual Invitee ID box allows you to locate an Event by specifying an individual
invited to it. An individual's ID number may be entered either in full (all 8 digits) or with
any leading zeros dropped (e.g., entering 564863 will work as well as 00564863).
Once you've entered your criteria, click the Search button to run the search.
If IMPACT View locates more than one possible match, you'll be taken to the Search Result
List (see below).
Search for: OSU President's Event
Page 27 of 46
User's Manual
e IMPACT View will also allow you to view a full list of all OSU President's Events on the
database. Just click the "View All Events" button at the bottom of the Search for: OSU
President's Event screen, and you'll be directed immediately to a full Search Result List.
F
A
B
C
D
E
A. The Event ID is the unique 4-digit identifier assigned to the specific Event listed.
Click on the ID number to select a record to view; the default starting screen for the
selected Event will display.
B. Entries in the Search Result are listed by Event Date in descending order (most
recent at top).
The initial view of the Search Result List displays
C. the Type
D. the Location and
E. the Sponsor
of each possible Event match.
F. The Search Result List has two views: a brief view, which provides a quick summary,
and an expanded view, which provides additional detail to aid in record selection.
Click the View … button to switch views.
Search for: OSU President's Event
Page 28 of 46
User's Manual
The Search Result List, cont'd.
The expanded Results List displays all of the information on the brief view, with the addition
of
G. The first line of the Comments which help to describe the Event;
H. The number of individuals who were invited to the Event;
I.
The number of individuals who attended the Event; and
J. The Event's Host.
F
(see above)
G
H
I
J
The Search Result List is designed to display up to 15 entries per page, in both brief and
expanded views.
K. A count of possible record matches will display at the bottom of each Search Result
List page.
K
L
M
N
O
In the event that your search criteria have more than 15 possible matches, additional
navigation buttons will appear at the bottom of each Search Result List page:
L. The << button will display the very first page of entries;
M. The >> button will display the very last page of entries;
N. The < button will display the previous 15 entries; and
O. The > button will display the next 15 entries.
Search for: OSU President's Event
Page 29 of 46
User's Manual
r Search criteria can be changed even after a search has been run by clicking the Revise
Search option on the menu. The option will only appear on the menu after a search has
been conducted.
The Search for: OSU President's Event screen
will retain the specific values you entered. Add
to or change the existing criteria, or click the
screen's Clear button to refresh the screen and
start over.
r
t
t A specific record is selected from the Results List by clicking on the ID number; after the
selected record displays, another option appears on the menu: Return to Search
Result.
A. A green check-mark displays to the left of the ID number for the
record that was selected; each time you select a different record
and subsequently return to the Search Result List, another checkmark will appear.
A
The Search Result List will remain available until you either start a new
record search or log out (whichever comes first).
Search for: OSU President's Event
Page 30 of 46
User's Manual
LOCATING DATA IN IMPACT VIEW - PROJECT FUND SEARCH
IMPACT View allows you to
1. go directly to a Project Fund's record using the specific 6-digit ID number assigned by
Gift Processing;
2. generate a list of possible matches for a Project Fund by using full or partial text, or
descriptive criteria;
3. return to the search screen after running a search in order to revise your criteria; and
4. return to a results list after viewing a possible match in order to select a different
record.
q
w
q If you know the 6-digit ID number of the Project Fund you're trying to locate, it may be
entered in the space to the right of Project Fund in the first section, "Find a Project Fund
by ID Number," of the Search for: Project Fund screen. (The banner frame's Search for:
Project and ID entry box may also be used to accomplish the same thing; see "Using the
Banner Frame," above.)
Click the Search button (or press ENTER) to perform the search. When IMPACT View
successfully locates a record using the ID number, the default starting screen will display
in the data frame. For a Project Fund, this starting point is initially set to be the General
Overview screen:
You can use the Default Options to choose a different screen to display first when
reviewing a Project Fund's record. (See "Customizing IMPACT View," below, for
additional information and instructions.)
Search for: Project Fund
Page 31 of 46
User's Manual
w If you do not know the exact 6-digit ID number of the Project Fund you're looking for,
IMPACT View allows you to search using some of all of the words in either the name
and/or description of the Project Fund.
B
C
A
D
A. Enter all or part of the text to search for in the space to the right of Project Fund
Text.
Do not use wildcard characters; IMPACT View will assume that the text you enter
could appear anywhere in…
B. the (short) Project Name (a field that stores up to 30 characters of information)
and/or
C. the Long Project Name (fields that store up to a total of 240 characters of
information) and/or
D. the Project Description (a much larger field used to provide additional information
about a Project Fund, often concerning stipulations for the Fund's use, or background
concerning the fund's creation).
In the following examples, a search is conducted
for a Project Fund using the word "asthma":
E
E. With only the Project Name box
checked, IMPACT View returns no
possible matches.
F. When the Long
Project Name box
is checked,
IMPACT View
finds one match
and displays the
default starting
screen for the
record.
F
G. Checking the Project
Description produces a much
more inclusive Result List.
IMPACT View locates 4
additional Project Funds
which have something to do
with asthma without
containing the word in either
their short or Long Project
names. NOTE: The Description does not display in the Search Result List.
Search for: Project Fund
G
Page 32 of 46
User's Manual
w "Find a Project Fund by Criteria," cont'd.: Descriptive Categories
The following five kinds of descriptive information may also be used in addition to -- or even
in place of -- text to locate a specific Project Fund:
A
B
C
D
E
A. Search for a fund in a specific Department Organization by first selecting "Equal to"
from the Department Org pull-down menu and then entering the Department
Organization number in the entry box that appears. (You can also search for funds
within a range of Department Organizations by first selecting "Between" from the
pull-down and entering the range's lower number in the left box and the higher
number in the right.)
The field label, "Department Org," is a link to the Department Organization Mapping
Table, which can be accessed in order to locate a number or range of numbers to
enter.
B. Search for a fund within a specific Home Department by entering the Home
Department number in the box to the right of "Home Department." The field label is
a link to the Home Department Mapping Table, which can be accessed in order to
locate a specific number to enter.
C. Search for an endowed or a current use fund using the Project Fund Status pull-down
menu. When you opt to search for
endowed funds, a second pull-down
menu will appear, allowing you to
find a fund whose endowment is
complete or is still pending.
D. Search for a fund according to its
designated purpose using the Project
Fund Purpose pull-down menu. Options
are listed in alphabetical order by code.
E. Search for a fund operating from either within the Ohio State University or within the
Ohio State University Foundation using the Foundation/University pull-down menu.
Once you've entered your criteria, click the Search button to run the search.
Search for: Project Fund
Page 33 of 46
User's Manual
w "Find a Project Fund by Criteria," cont'd.: The Search Result List
If IMPACT View locates only one possible match using the text (and/or descriptive criteria)
criteria that you entered, the default starting screen for that matching record will
automatically be displayed in the data frame.
When IMPACT View locates more than one possible match in a name search, however, a
Search Result List will display:
F
A
B
C
D
E
A. The Project Fund ID is the unique 6-digit identifier assigned to the specific Project
Fund listed. Click on the ID number to select a record to view; the default starting
screen for the selected Project Fund will display.
B. Entries in the Search Result are listed in alphabetical order by Project Name.
The initial view of the Search Result List displays
C. the Long Project Name
D. the Dept Org and
E. the Home Dept
of each possible Project Fund match.
F. The Search Result List has two views: a brief view, which provides a quick summary,
and an expanded view, which provides additional detail to aid in record selection.
Click the View … button to switch views.
Search for: Project Fund
Page 34 of 46
User's Manual
w
"Find a Project Fund by Criteria," The Search Result List, cont'd.
The expanded Results List displays all of the information on the brief view, with the addition
of
G. the Project Fund's Status;
H. the Project Fund's Purpose; and
I.
the Project Fund's Foundation / University indicator.
F
(see above)
G
H
I
The Search Result List is designed to display up to 15 entries per page, in both brief and
expanded views.
J. A count of possible record matches will display at the bottom of each Search Result
List page.
J
K
L
M
N
In the event that your search criteria have more than 15 possible matches, additional
navigation buttons will appear at the bottom of each Search Result List page:
K. The << button will display the very first page of entries;
L. The >> button will display the very last page of entries;
M. The < button will display the previous 15 entries; and
N. The > button will display the next 15 entries.
Search for: Project Fund
Page 35 of 46
User's Manual
e Search criteria can be changed even after a search has been run by clicking the Revise
Search option on the menu. The option will only appear on the menu after a search has
been conducted.
The Search for: Project Fund screen will retain
the specific values you entered. Add to or
change the existing criteria, or click the screen's
Clear button to refresh the screen and start
over.
e
r
r A specific record is selected from the Results List by clicking on the ID number; after the
selected record displays, another option appears on the menu: Return to Search
Result.
A. A green check-mark displays to the left of the ID number for the
record that was selected; each time you select a different record and
subsequently return to the Search Result List, another check-mark
will appear.
A
The Search Result List will remain available until you either start a new
record search or log out (whichever comes first).
Search for: Project Fund
Page 36 of 46
User's Manual
PRINTING DATA FROM IMPACT VIEW - SINGLE SCREENS
Centered at the bottom of each screen in IMPACT View is a Print Preview button which
allows you to generate a specially-formatted printout of that specific screen (see also "Using
the Data Frame," above).
A
q
B
C
w
q When you click the
Print Preview button…
w …a separate browser
window opens and
displays the screen.
The Print Preview screen
includes
D
A. the current record
ID and name in the
window's title bar,
which will print as a
page header;
B. the full "Current Record" indicator information, which will print at the top of the first
page (if the screen requires more than one page to print); and
C. a Print button, which will send the information to your printer.
NOTE: Using IMPACT View's Print button produces a
print-out that does not include the button icons; if
you use the browser's File menu option instead, your
resulting print-out will include the button icons.
D. Once you "OK" (or Cancel) the printout, click
Close to close the Print Preview window and
return to IMPACT View's main browser window.
Printing Data from IMPACT View
Page 37 of 46
User's Manual
PRINTING DATA FROM IMPACT VIEW - FULL RECORD
In addition to the ability to print out single data screens one by one, IMPACT View also
allows you to print out a full record, which can include as few or as many screens as you'd
like to have at once (only screens accessible from the menu can be included in a record
print; see "Customizing IMPACT View," below, for additional information).
Click on the Print Record menu link. A separate browser window will open:
q
w
e
A
B
Like the single screen Print Preview window, the full record Preview window also includes
q the current record ID and name in the window's title bar, which will print as a page
header; and
w the full "Current Record" indicator information, which will print at the top of the first
page (if the screens marked for inclusion require more than one page to print).
e Instead of just one screen, however, the full record print will display all screens selected
in the order in which they appear from the menu. A thin horizontal line is included to
separate the screens. (In this example, the Name History Detail, Demographics, and
Pledge Summary - Lifetime screens have been included in the Record Print Profile.)
At the very bottom of the Preview window, Close and Print buttons appear, just as in the
single screen Print Preview option (see above).
NOTE: If you have not accessed the Default Options screen to establish your Record Print
Profile(s), the following message will display when the Print Record menu option is clicked:
No user print default settings where found. To use Print Record, the user options
for print record must be set.
Printing Data from IMPACT View
Page 38 of 46
User's Manual
PRINTING HINTS
A number of things can affect the way your print-outs from IMPACT View look. Some things
to keep in mind:
q Your browser's text size setting will affect the text size in your print-outs as well.
(See
"Adjusting the Text Size," above, for more information.)
w The size of the banner and menu frames will not affect the size of your print-outs.
(See "Adjusting the Frame Sizes," above, for more information.)
e Consider changing the page orientation to minimize either the number of pages needed
to print or the text wrapping.
Portrait orientation provides more vertical space for information, so fewer sheets of
paper might be needed, but you may see more text wrapping (depending on how
much data appears across the screen).
° Landscape orientation provides more horizontal space for information, so less text
will end up wrapping from side to side, although you may end up needing more
sheets of paper to accommodate a longer screen.
°
r Alternate line shading in list-formatted screens does not always print by default:
To ensure that the shading will appear, you'll need to adjust a setting in Internet
Explorer:
° Click on the TOOLS menu and click on Internet Options.
° Click on the Advanced tab.
° Scroll down through the list of Advanced options to "Printing"
° Check the Print background colors and images box
NOTE: Printing the shading will use more printer ink/toner.
t Many list-formatted screens in IMPACT View are paginated so that only a set number of
entries are viewable at a single time. When you print a paginated screen, only the page
currently displayed in the data frame will be sent to the printer; if you want to print an
entire paginated list, you'll need to view and print each page separately.
y Links and buttons will display in IMPACT View's Print Preview window, but they are not
functional.
Printing Data from IMPACT View
Page 39 of 46
User's Manual
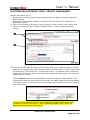
CUSTOMIZING IMPACT VIEW
Click on the User Options menu link to access the Set IMPACT Default Options screen.
IMPACT View allows you to customize four things:
q Menu Options
A
B
IMPACT View's menu hierarchies can either be expanded all the time or only expanded
when currently being displayed in the data frame.
When screens are loading, a dialog box can appear letting you
know data is loading. When set to Yes, users will see this box
when data is loading.
w The first screen you see when you log in to IMPACT View can be set to any one of the
Search for: screens that you're authorized to view.
e After you locate a specific record, the data display can be set to begin with any screen
that you're authorized to view.
A
B
q
A
B
w
e
Customizing IMPACT View
Page 40 of 46
User's Manual
r You can choose which of the screens will be included when you print a full record of data
from IMPACT View.
A. The Save All Changes and Close button at the very top and very bottom of the
window will allow you to save any changes made in any section of the Default Options
window; the Default Options window will close once the save is complete.
B. The Clear All Changes and Close button will allow you to close the Default Options
window without saving any changes you may have made in any section.
C. Each Record Print Profile section's Save All Changes button saves changes made in
any section of the Default Options window. The window will remain open once the save
is complete.
r
C
A
B
Customizing IMPACT View
Page 41 of 46
User's Manual
q
By default, a menu group's hierarchy will only be expanded
when a screen in that group is being viewed in the data frame.
Make sure that "No" is selected from the Expand all menu items
pull-down menu to keep the default setting; select "Yes" in order
to have all menu group hierarchies expanded all the time. (See "Using the Menu
Frame," above, for additional information.)
w When you first log in to IMPACT View, the Search for: Individual screen displays in the
data frame. This initial screen display can be set to any of the Search for: screens which
you're authorized to use:
Search for: Individual
Search for: Organization
Search for: Event
Search for: Project Fund
NOTE: If you're not authorized to access a specific kind of record, the corresponding
Search for: screen will not be listed here.
e By default, the first screen IMPACT View
will display in the data frame once a
record's been located is the General
Overview. Any screen
available from the menu
that you're authorized to
view can be set as the first
screen loaded when a record is accessed,
however.
Each of the record types that you're
authorized to view can have their own
starting points; if you're not authorized
to view a specific screen or kind of
record, it will not be available here.
r
IMPACT View's Record Print Profile doesn't include any screens by default. Any screen
available from the menu that you're authorized to view can be included in a record print,
however. (See "Printing Data from IMPACT View," above, for more information.)
A B
A B
A, B
Each record type that
you're authorized to view
has its own Record Print
Profile, and each Record
Print Profile section lists
the screens available on
the menu. Check a box to
the left of the screen name
to include it in a record
print; uncheck a box to
exclude it.
Use the Select All/Clear All buttons to quickly include or exclude all listed screens.
Customizing IMPACT View
Page 42 of 46
User's Manual
DISPLAYING MAPPING TABLES IN IMPACT VIEW
Much of the data displayed in IMPACT View has been stored in the database using
standardized codes; a number of Mapping Tables exist to provide full definitions of each
coded value. As a general rule, IMPACT View screens display mapped-out values along with
their codes.
IMPACT View also allows you to review the Mapping Tables independent of any specific data
display screen. Click on the Mapping Tables menu link to access an index of all of the
available Mapping Tables.
q
q The IMPACT Mapping Tables index
e
w The Tables are provided in
w
e An alphabetical shortcut key
list opens in a new browser
window.
alphabetical order, in a continuous,
single-page scrolling list.
appears at the top of the window;
click on a letter to advance to
Table Names starting with that
letter in the list.
r
r Click on a Mapping Table Name to
display that Table's codes and
descriptions.
A. Each individual Mapping Table
display includes a brief
description of its purpose.
A
B
B
C
NOTE: Print Mapping Tables with caution. Mapping
Tables are not paginated, and so the entire list will be
sent to the printer when you click the Print button.
B. By default, the Table's entries
will be listed in ascending
order by Code, but the Sort
by … button can be used to
re-order by Description (and
then vice versa).
C. Buttons at the bottom of both
the Mapping Table index and
display will allow you to
° close the window or
° print the list.
When displaying a specific
Table, you'll also have the
option of returning to the
index to select another Table
to view.
Displaying Mapping Tables
Page 43 of 46
User's Manual
USING IMPACT VIEW'S ON-LINE HELP: SCREEN-LEVEL HELP
General definitions for all of IMPACT View's screens and fields are available on-line.
q Click on the Help icon to the left of a screen's
q
name to access the on-line Help text for that
screen.
w On-line Help displays in a separate browser
window, and each screen-level Help window
includes the same features:
A
E
w
A. The name of the screen will
display at the top of the Help
window.
B
B. A description of the screen's
content will be provided,
including a summary of how the
screen may be accessed and
what, if any links to other
screens it provides.
C. A list of all of the fields
displayed on the screen will
appear below the screen's
definition. Click on a field link to
view the definition of that field.
C
D. Many screens in IMPACT View
are part of a larger group of
screens; any related screens will
also be listed in the on-line Help
window. Click on a screen name
to view the Help for that screen.
E.
Questions, comments,
corrections, and/or requests can
be sent to [email protected];
your message will be forwarded
to the Help Desk.
F.
Information about the
programming code required to
produce the screen displays in
the lower right corner of the
Help window. (If you need to
report a problem with a screen,
this information will help the
technical support team find and
fix the error.)
D
E
F
G
G. Buttons at the bottom of the
screen-level Help display allow
you to either close the window
or print the contents.
IMPACT View's On-Line Help
Page 44 of 46
User's Manual
USING IMPACT VIEW'S ON-LINE HELP: FIELD-LEVEL HELP
When you click on a field label link in the screen-level on-line Help window, that field's
definition will display. Field-level Help windows share the following features:
A. The field name displays at the top of the window (and above the definition).
B. A brief paragraph defining or describing the field displays in the body of the window.
C. Questions, comments, corrections, and/or requests can be sent to
[email protected]; your message will be forwarded to the Help Desk
D. Buttons at the bottom of the field-level Help display allow you to close the window,
print its contents, or just go back to the screen-level Help window.
C
A
B
C
D
Occasionally, field-level Help information is available directly from a screen displayed in
IMPACT View's data frame. In such instances, the display field label serves as the link:
E
F
E. Data links take you to other data screens (displayed in IMPACT View's data frame).
F. Label links take you to field-level Help screens (displayed in a separate browser
window).
IMPACT View's On-Line Help
Page 45 of 46
User's Manual
Page intentionally left blank
IMPACT View's On-Line Help
Page 46 of 46