1
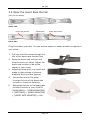
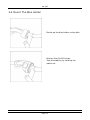
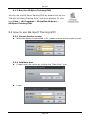
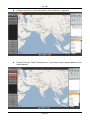
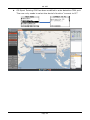
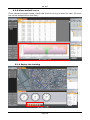
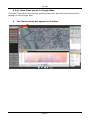
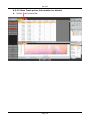
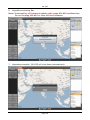
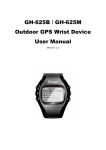
GH-625B / GH-625M
Outdoor GPS Wrist Device
User Manual
Version 0.3
GH-625
Table of Content
1. Introduction and Features............................................................................................ 4
1.1 Introduction ....................................................................................................................................... 4
1.2 Features............................................................................................................................................ 4
2. Specifications................................................................................................................ 5
3. Hardware Overview ...................................................................................................... 7
3.1 Accessories....................................................................................................................................... 7
3.2 Viewing Buttons ................................................................................................................................ 8
3.3 Antenna Introduction......................................................................................................................... 9
3.4 Battery Introduction........................................................................................................................... 9
3.5 Wear the Heart Rate Monitor.......................................................................................................... 12
3.6 Mount The Bike Holder ................................................................................................................... 13
4. Getting Started ............................................................................................................ 14
4.1 Starting the GH-625 ........................................................................................................................ 14
4.2 Change the mode ........................................................................................................................... 15
4.3 Menu Structure - Main Menu .......................................................................................................... 17
5. Activity ......................................................................................................................... 19
5.1 Activity Info...................................................................................................................................... 19
5.2 Activity Setting ................................................................................................................................ 20
5.3 Delete All (Training data) ................................................................................................................ 23
5.4 Memory Capacity ............................................................................................................................ 24
6.1 Navigation ................................................................................................................. 25
6.1 Add / Remove Map Mode ............................................................................................................... 25
6.2 Routes............................................................................................................................................. 25
6.3 Save a Waypoint............................................................................................................................. 27
6.4 Find Waypoint ................................................................................................................................. 27
6.5 Return to start ( Stop Goto)............................................................................................................. 29
6.6 GPS INFO....................................................................................................................................... 29
7. Connect to PC ............................................................................................................. 30
7.1 Connect to PC ................................................................................................................................ 30
8. CONFIGURATION........................................................................................................ 31
8.1 User Setting .................................................................................................................................... 31
8.2 Setup GPS ...................................................................................................................................... 35
8.3 Heart Rate Setting .......................................................................................................................... 36
8.4 Factory Reset.................................................................................................................................. 36
8.5 System Upgrade ............................................................................................................................. 37
8.6 About Product(GH-625) .................................................................................................................. 37
Page 2
GH-625
9.GS-Sport Training GYM ............................................................................................... 38
9.1 Install USB driver ............................................................................................................................ 38
9.2 How to use GS-Sport Training GYM............................................................................................... 40
10. Maintenance .............................................................................................................. 58
10.1 Take care of you GH-625.............................................................................................................. 58
11.Glossary...................................................................................................................... 59
11. Troubleshooting & FAQ ............................................................................................ 60
Page 3
GH-625
Thank you for purchasing GS-Sport GH-625. We sincerely hope you to enjoy
using this high technology GPS device. For fully understand the functions and
features of GH-625, please read the user manual before you get started.
1. Introduction and Features
1.1 Introduction
GS-Sport GH-625 is a stylish, fully-sealed, waterproof, wrist type GPS device with
the features of “Tracking”, “Lap”, “GPS positioning”, “Time alert”, “Heart rate
monitor (GH-625M only)”, etc. The GPS navigation function can locate and track
points anywhere you go. GH-625 is powered by SiRF Star III high performance
chip that can fix your position even with a weak signal status. It is adopted for
people who exercise for broad kinds of outdoor sports, such as Jogging, Running,
Biking, Snow Skiing, etc. It also can be used as a GPS receiver by USB interface.
1.2 Features
z
z
z
z
z
z
z
z
z
z
z
Built-in SiRF Star III LPx high performance GPS chipset. Excellent sensitivity
for position fixing even with a weak signal status.
Built-in rechargeable high capacity lithium-ion battery.
Large LCD for easy reading.
WAAS/ ENGOS support.
IPx7 Waterproof, rigid design to avoid careless damage.
Records all history of self-training by defined date.
GH-625 series can be used as a GPS receiver with an easy setup.
The firmware of the GH-625 can be upgraded through PC.
USB auto-detection function add-in.
Support 60,000 Track-points, 100 Waypoints, 6,000 Laps.
Navigation. Tracking your route as crumb method; marking and saving your
tracking points by a special algorithm; finding specified locations.
Page 4
GH-625
2. Specifications
Electrical and Mechanical Parameters General
Item
GH-625B
GH-625M
Number of Waypoints
100
Tracking point
60000
Laps
6000
Display Size
24.9 x 39.88 (H x W in mm.)
Display type
Black & White LCD
Pixels (H x W)
80 x 120
Unit Weight
72.87g (TBD)
Waterproof Standard
IPX7
Unit Size
76.5 x 61.5 x 17.5 (L x D (Φ) x H in mm.) (TBD)
Backlit Display
Single level
Operating temperature
-10 ° to 60 ° C
Humidity
5% to 95% Non-condensing
Voltage
3.7V for a rechargeable battery, 5V for charging input.
Charging connector
DC 5V
Battery
Power Consumption
Rechargeable 750mAh Li-ion battery (For B series)
Rechargeable 625mAh Li-Polyment battery (For M series)
GPS, HBM & Backlight off
25 mA
GPS on (no fixed); HBM & Backlight off
60 mA
GPS on (3D fixed); HBM & Backlight off
58 mA
GPS (no fixed), HBM on; Backlight on
73 mA
13 hours (3D fix, GPS on; HBM & Backlight off)
10 hours (3D fix, GPS, HBM & Backlight on)
28 hours (GPS, HBM off; Backlight off)
Battery life
For B & BE type
10 hours (3D fix, GPS on; HBM & Backlight off)
8 hours (3D fix, GPS, HBM & Backlight on)
21 hours (GPS, HBM off; Backlight off)
The M & ME types
Connect to PC Interface
Probe Pin to USB interface
Charger
Mini USB 350mA, 3 hours completed
Heart Rate Monitor
NO
YES
Barometer Altimeter
NO
NO
NO
NO
Electronic Compass
Page 5
GH-625
GPS Parameters General
GPS Chipse
SiRF Star III LPx
Frequency
L1, 1575.42 MHz
C/A code
1.023 MHz chip rate
Channels
20 channel all-in-view tracking
Antenna Type
Built-in patch antenna
10 meters, 2D RMS
Position
5 meters, 2D RMS, WAAS enabled
Velocity
0.1 m/s
Time
1 us synchronized to GPS time
Default datum
WGS-84
Reacquisition
0.1 sec., average
Hot start
1 sec., average
Warm start
38 sec., average
Cold start
42 sec., average
Altitude
18,000 meters (60,000 feet) max.
Velocity
515 meters/ second (1000 knots) max.
Acceleration
Less than 4g
Jerk
20 m/sec3
Heart Rate Monitor (HRM)
GH-625M
(HRM Receiver on PCBA)
GH-625M
(HRM Chest-belt)
Operating Voltage
2.4V~3.6V
Oscillator
Crystal 32.768KHz
Standby current
<0.5 uA
Operating current
<15 uA (without external circuit)
Operating Voltage
2.4V~3.6V
Oscillator
Crystal 32.768KHz
Standby current
<0.5 uA
Operating current
<100 uA
Transmission current
<6 mA
Battery life
1300 hours
Battery type
CR2032
Transmission frequency
5 KHz
Transmission distance
>0.8 meter
Transmission signal type
Analog signal without coded
Transmission time
20 ms
Page 6
GH-625
3. Hardware Overview
3.1 Accessories
Check the contents of your GH-625 packaging. If you find any accessories are
missing or appear damaged, please contact your dealer immediately.
Heart Rate Monitor (only for
GH-625M)
GH-625
CD-ROM
USB Cable
Screwdriver
Extended watchband
Page 7
GH-625
Bike Holder
Quick Guide
3.2 Viewing Buttons
1
4
2
5
3
6
Button
Description
z
1.
2.
ESC/LAP
In Menu mode, press ESC button to escape from the current page
and go back to the previous page.
z
Press to split a lap when timer is running.
z
Press 2 seconds to turn on/off GH-625.
z
When GH-625 is on, quickly press this button will turn on/off the
Power
backlight.
z
Press and hold this button for 14 seconds to do hardware reset if
the system is halted.
3.
4, 6
PG (Page)
Up / Down
z
Switch between the screens of “Menu mode”, “Location mode”,
“Speedometer mode” and “Map mode”.
z
To move upward/downward for highlighting an item.
z
In Speedometer mode, press to switch between two views.
z
In Map mode, press to zoom in or zoom out.
Page 8
GH-625
5
OK / Enter
z
Press to enter the highlighted item.
z
Press to confirm data entry or feature selection in Menu mode.
z
In Speedometer mode, press to start/stop the timer.
3.3 Antenna Introduction
The GPS antenna is located in the
lower part of the device. Let it face
the sky for a better reception.
3.4 Battery Introduction
GH-625 operates by a built-in
Li-ion rechargeable battery. A
battery icon shown on the right top
corner of screen indicates the
remaining battery power.
z To charge the battery:
1. Connect one end of USB
cable with GH-625 unit and
the other end with the AC
Page 9
GH-625
2.
adapter or USB port on PC.
It may need about 3 hours
to fully charge the battery.
Inside the USB socket, there is
a small "bar" on the right side.
There is a "groove" on the
side of the column of USB
connector.
Page 10
GH-625
Aim the "groove" at the "bar" for
plugging in the USB connector.
Page 11
GH-625
3.5 Wear the Heart Rate Monitor
(Only For GH-625M)
Outer side
Heart rate sensor
Transmitter
Heart rate sensor
Inner side.
Cling this side to your skin. You can wet the sensor to obtain a better reception of
your pulse.
1.
Put one end of the strap through the
slot of the heart rate monitor first.
2. Wrap the heart rate monitor and
strap around your chest. Adjust the
heart rate monitor to be at the
center of your chest.
3. Adjust the strap to fit your chest and
make it tight enough to prevent
dropping while you are jogging.
4. Put another end of the strap
through the slot of the heart rate
monitor to finish the wearing.
5. Remember to turn on the heart rate
monitor function in your GH-625.
[MAIN MENU] > [CONFIGURATION]
> [SETTINGS] > [HEART MONITOR]
> [HEART RATE MONITOR] > ON.
Page 12
GH-625
3.6 Mount The Bike Holder
Buckle up the bike holder on the bike.
Bind up the GH-625 strap.
Test the stability by twisting the
watch set.
Page 13
GH-625
4. Getting Started
4.1 Starting the GH-625
Press the Power button for 2 seconds to
turn on the device. You will see the
welcome screen displayed.
Allow the GH-625 a short time to track
satellites for the first time you use it.
Take your GH-625 to the outdoor open
space with a clear view to the sky and it
will be easy to acquire satellite signal
with a few seconds. If the device can't
get 3D fixed, you can still press PG
button to exit the Locating screen.
To turn off your GH-625, press the
Power button for 2 seconds.
The battery icon indicates the
remaining battery power.
The timer icon is displayed when
you start the timer. If you stop the
timer, the icon will be flashing. If it
is auto paused, you will see the
icon flashing.
The satellite icon indicates whether
the GPS is fixed or not. If the icon is
flashing, the GPS is not fixed. If the
icon is not flashing, the GPS is
fixed. If you turn GPS off, the icon
will disappear.
Page 14
GH-625
4.2 Change the mode
Press PG button to switch between different modes
Menu Mode
Direction
compass
(If you select a
destination to go)
Map mode
(If enabled)
Location Mode
Speedometer Mode
Page 15
GH-625
In Speedometer mode, press Up or Down button to switch different views.
Information displayed in different views:
SPEED: mile/hour, km/hour.
AVG SPEED: the average speed.
PACE: the time needed for one mile or one km.
Sport Type: the sport type you set for calories calculation.
Distance: shows how far you have traveled.
Calories: shows how many calories you have burned.
Time of Day: shows date, time and week day.
Page 16
GH-625
4.3 Menu Structure - Main Menu
This diagram presents all the available menu options for your quick look up.
ACTIVITY INFO
AUTO HOLD
TIME/DIST ALERT
ALERTS
ACTIVITY
ACTIVITY SETTING
SPEED/PACE ALERT
HEART RATE ALERT
CALORIES SETTING
LAP SETTING
SET UNITS
DELETE ALL
MEMORY CAPACITY
ADD MAP MODE / REMOVE MAP MODE
CREATE NEW ROUTE
ROUTES
LIST ALL
DELETE ALL
NAVIGATION
SAVE WAYPOINT
FIND WAYPOINT
LIST WAYPOINTS
DELETE ALL
RETURN TO START
GPS INFO
CONNECT TO PC
Waiting for PC to connect…
Page 17
GH-625
TIME ZONE
SETUP TIME
DAYLIGHT SAVING
TIME FORMAT
BEEPER
SET SYSTEM
LANGUAGE
SLEEP MODE
USER SETTING
SET DISPLAY
BACKLIGHT
CONTRAST
SET PAGE 1
SET CUST PAGE
CONFIGURATION
SET PAGE 2
SET PAGE 3
SET PAGE 4
USER PROFILE
TURN PC-GPS ON/OFF
DATA RECORDING
GPS SETTING
GPS OFF
WAAS/ EGNOS
HEART RATE
CARDIO MODE
SETTING
SET TARGET ZONE
FACTORY RESET
SYSTEM UPGRADE
ABOUT PRODUCT
Page 18
GH-625
5. Activity
5.1 Activity Info
[MAIN MENU] > [ACTIVITY] > [ACTIVITY INFO]
1.
Use Up and Down button to scroll to
the item you wish to display and
press OK button. The all training
data information will display
2.
Use Up and Down to select the file
you wish to check and press OK
button, the training data
information is shown on the screen.
Information items are displayed:
z Date and Time, Show the date and the time
z Total distance of this training.
z Total calories as you have burned.
z Total time of this training.
z Average speed of this training.
z Fastest speed of this training.
z VIEW? Display this training data on the screen.
z TRACK BACK? You can track back to the BEGIN point or END point of this
training route.
z LAPS? View the LAP details on map mode.
z DELETE? You can delete this training data.
Page 19
GH-625
5.2 Activity Setting
5.2-1 Auto hold
[MAIN MENU] > [ACTIVITY > [ACTIVITY SETTING] > [AUTO HOLD]
1.
The Auto Hold function allows you to
pause the timer automatically when
you stop moving or your speed falls
below a certain value.
2.
When the timer is paused, the data
is not recorded. Thus the average
speed and calories calculation could
be more accurate.
Page 20
GH-625
5.2-2 Alerts
[MAIN MENU] > [ACTIVITY > [ACTIVITY SETTING] > [ALERTS]
1.
[TIME/DIST ALERT]
2.
[SPEED ALERT]
3.
[HEART RATE ALREAT](GH-625M only)
z
[TIME/DIST ALERT]
1. Use Up and Down button to
select the item and press OK
to modify it.
2. You can set the alarm to sound
once when the specified time
is reached, or repeat to sound
on every specified time, or
turn it off.
3. You can set the alarm to sound
once when you reached the
specified distance, or repeat to
sound on every specified
distance, or turn it off.
z
[SPEED ALERT]
1. Use Up and Down button to
select the item and press OK
to modify it.
2. You can set the alarm to sound
when your speed is above or
below a specified value.
z
[HEART RATE ALREAT]
(625M only)
1. Use Up and Down button to
select the item and press OK to
modify it.
2. You can set the alarm to sound
when your heart rate is above
or below a specified value.
Page 21
GH-625
5.2-3 Calories Setting
[MAIN MENU] > [ACTIVITY]> [ACTIVITY SETTING] > [CALORIES SETTING]
1.
[SPORT TYPE]
2.
[TRAINING LEVEL]
3.
[EXTRA WEIGHT]
z [SPORT TYPE]
Select sport type from "Walking",
"Hiking", "Running", "Biking" or "By
Time" by press UP and Down button.
z [TRAINING LEVEL]
Select training level depend on your
sport type, the default setting is
Middle.
z [EXTRA WEIGHT]
Confirm the extra weight you
carry and then input to EXTRA WEIGHT
item.
System will calculate the calories
consumption depending on the
specified sport type.
5.2-4 LAP Setting
[MAIN MENU] > [ACTIVITY > [ACTIVITY SETTING] > [LAP SETTING]
You can select LAP trigger “by Distance”
or "by Time"
Page 22
GH-625
5.2-5 Set units
[MAIN MENU] > [ACTIVITY > [ACTIVITY SETTING] > [SET UNITS]
1.
The measurement unit can be set as
"statute" or "metric".
2.
The speed unit can be set as Pace
(min/m, min/K) or Speed (mph,
kph).
5.3 Delete All (Training data)
[MAIN MENU] > [ACTIVITY] > [DELETE ALL]
You can delete all the training data
stored in the device.
Page 23
GH-625
5.4 Memory Capacity
[MAIN MENU] > [ACTIVITY] > [MEMORY CAPACITY]
1.
2.
Display the remaining memory
capacity.
You will see how many points left
and the remaining time you can use.
The remaining time depends on the
period of your record setting. (See
[main menu] > [activity] >
[memory capacity])
Page 24
GH-625
6.1 Navigation
6.1 Add / Remove Map Mode
[MAIN MENU] > [NAVIGATION] > [ADD/REMOVE MAP MODE]
You can use this feature to display or not
display the map mode.
However, while the Map Mode is off, and
you execute "Return to start" or "GOTO"
a waypoint, the Map Mode will be turn on
again.
6.2 Routes
[MAIN MENU] > [NAVIGATION] > [ROUTES]
1.
[CREATE NEW ROUTE]
2.
[LIST ALL]
3.
[DELETE ALL]
Record the route when you are
exercising
z [CREATE NEW ROUTE]
1. You can add the waypoints to create
your own route. Press OK button to
insert a waypoint.
2. Highlight a waypoint and press OK
button for deleting this waypoint or
insert another waypoint in above.
3. In the first line of the screen, you
can edit the name of this route.
4. When you are done with editing the
route, press ESC button
Page 25
GH-625
z
[LIST ALL]
1. Select the route you want to
navigate, and select
"FOLLOW?". You will be asked
which point (start point or end
point) to navigate. You will see
your current position and
destination point on the screen,
and those nearby waypoints are
also displayed. Press Up and
Down button to zoom out and
zoom in the map view.
2. Press PG button display the
distance and time for you to
reach destination on the right
part of screen. The direction of
destination waypoint is shown
by the arrow sign of the
compass.
3. If you want to stop the
navigation, press [MAIN MENU]
> [NAVIGATION] > [STOP
ROUTE].
4. Select the route you want to
delete, and select "DELETE?".
This route will be deleted
immediately.
z
1.
[DELETE ALL]
A confirmation dialog box will
appear.
Use Up and Down button to highlight
"YES" and press OK.
All routes data in memory will be
deleted.
2.
1.
Page 26
GH-625
6.3 Save a Waypoint
[MAIN MENU] > [NAVIGATION] > [SAVE WAYPOINT]
1.
2.
3.
4.
You can save the current position.
If the GPS position is fixed, it shows
the longitude, latitude and
elevation on the screen. If the GPS
position is not fixed (no GPS signal
is received), the value will be zero.
Use Up and Down button to scroll to
the item you wish to modify and
then use the OK button to select
and confirm.
When you finish the modification,
input a “enter sign” character or
press the ESC button to exit.
Move highlight to "CONFIRM?" and
press OK button. The location data
will be stored in the memory of
GH-625.
6.4 Find Waypoint
[MAIN MENU] > [NAVIGATION] > [FIND WAYPOINT]
1.
[LIST WAYPOINT]
2.
[DELETE ALL]
z [LIST WAYPOINT]
1. Use Up and Down button to scroll
to the Waypoint you wish to go to
and press OK.
2. Highlight "GOTO?" item and press
OK.
3. You will see your current position
and destination point on the
screen, and those nearby
waypoints are also displayed.
Page 27
GH-625
4.
5.
Press Up and Down button to
zoom out and zoom in the map
view.
Press PG button display the
distance and time for you to reach
destination on the right part of
screen. The direction of
destination waypoint is shown by
the arrow sign of the compass.
To stop the GOTO, press [MAIN
MENU] > [NAVIGATION] > [STOP
GOTO].
z [DELETE ALL]
1. Use Up and Down button to scroll to
the Waypoint you wish to delete and
press OK.
2. Highlight "DELETE?" item and press
OK.
3. This waypoint will be deleted
Immediately.
Page 28
GH-625
6.5 Return to start ( Stop Goto)
[MAIN MENU] > [NAVIGATION] > [RETURN TO START / STOP GOTO]
1.
2.
3.
You can use this feature to navigate
you back to the start point of the
latest saved training data.
The navigation screen is shown and
you can follow the direction of
arrow to go back to the start point.
If you want to stop the navigation,
press [MAIN MENU] >
[NAVIGATION] > [STOP GOTO].
6.6 GPS INFO
[MAIN MENU] > [NAVIGATION] > [GPS INFO]
Here you can see the positioning status
of how many satellite signals are
obtained and their signal strength.
Page 29
GH-625
7. Connect to PC
The Exercise Studio allows you to setup the pause, alarm and sport type for
GH-625.
7.1 Connect to PC
[MAIN MENU] > [CONNECT TO PC]
1.
2.
You can transfer the training data
from GH-625 to your PC.
Refer to "GS-Sport Training GYM"
chapter for more details.
When USB connect to GH-625, the detected message will show on the screen.
Auto-detection function
Page 30
GH-625
8. CONFIGURATION
8.1 User Setting
8.1-1 Setup Time
[MAIN MENU] > [CONFIGURATION] > [USER SETTINGS] > [SETUP TIME]
1.
[TIME ZONE]
2.
[DAYLIHGT SAVING]
3.
[TIME FORMAT]
Use Up and Down button to scroll to
the item and press OK to modify it.
z [TIME ZONE]
You have to select your country to set
up the time zone
z [DAYLIHGT SAVING]
You have to select your local time
zone and enable Daylight Saving if
necessary, so system will display the
correct time for you.
z [TIME FORMAT]
You can also set the time to display in
the 12 Hour or 24 hour format.
Press ESC button to return to
previous page or PG button to go back
to main menu
Page 31
GH-625
8.1-2 Setup system
[MAIN MENU] > [CONFIGURATION] > [USER SETTINGS] > [SET SYSTEM]
1.
[BEEPER]
2.
[LANGUAGE]
3.
[SLEEP MODE]
z [BEEPER]
You can set the Beeper to sound or to
be silent according to your need.
z [LANGUAGE]
There are 5 different languages of User
Interface,
including
"English",
"German", "French", "Italian" and
"Spanish".
z [SLEEP MODE]
There are 5 different modes on sleep
mode.
Page 32
GH-625
8.1.3 Set backlight
[MAIN MENU] > [CONFIGURATION] > [USER SETTINGS] > [SET DISPLAY]
1.
[BACKLIGHT]
2.
[CONTRAST]
z [BACKLIGHT]
Set the backlight to stay on or
automatically turn off after a period of
time once you press Power button to
activate the backlight.
z
1.
2.
[CONTRAST]
Use Up and Down button to adjust
the contrast of the screen display.
When you are satisfied with the
contrast, press OK button to
accept it.
8.1.4 Set Custom Page
[MAIN MENU] > [CONFIGURATION] > [USER SETTINGS] > [SET CUSTOM PAGE]
You can modify the screen field number.
8.1-5 Use Profile
Page 33
GH-625
[MAIN MENU] > [CONFIGURATION] > [USER SETTINGS] > [USER PROFILE]
1.
2.
3.
You can input your personal
information in the user profile.
The data fields include "username",
"gender", "birth date", "weight" and
"height".
The system will do the calories
calculation base on the information
you provide. Please input the
correct value.
8.1-6 Turn PC-GPS On
[MAIN MENU] > [CONFIGURATION] > [USER SETTINGS] > [TURN PC-GPS ON]
You can use GH-625 as a G-mouse by
connecting it to your PC.
1. Use the USB cable to connect
GH-625 with your PC. Turn PC-GPS
function on.
2. Start you PC software; select the
correct COM Port and set Baud rate
to 57600.
3. The G-mouse function is ready for
your use.
4. When the GPS function is not
needed, you can turn it off to save
the battery power and extend more
battery life.
8.1-7 Data Recording
Page 34
GH-625
[MAIN MENU] > [CONFIGURATION] > [USER SETTINGS] > [DATA RECORDING]
1.
2.
System is default to record one
point for every second. This will
create the most accurate record
for your training activity. However,
you can set a different interval to
record the points.
Set the longer interval means less
data in a fixed period of time. But
you can use the device for a longer
time.
8.2 GPS Setting
[MAIN MENU] > [CONFIGURATION] > [GPS SETTINGS] > [GPS SETTING]
z [SETUP GPS]
The GPS function can be turned off for
saving battery power. If the battery
power is pretty low, the system will
also ask you if you want to turn off the
GPS function.
z [WAAS/EGNOS]
Turn on/off the ‘’WAAS/ENGOS’’
feature.
Page 35
GH-625
8.3 Heart Rate Setting
[MAIN MENU] > [CONFIGURATION] > [HEART RATE SETTING]
z
[CARDIO MODE]
z
[SET TARGET ZONE]
8.4 Factory Reset
[MAIN MENU] > [CONFIGURATION] > [FACTORY RESET]
This feature allows you to restore the
GH-625 back to factory default status.
In another words, the training data,
waypoint, and user profile will be
deleted.
Page 36
GH-625
8.5 System Upgrade
[MAIN MENU] > [CONFIGURATION] > [SYSTEM UPGRADE]
1.
2.
Allow you to upgrade the firmware
of GH-625.
If you want to cancel the upgrade
process, press Power + ESC
button at the same time.
8.6 About Product(GH-625)
[MAIN MENU] > [CONFIGURATION] > [ABOUT PRODUCT]
Display the firmware version
information.
Page 37
GH-625
9.PC Software application
9.1 Install USB driver
The USB driver is needed when you connect the GH-625 to PC. If the driver is not
installed, your PC could not recognize GH-625.
1. Insert the CD into the CD-ROM drive, and the Autorun will start
automatically.
2. Click on the "USB Driver" button to install the "PL-2303 USB-to-Serial" driver
to your PC.
3. Follow the instruction to complete the installation.
9.1-1 How to install GS-Sport Training GYM
z
Install GS-Sport Training GYM
You can use GS-Sport Training GYM to download the training data from GH-625 to
your PC.
1. Check the Microsoft Framework version
System Requirements
Supported Operating Systems: Windows Server 2003; Windows Server 2008; Windows
Vista; Windows XP
Please download Framework Version 3.5 as
http://www.microsoft.com/downloads/details.aspx?displaylang=en&FamilyID=333325fd-a
e52-4e35-b531-508d977d32a6
Supported Operating Systems: Windows 2000 Service Pack 4; Windows Server 2003;
Windows XP Service Pack 2Supported Operating
Supported Operating Systems: Windows Server 2003; Windows XP
Please download Framework Version 3.0 as
http://www.microsoft.com/downloads/details.aspx?familyid=EC2CA85D-B255-4425-9E651E88A0BDB72A&displaylang=en
Supported Operating Systems: Windows 2000 Service Pack 4; Windows Server 2003;
Windows XP Service Pack 2
Please download Framework Version 2.0 SP1 as
http://www.microsoft.com/downloads/details.aspx?familyid=79BC3B77-E02C-4AD3-AACF
-A7633F706BA5&displaylang=en
Page 38
GH-625
2.
Click on the "GS-Sport Training GYM/setup.exe" and follow the instruction to
complete the installation.
9.1-2 System requirement
For better performance, the following system requirement is recommended for
GH-625 GS-Sport Training GYM:
z CPU: Pentium III or above.
z RAM: at least 512 MB
z OS: Windows 2000 or XP
z Internet Explorer 6.0 or above
Page 39
GH-625
9.1-3 Run the GS-Sport Training GYM
You can run the GS-Sport Training GYM by double click on the
"GH-625 GS-Sport Training GYM" icon from desktop. Or click
from Start > All Programs > GlobalSat GS-Sport >
GS-Sport Training GYM.
9.2 How to use GS-Sport Training GYM
9.2-1 Choose Device version
z When the device is connected to PC, please choose which model is used.
9.2-2 Add New User
z Create new user name by clicking the “New User” icon.
z
Login
Page 40
GH-625
z
Please connect to Internet before the software is opened.
z
Please Choose “Data Transmission” and select which saved data will be
downloaded.
Page 41
GH-625
z
GS-Sport Training GYM has been modified to auto-detective COM port.
The user only needs to select the device’s function “connect to PC”.
Page 42
GH-625
9.2-3 Section Description
1.
2.
3.
4.
5.
6.
7.
Main Function
Sub tool Bar
Google Map, Track point data, Waypoint Data
Analysis tools, Play Meter
Training Data Base saved by calendar
Training data list
Training data detail
8. Software control Function
5
2
3
6
1
4
8
Page 43
7
GH-625
9.2-4 Menu Structure
Import Activity
Export Activity
Save training information to a ghd format file.
Export training information to KML, CSV, Text or
CPX format.
Capture Google
Main
Map
Show on Google
Map
Files
Search Data
Show Training data on Google Map. Specify the
folders for saving different format of files when you
export the training information.
Show on Google
Show Training data on Google Earth. Quit the
Earth
application, you will be asked to save the document.
Open
Save
Search by Date
Search by selecting “start date” and “End date”
Search by Sport
Search by Sport’s type
Download from Device
Track Points
Upload from Device
Delete all from Device
Data Transmission
Download from device
Way Points
Upload from Device
Delete all from Device
Com port Setting
Device
Configuration
Configuration
Device information
Firmware Upgrade
Firmware updated function
Unit Exchange
Three Unit selection(Metric, Statute and Nautical)
Language
Help
Device Com port setting
Six Language selection(English, Chinese, Spanish,
German, Italian and French)
Check update
Link to GS-Sport product website
User Manual
Directly open the user manual
About GS-Sport
GS-Sport introduction
About US
The team information
About
The company information
Page 44
GH-625
9.2-5 Download Data from GH-625
z Connect GH-625 to your PC with the USB cable.
In GH-625, press [MAIN MENU] > [Connect to PC].
In GS-Sport Training GYM, click [Data Transmission] > [Trackpoints]> [Download
from Device] or [Waypoint]> [Download from Device].
The downloaded training data will be stored in calendar.
The downloaded Trackpoints details
are displayed in this panel.
The training file will show in this panel.
Page 45
GH-625
9.2-6 Upload Data to GH-625
z Connect GH-625 to your PC with the USB cable.
In GH-625, press [MAIN MENU] > [Connect to PC].
In GS-Sport Training GYM, click [Data Transmission] > [Trackpoints]> [upload
from Device] or [Waypoint]> [upload from Device].
Page 46
GH-625
When GS-Sport Training Gym
searches successful, there will
be “Track File list” window
pop-up.
When the download procedure
is processing, the progressing
message will be displayed on
screen.
If the memory space is full, you
need to delete some waypoints
before you can make the
uploading. Meanwhile, the
waypoint will overwrite the one
with the same Location Name.
Page 47
GH-625
9.2-7 Waypoint Edition
Page 48
GH-625
9.2-8 View statistic curve
From statistics analysis area, check the kind of curve you want to view. (Or click
the curve buttons from tool bar.)
9.2-9 Replay the training
Page 49
GH-625
9.2-10 View Track points in Google Earth
1. Click the Track Records on the section 6.
2. Double click the earth icon on section 8. The software will open Google Earth
automatically if Google Earth has been installed in the computer. The Track points
will be shown on Google Earth. (This feature requires Google Earth installed on
your system.)
Page 50
GH-625
9.2-11 View Track points in Google Maps
Click the Track Records from the training files area, and the training trace will
appear on the Google Map.
z
The Track-points will appear on the Map.
Page 51
GH-625
9.2-12 View Track points information for details
z Select Track-points Bar
Page 52
GH-625
9.2-13 Firmware Upgrade
z Connect GH-625 to your PC with the USB cable.
In GH-625, press [MAIN MENU] > [CONFIGURATION] > [SYSTEM UPGRADE].
z Please follow the destruction list below.
Note: Interruption of firmware update will cause GH-625 malfunction.
1. In GS-Sport Training GYM, click [Configuration] > [Firmware Upgrade] from
menu bar.
Page 53
GH-625
2.
Browse for the firmware file (*.GHX). Click on the "Upgrade" button to start
firmware upgrade process.
3.
Select the firmware version
Page 54
GH-625
4.
Click the “Upgrade” button.
5.
Confirmation of firmware upgrade. If you decided to upgrade firmware,
please click “OK”.
Page 55
GH-625
6. Upgrade processing Bar.
Note: Interruption of firmware update will cause GH-625 malfunction.
Do not unplug GH-625 or turn off the Software.
7.
Upgrade successful. GH-625 will shut down automatically.
Page 56
GH-625
9.2-14 Display the system information of GH-625
z Connect GH-625 to your PC and GS-Sport Training GYM select the
[Configuration] > [Device Configuration]
Page 57
GH-625
10. Maintenance
10.1 Take care of you GH-625
z
z
Do not store your GH-625 in an extremely high or low temperature
environment.
Use a dampened cloth to clean your GH-625 and wipe dry. If necessary, apply
mild detergent solution to the cloth. Do not use strong chemical solvents, for
it may damage the plastic surface.
Page 58
GH-625
11.Glossary
Relates to data being transmitted from GH-625. Activity is a history or log
Activity
of events. Activity data includes time or distance updates.
Waypoints are sets of coordinates that identify a point in physical space. For
Waypoint
the purposes of terrestrial navigation, these coordinates usually include
longitude and latitude, and sometimes altitude (particularly for air
navigation).
Trackpoint
The current moving trace.
Navigation
The act of determining the course or heading of movement.
2D Operating
Mode
3D Operating
Mode
A “two-dimensional GPS position fix” includes only horizontal coordinates.
It requires a minimum of three visible satellites.
A “three-dimensional GPS position fix” includes horizontal coordinates, plus
elevation. It requires a minimum of four visible satellites.
Weak Signal
GPS signal is weak (GPS is fixing).
Receiving
Can’t find GPS (GPS turned off or broken down).
Wide Area Augmentation System / European Geostationary Navigation
WAAS/EGNOS
Overlay Service. These are two satellite-based systems that can be used to
increase the accuracy of GPS position fixes.
IPX7
An IPX7 designation means the GPS case can withstand accidental
immersion in one meter of water for up to 30 minutes.
Greenwich Mean Time (GMT) is a term originally referring to mean solar
time at the Royal Observatory, Greenwich in England. It is now often used
to refer to Coordinated Universal Time (UTC) when this is viewed as a time
GMT
zone, although strictly UTC is an atomic time scale which only approximates
GMT in the old sense. It is also used to refer to Universal Time (UT), which
is the astronomical concept that directly replaced the original GMT.
Page 59
GH-625
11. Troubleshooting & FAQ
1. Why can’t GH-625M receive heart rate signal?
Solution:
(1). Check if you correctly wear the heart rate monitor or not.
(2). Turn on the Heart Rate Alert function in GH-625M.
(3). If it is still not working, check the battery of Heart Rate monitor.
2. Why does it show “PC com port error” when I download data?
Solution:
(1). Please check if the USB driver is installed or not.
(2). Connect GH-625 to your PC with the USB cable.
(3). Double click the “GH625 GS-Sport Training GYM” icon from desktop
to start the application.
(4). From menu bar click “Settings” / “Configurations”, and click “Scan
COM Port” button. COM port will be automatically scanned.
Page 60
GH-625
FCC Notices
This device complies with part 15 of the FCC rules. Operation is subject to the
following two conditions:
(1) This device may not cause harmful interference, and
(2) This device must accept any interference received, including interference that
may cause undesired operation.
FCC RF Exposure requirements:
This device and its antenna(s) must not be co-located or operation in conjunction
with any other antenna or transmitter.
NOTE: THE MANUFACTURER IS NOT RESPONSIBLE FOR ANY RADIO OR TV
INTERFERENCE CAUSED BY UNAUTHORIZED MODIFICATIONS TO THIS
EQUIPMENT. SUCH MODIFICATIONS COULD VOID THE USER’S AUTHORITY TO
OPERATE THE EQUIPMENT.
Page 61