1
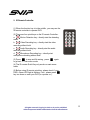
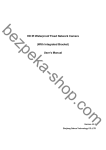
Mini Audio/Video Recorder
(SDV-03)
User Manual
All rights reserved. Copying in whole or in part is prohibited
without expressed written authorization from the manufacturer.
1
CONTENTS
1. GENERAL INFORMATION…………………….3
2. IMPORTANT SAFETY INSTRUCTION……….4
3. OPERATING DVR
BASIC OPERATION…………………………….5
SETUP……………………..…...……………….10
4. SPECIFICATION……………………………….17
5. LIST OF ACCESSORIES……………………..18
All rights reserved. Copying in whole or in part is prohibited
without expressed written authorization from the manufacturer.
2
IMPORTANT INFORMATION
Before you use the product, please read and retain the instruction. We do not
assume any liability arising out of improper operation.
GENERAL
GENERAL INFORMATION
INFORMATION
Mini A/V Recorder
- Portable Media Recorder and Player
- Voice Recorder
- Direct connection to TV via AV cable
Main Features
•
•
•
•
Support USB. (2.0)
Recorded data can be transferred into PC to play.
It can play PC media files on TV through DVR.
Support external memory card - Micro SD card (Up to 4G)
¾Transcend
¾Kingston
¾ADATA
¾SanDisk
WARNING
Only 5V adapter is acceptable, please do not connect any other adapter
or it may cause of serious damage.
All rights reserved. Copying in whole or in part is prohibited
without expressed written authorization from the manufacturer.
3
The important safety instruction ought to be read before
operating the product.
Electricity sound or smoke comes from AC adapter, it causes of electric shock and fire. In occasion, please turn off the power
and plug out the AC immediately
If AC adapter is broken, the product temperature will increase it cause of damage the product and break down. Plug out the
adapter from wall outlet immediately.
Please keep DVR away from water or moisture. Do not use this product in bathroom, swimming pool and wet places. If water
or other substances is in the DVR, please turn off DVR and unplug the adaptor.
Use provided power source. Do not use other power sources it causes of fire or electric shock.
Do not touch AC adapter with wet hand.
Do not unplug the connection cord; take out main body of Adapter.
Do not bend or twist the cable, it causes of fire or electricity shock
Do not load any things on the power; it damages the cord and cause of electricity shock.
Use 110V or 220V only.
Do not use damaged cable, it causes of fire and electricity shock.
For added protection, if there is lighting or storm, please unplug the AC adapter it may be risk of electric shock or serious injury
If there is lighting outside, do not touch and reach to adapter.
Do not use either damaged product or malfunction state, it cause of fire or electricity shock. Unplug the power immediately. Do
not try to fix the product yourself.
Please pull out connection cable and unplug when you carry DVR
Do not fall the product and keep children away. It causes of breaking the product.
Do not use the cable inadequate way such rolling neck with cable and do not give to who under 3 years
Do not replace or dismantle the product, it cause of hazard
Do not use in inadequate place or purpose, it causes of damage of product
While carrying the product, please unplug AC adapter.
Do not drop the product
While carrying DVR, be careful with shock. It could be main reason of breaking down
Do not place the product or cable near heat places.
If it is not used for a longer period of time, please unplug the AC adapter for the safety.
Operating Temperature: -5℃ ~ 40 ℃
Preserving Temperature: -20℃ ~ 60℃
If you do not use for a long period, turn off the DVR and unplug the AC adapter.
If the memory card is not ejected correctly, contact technical support immediately. Do not force the card in/out of the slot as
this could damage the memory card and or the unit itself.
All rights reserved. Copying in whole or in part is prohibited
without expressed written authorization from the manufacturer.
4
OPERATING
OPERATING DVR
DVR
1. BASIC OPERATION
Power on/off
Press Power button to turn on/off the device.
LED Indication :
LED COLOR
Blue
STATUS 1
(Flashing)
Battery Low
Red
STATUS 2
(Light On)
Power On
1) Power Charging – Turn off mode
2) Power Fully Charged – Light off
Green
Main Menu Mode
Blue/Red/Green
Reading / Writing Memory
Memory Full ( Blue & Green swap)
Important Notice
1. Press
1.5~3 seconds to power on.
2. If cannot power on, please check if the function key is in the middle
position, if not please shift it to the middle. (In order to power on/off the
DVR, please keep the function key in the middle position.)
3. If cannot power on, please check your DVR power status.
All rights reserved. Copying in whole or in part is prohibited
without expressed written authorization from the manufacturer.
5
Function Selection
Press
key to select functions, and then press
to enter the selected function.
Operation:
1.
Press
Menu )
to select main function ( Video / Audio / Photo /
2.
Press
to enter/confirm.
3.
Press
to select sub-function and then press
to go back or exit.
Video Mode
Photo Mode
Audio Mode
Menu Mode
All rights reserved. Copying in whole or in part is prohibited
without expressed written authorization from the manufacturer.
6
Switching Screens between main & sub-menu
Press
1.
to enter sub-menu.
Press
to move to the item you want and then press
to enter confirm.
3.
Press
to go back or exit without changing setting.
Quick Key (Hot Key)
1. Main body
(1) Shift function key to Video Recording or Audio Recording
(Middle for stop and file saving) .
(2) While the function key is working on Video or Audio recording,
system will be on hold; To release it, please shift the function key to
the middle position to stop recording.
All rights reserved. Copying in whole or in part is prohibited
without expressed written authorization from the manufacturer.
7
2. IR Remote Controller
(1) When the function key is in the middle , you may use the
IR remote controller to operate DVR.
(2) There are four quick keys on the IR remote Controller:
a.
mode.
Motion Detection key – directly start the detecting
b.
Video Recording key – directly start the video
recording without hold.
c.
Audio Recording key - directly start the audio
recording without hold.
d.
Microphone Recording key – directly start
microphone recording without hold.
(3) Press
to stop and file saving , press
to go back to main menu mode.
again
(4) The IR remote Quick Key only works on main menu
mode.
(5) Before using IR remote quick key, please check if your
DVR’s Green LED light is flashing, if not , please press
key two times or reset your DVR (or repower on ) .
All rights reserved. Copying in whole or in part is prohibited
without expressed written authorization from the manufacturer.
8
Video Image Capturing
Press
during video file playback, and then press
to
capture the image from the file. Recording status indicator will flash
while image capturing and the file will be saved in “Photo File”
Æ “My Record” as JPG file.
Volume Adjusting
Press
during Video and Audio playback to adjust volume (10 levels).
Access Keys
Press
under main menu to enter “Video/Audio Recording”
Menu.
Press
under main menu to enter “Setup” menu. It’s also
Function key under other menu.
Press
under main menu to enter “Setup” menu. It’s also
Function key under other menu.
All rights reserved. Copying in whole or in part is prohibited
without expressed written authorization from the manufacturer.
9
2. SETUP
Menu
1.
NTSC / PAL : Select Sync System
2.
System Setting : Setting DVR system :
(1) Sleep setting : for power saving
(2) Time setting : Setting System Date & Time
(3) Language : Setting system language
(4) Load setup defaults: reset system to default mold.
3.
Format : Format SD card
4.
Firmware Upgrade : upgrade new firmware for DVR
5
Memory Information : Memory card status information
6.
Schedule Presetting : Schedule presetting for Video , Audio &
Microphone recording.
All rights reserved. Copying in whole or in part is prohibited
without expressed written authorization from the manufacturer.
10
Schedule Presetting
Set up “Schedule Presetting” can automatically start and finish recording
at the time you wish to record.
There are four sets of schedule setting. Choose your REC sources from
3 selections below:
MIC REC / Audio Line In REC / Video Line In REC
Press
then press
to enter for more settings.
REC Start / Stop:
Enter date and time to start and stop recording.
Select: Quality / Setting
“Quality” to choose recording quality.
“Select” Æ “On” to enable “Schedule Presetting” function.
Please set up schedule by time order.
All rights reserved. Copying in whole or in part is prohibited
without expressed written authorization from the manufacturer.
11
Video
1.
Video Files :
(1) Press
to enter video file for video playback , press
to
pause , re-press
to continue playback. Press
to stop and go
back to the file list.
(2) Press
to Forward and
different speeds.
to Rewind with 2x/4x/8x three
(3) Under video playback mode, press
to exit sub-menu.
to enter sub-menu , press
a. Video Repeat : No , All , Single
b. Full Screen : On , Off ( for QVGA quality playback expand to full
screen )
(4) Under video file list , press
file information)
for file management (delete , protect ,
(5) Please press “Volume +” for video playback.
2.
External Video Recording :
(1) Press
to starting video recording.
(2) Press
to stop video recording
(3) Press
to enter sub-menu of video recording
a. Quality : video quality select ; High (720x480) , Medium (640x480) ,
Low (320x240)
b. Display Information : Show DVR information; On/Off
c. Rec Date Time : Add date/time info to video; On/Off
d. Over Write : Video recording file over write on or not; On/Off.
All rights reserved. Copying in whole or in part is prohibited
without expressed written authorization from the manufacturer.
12
3. Motion Detection :
(1) Press
to starting motion detection.
(2) Press
to stop motion detection or recording
(3) Press
to enter sub-menu of motion detection
a. Quality : video quality selection, High (720x480), Medium (640x480) ,
and Low (320x240)
b. Display Information : Show DVR information ; On / Off
c. Rec Date Time : Add date/time info to video ; On/Off
d. Motion detect Level : Setting motion detect sensitivity level , High /
Medium / Low
e. Motion Detect RecTime : Setting motion detect video recording time ;
30sec/1min/3min/5min/10min
f. Motion Detect Area Setting : Press
to enter area setting , press
to setting motion area On or Off ( Green On , None Off ) ; Press
to
exit.
All rights reserved. Copying in whole or in part is prohibited
without expressed written authorization from the manufacturer.
13
Audio
1.
Audio File :
(1) Press
enter audio file for audio file playback , press
to
pause , re-press
to continue playback. Press
to stop and back
to file list.
(2) Under audio playback mode press
to exit sub-menu.
to enter sub-menu , press
Audio Repeat : No , All , Single , Random
2.
Microphone Record :
(1) Press
to starting microphone recording.
(2) Press
to stop microphone recording
(3) Press
to enter sub-menu of microphone recording
Quality : audio quality select ; High, Low
(Note: Please shift the microphone cover while doing the microphone
recording.)
3.
Audio in Record :
(1) Press
to starting audio recording.
(2) Press
to stop audio recording
(3) Press
to enter sub-menu of audio recording
Quality : audio quality select ; High , Low
All rights reserved. Copying in whole or in part is prohibited
without expressed written authorization from the manufacturer.
14
4. BookMark :
Press IR Remote “Book Mark” Key or press play key while audio
playback to pause, and then press stop key to escape, go back to main
menu. Next time when you enter Audio playback, a “Continue or not”
message will show up, if you choice yes, system will direct you to last
flag to playback; if choice “no” will go to file list. This function only support
audio playback.
All rights reserved. Copying in whole or in part is prohibited
without expressed written authorization from the manufacturer.
15
Photo
Photo File :
(1) Press
to enter Photo Files for photo playback.
The pictures are saved and listed under MyRecord
folder.
(2) Press
to stop and go back to file list.
All rights reserved. Copying in whole or in part is prohibited
without expressed written authorization from the manufacturer.
16
Specification
NTSC / PAL TV output
Display
One Micro SD Card Slot Support SD2.0 (SDHC) & SD1.1 Micro SD
card
AV line-in ø2.5mm audio/video jack with DC 5V Power support
Interface
AV line-out with 14 pin audio/video jack
Mini USB
Mini MIC
Video
Encode
720x480(HIGH 18fps)/ 640x480(Medium
30fps)/320x240(Low 30fps) Quality ; file format AVI
from Camera module
Decode
720x480@30fps max
FF/RW/Pause/Slow motion/Video Capture
Function
Motion Detect for Camera in Video Record
Photo
Support JPEG baseline/ progressive format
Encode
Audio line-in, Microphone on ADPCM format
Support WAV playback
Decode
Audio
Function
FF/RW/Pause/Book mark (see note 3)/A→B repeat
DC in 5V/2A power supplier
Power System
3.7V 1000mAh Lithium battery
Dimensions &
Weight
Dimension
( L x W X H ) 75*50*17
Weight
100±5g
Battery weight
50±2g
Battery life time
1~1.5 hours with Video playback or Record
Accessory
Adapter , USB cable , RCA (RED/WHITE/YELLOW/DC5V) cable (for
AV out) , RCA(WHITE/YELLOW) cable for AV in.
All rights reserved. Copying in whole or in part is prohibited
without expressed written authorization from the manufacturer.
17
LIST OF ACCESSORIES
Super-Mini DVR
A/V Out Cable
A/V In Cable
Remote Controller
USB Cable
5V DC Adapter
All rights reserved. Copying in whole or in part is prohibited
without expressed written authorization from the manufacturer.
18