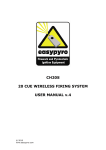
1
STEP13
Programmable Sequencer / Stepper
User Guide v1.5
Designed By EasyPyro Ltd
Made in the UK
Table of Contents
Front Panel............................................................................................3
Technical Specification.............................................................................4
Software Revision...................................................................................4
Menu System.........................................................................................5
Useful Information..................................................................................6
Error Codes...........................................................................................7
Battery Information................................................................................8
EQUAL INTERVAL MODE.......................................................................9
DIFFERENT INTERVAL MODE...............................................................11
CLOCK MODE....................................................................................13
STEP MODE......................................................................................15
SWEEP MODE...................................................................................16
Display Explanation........................................................................16
[Left > Right] & [Right > Left] Sweep...............................................17
[Crossed] Sweep............................................................................22
[Centre > Out] Sweep....................................................................23
© EasyPyro Ltd 2012
RhinoFire STEP13 User Guide v1.5
1 of 23
Front Panel
5
5
1
4
2
3
1
Trigger Input (PyroClip®)
2
Battery Charge Connector
3
Power Switch
4
Trigger Output / Cue 13 (PyroClip®)
5
Cue 1 - 12
© EasyPyro Ltd 2012
RhinoFire STEP13 User Guide v1.5
2 of 23
Technical Specification
Input Trigger Resistance
18 Ω
Input Trigger Voltage
3 – 70 Volts
Output Voltage
12 Volts
Total Output Current
6 Amps
Minimum Interval Time
10 ms
Maximum Interval Time
9m59.99s
Maximum Clock Time
9m59.99s
Battery Charge Time
1 hours
Battery Charger Plugs
USA / UK / EURO
Battery Type
YUASA NP0.8-12
Standby Time
20+ hours
Maximum e-match in series
8+ (assuming no cue overlap)
Maximum e-match in parallel
6+ (assuming no cue overlap)
CE Approved
Yes
Weight
1.4 Kg / 3 lbs.
Software Revision
Software Revision Changes
v0.1 – v1.0
BETA TEST
v1.2
OFFICIAL RELEASE March 2012
v1.3
Feature Added
1. Unit left on warning
2. Continuously variable pulse times
3. Start / Stop timed sequences
4. Simplified menu structure
v1.4
Bug Fix
1. Fixed long term timing drift
Feature Added
1. Trigger Input indication to check if unit is being trigger correctly
2. Factory Reset option
v1.5
Feature Added
1. Split Equal Interval mode into groups of cues 1x12, 2x6, 3x4 etc
© EasyPyro Ltd 2012
RhinoFire STEP13 User Guide v1.5
3 of 23
Menu System
MENU ITEM
DESCRIPTION
1] Equal
Set an equal time interval between cues
All
Fire all the cues on 1st Trigger Pulse
1x12
Fire Cue 1 – 12 on 1st Trigger Pulse
Fire Cue 13 / Trigger Out on all other Trigger Pulses
2x6
Fire Cue 1 – 6 on 1st Trigger Pulse
Fire Cue 7 – 12 on 2nd Trigger Pulse
Fire Cue 13 / Trigger Out on all other Trigger Pulses
3x4
Fire
Fire
Fire
Fire
4x3
...
6x2
...
2] Different
Cue
Cue
Cue
Cue
1 – 4 on 1st Trigger Pulse
5 – 8 on 2nd Trigger Pulse
9 – 12 on 3nd Trigger Pulse
13 / Trigger Out on all other Trigger Pulses
Set different time intervals between cues
2.1] Setup
Setup a series of intervals
2.2] Load Show
Load a stored series of intervals
2.3] Clear Show
Clear a stored series of intervals
3] Clock
Set the time a cue will fire according to a clock
3.1] Setup
Setup a series of times
3.2] Load Show
Load a stored series of times
3.3] Clear Show
Clear a stored series of times
4] Step
Step to the next cue on each input pulse.
5] Sweep
Timed [Left > Right], [Right > Left] sweeps across multiple
firing sites.
6] Setup
Device configuration options
6.1] Pulse
Set the duration of the firing pulse (0.01s – 9.99s)
6.2] Beep
Enable or disable all beeps (ON, OFF)
6.3] LED
Enable or disable th external ARM indicator (ON, OFF)
6.4] Language
Set the menu language (EN, ES, IT, DE, FR)
6.5] Reset
Factory Reset.
© EasyPyro Ltd 2012
RhinoFire STEP13 User Guide v1.5
4 of 23
Useful Information
•
The lid can be closed and locked over e-match wires.
•
Press
•
Hold
and press & release
at to provide an emergency Trigger Input and
start the sequence. This will fire cues.
•
Press
after you have set up the device. The device will beep and flash every 1
second. It is now waiting for a Trigger Input pulse to fire cues.
•
Hold
•
You can press any button to disarm the system.
•
You can disable the beep and flash in the menu.
•
The display backlight will turn off after 30 seconds. Press any button to turn it on again.
Press the button again to execute the function.
•
You can save up to 10 sequences in each mode, to be recalled at a later date.
•
Simply push down the PyroClips (Trigger Input and Trigger Output), insert the wire and
release. There is no need to wrap or twist the wire.
•
To prolong the life of the Terminals (Cues 1 – 12) when removing wires, depress the
springs and remove each e-match wire pair-by-pair. Do not simply “grab and pull”
wires.
•
If the deivce is not used regularly, charge it once every 3 months to keep the battery in
good condition.
•
The device will beep and flash every 1 minute after 5 minutes of inactivity to warn you
it is ON. This can be disabled.
•
The sequences can be paused / started by sucessive Trigger Input Pulses.
•
The Trigger Output / Cue 13 behaves differently according to which mode the device is
in.
at any time to simulate a sequence on the screen. This will not fire cues.
for 1 second to clear what you have entered.
Mode
Trigger Output / Cue 13 Behaviour
Equal [All]
Normal Cue.
Equal [1x12],[2x6],[3x4] etc
Device will pulse Triger Output on each Trigger Input pulse
received after all Cues have been fired on device.
Different, Clock Mode
Normal Cue.
Step Mode
Device will pulse Triger Output on each Trigger Input pulse
received after all Cues have been fired on device.
Sweep Mode
Device will immediately pulse Trigger Output on each Trigger
Input pulse received.
© EasyPyro Ltd 2012
RhinoFire STEP13 User Guide v1.5
5 of 23
Error Codes
The device will run a SELF TEST on power up.
If you see an error code, please do not use the device and contact us immediately.
Error Code
Description
00
Any Cue MOSFET stuck ON.
01
Cue 1 MOSFET stuck OFF.
02
Cue 2 MOSFTE stuck OFF.
03
Cue 3 MOSFET stuck OFF.
04
Cue 4 MOSFET stuck OFF.
05
Cue 5 MOSFET stuck OFF.
06
Cue 6 MOSFET stuck OFF.
07
Cue 7 MOSFET stuck OFF.
08
Cue 8 MOSFET stuck OFF.
09
Cue 9 MOSFET stuck OFF.
10
Cue 10 MOSFET stuck OFF.
11
Cue 11 MOSFET stuck OFF.
12
Cue 12 MOSFET stuck OFF.
13
Cue 13 MOSFET stuck OFF.
14
ARM MOSFET stuck ON.
15
RUN Button stuck ON.
16
MENU Button stuck ON.
17
LEFT Button stuck ON.
18
UP Button stuck ON.
19
OK Button stuck ON.
20
ARM Button stuck ON.
21
TEST Button stuck ON.
© EasyPyro Ltd 2012
RhinoFire STEP13 User Guide v1.5
6 of 23
Battery Information
Battery Voltage
Percentage %
> 12.5 volts
100%
< 9 volts
0%
Note: Charge the battery every 3 months to keep it in good condition.
© EasyPyro Ltd 2012
RhinoFire STEP13 User Guide v1.5
7 of 23
EQUAL INTERVAL MODE
Equal Interval Mode is used to quickly set the same interval between all cues.
Cues can be fired together or in groups.
Multiple devices can be connected together and cues fired in groups along the chain.
Option
Function
All
Fire Cues [1–13] with an Equal Interval.
1x12
Fire Cues [1–12] with an Equal Interval.
2x6
Fire Cues [1–6] and [7–12] with an Equal Interval.
3x4
Fire Cues [1–4], [5–8] and [9–12] with an Equal Interval.
4x3
Fire Cues [1–3], [4–6], [7–9], [10–12] with an Equal Interval.
6x2
Fire Cues [1-2], [3-4], [5-6], [7-8], [9-10], [11-12] with an Equal Interval.
Example
Trigger 1 Cue 1–13 will fire with 5s interval
Trigger 2 Nothing
Trigger 3 Nothing
Trigger 4 Nothing
Trigger 1 Cue 1–12 will fire with 1.75s interval
Trigger 2 Cue 13 / Trigger Out will fire
Trigger 3 Cue 13 / Trigger Out will fire
Trigger 4 Cue 13 / Trigger Out will fire
Trigger 1 Cue 1–6 will fire with 1.75s interval
Trigger 2 Cue 7–12 will fire with 1.75s interval
Trigger 3 Cue 13 / Trigger Out will fire
Trigger 4 Cue 13 / Trigger Out will fire
Trigger 1 Cue 1–4 will fire with 5s interval
Trigger 2 Cue 5–8 will fire with 5s interval
Trigger 3 Cue 9–12 will fire with 5s interval
Trigger 4 Cue 13 / Trigger Out will fire
© EasyPyro Ltd 2012
RhinoFire STEP13 User Guide v1.5
8 of 23
1. Press
and use
2. Press
to enter the mode.
3. Use
and
to navigate to Equal Interval Mode.
to set the desired time delay and operating mode.
After you have setup or loaded a sequence, you can press
to simulate the sequence, or
to ARM the system before use.
© EasyPyro Ltd 2012
RhinoFire STEP13 User Guide v1.5
9 of 23
DIFFERENT INTERVAL MODE
Different Interval Mode is used to set different time intervals between cues.
Different Interval Mode is a “relative time” mode. This means each time delay is relative to the
previous time delay.
Example
Cue 2 will fire 0.50s after Cue 1.
Cue 3 will fire 2.35s after Cue 2.
Cue 4 will fire 6.00s after Cue 3.
Cue 5 will fire 1m18.40s after Cue 4.
You can save and recall up to 10 sets of time delays in Different Interval Mode.
1. Press
and use
2. Press
to enter the mode.
3. Use
to navigate to Different Interval Mode.
and
to select SETUP, LOAD or CLEAR as desired.
and
to set the desired time delay between cues.
For SETUP,
1. Use
2. Press
to advance to the next delay. You can review or change a previously
entered time delay by pressing
several times to loop back to the delay you want.
3. The final option is Save Show?. The default is No. You can press
to loop back to
the start of the time delays OR you can use
and
to select which show
number (1 – 10) you want to save the show as. An asterisk (*) next to the show
number indicates a show is already stored in that memory location. You can overwrite
an existing show if you want.
© EasyPyro Ltd 2012
RhinoFire STEP13 User Guide v1.5
10 of 23
Note: It is not necessary to save a show to fire or reuse a show. The current show will stay in
memory even if the unit is switched off or the mode is changed. It is only necessary to save a
show if you wish to enter a new show in that mode and recall the saved show at a later date.
For LOAD,
1. Use
and
to recall the desired show from memory. The recalled show can
now be fired, reviewed or edited in the usual way. An asterisk (*) next to the show
number indicates a show is stored in that memory location.
For CLEAR,
1. Use
and
to delete the selected show from memory. An asterisk (*) next to
the show number indicates a show is stored in that memory location.
After you have setup or loaded a sequence, you can press
to simulate the sequence, or
to ARM the system before use.
© EasyPyro Ltd 2012
RhinoFire STEP13 User Guide v1.5
11 of 23
CLOCK MODE
Clock Mode is used to set different time intervals between cues.
Clock Mode is an “absolute time” mode. This means the time a cue fires is set to a clock. The
clock will start running as soon as a Trigger Input pulse is received. All other Trigger Inputs are
ignored.
Example
Cue 1 will fire 0.50s after the 1st Triger Input.
Cue 2 will fire 2.35s after the 1st Trigger Input.
Cue 3 will fire 6.00s after the 1st Trigger Input.
Cue 4 will fire 1m18.40s after the 1st Trigger Input.
Cue 13 will fire 2m35.00s after the 1st Trigger Input.
Note: It does not matter what order the Cues fire. For example, you could fire Cue 12 at 0.5s
after Trigger Input and Cues 1,2,3 and 6 25s after Trigger Input. Any Cue set to 0s will fire
immediately on Trigger Input.
You can save and recall up to 10 sets of time delays in Clock Mode.
1. Press
and use
2. Press
to enter the mode.
3. Use
to navigate to Clock Mode.
and
to select SETUP, LOAD or CLEAR as desired.
and
to set the desired time a cue will fire.
For SETUP,
1. Use
© EasyPyro Ltd 2012
RhinoFire STEP13 User Guide v1.5
12 of 23
2. Press
to advance to the next cue. You can review or change a previously entered
cue time by pressing
several times to loop back to the cue time you want.
3. The final option is Save Show?. The default is No. You can press
to loop back to
the start of the cue times OR you can use
and
to select which show number
(1 – 10) you want to save show as. An asterisk (*) next to the show number indicates
a show is already stored in that memory location. You can overwrite an existing show if
you want.
Note: It is NOT necessary to save a show to fire or reuse a show. The current show will stay
in memory even if the unit is switched off or the mode is changed. It is only necessary to save
a show if you wish to enter a new show in that mode and recall the saved show at a later
date.
For LOAD,
1. Use
and
to recall the desired show from memory. The recalled show can
now be fired, reviewed or edited in the usual way. An asterisk (*) next to the show
number indicates a show is stored in that memory location.
For CLEAR,
1. Use
and
to delete the selected show from memory. An asterisk (*) next to
the show number indicates a show is stored in that memory location.
After you have setup or loaded a sequence, you can press
to simulate the sequence, or
to ARM the system before use.
© EasyPyro Ltd 2012
RhinoFire STEP13 User Guide v1.5
13 of 23
STEP MODE
Step Mode is used to step to the next cue on each sucessive Trigger Input pulse. After the final
Cue is fired on a device, the Trigger Output will continue to pulse when a Trigger Input pulse is
detected. Many devices can be connected together by connecting the Trigger Output from a
device to the Trigger Input of the next device.
The illustration below shows 5 devices connected to give 60 cues, all fired from 1 cue on an
existing firing system.
Illustration 1: Step Mode
Note: It does NOT matter which way around the Trigger Input and Triger Output terminals
are connected. You do NOT need to match red to red and black to black.
© EasyPyro Ltd 2012
RhinoFire STEP13 User Guide v1.5
14 of 23
SWEEP MODE
Sweep Mode allows “right to left”, “left to right”, “centre out” and “crossed” sweep sequences
to be easily created using multiple devices.
Each time a Trigger Input pulse is received, the devices will fire the next free cue in order with
a time delay between each firing site.
You do not need to use a separate device for each firing site. Each device can be set up with
multiple sites. This reduces the number of devices and amount of wire needed to fire wide
firing fronts.
Each device can have a number of firing sites allocated to it.
Number of firing sites
per device
Cues per
firing site
Split of Cues on device
1
12
[1-12]
2
6
[1-6] & [7-12]
3
4
[1-4] & [5-8] & [9-12]
4
3
[1-3] & [4-6] & [7-9] & [10-12]
6
2
[1-2] & [3-4] & [5-6] & [7-8] & [9-10] & [11-12]
Note: On each sucessive Trigger Input pulse, the direction of fire will reverse.
Display Explanation
First site
on this device
Total number
of sites
Last site
on this device
© EasyPyro Ltd 2012
Delay between sites
[Must be same on all devices]
RhinoFire STEP13 User Guide v1.5
15 of 23
[Left > Right] & [Right > Left] Sweep
Example 1
The example below shows 9 sites of 4 cues each for a total of 36 cues, with 0.2s delay
between each site.
Device Screen
Description
A
Device A is set up with sites 1-3 of 9 and
interval 0.2s.
B
Device B is set up with sites 4-6 of 9 and
interval 0.2s.
C
Device C is set up with sites 7-9 of 9 and
interval 0.2s.
Trigger Input
Number ...
Behaviour
1st
Sweep Left – Right
Cue 1 on sites 1 – 9 fire with a 0.2s delay between each site, going from
Site 1 to Site 9.
2nd
Sweep Right – Left
Cue 2 on sites 1 – 9 fire with a 0.2s delay between each site, going from
Site 9 to Site 1.
3rd
Sweep Left – Right
Cue 3 on sites 1 – 9 fire with a 0.2s delay between each site, going from
Site 1 to Site 9.
4th
Sweep Right – Left
Cue 4 on sites 1 – 9 fire with a 0.2s delay between each site, going from
Site 9 to Site 1.
5th ...
There are no more cues to fire. All devices will have automatically disarmed.
© EasyPyro Ltd 2012
RhinoFire STEP13 User Guide v1.5
16 of 23
Illustration 2: Sweep Mode [Left > Right] & [Right > Left]
Note: Each time delay MUST be the same. For example, to achieve a sweep with 0.1s
between each firing site, the time on EACH device MUST be set to 0.1s.
© EasyPyro Ltd 2012
RhinoFire STEP13 User Guide v1.5
17 of 23
Example 2
The example below shows 8 sites of 6 cues each for a total of 48 cues, with 0.15s delay
between each site.
Device Screen
Description
A
Device A is set up with sites 1-2 of 8 and
interval 0.15s.
B
Device B is set up with sites 3-4 of 8 and
interval 0.15s.
C
Device C is set up with sites 5-6 of 8 and
interval 0.15s.
D
Device D is set up with sites 7-8 of 8 and
interval 0.15s.
Trigger Input
Number ...
Behaviour
1st
Sweep Left – Right
Cue 1 on sites 1 – 8 fire with a 0.15s delay between each site, going from
Site 1 to Site 8.
2nd
Sweep Right – Left
Cue 2 on sites 1 – 8 fire with a 0.15s delay between each site, going from
Site 8 to Site 1.
3rd
Sweep Left – Right
Cue 3 on sites 1 – 8 fire with a 0.15s delay between each site, going from
Site 1 to Site 8.
4th
Sweep Right – Left
Cue 4 on sites 1 – 8 fire with a 0.15s delay between each site, going from
Site 8 to Site 1.
5th
Sweep Left – Right
Cue 5 on sites 1 – 8 fire with a 0.15s delay between each site, going from
Site 1 to Site 8.
6th
Sweep Right – Left
Cue 6 on sites 1 – 8 fire with a 0.15s delay between each site, going from
Site 8 to Site 1.
7th ...
There are no more cues to fire. All devices will have automatically disarmed.
© EasyPyro Ltd 2012
RhinoFire STEP13 User Guide v1.5
18 of 23
Illustration 3: Sweep Mode [Left > Right] & [Right > Left]
© EasyPyro Ltd 2012
RhinoFire STEP13 User Guide v1.5
19 of 23
[Crossed] Sweep
The device does not need to wait until 1 sweep is finished before starting the next. 2 quick
Trigger Input pulses will cause the “Right to Left” and “Left to Right” sweeps to start at
approximately the same time. This gives the impression of the effects coming in from each
side and crossing in the middle.
Illustration 4: Sweep Mode [Crossed]
© EasyPyro Ltd 2012
RhinoFire STEP13 User Guide v1.5
20 of 23
[Centre > Out] Sweep
A centre out sweep can be created by using an even number of devices and mirroring them.
Devices marked A share the same configuration and devices mark B share the same
configuration.
The example below shows 12 sites of 4 cues each for a total of 48 cues.
Example 1
Device Screen
Description
A
Device's marked A are set up with sites 1-3
of 6 and time delay 0.1s.
B
Device's marked B are set up with sites 4-6
of 6 and time delay 0.1s.
Trigger Input
Number ...
Behaviour
1st
Sweep Centre – Out
Cue 1 on sites 1 – 6 fire with a 0.1s delay between each site, going from
Site 1 to Site 6 on both sides.
2nd
Sweep Right – Left
Cue 2 on sites 1 – 6 fire with a 0.1s delay between each site, going from
Site 6 to Site 1 on both sides.
3rd
Sweep Left – Right
Cue 3 on sites 1 – 6 fire with a 0.1s delay between each site, going from
Site 1 to Site 6.
4th
Sweep Right – Left
Cue 4 on sites 1 – 6 fire with a 0.1s delay between each site, going from
Site 6 to Site 1.
5th ...
There are no more cues to fire. All devices will have automatically disarmed.
© EasyPyro Ltd 2012
RhinoFire STEP13 User Guide v1.5
21 of 23
Illustration 5: Sweep Mode [Centre > Out]
Note: The left 2 devices are shown inverted (upside down) to aid the layout of the diagram.
© EasyPyro Ltd 2012
RhinoFire STEP13 User Guide v1.5
22 of 23