1
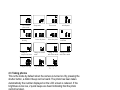
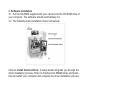
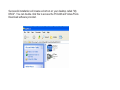
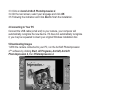
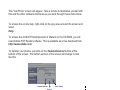
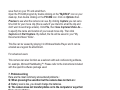
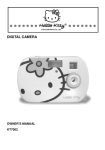
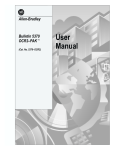
JDC9
USER’S MANUAL
FCC part 15.21
Warning: Changes or modifications to this unit not expressly approved by the
party responsible for compliance could void the user’s authority to operate the
equipment.
FCC part 15.105
NOTE: This equipment has been tested and found to comply with the limits for a
Class B digital device, pursuant to Part 15 of the FCC Rules. These limits are
designed to provide reasonable protection against harmful interference in a
residential installation. This equipment generates, uses, and can radiate radio
frequency energy and, if not installed and used in accordance with the instructions,
may cause harmful interference to radio communications. However, there is no
guarantee that interference will not occur in a particular installation. If this
equipment does cause harmful interference to radio or television reception, which
can be determined by turning the equipment off and on, the user is encouraged to
try to correct the interference by one or more of the following measures:
-
Reorient or relocate the receiving antenna.
-
Increase the separation between the equipment and receiver.
-
Connect the equipment into an outlet on a circuit different from that to which
the receiver is connected.
-
Consult the dealer or an experienced radio TV technician for help.
Pertinent testing documentation is available for verification.
We congratulate you on your acquisition of this digital camera. Before using it
please read this instruction manual carefully in order to be able to use all its
functions correctly, thus avoiding mistakes.
1
Index
FCC part ................................................................................................................. 1
1. Getting to know your digital camera:................................................................... 3
1.1
Functions and characteristics .......................................................... 3
1.2
Technical specifications................................................................... 4
1.3
System compatibility :...................................................................... 5
1.4
Camera functions ............................................................................ 5
2. Using your digital camera.................................................................................... 6
2.1 Battery loading ....................................................................................... 6
2.2 Changing function modes....................................................................... 6
2.3 Taking photos......................................................................................... 7
2.4 Sleep mode (automatic energy-saving) ................................................. 8
2.5 Self-Timer mode..................................................................................... 8
2.6 AVI mode................................................................................................ 8
2.7 Continuous shooting............................................................................... 8
2.8 Deleting all the photos saved to memory ............................................... 8
2.9 Deleting the last photos saved to memory ............................................. 9
2.10 Modifying resolution Ì ......................................................................... 9
2.11 Modifying frequency ............................................................................. 9
2.12 Modify the compression mode ............................................................. 9
3. Software Installation.......................................................................................... 10
4.Connecting to Your PC ...................................................................................... 12
5.Downloading Images.......................................................................................... 12
6. PC/Webcam Function ....................................................................................... 14
7. Problem-solving ................................................................................................ 15
Important NOTES.................................................................................................. 16
2
1. Getting to know your digital camera:
Using your digital camera will be a new experience.
You no longer need films and do not need to worry about ageing (colours
fading) of your precious pictures.
You can now store all your photos on your computer and on CD-ROM. After
taking pictures you can now touch them up in order to correct imperfections
due to poor conditions. You can also send your photos via the Internet and
use your camera as a web cam in order to have interactive discussions with
your friends. You will certainly become an expert in using digital cameras. It is
now up to you to enter into the fantastic world of digital photography.
1.1 Functions and characteristics
Camera functions: without any film you can capture your favourite moments.
These photos will be stored in the internal memory of the camera.
Computer Interface: it is not necessary to develop negatives. The photos
can be transferred onto your computer with the USB cable supplied with your
camera. You can thus appreciate your photos immediately, print them via an
external printer and even send them to your friends via the Internet.
Video function: when connected to a computer the camera becomes a web
cam. It can be used as a monitor or, on the Internet, can be used to conduct
a "face-to-face" conversation with images.
Timer: the camera has a time of function of 10 seconds accompanied by a
beep function and an LED light.
After 10 seconds the camera automatically takes the photograph.
Continuous shooting: in certain cases you may wish to record a group of
consecutive images. Your camera can take a succession of three photos with
3
each press of the shutter button.
Automatic exposure control: the camera automatically controls exposition
in poor light conditions meaning that you do not have to worry about aperture
or shutter speed.
Automatic shutdown (Sleep mode): after 30 seconds of inactivity the
camera automatically shuts down thus reducing the consumption of batteries
to a minimum. Alkaline batteries allow you to take more than 200
photographs.
Applications supplied: the camera is supplied with a powerful photo
processing program that allows you to capture, save, touch up, transform,
print and send your photos, in any manner that you so desire. It also allows
you to transform the camera into a video camera and to link it up to most
image processing programs, network management programs and video
programs used.
1.2 Technical specifications
Resolution : 100K Pixels (352 X 288) CIF
Colour : 24 bits
Lens : non-spherical
Aperture 1: 2.6
Focus = 5.4mm
Image variation: 0.5m –to infinity
Luminosity : 120 -- 16 000 (lux)
Storage capacity : 2MB
18 photos normal CIF (352 X 288)
50 photos compressed CIF
64 photos normal QCIF (176 X 144)
4
150 photos compressed QCIF
Power supply : 3 alkaline batteries type AAA
PHOTOS STORED IN MEMORY.
Interface : USB port
1.3 System compatibility :
- Pentium II
- Windows 98/2000/ME/XP
- Memory : 64 MB minimum (128 MB recommended)
- Hard drive capacity : 350 MB
- Installation via CD ROM drive
- Colour monitor : minimum 800*600. 24 bits
- Interface : USB
1.4 Camera functions
Self-timer LED
Viewfinder
Shutter Button
OPEN
Viewfinder
Mode Button
Lens
LCD
Tripod Mount
USB Interface
5
Battery Cover
2. Using your digital camera
2.1 Battery loading
Open the battery compartment located at the back of the appliance and place three
1.5V AAA type alkaline batteries in it, inserting them in the direction shown on the
diagram at the bottom of the compartment. Close the compartment and press the
MODE button. The number 18 will appear on the LCD screen of the camera. This
indicates that it is ready to take 18 "high-resolution" photographs and that its
memory is empty.
When the symbols blink on the LCD screen, which indicates low battery power, it is
time to change the batteries.
Warning: please transfer those captured photos to your computer via USB cable
before changing battery to save photos, or else, the photos captured will lose.
Important: we strongly recommend that you do not use rechargeable batteries in
order to not reduce the performance of your camera.
2.2 Changing function modes
The LCD screen displays different symbols when the MODE button is
pressed. The meanings are as follows:
6
H i-resolution
photo m ode
C ontinuous
shooting
C hange to
com pressed m ode
C om pressio n high
Sleep m ode
T im er m ode
D elete all photos
C hange to n orm al
m ode
A V I C a pture
D elete last photo
C hange to Low resolution
C hang e to 50 H z
anti-flicker m ode
C hange to 60 H z
anti-flicker m ode
C om pression low
l i
i
L ow resolution
i
2.3 Taking photos
This is the mode by default when the camera is turned on. By pressing the
shutter button, a distinct beep can be heard. The photo has been taken.
Automatically the number displayed on the LCD screen is reduced. If the
brightness is too low, 2 quick beeps are heard indicating that the photo
cannot be taken.
WARNING: when light is low the camera needs more time to automatically
adjust exposure and gain. The beep, indicating that the photo has been taken,
therefore goes off after a certain time has elapsed. Make sure you do not
move the camera during this time lapse.
7
2.4 Sleep mode (automatic energy-saving)
The camera goes into sleep mode automatically after 30 seconds of inactivity
if it is not linked to a computer via the USB cable.
You can manually go into sleep mode by pressing the MODE button until "off"
is shown on the LCD screen. Then press the shutter button to validate your
choice. A beep confirms your choice. In sleep mode energy consumption is
very low and the battery life is prolonged. Your camera can remain in sleep
mode for up to 100 hours. To use your camera again simply press the MODE
button.
2.5 Self-Timer mode
Press the MODE button until the LCD screen displays the icon of "Self-timer"
mode. Press the shutter button and the camera counts down for 10 seconds
then gives off a beep and the LED light blinks every second. Then the
camera takes a photo.
2.6 AVI mode
Press the MODE button until the LCD display shows <AVI Capture>.
Press the shutter button, and the camera will continuously capture for about 6
frames per second until you release the button.
2.7 Continuous shooting
Press the MODE button until the LCD screen displays the "continuous
shooting" mode. Press the shutter button and the camera takes three
consecutive photos. The number on the LCD screen goes down accordingly.
2.8 Deleting all the photos saved to memory
Press the MODE button until the LCD screen displays the icon of the "delete
all photos" mode and then press the shutter button twice to validate your
choice. All the photos stored in the camera will be deleted and the previously
8
chosen resolution mode will not change.
2.9 Deleting the last photos saved to memory
Press the MODE button until the LCD screen displays the icon of the "delete
last photo taken" mode and then press the shutter button to validate. The last
photo taken and saved will be deleted. If the last photo was taken in
continuous shooting mode the whole group of photos will be deleted.
2.10 Modifying resolution Ì
When you need to take a lots of photos at one time you can choose the "low
resolution" mode. Press the MODE button until the LCD screen displays the
symbol "Ì" and then press the shutter button to confirm. If you want to change
back into "high-resolution" mode, press the MODE button until the LCD screen
displays the symbol "ÌÌÌ" and then press the shutter button to confirm..
2.11 Modifying frequency
Modify the anti-flicker frequency if you decide to take photos in rooms with
fluorescent light bulbs. Press the MODE button until the LCD screen displays
the "anti-flicker" mode (50 / 60) and then press the shutter button to confirm.
2.12 Modify the compression mode
Press the MODE button until the LCD screen displays “Hd” and then press
the shutter button to confirm.
Note: Sometimes the actual photo number on low&compression mode may
be different to display under different background.
9
3. Software Installation
3.1 Put the CD-ROM supplied with your camera into the CD-ROM drive of
your computer. The software should automatically run.
3.2 The following main installation screen will appear.
Click on Install Camera Driver. A setup wizard will guide you through the
driver installation process. When its finished click Finish when prompted –
this will restart your computer and complete the driver installation process.
10
Successful installation will create a shortcut on your desktop called "My
DSC2". You can double click this to access the PCCAM and Video-Photo
Download software provided.
11
3.3 Click on Install ArcSoft PhotoImpression 4.
3.4 On the next screen, select your language and click OK.
3.5 Following the indication and Click Next to finish the installation.
4.Connecting to Your PC
Connect the USB cable (small end) to your camera, your computer will
automatically recognize the new device. If it does not automatically recognize
it, you may be requested to insert your original Windows installation disc.
5.Downloading Images
1.With the camera connected to your PC, run the ArcSoft Photoimpression
4™ software by clicking Start, All Programs, ArcSoft, ArcSoft
Photoimpression 4, then Photoimpression 4.
12
This "Get Photo" screen will appear. Take a minute to familiarise yourself with
this and the other software interfaces as you work through these instructions.
To access the on-line help, right-click on the grey area around the screen and
select
Help.
To access the ArcSoft PhotoImpression 4 Manual on the CD-ROM, you will
need Adobe PDF Reader software. This is available as a free download from
http://www.adobe.com
To transfer your photos, just click on the Camera/Scanner button at the
bottom of the screen. The bottom section of the screen will change to look
like this.
Acquire Options
Video Camera
Acquire
Select the source DualCamera , select an album (or select [NEW]) to insert
your photos into and click the Acquire icon. This will run the driver (program)
that accesses the photos on your camera. This driver software is called
" MyDSC2 ".
13
Click on the MyDSC2 icon and your pictures will be transferred to the
download program ,you can download all of the photos by clicking on the
Select all Photos icon. Clicking on the Transfer Photos button will transfer
the corresponding photo/s to the ArcSoft PhotoImpression 4™ interface.
Here you can edit, enhance, add special effects and save them on your
computer or on removable media e.g. floppy disc or a CD-R if you have the
facility.
6. PC/Webcam Function
By running the PCCam software you can capture real-time videos or images,
14
save them on your PC and email them.
Open the PCCAM program by double clicking on the "MyDSC2" icon on your
desk-top, then double clicking on the PCCAM icon. Click on Options then
Preview to see what the camera can see. By clicking Capture you can set a
time limit for your movie clip (this is useful if you intend to email the clip and
don't want to send large emails). Click File, then Save Captured Video As…
to specify the name and location of your saved movie clip. Then click
Capture and Start Capture. By default, the file will be saved in your "My
Documents\Videos" folder .
This file can be viewed by playing it in Windows Media Player and it can be
emailed as a regular file attachment.
For advanced users:
This camera can also function as a webcam with web conferencing software,
for example, Microsoft NetMeeting™. Please refer to the instructions included
with the specific software package used.
7. Problem-solving
Here are the most commonly encountered problems :
Q: When pressing the selection but the camera does not turn on :
A: Battery level is low, you should change the batteries.
Q: The camera does not transfer photos on to the computer or says that
there are no photos :
A: Restart the computer and reconnect the camera. Check that the folder
MyDSC2 is in the control panel/system settings. If device is not present then
reinstall it again.
15
Important NOTES
1. Please take few pictures and download images to computer
according with this Manual. Learn how to use and to know your
camera before taking important pictures.
2. Please transfer all captured photos to your computer before replacing
the batteries.
3. Using your camera when there is body static-electricity may power off
your camera or stop PC-CAM, simply restart it and the camera will
work again.
16