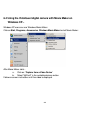
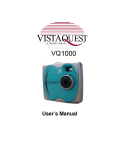
1
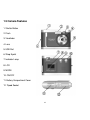
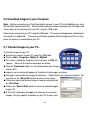
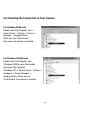
User’s Manual
Contents
1.0
Introduction ----------------------------------------------------------------------------------------------
1
1.1
Overview ---------------------------------------------------------------------------------------------------
1
1.2
Warnings and Precautions -------------------------------------------------------------------------
1
1.3
Package Contents --------------------------------------------------------------------------------------
3
1.4
System Requirements---------------------------------------------------------------------------------
3
1.5
Camera Features ---------------------------------------------------------------------------------------
4
2.0
Installing the Batteries --------------------------------------------------------------------------------
5
3.0
Capturing Images --------------------------------------------------------------------------------------
6
3.1
Power-On the Camera---------------------------------------------------------------------------------
6
3.2
Capture an Image --------------------------------------------------------------------------------------
7
3.3
Camera Status Icons-----------------------------------------------------------------------------------
8
3.4
Power-Off the Camera---------------------------------------------------------------------------------
9
3.5
Flash Charging-------------------------------------------------------------------------------------------
9
3.6
Self-Time ---------------------------------------------------------------------------------------------------
9
3.7
AVI Capture -----------------------------------------------------------------------------------------------
10
3.8
Continuous Capture -----------------------------------------------------------------------------------
10
3.9
Deleting Images -----------------------------------------------------------------------------------------
11
3.10
Image Resolution -----------------------------------------------------------------------------------------
11
Contents
3.11
High/Low Image Compression --------------------------------------------------------------------
12
3.12
Lighting Frequency ------------------------------------------------------------------------------------
12
3.13
Using the Flash: Automatic or On/Fill --------------------------------------------------------
12
3.14
Techniques for Capturing the Best Images --------------------------------------------------
13
4.0
Installing Camera Drive and Software ----------------------------------------------------------
14
4.1
Uninstalling Software and Camera Driver ----------------------------------------------------
15
5.0
Download Images to your Computer -----------------------------------------------------------
16
5.1
Transfer Images to your PC ------------------------------------------------------------------------
16
5.2
Transferring your Images to PhotoImpression 5 ------------------------------------------
17
5.3
ArcSoft PhotoImpression 5 -------------------------------------------------------------------------
18
5.4
ArcSoft VideoImpression 2 -------------------------------------------------------------------------
19
5.5
Checking the Connection of Your Camera ---------------------------------------------------
22
6.0
PC/Web Camera Video Function -----------------------------------------------------------------
23
6.1
Using the Camera in Video Mode ----------------------------------------------------------------
23
6.2
Using the Camera with PC Cam
-------------------------------------------------------------
23
6.3
Using the Camera with NetMeeting -------------------------------------------------------------
23
6.4
Using the VistaQuest digital camera with Movie Maker on Windows XP --------
24
7.0
Specifications --------------------------------------------------------------------------------------------
25
020606
WARNING
When the battery icon is blinking,
download the pictures to your computer, immediately, and
change the batteries; otherwise,
your images will be lost.
1.0 Introduction
1.1 Overview
Thank you for purchasing a VistaQuest digital camera. It can capture digital images, short
video-clips (continuous shooting mode), and it can also serve as a PC/Web camera. The camera is
equipped with 8 MB of memory to store your images and movie clips. You may download your
images and movie clips to your computer using the USB cable and included software.
1.2 Warnings and Precautions
1.2.1 FCC STATEMENT
This device complies with Part 15 of the FCC Rules. Operation is subject to the following two
conditions:
1. This device may not cause harmful interference, and
2. This device must accept any interference received, including interference that may
cause undesired operation.
Note: This equipment has been tested and found to comply with the limits for Class B digital
devices, pursuant to Part 15 of the FCC rules. These limits are designed to provide reasonable
protection against harmful interference in a residential installation. This equipment generates, uses
and can radiate radio frequency energy and, if not installed and used in accordance with the
instructions, may cause harmful interference to radio communications. However, there is no
guarantee that interference will not occur in a particular installation. If this equipment does cause
harmful interference to radio or television reception, which can be determined by turning the
equipment off and on, the user is encouraged to try to correct the interference by one or more of the
following measures:
-1-
1.
2.
3.
4.
Reorient or relocate the receiving antenna
Increase the separation between the equipment and receiver
Connect the equipment into an outlet on a circuit different from that to which the receiver
is connected
Consult the dealer or an experienced radio/TV technician for help
Use of shielded cable is required to comply with Class B limits in Subpart B of Part 15 of the FCC
rules. Do not make any changes or modifications to the equipment unless otherwise specified in
the manual. If such changes or modifications should be made, you could be required to stop
operation of the equipment.
1.2.2 GENERAL WARNINGS
Do not use batteries other than those specified for use with the camera. The use of unsuitable
batteries may result in the batteries splitting or leaking and causing a fire, injury, or soiling of the
battery compartment.
When placing batteries in the camera, check the polarity of the batteries (- and +) to ensure proper
orientation. Incorrect polarity may result in the batteries splitting or leaking and causing a fire, injury,
or soiling of the battery compartment.
Remove the batteries if the camera will not be used for an extended period of time. The batteries
may leak and cause a fire, injury or soiling of the battery compartment. If the batteries leak clean
and wipe the battery compartment carefully and install new batteries. Wash your hands carefully if
you touch the battery fluid. Please note that when you remove the batteries your images will be lost
from the camera memory.
WARNING: Handling the USB cable on this product may expose you to lead, a chemical known to
the State of California to cause birth defects or other reproductive harm. Wash your hands after
handling.
-2-
1.2.3 TRADEMARK INFORMATION
Microsoft® and Windows® are U.S. registered trademarks of Microsoft Corporation.
Pentium® is a registered trademark of Intel Corporation. Other names and products may be
trademarks or registered trademarks of their respective owner.
1.3 Package Contents
The package typically includes:
1. Camera
2. USB Cable
3. CD ROM with Driver and Application Software
4. User Manual
5. Three (3) AAA batteries
6. Hand Strap
Note: Included components may vary, as specified by local retailers and locations.
Consult with your retailer for specifics.
1.4 System Requirements
You must use a computer to download the images from your camera. The computer used
must meet the following minimum requirements:
1.
2.
3.
4.
5.
6.
Windows SE 98 /ME/2000/XP
Direct X 8.0 or higher
128 MB RAM
60 MB hard disk space available
Available USB Port
CD-ROM Drive
-3-
1.5 Camera Features
1. Shutter Button
2. Flash
3. Viewfinder
4. Lens
5. USB Port
6. Strap Eyelet
7. Indicator Lamp
8. LCD
9. MODE
10. ON/OFF
11. Battery Compartment Cover
12. Tripod Socket
-4-
2.0 Installing the Batteries
Step 1: Open the battery door by lifting the tab on the door.
Step 2: Insert three AAA batteries with the polarity as shown.
Step 3: Close the battery cover.
Warning: Do not open the battery door when the camera is powered ON. This will cause
all images in memory to be lost immediately. If you open the battery door when the camera
is OFF (when changing the batteries) you must close the door within thirty (30) seconds or
your images will be erased from memory.
Notes:
1.
2.
3.
4.
5.
6.
Always download your images to your computer soon after you have captured them.
Never assume your images will be retained for more than three or four days. If the
batteries are depleted, your images will be lost.
If you must change the batteries, makes sure the camera is OFF and then change the
batteries in less than thirty (30) seconds.
If you will not use the camera for a long time (several days, or more) remove the
batteries. The batteries will discharge slowly if left in the camera. This may cause
complete battery discharge as well as loss of images. The batteries may corrode if left in
the camera for extended periods of time.
Dispose of batteries properly in accordance with local laws and regulations. Do not place
them in fire.
The VQ 350 has an automatic power-saving feature. The camera will turn off
automatically if it has not been used after approximately thirty (30) seconds.
When the camera is connected to a computer using a USB cable, it is not necessary to
use batteries because the camera uses the power provided by the computer through
the USB interface.
-5-
3.0 Capturing Images
Using your new camera is fun and easy.
There are two basic steps to capturing
your first image.
Step 1: Turn on the camera by holding down
the Power Button for two seconds.
Step 2: Press the Shutter Button to capture an image.
It is really that easy! The following sections will tell you about more features available on your camera.
3.1 Power-On the Camera
To power-on the camera hold down the Power ON/OFF button for two seconds as shown
above. The camera will beep once, indicating that it is ready. The Status LCD display will turn as
Illustrated in the picture at the right.
In this example the camera is ready to capture an image in High
Resolution Mode. (Function icons are explained in Section 3.3.)
Note that the camera will automatically power-off after 30 seconds of inactivity
to save battery power. To turn the camera on again, press the Power button.
-6-
3.2 Capture an Image
In film photography we say: “Take a Photo.” In digital photography we say: “Capture an Image.”
Capturing an image with the VQ 350 is easy.
Step 1: Power-on the camera and look through the viewfinder to frame your subject.
Make sure your subject is no closer than three or four feet (one meter)
to insure good focus.
Step 2: Press the Shutter button to capture an image.
The camera will beep once and the image counter
will increase by one count.
For example the counter may change from
to
The display counter shows the number of images to be taken.
Memory is full when the “FL” warning message appears on the Info/Status LCD.
Downloading your images or choosing to delete them is necessary at that time
to make space available to capture additional images.
Warning: When batteries are disconnected or discharged, the memory and all
pictures taken will be erased.
-7-
3.3 Camera Status Icons
Beyond the basics of capturing an image, the VQ 350 has many other features.
Turn on the camera and notice the many icons and symbols on the status LCD.
As you press the Mode button
the LCD display will change in the following order.
To learn more about each function refer to the referenced section in this User Manual.
Display
Function
Refer
Off
Power-off
3.4
So
Flash Charging
3.5
Self-Timer
3.6
AVI Capture
3.7
Continuous Capture
3.8
Delete the last image from memory
3.9.1
Delete all images from memory
3.9.2
Hi/LO
Image Resolution
3.10
HD/LD
60/50
SA/SF
Higher or Lower Image Quality (compression)
3.11
Indoor Lighting Frequency (Hz)
3.12
Strobe (flash) Automatic/Strobe Forced (on)
3.13
Battery Status
-----------
Whenever the camera communicates with a PC, the USB icon will be
shown on the LCD
-----------
-8-
3.4 Power-Off the Camera
Hold down the Power ON/OFF button for 2 second to turn-off the camera immediately.
You can also press Mode button until “ Off ” appears on the LCD; then press the
Shutter button within three seconds to power-off the camera.
Note: The camera will automatically power-off after 30 seconds of inactivity.
3.5 Flash Charging
Press Mode button until “ So ” appears on the LCD display then press the Shutter button
within three seconds to start charging the flash. The lightening icon “
” will blink continuously until it is
fully charged.
3.6 Self-Timer
If you would like to capture yourself in the image you wish to capture, you may use the self-timer
feature to delay the camera by ten (10) seconds. Place the camera on a tripod or a flat, stable
surface. Turn on the camera. Press the Mode button until the “
” icon appears on the LCD
display.
Press the Shutter button. The camera will beep as it counts down. The camera will then
capture an image automatically after 10 seconds.
-9-
3.7 AVI Capture
You can capture motion-video clips using the AVI Capture feature. The image is stored
in the AVI format. The image counter counts in increments by one after movie clips are stored.
Video clips are captured at a resolution of 320 x 240. The movie-clip frame rate will be
approximately six frames per second. Movie clips are silent. (No audio.) To use the AVI Capture
Mode follow these steps:
Step 1: Power-on the camera. Press the Mode button until the “
LCD display.
” icon appears on the
Step 2: Once the Shutter button is pressed, the camera will beep and the camera starts
recording videos continuously until the button is released.
Step 3: Release the Shutter button to stop recording. The camera will stop recording
automatically when the built-in memory is full. When the built-in memory is full,
“FL” will be shown on the LCD display.
Note: When you download a movie-clip it will be in the popular AVI format.
Use Windows Media Player or Apple Quick Time Player to view movies.
3.8 Continuous Capture
You can capture three images using the Continuous Capture feature. When you use this mode
the image resolution will be 640 x 480. To use the Continuous Capture mode follow these steps:
Step 1: Power on the camera. Press the Mode button until the “
LCD display.
” icon appears on the
Step 2: Press the Shutter button; the camera will capture three images continuously.
-10-
3.9 Deleting Images
You can delete the last image captured or delete all images in memory.
3.9.1 Delete the Last Image
Step 1: Power-on camera. Press the Mode button until the “
display.
” icon appears on the LCD
Step 2: Press the shutter button to delete the last picture. The image will be deleted; the
image counter will decrease by one. (Example: 020 will change to 019.)
3.9.2 Delete All Images
Step 1: Power-on the camera. Press the Mode button until the “
LCD display.
” icon appears on the
Step 2: Press the Shutter button. The image counter will flash on & off.
Step 3: Press the Shutter button again to delete all images.
All Images will be deleted and the image counter will display 000.
3.10 Image Resolution
Resolution is the size of a digital image measured in pixels (dots), expressed as horizontal number
of pixels times (x) vertical number of pixels. The VQ 350 offers two resolution modes. The
highest (best) resolution is 640 x 480: a VGA resolution. The second choice of resolution is 320 x
240: a QVGA resolution.
VGA resolution images will be the best possible images from your camera.
QVGA resolution images are noticeably smaller when you view them on your computer. QVGA
resolution is not recommended for individual digital images. The primary advantage to QVGA
-11-
resolution is that you may store more images (four times more) than VGA resolution images.
If you would like to use the QVGA resolution, turn on the camera. Press the Mode button until
“
” appears on the LCD display and “Hi” starts flashing on and off. Press the Shutter button
to change “Hi” to “Lo”---which is the QVGA mode.
If you would like to change resolution from QVGA to VGA, press the Mode button until “
”
appears on the LCD display and “LO” begins flashing on and off. Press the Shutter button to
change “LO” to “Hi.”----which is the VGA mode.
3.11 High/Low Image Compression
Press the Mode button until HD/LD appears on the LCD display. Press the Shutter button to set
the picture to “ HD ” (highest image quality, using the least compression) or “ LD ”(lower image
quality, using more compression). Higher quality images captured in the HD Mode will use more
of your camera’s available memory (storage space). The LD Mode allows you to store more
images, but of a lesser quality.
3.12 Light Frequency
When capturing images or movie clips under indoor lighting, the image quality will be best if you set
the camera to match the frequency of the room-lighting. In general, 60 Hz frequency is used in
US and Asia, whereas 50Hz is most common in UK, Japan, and Europe. To change the
frequency, turn on the camera. Press the Mode button until “ 50 ” or “ 60 ” appears on the LCD
display. Press the Shutter button to choose the setting you desire.
3.13 Using the Flash – Automatic (SA) or On (SF)
Press the Mode button until SA/SF appears on the LCD display. Press the Shutter button to set
the flash to automatic flash (Strobe Automatic) or forced flash (Strobe Forced). In automatic mode,
the camera will determine if the flash is needed, or not. In forced mode (also known as “fill” flash)
the flash will always fire, regardless of lighting conditions.
-12-
3.14 Techniques for Capturing the Best Images
The VQ 350 captures images to record special memories and lscenes you’ll want to share. Here
are a few tips for getting the best possible images from your camera.
1. Use good lighting. Give attention to your surroundings to insure your VQ 350 can perform
well with adequate existing lighting or use the flash to fill shadows or light dim areas.
2. Avoid uneven lighting and high contrast. Compose your scenes so that there are no deep
shadows or bright backgrounds. The key to good images is balanced scene lighting. Use
the fill - flash for scenes where high contrast and dark shadows are unavoidable.
3. Minimum focus distance. Make sure your subject is not too close. The minimum focus
distance is three to four feet (one meter).
4. Position your primary subject in the center of the image. The VQ 350 focuses best in the
center of the image. The edges of your images are softly focused, giving a nice soft
perimeter effect to each image.
-13-
4.0 Installing Camera Drive and Software
•
Installing Driver
1. Turn on the computer.
2. Insert installation CD into the CD-ROM drive and the
installation CD menu will appear.
3. When you see the following screen, choose “Camera Driver”.
4. Follow the on-screen instructions.
5. Restart the computer.
For Windows 2000/XP only:
During installation of the driver or software, computer may display the message:
“The software you are going to install doesn’t contain the Microsoft signature, and
may not work correctly. Do you want to continue? Y / N”
Please select Y to continue the installation.
•
Installing Software
1. Insert installation CD into the CD-ROM drive and the
installation CD menu should appear.
2. When you see the following screen, choose
“Arcsoft Software ” to install the software.
3. Follow the instructions on screen.
4. Installed software will automatically create
“VideoImpression 2” or “PhotoImpression 5” logo on your desktop.
-14-
4.1 Uninstalling Software and Camera Driver
The following instructions guide you to uninstall (remove) software from your computer.
Uninstalling Software
1. Click “Start” from the task bar and choose “Settings->”Control Panel”
For Windows XP: “Start”->”Control Panels”
2. Double click “Add/Remove Programs”.
3. Select the program to be uninstalled: “ArcSoft Software Suite”.
4. Click “Remove Program”. (For Windows 2000/XP: Click ”Change/Remove”)
5. Click “OK”.
Uninstalling Camera’s Driver
1. Click “Start” from the task bar and choose “Settings”-> “Control Panel”.
For Windows XP:”Start”-> “Control Panels”
2. Double click “Add/Remove Programs”
3. Select the program to be uninstalled: “DualCamera”.
4. Click “Remove Program”. (For Windows 2000/XP: Click ”Change/Remove”)
5. Click “OK”.
-15-
5.0 Download Images to your Computer
Note: Before connecting your VistaQuest digital camera to your PC for the first time you must
first install the camera driver first. After the driver software has been installed, your still images and
movie clips can be transferred to your PC using the USB cable.
Connect your camera to your PC using the USB cable. The camera will beep once, indicating the
connection is established. The camera installation process will be completed at the first time
when the camera is connected to your PC.
5.1 Transfer Images to your PC To transfer images to your PC:
Connect the camera to your PC using the USB cable
Click on StartProgramsMyDsc2MyDsc2.
This screen (called the Graphical User Interface, or GUI) will
appear. Note that the twelve rectangles are empty.
Click the “Download” button to start downloading your images
into the GUI.
mages in your camera will appear as thumbnail sized images as shown:
Using your mouse click on images to selct them. (Right click on an image to enlarge it.) You
may click on the “Select All” button to select every image.
If there are more than twelves images in camera memory click
on “Next Page.”
Click on the “Save to Disk” button to save the selected images
to your PC.
A “Save As” dialog box will appear to allow you to save your
images. You may specifiy a location on your PC to store your
-16-
images. The default directory will be “My Documents”
All selected images will be saved sequentially beginning
with the name Photo001. You may specify a different prefix by typing the desired name in the
“File name” space.
Click on the “Save” button to save the selected images.
Note: After your images are downloaded to your PC, disconnect the camera. Your images remain
in camera memory. Delete the images from camera memory so you can capture more.
5.2 Transferring your Images to PhotoImpression 5
To transfer images to PhotoImpression following these steps:
Connect your camera.
Launch PhotoImpression.
In the “ Get photo from…. ” dialog box (shown to the right)
choose the source of your images.
Click on “ Camera/Scanner.”
A new window as below will appear.
Double click on “MyDsc2”, or “DualCamera.”
The VQ 350 (MyDsc2) GUI control panel appears on the
screen.
Follow the steps in the prior section.
Note that a fourth button appears in the VQ 350 GUI –
“Transfer to AP”. Instead of immediately saving your
images to disk you may first transfer them to
PhotoImpression to edit them prior to saving them.
-17-
5.3 ArcSoft PhotoImpression 5
Arcsoft PhotoImpression 5 is a complete digital image editing application
designed with real people in mind. Easy-to-use “Getting Start” guides,
user-friendly UI, and complete image editing functionality give users wonderful
experiences to organize, view, enhance, edit, print and share photos.
Click on “Start”
“Program”
“ArcSoft Software Suite” to PhotoImpression 5
and you will see a window as below.
Select the “Photos Source.” For example: Click “Folder”
to acquire photos from your
computer. Select the file path. You can start editing them now.
-18-
1.
2.
3.
4.
5.
6.
Get Photo: Choose how to view or acquire photos.
Enhance: Crop, brighten, rotate, resize and modify photos.
Create: Add clip art, special effects, frames and more.
Project: Make calendars, photo books and greeting cards.
Print: Print multiple images per page and multiple pages at one time.
Send: Email photos or upload them to online photo sharing accounts.
Note: For detailed information, please refer to the Help of the program.
-19-
5.4 ArcSoft VideoImpression 2
VideoImpression creates home movies and slide shows by combining existing videos, still images,
exciting scene transitions, and multiple audio tracks. Though simple to use, the program provides
intense and broad video editing and export options perfect for owners of digital still cameras,
desktop and digital video cameras, and camcorders. Click “Start” “Program” “ArcSoft Software
Suite” “VideoImpression 2” to launch VideoImpression 2 or double click VideoImpression 2 icon
on the desktop and you will see a window as the screenshot below:
Open a Project. Lets you browse project files in the VideoImpression system folder. “Project” is
a file that contains all of the settings and each individual component on the Storyboard. When you
save your work as a project, you can go back and swap components, add and remove them, alter
audio, etc.
Create a Video. Create a new video project, retrieve media materials from the device connected,
or choose media files from system folder. You can choose video materials from your photo album
as well.
Create a Slide Show. Create a new slide show project, retrieve media materials from the device
connected or choose media files from system folder. You can choose slide show materials from
your photo album as well. If the box “always show this wizard when VideoImpression starts” at the
bottom of the wizard is checked, the wizard will appear each time you run the program. If you‘d like
to skip the wizard next time, uncheck the box. Select the item, picture, or videos you need, then you
-20-
will enter the editing interface as below.
You can use the six steps in the Function Menu to create video clips and slide shows.
Media: Select the videos and images that will comprise your final movie or slide show.
Edit: Modify video, image color and adjust the duration of each movie component. Only
available for video projects.
3. Effects: Add special effect transitions between each component or apply a pre-made
theme.
4. Text: Place animated text on any movie component. Only available for video projects.
5. Narrate: Record audio directly from the program and it to your movie.
6. Produce: Combine all components to create your final videos; save it in a variety of
ways or email it to friends.
The Storyboard: The backbone of the creation process; it’s where you assemble your movie.
The Player: Preview and modify your movies in this area.
Working with Albums: Albums let you organize your media for easy access.
1.
2.
For detailed information, please refer to the Help pf the program.
-21-
6.5 Checking the Connection of Your Camera
For Windows 98/Me only
Double click “My Computer” icon ->
Control Panel -> System -> Device ->
Manager -> Imaging Device;
When you see “DualCamera”
that means the camera is installed.
For Windows 2000/Xp only
Double click “My Computer” icon
(Windows 2000) or go to Start button
and select “My Computer”
(Windows XP) -> Control Panel -> System ->
Hardware -> Device Manager ->
Imaging Device; When you see
“DualCamera” the camera is installed.
-22-
6.0 PC/Web Camera Video Function
6.1 Using the Camera in Video Mode
PC users may use their camera as a PC/Web Cam. Note that the camera is a dual mode camera.
It is both a Digital-Still Camera and a PC Camera.
To use your camera as a PC/Web Cam you must first install the driver. After the driver is installed
and the camera is connected to your PC, you may view live video several ways:
1.
2.
3.
Use the PC Cam video utility included with the camera. (Refer to Section 7.2.)
Use your favorite third-party video program.
Use Microsoft NetMeeting (see Section 7.3)
Note: The Camera is a dual mode camera. You may use either mode, but you cannot use both
modes at the same time. Close the Camera GUI before starting the camera video mode.
6.2 Using the Camera with PC Cam
1.
2.
Click on Start, Programs, MyDSC2, PC Cam to start the PC Cam program:
The camera will start functioning as a PC Camera. Or you may select “Options” ->
“Preview” to begin the video function.
6.3 Using the Camera with NetMeeting
You may wish to use MS NetMeeting. Follow the steps below to set up your camera as the video
capture device.
1. Start NetMeeting.
2. After NetMeeting starts, click on Tools, Options.
3. From the Options dialog box, select the Video tab.
4. Refer to the Video camera properties section.
5. Select “DualCamera” as the video capture device.
6. Refer to the NetMeeting help file for additional information.
-23-
6.4 Using the VistaQuest digital camera with Movie Maker on
Windows XP –
Windows XP users can use Windows Movie Maker.
Click on Start, Programs, Accessories, Windows Movie Maker to start Movie Maker:
After Movie Maker starts a. Click on: “Capture from a Video Device”
b. Select “MyDsc2” in the available devices section.
Follow on-screen instructions until live-video is displayed.
-24-
7.0 Specifications
Image Resolution: 640 x 480 Pixels (VGA), or 320 x 240 Pixels (QVGA)
Built-in Memory: 8 MB (SDRAM)
Image Storage Capacity (approximate):
Resolution
640 x 480 (VGA)/HD
640 x 480 (VGA)/LD
320 x 240 (QVGA)/HD
320 x 240 (QVGA)/LD
Movie = 320 x 240 (QVGA)
Number of Images
25
119
100
463
120 seconds
Self-Timer: 10 seconds
Capture Modes: Single, Continuous, AVI Capture (movie clips)
Automatic Energy Saving: automatically shut-down after 30 seconds
Exposure and White Balance: Automatic
Power: Three AAA (1.5 VDC) batteries
PC Interface: USB 1.1
Working Temperature: 0 to 40 degrees C (32 to 90 F)
C 2006
Vistaquest Corporation
-25-
www.vistaquestusa.com