1
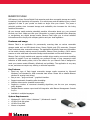
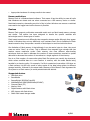
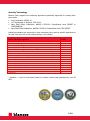
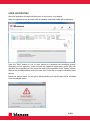
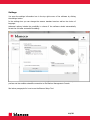
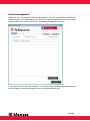
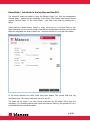
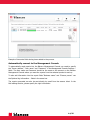
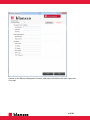
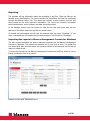
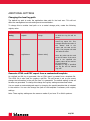
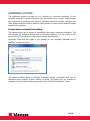
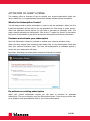
BLANCCO FLASH User Manual VERSION 2015 1.3.2.4 Windows 8.1, Windows 8, Windows 7, Vista and Windows XP. Certified and tested for Windows 8.1, Windows 8, Windows 7, Vista and Windows XP. www.blancco.com ABSTRACT This is the official Blancco Flash User Manual. Blancco is the proven data erasure solution for millions of users around the world. As the pioneer and global leader in data sanitization and end-of-lifecycle solutions, the company offers the most certified data erasure within the industry. Blancco Flash ensures data erasure before you dispose of your digital storage media. It permanently erases data from various solid-state removable storage media such as USB thumb drives, Secure Digital (SD) memory cards, CompactFlash cards and other flash memory storage devices. 2/25 DEFINITIONS ITEM EXPLANATION Compact Flash (memories) DWORD (Window registry) Compact Flash is a memory card format often used in portable, electronic devices. DWORD is one of the terms used to describe a variety of sizes of data. A DWORD consists of two WORDs which is equal to 32 bits. HTML, which stands for Hyper Text Markup Language, is the predominant markup language for web pages. It provides a possibility to create structured documents by denoting structural semantics for text such as headings, paragraphs, lists etc as well as for links, quotes, and other items. Secure Digital is a memory card format often used in portable, electronic devices. String is a data type consisting of a sequence of characters. A string is often carried out as a word (byte). Windows registry is a database used within Windows operating systems that stores configurations and option settings. eXtensible Markup Language is a markup language that defines a set of rules for interpreting documents. HTML Secure Digital (memories) string (Windows registry) Windows registry XML 3/25 TABLE OF CONTENTS Blancco Flash ......................................................................................................................... 5 Features and usage ............................................................................................................. 5 Key Features ................................................................................................................... 5 System Requirements ....................................................................................................... 5 Known restrictions............................................................................................................ 6 Devices .............................................................................................................................. 6 Supported devices ............................................................................................................ 6 Security Technology ......................................................................................................... 7 Install/Uninstall ...................................................................................................................... 8 Install................................................................................................................................. 8 Uninstall ............................................................................................................................. 8 User Guidelines ...................................................................................................................... 9 Settings ............................................................................................................................ 10 License management ......................................................................................................... 11 Extra fields / info fields in the log files and the GUI .............................................................. 13 Automatically connect to the Management Console .............................................................. 14 Reporting ......................................................................................................................... 16 Importing the reports to Blancco Management Console for Windows ..................................... 16 Additional Settings ................................................................................................................ 18 Changing the local log path ................................................................................................ 18 Generate HTML and PDF report from a customized template................................................. 18 Shredding station ................................................................................................................. 20 Format after successful shredding....................................................................................... 20 Frequently asked questions ................................................................................................... 21 NAVSO P-5239-26 (FEPROM) ............................................................................................. 21 Drivers ............................................................................................................................. 21 Activation of client license ..................................................................................................... 22 What is the Subscription Center? ........................................................................................ 22 Purchase and activate your subscription .............................................................................. 22 Re-activate an existing subscription .................................................................................... 22 Activation Troubleshooting ................................................................................................. 23 Contact information .............................................................................................................. 24 4/25 BLANCCO FLASH USB memory drives, Secure Digital Card memories and other removable storage are rapidly increasing in both popularity and capacity. It is entirely easy and affordable to carry around gigabytes of data in your pocket on media no larger than your thumb. This poses a potential problem since increased storage and availability also increases the risk losing sensitive information. All your storage media contains potentially sensitive information about you, your personal life and your work. Make sure that your information is properly shredded before disposing or reorganizing any digital storage media. Blancco Flash helps you to shred sensitive information and to comply with company policies and your local legislation. Features and usage Blancco Flash is an application for permanently removing data on various removable storage media such as USB thumb drives, Secure Digital card (SD) memories, Compact Flash cards and other removable storage. The application effectively wipes any information on the media, thereby making recovery impossible. Blancco Flash provides a 100% secure erasure on most solid-state removable storage media available on Microsoft Windows. Blancco Flash is highly scalable and supports multiple drives making concurrent shredding possible. No matter if you are shredding your personal SD-card or your company’s entire collection of USB memory sticks; this is the solution for you. Blancco Flash is designed to meet your erasure needs efficiently, effectively and profitably. The application is very easy to use, and does not require any training or technical expertise. Key Features Shred any type of flash based removable storage media supported by Microsoft Windows (not intended for USB connected hard drives. Please use a suitable Blancco solution for erasing hard drives). Easy to use - “plug and shred” - graphical interface. Supports automatic formatting after shredding. Multiple drives can be shredded concurrently. Supports a number of renowned shredding algorithms, use the one your company policy dictates. Detailed Blancco erasure report and full integration with Blancco Management Console 2.x/3.x. Available in multiple languages. System Requirements Windows XP / 2003 / Vista / Windows 7 / Windows 8.1 and 8 15 MB of free disk space 10 MB of free RAM Mouse or keyboard 5/25 Appropriate hardware for storage media to be erased Known restrictions Blancco Flash is a Windows based software. That means it has the ability to erase all units that Windows can detect and use when connected as a USB memory device or similar. Restricted memories, demanding any kind of log in before Windows can access a restricted area need to be logged onto before erasure is possible. Devices Blancco Flash supports solid-state removable media such as flash based memory storage and similar. This edition has been designed to handle the specific methods and technologies used in these types of media. Flash based memories work differently than magnetic storage media. Although they appear similar in Windows they act very differently on a hardware level. Due to limitations of flash based memories they incorporate a number of techniques to avoid and minimize them. One limitation of flash memory is that although it can be read a byte at a time, they must erase an entire "block" at a time. This is different from magnetic type storage that has random access read/write cycles. Flash memory also uses different wear-leveling techniques that are used to decrease the number of erase operations required to update data and to decrease the number of overwrites to a single segment of the memory. Due to a finite number of erase-write cycles flash file systems are usually log-structured, which writes modified data to a new location in memory with the exact details being handled by a cleaning policy. For example, if a file is created and overwritten 100 times on a flash memory this will only result in many copies of the data being written to different storage locations, followed by the actual data. Because of this Blancco Flash bypasses the file system on a flash memory to avoid potential data left behind. Supported devices USB flash drive SmartMedia SecureDigital (SD/SDHC/miniSD) MultiMediaCard (MMC/MMCMobile/RS-MMC) Compact Flash (CF) Memory Stick Digital cameras with flash drives MP3 players with flash drives Other flash based storage media 6/25 Security Technology Blancco Flash supports four sanitizing algorithms specifically approved for erasing flashtype media: Army Regulation, AR380-19 U.S. Department of Defence, 5220.22-M Navy Staff Office Publication, NAVSO P-5239-26. Classification level SECRET or CONFIDENTIAL Navy Staff Office Publication, NAVSO P-5239-26. Classification level TOP SECRET Additional standards are supported in case corporate policy requires specific algorithms to be used. See entire list in the product settings. List includes: Erasing Algorithms supported: Overwriting rounds HMG Infosec, Lower standard (DEFAULT ALGORITHM) HMG Infosec, Higher standard Peter Gutmann's Algorithm U.S Department of Defence Sanitizing (DoD 5220.22-M) Bruce Schneier's Algorithm Navy Staff Office Publ. NCS Center Air Force System Security US Army OPNAVINST 5239.1A NSA 130-1 DoD 5220.22-M ECE BSI-2011-VS (similar) BSI-GS BSI-GSE 1 3 35 3 7 3 4 4 3 3 3 7 3 2 3 Random* 1 * Random; 1 round of overwriting based on pseudo random data generated by host OS PRG. 7/25 INSTALL/UNINSTALL Blancco Flash is available through your local Blancco representative. Contact us to receive an evaluation version of the software or for licensing information. The licensing can be both time based as well as unit based if a connection with a Blancco Management Console and HASP-key exist. Install Install the application with the self-extracting compressed executable. This opens an installation wizard that will guide you through the necessary installation steps. Uninstall Use “Add/Remove Programs” in the Control Panel to remove Blancco Flash. 8/25 USER GUIDELINES Open the application through the Start menu or the icon on your desktop. When the application has launched a list of available removable media will be displayed. Press the “Start” button on one or more devices to commence the shredding process. Depending on the algorithm, speed and size this operation might take a while. After the operation has completed you can review the result of the operation in the “Status”-column. Remove the shredded devices and insert new ones if you wish to continue shredding more devices. Before the erasure starts you will get a warning telling you that all data will be shredded from the selected device. 9/25 Settings You open the settings information box in the top right corner of the software by clicking the settings-button. In the settings box you can change the erasure standard used as well as the choice of language. Advanced options include the possibility to choose if the software should automatically format the unit after successful shredding. The settings box. If you press Management Console Setup you will start a new program, The Blancco Setup Tool, which allows you to configure license management, include extra fields in the report process and also enable automatic connection to the Blancco Management Console. See below paragraphs for how to use the Blancco Setup Tool. 10/25 License management When you click the red field “license management” You can choose which product you want to set up in the drop down list and then if you want to activate licensing from a local Blancco HASP-key or from a HASP-key in the Blancco Management Console. If you check the box “show all products”, you will see a list of all Blancco products and the current number of licenses available to you on the selected HASP-key. 11/25 Example of product list shown with number of licenses available. 12/25 Extra fields / info fields in the log files and the GUI The extra/info fields are added by using the Blancco Setup Tool. Click the Management Console Setup – button located in Settings. In the Setup Tool window (see below), choose product “Blancco Flash”. In the “Extra Fields” – tab, add a new field by pressing the + below. These fields are named Extra1, Extra2 or Info1, Info2 and so on (choose Extra or Info fields depending on your current usage of the Blancco Management Console and how data fields are integrated into other systems etc. The most common is to use the Extra fields.). In the below example two extra fields have been added. One normal field and one mandatory field. The names have been set to E1 and E2. The fields will be white if you have chosen that they can be edited. Red if they are mandatory (i.e. shredding cannot start unless the fields are filled in) and grayed out if it is a disabled field that cannot be edited. 13/25 Example of two extra fields having been added to the process. Automatically connect to the Management Console To automatically send reports into the Blancco Management Console you need to specify the “Server address”, “User name” and “Password” in the Management Console Settings – fields. The User name and Password should be the same as the account on the Blancco Management Console where you want the reports from the selected product to end up. To also add information into the report fields "Business name" and "Erasure person" use the Optional log information – fields in the same box. The reports generated can also be sent directly by email from the erasure client. In the Mail settings section, please specify the right information. 14/25 Connect to the Blancco Management Console, add report information and send report also via e-mail. 15/25 Reporting The software will log information about the shredding in log files. These log files can be handled by an administrator. The report includes the information the user has configured through the Blancco Setup Tool. The report also includes a serial number from the unit being erased as the most important information. The report also contains information about manufacturer, size of memory and data about the process. In the settings window you can choose to view the log files and hence also see the pathway to the folder where the log files are stored locally. An erased and reformatted unit will also be renamed with the name “Shredded”. If you enter a shredded and reformatted unit the device name in the GUI will be "Shredded". Importing the reports to Blancco Management Console for Windows The XML reports generated can also be manually imported into the Blancco Management Console for Windows. The reports are available one by one or all at once. The single files are named after date and time when the operation started in minutes and the file with all reports is called all.xml. To import the reports into the Blancco Management Console the HASP key needs to have a license for Blancco Flash as a product. Example of view after successful import. 16/25 If a successful import of all reports has been made we recommend that you remove the all.xml which will create a new file that includes only the new reports made that are not yet imported into the database. Example of view of listed reports in the Blancco Management Console for Windows. 17/25 ADDITIONAL SETTINGS Changing the local log path The default log path is under the application data path for the local user. This will not affect the management console settings and communication. To change this to another local path or to a central storage point, create the following registry value. HKEY_LOCAL_MACHINE\SOFTWARE\Blancco\Blancco Flash\Settings String LogPath Z:\logs The value identifies the folder in which the log file will be saved. An option to rename the actual log report file. This example will take the value of the "Extra1" field in the report and use that as the name. The program will add .xml after the value. String LogFileName [Extra:1:Value] Note: Any value can be used as the file name. If the extra field is not specified the registry value will be used as file name directly. Example: If “log” if specified the log file will be named “log.xml”. Generate HTML and PDF report from a customized template As a default an XML log is generated. Also a HTML report is created from a template file. This HTML file is also used for creating a pdf file. The pdf format is set so you cannot change the information in the pdf file once it is generated. The default setting is that all formats are generated. To change this change the registry settings as described below. You can create a custom designed report by changing the special template that is included in the solution. You can also change the path to the template if necessary with registry settings. Note: These registry settings are the same no matter if you have 32 or 64 bit systems. 18/25 HKEY_LOCAL_MACHINE\SOFTWARE\Blancco\Blancco XML Reports TemplateFilePath Path to the template String MakeLogIntoPdf DWORD Possible values are 0 and 1. 0 = Don’t make pdfs 1 = Make pdfs from the template report Defines the path to a template used when generating a customized report. If this value does not exist no extra report is generated. Defines if a pdf should be generated of the template generated report. If emailing of the report is activated the pdf is sent. 19/25 SHREDDING STATION The application supports at least up to 16 devices for concurrent shredding. If your hardware supports more USB connected units, the number can be higher. Optimal speed can be achieved by assigning each device to a separate hardware controller. USB hubs and other similar devices are able to handle a larger number of units but will divide the speed between active devices. Format after successful shredding The settings dialog has an option for formatting drives after a successful shredding. This will reformat the shredded devices after a successful operation. The file format on the device will be FAT regardless of previous file systems and partitions. Important: Note that this option is not specified by the shredding standards and is therefore an optional setting. The default Windows action for handling removable storage is autoplay which can be disruptive when handling a large number of drives. This setting can be modified in Windows using the Registry Editor and modifying the “NoDriveTypeAutoRun” value. 20/25 FREQUENTLY ASKED QUESTIONS The following are questions frequently asked by our customers concerning Blancco Flash. Please visit our homepage or contact support if you have additional questions. NAVSO P-5239-26 (FEPROM) The Navy Staff Office Publication dictates a 2 minutes waiting period when shredding FEPROM (Flash Erasable Programmable Read Only Memory) type memories. Therefore this waiting period has been included into the algorithm. The standard also recommends retaining the data storage media under Government control for four hours after shredding. Please note that these recommended procedures only apply to devices with the classification level of TOP SECRET. This algorithm is available in Blancco Flash. Drivers Sometimes a USB memory stick or other devices requires additional drivers to be installed. This might take a while so please be patient while Windows installs new hardware. Older memories are not always supported on newer versions on Windows. Windows Vista for example is known to have limited support for old USB thumb sticks. This might require you to shred these devices on Windows XP or visit the manufacturer’s homepage for drivers. Laptops often require additional and updated drivers to use built in media slots (like SD and similar). 21/25 ACTIVATION OF CLIENT LICENSE This chapter offers an overview of how to activate your product subscription unless you have a HASP-key or an organizational license with already included license information. What is the Subscription Center? You will always need an active subscription in order to use the application. When you first install the application will be able to run the application for free during a “grace period”. When this evaluation period expires you will need to purchase an activation code. This code is used to activate your subscription. Click on the “i” symbol for “about” in the bottom left corner of the software to be able to access your subscription and license information. Purchase and activate your subscription Open the Subscription Center to purchase or activate your personal activation code. When you have received your activation code simply enter it in the Subscription Center and enter your personal activation code. The code will automatically be validated against a server and your subscription will begin. Important: Activating your subscription requires an Internet connection. Re-activate an existing subscription When your current subscription expires you will need to purchase an extended subscription. This can be done by using the Subscription Center. From here you will be able to be guided to purchase additional time to your current subscription. 22/25 Activation Troubleshooting 1. The license code must be entered exactly as it appears in the license email, including upper and lowercase letters, periods, and so on. 2. The program seems to hang when the code is activated. The program tries for five minutes and during this period there will be no progress. If it takes longer than 30 seconds it is most likely that a firewall or a similar program blocks access to our activation server. 3. The activation went well, but at the next start-up, the program has forgotten the registration information. There is possibly an anti-virus protection that blocks access to the program. Start the application as the administrator by right-clicking the program icon and select "Run As Administrator". Activate the program as usual. 23/25 CONTACT INFORMATION Visit the technical knowledgebase (FAQ) and contact Blancco Technical Support by submitting a technical support ticket at: http://support.blancco.com/ See the instructional videos for Blancco products at: http://www.blancco.com/en/videos For contact information and the latest information about secure data erasure solutions, visit the Blancco website at: http://www.blancco.com/ We are always looking for ways to improve our products. Please let us know if you have any suggestions! 24/25 25/25