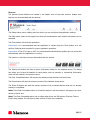
1
BLANCCO MOBILE
User Manual for Windows 7
(Professional, Ultimate or Enterprise)
www.blancco.com
TABLE OF CONTENTS
Contact and Legal Information ................................................................................................. 4
Notice to Users ................................................................................................................ 4
Introduction ........................................................................................................................... 5
Overview ......................................................................................................................... 5
System Requirements ....................................................................................................... 5
Licensing ......................................................................................................................... 5
Getting Help .................................................................................................................... 6
Online Help ..................................................................................................................... 6
Technical Support ............................................................................................................ 6
Chapter 1: Installation ............................................................................................................ 7
Installing Blancco Mobile................................................................................................... 7
Release Notes ................................................................................................................ 10
Blancco Mobile PC Connectivity Driver Setup .................................................................... 11
Blancco Mobile Setup Licenses ........................................................................................ 11
Setting Up License Consumption from Management Console .............................................. 13
Chapter 2: Interface ............................................................................................................. 15
Overview ....................................................................................................................... 15
Device Listing ................................................................................................................ 15
Status Area ................................................................................................................... 15
Buttons ......................................................................................................................... 16
Device Information Dialog............................................................................................... 17
Configuration .................................................................................................................... 18
Erase Tab ...................................................................................................................... 18
Management Console Tab ............................................................................................... 21
Reports Tab................................................................................................................... 22
License Tab ................................................................................................................... 22
Connectivity Tab ............................................................................................................ 23
USB Ports Tab ............................................................................................................... 24
Miscellaneous tab ........................................................................................................... 25
Updates tab ................................................................................................................... 26
2/45
Chapter 3: Operation ............................................................................................................ 27
All devices ..................................................................................................................... 27
Device specific features .................................................................................................. 27
Nokia Series 40 .............................................................................................................. 35
Erase Phone .................................................................................................................. 35
Shortcuts....................................................................................................................... 36
Erasure Result from Phone.............................................................................................. 37
Download Licenses from the License Server ..................................................................... 37
Add Licenses to HASP ..................................................................................................... 37
Clear Device List Box from Completed Devices .................................................................. 37
FACTORY RESETTING .................................................................................................... 38
Chapter 4: Reporting ............................................................................................................ 40
Overview ....................................................................................................................... 40
Erasure Report to XML File .............................................................................................. 40
Chapter 5: Troubleshooting ................................................................................................... 42
Troubleshooting Application ............................................................................................ 42
3/45
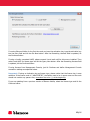
CONTACT AND LEGAL INFORMATION
Notice to Users
Contents Copyright © 2011 Blancco Oy Ltd. All rights reserved.
The information contained in this publication is subject to Finnish and international copyright laws
and treaties. Except as permitted by law, no part of this document may be reproduced or
transmitted by any process or means without the prior written consent of Blancco Oy Ltd.
Blancco Oy Ltd has taken care in preparation of this publication, but makes no expressed or
implied warranty of any kind.
The license to the Product is non-transferable and is granted personally to the Licensee, and the
Licensee shall not, without prior written consent of Blancco, be entitled to assign or transfer the
license for any reason including, without limitation, merger, reorganization, sale of all or
substantially all of the assets, change of control or operation of law.
Blancco Oy Ltd does not guarantee that any information contained herein is and will remain
accurate or that use of the information will ensure correct and faultless operation of the relevant
software, service or equipment.
Blancco Oy Ltd its agents and employees shall not be held liable for any loss or damage
whatsoever resulting from reliance on the information contained herein.
All other products mentioned herein may be trademarks of their respective companies.
Published by Blancco Oy Ltd.
Blancco Service Team:
Blancco recommends using email to contact the support team. Service engineers will respond
within 24 hours to customers who have purchased a Blancco Service Package. Response time may
be longer during weekends and on Finnish public holidays.
Technical support:
support.blancco.com
Phone and Fax:
Telephone switch:
+358-207-433-850
Address:
Blancco Oy Ltd.
Länsikatu 15
FIN-80110 Joensuu
Finland
The Blancco website has the latest information about secure data destruction solutions:
http://www.blancco.com
We are always looking for ways to improve our products. Please let us know if you have any
suggestions!
4/45
INTRODUCTION
Overview
Blancco Mobile is an application that runs on Windows 7 (Professional, Ultimate or Enterprise)
32/64-bit platform. The main purpose of the application is to securely erase the internal memory
and external memory card from the attached (via USB) smartphones.
An erasure report is generated containing the result of the erasure process. The report can be
saved to a local hard drive, external media or sent directly to Blancco Management Console.
The erasure process does not erase operating system files, integrated operating system
applications or firmware updates. It does, however, erase all user content related to those
applications. The external memory is fully formatted and overwritten. All user data, such as the
phonebooks and Call & Messaging information are deleted and overwritten.
It is assumed that the reader of this document have at least basic PC skills.
System Requirements
To use Blancco Mobile, the following hardware and software are needed:
Windows® 7 (Professional, Ultimate or Enterprise) 32/64-bit
Microsoft .NET Framework 3.5 with latest updates
Blancco recommends using a PC equipped with a powerful processor and with a desktop
motherboard. Contact your Blancco sales representative or Blancco technical support for
more detailed PC hardware requirement information.
Internet connection (needed for license activation, report sending to Blancco Management
Console and during erasure of iPhone/iPad, and downloading phone drivers if not found
from PC. Otherwise the program is fully standalone)
Licensing
Blancco Mobile is licensed per erasure. This license is based on an erasure counter and the number
of licenses decreases when a device has been erased. The license can also be limited to a time
period, i.e., the license expires after a certain time period even if there are still licenses remaining.
Licenses can be activated with an activation key, consumed from a locally connected HASP or from
the Management Console.
Important The user is not allowed to change the expiration date after obtaining the licenses. This
is likely to cause problems when using the software.
5/45
Getting Help
The following ways provide help with the application: Online Help and Technical Support.
Online Help
Online Help includes all of the information in the user guide and allows you to quickly access this
information.
To Start Online Help
Click the Help button on the application main window OR press the F1 key.
Technical Support
If you have questions that are not addressed in the user guide or the online Help, or if you have
some other problem, please contact our Technical Support group. When reporting an issue, please
include any information that might help to diagnose the problem. The following details are often
the most helpful:
The version of Blancco Mobile that you are using (on the main window dialog title).
The version of Windows that you are running.
The circumstances and sequence of steps that led to the problem.
The error messages (if any appeared).
A list of other Windows programs that you were running when the error occurred.
The model of the phone that you are using.
The platform that the phone uses (eg, Symbian).
Contact Information
See “Contact Information” on page 4.
Conventions in this Manual
This manual uses the following guidelines for documenting notes and tips.
Notes (including cautions, important notes, tips, and warnings, as well as general notes) call the
user’s attention to information of special importance or information that cannot otherwise be
suitably presented in the main text.
Note indicates neutral or positive information that emphasizes or supplements important points of
the main text. A note supplies information that may apply only in special cases-for example,
memory limitations, equipment configurations, or details that apply to specific versions of a
program.
Important provides information essential to the completion of a task. Users can disregard
information in a note and still complete a task, but they should not disregard an important note.
Caution advises users that failure to take or avoid a specified action could result in loss of data. If
the advice isn’t followed serious problems may occur including data loss and hardware damage.
6/45
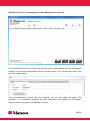
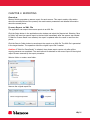
CHAPTER 1: INSTALLATION
Installing Blancco Mobile
Blancco Mobile consists of:
The software installed on the PC (known as Blancco Mobile)
The License Server (not addressed in this document)
Blancco Management Console (not addressed in this document)
1. Unzip the file Blancco_Mobile.zip.
2. Run the installation program Setup_Blancco_Mobile_[version number].exe and follow the onscreen instructions.
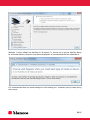
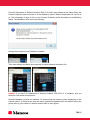
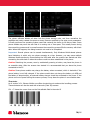
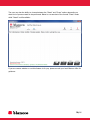
3. You will be prompted to go through the pre-installation steps.
It has five things you have to check. See pictures below. The Help button on the right side of
each Set button will explain each setting.
As part of the installation process, the device drivers are installed to the PC. However, there may
be situations in which the PC will need to download a driver from Windows Update. In this case it
is recommended that you set the device installation setting as shown below.
7/45
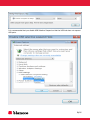
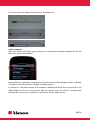
Windows 7 will by default use AutoPlay for all devices. To choose not to get the AutoPlay dialog
for connected devices, follow the instructions displayed it is recommended that you deactivate it.
It is recommended that you enable settings to avoid having your computer going to sleep during
this process.
8/45
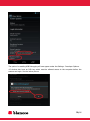
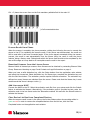
It is recommended that you disable USB Selective Suspend so that the USB hub does not suspend
USB ports.
9/45
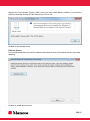
Keeping the User Account Control (UAC) turned on may cause Blancco Mobile to not function
properly. Note that turning off UAC may put your PC at risk.
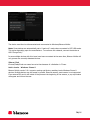
Hit Next to see release notes.
Release Notes
It is recommended that you read the release notes because some of the device drivers may need
updating.
Hit Next to install device drivers.
10/45
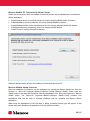
Blancco Mobile PC Connectivity Driver Setup
Install only those drivers that are needed. Connectivity drivers can be installed later from Blancco
Mobile application.
Install
Install
Install
Install
Install
Symbian phone connectivity drivers for erasing Symbian/Nokia Series 40 devices
BlackBerry phone connectivity drivers for erasing BlackBerry devices
Windows Mobile phone connectivity drivers for erasing Windows Mobile 5/6 devices.
Android phone connectivity drivers for erasing Android devices
iTunes for erasing iPhone/iPad devices
When all relevant device drivers are installed, hit Close and reboot the PC.
Blancco Mobile Setup Licenses
After the installation is complete, run the application by running the Blancco Mobile icon from the
Desktop or Start->All Programs->Blancco->Blancco Mobile->Blancco Mobile. Please read the
release notes in the Read Me file before using the application from Start->All Programs-> Blancco
Mobile menu. The Start->All Programs->Blancco->Blancco Mobile->Tools contains tool
applications that can be used in problem situations and for updating the Blancco Mobile
application.
When using the application for the first time, a dialog prompting license type will appear. It will
appear also when updating the application from the previous version.
11/45
If running Blancco Mobile for the first time and you have the activation key, type the activation key
into the entry field and hit the Get Now button. After the Remaining Licenses field is updated, hit
the Continue button.
If using a locally connected HASP, please connect it and wait until its drivers are installed. Then
select Local HASP for license type and hit the Query Now button. After the Remaining licenses field
is updated, hit the Continue button.
If using licenses from Management Console, just hit Continue and define Management Console
connection settings as explained below.
Important: If using an Activation key as license type, please notice that the license key is case
sensitive. If the license code is “:AB1CD2EF3G”, the letters need to be in upper-case and the code
should not contain any spaces. Also, remember the colon (:) at the beginning.
If you are updating from a previous version of Blancco Mobile, select the license type and hit the
Continue button.
12/45
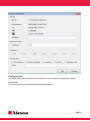
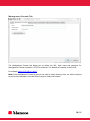
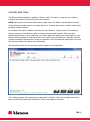
Setting Up License Consumption from Management Console
If running Blancco Mobile for the first time and you want to obtain licenses from the Management
Console, verify that the Management Console is up and running. Then hit the Setup button from
the main window header.
Type the Management Console URL and credentials into the entry fields and select “Test
Connection”. If a successful connection has been established, the following line will appear:
“Blancco Mobile is connected to Management Console.
13/45
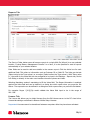
Now select the License tab.
Select Management Console as the license type. Within a few seconds the Remaining Licenses field
should contain the number of licenses still available. If it says something else (such as in the
above picture) there may be a connection error. Verify the URL/credentials from the Management
Console tab and check that the Management Console PC can be reached.
Hit the OK button. The license settings are now configured.
14/45
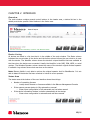
CHAPTER 2: INTERFACE
Overview
The main window contains general control buttons in the header area, a device list box in the
middle, and device specific control buttons in the footer area.
Device Listing
All devices are listed in a list box that is in the middle of the main window. The Status column
indicates the current state of the device and the Action column informs the user what to do next
with the device. The Identifier column shows the device’s unique identifier that was available at
the time when the device was connected. Usually the identifier is the IMEI, ESN, MEID, or serial
number. The Wireless Operator column shows the name of the device’s original wireless operator
if available. Log columns show what was done on the device.
Note: Blancco Mobile is only able to retrieve the original operator lock for BlackBerries. It is not
able to detect if the device has been unlocked or locked to a new operator.
Status Area
The status area at the bottom of the user interface shows three things:
Number of remaining licenses
o Locally stored licenses or licenses available in the Blancco Management Console
If the erasure process startup is fully automatic or manual
o Green when configuration is fully automatic and red when manual
If the device information window is shown automatically at the startup
o Green when configuration is automatic and red when manual
15/45
Buttons
The general control buttons are located in the header area of the main window. Header area
buttons are not associated with the devices.
The Setup button opens a dialog box from which you can configure the application settings.
The Help button opens a web page from which all documentation and contact information can be
accessed.
The Close button will close the application.
Important: It is recommended that the application is closed using the Close button as it will
perform finalizing tasks required for proper application operation.
Important: If the PC is kept on 24/7 it is recommended that Windows Updates are not performed
automatically when the application is running.
The buttons in the footer area are associated with the devices.
The Device Info button will show a device information dialog for the selected device. The dialog
box allows you to save information for each device, such as operator or commercial information
which will be present in the erasure report.
The Clear Completed button will remove the already erased devices from the list box.
The Erase button will start the erasure process of the selected single device.
The Erase All button will start the erasure process of all connected devices that are not already
erasing or completed.
Note: If the Clear Completed button is hit and the device is still connected, it will appear as a new
device in the list box.
Note: The Clear Completed button has no effect when there are iOS devices (iPhones, iTabs or
iPods) being erased. You will have to wait until all of those are completed.
16/45
Device Information Dialog
The Device Information dialog box provides details of the selected phone. This information will
also appear in the erasure report.
The Model field shows the phone model and the manufacturer. The Identification field shows the
unique device identifier. The OS field shows the operating system and version information. You
can also see the mobile device’s internal and external memory partitions and their sizes. You can
add extra information about the device to the Remarks field/eg, a short estimate about the
condition).
Extension fields can be added from the Setup dialog box.
You can also select the accessories to be included with the selected phone and input other
information related to the device’s accessories.
These details will be shown in the erasure report.
Caution Verify that the memory card is also shown in the device info dialog box.
Caution Verify the memory card size shown in the device info dialog box, otherwise the card may
have been partitioned in such a way that it is not supported. The erasure of all partitions is not
guaranteed.
17/45
Configuration
The Setup button opens a dialog box from which you can configure the application settings.
Erase Tab
The Erase tab allows you to define erasure specific settings.
18/45
The Erase Tab is divided into five sections:
For all devices
Symbian, Windows Mobile, Android
BlackBerry
iPhone/iPad/iPod
Android
Settings common to all phone models
Erasure standard selection
Erasure method selection
Apple device handling method selection
Rooted Android handling
Symbian, Windows Mobile and Android
The most recommended way is to set the checkboxes as shown in the picture below. One-time
wiping is acceptable (eg, “HMG Infosec Standard 5, The Baseline Standard”). Three-times wiping is
also possible (eg, “HMG Infosec Standard 5, The Enhanced Standard”), but this takes about three
times longer to erase the device.
BlackBerry
If more than one-time overwrite is desired, then select the US Department of Defense Directive
5220.22-M option. The system default value for erasure of BlackBerry devices is the one-time
overwrite method.
If detailed device information of the BlackBerry device is not important, do not check the ‘Get
detailed device information’ checkbox. This will speed up the BlackBerry device detection. In this
case, the model, amount of memory, platform version and IMEI, ESN/MEID will not be read from
the device and therefore will not be the report. BlackBerry PIN, OS version and wireless operator
19/45
(if available) are saved to the report. If it is more helpful to view the MEID/ESN number instead of
the IMEI when connecting devices, this can also be configured.
Finally, 4.2 devices can be erased if the option to do so is selected. Note that these devices may
contain special IT policies that need to be removed through alternative means. In this case, please
contact Blancco technical support.
iPhone, iPad, iPod
The automatic iTunes handling option hides iTunes on the PC’s screen. For some rare problem
devices, it may be required to manually erase the device using iTunes. In this case, the erasure
process starts normally, but you will need to press the iTunes button manually. When you do not
select the automatic erasure option in iTunes, the iTunes window can be seen on the screen.
Note: The iTunes language should always be set to English. This enables automatic iTunes
handling to work as expected. This language setting should be done when the Blancco Mobile
application is not running.
Note: When unwanted pop-ups appear (such as "Do you wish iTunes to be your default player?"),
a tool named Blancco Mobile iTunes settings can be run from the Start->All Programs->Blancco->
Blancco Mobile->Tools. It helps to reconfigure iTunes so that the pop-ups no longer appear.
Android
If Android devices with rooted operating systems should not be erased, uncheck this option.
20/45
Management Console Tab
The Management Console tab allows you to define the URL, login name and password for
Management Console connection. HTTPS is preferred. The default port number is then 8443.
For example https://192.168.0.1:8443
Note if the Management Console is going to be used to obtain licenses, then you will be required
to set up the credentials in this tab before trying to obtain the licenses.
21/45
Reports Tab
The Save to Folder button saves all erasure reports in a single XML file (All.xml) to a user selected
location. If using Blancco Management Console 2.x or later, it is also possible to send all reports
automatically to your selected location.
Extra fields can be used to add more details to the erasure report. Click the Active box for each
additional field. Title refers to information such as Customer ID or Pallet ID. The Value can be text
(Select string in the Type column) or a number (Select unit as the Type column). With “Enter value
in”, the value for the extra field can be configured to be input in the Settings – Reports tab, Device
Info Dialog or directly in the main user interface where the phones are listed.
Selecting Mandatory makes it mandatory to fill the Value field. The Regex information is matched
against the Value field and can be defined in a dialog box which opens when you press the Set
button. The expression can be defined in a dialog box which opens when you press the Set button.
For example: Regex ^[0-9]{3}$ would validate the Value field input to be in the range of
000…999.
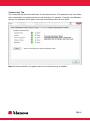
License Tab
The License tab allows you to obtain licenses from the BM License server to the PC’s hard drive.
License tab settings are defined in Blancco Mobile Setup Licenses.
Important Licenses cannot be transferred between computers after they have been activated.
22/45
Connectivity Tab
The connectivity tab allows the activation of connectivity drivers. The application may work faster
when unnecessary connectivity drivers are not activated. For example, if erasing only BlackBerry
phones, the application works faster if the other connectivity drivers are not active.
Note The Active checkbox only applies when the connectivity driver is installed.
23/45
USB Ports Tab
The USB Ports tab allows you to set up a description for the USB (HUB) ports. In this way the
device can be identified more easily.
First, hit the Detect button. Next, insert a USB stick into a USB port. After ten seconds the port
should be detected and the location shown under Port title. Continue configuring all USB ports in
this manner until all of them have been detected and numbered. Press “Stop” to complete the
process. Check the “Show the Hub and Port number in main window” option, select “OK” and
restart the application.
Note the USB port identification may not work for some phone models. USB port mapping relies
on certain USB level registrations which are not available for all phone models.
Note Typing *#06# in Nokia Series 40 phones will show the IMEI code on the screen.
Note To get the PIN code on the BlackBerry screen, enter the Home screen on your BlackBerry
device, scroll to and click the OPTIONS icon, the Device Options screen appears. Scroll to and click
Status. PIN is available in the list.
24/45
Miscellaneous tab
The Miscellaneous tab allows you to turn on debug logging when asked to do so by Blancco
support engineers. Advanced Android debugging should only be activated for Android devices. This
log compliments the normal debug log. Both should be sent to Blancco technical support when
necessary for troubleshooting purposes.
The Auto Resize List Columns setting will resize the list columns whenever their content changes.
Some notification/warning message dialog boxes have a checkbox that will make them disappear.
Hitting the Clear All Checked Warning Messages button will show the message dialog boxes again.
A language can be changed from the Language drop list. A change will become effective after the
application has been restarted.
25/45
Updates tab
The Updates tab allows you to check whether there is update to the Blancco Mobile application
and run an updater application that will download and install the update.
If Check updates automatically -checkbox is selected, the updates are checked once an hour.
Note Blancco Mobile must be not running when updating.
The currently supported iTunes version is always shown in this tab. Keep iTunes updated to match
this version at all times.
26/45
CHAPTER 3: OPERATION
Important Please read this section before using the product!
All devices
1. Remove the SIM card from the device - if there is one.
2. For increased process speed, memory cards should be erased with Blancco Flash.
3. If using Blancco Mobile to erase a memory card, check if the external memory card is
present in the device. If one exists, check its storage capacity.
4. Keep the device connected during the erasure process. Note: See the Windows Mobile
chapter.
5. If possible, restart the device before the erasure process begins.
6. Make sure the battery is almost full or connect the device to a power supply.
Note Device specific process guides will show you how to simplify the operation and increase the
amount of erasures per day. It is strongly recommended that you familiarize yourself with these
documents.
Caution If the external memory card has been partitioned with a special partitioning tool, only the
first partition will be erased. Most mobile operating systems support only one partition in memory
cards. This situation can be recognized by comparing the card storage capacity information
provided in the physical card with the information reported by BM. If there is a significant
difference, the memory card status must be checked manually. For increased process speed,
memory cards should be erased with Blancco Flash.
Device specific features
Device specific features are explained in the following paragraphs.
Symbian phones
Make sure that the date setting on the mobile device is correct before connecting it to the PC via a
USB cable. The mobile device installer may not accept the software if the date and time settings
on the phone differ significantly from the current date and time.
PC suite mode must be selected from the phone. Without it, the connection application will not
work.
The Nokia Ovi or PC suite programs should not be installed in the computer in which the erasure
program is installed. Use the Nokia drivers which come with the software.
When connecting the phone, if prompted choose PC suite.
The external memory card will also be erased with the "Erase phone memories" option.
27/45
Windows Mobile phones
If a connection type is requested, choose ActiveSync. If prompted for the destination path, always
install it to the device memory.
The external memory card will also be erased with the "Erase phone memories" option.
Important Only one (1) Windows Mobile based device can be connected to the PC at a time.
Blackberry phones
With some BlackBerry devices you will get the following prompt on the device itself when the
device is connected to the USB: Application Permission: Would you like to grant BlanccoMobile
Trusted Application status? You have to reply Yes to this prompt. Otherwise the device will not be
shown in the list box.
28/45
If this process on the phone itself is not completed within a few seconds, the application opens a
dialog box notifying you to finish the installation in the BlackBerry. When this process is completed
on the phone, hit the OK button in the dialog box.
If the BlackBerry device is protected with a password, Blancco Mobile must first remove it before
the device is shown in the list box. A dialog box like the one shown below is displayed. The
password removal starts after the user hits the OK button. If you want this process to be
automatic, select the Do Not Show This Message Anymore -checkbox. If you do not want the
password to be removed, the device can be disconnected in this stage.
The device details are obtained after the IT management policy removal process is over. Until
then, the device has an entry in the list box but without the device information (eg, manufacturer
and model info not detected).
The device can be erased when it is properly detected.
Erasing the external memory card is currently not supported on Blackberry devices. The
notification such as the one below may appear when erasing Blackberry devices.
29/45
If the US Department of Defense Directive 5220.22-M option was selected in the Setup dialog, the
Content Protection must be turned on in the BlackBerry device. Blancco Mobile asks the user to do
so. The information on how to turn on the Content Protection varies according to the BlackBerry
model. The BlackBerry 9530 shows the following.
Change the encryption from Disabled to Enabled.
Then save settings and define the password. A simple password should be fine.
Caution If you want US Department of Defense Directive 5220.22-M, it is obligatory that you
follow the instructions shown above.
Normally BlackBerry phones are rebooted 1-3 times during the erasure process, depending on the
erasure options. In cases where there are many applications installed which are started during the
phone start-up, the number of required reboots may be even higher.
30/45
The phone screen will display either Wiping or Scrubbing text.
Android phones
Make sure that he USB Debug mode is turned on, otherwise the connection between the PC and
the phone cannot be established.
Choose Settings, Applications, Development and make sure the USB debugging option is enabled.
This path can also be found from Settings, Developer options.
In Android 4.2. Jelly Bean devices, first navigate to Settings and About Phone. Now scroll to the
Build Number and tap on it seven times. After the seventh time, you will see a message that
indicates that you are now a developer on that phone. See the below picture:
31/45
The option for enabling USB Debugging will now appear under the Settings - Developer Options.
4.2 devices also have an RSA key which must be allowed access to the computer before the
erasure can begin. See the below picture:
32/45
Note: If your Android hangs/freezes during the erasure process, you may remove the battery and
restart the phone. The BM Android client continues erasing the phone from the stage just before
the problem occurred.
In case an Android device has been mounted to Windows in MSC mode and is inaccessible for
erasure, Blancco Mobile will alert the user.
Here is an example of an Android device which is mounted in MSC mode:
The device must then be placed into MTP mode as seen below.
33/45
The device must then be disconnected and reconnected to Windows/Blancco Mobile.
Note: Some devices are automatically set to “read only” mode when connected in MTP USB mode.
This varies depending upon the manufacturer. To overcome this obstacle, connect the device as
USB “Charge Only”.
In case multiple devices with this issue have been connected at the same time, Blancco Mobile will
only process the correctly detected devices.
iPhone/iPad
iPhones/iPads/iPods are erased one at a time because of a limitation in iTunes.
Nokia Lumia - Windows Phone 8
Blancco Mobile version 2.6.1 supports erasing and factory resetting Lumia Windows Phone 8
devices. Multiple devices can be erased in parallel. External memory card erasure is not supported.
If an external SD card is still inside of the phone at the beginning of the erasure, a pop-up window
will appear and inform the user.
34/45
When the erasure begins, the first step is to manually factory reset the phone while it is still
connected to the computer. This can be done by going to ‘Settings – About – Reset your Phone’.
After the factory reset is complete, the overwriting of the memory will begin.
Nokia Series 40
The USB port cannot be detected from Nokia Series 40 devices. It is recommended that you enter
into the phone: *#06# to show the IMEI number. In this way the phone can be identified using an
Identifier column in the list box.
Erase Phone
Erasure is started fully automatically when the phone is detected. Erasure is started semiautomatically
for all connected devices by clicking the Erase All button. Erasure is started
manually for a single device by clicking the Erase button from the application main window. The
phone software is installed to the phone and the erasure starts immediately after the installation is
completed. Depending on the phone model, the user may or may not need to answer some of the
questions that the phone application installer presents. They are usually answered with
Yes/Continue.
Note It is recommended that the user chooses the semi-automatic Erase All button instead of
choosing the fully automatic process. As phone conditions vary considerably, this has proved to be
a faster solution. In this way the user can connect the phones, wait until they become visible in
the main window, and then start the erasure process all at once. When using the fully automatic
process, the erasure may start in some devices before others are detected. Please see the process
guides for improved process speed.
An example of the beginning of the erasure process in a Nokia phone can be seen below:
35/45
The phone software deletes all data from the phone storage units, and then overwrites the
available and newly created free space as many times as specified by the wipe count parameters.
It finally performs the operating system reset that restores the device to its factory state. Some
phone models may warn the user that it is running out of free space. This usually occurs during
the overwriting process and is normal because the overwriting process fills the memory with blank
data. When this happens, the dialog boxes do not need to be completed.
Important Several phones can be erased simultaneously. Only Windows Mobile-based phones
have limitations in which only one phone connects at a time. However, you may erase multiple
Windows Mobile devices by disconnecting the USB cable after the erasure has started and then
connecting the cable back in when the erasure result has been established in the phone.
Caution Disturbing the process, even by accidentally pressing a button, may leave the phone in
an unusable state. After the erasure has started it is recommended that you leave the phone
connected to the PC.
Caution Some phone models may charge the battery when connected, which is desirable if the
phone battery is not fully charged. If the phone model does not charge the battery via USB and
the battery is almost empty, an external battery charger should be connected to the phone. If the
phone runs out of power during the erasure process, it may leave the phone in an unusable state.
Shortcuts
As of version 2.6.1, Blancco Mobile now offers shortcut keys to enhance the handling process.
These shortcuts can also be used with a barcode (Code 39) scanner:
Ctrl + T places the cursor focus on the first editable field in the main UI
36/45
Ctrl + F places the cursor focus on the first mandatory editable field in the main UI
Ctrl + E starts the erasure (or factory reset) of all connected devices
Erasure Result from Phone
When the erasure is complete, the phone presents a dialog box informing the user to connect the
phone to the PC for uploading the erasure result. If the phone was disconnected, the result can
still be read after it has been connected again. If the phone stayed connected during the erasure
process, the result is read automatically from the phone. After the result is read the phone
reboots, doing a factory reset. Dialog boxes within the phone itself should not be completed by the
user at this stage as it may lead to an incomplete erasure result in the report.
Download Licenses from the License Server
Blancco Mobile is licensed per erasure. More licenses can be obtained by contacting Blancco Sales
Group. Please see Licensing on page 5 and Contact and Legal Information on page 4.
When you have a valid Activation key, click the Setup button from the application main window
and select the License tab. Select Activation key for license type, complete the Activation key and
click the Get Now button. The activation process requires internet connection. The activation key
defines how many licenses are obtained from the server. Please note that the license key is case
sensitive and that there is always a colon (:).
Add Licenses to HASP
Connect the HASP to the PC. Select the activation code file from your system and click the Submit
button to activate the licenses. Alternatively, if the activation code is provided as text, enter the
activation code in the box found under the "alternative method" link and click the Submit button to
activate the licenses.
Clear Device List Box from Completed Devices
When the erasure result is seen in the phone, the list box Status column shows status either in
green or red. In order to remove the completed devices from the list box, click the Clear
Completed button on the application main window.
37/45
FACTORY RESETTING
The Blancco Mobile application includes a "factory reset" only option in case the user needs to
complete the erasure process within just a few minutes.
NOTE: Data may be recoverable after a factory data reset. This feature was developed to meet
certain industry standards but by no means delivers a "certified data erasure" solution without the
possibility of data recovery.
As a default, this option is hidden from the main User Interface. To gain access to this feature,
please contact your local Blancco office to receive the appropriate licenses. Once you have
activated the licenses on your HASP key, the "Reset" option will appear as an extra button in your
Blancco Mobile application. Please note that if your HASP key is connected to a separate machine
running the Blancco Management Console, a connection to the Console and appropriate user must
first be setup before the licenses can be accessed.
See the below picture for how this extra option appears in the application:
The handling process is the exact same as described in Chapter 3 with the exception that only a
factory reset will be performed instead of a secure overwriting of all sectors.
38/45
The user now has the ability to choose between the "Reset" and "Erase" options depending on
what kind of process needs to be performed. Below is a screenshot of the normal "Erase" mode
while "Reset" is still available:
If you are unsure whether or not this feature is for you, please consult your local Blancco office for
guidance.
39/45
CHAPTER 4: REPORTING
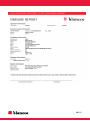
Overview
Blancco Mobile generates an erasure report for each erasure. This report contains information
about the success/failure of the process, the used erasure parameters and detailed information
about the erased phone.
Erasure Report to XML File
The application can export the erasure reports to an XML file.
Click the Setup button in the application main window and select the Reports tab. Selecting ‘Save
to Folder’ will save the erasure report to the hard disk immediately after the erasure was started.
If ‘Wait for Erasure Result’ was selected, the report is updated when the result is read from the
phone.
Click the Save to Folder button to save/export the report as an XML file. The XML file is generated
in the target location. The operation clears the original report file if needed.
Caution: If “Wait for Erase Result” is selected, then please export reports only after all the
ongoing erasures are completed. The result cannot be attached to the correct report if the original
report file was removed by the export procedure.
Select a folder or create a new folder.
Remove the original report file.
40/45
41/45
CHAPTER 5: TROUBLESHOOTING
Troubleshooting Application
Please read the release notes in the Read Me file from Start->All Programs->Blancco-> Blancco
Mobile menu.
Also read the process guides available by clicking on the Help button in the main window.
For ALL devices
1. Remove the SIM card from the phone (if one exists). SIM erasure is not supported.
2. Keep the phone connected during the erasure. Note: See Windows Mobile chapter.
3. If possible, restart the phone before erasure.
4. Make sure that battery is almost full or connect the device to a power supply.
5. Verify that inserted memory card is also shown in device info dialog.
6. Verify that the inserted memory card size is the same as the information presented in the device
info dialog box. Otherwise the card may have been partitioned and the erasure of all partitions is
not guaranteed.
7. When printing reports from a web browser, Firefox is recommend. If Internet Explorer is the
only option, version 10 works correctly while version 9 requires the option “Enable Shrink-to-Fit” to
be enabled.
Symbian OS based devices
1. Make sure that the mobile device's date setting is correct before connecting the mobile device
to the PC via a USB cable. Mobile device installer may not accept the software if the phone’s date
time setting is too much at the past.
2. If there are lots of Symbian phones to be erased at once, it may save time when OVI/PC Suite
mode is set as default USB mode in the phone itself.
3. Running PC/OVI Suite application at the same time may cause connectivity problems.
4. Some Symbian 5th Edition phones may be detected as 3rd Edition phones.
Windows Mobile based devices
1. Only one (1) Windows Mobile-based device can be connected simultaneously to the PC. If there
are many Windows Mobile phones to be erased, connect the first phone and start erasure,
disconnect after erasure has started (progress bar appears on the phone), and connect another
phone, and so on. When the erasure is completed in the phone, connect it in again to read the
result.
42/45
2. When erasure is complete, the phone’s screen will notify the user to connect to the PC or click
OK. Hitting OK in that screen will initiate the final factory reset stage and the PC side may miss
reading the result. So in general there is no need to hit the OK button on the phoneitself.
3. If the installation asks for a destination path, always install to the device memory (i.e. not to the
memory card).
4. Keep the phone functionality turned on.
5. Notice that the Windows Mobile memory card encryption feature stores the encryption keys to
the phone memory. They are lost when erasing the phone memory (i.e. the memory card content
cannot be recovered).
6. There seems to be some kind of issue with the way in which a Windows Mobile device detects
the SD memory card inserted into the device. Sometimes the SD memory card seems to disappear
(no longer shown by file browser either in the phone or PC).The final stage of the erasure
application performs a cold boot that will access the memory card. If the card is in a corrupted
state, the erasure application may hang/freeze in the final stage. The solution is to remove the
memory card before erasure if it does not show up with a simple eject and reinsert into the slot
until it is shown again. Sometimes it may help to boot the phone without the SD card and then
insert the card.
BlackBerry devices
1. Do not disconnect the phone until erasure is complete.
Android devices
1. Android phones: Make sure that the Debug mode is set as ON, otherwise the connection
between PC and mobile phone cannot be established. Choose Setting, Applications, Development
and check that USB debugging is on.
2. When a new type of Android device is connected, Windows starts the USB driver wizard. Let
Windows install the recommended driver.
3. Collect and send both a “Debug Log” and “Advanced Android Debug Log” to
[email protected]. The Android Debug log can be collected by first enabling it under ‘Settings
– Miscellaneous’. Connect only one Android device to Blancco Mobile and begin the erasure. The
“Erase” button and not the “Erase All” button must be pressed. After the erasing process, open the
Android Debug log in Notepad, save it and send it.
43/45
iOS devices
1. iTunes needs to have been installed on the PC.
2. iTunes language must be US English and full keyboard support must be on.
44/45
45/45