1
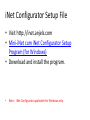
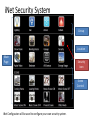
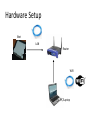
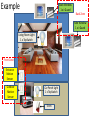
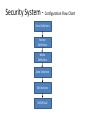
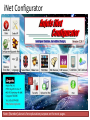
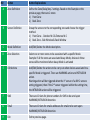
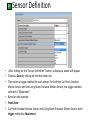
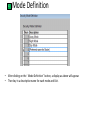
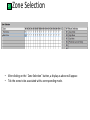
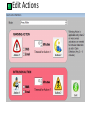
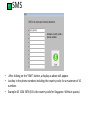
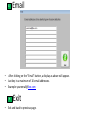
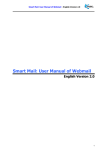
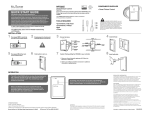
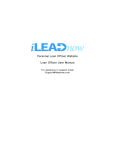
iNet Configurator
Security System
User Manual
Introduction
• Welcome to the world of wireless communication. We are pleased that
you have chosen the Anjels iNet.
• iNet Configurator is a software for you to personalize your iNet.
• iNet Configurator allows you to Create/Edit/Delete the data structure,
icons, scene control, security system and extra to enhance your lifestyle.
• The user guide will go through the whole process with a sample project for
better understanding.
iNet Configurator Setup File
• Visit http://inet.anjels.com
• Mini-iNet cum iNet Configurator Setup
Program (for Windows)
• Download and install the program.
• Note:iNet Configurator applicable for Windows only.
iNet Security System
Group
Location
Main
Page
Security
Icon
Scene
Control
iNet Configurator will be used to configure your own security system.
Hardware Setup
iNet
LAN
Router
WiFi
PC/Laptop
Notes
•
•
•
•
This user manual covers only the Security System configuration.
Please refer to iNet Configurator – HomeAutomation user manual for Home
Automation configuration.
Both user manuals are available on http://inet.anjels.com
ALL the Devices/Sensors that used in Security System have to be pre-configured
location IDs & device IDs.
Example
Back Window
1 x i-Guard
Back Zone
Side Window
1 x i-Guard
Living Room Light
1 x TopSwitch
Front Zone
Entrance
Motion
Sensor
Outdoor
Motion
Sensor
Car Porch Light
1 x TopSwitch
Siren
Security System - Configuration Flow Chart
Zone Definition
Sensor
Definition
Mode
Definition
Zone Selection
Edit Actions
SMS/Email
iNet Configurator
1
Note: [Number] above is for explanation purpose on the next pages.
NO
1
Button
Button Explanations
Security
Security system configuration.
1
•
Security
A
B
C
D
E
F
G
H
After click on “Security” button, window as above will appear.
Note:[Alphabets] above are used for explanations on subsequent pages.
NO
Button
Button Explanations
A
Zone Definition
Define the Zone/Delay/Any 2 settings. Based on the Example on the
previous page, there are 2 zones:
1) Front Zone
2) Back Zone
B
Sensor Definition
Group the sensors to the corresponding zone and choose the trigger
method.
1) Front Zone - Outdoor M.S & Entrance M.S
2) Back Zone - Side Window & Back Window
C
Mode Definition
Add/Edit/Delete the Mode description.
D
Zone Selection
Select one or more zones to be associated with a specific Mode.
Example: If all the zones are associated Away Mode, devices in those
zones will be monitored when Away Mode is activated
E
Edit Actions
Add/Edit/Delete the actions to be carry out when devices associated to a
specific Mode is triggered. There are WARNING action and INTRUSION
action.
Warning action will be triggered when the 1st sensor of a ANY 2 sensors
setting triggered, then if the 2nd sensor triggered within the setting time,
the INTRUSION action will be triggered.
F
SMS
There are 10 slots for phone numbers for SMS to be send upon
WARNING/INTRUSION detection.
G
Email
There are 10 slots for emails addresses for emails to be sent upon
WARNING/INTRUSION detection.
H
Exit
Exit to previous page.
A
•
•
•
•
•
•
•
•
Zone Definition
After click on “Zone Definition” button, window as above will appear.
Key in the zone name under Description.
Delay – The delay for the actions to carry out after intrusion.
Any 2 (mins) – For motion sensor pair setting. 1st sensor trigger WARNING action,
2nd sensor trigger INTRUSION action. To eliminate false alarm.
Based on the example:
Zone - Front Zone & Back Zone.
Delay – No delay.
Any 2 – Front zone for Outdoor M.S and Entrance M.S
B
•
•
•
•
•
•
Sensor Definition
After clicking on the “Sensor Definition” button, a display as above will appear.
Choose a Zone by clicking on the drop down list.
Then select a trigger method for each sensor. For both the Car Porch Outdoor
Motion Sensor and the Living Room Entrance Motion Sensor, the trigger method
selected is "Movement".
Based on the example:
Front Zone:
Car Porch Outdoor Motion Sensor and Living Room Entrance Motion Sensor, both
trigger method by Movement.
C
•
•
Mode Definition
After clicking on the ᾿ Mode Definition῀ button, a display as above will appear.
Then key in a descriptive name for each mode and Exit.
D
•
•
Zone Selection
After clicking on the ᾿ Zone Selection῀ button, a display as above will appear.
Tick the zones to be associated with a corresponding mode.
E
Edit Actions
• Choose the Mode to be edit with actions by the drop down list.
• Warning Action: (Only work with Any 2 motion sensors setting)
Action 1 - Normally to switch on a light. Action 1 is triggered when the first
sensor is triggered, normally upon detection of movement. Just tick the
SMS/Email if you want to be notified when warning action is activated.
Timeout (Mins) – Timeout for Action 1.
Action 2 - Normally to switch off the light which are switched on earlier by
Action 1. Action 2 occurs after Action 1 has timed out.
• Intrusion Action:
Action 1 - Normally to switch on all the lightings as well as to turn on the
siren. Action 1 is triggered upon intrusion detection depending on the
configuration as "Any 2" or any one sensor. Just tick the SMS/Email if you
want to be notified when intrusion is activated
Timeout (Mins) – Timeout for Action 1.
Action 2 - Normally to switch off the light which are switched on earlier by
Action 1. Action 2 occurs after Action 1 has timed out.
F
•
•
•
SMS
After clicking on the “SMS” button, a display as above will appear.
Just key in the phone numbers including the country code, for a maximum of 10
numbers.
Example: 65 1234 5678 (65 is the country code for Singapore. Without spaces)
G
•
•
•
After clicking on the “Email” button, a display as above will appear.
Just key in a maximum of 10 email addresses.
Example: [email protected]
H
•
Email
Exit
Exit and back to previous page.