1
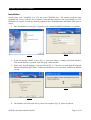
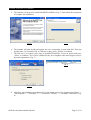
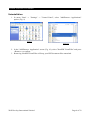
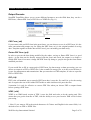
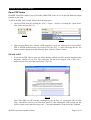
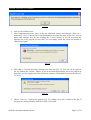
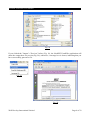
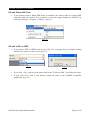
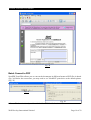
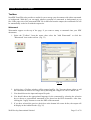
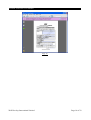
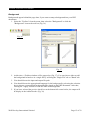
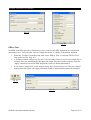
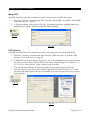
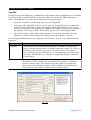
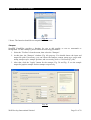
NextPDF FormFiller User Manual
Introduction
In today's world, if you have received a PDF form from the Internet, and you would like to fill in
the form with a free version of the Adobe Reader. You may feel headache about that, cause the free
version of the Adobe Reader only allows users to fill the form and print it out, without saving it. It
is inconvenient to all of you.
However, with our NextPDF FormFiller, such a problem is no longer exist. It enables you to easily
fill in, save and print out a PDF form in your computer. It is easy to use, it only requires a free
version of the Adobe Reader 8 or above, then you can fill in the forms and save your forms
whenever and whatever you want.
Sophisticated functions of NextPDF FormFiller include:
●
Supports different output formats, they are simple PDF form, flatten PDF form, FDF and
XFDF files.
●
Opens different formats, they are PDF form, FDF form and XFDF form.
●
Can be filled with the words of English, Chinese Traditional and Chinese Simplified.
●
Provides automatic E-mail As Attachment when finish filling forms.
●
Switch to different languages' user interfaces easily, they are English, Chinese Traditional
and Chinese Simplified.
Besides, for easy management of the PDF documents, NextPDF FormFiller added a lot of useful
tools, they are:
●
Add Watermark in batch or single file.
●
Add Background in batch or single file.
●
Set the PDF Security in batch or single file.
●
Convert PDF documents into text format in batch or single file.
●
Merge PDF files.
●
Filter PDF pages from a PDF document.
●
Add Signature to PDF.
●
Add a Stamp to the PDF.
*Note: You must have Adobe Reader installed in you system in order to use this application.
You may need owner passwords for the PDF documents.
Well Develop International Limited
Page 1 of 22
NextPDF FormFiller User Manual
Installation
Simply place your "NextPDF v3.x" CD into your CD-ROM drive. The autorun program starts
automatically. If not, click the "My Computer" icon and then click the icon representing your CDROM drive to open it. Locate the autorun program in the CD-ROM folder and double click on it to
start it.
1. The "Installation" screen (Fig. 1) appears, press <Install NextPDF FormFiller> to continue.
Fig. 1
Fig. 2
2. In the "Personalize Detail" screen (Fig. 2), enter your Name, Company and Serial Number.
Your Serial Number is printed at the first page of this booklet.
3. Select your desired language version to install (Fig. 3). You can view and input the English,
Chinese Simplified and Chinese Traditional characters even if you have installed an English
version.
Fig. 4
Fig. 3
4. The installer will extract the file to your local computer (Fig. 4), please be patient.
Well Develop International Limited
Page 2 of 22
NextPDF FormFiller User Manual
5. The installer will proceed to install NextPDF FormFiller (Fig. 5). Just follow the instruction
to complete the installation.
Fig. 5
Fig. 6
6. The installer will then install and register the core components in your hard disk. This step
usually takes 2 to 5 minutes(Fig. 6). When it is done, press <Finish> to continue.
7. The last step is to register your copy of NextPDF FormFiller. Select an option and press
<Next> to continue. You will be entitled 90-day free telephone and email support service
upon the registration. (Fig. 7)
Fig. 8
Fig. 7
8. After that, the installation is completed. You can found an new icon in your menu "Start" →
"All Programs" → "NextPDF 3" → "FormFiller Toolbox" → "NextPDF FormFiller".(Fig.
8)
Well Develop International Limited
Page 3 of 22
NextPDF FormFiller User Manual
Uninstallation
1. In menu "Start" → "Settings" → "Control Panel", select "Add/Remove Applications"
option. (Fig. 9)
Fig. 9
Fig. 10
2. In the "Add/Remove Application" screen (Fig. 10), select "NextPDF FormFiller" and press
<Remove> to confirm.
3. Removing NextPDF FormFiller will keep your PDF document files untouched.
Well Develop International Limited
Page 4 of 22
NextPDF FormFiller User Manual
Output Formats
NextPDF FormFiller allows you to create different formats to save the filled data, they can be a
PDF form, a flatten PDF form, a FDF file or a XFDF file.(Fig. 11)
Fig. 11
PDF Form (.pdf)
If you want to edit you PDF form in the near future, you can choose to save it as PDF form. It is the
most convenient and prompt way for filling the PDF form, as it is the original method of saving
data. Template together with the data will be saved, you can modify your data easily.
Flatten PDF Form (.pdf)
In order to prevent the data being modified by the others, saving as flatten PDF form is a good
choice. As the data can be directly merged with the form and saved, the output is no longer a
fillable PDF form, it becomes a image like PDF form. By doing so, people who get the form cannot
modified your data.
If you would like to fill in a mass pack of PDF form, for data storage or data processing, you can
choose to output it as FDF or XFDF files. It has a small file storage size, as it only saves the data, it
is ease for management and transmission. But you must have a PDF template, in order to open the
FDF or XFDF files.
FDF (.fdf)
FDF is the old standard way to transfer PDF form data, it uses the Key and Pair to be the storing
unit. It requires the use of the Adobe FDFToolkit or other similar tool to parse the files.
*Attention: It is only be effective to convert FDF files when you choose FDF as output format
before opening a PDF form.
XFDF (.xfdf)
XFDF is an XML-based version of FDF, it uses the field and value to be the storing unit. This
means that you get the benefits of FDF, with the ability to use your favorite XML tools for data
processing.
* Note: If you want to fill in the mixed characters of Chinese and English in the same fields, it is
advised to save as FDF or XFDF files.
Well Develop International Limited
Page 5 of 22
NextPDF FormFiller User Manual
Open PDF forms
NextPDF FormFiller enables you to fill in the fillable PDF form, save it in the four different output
formats as you want.
To fill in the PDF form, simply follows the following steps:
1. Open your PDF form by clicking the "File"->"Open"->"Form" or clicking the "Open Form"
icon on the tool bar.(Fig. 12)
Fig. 12
Fig. 13
2. Then an Open dialog box (Choose a PDF template) is pop out, asking you to select a PDF,
FDF or XDFD document that you want to fill with. (Fig. 13) After choosing the file, the
name would be displayed on the filename, then click the <Open> button.
Fill with a PDF
1. If you choose PDF form to open, an Adobe Reader window would be opened, displaying the
temporary content of your file. The temporary file has been merged with a "Save As..."
button on your form top right-hand corner. (Fig. 14)
Fig. 14
Note: If the PDF is in XFA format, a dialog box pops up (Fig. 15), saying that "This is XFA
form, it should be convert to AcroForm for process", after clicking the "OK" button, the file
will be copied to the same directory with "_ConvertFormButton" at the end of the filename.
Well Develop International Limited
Page 6 of 22
NextPDF FormFiller User Manual
Fig. 15
2. Now you can fill the form
3. After completing the form, move to the top right-hand corner, and click the "Save As..."
button (Fig. 14). A "Cannot Save Form Information" message box pops up(Fig. 16), you can
ignore this message box, by just clicking the <Close> button. If you do not want this
message box to be popped up next time, you can simply check the check box named as
"Don't show again".
Fig. 16
4. After that, a "Security Warning" message box pops up (Fig. 17), this one can be ignored,
too, by clicking the <Allow> button. If you do not want this message box to be popped up
next time, you can simply check the check box named as "Remember my action for the site:
127.0.0.1" .
Fig. 17
5. Then a "Save As..." dialog box appears (Fig. 18), asking you to give a name to the file. If
you pick an existing filename, that file will be overwritten.
Well Develop International Limited
Page 7 of 22
NextPDF FormFiller User Manual
Fig. 18
If you clicked the "Output"->"Preview" before (Fig. 19), the NextPDF FormFiller application will
show the output there for preview(Fig. 20); otherwise, a message box is shown, indicating that you
have successfully generate a file.
Fig. 19
Fig. 20
Well Develop International Limited
Page 8 of 22
NextPDF FormFiller User Manual
Fill with Flatten PDF Form
1. If you want to create a flatten PDF Form, its method is the same as that for creating PDF
form. But what you need to do is to choose to select the output format into "Flatten", by
selecting "Settings"->"Output"->"Flatten". (Fig. 21)
Fig. 21
Fill with a FDF or XFDF
1. If you choose FDF or XFDF form to open (Fig. 22), a message box is prompted, asking
whether you want to re-edit it or not (Fig. 23).
Fig. 22
Fig. 23
2. If you click <Yes>, then it has the same result as the "Fill with a PDF", just follow the steps.
3. If you click <No>, then it will directly output the form in the NextPDF FormFiller
application. (Fig. 24)
Well Develop International Limited
Page 9 of 22
NextPDF FormFiller User Manual
Fig. 24
Batch Convert to PDF
NextPDF FormFiller allows you to convert the documents in different format to PDF files in batch.
(Fig. 26) Before the conversion, you may need to set "NextPDF" print drive as the default printer.
(Fig. 25)
Fig. 25
Fig. 26
* Notes: The function is only enable with the NextPDF 3.x Professional Edition.
Well Develop International Limited
Page 10 of 22
NextPDF FormFiller User Manual
Print
It allows you to print the output document.
Preview
Specify whether you would like to automatically preview your output files using our NextPDF
FormFiller Application.(Fig. 27)
Fig. 27
Email As Attachment
You can choose to place the output file into your default email account automatically (Fig. 29), by
simply clicking the "Email As Attachment" box. (Fig. 28) Then the file would be automatically
being attached into your email.
Fig. 28
Fig. 29
Well Develop International Limited
Page 11 of 22
NextPDF FormFiller User Manual
Language
It provides English, Chinese Traditional and Chinese Simplified user interface (Fig. 30). In
Windows Vista or Windows 7, you may be affected by the "User Account Control (UAC)", the
language setting can only be changed temporarily, not permanently (Fig. 31). If you encountered
such a problem and want to set the language permanently, you may go to "Start" → "All Programs"
→ "NextPDF 3" → "FormFiller Toolbox" → "Settings" (Fig. 8) for settings.
Fig. 31
Fig. 30
"Save As" Button Position
You can set the position of the "Save As" button, either on the "Top Right Corner" or on the "Last
Page". By selecting the "Settings" -> "'Save As' Button Position" (Fig. 32). By default, the "Save
As" button would be placed on the top right corner.
Fig. 32
Well Develop International Limited
Page 12 of 22
NextPDF FormFiller User Manual
Toolbox
NextPDF FormFiller also provides a media for you to merge your documents with either watermark
or background. With this, you can apply whatever template of watermark or background as you
like. If the paper size of the watermark PDF file is different from the output, the watermark file will
be automatically scaled to fit with the output size.
Watermark
Watermarks appear on the top of the page, if you want to stamp a watermark into your PDF
documents.
1. Select the "Toolbox" from the menu, then select the "Add Watermark" or click the
"Watermark" icon on the tool bar. (Fig. 33)
Fig. 33
Fig. 34
2. At this time, a Toolbox window will be popped up(Fig. 34). You can choose either to add
the watermark in batch or in a single file by selecting the "Single File" tab or "Batch" tab.
3. You should choose the input and output file path.
4. You should choose the appropriated language for the watermark by selecting the selection
box or choose a personalized watermark to be placed on the PDF documents. After that,
clicking the "Apply" button to create the PDF with watermark.
5. If you have selected the preview check box at the bottom left corner before, the output will
be display in the Adobe Reader. (Fig. 35)
Well Develop International Limited
Page 13 of 22
NextPDF FormFiller User Manual
Fig. 35
Well Develop International Limited
Page 14 of 22
NextPDF FormFiller User Manual
Background
Backgrounds appear behind the page data, if you want to stamp a background into your PDF
documents.
1. Select the "Toolbox" from the menu, then select the "Background" or click the
"Background" icon on the tool bar.(Fig. 36)
Fig. 36
Fig. 37
2. At this time, a Toolbox window will be popped up (Fig. 37). You can choose either to add
the background in batch or in a single file by selecting the "Single File" tab or "Batch" tab.
3. You should choose the input and output file path.
4. You should choose the appropriated language for the background by selecting the selection
box or choose a personalized background to be placed on the PDF documents. After that,
clicking the "Apply" button to create the PDF with background.
5. If you have selected the preview check box at the bottom left corner before, the output will
be display in the Adobe Reader. (Fig. 38)
Well Develop International Limited
Page 15 of 22
NextPDF FormFiller User Manual
Fig. 38
Set Security
In order to protect your PDF documents, users can set the owner password and user password to
prevent other users from illegally modifying the PDF documents. To set the security, please follow
the following procedures:
1. Select the "Toolbox" from the menu, then select the "Set Security".
2. At this time, a "Set Security" window will be popped up (Fig. 39). You can choose either to
set the PDF security in batch or in a single file by selecting the "Single File" tab or "Batch"
tab.
3. Click the "Set Security" button to open the "Security" window (Fig. 40). At this time, you
can set the security rules for the PDF documents.
4. After finish setting the security rules, click "Submit" button.
5. In the "Set Security" window (Fig. 39), click "Apply" button to set the PDF security.
Well Develop International Limited
Page 16 of 22
NextPDF FormFiller User Manual
Security Settings
Function
Details
Owner Password
The password that is required to change security
(The length should not be less than 6 digits) settings in Adobe Acrobat. If the reader of the
document knows this password he can change any
security settings, including all passwords.
User Password
The password that is required to read the document.
(The length should not be less than 6 digits) User password does not give the reader the ability to
change any security setting.
Encryption – 40 bits / 128 bits
40 bit encryption is back-compatible with Adobe
Acrobat versions before 5.0. It is less secure but
faster. Besides, it does not provide as many features
as 128 bit encryption.
128 bit encryption is more secure but requires more
processing time. It offers extra security features, such
as the ability to allow degraded printing, but only
works with Acrobat 5 and above.
Allow Printing
If not selected, readers will not be able to print the
document in optimal quality.
Allow Degraded Printing
If this checkbox is ticked, readers can only print the
document in a lower quality.
Allow Screen Reading
If this checkbox is not ticked, readers will not be able
to read the document on screen or use other
accessibility tools to interact with your document.
Allow Copying
If this checkbox is not ticked, readers will not be able
to copy document content by copying text or
graphics to the clipboard and then pasting the content
into another application. If you allow copying to
clipboard you also automatically enable the "Allow
screen readers" options and other accessibility tools
can access to the content of your document.
Allow Form Filling
If this checkbox is ticked, and the PDF is in form
format, readers can fill in the form directly.
Well Develop International Limited
Page 17 of 22
NextPDF FormFiller User Manual
Fig. 39
Fig. 40
PDF to Text
NextPDF FormFiller provides a function for you to convert your PDF documents to a text format
documents (.txt). You can either convert a single document or a folder of documents in Batch.
1. Select the "Toolbox" from the menu, then select "PDF to Text" or click the "PDF to Text"
icon on the tool bar. (Fig. 41)
2. A Toolbox window will pop up (Fig. 42). You can either choose to convert in a single file or
in batch. Then you should choose the input and output file path or folder. Finally, click the
"Apply" button to convert the PDF document(s) into text format document(s).
3. If you choose “Single File” mode and previously have checked the box of "Preview Output"
at the bottom left corner, the output document would be automatically opened by Notepad.
Fig. 41
Fig. 42
Well Develop International Limited
Page 18 of 22
NextPDF FormFiller User Manual
Merge PDF
NextPDF FormFiller provides a function for you to merge two of your PDF documents.
1. Select the "Toolbox" from the menu, then select the "Merge PDF" or click the "Merge PDF"
icon on the tool bar. (Fig. 43)
2. A Toolbox window will be pop up (Fig. 44). You should choose the input and output file
path, then click "Merge" button to merge the PDF documents.
Fig. 43
Fig. 44
PDF Selection
NextPDF FormFiller provides a function for you to select pages from your PDF documents.
1. Select the "Toolbox" from the menu, then select the "PDF Selection" or click the "PDF
Selection" icon on the tool bar. (Fig. 45)
2. A PDF Selection window will be pop up (Fig. 46). You should choose the input and output
file path, as well as choose either to delete or to select a range of pages, for example, "1-5,
21, 23, 25-30", then click the "Apply" button for the selection.
3. You can also check the box of "Preview Output" for previously preview before the
selection. Page preview can be shown on the right-hand side of the window, you can just
enter the page number below the preview window to preview the page before you select or
delete the page.
Fig. 45
Fig. 46
Well Develop International Limited
Page 19 of 22
NextPDF FormFiller User Manual
Sign PDF
In order to ensure the authenticity, confidentiality, data integrity and non-repudiation, etc. NextPDF
FormFiller added a sign PDF function, to let users add their e-cert into the PDF documents to
ensure confidentiality. To do this, please follow the following procedures:
1. Select the "Toolbox" from the menu, then select the "Sign PDF".
2. At this time, the "Sign PDF" window (Fig. 47) pops up. You should choose the input and
output file path, set whether to display the signature on the PDF document or not. If you
need you can add your own graphic to the signature, the signature properties, the position of
the signature, set security (refer to "Set Security" part), as well as the signing method.
3. After that, click the "Apply" button for the signature. If you have selected the "Preview
Output File" checkbox, the output will be display in the Adobe Reader. (Fig. 48)
For the Signing Method, there are two options for you to choose, they are: "By Hashed" and "By
Detached".
Function
Details
By Hashed
A hash function H is a transformation that takes a variable-size input m and
returns a fixed-size string, which is called the hash value h (that is, h = H(m)). A
hash function H is said to be one-way if it is hard to invert, where "hard to
invert" means that given a hash value h, it is computationally infeasible to find
some input x such that H(x) = h. Therefore, using hashed signature can ensure
the data integrity.
By Detached
The signature is over content external to the Signature element, and can be
identified via a URI or transform. Consequently, the signature is "detached"
from the content it signs. This definition typically applies to separate data
objects, but it also includes the instance where the Signature and data object
reside within the same XML document but are sibling elements.
Fig. 47
Well Develop International Limited
Page 20 of 22
NextPDF FormFiller User Manual
Fig. 48
* Notes: The function should be accompanied with an e-cert.
Stamper
NextPDF FormFiller provides a function for you to add graphic or text as watermark or
background. To add a stamper, please follow the following procedures:
1. Select the "Toolbox" from the menu, then select the "Stamper".
2. At this time, the "Stamper" window (Fig. 49) pops up. You should choose the input and
output file path. If necessary, you can choose the stamper content, stamp type, pages with
stamp, stamper style, stamper position, and set security (refer to "Set Security" part).
3. After that, click the "Apply" button for the stamper. Fig. 50 and Fig. 51 are the sample
output for graphic stamper and text stamper respectively.
Fig. 49
Well Develop International Limited
Page 21 of 22
NextPDF FormFiller User Manual
Fig. 50
Fig. 51
Trial Version
Basically, the functions of trial version are the same as the retail version. The only differences are
as follows:
1. It restricts the output formats, no FDF or XFDF is provided. The users can only save your
forms as either PDF form or Flatten PDF form.
2. The documents that being created by our NextPDF FormFiller, will be dropped a line as
"This form is filled by the free version of NextPDF FormFiller (http://www.nextoffice.net)"
at the footer of your documents. (Fig. 52)
Fig. 52
Well Develop International Limited
Page 22 of 22