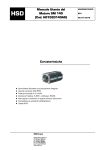
1
H5801D0003ING Motor SM137 User Manual 02 05/15/2007 Technical Specifications Brushless motor with Driver and reductor integrated Total reduction ratios 1:6.25 - 1:8 - 1:25 - 1:50 Nominal Speed 640 - 500 - 160 - 80 RPM Nominal Power in S1 68W FieldBus interfaces: E-NETx, CANopen, RS485 High Torque even with unfavourable inertial ratio Compact and easy to be installed IP50 class CNI Engineering S.r.l. Update List Revision Added Deleted 00 First Edition 01 General Revision 02 Sect. 6.3 H5820D0003ING-02_Cop.fm Changed New Layout PUBLICATION ISSUED BY: Documentation office Via Carpanelli, 24 40011 Anzola dell'Emilia (Bo) Italy Tel. +39 051 6508911 Fax +39 051 6508912 [email protected] www.cnicnc.com Registered offices Via dell’Artigianato, 1 48011 Alfonsine (Ra) Italy Tel. +39 0544 84277 Fax +39 0544 80635 P.I. e C.F. 02248390391 Document Code: H5801D0003ING Document revision: 02 Document edition: 05/15/2007 Manual written by the CNI Engineering Technical Publications Office H5820D0003ING-02_Col.fm INDEX INDEX 1 INTRODUCTION .........................................................................................1 1.1 1.1.1 1.2 1.3 1.3.1 1.3.2 1.4 1.4.1 1.4.2 1.5 2 PACKAGING, TRANSPORT AND STORAGE ...........................................5 2.1 2.2 2.3 3 Packaging/unpackaging conditions .......................................................... 5 Transport ................................................................................................... 5 Storage ..................................................................................................... 5 TECHNICAL DESCRIPTION ......................................................................7 3.1 3.2 3.3 4 Warnings and basic safety precautions .................................................... 1 Purpose of this manual ........................................................................... 1 Symbols used in this manual .................................................................... 1 Risks associated with the use of the product ............................................ 2 Risks associated with improper use and handling ................................. 2 Specific hazards with the product under maintenance ........................... 2 Product information ................................................................................... 3 Purpose of the product ........................................................................... 3 Range of applications ............................................................................. 3 Glossary .................................................................................................... 3 Specifications ............................................................................................ 7 Torque and Service specifications measured at the rotor ......................... 8 Ordering codes ....................................................................................... 12 INSTALLATION.........................................................................................13 4.1 4.2 4.2.1 4.2.2 4.3 4.4 4.4.1 4.4.2 4.4.3 4.5 4.6 4.6.1 4.6.2 4.6.3 4.7 Dimensions ............................................................................................ 13 Installation ............................................................................................... 15 Preparation of the auxiliary parts for installation ................................... 15 Mechanical fittings ................................................................................ 15 Electrical connections ............................................................................. 16 Fieldbus interfaces .................................................................................. 18 E-NETx ................................................................................................. 18 CANopen .............................................................................................. 18 RS485 .................................................................................................. 19 Dynamo effect ......................................................................................... 19 Configuration .......................................................................................... 19 E-NETx configuration ........................................................................... 20 CANopen configuration ........................................................................ 21 RS485 configuration ............................................................................. 22 Diagnostics ............................................................................................. 23 H5801D0003ING-02TOC.fm (14-05-07) CNI Engineering I INDEX 5 COMMISSIONING.................................................................................... 25 5.1 5.2 5.2.1 5.2.2 6 25 25 25 25 MAINTENANCE ....................................................................................... 27 6.1 6.2 6.2.1 II Checks at first start-up ........................................................................... Use of the engine ................................................................................... Environmental conditions ..................................................................... Running-in ........................................................................................... Ordinary maintenance procedures ......................................................... 27 Unscheduled maintenance operations ................................................... 27 Disposing of the product ...................................................................... 27 CNI Engineering H5801D0003ING-02TOC.fm (14-05-07) 1 1 INTRODUCTION 1.1 Warnings and basic safety precautions 1.1.1 INTRODUCTION Purpose of this manual Keep this manual safe, and make sure that it is distributed to and available to all persons involved with the product. The instructions in this manual provide essential information on how to operate the product correctly and in accordance with the manufacturer’s requirements. If you encounter any inconsistencies between the instructions in this manual and any applicable safety precautions, contact CNI to have the necessary corrections and/or modifications introduced. Make sure that you have read and fully understood all the documentation supplied with the product to avoid operating it in ways that could cause injury to persons and/or damage to the product itself. Keep this manual in a suitable place, where it is always readily available for consultation. The information contained in this manual is essential for the safe and correct use of the product. 1.2 Symbols used in this manual WARNING This symbol identifies a procedure, instruction or precaution that, if ignored or performed incorrectly, may result in personal injury. CAUTION This symbol identifies a procedure, instruction or precaution that, if ignored or performed incorrectly, may result in damage to or destruction of the product. IMPORTANT This symbol identifies particularly important general information that must not be ignored. info_prelim-en.fm (14-05-07) CNI Engineering 1 1 INTRODUCTION 1.3 Risks associated with the use of the product CNI does not and cannot know how end users will install the product. The installer or customer must therefore perform a separate risk assessment for each installation and application. In any case the installer is responsible for guaranteeing that there is an adequate degree of protection against the risk of accidental contact with moving parts and organs. The installer and the user must also take into account other types of hazard, in particular those arising from the foreign bodies getting in or from the conveyance of explosive, inflammable or toxic gases at high temperature. Also to be considered are the hazards concerned in maintenance operations which must be carried out in conditions of maximum safety, isolating the product and making certain that its moving parts have been immobilized. When the choices have been made and according to the way the installer and/or the customer have defined and applied the modes of installation, the definitive machine can be considered a "finished machine" under the machinery directive. An overall evaluation of the hazards must be carried out and a declaration of conformity must be compiled in accordance with Directive 98/37/ CE as amended. 1.3.1 Risks associated with improper use and handling Never impede the function of, remove, modify, or in any way interfere with any safety device, guard, or control of any individual parts or of the product as a whole. Keep hands, arms and any part of the body away from moving parts Do not use the product in atmospheres or environments where there is a risk of explosion Unless you are qualified and authorised to do so, never attempt to repair faults or malfunctions and never interfere in any way with the product’s operation or installation Maintain all protection and safety devices in perfect working order. Also make sure that all warning labels and symbols are correctly positioned and perfectly legible For troubleshooting for any fault or breakdown concerning the product, take all the precautions described or implemented After adjusting or setting-up operations carried out on any mechanical element, all screws, bolts and locking nuts must be tightened again Before starting the product, verify that all the safety devices are installed and working perfectly; if this is not the case, it is strictly prohibited to activate it and the head of internal safety or the department foreman must be informed The operator must be fitted out with Personal Protective Equipment (PPE) in accordance with the binding laws; baggy clothes and various accessories are prohibited (ties, loose sleeves, etc.) 1.3.2 Specific hazards with the product under maintenance Separate the product from the main power supply before proceeding with any maintenance operation When the product is not powered, the rotating parts can still move due to the inertia of the motor; therefore, before carrying out the maintenance operations make sure the product's moving parts are at a standstill 2 CNI Engineering info_prelim-en.fm (14-05-07) 1 1.4 INTRODUCTION Product information 1.4.1 Purpose of the product The SM137 motor is part of a machine and is intended to be assembled or incorporated into other machine parts or machines, to form a machine under Directive 98/37/CE. Starting the product is prohibited before the machine into which it will be incorporated has been made to conform with the provisions of Directive 98/37/CE as amended. 1.4.2 Range of applications The SM137 motor has been designed for the general handling of mechanical parts within the limits of the power specifications quoted in the following documentation. 1.5 Glossary Nominal specifications The whole of the nominal values reached at the nominal frequency. Service S1 Running under constant load, of sufficient duration to allow the motor to reach thermal equilibrium. The appropriate abbreviation is S1. (CEI EN 60034-1 standard) Service S5 Sequence of running cycles that are identical, each one including a running time under constant load and a loadless running time keeping up the rotation speed, there is no rest time. The appropriate abbreviation is S5, followed by the percentage ratio between running time duration under load and the duration of a cycle. (CEI EN 60034-1 standard). Example: S5 40% (40% running time under load, 60% loadless running time rotating) Torque and Power C=Torque W = Power rpm = revolution per minute Ordinary maintenance info_prelim-en.fm (14-05-07) Providing the precise physical definitions of torque and power goes beyond the scope and the possibilities of this manual. However, an approximate correlation can be made between the torque and the force with which the tool bites into the piece being machined (and with the same torque, the force increases as the diameter of the tool decreases). The power, on the other hand, is proportional to the torque and the speed of rotation and determines the maximum cutting speed (compatibly with the performance of the tool, the characteristics of the material being machined and the type of machining). It is the whole of the acitivies carried out in order to maintain the conditions of use and running of the electrically driven spindle, contemplated by CNI when introduced onto the market; it is achieved through scheduled interventions of adjustment, restoration and replacement of parts. CNI Engineering 3 1 4 INTRODUCTION CNI Engineering info_prelim-en.fm (14-05-07) 2 PACKAGING, TRANSPORT AND STORAGE 2 PACKAGING, TRANSPORT AND STORAGE 2.1 Packaging/unpackaging conditions The SM137 motor is delivered packaged. The package consists of a profiled polyethylene container inside a cardboard box. This packaging preserves the integrity of the product during transport operations preventing small knocks from damaging it or dirtying it. Each box contains 4 motors, each one weighing 950 g, making a total of 3.8 Kg. In the packaging stage, each motor shaft is given a coating of waxy grease. Check that the packaging and the product itself are undamaged as soon as you open the box. Contact the supplier immediately if you notice any damage. When you unpack the product, dispose of unwanted packaging material in compliance with applicable recycling and waste disposal standards and regulations. 2.2 Transport Given the product’s small size, it can be easily carried. When lifting and moving the product, take great care to avoid dropping it and also avoid any unnecessary impact that could cause malfunctioning or damage to delicate parts. 2.3 Storage If the product is going to be warehoused or stored for an extended period of time, make sure that it is adequately protected against the weather and any potential sources of damage in the storage environment (rain, humidity, dust, chemicals, etc. It must be stored in an airtight envelope which restricts the formation of humidity, or in envelopes that restrict oxidation, which themselves must contain sachets of silicagel to absorb the humidity. During the storage period, the following environmental conditions must be respected: Temperature range in storage –5 ÷ +55°C (+23 ÷ +131°F) Relative humidity in storage 5% - 55% Maximum storage altitude 2000 m It is also advisable: to make periodic checks to verify the good state of general conservation dati_imm_tras-en.fm (14-05-07) CNI Engineering 5 2 6 PACKAGING, TRANSPORT AND STORAGE CNI Engineering dati_imm_tras-en.fm (14-05-07) 3 3 TECHNICAL DESCRIPTION 3.1 Specifications TECHNICAL DESCRIPTION OPERATING ENVIRONMENT Temperature 0° ÷ 40°C (32° ÷ 104°F) Max humidity non-condensing 10% - 75% Maximum operating altitude 2000m (6500ft) Device operating area Zone A Overvoltage class II IP protection rating IP 50 Insulation class F Noise level <70dB MECHANICAL DATA Reductor Type 1 or 2 stage planetary reduction Total reduction ratios 1:6,25 / 1:8 / 1:25 / 1:50 Shaft external diameter 10 mm Motor max dimensions (mm) 1:6,25/1:8/1:25 Length (L) 176,4 x Height (H) 57 x Depth (D) 40 1:50 (L) 179,7 x (H) 57 x (D) 40 Weight (g) 950 INTERFACE Electrical connection 9 pin male connector FieldBus interface Enet-X, CANopen, RS485 Type of interface See Chapter 4.4 CONTROL MODES Built-in incrementale encoder 800 pulses/revolution + zero index Position feed-forward compensation (%) 0 ÷ 100% Speed control range (RPM) 1:6,25 20 ÷ 700 1:8 15 ÷ 550 1:25 5 ÷ 175 1:50 2 ÷ 82 Speed feed-forward compensation (%) 0 ÷ 100% Torque control range (A) 0 ÷ 9.0 A carat_tecn-en.fm (14-05-07) CNI Engineering 7 3 TECHNICAL DESCRIPTION ELECTRICAL SPECIFICATIONS Logic Feeding (V) Backup power source 24V DC +/-10% (SELV o PELV) Absorption logic feeding 100 mA @ 24V DC Motor power supply (V) Backup power source 24V DC +/-10% (SELV o PELV) Absorption power feeding See section 3.2 FLASH MEMORY Dimension 32 K x 16 bits Time 10,000 writing/deleting cycles 3.2 Torque and Service specifications measured at the rotor Specifications at the rotor Max S1 (*) 4000 rpm S1 (*) 0 rpm S5 (**) Absorption power feeding (W) 250 68 17 34 Torque (Nm) 0.54 0.1 0.16 0.2 Speed (RPM) 4400 4000 0 4000 Moment of inertia (Kg*mm2) 3.9 3.9 3.9 3.9 Cycling duration factor (%) 100 100 100 59 Note Dimensions are measured up to motor shaft at ambient temperature of 25°C (*) Please check graphic of continous running duty Service S1. (**) Please check graphic of continous running duty Service S5 (50%): ∆tD=0.50 [S] ∆tP=2.25 [S] ∆tF=0.50 [S] ∆tR=2.25 [S] 8 CNI Engineering carat_tecn-en.fm (14-05-07) 3 Reduction ratio (1:R) Number of stages Efficiency Reduction Gear clearance Moment of inertia at the motor shaft (Kg*mm2) TECHNICAL DESCRIPTION Thrust load (1) [N] Radial load (2) [N] Distance from the ledge 15mm 2,5mm 1:6,25 1 95% 20’ 0,118 70 250 500 1:8 1 95% 20’ 0,075 70 250 500 1:25 2 91% 20’ 0,115 70 250 500 1:50 2 91% 20’ 0,11 120 300 (3) (1) Maximum axial load at 4000/R rpm with life of 10,000 hours (2) Maximum radial load at 4000/R rpm with life of 10,000 hours (3) Maximum radial load applicable on the centre line of the output shaft (with speed of rotation of 100 rpm) with life of 20,000 hours TORQUE CHARACTERISTICS SM137 to the rotor [Nm] 0.5 0.4 Max 0.3 S1 0.2 0.1 0 0 carat_tecn-en.fm (14-05-07) 800 1600 2400 CNI Engineering 3200 4000 [rpm] 9 3 TECHNICAL DESCRIPTION CONTINUOUS RUNNING DUTY S1 Legend P Load Pv Eletrical losses Θ Temperature Θmax Maximum temperature attained t Time 10 CNI Engineering carat_tecn-en.fm (14-05-07) 3 TECHNICAL DESCRIPTION INTERMITTENT PERIODIC DUTY S5 ( ∆tD + ∆tP + ∆tF ) / Tc Cycling duration factor Legend P Load Pv Eletrical losses Θ Temperature Θmax Maximum temperature attained t Time Tc Time of one load cycle ∆tD Starting / acceleranting time ∆tP Operation time at costant load ∆tF Time of electric braking ∆tR Time at rest and de-energized carat_tecn-en.fm (14-05-07) CNI Engineering 11 3 TECHNICAL DESCRIPTION 3.3 Ordering codes CODES Fieldbus interface Reduction ratio SHAFT DESIGN H0102D137C0 E-NETx 1:6,25 Stub plane H0102D137C1 E-NETx 1:8 Stub plane H0102D137C2 E-NETx 1:25 Stub plane H0102D137C3 CANopen 1:6,25 Spline H0102D137C4 CANopen 1:8 Spline H0102D137C5 CANopen 1:25 Spline H0102D137C6 RS 485 1:6,25 Spline H0102D137C7 RS 485 1:8 Spline H0102D137C8 RS 485 1:25 Spline H0102D137C9 E-NETx 1:6,25 Spline H0102D137CA E-NETx 1:8 Spline H0102D137CB E-NETx 1:25 Spline H0102D137CJ RS 485 1:50 Spline H0102D137CK E-NETx 1:50 Spline H0102D137CL CANopen 1:50 Spline More versions are available on the mand, plese contact CNI for more details. 12 CNI Engineering carat_tecn-en.fm (14-05-07) 4 4 INSTALLATION 4.1 Dimensions INSTALLATION VERSION WITH SHAFT WITH STUB PLANE I = = 29 II 40 1 9.5 1 12 29 = = 40 1 M6 III 7.5 18 3 4.5 2 35 O 10 30 40 57 16 20 16.9 158.4 176.4 Legend I Shaft side view 1 M6 fixing hole II Perspective view 2 Male 9 pin connector III Longitudinal section installa-en.fm (14-05-07) CNI Engineering 13 4 INSTALLATION VERSION WITH SHAFT WITH SPLINE I II 1 40 29 = = 11.2 1 29 = = 40 C 3N 9/j s9 III 18 3 4.5 ,5 M4 2 9 16.9 35 O 10 30 40 R1 57 11 20 A B Legend I Shaft side view 1 M6 fixing hole II Perspective view 2 Male 9 pin connector III Longitudinal section 14 CNI Engineering installa-en.fm (14-05-07) 4 4.2 4.2.1 INSTALLATION Installation Preparation of the auxiliary parts for installation It is the customer's responsibility to provide for the preparatory works (e.g. electricity and compressed air supplies, etc.). The connection to the mains electricity supply must be carried out by qualified personnel. It must be remembered, moreover, that the customer is responsible for the entire power supply system as far as the connectors of the motor. The earthing system must comply with the binding regulations in the country of installation and be regularly inspected by qualified personnel. Do not install SM137 in environment with risk of explosion 4.2.2 Mechanical fittings The load-bearing structure to which the SM137 motor will be secured must ensure a rigidity adequate to its weight, and to the type of work it must perform. The support surface onto which the motor will be secured must have a flatness that is less than 0.02 mm FIXING FLANGE OF THE SM137 UNIT Use: 2 screws M6 Resistance Class 8.8 Fixing torque 7 Nm Screws lenght must not engage the screw thread for more than 10mm 29 = = 40 1 9.5 1 12 29 = = 40 1 Legend M6 1: M6 fixing holes installa-en.fm (14-05-07) CNI Engineering 15 4 4.3 INSTALLATION Electrical connections The SM137 needs two separate feeds provided by two different feeders: a logic feed equipped with adequate power and protected by a fuse whose type and rated value depend on the number of modules in cascade connection (in any case not above 4A) a power feed protected by a retarded fuse whose rated value is 10A The SM137 does not allow the possibility of connecting modules downstream; therefore, it must be connected as the last module of a cascade. To connect more than one SM137 module, an HUB CE104C or PM55 repeater must be used. When powering up the system, always power up the logic circuit first and then the power circuit. When powering down the system, power down the power circuit first and then the logic circuit. It is the user’s responsibility to ensure safe isolation between all SELV (or PELV) type cables and components and those of a type other than SELV (or PELV). Never attempt to service, connect or disconnect modules or connectors while the system is powered up. Incorrect connections (power, Fieldbus) can cause irreparable damage to the device itself and to other devices connected to it. Instructions for using connector: Encoder connectors are not designed to withstand significant torsional or axial forces and must therefore be handled with care and never manipulated with tools. Before attempting to plug in or unplug a connector, make sure that you can clearly see both connector sections. This is important because incorrect handling can twist or compress the connectors and damage the connectors and their pins. Proceed as follows to plug in a connector: before pushing in the connectors make sure that you know exactly how the pins are arranged push the male connector gently into the female socket and firmly but gently push it home once you are sure that the two connector sections are mating perfectly, hold the male connector in place with one hand, and with the other screw up the connector’s ring nut until it is secure 16 CNI Engineering installa-en.fm (14-05-07) 4 INSTALLATION 1 9 Motor side view 9-POLES MALE CONNECTIONS PIN SIGNAL 1 GND 2 FBCAN_L RX/TX- 3 GND 4 GND 5 GND 6 Logic VCC 7 FB+ CAN_H RX/TX+ 8 Power VCC 9 Power VCC 6 7 8 9 1 2 3 4 5 Front view - Contacts side N.B. There is only one Logic, Power and Fieldbus earth. N.B. Whilst powering up and powering down and in the event of a communication breakdown with the PLC, the motor is taken back to a "safe status" by means of a reset circuit. "Safe status" is understood to be the absence of movement of the shaft. To restore normal operation a special software command is required. Input circuit diagram installa-en.fm (14-05-07) CNI Engineering 17 4 INSTALLATION 6 7 Voltage regulator Current limiting 1 2 3 8 4 9 5 Internal 3,3V Power ON Led red P24V Led yellow 4.4 Fieldbus interfaces SM137 support 3 communication protocols: E-NETx, CANopen, RS485. 4.4.1 E-NETx Protocol type E-NETx Transmission speed 3 Mbit/sec Maximum distance from master 200 m Number of selectable addresses 32 Cable type RS232 serial cable Refer to the “E-NETx Communications Protocol”, “CE104C” and “PM55” manuals distributed by CNI for any information you need concerning: connections the maximum number of units that can be connected what cables to use the need for modems and/or repeaters 4.4.2 CANopen Protocol type CANopen Transmission speed 20K - 50K - 100K - 125K 250K - 500K - 800K - 1000K Number of selectable addresses 31 Cable type Multicore Refer to the “CANopen Communications Protocol” manual distributed by CNI for any information you need concerning: module usage CiA DS301 and DS401 specifications connections line terminations 18 CNI Engineering installa-en.fm (14-05-07) 4 INSTALLATION the maximum number of units that can be connected how to interrogate the module about the version of firmware installed what cables to use the need for modems and/or repeaters 4.4.3 RS485 Protocol type RS485 Transmission speed 4.5 19200 buad 38400 baud Dynamo effect With the motor switched off, the axis of the SM137 can be moved from the outside. This behaviour produces energy inside the motor due to the dynamo effect. In case of the motor being used in this way, remember that the presence of a reduction unit multiplies the number of revolutions of the motor shaft. The maximum speed the motor shaft (without any reduction unit) can support under the dynamo effect is 500 rpm. Rotation at a higher speed produces the immediate and irreversible breakage of the motor. 4.6 Configuration The dip-switches are used to set the address of the module on the Fieldbus and the transmission speed and line terminations. The configuration of the dip-switches changes according to the communication protocol used. SW1 1 2 3 4 5 6 7 8 Dip-switch positioning Replace the cover over the dip-switch when you finish configuring. installa-en.fm (14-05-07) CNI Engineering 19 4 INSTALLATION 4.6.1 E-NETx configuration DIP-SWITCH SIGNAL 1 Address bit A0 2 Address bit A1 3 Address bit A2 4 Address bit A3 5 Address bit A4 6 OFF (3 Mbit/sec) 7 Field Bus terminated = ON 8 Field Bus terminated = ON The five addressing dip-switches allow the setting of the address of the SM137 operation on Fieldbus. To set the address, configure the switches so that they form the binary number identifying the required address. A0 is the least significant bit and A4 is the most significant bit. Dip switch 6 serves for setting the protocol communication speed. DIP switches 7 and 8 serve to terminate the line (and prevent unwanted signal reflections). Refer to the E-NETx Communications Protocol manual for information on how to terminate the line correctly. Examples: ADDRESS DIP SWITCH SETTING Hexadecimal Binary A4 A3 A2 A1 A0 01 00001 OFF OFF OFF OFF ON 05 00101 OFF OFF ON OFF ON 0A 01010 OFF ON OFF ON OFF 15 10101 ON OFF ON OFF ON 20 CNI Engineering installa-en.fm (14-05-07) 4 4.6.2 INSTALLATION CANopen configuration Using the dip-switches present on the motor the baudrate and number of motor nodes can be set. DIP-SWITCH MEANING 1 If bit 6 is at ON, they indicate the baudrate; if not, the node number. 2 3 4 5 6 If ON, the baudrate can be set by means of the bits from 1 to 5. If OFF, bits 1 to 5 represent the motor address 7 Both on the ON position connect the line termination. Both OFF do not connect any termination. The other possible configurations should be avoided. 8 To set the desired baudrate the motor must be started with bit 6 high and bits 1 to 5 set according to the desired baudrate: Dip-switch Baudrate Confirmation Blink 5 4 3 2 1 Off Off Off Off On 1 Mbaud 1 Off Off Off On Off 800 Kbaud 2 Off Off Off On On 500 Kbaud 3 Off Off On Off Off 250 Kbaud 4 Off Off On Off On 125 Kbaud 5 Off Off On On Off 100 Kbaud 6 Off Off On On On 20 Kbaud 7 Immediately after start up, the green LED lights up for one second. After this, if the flash saving of the desired baudrate value has been successful, it begins to flash periodically with a number of blinks relative to the chosen baudrate. If the configuration of the dip switches is not among those included, the baudrate remains as the one previously set. The motor comes with a default baud rate setting of 500K. If any flash memory write problems are encountered, the green LED will start to flash on for two seconds, then off for two seconds in a 4 second cycle. At the end of the procedure the motor has to be switched off, lower dip switch 6 and on dip switches 1 to 5 set the desired node number. Setting dip switches 5 and 4 to ON, all the motor's default parameters can be reset, including the baudrate. At the end of the procedure the LED flashes with the coding mentioned in the above "Baudrate" paragraph. This functionality is available from version 123 of the firmware onwards. installa-en.fm (14-05-07) CNI Engineering 21 4 INSTALLATION If the motor is switched on with dip switch 6 at OFF, the Smart Motor starts normally reading the node number from dip switches 1 to 5 Dip-switch Node number 5 4 3 2 1 Off Off Off Off Off 0 Off Off Off Off On 1 Off Off Off On Off 2 … … … … … … On On On On Off 30 On On On On On 31 The node number can vary from 0 to 31 and once the motor is switched on cannot be changed. In other words, to change the node number, the motor has to be switched off and switched on again 4.6.3 RS485 configuration DIP-SWITCH SIGNAL 1 Address bit A0 2 Address bit A1 3 Address bit A2 4 Address bit A3 5 Address bit A4 6 19200 baud= OFF 38400 baud= ON 7 Field Bus terminated = ON 8 Field Bus terminated = ON There are five address switches for setting the SM137 drives of the Fieldbus address. To set the address, configure the switches so that they form the binary number identifying the required address. A0 is the least significant bit and A4 is the most significant bit. Dip-switch 6 serves for setting the protocol communication speed. Dip-switches 7 and 8 serve to terminate the line (and prevent unwanted signal reflections). Examples: ADDRESS DIP-SWITCH SETTING Hexadecimal Binary A4 A3 A2 A1 A0 01 00001 OFF OFF OFF OFF ON 05 00101 OFF OFF ON OFF ON 0A 01010 OFF ON OFF ON OFF 15 10101 ON OFF ON OFF ON 22 CNI Engineering installa-en.fm (14-05-07) 4 4.7 INSTALLATION Diagnostics LED MEANING LED1 The green READY LED lights to show that the module is operating over the Fieldbus. LED2 Red LOGIC LED. When lit, it indicates that the logic feed is present in the operation. LED3 Yellow POWER LED. When lit, it indicates that the power feed is present in the operation. LED1 LED2 LED3 installa-en.fm (14-05-07) CNI Engineering 23 4 24 INSTALLATION CNI Engineering installa-en.fm (14-05-07) 5 5 COMMISSIONING 5.1 Checks at first start-up COMMISSIONING Before carrying out any operation, VERIFY : that no parts of the products have been knocked during transport and/or handling that the containers are not damaged 5.2 5.2.1 Use of the engine Environmental conditions CNI have tested and inspected their motors according to the standard environmental conditions; for a detailed description of the environmental values see Chapter 3 - Technical Description. For information on the possibility of applications in special environments contact CNI. 5.2.2 Running-in Before being prepared for shipment, an automatic running-in cycle is run on the motor to guarantee the lubricant is spread properly over the bearing races; the running-in cycle also includes a stiff check on all the control and signalling members simulating the various machining cycles at the test bench, therefore the customer need not perform any running-in on the motor at all. messa_serv-en.fm (14-05-07) CNI Engineering 25 5 26 COMMISSIONING CNI Engineering messa_serv-en.fm (14-05-07) 6 6 MAINTENANCE 6.1 Ordinary maintenance procedures MAINTENANCE The SM137 modules do not require any special maintenance. 6.2 6.2.1 Unscheduled maintenance operations Disposing of the product At the end of the motor's life cycle, the user company must take care of its demolition. First of all, the various elements must be cleaned and then the various parts must be separated into components and electrical material. Different materials must be separated, for example: the electric motors (copper windings), the metal parts, the plastic materials, etc. and subsequently disposed of through the separate waste collection system in accordance with the binding law of the country of installation. man_ord_straord-en.fm (14-05-07) CNI Engineering 27 6 28 MAINTENANCE CNI Engineering man_ord_straord-en.fm (14-05-07)