1
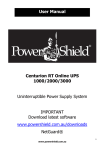
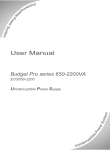
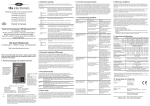
1. Introduction Thank you for purchasing Defender 1200/1600. It is designed to provide safe and reliable power protection to your precious electronics equipment. Before you start using the product, please read this user’s manual. It contains instructions relating to safety, installation, operation maintenance and warranty. Please keep this manual in a safe place for future use. 2. Safety instruction Please read following safety instruction carefully before using Defender 1200/1600 ATTENTION ! : ELECTRICAL SAFETY. To prevent the risk of fire and electric shock, install the product in a controlled temperature and humidity indoor area where it is free from conductive contaminants. To reduce the risk of overheating of the product, do not cover the cooling vent holes and avoid exposing the unit under direct sunlight or installing the unit near the heat emitting appliances such as heaters or furnaces. Do not connect non computer related equipment such as medical equipment, life-support system, microwave oven, vaccum cleaners. Also since this unit output is not sinusoidal, please do not connect AC line filters, motors and other inductive / capacitive equipment. These equipment might damage the unit. Do not plug the unit input cord to its own output. Do not allow liquids or any foreign object to get inside the unit. Do not place any liquid formed materials on the top of the unit or right next to it. VERY IMPORTANT In order to validate your warranty it is essential that you register it. Warranties must be registered online Please register your warranty by visiting www.powershield.com.au For safety purpose, proper grounding is necessary during installation of the unit in order to reduce the leakage current below 3.5mA. Hazardous due to electric shock. Although, unit is disconnected from the mains, hazardous voltage may still be accessible through supply from the battery. Battery connection should be disconnected when servicing the product. 1 Do not attempt to open enclosure for modification and service, there is no 3. Package Contents serviceable parts inside the unit other than replacing the battery from front panel You should have received the following items inside of package: compartment. Modification applied to this unit void product warranty. CAUTION : BATTERY SAFETY When replacing the batteries, use the same number and type of batteries. See www.powershield.com.au for further information on replacement battery kit. Do not dispose of batteries in a fire. The battery may explode. Do not open or mutilate the battery. Released electrolyte is harmful to the skin and eyes. A battery can present a risk of electric shock and high short circuit current. This unit contains no serviceable components other than battery. Repairing of the product must only be performed by qualified service personnel. Following precautions should be observed before replacing batteries. 1. Remove watches rings and other metal objects. 2. Use proper tools with insulated handles. 3. Do not lay tools or metal parts on the top of batteries - PowerShield Defender 1200/1600VA unit PowerShield Defender User’s Manual USB communication cable NetGuard CD monitoring software Note: Before installation, please inspect the unit and make sure that no damages have occurred during transit. If any damage is found, please notify your dealer. Please keep the shipping materials in the event the product must be returned to a repair centre for service. 4. Product Overview PowerShield Defender will protect your computer, telephone system and other electronics devices from various power disturbances including black and brown out. This product features user friendly LCD display that displays status of the product. Front View : 4. Disconnect charging source prior to connecting or disconnecting battery terminals. 5. Make sure that the UPS is turned completely OFF. 1. User-friendly LCD Display 2. 2 3 On/Off Switch 5. Installation & Start up Rear View : Install the unit in the controlled environment area that is free from dust and has adequate air. Plug the AC input cord into the wall outlet and the unit will automatically start charging the battery. Please allow 6 hours to recharge the battery. 1. User Friendly LCD Display See 6. “Understanding Display section for detail .” 2. On/Off Switch Turn on and off unit with and without utility. 3. Resettable input circuit breaker Breaker will trip when there is overload / short occurs at output of the unit. NEVER Connect a laser printer / scanner to the UPS outlets. This may cause Circuit breaker is rated at 10Amp. damage to the unit. The, following types equipment may cause some problems since 4. USB interface port battery output of this UPS is not sinusoidal. Connect USB cable and computer. Install NetGuard UPS monitoring software Inverter, Transformer, AC line filters and some PFC power supplies. for advanced power monitoring. 5. Full time Surge protection outlets These outlets do not provide battery backup when mains has failed. The outlets provide continuous protection for surges and spikes. Connect peripherals that do NOT need battery backup. UPS and Surge Protection outlets These outlets provide battery backup power when main fails and unit is turned on. Connect peripherals that need battery backup protection. Do not connect Laser printers. 4 5 6. Understanding LCD display Overload status Total output power has exceeded the maximum power rating of the unit. Load level indicator flashes. Constant Beeping Fault mode ① Input Voltage meter ②On line mode Icon 3 ○ Output voltage meter ④Load level indicator 5 ○ On battery mode Icon ⑥Battery level indicator Status LCD On line Operation Please call for assistance when this indicator appears. Standby Mode On/Off button does not turn on. The Status unit is connected to utility. Battery Utility is stable and the unit is are being recharged. supplying its power from utility. No Beep. No beep AVR operation The unit is boosting / bucking input 7. Software Installation voltage. On line mode icon flashes every 1 sec. No Beep On battery There is a power disturbances / Operation black out. The unit is supplying power from battery. 1. Insert NetGuard CD into CD-ROM drive and follow the on screen instruction. If Auto start does not run, then please run “ setup.exe” for the installation. 2. When the installation completed, NetGuard agent icon will appear on Task bar. 3. Once the installation is completed click plug icon found on the task bar and start the program. Beeps 2 beeps every 30 sec Low battery status Battery capacity becomes low. The unit will shut its output down. On battery mode icon flashes. Rapid beep one sec interval 6 7 8. Battery replacement 9. Trouble Shooting Defender 1200/1600 have user replaceable battery feature. Please read Please follow the trouble shooting section below. If the problem cannot be warning on the front page about battery safety and follow the steps carefully resolved, please check PowerShield FAQ web page or call our customer support shown below. Please use only PowerShield approved battery pack to for further assistance. maximize the performance of the unit. Problem Probable Causes Low battery 1. Shutdown all connected equipment and turn the UPS off by pressing on / LCD display not lit Battery maybe faulty off button. Input circuit breaker tripped 2. Remove input cord from mains and remove all output cord from the UPS. 3. Flip the UPS upside down. There is a front door screw found on the front panel. Remove the screw using Philips screw driver. Continuous beeping while unit utility is normal 4. Remove the front panel by grabbing the bottom edge of the front panel Equipment maybe connected to Surge protection outlets forward. Remove hooks from the enclosure. Please be careful not to apply excess force to the panel as it may cause damage to the LCD cable attached to it. The unit maybe overloaded Back up time is short / The unit maybe overloaded none when power fails. 5. There is a metal plate holding the battery pack in the enclosure. Remove the Low battery metal plate from the unit. Battery maybe fault 6. Pull tag of the battery pack and remove the battery from the unit 7. Remove Red ( Positive )and Black ( Negative ) battery wires from the battery pack. 8. Prepare new battery pack. Connect Black ( Negative ) wire to the new The unit stays on battery when the utility is normal Input circuit breaker tripped Check circuit breaker at rear panel and reset if it is tripped. Input power cord maybe loose Reconnect the power cord to wall outlet properly. battery black terminal and connect Red ( Positive ) battery wire to the red battery terminal. Note : You will see a small spark when you connect red wire to the battery. This is normal as the unit charges energy to some component. Please check polarity of battery terminals. 9. Insert the battery back into the unit and put the metal plate back to the front of the enclosure. Place the front panel and screw the battery door screw. 10. Please recharge the unit for 6 hours before you turn the unit on. 8 Solution Recharge the unit for at least 6 hours and try to start it again. Replace the battery with Powershield battery kit. Check circuit breaker at rear panel and reset if it is tripped. Remove some equipment that is connected to UPS outlets and check load level indicator on LCD display. The surge protection does not have battery back up function. Connect your equipment to UPS outlet if it is required for battery back up. Remove some equipment that is connected to UPS outlets and check load level indicator on LCD display. Recharge the unit for at least 6 hours and try to start it again. Replace the battery with PowerShield battery kit. 9 10. Warranty and Service. transit. Damage sustained in transit is not covered under warranty. 8. Mark the RMA # on the outside of the package. Warranty Condition 9. Return the defective unit by insured, prepaid carrier to the address given to The standard warranty is TWO (2) years from the date of purchase. The standard you by Technical support. PowerShield procedure is to replace the original unit with a factory refurbished unit. PowerShield will ship the replacement unit once the defective unit has been received by the service department, or cross ship upon the receipt of a valid credit card number. The customer pays for shipping the defective unit to 11. Storage and Maintenance Operation replacement to the customer within Australian capital cities metro areas only. Defenders contains no user-serviceable parts other than battery pack. If the battery service life (3~5 years at 25°C ambient temperature) has been exceeded, the batteries must be replaced. WARRANTY SEVICE PROCESS : Please contact your dealer or visit PowerShield web site. 1. Review the problems discussed in the troubleshoot section of this manual to www.powershield.com.au/support.php PowerShield. PowerShield pays ground freight transportation costs to ship the eliminate common problems. 2. Verify that no input/output circuit breaker is tripped. A tripped circuit breaker Be sure to deliver the spent battery to a recycling facility or ship it to your dealer in the replacement battery packing material. is the most common problem. 3. If the problem still persists, please call 1300-305-393 for technical support or fill in the form in PowerShield web page for on line technical support. Following details are needed for warranty claims. Model number Serial number The date of purchase Storage Before storing, charge the UPS 6 hours. Store the UPS covered and upright in a cool, dry location. During storage, recharge the battery in accordance with the following table: 4. Be prepare to troubleshoot the problem over the phone with PowerShield technical support. 5. If technical support found that the product is defective, then the technical support will issue a Return Material Authorization Number ( RMA # ) Storage Temperature Recharge Frequency Charging Duration -25°C - 40°C Every 3 months 1-2 hours 40°C - 45°C Every 2 months 1-2 hours 6. If the unit is under warranty, repair is free. If not there is a repair charge. 7. Pack the unit in its original packaging. Pack properly to avoid damage during 10 11 12. Product Specification Product Specification MODEL # CAPACITY PSD1200 PSD1600 1200VA/ 720W 1600VA/ 960W INPUT 240 Vac (Australia) Voltage (Nominal) 177-290 Vac Voltage Range 50/60 Hz ± 5 Hz Frequency Range OUTPUT 240 Vac (Australia) Output Voltage 240 Vac ±10% Output Voltage Regulation Frequency AC mode tracks utility. Battery Mode 50 Hz ±1% 50 Hz or 60 Hz ±1 Hz Frequency Range (Batt. Mode) Typical 2 / 6 ms, 10 ms max. Transfer Time Simulated Sine Wave Waveform (Batt. Mode) UPS & Surge Protection 3 3 Surge Protection 3 3 12 V * 7 AH (x2) 12 V * 9 AH (x2) 40 min. 45 min. BATTERY Battery Type & Number Backup Time (One PC load @ 120W) 4 - 6 hours recover to 90% capacity Typical Recharge Time PROTECTION Full Protection Overload, discharge and overcharge protection 936 Joules/ 19500 A Surge Protection Safety EN62040-1-1 2003, IEC60950-1 : 2001 EN62040-2 2006 EMC OPERATING ENVIRONMENT Humidity 0-90% RH @ 0-40˚C (non-condensing) Less than 40 dB Noise Level PHYSICAL 397 x 146 x 205 mm Dimension D x W x H Net Weight 11.1 kg 11.5kg Powershield part # 990-1001 rev01 12 13