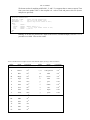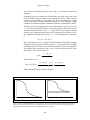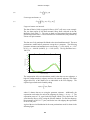
1
mle A Programming Language for Building Likelihood Models Version 2.1 Volume 1. User’s Manual Darryl J. Holman mle user’s manual: Preface mle A Programming Language for Building Likelihood Models Version 2.1 Volume 1. User’s Manual © Copyright 1991–2003 Darryl J. Holman Department of Anthropology Center for Studies in Demography and Ecology Center for Statistics and the Social Sciences The University of Washington Box 353100 Seattle, WA 98195 [email protected] The software and manual for mle version 2 is distributed in electronic form free of charge for personal and academic use. Permission to use, copy, and distribute this software and documentation is hereby granted for personal and non-commercial academic use provided that the above copyright notice appears on all copies and that both the copyright notice and this permission notice appear in the supporting documentation. Other uses of this manual or software are prohibited unless the author grants written permission. This software may not be sold or repackaged for sale in whole or in part without permission of the author. This software is provided "as is", without warranty. In no event shall the Author be liable for any damages, including but not limited to special, consequential or other damages. The Author specifically disclaims all other warranties, expressed or implied, including but not limited to the determination of suitability of this product for a specific purpose, use, or application. The user is responsible for ensuring the accuracy of any results. Sound engineering, scientific, and statistical judgment is the user's responsibility. Suggested citation: Holman, Darryl J. (2003) mle: A Programming Language for Building Likelihood Models. Version 2.1. Vol. 1: User’s Manual. http://faculty.washington.edu/~djholman/mle. mle List: There is an email list for mle users to receive update and bug notices. To subscribe, send an email message to [email protected] with the text "subscribe mle" as the body of the email message. i mle user’s manual: Preface Preface mle is the culmination of years of tinkering, punctuated by occasional bursts of concentrated activity that began in 1991. At the time, I was a graduate student in biological anthropology and demography working on several projects that used parametric survival analysis. Some of the parametric models I was working with—a bivariate normal, and a negative exponential distribution with lognormally distributed frailty and an immune fraction—were not available in software I had at hand. Instead, I pieced together a series of numerical routines, some translated from FORTRAN to Pascal, into a special-purpose program for my needs. Ken Weiss suggested that there was a need for a general-purpose program for specifying and solving likelihood models. That suggestion and encouragement from Jim Wood and Robert Jones led me to develop mle. Since then, I have progressively added language features, functions, probability density functions, and numerical methods to the program. For a spell, I was obsessed with collecting probability density functions the way some people collect shoes—many will never be used for serious work, but I can peer into the wardrobe and take great satisfaction in seeing them tidily arranged. During another compulsive period, I decided that mle ought to recognize a plethora of number formats, including dates, times, angular formats, numbers in arbitrary bases, numbers with metric and computation suffixes, and Roman numerals. Eventually, the language was generalized to recognize and work with different variable types, including integer, real, complex, boolean, character, string and file types. This led to a preoccupation with adding predefined mathematical, boolean, and string functions. Recent additions to mle have included full programming language capabilities. The language was largely modeled after Pascal, with some major differences. First, I jettisoned most punctuation—those pesky semicolons that separate statements, and the commas and semicolons that separate lists of arguments. In mle, commas are always optional where they make sense. Sometimes they are helpful for appearance or to separate an argument beginning with a negative sign [so that (a, -b) is treated as two arguments and not the algebraic expression (a – b)]. In an important way, the mle programming language breaks sacred rules from the halls of Computer Science: variables can be automatically declared when first encountered in an assignment statement. The pitfalls of permitting this, in my opinion, are offset by ease of use in a statistical programming language. Formal declarations are intimidating to the occasional programmer (although I insist on writing the mle interpreter in a language that strictly enforces variable declaration). The suite of programming features was completed with the addition of user-defined procedures and functions. Currently, mle is embodied as about 25,000 lines of Pascal. Earlier DOS versions of the mle interpreter were compiled in Borland Pascal version 7. I still use the Borland environment for most development and ii mle user’s manual: Preface debugging. The most recent release is compiled using the Free Pascal Compiler, FPC (Van Canneyt, 2000), which benchmarks at three to six time faster than the Borland compiler, with slightly smaller code size. FPC has also relaxed the small data set limitation as data variables and arrays can now be allocated larger than 64 Ki. With FPC, I can now release versions for Linux (ELF binaries), Windows 95/98/2000/NT, and, in the off chance that there is demand, OS/2, FreeBSD, Solaris/Intel, Commodore Amiga, and Atari ST. The Unix version of mle has traditionally been Solaris for the Sun Sparc architecture. This version was created by translating Pascal into c using the p2c translator (Gillespie 1989), and then compiling the result with a c compiler. An old version of mle (2.0.10) is still available for Solaris/Sparc, but I have made the agonizing decision to restrict future development to architectures supported by FPC. For the first-time user of mle, I would like to offer this encouragement. Many of the uninitiated find the ideas behind maximum likelihood estimation completely foreign. Yet, the principles, once grasped, are utterly straightforward and fundamental. A Zen-like attitude really helps—empty your mind of traditional statistical teachings. Learning the mle language for doing likelihood estimation essentially involves thinking about the likelihood of an observation, and specifying the likelihood for that observation in a way that is useful to the computer. Once you begin thinking in this mindset, the rest is straightforward hard work. Many people have contributed their ideas, insights, criticisms, and bug reports. Other's have given me time or space for development, datasets, interesting analytical challenges, or have given of his or her time in reading or testing. I thank Ken Bennett, Adam Connor, Henry Harpending, Dennis Hogan, Robert E. Jones, George Kephart, Goeff Kushnick, Lyle Konigsberg, Arindam Mukherjee, Kathleen O'Connor, Paul Riggs, David Steven, Bethany Usher, Kenneth Weiss, and James Wood. Their encouragement and interest are deeply appreciated. I suspect that few software manuals come complete with dedications. But, it is with great pleasure I dedicate this manual to my undergraduate advisor, the late Dr. Robert E. Miller. Dr. Miller was an anthropologist, a South Asianist, a futurists, and an ardent advocate of systems thinking. He taught with an enthusiasm that was both infectious and inspiring. I suspect that my career as an anthropologist has been motivated (subconsciously) by the words that ended a number of our philosophical debates, “Darryl, you simply can’t quantify love!” If Dr. Miller’s conjecture is ever disproven, I am sure that likelihood will have played a pivotal role. iii mle user’s manual: Brief table of contents Brief table of contents PREFACE ......................................................................................................................................................................... II BRIEF TABLE OF CONTENTS ....................................................................................................................................IV TABLE OF CONTENTS.................................................................................................................................................VI INTRODUCTION TO MLE .............................................................................................................................................. 1 INSTALLING AND RUNNING MLE ............................................................................................................................. 31 CREATING DATA SETS................................................................................................................................................ 47 BUILDING LIKELIHOOD MODELS ........................................................................................................................... 57 PLOTS AND GRAPHS.................................................................................................................................................... 85 STATISTICAL EXAMPLES ........................................................................................................................................ 107 PROGRAMMING TUTORIAL.................................................................................................................................... 131 REFERENCES .............................................................................................................................................................. 163 iv mle user’s manual: Brief table of contents v mle user’s manual: Brief table of contents Table of contents PREFACE ......................................................................................................................................................................... II BRIEF TABLE OF CONTENTS ....................................................................................................................................IV TABLE OF CONTENTS.................................................................................................................................................VI INTRODUCTION TO MLE .............................................................................................................................................. 1 PRELIMINARIES................................................................................................................................................................. 1 The Program File......................................................................................................................................................... 2 The Data File............................................................................................................................................................... 2 The Output File ............................................................................................................................................................ 2 Skeleton of an mle Program........................................................................................................................................... 2 AN EXAMPLE.................................................................................................................................................................... 3 Program Constants and Variables ................................................................................................................................ 4 Comments .................................................................................................................................................................... 4 Reading Data ............................................................................................................................................................... 4 Likelihood Model ......................................................................................................................................................... 5 Model. . . Run Part of the Model Statement..................................................................................................... 5 Run. . . End Part of the Model Statement.......................................................................................................... 6 A Note About Parameters ............................................................................................................................................. 7 WRITING MLE PROGRAMS ................................................................................................................................................. 8 Style Conventions ......................................................................................................................................................... 8 Typographic Conventions ............................................................................................................................................. 9 What is a Statement? .................................................................................................................................................. 10 Assignment Statement................................................................................................................................................. 10 Variable Names...................................................................................................................................................... 11 Variable Types ....................................................................................................................................................... 12 Array Variables ...................................................................................................................................................... 13 Initialized Array Variables...................................................................................................................................... 14 Data Statement........................................................................................................................................................... 14 Model Statement......................................................................................................................................................... 16 Intrinsic Procedures................................................................................................................................................... 16 User-defined Procedures............................................................................................................................................ 16 User-defined Functions .............................................................................................................................................. 18 BEGIN...END Statement............................................................................................................................................. 19 FOR Statement........................................................................................................................................................... 19 REPEAT Statement..................................................................................................................................................... 20 WHILE Statement....................................................................................................................................................... 20 IF Statement............................................................................................................................................................... 20 The Break Statement................................................................................................................................................... 21 The Continue Statement.............................................................................................................................................. 21 The Exit Statement...................................................................................................................................................... 21 DIFFERENCES BETWEEN VERSION 2.0 AND VERSION 2.1................................................................................................... 21 DIFFERENCES BETWEEN VERSION 1 AND VERSION 2 ........................................................................................................ 23 Changes and New Features in Version 2..................................................................................................................... 23 Converting Version 1 Programs to Version 2.............................................................................................................. 27 vi mle user’s manual: Brief table of contents INSTALLING AND RUNNING MLE ............................................................................................................................. 31 INSTALLING MLE............................................................................................................................................................. 31 Unix........................................................................................................................................................................... 31 Windows .................................................................................................................................................................... 32 EDITING A PROGRAM....................................................................................................................................................... 32 EMLE .............................................................................................................................................................................. 32 Menus ........................................................................................................................................................................ 33 File menu ............................................................................................................................................................... 33 Edit menu............................................................................................................................................................... 34 Block menu ............................................................................................................................................................ 34 Search menu........................................................................................................................................................... 34 Mle menu............................................................................................................................................................... 34 Window menu ........................................................................................................................................................ 35 Help menu.............................................................................................................................................................. 35 Default settings .......................................................................................................................................................... 35 Default command mapping......................................................................................................................................... 36 Cursor control commands ....................................................................................................................................... 36 Insert and delete commands .................................................................................................................................... 36 File commands ....................................................................................................................................................... 36 Block commands .................................................................................................................................................... 37 Page formatting commands..................................................................................................................................... 37 Help commands...................................................................................................................................................... 37 Execution commands.............................................................................................................................................. 37 Search commands................................................................................................................................................... 37 Other commands .................................................................................................................................................... 37 Menu commands .................................................................................................................................................... 38 Default keyboard mapping.......................................................................................................................................... 38 RUNNING A PROGRAM ..................................................................................................................................................... 40 SPECIFYING THE PROGRAM FILE AND COMMAND LINE OPTIONS ....................................................................................... 41 Help Options.............................................................................................................................................................. 41 Debugging Options..................................................................................................................................................... 44 Other Options ............................................................................................................................................................ 44 testing number formats ........................................................................................................................................... 44 Start-file options..................................................................................................................................................... 45 Batch options.......................................................................................................................................................... 45 interactive mode ..................................................................................................................................................... 45 CALCULATOR MODE ....................................................................................................................................................... 45 CREATING DATA SETS................................................................................................................................................ 47 READING DATA FROM A FILE ........................................................................................................................................... 47 Naming the data file ................................................................................................................................................... 47 The DATA statement................................................................................................................................................... 48 Dropping or keeping observations .............................................................................................................................. 49 Observation frequency................................................................................................................................................ 49 Transformations of data ............................................................................................................................................. 49 Creating dummy variables.......................................................................................................................................... 50 Skipping initial lines in the data file ............................................................................................................................ 51 Delimiters in the data file ........................................................................................................................................... 51 CREATING OBSERVATIONS WITHOUT A FILE ..................................................................................................................... 51 PRINTING OBSERVATIONS AND STATISTICS ....................................................................................................................... 52 AN EXAMPLE OF CREATING AND READING A DATA FILE .................................................................................................... 52 ACCESSING OBSERVATIONS ............................................................................................................................................. 54 NUMBER FORMATS ......................................................................................................................................................... 55 BUILDING LIKELIHOOD MODELS ........................................................................................................................... 57 STRUCTURE OF THE MODEL STATEMENT ....................................................................................................................... 57 A simple example........................................................................................................................................................ 57 Another example......................................................................................................................................................... 58 vii mle user’s manual: Brief table of contents Runlist........................................................................................................................................................................ 59 FULL ..................................................................................................................................................................... 60 REDUCE ............................................................................................................................................................... 60 WITH..................................................................................................................................................................... 60 THEN…END......................................................................................................................................................... 61 Bayesian model averaging.......................................................................................................................................... 62 Results ....................................................................................................................................................................... 62 Defining the output file........................................................................................................................................... 62 Standard Error Report............................................................................................................................................. 62 Variance-covariance Matrix.................................................................................................................................... 63 Confidence Interval Report..................................................................................................................................... 63 Report with no standard error or confidence intervals.............................................................................................. 65 Printing Distributions.............................................................................................................................................. 65 Other Printing Options............................................................................................................................................ 65 Variables created by models ................................................................................................................................... 65 BUILDING MODEL STATEMENTS .................................................................................................................................... 66 The DATA function..................................................................................................................................................... 67 The PARAM function.................................................................................................................................................. 68 Setting Parameter Information ................................................................................................................................ 69 Modeling Covariate Effects .................................................................................................................................... 70 The PDF functions ..................................................................................................................................................... 71 PDF Time Arguments............................................................................................................................................. 72 The Hazard Parameter ............................................................................................................................................ 74 The LEVEL function ................................................................................................................................................... 74 The LEVELDELTA function........................................................................................................................................ 76 SETTING THE MAXIMIZATION METHOD ............................................................................................................................. 77 Conjugate gradient method......................................................................................................................................... 78 Simplex ...................................................................................................................................................................... 79 Direct Method ............................................................................................................................................................ 79 Simulated Annealing Method ...................................................................................................................................... 80 Stopping Criteria........................................................................................................................................................ 82 Looping Through Methods.......................................................................................................................................... 82 THE INTERACTIVE DEBUGGER ......................................................................................................................................... 82 PLOTS AND GRAPHS.................................................................................................................................................... 85 CREATING PLOTS ............................................................................................................................................................ 85 Defining the Plot File ................................................................................................................................................. 86 The Plot Statement ..................................................................................................................................................... 87 The Curve Statement................................................................................................................................................... 88 Two-dimensional Plots ........................................................................................................................................... 88 KEY....................................................................................................................................................................... 89 AXES..................................................................................................................................................................... 89 WITH..................................................................................................................................................................... 89 ERRORBARS ........................................................................................................................................................ 90 Other strings........................................................................................................................................................... 91 Three-dimensional Plots ......................................................................................................................................... 92 Multiple plots ............................................................................................................................................................. 95 Working with Gnuplot ................................................................................................................................................ 96 What is Gnuplot?.................................................................................................................................................... 96 How to Obtain Gnuplot........................................................................................................................................... 96 Basics of Gnuplot ................................................................................................................................................... 97 Setting the Output Device ....................................................................................................................................... 97 The FINISHPLOT procedure.................................................................................................................................. 99 MORE E XAMPLES ........................................................................................................................................................... 99 Graphing PDFs, SDF, CDF, and HFs ........................................................................................................................ 99 Contour plots ........................................................................................................................................................... 100 A Helix..................................................................................................................................................................... 101 Geometric Figures.................................................................................................................................................... 101 Animation Example .................................................................................................................................................. 102 viii mle user’s manual: Brief table of contents CREATING PLOTS FROM THE MODEL STATEMENT .......................................................................................................... 103 Estimated Distributions ............................................................................................................................................ 103 Likelihood Surfaces.................................................................................................................................................. 103 An Example.............................................................................................................................................................. 103 STATISTICAL EXAMPLES ........................................................................................................................................ 107 SURVIVAL ANALYSIS—EXACT MEASUREMENTS ............................................................................................................. 107 SURVIVAL ANALYSIS—EXACT FAILURE AND RIGHT CENSORED OBSERVATIONS ............................................................. 108 SURVIVAL ANALYSIS—INTERVAL CENSORED OBSERVATIONS ........................................................................................ 110 CURRENT STATUS ANALYSES......................................................................................................................................... 110 SURVIVAL ANALYSIS—LEFT-TRUNCATED OBSERVATIONS .............................................................................................. 112 SURVIVAL ANALYSIS—RIGHT-TRUNCATED OBSERVATIONS............................................................................................ 113 SURVIVAL ANALYSIS—LEFT-AND RIGHT-TRUNCATED OBSERVATIONS ............................................................................ 114 SURVIVAL ANALYSIS—ACCELERATED FAILURE TIME MODEL ......................................................................................... 115 SURVIVAL ANALYSIS—HAZARDS MODEL ...................................................................................................................... 116 SURVIVAL ANALYSIS—IMMUNE SUBGROUP ................................................................................................................... 116 LINEAR REGRESSION IN THE LIKELIHOOD FRAMEWORK................................................................................................... 119 CASE STUDY —MORTALITY MODELS ............................................................................................................................. 121 LOGISTIC REGRESSION .................................................................................................................................................. 124 CASE STUDY: E XTENDED POISSON FOR MODELING SPECIES ABUNDANCE ......................................................................... 126 PROGRAMMING TUTORIAL.................................................................................................................................... 131 INTRODUCTION TO PROGRAMMING IN MLE ..................................................................................................................... 131 ELEMENTS OF MLE PROGRAMMING ................................................................................................................................ 132 The first program ..................................................................................................................................................... 132 Identifiers, assignment statement, and functions........................................................................................................ 133 Types ................................................................................................................................................................... 135 Statements with numeric, boolean, and logical expressions.................................................................................... 137 Operator precedence ............................................................................................................................................. 138 More on strings .................................................................................................................................................... 139 Commas in lists of arguments ............................................................................................................................... 139 Reading from the keyboard................................................................................................................................... 141 Mathematical computation ....................................................................................................................................... 142 Summation ........................................................................................................................................................... 142 Products ............................................................................................................................................................... 142 Integration............................................................................................................................................................ 143 Probabilities ......................................................................................................................................................... 143 Random numbers.................................................................................................................................................. 144 Flow control............................................................................................................................................................. 144 IF statement.......................................................................................................................................................... 144 FOR statement...................................................................................................................................................... 145 FOR…STEP statement ........................................................................................................................................ 146 FOR…STEPS statement...................................................................................................................................... 147 REPEAT statement............................................................................................................................................... 147 WHILE statement................................................................................................................................................. 148 The Break Statement ............................................................................................................................................ 148 The Continue Statement........................................................................................................................................ 149 Arrays...................................................................................................................................................................... 149 Files......................................................................................................................................................................... 150 User-defined procedures........................................................................................................................................... 151 Defining the procedure ......................................................................................................................................... 152 Calling the procedure............................................................................................................................................ 152 Nested procedures ................................................................................................................................................ 153 EXIT statement .................................................................................................................................................... 153 User-defined functions.............................................................................................................................................. 154 Defining the function............................................................................................................................................ 154 Calling the function .............................................................................................................................................. 154 Nested procedures ................................................................................................................................................ 155 EXAMPLE PROGRAMS .................................................................................................................................................... 155 ix mle user’s manual: Brief table of contents A simple simulation program.................................................................................................................................... 156 A less simple simulation program ............................................................................................................................. 156 An even more complicated simulation program......................................................................................................... 159 REFERENCES .............................................................................................................................................................. 163 x mle 2.1 manual 2 mle 2.1 manual Chapter 1 Introduction to mle mle is a simple programming language for building and estimating parameters of likelihood models. The language was originally intended for building and estimating the parameters of survival models, but it has evolved to be general enough to estimate parameters for many other types of likelihood models. Indeed, the language attempts to be a general-purpose tool for likelihood estimation. This chapter provides an overview of mle. The basic concepts of the programming language are introduced and some examples are given. Additional examples of mle programs and program fragments are sprinkled throughout this chapter, the rest of this User’s manual and the Reference manual. The mechanics of running mle from DOS or Unix is given in Chapter 2. Formal descriptions of the mle programming language are saved for later chapters. Another later chapter is devoted to examples of different type of likelihood models. Preliminaries This manual gives only a superficial treatment of topics like probability theory, probability models, stochastic modeling, and maximum likelihood estimation. In order to write mle programs, you will need a basic understanding of these topics. Some helpful, generally applied, introductions to statistical modeling and maximum likelihood estimation can be found in Burnham and Anderson (1998), Cullen and Frey (1999), Edwards (1972), Hilborn and Mangel (1997), Holman and Jones (1998), King (1998), Nelson (1982), Morgan (2000), Pickles (1985), Royall (1999) and Wood et al. (1992). Guttorp (1995) and Morgan (2000) give accessible introduction to stochastic modeling. Programs written in mle are, in many respects, similar to those written in SAS, S+, SPSS, BMDP, or other statistical programming languages. The language consists of keywords like MODEL, END, DATA, and so on. Like all languages, mle has rules of syntax that must be strictly followed to produce a valid program. The resulting mle program is translated into actions (like parameter estimation) by the mle interpreter.1 The mle interpreter typically works with three files: the mle program file, the data file, and the output file. The next three sections discuss these files in more detail. 1 Notice that mle has two distinct meanings in this document. First, it is a programming language for building likelihoods described herein. Second, it is the name of the computer program that interprets the language and finds maximum likelihood estimates of model parameters. 1 mle 2.1 manual The Program File The program file contains a program written in the mle programming language. The first line of this file begins with the word MLE and the program ends with a matching END. The program—consisting of a set of zero or more statements—falls between the MLE and the END. Most programs will have statements that name the data file and the output file, a DATA statement describing how to read (and possibly transform) observations from a data file, and specifications of one or more likelihood models along with parameters to find. Parameter estimates are then found by an iterative search that maximizes the likelihood given a set of observations. The resulting parameter estimates are then written to the output file. The mle program file is created as an ordinary text file using almost any editor. You can create and edit the mle program using Notepad (in Windows), the EDIT command (in DOS), vi, pico, or Emacs (in Unix), or any other editor that will read and write a file as ASCII text. Word processors, such as Microsoft MSWord, can be used as well, but you must remember to save your work using the "text (with line breaks)" option. The Data File The data file contains lines of observations. The observations are read, and perhaps transformed, when the mle program is run. The observations are then used with the likelihood function (specified in the mle program file) to find parameter estimates. Data files are standard ASCII text files. Typically, one line in the file represents one observation (although a single observation can span more than one line). Within each observation is a series of fields that are separated by spaces, tabs, commas, or some other user-specified delimiter. Numeric fields can be read into mle variables. The Output File The output file is where results are usually written. The name of the output file is specified in the mle program file. The program file also specifies what kind of result will be written to the output file, and how much of the details will be included. You can also specify that mle write partial results and messages to the screen (or standard output as it is called). This is helpful for monitoring progress while estimation is taking place. Skeleton of an mle Program An mle program begins with the word MLE and ends with a matching END. A typical program includes four types of statements between the MLE and END. • • • A DATA statement describes the format of the input data file, and provides simple data transformations and mechanisms to drop observations. A MODEL statement defines the likelihood function along with the parameters to be estimated. A second part of each MODEL statement contains the keyword RUN that specifies how the model is to be estimated. Assignment statements define variables and change the values of the variables, including some that affect the behavior of the DATA and MODEL statements. 2 mle 2.1 manual • Procedure statements, like DATAFILE() and OUTFILE(), take a list of arguments and performs some predefined action. DATAFILE(), for example, names and opens up the file read in by the DATA statement. The following code fragment shows the skeleton of a typical mle program. The first two statements are procedure calls that define the data file and the output file. The DATA statement comes next, followed by a MODEL statement. Omitted sections of code are specified <like this>. MLE DATAFILE("mydatafile.dat") OUTFILE("myoutfile.out") TITLE = "..." MAXITER = 100 {for example} DATA <Data specification> END MODEL <Expression> RUN <Run specification> END END An Example Figure 1 is an example of an mle program that estimates the parameters of a likelihood. The problem at hand is to estimate the distribution of gestational ages at birth given for the observations shown in Figure 2. These observations are counts of gestational ages at birth that were (mostly) recorded two within one week. We will use survival analysis to estimate the parameters (µ and σ) for the best-fitting normal distribution. This is an example of survival analysis with interval censored observations. In this example, each line in the data file represents multiple observations. The number of observations on each line is given as frequencies within each interval. 3 mle 2.1 manual MLE TITLE = "Distribution of gestational age" {Data are from Hammes and Treloar(1970) Am J Pub Health 60:1496-1505} MAXITER = 50 {Maximum number of iterations allowed} EPSILON = 0.0000001 {Criterion for convergence of the model} DATAFILE("hammes.dat") {Opens the input data file} OUTFILE("hammes.out") {Opens the output file} DATA {This is the data statement} {Data are interval censored and are in units of days as per Table 2 of Hammes and Treloar} topen FIELD 1 {time at opening the interval} tclose FIELD 2 {time at closing the interval} frequency FIELD 3 {Frequency from Menstrual History Program} END {data} MODEL DATA PDF NORMAL(topen, tclose) PARAM mean LOW = 100 PARAM stdev LOW = 0.1 END {pdf} END {data} RUN FULL END {model} END {function to loop through all observations} {Define the parametric distribution} HIGH = 400 START = 270 END HIGH = 100 START = 20 END {run the model with both parameters free} {mle} Figure 1. Program to estimate parameters for the distribution of gestational ages at birth. Program Constants and Variables A number of variables and constants (e.g. MAXITER) are pre-defined in mle. Frequently, you will want to change the value of these variables in order to fine tune the behavior of the program, change the type of output produced, etc. MAXITER is a pre-defined variable that changes the maximum number of iterations permitted in estimating the model parameters. In this example, the value of MAXITER is changed from the default value of 100 to a maximum of 50. The TITLE variable is also assigned to a string variable (i.e. a series of characters). The TITLE variable is simply written to the output file. The variable EPSILON is assigned a value as well. This variable determines how precisely the parameters are to be found: normal convergence occurs when the change in the log-likelihood from one iteration to the next falls below this value. Comments Comments can be placed throughout the body of a program by enclosing the text in curly brackets { and }. Likewise, the curly brackets can be used to effectively remove large sections of code. A second way to comment out all or part of a single line is to put a pound sign (#) at the point where you want the comment to begin. mle ignores all text from the pound sign to the end of the line. Reading Data The data file called hammes.dat, is shown in Figure 2. Data files are standard ASCII text files of numbers. The numbers are organized into a series of fields. Each field is usually delimited by white space (tabs or spaces as used in Figure 2) or commas. You can specify your own list of field delimiters, for example, if your data are separated by colons or semicolons. This is done by changing the value of the variable called DELIMITERS (see the DATA chapter for details). The data in Figure 2 are structured as three columns of numbers. The first field is the last observed gestational age prior to birth. The second field is the observed gestational age after a birth was 4 mle 2.1 manual observed. These two times form an interval within which the birth occurred (i.e. the birth occurred at some unknown time within this interval). The third field is the number of births that were observed within the interval. 0 141 197 218 225 232 239 246 253 260 267 274 281 288 295 302 309 316 323 329 141 196 217 224 231 238 245 252 259 266 273 280 287 294 301 308 315 322 329 -1 0 9 11 2 12 17 22 40 69 134 324 653 724 382 125 47 26 10 1 6 Figure 2. Data file read by the program in Figure 1. Column 1 is the minimum gestational age in a category, column 2 is the maximum gestational age in a category. Together they define a birth weight interval. The -1 in the last row denotes an open birth weight interval (i.e. a weight of 329+). Column 3 is the frequency of births in each birth weight interval. The DATA statement given in Figure 1 specifies how the data file is to be read. topen, tclose, and frequency that come between DATA and its matching END The three variables, are read in for each observation (i.e. each line in Figure 2). In fact, each of these variables will be created as an array, each having twenty elements, each element corresponding to one line in the data file. The variable name frequency is special. mle treats variables with the name frequency (and freq as well) as a count of repeated observations. The likelihood is "adjusted" for the number of observations so that the contribution will be the same as if multiple identical observations been read in from the file. Likelihood Model The next part of the program is the MODEL statement. The MODEL statement consists of two parts: an expression that comes between the MODEL and RUN that defines the likelihood, and a list of one or more specifications between the RUN and END, each giving some details of how parameters are to be estimated. Model. . . Run Part of the Model Statement Within the MODEL...RUN part of the statement is a single function that defines the likelihood. In this example, we specify the likelihood: N (1) L( µ , σ) = ∏ S (t i =1 openi | µ , σ ) − S ( t closei | µ , σ ) frequencyi where N is the number of age categories (i.e. the number of lines of observations), frequency is the frequency of observations per age category, S() is a survival density function for the normal distribution, topen and tclose are the two times read from the data file into the variables topen and tclose, and µ and σ are the parameters that will be found by maximizing the likelihood. The first part of the likelihood expression is a DATA...END function. This function specifies that observations are to be "fed" to the likelihood one at a time, corresponding to the product (∏) shown in the likelihood above. Do not confuse the DATA function (found within the MODEL statement) with the DATA statement (discussed above). The DATA function loops through all observations that were 5 mle 2.1 manual previously read in by the DATA statement. Within the DATA...END function comes the rest of the likelihood, which is shown to the right of the ∏ in likelihood (1). Within the DATA...END function is the individual likelihood. As parameter estimates are being found, the individual likelihood is evaluated for each observation, and the log of that likelihood is taken. Each individual loglikelihood is multiplied by the frequency of the current observation and added to the total likelihood. In short, the DATA...END function takes a series of observations and an expression for an individual likelihood. It computes and returns the total log-loglikelihood. The individual likelihood for this example (specified within the DATA function) consists of a PDF function. A NORMAL distribution is specified with two arguments (topen, tclose). These times denote the time interval within which births occur. Because the arguments (which were read from column 1 and 2 of the data file) differ from each other, the PDF function returns the area under a normal PDF between topen, and tclose. The area corresponds to the probability of observing a birth within that interval. If, instead, we had specified one argument to the PDF function (or if topen was equal to tclose), the PDF function would have returned the probability density at that point, corresponding to exact ages at birth. Within the PDF NORMAL function call are two PARAM functions. These functions define parameters that will be changed in order to maximize the likelihood. Naturally, you can specify limits, starting values, etc. for these parameters. Run. . . End Part of the Model Statement Between the RUN and the END part of a MODEL statement comes a list specifying how to run the model. The full model is run by specifying FULL; all parameters defined in the model will be estimated. Various reduced forms of the model can be run by specifying a REDUCE command. More details on this are given below and in a later chapter. 6 mle 2.1 manual Distribution of gestational age Parameter file: hammes.mle Input data file name: hammes.dat Output file name: hammes.out 3 variables read. 18 lines read from file hammes.dat 18 Observations kept and 0 observations dropped for each variable. ROW topen tclose frequency MEAN 258.722222 253.555556 144.111111 VAR 5338.56536 6032.37908 51267.3987 STDEV 73.0654868 77.6683918 226.423052 MIN 0.00000000 -1.0000000 0.00000000 MAX 329.000000 329.000000 724.000000 Model 1 Run 1 : Distribution of gestational age METHOD = DIRECT Maximum Iterations MAXITER = 50 Maximum function evaluations MAXEVALS = 100000 Convergence at EPSILON = 0.0000001000 LogLikelihood: -6459.238 AIC: 12922.476 Del(LL): 0.0000000000 Iterations: 3 Function evaluations: 146 Converged normally PDF NORMAL with 2 free parameters Name Form Estimate mean 279.1204377949 stdev 23.02007362180 Variance/covariance matrix: 0.13694904596 -0.0586570132 -0.0586570132 0.13394679920 Std Error 0.370066272387 0.365987430388 t against 754.244465444 0.0 62.8985361530 0.0 Likelihood CI Results: Log Likelihood = -5915.1352 after 4 iterations. Delta(LL)=0.00000000 PDF NORMAL with 2 free parameters Name Form Estimate Lower CI Upper CI mean 279.7654969512 279.1863052702 280.3447034638 stdev 13.04605798312 12.64289497881 13.47052893809 Figure 3. Output generated by the program in Figure 1. The mle program is run by typing the line mle hammes.mle at the command line prompt (see Chapter 2 for details). The results written to the output file are shown in Figure 3. The first section of the output provides summary statistics for each of the variables read from the data file. The parameter estimates are given in two ways: once with estimated standard errors (including a t-test of the hypothesis that the estimate is zero) and once with likelihood confidence intervals. A Note About Parameters The ultimate goal of putting together a likelihood model is to estimate one or more parameters of the model. In mle, the PARAM...END function defines parameters to be estimated. This use of the word "parameter" can be confusing, so lets clear up the issue. In any mathematical language, we can refer to a function's arguments as "parameters". For example, in the statement a = sin(b), sin() is a function with one "parameter", b. This manual will avoid the word "parameter" in this general sense. Instead, the word argument will be used to refer to the arguments of a function in this general sense. So, the sin() function has the argument b. As used in this manual, the word parameter in mle refers to an unknown quantity of a probability model whose value is to be estimated.2 Parameters, in this sense, are frequently arguments to functions, but not all arguments are parameters. 2 A more accurate definition of a parameter is an unknown quantity whose distribution of values is to be estimated. The standard errors or confidence intervals provide information about the distribution of possible parameter values. 7 mle 2.1 manual Parameters are sometimes the constants defined within a function. For example, in the equation for the slope of a line, y = mx + b, we would call m and b the parameters of the equation, and x the argument. This is clearer when we rewrite the equation for a slope as f(x | m, b) = mx + b, which is read, "f of x given m and b. . . ." This function has a single argument x, and the parameters are m and b. Typically a series of x values are known, and the goal is to find the best values for parameters m and b. By "best", of course, we mean the best in some statistical sense. In mle, m and b would be called parameters if and only if they were quantities to be estimated. The one exception to this usage of parameter is for the built-in probability density functions in mle, where we refer to intrinsic parameters. For example, the normal distribution, f(t|µ, σ), has two intrinsic parameters, µ and σ. Typically we wish to estimate these intrinsic parameters. If so, the intrinsic parameters µ and σ are also model parameters. As described later, most probability density functions take four argument for t. Combinations of these arguments allow you to specify • The probability density function (1 argument, or 2 identical arguments). • The cumulative density function (2 arguments: the 1st argument ≤ minimum range of the PDF). • The survival density function (2 arguments: the 2nd argument is ≥ maximum range, or the 2nd argument < the 1st argument). • An area under the probability density function (2 arguments within the range of the PDF). • The hazard function (3 identical arguments). • Any of the above with right and left truncation of the distribution. (The 3rd and 4th arguments define the left and right truncation points). Thus, in the syntax of mle , there is a natural delineation between arguments and intrinsic parameters. Consider the following function call: PDF NORMAL(0, 4, 0, 40) 10, 20 END. This function call has the four "time" arguments 0, 4, 0, and 40. Together they specify a normal distribution truncated over the range 0 and 40, with the area between 0 and 4 returned. The two intrinsic parameters of the normal are passed as µ = 10 and σ = 20. There are no model "parameters" in this example, simply because there are no PARAM functions specified. Writing mle Programs This section gives additional details needed to write mle programs. The simplest way to create a new mle program is to modify a working program (like that given in Figure 1) to make it do the task at hand. Style Conventions mle is a free format language. That is, a program can be written on a single line, or spaced across multiple lines. Indenting, spacing within a line, and spacing across lines is never done for the computer. Rather, the use of indentation is solely for the benefit of human readers. 8 mle 2.1 manual Good programming practices can greatly aid in reading, understanding and debugging a program. Good formatting consists of selecting and consistently using indentation to reflect logical levels and blocks within a program. Comments are indispensable for making a program understandable. Throughout this manual, mle programs use indentation to show, for example, the matching MODEL and END. This manual uses two spaces to indent each natural "level". Keywords that are a part of mle are always upper-case letters and user-defined words are lower-case (this is not required since mle is not case sensitive). Finally, each matching END is usually followed by a comment denoting what key-word the END matches. This last convention is helpful in complex programs that involve many nested functions. Typographic Conventions Typographic conventions are used in this manual to distinguish between mle language components and English text. • • • • • • Keywords in mle are shown in a fixed-pitch font as uppercase words: MODEL END, DATA END, and DEFAULTOUTNAME. User-defined variables and identifiers are shown in a fixed-pitch font as lowercase words: y = slope + intercept*x. Within programs, items placed in < and > and italicized are used to denote an omitted or unspecified parts of the code. For example, <Statements> denotes a list of program statements that have been omitted. Other commonly used phrases are <expr> to denote an expression, <v> to denote an identifier, <rexpr> to denote an expression of type REAL, <iexpr> to denote an INTEGER expression, <bexpr> to denote a BOOLEAN expression, <sexpr> to denote a string expression. Here is an example: WHILE <bexpr> DO <statements> END. When syntax diagrams are shown, items shown within [] are optional arguments. Note that the brackets are italicized. Un-italicized [] are part of the language (used for arrays). For example, WRITELN[ ( [fexpr[,]] <expr> [[,] <expr> ...] ) ] shows that the WRITELN statements has an optional set of arguments enclosed within parenthesis. The first argument can optionally be a file expression. At least one expression must be enclosed within the parentheses. Commas separating the expressions are optional. Ellipses (...) are used in two ways. First, they denote that a pattern can be repeated an unlimited number of times. Hence, in the previous point, the ellipses indicate that an unlimited number of expressions can be placed within the WRITELN statement. The second use denotes that parts of a statement or function are not shown. For example, MODEL...END uses ellipses in this way. A list of alternatives are separated by the vertical bar (|). For example, the DATA function has a series of optional forms specified this way: DATA [ FORM = SUMLL | SUMMATION | SUM | PRODUCT | PROD ] <expr> END 9 mle 2.1 manual What is a Statement? Every program begins with the word MLE and ends with the matching word END. Any text after the final END is ignored. Between the MLE and its matching END comes the body of an mle program as a series of statements. The most basic outline of an mle program looks like this: MLE <Statement 1> <Statement 2> <Statement 3> . . . END A statement is a single complete instruction. When a program is run, each statement is executed in turn. Here are some things statements do: • Print messages to the screen (WRITELN statement) • Create data sets (DATA statement) • Find maximum likelihood estimates (MODEL statement) • Define variables (assignment statement) • Assign or change the value of a variable (assignment statement) • Define a data file (a call to the DATAFILE procedure) • Loop through a series of statements (FOR, WHILE, or REPEAT statements) • Conditionally execute one series of statements over of another (IF statement) • Create user-defined procedures or functions (PROCEDURE or FUNCTION statements) • Call a user-defined procedure (procedure call) Each type of statement is briefly discussed below. Assignment Statement Assignment statement serves two purposes. The primary purpose is to assign values to variables. A secondary purpose is to define new variables. A great number of pre-defined variables are available to change or fine-tune the behavior of mle, and the values of these variables can be changed with assignment statements. Assignment statements may be placed anywhere within the body of the mle program—that is, between the MLE and its matching END.3 Some examples are: 3 Normally assignment statements do not occur within the DATA...END and MODEL...END statements. Assignment-like statements occur within the DATA statement for transformations. Additionally, the PREASSIGN and POSTASSIGN functions allow a list of one or more assignment (or other) statements to be used. Finally, the PARAM...END statement uses assignment-like statements, like to define start, highest, and lowest values of parameters. 10 mle 2.1 manual MAXITER = 100 EPSILON = 0.0000001 PRINT_OBS = TRUE {Set the maximum number of iterations} {Set the criterion for convergence} {print all observations after transformations} The simplest assignment statement is generically defined in this way: <variable name> = <expression>. The <variable name> name can be a preexisting variable (e.g. MAXITER, EPSILON), or a user-defined variable. The <expression> that follows the equal sign can be a simple constant, another variable, or a mathematical expression. Details of the syntax and functions that can be used to make up expressions are given in a later chapter. The following are some examples of assignment statements using expressions: pie bmi_max total last_age area one = = = = = = PI weight_max/height_max^2 e1_count + e2_count + e3_count + e4_count IF linear THEN max_age ELSE SQRT(max_age) END PDF NORMAL(-2, 2) 1, 3 END {gives area from -2 to 2 for N(1, 3)} SIN(total)^2 + COS(total)^2 Variable Names You can create new variables for the purpose of holding values. A few rules must be observed for naming variable (and other identifiers, such as user-defined procedure and function names). • • A variable name must begin with a letter. After the initial letter, any combination of letters, numbers, the underscore character (_) and the period (.) character may be embedded in the name. Punctuation other than a period and underscore character is not permitted. • Variable names in mle are insensitive to case: the variable GGG is the same as ggg, Ggg, and gGg. • Variable names cannot be identical to mle keywords, such as PROCEDURE, DATA, FOR, etc. Also, a variable cannot take on the name of an intrinsic procedure (READLN, SEED, OUTFILE, etc.). • Variable names can be the same as an intrinsic function. You are discouraged from doing this—it can become extremely confusing. If you do define variable with the same name as a function, the function will no longer be available for use by the program. Here are some examples of valid variable names: 11 mle 2.1 manual a = 1 A = 2 {identical identifier: a is the same as A} a_ = 1 a_long_variable_name = 1 a23 = 1 measure.left = 1 United_States.Wisconsin.Madison.longitude = 40.1388333 { Here are some legal names that are of questionable value } a________ = 1 {legal, if odd, name} a........ = 3 {ditto} sin = 4 {bad name -- could be confused with the sin() function} a...b = 3 {confusing name. Looks like a subrange of some sort} O.123E23 = 2 {confusing legal name. The leading oh looks like a zero} l423 = 4 {confusing legal name. The leading el looks like a 1} Here are some examples of improper variable names: {Bad variable names} test = 2 model = 2 writeln = 6 2days = 2 _now = 2 sib's_name school number {TEST is an mle reserve word} {MODEL is an mle reserve word} {WRITELN is an mle intrinsic procedure} {doesn't begin with a letter} {doesn't begin with a letter} {embedded punctuation} {embedded space} Variable Types Most examples so far have shown assignments using real numbers and integers. There are, in fact, seven different types supported by mle: REAL, INTEGER, COMPLEX, BOOLEAN, STRING, CHAR (character), and FILE. A variable's type refers to the domain of values that the variable can take on. For example, INTEGER variables can take on a limited range of integer values, BOOLEAN variables can only take on the values TRUE and FALSE. Variables can be defined for each of the seven types; expressions always take on one of these types. Here is an explanation of each: • • • Real variables represent the continuous real number line. 4 Many mathematical functions like GAMMA(), BETA(), and BESSELI() return real values, and so the variable to which these functions are assigned must be type REAL as well. Integer variables and functions can always be assigned to real variables—they are automatically converted to real values on assignment. On the other hand, you must use the ROUND() or TRUNC() functions to convert a real number into an integer value for assignment to an integer varuable. Integer variables take on whole number values over a machine-dependent range of numbers. For most versions of mle this range is [-2,147,483,648 to 2,147,483,647]. Arguments to some functions require INTEGER type variables, like IDIV(). Complex variables include a real number part and an imaginary part. Complex numbers are specified by expressions such as 1.2 + 0.4i. Most mathematical functions are defined for complex types. For example, SQRT(-1 + 0i) returns 0.000+1.000i. There is no natural ordering for complex variables, so that the comparisons <, <=, >, and >= are undefined. Boolean variables take on one of two states: TRUE or FALSE. No other value is allowed or recognized. Boolean expressions are frequently used to test conditions. For example, the IF...THEN...ELSE...END function evaluates the first expression (between the IF and THEN) to 4 Be aware, however, that the computer representation for real numbers is not strictly continuous. Occasionally difficulties arise with round-off error because of the discrete computer representation of real numbers. 12 mle 2.1 manual either TRUE or FALSE and decides which of the remaining two expressions will be evaluated and returned. An example of a boolean expression is this: 3.5 == 4.5, which returns the value FALSE. • • • String variables hold a sequence of character constants. A string written as a constant is a sequence of characters, enclosed within quotes ("). The single quote character (') can be used as well for strings greater than one character (see Character below for an explanation). String variables are typically used to assign file names, titles, etc. Some functions take on string (or character) variables, other functions return strings. For example, the CONCAT(s1, s2) function will add together two string variables and return it as a longer string. Character variables take on the value of a single character. When written as a constant in a program, character constants consist of a single character enclosed within single quotes ('). Character constants are not typically used within a user's program, but are available if needed. Usually, character constants and variables can be used anywhere string variables are allowed. File variables are used to reference files. Most of the time, file variables are transparent, and you need not explicitly define or manipulate file variables. This is because mle defines and does the bookkeeping for the data file, the output file, the plot file, and the screen (or standard output) file. File variables can be created should you wish to create and manipulate other files. When a variable is first used in an assignment statement, its type will be determined by the type returned from the expression on the right-hand side. Here are some examples to illustrate the point: large_data subtitle nine five = = = = N_OBS > 5000 "Analysis: " + DEFAULTOUTNAME 3 * 3.0 2 + 3 {large_data will be type BOOLEAN} {subtitle will be type STRING} {nine will be REAL} {five will be INTEGER} You can explicitly define the type for a variable when it is first referenced in an assignment statement. Here are some examples: c:STRING = 'x' nine:REAL = 3 * 3 t:BOOLEAN = TRUE ang:REAL = SIN(2*pi) {c would default to CHAR, but is explicitly defined as a STRING variable} {nine would default to INTEGER, but will be a REAL variable} {t is explicitly declared as Boolean, although this is the default} {ang is explicitly declared as real, although this is the default} Array Variables Multidimensional arrays and matrices of all types are supported by mle. Array variables must be explicitly defined the first time the variable is mentioned in the program. The format is <var> : <type>[<min1> TO <max1>, <min2> TO <max2>, . . . ]. Some examples of declarations are: s : STRING[1 TO 5] r : REAL[1 TO 10, 1 TO 10] b : BOOLEAN[0 TO 1, 0 TO 1, 0 TO 1] {Defines a one-dimensional array of strings} {Defines a 10 x 10 matrix} {Defines a 3 dimensional BOOLEAN array} Values within an array variable are accessed using brackets to denote subscripts. The following example creates an array of radian angles for integral degree angles, and prints out a table of sine values: r : REAL[0 TO 359] FOR i = 0 TO 359 DO r[i] = DTOR(i) writeln("Sin(" i ") = " SIN(r[i]) ) END {assignment to element i of array r} {access the ith element of array r} 13 mle 2.1 manual Initialized Array Variables Arrays can be initialized in the same time they are defined. There are three ways to initialize an array. First, the value of a constant can be assigned to the array. Examples are: s : STRING[1 TO 5] = "" {Defines s and initializes all values to an empty string} r : REAL[1 TO 10, 1 TO 10] = 0 {Defines a 10 x 10 matrix and initializes everything to 0} An array can be used to initialize another array, provided that the arrays are identically defined. That is, they must have the same number of subscripts and the same subscript ranges. Here is an example: a : REAL[1 TO 20] FOR x = 1 TO 5 DO a2[x] = x END {for} b : REAL[1 TO 5] = a2 Arrays can also be initialized with a list of values, one per element. A special function is defined that that is enclosed within brackets ([]), and within the function, brackets are used to nest the values to different levels. Here is an example: a : REAL[1 TO 5, 1 TO 2] = [[1.1 [2.1 [3.1 [4.1 [5.1 1.2] 2.2] 3.2] 4.2] 5.2]] FOR x = 1 TO 5 DO FOR y = 1 TO 2 DO WRITE(' a[' x ',' y ']=' a[x, y]) END {for y} WRITELN END {for x} Here are the results of running this example: a[1,1]=1.1000000000 a[2,1]=2.1000000000 a[3,1]=3.1000000000 a[4,1]=4.1000000000 a[5,1]=5.1000000000 a[1,2]=1.2000000000 a[2,2]=2.2000000000 a[3,2]=3.2000000000 a[4,2]=4.2000000000 a[5,2]=5.2000000000 Data Statement Most mle programs include a DATA...END statement. The purpose of a DATA statement is to create a series of observations, which will be used to compute likelihoods. The DATA...END statement defines the format of the data file, defines variables to be read in, provides a way of transforming variables, and provides a way of selecting and dropping observations. Only an overview of the DATA statement is given here. Details are given in chapter three. Formats for the DATA statement are: DATA <variable> FIELD x {reads variable from field> <variable> FIELD x LINE y {multiline version} <variable> FIELD x [LINE y] = <expr> {reads and transforms} <variable> FIELD x [LINE y] [DROPIF <expr> | KEEPIF <expr> ...] {generic from with FIELD} <variable> = <expr> {creates from an expressions} <variable> = <expr> [DROPIF <expr> | KEEPIF <expr> ...] {creates and conditionally keeps} <variable> [FIELD x [LINE y]] = <expr> [DROPIF <expr> | KEEPIF <expr> ...] ... END A description of each field follows: 14 mle 2.1 manual • • • • • • <variable> is the name of the variable being defined. The variable must not already exist. All variables created by the DATA statement are defined to be type real. Integer values will be read in from the data file and converted to real numbers. Text strings can exist within a fields of a text file, but must not be assigned to a variable. refers to which column within an input file a variable is found in. In the hammes.dat file, four fields (or columns) existed in the input file. The field specifier must be a positive integer constant. FIELD LINE provides a way to read observations spread across multiple lines the LINE keyword is used, the maximum number of lines specified in the data file. When (e.g. 2 for LINE 2) is taken as the number of lines for all observations. If observations each take but one line, the statement LINE 1 may be dropped—one line per observation is assumed as a default. The line specifier must be a positive integer constant. defines a data transformation expression. The expression may refer to the variable being read, or any variables defined prior to the current variable. The line newvar FIELD 3 = newvar^2 will read newvar from field three of the data file; the value of newvar is then squared and assigned back to newvar. <= expr> DROPIF provides a mechanism to drop observations. The expression following DROPIF will evaluate to TRUE or FALSE. If TRUE, the observation is dropped. The line newvar FIELD 3 DROPIF newvar <= 0 will drop all observations when the variable in field three is not positive. provides another mechanism to drop observations. The expression following KEEPIF must evaluate to TRUE or FALSE. If FALSE, the observation is dropped (that is, not kept). The line newvar FIELD 3 KEEPIF newvar > 0 will drop all observations for which the variable in field three is not positive. KEEPIF and DROPIF expressions can be far more complex, but must return TRUE or FALSE. KEEPIF Usually, data are read from a data file. The DATAFILE() procedure defines and opens this file. Here is an example: DATAFILE("test.dat") DATA o_time FIELD 1 c_time height heightsq missing frequency END = o_time*365.25 DROPIF (o_time > 1000) FIELD 3 = IF c_time = -1 THEN c_time ELSE c_time*365.25 END FIELD 6 DROPIF height <= 0 = height^2 FIELD 4 DROPIF missing_data <> 1 FIELD 5 DROPIF frequency <= 0 The variable names FREQUENCY or FREQ are taken as frequencies for each observation. (If both variable names are used, FREQUENCY is taken as the frequency variable). The frequency of each observation is used to compute a proper likelihood as if multiple lines of identical observations were read. If the FREQUENCY or FREQ keywords are missing, a frequency of one is assumed for each observation. The DATA statement is used in conjunction with the DATA function. Within a MODEL statement, you can use the DATA function to evaluate the likelihood, one observation at a time. Do not be confused by the fact that there is both a DATA statement and a DATA function. They complement each other. Simply remember that a DATA statement is used as a statement, and there is typically one such 15 mle 2.1 manual statement per program. The DATA function can only be used as part of an expression—typically only within the likelihood expression of a MODEL statement. Model Statement The MODEL...RUN...END statement defines the underlying probability model used by mle, defines the parameters to be found for the model, and defines constraints under which parameters are to be estimated. Only an overview of the MODEL statement is given here. An entire chapter is devoted to the MODEL statement, including some details for specifying likelihoods. The basic structure of the MODEL statement looks like this: MODEL <expression> RUN <run specifications> END Between MODEL and RUN is a single expression that is the likelihood. Within the likelihood is one or more PARAM...END functions. These define the parameters, whose values will be found so that the likelihood is maximized. One of the most important aspects of learning mle is the design and construction of the expression for the likelihood. A list of <run specifications> is given between the RUN and the END part of the MODEL statement, this provides a way of evaluating the full model as well as a series of nested or reduced models. If all of the parameters (defined by PARAM...END functions) are to be found, a simple FULL command is placed between the RUN and its matching END. Reduced models, where one or more parameters are constrained to a constant or another parameter, are specified as REDUCE followed with a list of one or more "reductions". For example, you might constrain a parameter called mean to be zero and only allow the parameter called stdev to be found. Then you would put REDUCE mean = 0 between the RUN and the END. Any number of REDUCE commands (along with one FULL) can be used in a single model. The various forms of the model will be evaluated in turn. Intrinsic Procedures Intrinsic procedures are predefined, single word statements that perform a specific task on a list of zero or more arguments. When called, a procedure executes a series of actions using the arguments. (Procedures do not return a value the way a function does). For example, the statement DATAFILE("hammes.dat") found in the earlier example defines and opens the file used by the DATA statement. A list of all procedures, with examples, can be found in a later chapter. Here are some example procedure statements: SEED(9734) HALT WRITELN("Final value is ", total) DATAFILE("hammes.dat") OUTFILE("hammes.out") {Seeds the random number generator} {stops a program from running further} {Writes text to the screen} {Defines and opens a data file} {defines and opens an output file} User-defined Procedures mle provides capabilities for users-defined procedures (and functions). A procedure is a single-word command that takes a list of zero or more arguments; when called, a procedure executes a series of statements and returns to the place whence called. User-defined procedures are something like subroutines in FORTRAN; they are very similar to Pascal's user-defined procedures. User-defined procedures must be understood as two components: the procedure definition and a call to the procedure. 16 mle 2.1 manual A user-defined procedure must be defined prior to being invoked (called). By convention, userdefined procedures (and functions) are usually placed near the beginning of the program. Here is an example of a user-defined procedure being defined and later called. MLE a : STRING = "Hello world" PROCEDURE myproc (a:INTEGER b:REAL c:STRING) {Define the procedure here} msg = " a is " WRITELN(" In myproc: a = ", a, " b = ", b, " c = ", c) IF a < 10 THEN WRITELN(msg "< 10") a = a + ROUND(b) ELSE WRITELN(msg "> 10 ") END {if} WRITELN(' Exit myproc with a = ', a) END {procedure} {End of user-defined procedure definition} t = 4 WRITELN('Call myproc with t = ' t) myproc(t, 4.2, a) {Here is a call to the user-defined procedure} WRITELN('Back from myproc with t = ' t) END The definition begins with the word PROCEDURE and ends with the corresponding END. The word following PROCEDURE is the name of the procedure, in this case myproc. The name is followed by a list of 0 or more arguments that are formally defined—that is, a name and type must be specified for each argument. In this example three arguments (a, b, and c) are defined. The argument names and all of the variables defined within the procedure (like msg) are "private" to the procedure. Names of preexisting variables (like a) are not affected by and do not affect declarations outside of the procedure. The procedure definition does not actually do any (visible) work in a program. The work comes when a procedure is called, as in the line myproc(t, 4.2, a). Once called, each argument is evaluated and a copy of the result is assigned to the formal argument defined in the heading of the procedure. The statements within the procedure are executed, and control is passed back to the main program. Here are results from the sample program: Call myproc with t = 4 In myproc: a = 4 b = 4.2000000000 c = Hello world a is < 10 Exit myproc with a = 8 Back from myproc with t = 4 A careful examination reveals an interesting behavior in this example: the arguments passed from outside the procedure are not affected by any manipulation within the procedure. Specifically, t in the call was not changed by the assignment to a in the procedure. The reason is that a copy of each argument is passed to the procedure. This behavior prevents accidental side-effects (outside of the procedure) resulting from manipulations within procedures. Additionally, this permits recursive calls to a procedure (i.e. a procedure that calls itself). Sometimes it is helpful to permit the procedure to change the variables back in the main program (or calling procedure). It is possible to pass a variable to a procedure so that its value can be manipulated within the procedure. This is done by preceding the variable in the formal argument list of the procedure by the name VAR. (This mechanism is almost identical to variable arguments in Pascal and Modula.) Suppose we rewrite the previous example by adding VAR before the formal declaration of variable a: PROCEDURE myproc (VAR a:INTEGER b:REAL c:STRING) msg = " a is " . . . 17 mle 2.1 manual Now, any changes to variable a within the procedure will be reflected in changes to variable t outside of the procedure. Call myproc with t = 4 In myproc: a = 4 b = 4.2000000000 c = Hello world a is < 10 Exit myproc with a = 8 Back from myproc with t = 8 Here are some other notes about user-defined procedures • VAR • Arrays can only be passed as VAR arguments • • arguments require that variables be passed (instead of constants), since the variable may be modified Procedures can be defined and called within a procedure (but will not be available outside that procedure) Procedures can "overwrite" the name of intrinsic procedures User-defined Functions mle provides capabilities for user-defined functions. A function is a single-word command that takes a list of zero or more arguments, performs some operation, and returns a result. User-defined functions in mle are very similar to Pascal's user-defined functions. They must be understood as two components: the function definition and a call to the function. A user-defined function must be defined prior to being called. By convention, they are usually placed near the beginning of the program. Here is an example of a user-defined function being defined and later used. MLE FUNCTION int_power(a:REAL j:INTEGER):REAL { -- raises a to integer power j} RETURN = 1.0 WHILE j > 0 DO IF ISODD(j) THEN RETURN = RETURN*a END {if} a = a*a j = j DIV 2 END {while} END {int_power} WRITELN( int_power(SQRT(4), 2), ' ', int_power(4.5, 2), ' ', int_power(10/2, 3) ) END The definition begins with the word FUNCTION and ends with the corresponding END. The word following FUNCTION is the name of the function, in this case int_power. The name is followed by a list of 0 or more arguments that are formally defined—that is, a name and type must be specified for each argument. In this example two arguments (a and j) are defined. The argument names and all of the variables defined within the function are "private" to that function. The function declaration does not actually do any work in a program. The work comes when the function is called, as in the WRITELN line that calls the function. Once called, each argument is 18 mle 2.1 manual evaluated and a copy is assigned to the formal argument defined in the heading of the function. The statements within the function are executed, and the result is passed back to the expression. Within a function, the variable RETURN is automatically declared. RETURN can be used as an ordinary variable. When the function exits, the value stored in RETURN is passed back to the calling expression. Here is what this example produces: 4.0000000000 20.250000000 125.00000000 Here are some other notes about user-defined functions • Like procedures, VAR arguments can be defined • Arrays can only be passed as VAR arguments to user-defined functions • • Functions and procedures can be defined and called within a function (but will not be available outside that function) User-defined functions can "overwrite" the name of intrinsic functions BEGIN...END Statement The BEGIN...END statement provides a means of providing multiple statements in contexts where only a single statement is allowed. The format is BEGIN <statements> END The most important use for this statement is with the PREASSIGN...END and POSTASSIGN...END functions discussed in a later chapter. FOR Statement The FOR statement provides a means of looping through statements. The formats are FOR <v> = <expr> TO <expr> DO <statements> END FOR <v> = <expr> TO <expr> STEP <expr> DO <statements> END FOR <v> = <expr> TO <expr> STEPS <iexpr> DO <statements> END FOR <v> = <array> DO <statements> END {form 1} {form 2} {form 3} {form 4} Form 1 is a simple looping statement. The variable <v> must either not be previously defined or, if it already exists, it must be an integer or real variable. Its value will change as the FOR statement is executed. The first <expr> will be executed once and will define the starting value of <v>. The second <expr> will be executed once and will define the last value of <v>. Every iteration through the loop, the value of <v> will be incremented by 1. Here is an example that will print sine and cosine tables in one degree increments as well as creating a table of radians for each degree: 19 mle 2.1 manual r : REAL[0 TO 359] FOR x = 0 TO 359 DO r[x] = DTOR(x) WRITELN(x " degrees (" r[x] " radians): SIN()=" SIN(r[x]) ", COS()=" COS(r[x])) END Form 2 of the FOR statement is like form 1 except that the <expr> after STEP will be used as the increment (or decrement) value instead of one. The step size can be any real or integer value. If the value is positive, then <statements> will not be executed unless the start <expr> is less than or equal to the TO <expr>. Likewise, if the step size is less than zero, then the start <expr> should be greater than or equal to the TO <expr>. Form 3 of the FOR statement performs the loop in a fixed number of steps, defined by the <expr> after STEPS, in equally spaced values from the start <expr> to the TO <expr>. The variable <v> is declared as type REAL (or must be REAL if it is already defined). Here is a simple example that goes from 0 to 1 in 100 steps: FOR x = 0 TO 1 STEPS 101 DO ... END. Form 4 of the FOR statement takes an array variable (or a dataarray) and loops through the array from its lowest bound to its highest bound. The index variable may be any type and must match the type of the array elements. Here is an example using a dataarray: FOR x = [TRUE FALSE FALSE TRUE TRUE] DO ... END. REPEAT Statement The REPEAT statement loops through statements until some condition is met. The format is REPEAT <statements> UNTIL <bexpr> The <statements> are executed and then the Boolean expression<bexpr> is evaluated. If the result is FALSE, the loop repeats and <statements> are executed again. When <bexpr> evaluates to TRUE, the loop terminates. A REPEAT statement always executes the <statements> at least once. WHILE Statement The WHILE statement loops through statements while some condition is true. The format is WHILE <bexpr> DO <statements> END The Boolean expression <bexpr> is executed first. If the value is TRUE, the <statements> are executed once and <bexpr> is evaluated again. The sequence continues until <bexpr> evaluates to FALSE. That is, when <bexpr> is FALSE, the loop terminates. Unlike the REPEAT statements, the statements will not be executed once if the condition initially fails. IF Statement The IF statement provides a means of conditionally executing statements. The following types of IF statements are available: IF <bexpr> THEN <statements> END This form will conditionally execute the <statements> only if <bexpr> evaluates to TRUE. An ELSE clause can be added to the statement so that one of two sets of statements will always be executed: 20 mle 2.1 manual IF <bexpr> THEN <statements> ELSE <statements> END In addition, one or more ELSEIF clauses can be added to the statement to allow multiple conditions to be tested: IF <bexpr> THEN <statements> ELSEIF <bexpr> THEN <statements> ELSEIF <bexpr> THEN <statements> ELSE <statements> END Here is an example of an IF statement: IF SYSTEM = "MS-DOS" THEN PRINTLN("Run from an MS-DOS system") SEP = '\' DATAFILE("C:" + SEP + DIR + SEP + NAME) ELSE PRINTLN("Run on a unix system") SEP = '/' DATAFILE(DIR + SEP + NAME) END The Break Statement The BREAK statement works within loop statements (WHILE, REPEAT, and FOR). When a BREAK statement is encountered, the loop is immediately exited. The behavior of a BREAK statement outside of a loop causes the current "scope" to be exited. This means that within the main program (outside of a user-defined procedure or function) a BREAK acts like a HALT statement. Within a userdefined procedure or function, the procedure or function is exited. The Continue Statement The CONTINUE statement works within loop statements (WHILE, REPEAT, and FOR). When a CONTINUE statement is encountered, all further statements are skipped until the end of the current loop. The Exit Statement The EXIT statement immediately exits the current procedure or function. When an EXIT statement is encountered outside of a procedure or function, the program exits. Differences Between Version 2.0 and Version 2.1 Version 2.1 offers improved speed, greater memory capacity, and the addition of some significant new capabilities. With one minor exception (FOR loops using DOWNTO), version 2.0 programs should work without change in version 2.1. Here is a list of the most important changes: • User-defined procedures and functions are now available. 21 mle 2.1 manual • BREAK, CONTINUE, and EXIT statements • DOS/Windows versions of mle execute from two to five times faster. • • • have been added. Versions are now available for Linux (and other) operating systems. New versions are not available for Solaris/SPARC systems. The 64 ki limit on user-defined arrays and DATA variables in DOS/Windows versions has been lifted. The dataarray structure for defining arrays (single or multidimensional) [<expr>, <expr>, has been added for assigning initial values to array variables. ...] • • • • • • • • • Array variables can be assigned to other array variables of identical size. Complex numbers are now supported. Many functions have been extended to return complex numbers. Complex numbers are specified as the expression, for example, 2.7 3.4i. The REAL2STR function has been modified to provide for many new formats. Some predefined files are now flushed (i.e. buffered data are written) before the program exits is a new Boolean variable that, when TRUE (the default) writes oo and -oo for infinity. When false, it prints a number. This is useful when writing output to be used by other programs. Also, the value of infinity can be changed by assigning a new value to INFINITY. SYMBOLICINFIN The default width of real numbers is controlled by the REALWIDTH and the default number of decimal places is controlled by the REALDECIMALS variables. Likewise, the default width and decimal places for complex numbers is controlled by COMPLEXWIDTH and COMPLEXDECIMALS. Plotting routines have been added for generating GNUPLOT output: PLOT, CURVE, and MULTIPLOT. Also the MODEL statement has been modified to plot estimated distributions (with confidence intervals) and likelihood surfaces. See the PLOTTING chapter in the Users manual for details. The FOR statement has been greatly enhanced. The STEP keyword provides for different step sizes. The looping index variable can be either real or integer. The STEPS keyword specifies the number of steps to loop over between the two limits. Finally, the FOR statement can take a dataarray or an array variable and loop over each element of the array (of any type). Since a step size of -1 can be used, the DOWNTO statement is no longer supported. A great number of intrinsic functions have been added: CLOCKSEED, EXEC(<cmd>,<args>), PLOTFILE(), NORMAL(x), NORMALCDF(x), CHISQ(x,df), STUDENTT(x,df), INVSTUDENTT(p,df), FDIST(x,df1,df2), INVFDIST(p,df1,df2), INVBETA(p,v,w), DIREXISTS, FILESIZE(), ENVCOUNT, ENVSTRING(), ARGCOUNT, ARGSTRING(), GETDIR, ZETA(), SETRANSFORM(<expr>). 22 mle 2.1 manual • • • • • • • Added some new procedures. Among them: ERASE, EXEC(<cmd>,<args>), RENAME(n1, n2), CHDIR(n1), MKDIR(n1), RMDIR(n1), GETDATE(), GETTIME(), WRITEPLOTLN(), WRITEPLOT(), PLOTFILE(), PTRANSFORM(), FINISHPLOT. Additionally, INC(x) and DEC(x) are defined as both procedures and functions. New predefined PDFs: ZIPF, BETABINOMIAL, THOMAS, POLYAEGGENBERGER. A restart file option has been added assist in rerunning programs. The –sw writes updated parameter START values to the file <name ><model_number>.<run_number> each iteration. The –sr option on the command line instructs mle to read parameter START values from the file. A termination file option has been added. When the –t is given, the program will periodically check for the file <name>.TRM. If the file exists, the program will terminate. The RUN part of the MODEL statement can now take a WITH clause in addition to FULL and REDUCE. A list of parameter names follow the WITH keyword. The model will be run using only those parameters. Other parameters will be set to the TEST value set in the PARAM function. Additionally, one or more parameter names can be enclosed in parentheses following the WITH keyword. All possible models (2N for N parameters) that include and exclude these parameters will be formed. A Bayesian model selection report is now available. Setting AIC_SELECT=TRUE will produce a report based on Akaike’s information criterion (AIC). Setting AICC_SELECT=TRUE will produce a report based on a sample-size corrected Akaike’s information criterion (AICC). Setting BIC_SELECT=TRUE will produce a report based on Bayesian information criterion (BIC). For each report, the most parsimonious model is selected. Parameters for the selected model are reported with new estimates of standard errors that include model selection uncertainty. The variable IC_SAMPLE_SIZE can be set to the effective sample size for a set of observations used for AICC and BIC report. The RUN part of the MODEL statement now takes on a THEN <statements> END clause. The statements are executed after each sub-model is solved. Likewise THEN <statements> END can be used after each FULL, REDUCE, and WITH clause to run statements after the model. Differences Between Version 1 and Version 2 Changes and New Features in Version 2 There are a number of syntax differences and other changes between mle version 1 and version 2. Here is a summary of the most important changes: • General algebraic expressions are now recognized. Standard operators include: +, -, *, /, ^, These operators can be used to build algebraic and Boolean expressions of nearly unlimited complexity. Both = and == are allowed for specifying Boolean comparisons. The standard operator precedence, common to most programming languages, is recognized by mle: AND, OR, XOR, NOT, MOD, DIV, SHL, SHR, >, <, <>, =, ==, >=, <=. Operator(s) Precedence 23 Category mle 2.1 manual - + NOT High Uniary operators ^ Exponent operator * / DIV MOD AND SHL SHR Multiplying operators + - OR XOR Adding operators = (or ==) <> < > <= >= low Relational operators The expression -23+4*-2^3 is equivalent to ADD(NEGATE(23), MULTIPLY(4, POWER(NEGATE(2), 3))) which returns -55. Parenthesis can be used to override operator precedence. For example, 2*5 + 3*7 will evaluate each multiplication before the addition. Addition can be forced to occur first with parenthesis as in 2*(5 + 3)*7. • The DATA statement has been rewritten to have a more intuitive transformation mechanism. The transformation looks like an assignment statement following the FIELD and LINE specification (if any). A list of DROPIF <expr> and KEEPIF <expr> statements can then be specified (replacing the old DROP and KEEP statements). Here are some examples: DATA age FIELD 1 = age*365.25 + 270 {convert to days since conception} weight FIELD 2 = weight * 1000 DROPIF weight <= 0 height FIELD 3 KEEPIF height > 0 bmi = height/weight^2 END {data} The formal specification for each variable is this <var> [FIELD x [LINE y]] [= <expr>] [DROPIF <bexpr> | KEEPIF <bexpr> ...] The first example above reads a value in the first field of the data file and assigns the value to the variable age. After that, the expression age*365.25 + 270 is evaluated and the result assigned to the variable age. The second example reads the second field and assigns the value to the variable weight. Following that, the expression weight*1000 is evaluated and assigned to the variable weight. Then the expression weight <= 0 is evaluated. If TRUE, the observation is dropped. If not, the observation is kept. • Observations can now be simulated or otherwise created within mle, without reference to a data file. This is done by setting CREATE_OBS to some positive value. The following example will create 100 uniform random observations: CREATE_OBS = 100 DATA v1 FIELD 1 = RAND END {data} • • • A number of useless functions that were used with the old data transformations have been eliminated, e.g.: ONE, SECOND, ONEIF, RESPONSE, etc. A number of new functions have been added, e.g.: DEFAULTOUTNAME, FISHER, ISODD, STRING2REAL, INT2STR, EOF, EOLN. A fairly complete set of functions are now available to work with calendar dates. A full list of simple functions can be generated by typing mle -h functions. The PREASSIGN and POSTASSIGN functions have been generalized so that any single statement is allowed in the statement part of the function. By using a BEGIN ... END block, more than one statement can be used in the assignment part of the functions. For example: 24 mle 2.1 manual PREASSIGN BEGIN {This is the statement part} r : REAL[0 TO 359] FOR i = 0 TO 359 DO r[i] = DTOR(i) END {for} END {begin — this is the end of the statement part of the PREASSIGN} PDF NORMAL(a, b) c, d END {This is the function returned by PREASSIGN} END {preassign} • • The conditional expressions in the IF THEN ELSE END and LEVEL functions take a Boolean expression of any complexity, e.g., IF (a = b) AND (c^2 + 2 <= 23) OR (d > 1) THEN ... ELSE ... END. The IF...THEN...ELSE...END function has been generalized so that multiple ELSEIF...THEN... conditions may be added. The following assignment is an example: status = IF height < 48 THEN -1 ELSEIF (height >= 48) and (height <= 60) THEN 0 ELSE 1 END {if} • Types can be optionally defined for variables when they are first encountered. Valid types are INTEGER, REAL, CHAR, STRING, BOOLEAN, and FILE. For example: x : REAL = 23 {x would be integer, but is defined to be real} c : STRING = '!' {c would be char, but is defined to be string} • • In general, types are handled better. Adding two integers variables together, for example, returns an integer value. The IF...THEN...ELSE...END function can return any type, but the type after the THEN must match the type after the ELSE. Multidimensional arrays are supported for all types. Subscripted values are accessed as, for example, z[i, j, k]. Arrays are declared as a : REAL[1 TO 5, -1 TO 1] = 0 b : INTEGER[-4 TO 4, 0 TO 1] • • • • {Declare and initialize matrix a} {Declare but no assignment} A new DERIVATIVE function numerically finds the value of a derivative at a specified point along some function. For example, DERIVATIVE x = 2, 3*x^2 + 2*x + 4 END, which is the derivative of 3x2 + 2x + 4 evaluated at x = 2, returns 14.0. The new FINDMIN function finds the value that minimizes a bounded function. An example is FINDMIN x (0, 2*PI) COS(x) END, which finds a minimum of the function cosine(x) between 0 and 2π. It returns 3.1415925395570 (π is an exact solution). The accuracy of the solution may be specified as a third argument within the parenthesis. The new FINDZERO function finds the value of an argument for which the function goes to zero. An example is FINDZERO x (0, PI) COS(x) END, which finds a value of x for which cosine(x) is zero. It returns 1.5707963267949 (which is close to the exact solution of π/2). The accuracy of the solution may be specified. An important syntactical change is that every PARAM function must have a matching END. 25 mle 2.1 manual • • The default FORM for the PARAM function is NUMBER if no covariates are specified and LOGLIN if one or more covariates are specified. The COVAR specification part of the PARAM function has been generalized to COVAR <expr> <expr>. A typical specification is PARAM x LOW=0 HIGH=100 START=25 COVAR z PARAM beta_z LOW=-5 HIGH=5 START=0 END END Nevertheless, other expressions are legal. For example PARAM x LOW=0 HIGH=100 START=25 COVAR z 1 END {param} • The PARAM options HIGH, LOW, START, and TEST are treated like assignment statements which are evaluated just prior to maximization. The right-hand side of the assignment can be any valid expression. For example, PARAM a LOW = IF y > 3 THEN 0 ELSE 3 • • OPENAPPEND(,) OPENREAD(,) OPENWRITE(,) WRITE() WRITELN() READ() READLN() PRINT() PRINTLN() CLOSE() SEED() DATAFILE() OUTFILE() HALT HIGH = x^2 + 2x - 4 START = y - 1 END The CONST part of the MODEL statement is longer supported. A number of procedures have been added that can be used wherever a statement is allowed, including {Opens a file for appending} {Opens a file for reading} {Opens a file for writing} {writes to standard output} {writes a line to the standard output} {Reads variables from the standard input} {Reads one line of variables from the standard input} {writes to the output file} {writes a line to the output file} {Closes a file} {seeds the random number generator} {defines the data file} {defines the output file} {halts the program} • A variety of statements have been added that can be used wherever a statement is allowed, including IF <bexpr> THEN <statements> ELSEIF . . . ELSE <statements> END FOR <v> = <expr> TO <expr> DO <statements> END BEGIN <statements> END WHILE <bexpr> DO <statements> END REPEAT <statements> UNTIL <bexpr> BREAK {exits the current WHILE, REPEAT, FOR loop, or BEGIN...END block} CONTINUE {Skips to the next iteration of a WHILE, REPEAT, or FOR loop} • A new QUANTILE function returns the value that gives the qth quantile of any of the predefined pdfs. For example, the median (where q = 0.5) can be found for the RANDOMWALK pdf, with arguments 2 and 3, as: QUANTILE RANDOMWALK(0.5) 2, 3 END. It returns 7.4595847118228. The function uses algebraic solutions for many pdfs. When no closed for solution is known, an iterative solution is found. 26 mle 2.1 manual • • Fundamental physical constants have been updated to the most recent recommend values provided in Mohr and Taylor (1999). Strings can be delimited by either " or ', except that a one-character sequence using ' is a character constant. Converting Version 1 Programs to Version 2 Programs written in earlier versions of mle can be converted into later versions without much difficulty. The most important things to change are given below. • • • • • • Change all INFILE = "mydata.dat" statements to DATAFILE("mydata.dat") procedure calls. Change all OUTFILE = "results.out" statements to OUTFILE("results.dat") procedure calls. Change all SEED = 5352 statements to SEED(5352) procedure calls. Eliminate all CONST blocks that may have been used at the beginning of MODEL statements. Instead, define the constant outside of the MODEL statement. Alternatively, use a PREASSIGN function within the MODEL statement to create temporary variables within that statement. Add an END after all PARAM functions. Some older versions of mle did not have or allow the DATA...END function within the MODEL statement. In more recent versions, a DATA...END function is almost always required to cycle through all observations in the data set. MODEL statements should usually look like this: MODEL DATA END RUN FULL END {the rest of the likelihood goes here} {data} {model} • • Some older versions of mle used the keyword FREQ followed by a variable name within a PDF function to denote the a frequency variable. These must be deleted. The special variable names FREQ and FREQUENCY should be used in the DATA statement to denote frequencies of observations. The method of transforming variables within the DATA statement has changed in version 2. All transformations must be re-coded following the new syntax (described earlier in this chapter and in a later chapter). Additionally, the method of dropping or keeping variables within the DATA statement has changed. An example of the old syntax is 27 mle 2.1 manual DATA v1 FIELD 1 DROP < 0 v2 FIELD 2 ADD 10 MULTIPLY 2 v3 FIELD 3 KEEP >= 24 v4 FIELD 4 SUBTRACT 10 POWER 3 DROP <= 1 END {data} and the corresponding new syntax is DATA v1 FIELD 1 DROPIF v1 < 0 v2 FIELD 2 = (v2 + 10)*2 v3 FIELD 3 KEEPIF v3 >= 24 v4 FIELD 4 = (v4 - 10)^3 DROPIF v4 <= 1 END {data} 28 mle 2.1 manual 30 mle 2.1 manual Chapter 2 Installing and running mle The mle interpreter is a small, self-contained program that can be run from the command line of the operating system. This chapter describes how to install mle in both the DOS environment and the Windows environment. A brief tutorial is given on how to run mle, and how to edit program files using a text editor. Additionally, the editor emle is described. All command line options are described. Installing mle Under Windows, mle is installed using a built-in installer. This will install the interpreter along with a rudimentary editor that can be used to edit and run mle programs. If you prefer, you can install everything by hand under Windows as well (this is especially helpful if you want to run mle from the DOS command line. The current releases of mle can be found on the web at http://faculty.washington.edu/~djholman/mle. For the purposes of this manual we will assume that the current release is 2.1.16. Unix Find the current release of mle. For a Linux ELF binary, the current release might be called: mle2.1.15.linux.i386.tar.Z. Experienced Unix users will recognize this as a compressed tar file. Here are the steps for installation: • • Copy the file to a subdirectory (say, ~/mle). Uncompress the archive with the command archive with uncompress: mle-2.1.11.linux.i386.tar.Z • Extract everything from the the command tar –xvf mle-2.1.11.linux.i386.tar • Make sure you have permission to execute the program. Type: chmod u+x mle • The directory now contains the executable (mle), example programs, etc. At this point you can run programs from within the directory. You can add the directory to your PATH so that you can execute the program from anywhere. 31 mle 2.1 manual Alternatively, you can move the executable program to a directory in your path. For example: mv mle ~/bin Windows Find the current release of the mle setup and installation program. The current release might be called: mle_2_1_15_setup.exe. Note that there are versions with and without the mle documentation. The versions should be apparent from the file names. Here are the steps for installation: • • The easiest way to install mle is to “open” the setup program via a web browser. Windows will, in effect, execute the install the package. Alternatively, you can download the setup program to any directory, and then run the program (from a DOS window or using the Startà Run… command). The setup program will walk you through a number of steps for installation. If you are not an administrator or power-user on the computer, you will want to change the location where the program is installed from the default of C:\Program Files\mle to some other location like C:\Documents and Settings\<username>\mle • Once the installation is complete, you can optionally modify your PATH variable so that mle can be run from any directory on the command line. The PATH variable can be changed in most versions of Windows via StartàSettingsàControl PanelàSystemàAdvancedàEnvironment Variab les. Editing a program Writing an mle program requires that you edit the text of the program, and then “submit” it to the mle interpreter. The next step is to view the output of the program. Depending on the results, you will then edit the program again and submit it again. Almost any text editor can be used to edit a program. Additionally, the Windows version of mle comes with a simple text editor that is tailored to editing and running programs. This section first describes some text editors available in DOS and Unix that can be used for editing programs. Then the mle editor is briefly described. Under Unix, there are a number of de facto standard editors that are used for programming. The vi editor, in particular, is available on almost every installation. Other commonly used text editors on Unix systems are Pico and EMACS. Before you can develop mle programs, you will need to know one of these editors. Under DOS or Windows, there are a number of editors available (besides the one that comes with mle). A standard editor available in all later versions of DOS is called EDIT. Alternatives that come as part of Windows are NOTEPAD and WordPad. Even word processing programs (like MS-Word) can be used, although you must be certain to save the programs as text files. emle A rudimentary editor is now available with Windows versions of mle. This section of the manual briefly describes the editor and its functions. 32 mle 2.1 manual The editor can be started from the Startà Program menu. A window pops up that looks like the this: Alternatively, the editor can be opened from a DOS command line. To do so, the emle.exe command must be in your path or current directory. The command emle myfile.mle will open the editor and load (or create) the file myfile.mle The text being edited is displayed in the black area of the screen (although the color can be changed). The top of the screen shows the current menu. The bottom of the screen shows status information. The first ‘*’ means that the current file has been changed. The line number and column number come next. The “Insert” or “OvrWrt” indicates the mode the editor is in. Finally the filename is given if a file is opened for editing. Editor commands can be accessed through the keyboard (there is currently no mouse support). Keystrokes work as expected— that is, the arrow keys navigate around the text, <PgUp> and <PgDn> keys scroll up and down through the text, etc. Additionally, menu items (which are listed at the top of the screen) are accessed using the <Alt> key along with the highlighted character. Menus This section shows and describes the menu commands available in emle. File menu From the main menu, <Alt>F brings up the File menu. The File menu provides a number of commonly used file-related operations. The menu contains these elements: Open <Alt>O provides a menu for opening up a file. The arrow keys can be used to move through files and directories. Note that the special file “..” is used to change to the previous directory. Save Saves the current file. saveAs Prompts for a new name and then saves the current work as that name. Close Closes the current file. eXit Exits the program. Backups Toggles whether or not back-ups are made while saving files. Dos Escapes to a DOS session. 33 mle 2.1 manual Edit menu From the main menu, <Alt>E brings up the Edit menu. The Edit menu provides some special editing functions. The menu contains these elements. Del_line Deletes the current line. Flipcase Flips the case of all characters from the cursor to the end of the current line. Lowercase Changes characters to lower case to the end of the current line. Uppercase Changes characters to upper case to the end of the current line. Ctrl_key After selecting this, a control key can be entered into the text. Quit Quits this menu. Block menu From the main menu, <Alt>B> brings up the Block menu. This menu provides editing functions for selecting, moving and performing other functions on blocks of text. The menu contains these elements. markBegin Marks the beginning of a block. markEnd Marks the end of the block. Goto Goes to the currently marked block. Copy Copies the current block. Delete Deletes the current block. Move Moves the current block. cLear Removes the current block. Write Writes the current block to a file. Quit Quits this menu. Search menu From the main menu, <Alt>S brings up the Search menu. This menu provides text searching and replacement functions. The menu contains these elements. Find Searches for a string of text. Find (Next) Searches for the next occurrence of the text. Find (Opts) Searches for text after setting the search options. Replace Searches and replaces text. Replace (neXt) Searches and replaces text again. Replace (oPts) Searches and replaces text after setting some options. Goto_line Goes to the specified line number Quit Exits the menu. Mle menu From the main menu, <Alt>M brings up the Mle menu. This menu provides some several mle-related special functions. The menu contains these elements. 34 mle 2.1 manual Parse Submits the current file to mle with the parse option (-p). This, in effect, checks for syntax errors. Run Submits the current file to mle, so that the program is run. Expression Prompts the user for an expression to evaluate via mle. template (Insert) Inserts a code template at the current location. template (Options) Sets options (intent level, case for code, case for comments) for the templates. Quit Exits the menu. Window menu From the main menu, <Alt>W brings up the Window menu. This menu provides some several mle-related special functions. The menu contains these elements. Backcolor Switches through the background color for the text. Forecolor Switches the foreground color of the text. Wordwrap Toggles word-wrap Setmargins Sets the left and right margins. Ruler Toggels a ruler display (Off, Top, Bottom). reDraw Redraws the current screen. Quit Exits the menu. Help menu From the main menu, <Alt>H brings up the Help menu. This menu provides for several types of help information. The menu contains these elements. Editor_keys Displays the current mapping between editor commands and the keyboard. Key_map Displays the current mapping of key to editor commands. Mle_help Submits the current word (the word the cursor is currently sitting on) to mle with the help option (-h) option. Any mle help messages that match the keyword exactly will be displayed. mle_Search Submits the current word to mle with the help option (-H) option. Any mle help messages that match any part of the keyword will be displayed. About Shows information about the editor. Quit Exits the menu. Default settings The editor preserves a number of settings from one editing session to the next: foreground color, background color, insert status, word wrap status, right and left margins, ruler setting, mle indent setting, mle keyword case setting, mle comment case setting, back-up setting, search “from top” flag, search “ignore case” flag. 35 mle 2.1 manual The information for these settings is stored in the file emle.cfg which resides in the same directory as emle.exe. The configuration file can also save a series of user-defined commands that are executed whenever the editor is started. To add commands to the file, use the Alt_F9 command, which prompts for additional commands before saving the configuration file. Default command mapping The default mapping between editor commands and the keyboard is described in this section. Notice that a command can have more than one key assigned to it. The default keyboard mapping can be changed by saving the current map (Shift_F9 by default), and editing the resulting file. The editor will then read the keyboard map by default. The keymap is stored in the file emle.kbm which resides in the same directory as emle.exe. Cursor control commands RtArr ..................... Go to next character LtArr ..................... Go to previous character Ctrl_PgUp ............. Go to beginning of file Ctrl_PgDn ............. Go to end of file End........................ Go to end of line Home..................... Go to beginning of line DnArr .................... Go to next line UpArr .................... Go to previous line PgDn ..................... Go down one page PgUp ..................... Go up one page Ctrl_I..................... Go to next tab Shift_Tab............... Go to previous tab Ctrl_Home............. Move window up Ctrl_End ................ Move window down Ctrl_RtArr ............. Skip ahead one word Ctrl_LtArr ............. Skip back one word Insert and delete commands Delete.................... Delete character (del) Ctrl_H ................... Delete character (backspace) Ctrl_J, Ctrl_M ....... Break line at current position Insert ..................... Toggle insert/overwrite Ctrl_Y ................... Delete line Ctrl_B.................... Delete to beginning of line Ctrl_E.................... Delete to end of line Ctrl_N ................... Insert new line Ctrl_R.................... Delete word File commands <not assigned>....... Close file. Save if necessary <not assigned>....... Close file without saving <not assigned>....... Save and close file Ctrl_O ................... Open. Save current file if necessary <not assigned>....... Open without saving current file <not assigned>....... Save current and open Alt_X .................... Quit. Save if necessary Ctrl_K ................... Quit without saving 36 mle 2.1 manual Shift_F3................. Save and quit <not assigned>....... Save as <not assigned>....... Save <not assigned>....... Save file Alt_F3 ................... Set whether backup files are made Block commands Shift_F4, Alt_-....... Mark beginning of block Alt_P ..................... Copy block Alt_Q .................... Delete block Ctrl_F4, Alt_= ....... Mark end of block Alt_O .................... Go to block Alt_C..................... Clear block marks Alt_V, Alt_F4........ Move block Alt_T..................... Write block to a file Page formatting commands Ctrl_F5 .................. Set background color Shift_F5................. Set foreground color Shift_F8................. Set margins F5.......................... Redraw the screen Alt_K .................... Toggle ruler display F8.......................... Toggle word wrap Help commands F1.......................... Displays editor commands Alt_F1 ................... Displays keys mapped to commands Ctrl_F1 .................. Give help on an mle keyword Shift_F1................. Match and give help on a keyword <not assigned>....... Program information Execution commands F9.......................... Open up OS window Shift_F2................. Parse in mle F2.......................... Run in mle Alt_F2 ................... Run an mle expression Search commands F6.......................... Find text Shift_F6................. Find next occurrence Ctrl_F6 .................. Find with options F7.......................... Find and replace Shift_F7................. Find and replace next occurrence Ctrl_F7 .................. Find and replace options Alt_G .................... Goto line Other commands Ctrl_T, F10 ............ Insert an mle template Shift_F10............... Change mle template options Ctrl_F.................... Change case to end of line Ctrl_L.................... Change to lower case to EOL Ctrl_U ................... Change to upper case to EOL 37 mle 2.1 manual Alt_A .................... Enter ASCII code Ctrl_V ................... Accept <Ctrl> key Shift_F9................. Writes startup key map file: emle.kbm Ctrl_F9 .................. Reads key map file: emle.kbm Alt_F9 ................... Saves configuration information to the file: emle.cfg Alt_F8 ................... Shows internal information (used for debugging). Alt_F5 ................... Turns debugging on Menu commands <not assigned>....... Main menu Alt_F, F3 ............... File menu Alt_E..................... Edit menu Alt_B, F4............... Block menu Alt_S ..................... Search menu Alt_M.................... mle menu Alt_W.................... Window menu Alt_H .................... Help menu Default keyboard mapping The default keyboard map is described in this section. The default keyboard mapping can be changed by saving the current map (Shift_F9 by default), and editing the resulting file. Ctrl_A ................. unmapped............... Ctrl_B.................. linedelBOL.............Delete to beginning of line Ctrl_C.................. unmapped............... Ctrl_D ................. unmapped............... Ctrl_E.................. linedelEOL .............Delete to end of line Ctrl_F.................. flipcase...................Change case to end of line Ctrl_G ................. unmapped............... Ctrl_H ................. chardelback ............Delete character (backspace) Ctrl_I................... tabnext....................Go to next tab Ctrl_J................... enter .......................Break line at current position Ctrl_K ................. quitnosave ..............Quit without saving Ctrl_L.................. tolower ...................Change to lower case to EOL Ctrl_M................. enter .......................Break line at current position Ctrl_N ................. lineins.....................Insert new line Ctrl_O ................. open .......................Open. Save current file if necessary Ctrl_P.................. unmapped............... Ctrl_Q ................. unmapped............... Ctrl_R.................. worddel ..................Delete word Ctrl_S.................. unmapped............... Ctrl_T.................. mletempl ................Insert an mle template Ctrl_U ................. toupper ...................Change to upper case to EOL Ctrl_V ................. ctrl..........................Accept <Ctrl> key Ctrl_W................. unmapped............... Ctrl_X ................. unmapped............... Ctrl_Y ................. linedel ....................Delete line Ctrl_Z.................. unmapped............... Ctrl_[................... unmapped............... Ctrl_\ ................... unmapped............... Ctrl_]................... unmapped............... 38 mle 2.1 manual Ctrl_^ .................. unmapped............... Ctrl__ .................. unmapped............... Shift_Tab............. tabprev ...................Go to previous tab Alt_Q .................. blockdel..................Delete block Alt_W.................. windowmenu ..........Window menu Alt_E................... editmenu.................Edit menu Alt_R................... unmapped............... Alt_T................... blockwrite ..............Write block to a file Alt_Y .................. unmapped............... Alt_U .................. unmapped............... Alt_I .................... unmapped............... Alt_O .................. blockgoto................Go to block Alt_P ................... blockcopy...............Copy block Alt_A .................. ascii........................Enter ASCII code Alt_S ................... searchmenu.............Search menu Alt_D .................. unmapped............... Alt_F ................... filemenu .................File menu Alt_G .................. gotoline ..................Goto line Alt_H .................. helpmenu................Help menu Alt_J.................... unmapped............... Alt_K .................. rulertoggle ..............Toggle ruler display Alt_L................... unmapped............... Alt_Z................... unmapped............... Alt_X .................. quit .........................Quit. Save if necessary Alt_C................... clearmarks ..............Clear block marks Alt_V .................. blockmove..............Move block Alt_B................... blockmenu..............Block menu Alt_N .................. unmapped............... Alt_M.................. mlemenu.................mle menu F1........................ helpedit ..................Displays editor commands F2........................ mlerun....................Run in mle F3........................ filemenu .................File menu F4........................ blockmenu..............Block menu F5........................ redraw ...................Redraw the screen F6........................ find.........................Find text F7........................ replace....................Find and replace F8........................ wordwraptoggle......Toggle word wrap F9........................ exec........................Open up OS window F10 ...................... mletempl ................Insert an mle template Home................... linebegin.................Go to beginning of line UpArr .................. lineprev ..................Go to previous line PgUp ................... pageup....................Go up one page LtArr ................... charprev .................Go to previous character RtArr ................... charnext..................Go to next character End...................... lineend....................Go to end of line DnArr .................. linenext ..................Go to next line PgDn ................... pagedown ...............Go down one page Insert ................... inserttoggle.............Toggle insert/overwrite Delete.................. chardel....................Delete character (del) Shift_F1............... helpmlesearch.........Match and give help on a keyword Shift_F2............... mleparse.................Parse in mle 39 mle 2.1 manual Shift_F3............... quitsave ..................Save and quit Shift_F4............... blockbegin..............Mark beginning of block Shift_F5............... colorforeset ............Set foreground color Shift_F6............... findnext ..................Find next occurrence Shift_F7............... replacenext .............Find and replace next occurrence Shift_F8............... marginset ................Set margins Shift_F9............... writekeymapfile......Writes startup key map file Shift_F10............. mletmplopts............Change mle template options Ctrl_F1 ................ helpmle ..................Give help on an mle keyword Ctrl_F2 ................ unmapped............... Ctrl_F3 ................ unmapped............... Ctrl_F4 ................ blockend.................Mark end of block Ctrl_F5 ................ colorbackset ...........Set background color Ctrl_F6 ................ findopts ..................Find with options Ctrl_F7 ................ replaceopts .............Find and replace options Ctrl_F8 ................ unmapped............... Ctrl_F9 ................ readkeymapfile .......Reads key map file Ctrl_F10 .............. unmapped............... Alt_F1 ................. helpkeyboard..........Displays keys mapped to commands Alt_F2 ................. mleexpr ..................Run an mle expression Alt_F3 ................. makebackup ...........Set whether backup files are made Alt_F4 ................. blockmove..............Move block Alt_F5 ................. debug .....................Turns debugging on Alt_F6 ................. unmapped............... Alt_F7 ................. unmapped............... Alt_F8 ................. debugscreen............Shows internal information Alt_F9 ................. configsave ..............Saves configuration information Alt_F10 ............... unmapped............... Ctrl_PrtSc............ unmapped............... Ctrl_LtArr ........... wordprev ................Skip back one word Ctrl_RtArr ........... wordnext ................Skip ahead one word Ctrl_End .............. windowdown ..........Move window down Ctrl_PgDn ........... fileend ....................Go to end of file Ctrl_Home........... windowup...............Move window up Alt_1 ................... unmapped............... Alt_2 ................... unmapped............... Alt_3 ................... unmapped............... Alt_4 ................... unmapped............... Alt_5 ................... unmapped............... Alt_6 ................... unmapped............... Running a program mle programs are usually run by typing mle followed by any command-line options, followed by the name of the program file on the DOS or Unix command line. The mle interpreter will then read in and parse the entire program file, and the program statements will be executed. If mle encounters an error in the program, an error message is printed and further execution terminates. Warning messages are printed from mle without terminating the run. 40 mle 2.1 manual The following sections provide more details on how to run mle from the command line. Specifying the Program File and Command Line Options There are several methods for specifying the program file. Typically, the program file is specified on the command line. Here are some examples of how the mle command is used to run a program file called test.mle: c:\test> mle test.mle c:\test> mle -v test.mle c:\test> mle -p test.mle C:\test> mle mle Program file to run? test.mle Runs mle on the file analysis.mle. Runs mle, verbose option is set. Parses test.mle, reports syntax errors. mle will request the input file name. The last example shows that if a program file name is not given on the command line, you will be prompted for the program file name. The middle two examples show command line options (-v and -p) being specified. Command line options are used to change the behavior of mle, and are discussed below. If you type an erroneous command line option, or the file is not recognized by mle the following synopsis is given: c:\test> mle -z analysis.mle Error: Incorrect number of parameters There is no -z option. Usage: mle [-v] [-p] [-i] [-dd] [-de] [-di] [-dl] [-dp] [-ds] [-dx] [mlefile] -v Iteration histories and other messages are written to the screen -p Only parses the mle file -i Runs mle interactively -dd Turns on data debugging -de Echos characters while parsing -di Turns on integration debugging -dl Turns on likelihood debugging -dp Turns on parser debugging -ds Turns on symbol table debugging -dx Turns on debugging during execution mlefile is the name of the file with the program Usage: mle -h [name1 name2 . . . .] help for PDFs, functions, symbols, parameter transforms -h matches words exactly, -H searches within words Usage: mle -pn n1 n2 . . . . parses n's and returns values and type Table 1 gives a list of valid command line options. A useful command line option is -p (parse only) which tell mle to parse the program (without running it) and report any errors in the grammar. The statements within the program are not executed. Another very useful option is the -v (verbose) option, which tells mle to provide periodic status reports while solving a likelihood. Among other things, the status report prints out the likelihood and parameter values at each iteration. Help Options mle predefines a large number of functions, variables, constants, and reserved words. The -h (help) option provides short summaries of mle language parts, PDFs, and concepts. Typing mle -h yields 41 mle 2.1 manual Type mle -h <keyword> to match keywords exactly. Type mle -H <keyword> to match partial keywords. mle -h MLE gives a program outline. mle -h PROCEDURES lists procedures. mle -h PDFS lists PDF types. mle -h FORMS lists parameter forms. mle -h HAZARD gives an example of a hazard specification. mle -h SYMBOLS lists pre-defined variables. mle -h NUMBERS lists number formats. mle -h FUNCTIONS lists simple functions, Help is available for the following types of functions/expressions: IDENTIFIER FUNCTION ARRAY DATA DATAARRAY DERIVATIVE FINDMIN FINDZERO FUNCTION IF INTEGRATE LEVEL LEVELDELTA PARAM PDF PHAZARD PPDF POSTASSIGN PREASSIGN PRODUCT QUANTILE QDF SUMMATION Help is available for the following statements: ASSIGNMENT BEGIN BREAK CONTINUE CURVE DATA EXIT FOR FUNCTION IF MODEL MULTIPLOT PLOT PROCEDURE REPEAT WHILE This option is particularly helpful for providing a short summary of intrinsic parameters for predefined PDFs. For example, typing mle -h weibull yields: WEIBULL Distribution 4 continuous variables: t(open), t(close), t(left trunc), t(right trunc) Exact failure when t(open)=t(close) Range: t: (Time) 0 <= t < +oo 2 intrinsic parameters: a: (Scale) 0 < a < +oo b: (Shape) 0 < b < +oo a is the characteristic life ~= 63.2th % in units of a f(t) = S(t)h(t); S(t) = exp[-(t/a)^b]; h(t) = [b*t^(b-1)]/(a^b) mean = a*Gamma[1+1/b]; var = (a^2)*Gamma[1+2/b]-{Gamma[1+2/b]}^2 mode = a(1-1/b)^(1/b) for b>1; mode = 0 for b<=1; median = a*log(2)^0.5 Gamma(x) is the gamma function Covariate effects may be modeled on the hazard 42 mle 2.1 manual Table 1. Command line options. Option Description –v Sets VERBOSE to TRUE so that an iteration history and other information is printed to standard output while solving a likelihood model. –h Provides help information about PDFs, functions, variables, constants, reserved words, and parameter transformations. When <name> is replaced by a PDF name, a transformation name, a function, or a predefined variable, a brief help message is given. If <name> is not a known topic, a list of topics is printed. –h <name> –H <name> Provides help information like –h, but matches anything that contains the string <name>. If <name> is not given, all help messages are given. –i Runs mle interactively. Commands are typed directly in from the keyboard. Using interactive mode is helpful for using mle as a probability calculator. Interactive mode is discussed later in this chapter. –p The program file is parsed for errors and not run. Sets the internal variable PARSE = TRUE. -I <path> Specifies a file system path to include while searching for include files (see command INCLUDE). -b Batch mode. Turns off keyboard monitoring (for interactive debugging) while executing models. -t Tells mle to watch for a termination file while solving a model, and if it is found, terminates solving the model at the end of the next iteration. -Sr Tells mle to read in values from the “start-file” to initialize start values for a MODEL statement. The start-file is automatically created by the –Sw option. -Sw Tells mle to write a “start-file” following each iteration during a MODEL statement. The values are read and used as “updated” start values when the –Sr option is used. -S A special flag equivalent to –Sr –Sw –t -v -af A flag used by the editor emle to interact with mle. –pn # ... mle supports various number formats (dates, times, Roman, etc.). This command line option takes a list of numbers, parses them, and reports the results. -vx Prints out a version number string. –dd Turns on data debugging, where details are printed as each observation is read from the data file and converted into a data set. Sets DEBUG_DATA = TRUE. –de Echos each character in the program file as it is being read. Sets DEBUG_ECHO = TRUE. –di Turns on debugging for the integration routines, so that a report for each integration call is written to the standard output. Sets DEBUG_INT = TRUE. –dl Turns on likelihood debugging, so that parameter estimates and an individual likelihood is written to standard output for every likelihood evaluation. Sets DEBUG_LIK = TRUE. –dp Turns on debugging while reading and parsing the program file. Sets DEBUG_PARSE = TRUE. –ds Turns on debugging for the symbol table routines, so that information is printed to standard output whenever variables and symbols are created or destroyed. Sets DEBUG_SYM = TRUE. –dx Turns on debugging while running (executing) the program file, so that a message is written to the screen just prior to executing each statement. Sets the internal variable DEBUG_EXEC = TRUE. –d # Sets the internal variable DEBUG to the value set by #. When # is greater than zero, debugging messages are printed. The nature and type of messages changes, and the output is used for program development. A value of 0 turns off debugging. 43 mle 2.1 manual which shows that there are two intrinsic parameters. Note that equations are given for the probability density, survival function, or hazard function. At least one of these is given for other PDFs as well. Here is another example: mle -h pi Symbol: PI{REAL Const Static} = 3.14159265359 And, a third example: mle -h besseli Function BESSELI(x1, x2) returns the modified Bessel fcn I (integer order x1) of real x2 The -h option provides summaries for a few topics. For example, mle -h FUNCTIONS, will list all of the intrinsic simple functions, and mle -h SYMBOLS which lists all variables in the symbol table. Typing mle -h functions | more is a useful way to examine all mle intrinsic functions because the more program will stop the display after each page of output is listed. The -H <name> option is similar to the -h option except that any function, variable, constant, or reserve word that includes <name> as some part of the reserve word is printed. The -H option is particular useful when you cannot recall the exact name for some keyword. Thus, mle -H integra lists all keywords with the string "integra": INTEGRATE INTEGRATE v is the expr1 is expr2 is expr3 is expr4 is v (expr1, expr2) expr3 END v (expr1, expr2, expr4) expr3 END variable of integration. evaluated for the lower limit of integration. evaluated for the upper limit of integration. the integrand, and may reference v. an optional convergence criterion INTEGRATE_METHOD = I_TRAP_CLOSED uses closed trapezoidal integration INTEGRATE_METHOD = I_TRAP_OPEN uses open trapezoidal integration INTEGRATE_METHOD = I_SIMPSON uses open simpson integration INTEGRATE_METHOD = I_AQUAD (default) uses adaptive quadrature integration INTEGRATE_N is the number of iterations (default: 100) INTEGRATE_TOL is the convergence criterion (default: 1.0E-0006) INTEGRATE_METHOD{INTEGER} = 3 INTEGRATE_N{INTEGER} = 100 INTEGRATE_TOL{REAL} = 0.00000100000 Debugging Options A number of command line options assist in debugging models, data files, program options, numerical methods, and the mle program interpreter itself (see Table 1). The -dx option provides a way of tracing the execution of each statement in turn. The -dl option is useful for examining likelihoods every time a complete likelihood is computed. More advanced debugging options assume some familiarity with the internal workings of parsers, symbol tables, and an advanced understanding of likelihood estimation. The di option offers help with debugging problems of numerical integration in mle. The debugging and help options send output to the screen (or standard output device). The standard DOS and Unix redirection symbols ">" and "|" can be used to redirect the output to other devices. For example, the command mle -d 25 test.mle > test.dbg will create a (possibly large) file called test.dbg. The output file specified within the test.mle program will not be affected. Other Options testing number formats mle supports many formats for numbers. Each number begins with a numeral, but can contain additional symbols to specify different meanings. A full discussion of the number formats is given in the data chapter. You can test the way in which mle reads numbers by using the -pn option. The command line mle -pn 8x3017 22'16" 12k returns 44 mle 2.1 manual "8x3017" is the integer 1551 "22'16"" is the real 0.0064771107796 "12k" is the real 12000.000000000 A list of all number formats is given with mle -h numbers Start-file options The –Sr and –Sw options work together to read and write temporary results to a file, called a start-file, while a MODEL statement is executing. When the –Sw option is used, the current parameter estimates are written at each iteration. The –Sr option will read the start-file and replace the START= parameter values with the start-file values. The purpose for using these options is to preserve intermediate results for models that take a long time to solve. For example, if a program will take weeks or months to solve, using these options can prevent the loss of work in the event the computer crashes. Batch options “Batch” refers to running programs in an unattended mode. Typically, batch mode is used when a user (or another program) starts running a program and then logs out. mle provides a few options that assist in running in a batch mode. The –b option turns off keyboard monitoring (for interactive debugging) while executing models. Normally, a user can interrupt mle while solving a model, and the interactive debugger can be used. However this can potentially lead to difficulties because the keyboard must be monitored. While running in a batch mode, the –b option turns off this monitoring and slightly speeds up execution. The termination file option –t tells mle to watch for a termination file while solving a model. The term file is given the same name as the program file name, but with a .trm file extension replacing the .mle. If the file is found, mle terminates solving the model at the end of the next iteration. interactive mode mle can be run interactively using the -i command line option. When run interactively, commands are typed directly into the command line. This option is particularly useful when mle is used as a "calculator", which is described in the last section of this manual. Of course, a full program can be written directly from the keyboard using this option. Calculator Mode mle can act like a calculator. In this mode, instead of a program filled with assignment statement, data statements, and model statements, a series of expressions are given to mle. The expressions are evaluated and the result is printed. This can be done either interactively (using the -i command line option) or by reading in a program file. This “calculator” mode is assumed when the first keyword of a program is not MLE. mle will then execute all subsequent commands as expressions to be interpreted. Here is an example 45 mle 2.1 manual c:\>mle -i sin(pi * 3) This is the user-defined expression 2.168404E-0019 And this is what was returned PDF normal(2, 3) 1, 2 end Compute the area under normal pdf from 2 to 3, µ=1, σ=2 0.1498822726114 resulting area INTEGRATE z (2, 3) PDF NORMAL(z) 1, 2 end end Expressions can be nested. Integrate for 2 to 3 a normal pdf with µ=1, σ=2 0.1498822847945 This should be close to the previous result gamma(3.8) Evaluates the gamma function 4.6941742051124 summation i (1, 10) 1/i^2 end Sum from 1 to 10, 1/i2 1.5497677311665 end Ends and returns to DOS In version 2 of mle, when using calculator mode interactively, there will always be a delay of one expression before the results is returned. This is because an expression can continue indefinitely. For example, the expression "SIN(2*pi)" followed by a carriage return does not complete the expression because the next line may be "+ 1/2". A new expression is needed to denote the end of the old expression. Thus, typing "1 pi 2" followed by a carriage return will result in two complete expressions (returning 1 and 3.1415926535898). The third expression is not yet complete. Note that if you begin mle with the options -i -v and begin typing expressions, the verbose result will show the entire expression in functional form (i.e. as a series of functions). For example c:\>mle -i -v sin(pi^2/4 + 1) expression returns SIN(ADD(DIVIDE(POWER( PI , This is the user-defined 2), 4), 1)) -> 46 -0.320074806512 mle 2.1 manual Chapter 3 Creating data sets As a first step in parameter estimation, a data set must be read in or created. This chapter discusses aspects of creating a data set, including • How to read a data set into mle • How to set up a data file • How to transform variables • How to drop unwanted observations • The number formats recognized by mle Reading data from a file Data sets are read into mle from an input file. They consist of at least one, and usually many, observations. Each observation is a collection of one or more variables. The mle DATA statement defines how observations are to be read from a file. The data statement also has mechanisms for doing transformations to the data as they are being read. In the current implementation of mle the transformations and other data manipulations provided by the data statement are adequate for most tasks, but are not particularly powerful. Other programs (spreadsheets or database managers, for example) can be used for complicated data transformations, and the resulting data set can be then used by mle. Naming the data file Data sets are created by a DATA statement. The data statement typically works by reading observations from a data file. This file must be named and opened with a call to the DATAFILE() procedure. The call to DATAFILE() is usually defined near the top of the program, before the DATA statement, as in the example in Chapter 1. The data statement begins with the word DATA and is terminated by a matching END. So, if the name of the data file is MYDATA.DAT, you include the statement DATAFILE("MYDATA.DAT") prior to the DATA statement. Full path names are permissible: you might call the DATAFILE procedure as DATAFILE("C:\STATS\MLE\BONES\DATAFILE.DAT"). 47 mle 2.1 manual The DATA statement The DATA...END statement reads in the data file. Within the DATA...END is a sequence of one or more variable names. Here is a simple DATA statement that creates three variables. DATAFILE("test.dat") DATA first_time FIELD 3 missing_data FIELD 4 last_time FIELD 1 END This example shows three components for defining each variable, the variable name, the key word FIELD and a field number. Variable name: Variables names begin with a letter and can then contain any combination of letters, numbers, the underscore, and period characters. A variable name may be up to 255 characters long and all characters are significant. Examples of valid variable names are: LAST_ALIVE, VARIABLE_14 , A_REALLY_LONG_VARIABLE_NAME, and A. Variable names are not case sensitive so the variable abc is the same as ABC and aBc. In the current version of mle, all variables created in the DATA...END statement are defined to be type real. This is so even if the number format suggests that the variable should be type integer. Integer values read from the data file are simply converted to real number values. Text strings can exist within a text file, but must not be assigned to a variable. mle pre-defines many built in constants and variables, so you should avoid variable names that exist for some other purpose such as an mle constant (a list of all variables appears in a later chapter). Likewise, mle uses the period as an internal delimiter for some purposes. Conflicts might arise if your variable names contain a period; you are free to use periods, but an underscore might be a better choice. Field: The word FIELD refers to which column within an input file a variable is found in. In the file used in Chapter 1, four fields (or columns) existed in the input file. The field specifier must be a positive integer constant. hammes.dat A number of other elements can be added to a variable definition as well. These are defined below, but the grammar used for specifying each variable is: <variable name> [FIELD x [LINE y]] [= <expr>] [DROPIF <expr> | KEEPIF <expr> ...] Line: Sometimes observations take up multiple lines in the data file. An example might be times to first birth for a married couple in which female characteristics appear on the first line and the male characteristics occur on the second line. When the LINE keyword is used, e.g. LINE 2, mle keeps track of the maximum number of lines specified this way. Then, all observations are assumed to have the maximum number of lines. If observations are each on one line, the statement LINE 1 may be dropped—one line per observation is assumed. The line specifier must be a positive integer constant. The remaining specification provides ways of transforming variables and dropping (or keeping) observations. The next several sections discuss transformations and gives additional examples of declaring variables in the DATA section. 48 mle 2.1 manual Dropping or keeping observations A series of statements to drop (or keep) individual observations from the input file can be specified as the last items in a variable declaration within the DATA statement. Here are some example of this: DATAFILE("test.dat") my_drop_value = 100 DATA first_time FIELD 3 missing_data FIELD 4 last_time FIELD 1 alt_missing END FIELD 5 DROPIF DROPIF KEEPIF DROPIF KEEPIF first_time <= 0 missing_data <> 1 last_time > 0 (last_time == INFINITY) OR (first_time < last_time) alt_missing == missing_data The DROPIF keyword specifies that a condition will be tested; if the condition is true, then the entire observation is dropped. The first DROPIF statement here specifies that the entire observation is to be dropped if first_time is less then or equal to zero. The KEEPIF keyword is like DROPIF except that the observation will be kept if the condition is true, and dropped otherwise. The grammar is KEEPIF <bexpr> and DROPIF <bexpr>, where <bexpr> is a boolean expression. A boolean expression is one that evaluates to true or false. Typically, boolean expressions use relational operators (>, >=, <, <=, ==, <>) and boolean operators (NOT, AND, OR, XOR). Functions that return boolean values can be used as well. Multiple KEEPIF and DROPIF statements can be used for a single variable. As mle reads in variables, each condition is tested in sequence, until the end of the tests are reached or the observation deemed dropped (that is, boolean short-circuiting will be used to drop variables at the first opportunity). The third example is a test that keeps the observation if last_time is greater then zero; the second test will examine if the value is equal to INFINITY (a built-in constant) or less than first_time, and drop the observation if either condition is true. Then, if the variable is to be dropped, the entire observation is dropped. Note that the value of other variables in the current observation may be used in a DROPIF and KEEPIF statement. Observation frequency Each observation in a data file (which typically occurs on a single line) is usually a single observation. Sometimes it is convenient to place multiple identical observations on a single line along with a count of how many observations are represented. The names FREQUENCY or FREQ have a special meaning when defined as variables in a DATA statement. They are taken as the frequency (or count) for each observation. (If both variable names are used, FREQUENCY is taken as the frequency variable). For example: DATAFILE("test.dat") DATA frequency FIELD 1 DROPIF frequency <= 0 start_time FIELD 2 last_time FIELD 3 END will take the first field in "test.dat" as the frequency for each observation. The maximizer will automatically use the frequency variable as a count of repeated observations. Transformations of data A number of simple data transformations can be made within mle. The transformations are done while the data are being read from the input file. Examples of transformations are: 49 mle 2.1 manual DATA event_time direction winglength estage END FIELD 5 = (event_time - 1900)*365.25 DROPIF event_time < 0 FIELD 6 = COS(direction) FIELD 8 = LN(winglength/2.25) = 3.7 + winglength*12.76 + winglength^2 * 1.14 Transformations begin with '=' which is followed by an expression. Expressions are discussed in great detail in the reference manual. Basically, expressions in mle are similar or identical to expressions found in other computer languages and spreadsheets. In the first variable declaration of the example, event_time is read in from the input file. That initial value of event_time is then used in the transformation, and a new value of event_time is computed as (event_time - 1900)*365.25. This result is assigned back to event_time. Following that, the DROPIF statement will conditionally decide whether or not the observation is to be dropped. Variables are read in the same order in which they are defined. This is true even if they are read over several lines. Once a variable is defined, its value can be used in later transformations. Then, when reading in the data file, mle will take the value of that variable for the current observation for use in the later transformation. An example might be: DATA subject_id births miscarriages abortions pregnancies END FIELD 1 FIELD 6 FIELD 8 FIELD 9 = births DROPIF subject_id =1022 DROPIF subject_id = 3308 DROPIF births = -1 DROPIF miscarriages = -1 DROPIF abortions = -1 + miscarriages + abortions KEEPIF pregnancies > 0 This data statement will read subject_id, then births, then miscarriages and then abortions. These variables will then be added together and assigned to the variable pregnancies. An observation will be dropped if any of births, miscarriages, or abortions are negative one (in this case, the "missing" code), or if two particular subject_ids are found, or if pregnancies = 0. Creating dummy variables Dummy variables (sometimes called indicator variables) are variables that take on the values 0 and 1 to denote two different states for an observation. A typical example is a dummy variable for an individual's sex, taking a 0 for females and a 1 for males. Frequently dummy variables are used to simplify a more complex continuous or ordinal variable. Maternal age, for example, might be measured as a continuous variable, but the characteristics of interest are teen mothers, mothers from 20 to 35, and mothers over age 35. Two dummy variables can be created from the continuous measure of age. The reference age group can be defined as mothers from 20 to 35. One dummy variable is created that takes on the value 1 for mothers under 20 and 0 otherwise. And the second dummy variable takes on a value of 1 for mothers over 35, and a 0 otherwise. Dummy variables are easy to create within the DATA statement. Suppose you are measuring the length of some study animal. You want to create four dummy variables for the length range short [0 to 30 mm)5, medium [30 to 40 mm) long [40 to 50 mm) and very long [50+ mm): 5 The [xxx, yyy) notation defines an interval that includes exact number xxx and up to, but not including yyy. 50 mle 2.1 manual DATA length is_short is_medium is_long is_verylong END FIELD 5 DROPIF length <= 0 = IF length < 30 THEN 1 ELSE 0 = IF (length >= 30) AND (length < 40) THEN 1 ELSE 0 = IF (length >= 40) AND (length < 50) THEN 1 ELSE 0 = IF length >= 50 THEN 1 ELSE 0 Skipping initial lines in the data file Data files may have initial descriptive lines at the top that must be skipped. The INPUT_SKIP variable controls how many lines to skip in a data file. For example, if the first four lines must be skipped, the line INPUT_SKIP = 4 should appear before the DATA statement. It will direct mle to discard the first four lines of the data file. The default value is zero so that no lines are skipped. Delimiters in the data file Data files consist of a series of text elements separated by one or more delimiters. One or more delimiters must appear between each record within a data file. The delimiters define the fields within each line in which variables reside. By default, the characters space, tab, and comma are treated as delimiters. You can redefine the delimiters by changing the variable DELIMITERS before the DATA statement. If, for example, you wanted the colon and semicolon character as the only valid delimiters, you would add the line: DELIMITERS = ":;" Creating observations without a file Sometimes it is useful to create observations, rather than reading observations from a file. For example, you can simulate data sets using the random number generator in mle. To create variables, simply set the variable CREATE_OBS to some positive number, prior to the DATA statement. That number of observations will be created. Here is an example CREATE_OBS SEED(8936) DATA var1 = var2 = var3 = END = 10 {create 10 observations} {set the random number generator seed} QUANTILE WEIBULL(RAND) 3.2, 2.5 END IRAND(100, 200) sin(pi*RAND) {draw variates from a Weibull(3.2,2.5) pdf} {draw discrete variates from a uniform} {sine-transformed variates} that yields the following data set: var1 2.6679777032 3.7136215828 3.8714564727 4.6521659697 2.5649275178 0.6017912164 2.6553390371 0.7412253145 2.7631538913 4.0772026291 var2 var3 157.0 0.9809586099 117.0 0.2439682743 173.0 0.7307000229 139.0 0.8642639946 197.0 0.8824737096 136.0 0.0966561712 136.0 0.3989167160 198.0 0.7812333882 185.0 0.3651667470 193.0 0.4812826931 51 mle 2.1 manual Printing observations and statistics Some other variables can be used to fine-tune the DATA statement. The variable PRINT_DATA_STATS, when set to TRUE, prints summary statistics for each variable, including the mean, variance, standard deviation, minimum and maximum. The default is TRUE, so this report can be suppressed with PRINT_DATA_STATS = FALSE. When PRINT_OBS is set to TRUE, each observation is printed to the output file. The report is printed after all transformations have been done. The default value is FALSE, so you must have the statement PRINT_OBS = TRUE to print the observations. The variable PRINT_COUNTS, when set to TRUE, prints out how many lines were read from the input file, how many observations were kept, and how many observations were dropped. The default value is TRUE, so these reports can be suppressed with PRINT_COUNTS = FALSE. The PRINT_BASIC variable, when TRUE directs that the title, parameter file name, input file name, and the count of variables to be read from the input file are printed. The PRINT_FIELDS variable, when TRUE, prints out the name of each variable and the field it is read in from the input file. An example of creating and reading a data file Data file are read as ordinary ASCII text files, which means they can be created with any text editor. Word processors can be used to create files as well, but the results must be saved as ASCII text file. Nearly all word processors provide an ASCII text option. An example of a typical data file can be seen in Chapter 1, but here we will examine a more complicated data file and write the mle program to read and process the file. The current version of mle creates variables of type real, and attempts to read real numbers from each field for which a variable is defined. Even so, any delimited text can appear in fields that are not assigned to variables. Consider how we would create a DATA statement to read the numeric values for the following file: Last Smith Jones Connor First,MI James,A David,J Mary Age 42 38 50 Amount 12000 8000 11000 More TRUE FALSE TRUE Rate 18% 12% 19% Time 4.2 3.1 2.1 First of all, notice that the first line of the file is a comment. Clearly, we do not want mle to treat this line as an observation, so we can discard the line by setting INPUT_SKIP=1. From there, the data file has one line per observation, with each variable corresponding to one column (meaning that we will not need to use the LINE specification here; Some data files place each observation across multiple lines, so that the LINE option in the DATA statement must be used). This sample data file consists of seven fields delimited by space characters. Since the space character is one of the default delimiters, we do need to change the DELIMITERS variable to recognize the space as such. But, since we have commas embedded in the text that should not to be taken as a delimiter, we must redefine DELIMITERS to exclude the comma and include the space (and the tab character, if necessary). The numeric values appear in fields 3, 4, 6, and 7. 52 mle 2.1 manual We do not need to do anything with fields 1, 2, and 5. Let suppose that we want to convert Time from years into months. Here is the complete mle code to read and process this file (but no analyses are specified): MLE DATAFILE("THEDATA.DAT") PRINT_OBS = TRUE {print out each observation} INPUT_SKIP = 1 {get rid of the header line} DELIMITERS = " " {spaces only--treat commas as text} DATA age FIELD 3 amount FIELD 4 DROPIF amount <= 0 rate FIELD 6 {% is a legal number suffix in mle} time FIELD 7 = time*12 END END Running mle on this file produces the output to the screen (or standard output) since no OUTFILE procedure was called. Here are the results: Table 2. Standard metric/SI suffixes (Taylor 1996) and IEC suffixes for integer and real numbers. Suffix Name Conversion Suffix Name Conversion da Deka ×10 d deci ×10-1 h Hector ×102 c, % centi, percent ×10-2 k Kilo ×103 m milli ×10-3 M Mega ×106 µ, u micro ×10-6 G Giga ×109 n nano ×10-9 T Tera ×1012 p pico ×10-12 P Peta ×1015 f femto ×10-15 E Exa ×1018 a atto ×10-18 Z Zeta ×1021 z zepto ×10-21 Y Yotta ×1024 y yocto ×10-24 Ki Kibi ×210 Mi Mebi ×220 Gi Gibi ×230 Ti Tebi ×240 Pi Pebi ×250 Ei Exbi ×260 53 mle 2.1 manual 3 lines read from file THEDATA.DAT 3 Observations kept and 0 observations dropped. NAME 1 2 3 age 42.0000000 38.0000000 50.0000000 amount 12000.0000 8000.00000 11000.0000 rate 0.18000000 0.12000000 0.19000000 time 50.4000000 37.2000000 25.2000000 MEAN VAR STDEV MIN MAX 43.3333333 37.3333333 6.11010093 38.0000000 50.0000000 10333.3333 4333333.33 2081.66600 8000.00000 12000.0000 0.16333333 0.00143333 0.03785939 0.12000000 0.19000000 37.6000000 158.880000 12.6047610 25.2000000 50.4000000 Accessing observations Variables created by the DATA statement are treated somewhat differently than are other variables. The value of a particular variable changes depending on a counter that keeps track of the current observation. The value of a variable for the current observation is accessed by specifying the variable name. What determines the current observation? Within MODEL statements, the current observation is usually set by the DATA function. Internally, the DATA function loops through all observations and sums the individual likelihood computed for each observation. The LEVEL and LEVELDELTA functions work in similar ways. Here are more specific details on how the individual observations are accessed. Consider the variables read in the example above. When the DATA function is specified with a model, a variable called D_IDX is initialized to the value of 1. When D_IDX is 1, any reference to the DATA variables returns the value of the first observation. Thus, the variable age yields the value 42. As each likelihood (within the DATA function) is computed, the value of D_IDX is incremented up to the last observation. The total number of observations read by DATA statement is accessed by the variable N_OBS. This variable is assigned the count of lines of observations read in (assuming one line per observation) and kept (i.e. not dropped). However, this variable is incorrect if a single line represents more than one observation. For example, if the FREQUENCY variable is defined and some observations have frequencies other than one, the N_OBS will no longer represent the correct number of observations. Another variable, TOTAL_OBS, is the sum over all FREQUENCY observations, and can be used as a count of the total number of observations. Internally, variables are stored as special array variables. Whenever a data variable name is specified, the value of D_IDX is used as the index into the array. All observations are easily accessed outside of the DATA, LEVEL, or LEVELDELTA functions by directly manipulating D_IDX. Here is an example that builds on the previous example. The following code, which is placed after the DATA statement, counts and prints the number of observations under and over the age of 40: lessthan40 = 0 greaterthan40 = 0 FOR D_IDX = 1 TO N_OBS DO IF age >= 40 THEN greaterthan40 = greaterthan40 + 1 ELSE lessthan40 = lessthan40 + 1 END {if} END {for} WRITELN(lessthan40, " < 40 and ", greaterthan40, " >= 40") 54 mle 2.1 manual Number formats The mle language primarily works with numbers. With this in mind, a wide variety of number formats, including some automatic conversions, are supported. The standard formats for real and integer numbers are recognized, so that "3.14159", "-12.14" and "0.001" are read as would be expected. Real numbers must have a digit both before and after the decimal point, so ".23" is not valid but "0.23" is. Real numbers can be specified in scientific notation so that "2.1E-23", "0.3E12", "-1e4", "12345e-67" are valid numbers. Table 3. Standard number formats. Format Examples D 1, 200 integer d.d, d. 3.1415, 3. real ds, -ds, d.ds, -d.ds, 14%, 23.7M, 45.7da, 2n, 2.418E Metric / other suffix (Table 2) real dEd, dE-d, d.dEd, d.dE-d, 3e23, 511E-10, 31.416e-1, 7.0E-10, 12.e-6, 1.45E-3, 1.0E0 Standard exponential format. real 0Rv 0RXLVII, 0rMXVI, 0rmdclxvi Roman numerals to integer integer dXy 2x1001 (binary), 8X3270 (octal), 16xA4CC (hex), 32x3vq4h (base 32). Converts y from base d (from 2 to 36) into integer. integer d:d:d, d:d:d.d, d:d, d:d.d 10:42, 14:55:32, 10:40:23.4, 16:53.2 24-hour time into hours. Hours must be 0-24. real d:d:dAM, d:d:dPM, d:d:d.dAM, d:d:d.dPM, d:dPM, d:dAM, d:d.dAM, d:d.dPM 10:42AM, 2:55:32pm, 10:40:23.4am 12-hour time with AM and PM suffixes into hours. Hours must be 0-12. real dHd'd", dHd'd.d", dHd', dHd.d'', dHd.d'' 230h16'32", 14H32'6", 100h22', 30H32.2', 0h12', 0H12'3" Degree/hour minute, second format. Converted to real angle/time. real d`d'd", d`d'd.d", d`d', d`d.d'', d`d'd", d`, d.d`, d°d'd", d°d'd.d", d°d', d°d.d'', d°, d.d° 230`16'32", 14`32'6", 100`22', 30`32.2', 14`, 230°16'32", 14°32'6", 270°10'0", 30°18.2', 3.4° Degree, minute, second format, converted to radians. real d'd", d'd.d", d', d.d', d", d.d" 12'32", 166'12.9", 19', 14.7', 12", 607.3" Minute-second and second format, converted to radians. real d_d/d 12_5/16, 3_2/3, 0_1/7 Fraction notation. real dDdMdY 16d12m1944y, 1D6M1800Y Date converted to Julian day integer dMdDdY 12m16d1944y, 6M1D1800Y Date converted to Julian day integer dYdMdD 1944y12m16d, 1800Y6M1D Date converted to Julian day integer Dmmmy 14Dec1999, 30jun1961, 1MAY1944 Date converted to Julian day integer d.Ed, d.E-d Conversion Result xEy ⇒ x × 10 y d is a strings of one or more positive digits; s is a one or two character case-sensitive metric or percent suffix (see Table 2), v is a string of one or more Roman numeral digits {IVXLCDM}, y is a string of one or more characters, mmm is a 3-character English month name. E.g. jan, Feb, MAR, etc. The degree character (°) is available on some hardware platforms as ASCII code 230. On many Intel platforms, holding down the <ALT> key and typing 230 on the numeric keypad gives the degree character. The Greek letter micro (µ) is available on some hardware platforms as ASCII code 248. On many Intel platforms, holding down the <ALT> key and typing 248 on the numeric keypad gives this character. 55 mle 2.1 manual Less common formats include numbers with metric and percent suffixes, numbers interpreted as times, numbers in an angle notation (one format that converts degrees to radians), numbers in bases from 2 to 36, Roman numerals ("why?" you ask. Why not!), numbers in fraction notation, and several date formats. These formats are supported in data files as well as numeric constants within an mle program. Table 3 is a comprehensive list of formats recognized by mle , and Table 2 is a list of suffixes permissible on standard integer and real format numbers. 56 mle 2.1 manual Chapter 4 Building Likelihood Models The MODEL statement is at the heart of parameter estimation. It specifies the likelihood, defines parameters, and specifies which parameters are to be estimated. A complete understanding of how models are built in mle requires an understanding of the structure of the MODEL statement, an understanding of parameters and how they are specified, an understanding of how expressions are specified and are built into likelihoods, and an understanding of the specification for running models. This chapter discusses the MODEL statement. It is assumed that you understand the basics of expressions and data types for the mle language. The reference manual and Chapter 1 provides much of the necessary background on expressions. This chapter covers several aspects of expressions that are primarily used for building typical likelihood models in mle: the PARAM function, the PDF function, the DATA function, and LEVEL functions. Structure of the MODEL Statement The basic structure of the MODEL statement looks like this: MODEL <expression> RUN [THEN … END] <runlist> END The single <expression> in the MODEL statement defines the likelihood that is to be maximized. Technical details about writing expressions are given in the Reference manual; some details are provided here as well. The optional THEN…END clause gives you a way to do something after each model is solved. For example, you could insert code to transform the parameters from one form into another, plot distributions, or write results to another file. Most legal statements can come between the THEN and END (except DATA…END and MODEL…END statements). The <runlist> is a series of one or more commands that specify which of the parameters are to be changed in maximizing the likelihood. The commands are FULL, REDUCE, or WITH. A simple example Here is an example of a simple model for finding the two parameters of a normal distribution from a series of intervalcensored observations. Suppose there are N interval-censored observations. The interval in which events occur fall between 57 mle 2.1 manual the times topen and tclose. The goal is to estimate the parameters µ and σ of the normal distribution (we will use mu and sigma as parameter names). The likelihood needed for this problem looks like this: N L = ∏ S (topeni | µ, σ) − S (tclosei | µ, σ) i =1 where S(t) is the survival function for a normal distribution. The mle program for this likelihood looks like this: {1} MODEL {2} DATA {3} PDF NORMAL(topen, tclose) {4} PARAM mu LOW = 5 HIGH = 14 {5} PARAM sigma LOW = 0.1 HIGH = 5 {6} END {pdf} {7} END {data} {8} RUN {9} FULL {10} END START = 8 END START = 1.2 END Everything beginning with the DATA function on line 2 to the END on line 7 is a single expression that defines the likelihood. The DATA function corresponds to the product in the likelihood. It loops through all data and evaluates the expression nested within it for each observation. The expression PDF NORMAL(topen, tclose)…END defines the area under a normal distribution in the interval [topen, tclose). Finally, the PARAM functions tell mle that mu and sigma are the parameters in the model that are to be changed in pursuit of maximizing the likelihood. Values for the parameters mu and sigma will be tried until those that maximize this likelihood are found. The word FULL between RUN and END tells mle that all parameters defined in the likelihood—in this case mu and sigma—are to be manipulated in order to maximize the likelihood. Alternatively, the REDUCE or WITH keywords can be used in place of FULL. Another example The expression that defines the likelihood within a model statement can become much more complicated than the first example. Consider the following likelihood: N { }. L = ∏ p S (topeni | µ1 , σ1 ) − S (tclosei | µ1 , σ1 ) + (1 − p) S (topeni | µ 2 , σ 2 ) − S (tclosei | µ 2 , σ 2 ) i =1 This is the likelihood for a mixture model, in which observations are drawn from two distributions (that is, two different sets of parameters for the same distribution), and mixed at some fraction p. This type of model arises when one cannot tell which of the two distributions observations are drawn from. An example might be a collection of people heights with no information on the sex of each individual. Even without such information, the proportion of each sex can be treated as a latent variable, and sex-specific parameters can be estimated along with the proportion. This more complicated likelihood can be coded as follows: 58 mle 2.1 manual MODEL {mixture of two normal distributions} DATA MIX( PARAM p LOW = 0 HIGH = 1 START = 0.5 END , PDF NORMAL(topen, tclose) PARAM mu1 LOW = 5 HIGH = 14 START = 8 END PARAM sigma1 LOW = 0.1 HIGH = 5 START = 1.2 END END {PDF} , PDF NORMAL(topen, tclose) PARAM mu2 LOW = 0 HIGH = 6 START = 2 END PARAM sigma2 LOW = 0.01 HIGH = 5 START = 1.2 END END {PDF} ) {mix} END {data} RUN FULL END {model} Here, again, the <expression> begins with the DATA function and ends with a matching END just before the RUN. Within the DATA function, the MIX function is immediately called, and the MIX function contains three arguments separated by commas. Each of these three arguments contains an expression. Here, we see one parameter p (a mixing proportion) and two function calls: PDF...END. Within each PDF...END, two parameters are defined. The model contains a total of five parameters. The FULL keyword specifies that all parameters will be estimated. Runlist Parameters that are defined with the PARAM…END function can be free parameters, and therefore estimated as part of maximizing the likelihood. Alternatively, they can be constrained for the purpose of hypothesis testing or otherwise modifying the model. Parameters may be held constant, or fixed to the value of another parameter. These are called fixed parameters, and an estimate will not be found for them when the likelihood is maximized. The <runlist> in mle provides the mechanism to specify a series of one or more models containing different combinations of free and fixed parameters. For example, in the mixture model likelihood above, we may have reason to believe that the proportion parameter (p) ought to be 0.5. Perhaps this is because of the nature of the system being modeled. We could first fit our collection of t values to the model with parameter p free, and secondly fit it with p held constant to 0.5. Statistical criteria (a likelihood ratio test, Akaike’s Information Criterion, or a Walt test) can then be used to determine whether p deviates from the value 0.5. The run list defines which parameters are free and allows the user to test reduced models. The run list begins with the word RUN and ends with a matching END. Between the RUN and the END comes a list that specifies how the model is to be run. Each model can be run with a different combination of free and fixed parameters. Generically, a runlist looks like this: RUN FULL REDUCE <reducelist> WITH <withlist> ... END [THEN … END] [THEN … END] [THEN … END] 59 mle 2.1 manual FULL When FULL is specified, all model parameters defined with the PARAM…END function are taken to be free parameters and estimated. Only one FULL is usually needed for a model. REDUCE The REDUCE keyword provides a mechanism to constrain some parameters of the model. The REDUCE keyword is followed by a list of constraints. All parameters of a model will be considered free except those constrained in the <reducelist>. Parameters may be constrained to other parameters, to constants or to variables. More than one REDUCE keyword may occur in a single run list. The <reducelist> is a set of one or more constraints that look like assignment statements. Parameters so constrained will not be estimated. Consider the following likelihood: N L = ∏ f (ti | µe sexi ×βsex , σ) . i =1 This likelihood estimates the effect of the variable sex on the mean of a distribution. Suppose f(t) is a normal distribution. This likelihood would be written as largeeffect = -1.9 MODEL DATA PDF NORMAL(topen, tclose) PARAM mean low=5 HIGH=500 START=100 FORM=LOGLIN COVAR sex PARAM b_sex LOW=-5 HIGH=5 START=0 END END {param} PARAM stdev LOW=0.001 HIGH=25 START=10 END END {pdf normal} END {data} RUN FULL {Runs the model with no constraints} REDUCE b_sex = 0 {One constraint} REDUCE mean = 100 b_sex = 0 {Constrains 2 parameters} REDUCE b_sex = largeeffect {Fixes sex to another param or variable} END Notice that there are four versions of the model that will be estimated. The first case (FULL) estimates all three parameters (mean, b_sex, and stdev). The second case constrains the parameter b_sex to 0 (no effect), so that only two parameters are estimated. The third case constrains the parameter mean 4 and b_sex to 0, so that only one parameter is estimated. The forth REDUCE constrains b_sex to the value of a variable. WITH The WITH keyword provides a mechanism to include certain parameters in a model. The WITH differs from the FULL and REDUCE keywords because a single WITH command can generate more than one model. The WITH keyword is followed by a list of parameters to always include in each model. Additionally, a list of parameters can be specified that will be used to create a series of models. More than one WITH keyword may occur in a single run list. The <withlist> is a list of parameters. Parameters are listed in one of two ways. Parameters listed outside of parentheses are included in every model. Parameters listed in within parentheses are included in some models, but not others—essentially, all permutations of models are generated from parameters listed in parentheses. 60 mle 2.1 manual Here is an example. Suppose the likelihood of interest specifies a logistic regression model with three covariates: N 1 L = ∏ B t , i =1 1 + exp ( β0 + β1 x1i + β2 x2i + β3 x3i ) . B(t, p) is a Bernoulli trial with parameter p; the function returns p whenever t is 1 (success) and returns 1 – p when t is 0 (failure). This likelihood has four parameters. β0 defines the baseline probability of success. β1 to β3 are the effects of covariate x1 to x3 on the baseline probability, respectively. A natural way of estimating this model is try every permutation of covariates, and take the most parsimonious of the models. Here is a likelihood that will do just that. MODEL DATA PDF BERNOULLITRIAL(success) PARAM b_0 LOW = -500 HIGH = 500 FORM = LOGISTIC COVAR x1 PARAM b_1 LOW = -10 HIGH = 10 START = 0 END COVAR x2 PARAM b_2 LOW = -10 HIGH = 10 START = 0 END COVAR x3 PARAM b_3 LOW = -10 HIGH = 10 START = 0 END END {param} END {pdf} END {data} RUN WITH b_0 (b_1 b_2 b_3) END {model} The single WITH keyword creates a total of eight models. All of the models include the parameter b_0. And, all models will be created from the list (b_1 b_2 b_3). Here is the equivalent list of models that will be estimated from this single WITH statement. MODEL ... RUN WITH b_0 b_1 WITH b_0 b_1 WITH b_0 b_1 WITH b_0 b_2 WITH b_0 b_1 WITH b_0 b_2 WITH b_0 b_3 WITH b_0 END {model} b_2 b_3 b_2 b_3 b_3 The use of parameters within parentheses in the <withlist> raises the issue of the number of models that will be created. Since each parameter has two states (included and not included), there are 2K models formed, where K is the number of parameters given in parentheses. The practical use of WITH in this way depends on how quickly a single model solves. With eight parameters, there are 256 models estimated. At 10 parameters, the number is 1024, and 15 parameters yields 32768 models. THEN…END Each of the keywords FULL, REDUCE, and WITH can be followed by an optional THEN…END clause gives you a way to do something a particular model is solved (or set of models for WITH). For example, you could insert code to transform the parameters from one form into another, plot distributions, or write results to another file. Most legal statements can come between the THEN and END (except DATA…END and MODEL…END statements). 61 mle 2.1 manual Bayesian model averaging The WITH keyword can generate many models from a single line of text. Ideally, the uncertainty of estimating multiple models can be taken into account. mle supports Bayesian model selection and Bayesian model averaging. Accessible introductions to these topics can be found in Burnham and Anderson (1998) and Raftery (1995). The following show how to enable Bayesian model selection and the types of model selection are supported: AIC_SELECT = TRUE AICC_SELECT = TRUE BIC_SELECT = TRUE {selects via Akaike’s information criterion (AIC)} {selects via sample-size corrected AIC} {selects via Bayesian information criterion (BIC)} When any of these three variables are set to TRUE, Bayesian model averaging will be conducted according to the criterion. Bayesian model averaging uses certain assumptions to find relative probabilities that each of the models is the true model or the best fitting model. A final set of parameters (estimated according to the best overall model) is computed, and a second set of standard errors are computed that is an average over all models, weighted by the probability of each model. The standard errors contain a component of variability from model-selection uncertainty and a component for uncertainty of the parameter estimates. See Burnham and Anderson (1998:325). Results The output report from a mle MODEL statement consists of a number of smaller reports. Most reports can be enabled or disabled by modifying variables. Some examples are: parameter estimate reports, the variance-covariance matrix, a list of the individual likelihoods for each observation, and tables of distributions, Bayesian model averaging reports, etc. This section describes the output options and how to direct the output to a file. Defining the output file mle defines a special file that is used for the results of DATA and MODEL statements. The OUTFILE is used to define where the results will be sent (otherwise they are sent to the screen). A number of variables control the format of the output. Typically, an program used to estimate a likelihood model contains a line like the following near the top of the program: OUTFILE("analysis.out") {writes to the file analysis.out} As an alternative to specifying the file name explicitly, the function DEFAULTOUTNAME can be called. This function will use the name of the program to automatically generate an output file name. Suppose you run the command mle myprog.mle. The statement OUTFILE(DEFAULTOUTNAME) Will create a file called myprog.out for the output. Standard Error Report A report with estimated standard errors is printed when PRINT_SE = TRUE. The parameters will be written with an estimate of standard errors. By default standard errors are written to the output file. Whenever standard errors are reported, a variance-covariance matrix will be estimated. If the matrix is singular (which can happen for a number of reasons), the standard errors are +∞. When the variable PRINT_SHORT = TRUE, the report format is modified so that all parameters estimates are printed on one line. 62 mle 2.1 manual Variance-covariance Matrix The estimated variance-covariance matrix is printed by setting PRINT_VCV = TRUE. The number of elements of the matrix printed on a single line is normally 5, but can be changed by modifying the value of VCV_WIDTH. The asymptotic variance-covariances of maximum likelihood estimates are found by inverting the local Fisher's information matrix I for the n parameters: −∂ 2l −∂ 2l E 2 L E ∂θ1θn ∂θ1 I = M O M −∂ 2l −∂ 2l E L E 2 ∂θnθ1 ∂θn The expectations are, ideally, taken at the true parameter values. In practice, we have parameter estimates, not the true values. Hence, numerical estimates of the information matrix, Iˆ , are found by plugging in parameter estimates, θ̂ . An estimated variance-covariance matrix is then ˆ = Iˆ −1 . estimated as V mle uses two different estimates for the variance-covariance matrix. Either one or both methods may be used by setting INFO_METHOD1 or INFO_METHOD2 to TRUE or FALSE. The default method (INFO_METHOD1=TRUE) computes the variance and covariance matrix by inverting Nelson's (1983) approximation to the Fisher's information matrix. The xth, yth element of that matrix is computed ˆ xy = as Ε ∏ ( ∂L / ∂x )( ∂L / ∂y ) , using the standard perturbation method for approximating the i i i partial derivative. Appropriate sizes for ∆x and ∆y are iteratively computed for each parameter. mle initially uses a ∆x (and ∆y) of DX_START and then iteratively finds a ∆x that changes the loglikelihood by at least DX_TOOSMALL but no more than DX_TOOBIG. Up to DX_MAXITS such iterations are permitted. The default values are almost always suitable. The one serious limitation of this method is that it does not work well for hierarchical likelihoods. The second estimate of the variance-covariance matrix is computed by estimating the second partial derivative by numeric perturbation. This method does not truly compute an expectation, and is sometimes inaccurate—you can compare the two methods by setting both INFO_METHOD1=TRUE and INFO_METHOD2=TRUE. Nevertheless, when hierarchical likelihoods are being computed, this method will produce better estimates. Confidence Interval Report An approximate confidence region for each parameter can be estimated by mle. The report is printed when PRINT_CI = TRUE. When the variable PRINT_SHORT = TRUE, the report format is modified so that all parameters estimates are printed on one line. The confidence interval is defined as the extent of upper and lower perturbations away from the estimates that change the loglikelihood by a specified amount. For example, approximate 95% confidence intervals are formed when the change in the loglikelihood in each direction is 5.0239. This value corresponds to an expected probability of 0.025 on each tail of the chi-squared distribution with one degree of freedom. Over both directions, the total interval can be considered a 95% confidence interval for the parameter. 63 mle 2.1 manual The interpretation of the one-dimensional confidence region must be done with caution, as the method assumes that parameters are uncorrelated. Figure 4 shows what happens when parameters are correlated (which is quite common). Panel a. shows the contour of the loglikelihood surface when parameter 1 is changed over the p1 axis, and parameter 2 is changed over the p2 axis. The bold ellipsis represents the desired confidence level (say, 95%). The dotted lines show the confidence limits when p1 is perturbed along the axis to each side of the estimate; this occurs where the bold ellipse intersects the p1 axis. Panel b. shows what happens when parameters are correlated. Now, the dotted lines still show the 95% confidence limits when p1 is perturbed from the estimate and p2 is held constant at its maximum. The dashed lines show the true confidence region defined as the greatest extend of the 95% confidence ellipse over the space of p1 and p2. It is easy to see that the one-dimensional confidence interval will always underrepresented the true interval p1 and p2 are correlated. p2 p2 p1 p1 a. b. Figure 4 The log likelihood contour over the space of parameters p1 and p2. The bold ellipse represents the target change in likelihood that defines the upper and lower bounds of the confidence interval. Panel a: uncorrelated parameters, where the one dimensional change in likelihood is identical to the change over both parameters. Panel b: correlated parameters where the change in likelihood (dotted lines) is less than the change in likelihood over both parameters (dashed lines). Given the limitation of these confidence intervals, why use them? There are several cases where they are helpful: • • When a single parameter is being estimated. In some models where parameters are statistically independent, like while estimating the location and scale parameters of a normal distribution. There are circumstances when the variance-covariance matrix is singular. For example, this happens when one or more parameters are collinear and don’t independently contribute information to a likelihood. Under these circumstances, the confidence intervals are helpful for identifying poorly identified parameters so that the model can be modified to eliminate collinear parameters. The confidence intervals are found iteratively in one dimension at a time. For each of the limit pairs, mle first evaluates the likelihood at the extremes LOW + CI_LIMIT_DELTA and HIGH + CI_LIMIT_DELTA. Convergence occurs when the difference between the likelihood at the parameter estimate and the confidence limit estimate is equal to CI_CHISQ, down to an absolute error of ±CI_CONVERGE. The maximum number of iterations for each of the limits is CI_MAXITS. 64 mle 2.1 manual Report with no standard error or confidence intervals At times, it is desirable to print parameter values without standard errors or confidence intervals. This can be done by including the assignment PRINT_PARAMS = TRUE. This will print out an additional report with parameter estimates. Additionally, PRINT_SE and PRINT_CI can be set to FALSE so that neither confidence intervals nor the variance-covariance matrix are computed. When the variable PRINT_SHORT = TRUE, the report format is modified so that all parameters estimates are printed on one line. Printing Distributions The values of all survival function, the probability density function and the hazard function can be tabulated for each PDF function in the likelihood. To do so, set PRINT_DISTS = TRUE. All distributions that are in the model will be tabulated. The tabulation starts at value DIST_T_START, ends at the value DIST_T_END, and is tabulated for DIST_T_N equally spaced points. The mean values of data variables (e.g. covariates) are used when computing the distributions. For example, to print the SDF, PDF, and hazard function at 101 points from 0 to 100 use the following code: PRINT_DISTS DIST_T_START DIST_T_END DIST_T_N = = = = TRUE 0 100 101 {print out distributions} {lowest value to print} {highest value to print} {number of points to print} Other Printing Options The MIN_SIGNIFICANT variable controls the minimum number of significant digits in each numeric field of the confidence interval and standard error reports. More significant digits are displayed if there is room. If the number of leading zeros becomes too large, that number will be printed in scientific notation (e.g. 1.2343E-56). The variable PRINT_INFO, when TRUE, directs mle to print basic information about the model, including the method being used, the maximum number of iterations, the maximum number of function evaluations, and the criterion for normal convergence. The PRINT_FREE_PARAMS variables, when TRUE¸ directs mle to print a list of all free parameters and the attributes of those parameters. The variable PRINT_LLIKS controls printing of the individual likelihoods in a model. When set to TRUE, the likelihood and frequency for each observation will be printed to the output file. Variables created by models mle creates variables in order to access the results from previous runs (either within or outside of the MODEL statement). Each MODEL statement is numbered (beginning with 1) in the order in which they are found in the program. Furthermore, each run of the model, defined by the FULL or REDUCE statement, is numbered beginning with 1 for each MODEL. The following variables are created: 65 mle 2.1 manual <param>.<m>.<r> <param>.LOW.<m>.<r> <param>.HIGH.<m>.<r> <param>.START.<m>.<r> <param>.UCI.<m>.<r> <param>.LCI.<m>.<r> <param>.SE.<m>.<r> LOGLIKELIHOOD.<m>.<r> FREE_PARAMS.<m>.<r> DELTA_LL.<m>.<r> ITERATIONS.<m>.<r> EVALS.<m>.<r> VCV_EVALS.<m>.<r> CI_EVALS.<m>.<r> INVERTFLAG.<m>.<r> CONVERGENCE.<m>.<r> VCV.<m>.<r> where <m> is the model number and <r> is the run number for the model, and <param> is the name for a free parameter in the model. Each VCV.<m>.<r> is an n×n matrix where n is the number of free parameters, which is available in FREE_PARAMS.<m>.<r>. The variable INVERTFLAG.<m>.<r> is a boolean variable that specifies whether or not the variance-covariance matrix was inverted without error. Each CONVERGENCE.<m>.<r> variable has an integer value that takes on a value given in Table 4. Table 4. Meaning of the CONVERGENCE variable. Value Meaning 0 Not done 1 Stopped after maximum function evaluations 2 Stopped after maximum number of iterations 3 Converged normally 4 Trouble converging in one dimension 5 Starting value is not within min and max bounds 6 Starting temperature is not positive 7 Did not converge Building MODEL statements Expressions are used in many ways within mle, so that you should become thoroughly acquainted with expressions before attempting to develop mle programs. The likelihood within a MODEL statement is a single (sometimes complicated) expression. Expressions are used to define limits of integration, summations, and products, they can be used to define START, HIGH, LOW, and TEST values for parameters, and many other things. This section briefly discusses expressions and functions, and then provides some details on functions of special interest when building likelihood models. The reference manual should be consulted for summaries of expressions and descriptions of all functions defined in mle . At the simplest level, an expression in mle can be a numerical constant or a variable name. More complex expressions consist of algebraic operators (*,^,+, etc.) and function calls each with zero or more arguments. Most functions in mle are simple functions with a fixed number of arguments, for example: PERMUTATIONS(x, y), ARCSIN(x), ABS(x), MIX(p, x, y). 66 mle 2.1 manual A second class of functions are more complex, and have a more complicated syntax. These functions begin with a keyword, and end with an END. Examples of some of these functions are the PARAM...END function, DATA...END function (not to be confused with the DATA END statement described in a previous chapter), the PDF...END function, the INTEGRATE a (b, c)...END function, and the IF THEN...ELSE...END function. Suppose you want to integrate sin(x2 + 2x) from -√π to √π. Here is an example of how that could be coded: INTEGRATE x (-SQRT(PI), SQRT(PI)) SIN(x^2 + 2*x) END. (The function evaluates to ≈ -1.525). Here it is with comments: INTEGRATE x ( -SQRT(PI), SQRT(PI) ) SIN(x^2 + 2*x) END {x is the variable of integration} {This is the lower limit of integration} {This is the upper limit of integration} {Close of the argument list} {The function to be integrated} {End of the integrate function} Any of the predefined probability density functions can be used as part of an expression. For example, the area under a normal distribution with µ=10 and σ=3, between 8 and 12, could be calculated by PDF NORMAL(8, 12) 10, 3 END The DATA function The DATA...END function provides a mechanism to "feed" observations to the likelihood. This function specifies that observations are to be "fed" to the likelihood one at a time, corresponding to the product (∏) over all observations shown in likelihoods (or the Σ shown in loglikelihoods). The DATA function loops through all observations that were previously read in by the DATA statement. In other words, the DATA...END function returns the total logloglikelihood or total likelihood, given a series of observations and an expression for an individual likelihood or individual loglikelihood. The general form for the DATA function is: DATA <optional_form> <expression> END where optional_form is one of • FORM • FORM = SUM • FORM = PROD — This takes the log of each individual likelihood and sums the loglikelihoods over the data. A likelihood (rather than a loglikelihood) is specified for <expression>. This is the default value if no <formtype> is specified. = SUMLL or FORM = SUMMATION — Sums loglikelihoods over the data without first taking the log. This is used when a loglikelihood is specified rather than a likelihood for <expression>. or FORM = PRODUCT — Takes the product of likelihoods over the data and does not take the log of the likelihood. This is used when a likelihood (rather than a loglikelihood) is specified for <expression> and some function appears outside the data function that takes the log. Here are three models that yield the same overall likelihood function, but uses different forms for the DATA function: 67 mle 2.1 manual MODEL DATA FORM = SUMLL {the default form} PDF NORMAL(topen tclose) PARAM mu LOW = 10 HIGH = 100 START = 30 END PARAM sigma LOW = 0.0001 HIGH = 10 START = 1 END END {pdf} END {data} RUN FULL END {model} MODEL DATA FORM = SUM {The loglikelihood is specified} LN(PDF NORMAL(topen tclose) PARAM mu LOW = 10 HIGH = 100 START = 30 END PARAM sigma LOW = 0.0001 HIGH = 10 START = 1 END END {pdf} ) END {data} RUN FULL END {model} MODEL LN( DATA FORM = PRODUCT {The likelihood is specified} PDF NORMAL(topen tclose) PARAM mu LOW = 10 HIGH = 100 START = 30 END PARAM sigma LOW = 0.0001 HIGH = 10 START = 1 END END {pdf} END {data} ) RUN FULL END {model} In theory, these three models will yield identical results. In practice, results may differ slightly because of round-off errors. This will be most noticeable in the last model, because the product of very small numbers will lead to smaller and smaller numbers before the log is taken of the entire likelihood. There are several reasons for providing these three ways of specifying how the data is used within the likelihood: Some likelihoods are much easier to write as a loglikelihood. • • Some likelihoods require things like taking an expectation outside of the individual likelihoods, where the integration is done outside of the data function. Some multilevel or hierarchical likelihoods require this type of control over the likelihood. There are two functions that are closely related to the DATA function: the LEVEL function and the LEVELDELTA funciton. These two functions provides a mechanism by which multilevel or hierarchical models can be constructed. The PARAM function mle has a general method for defining all parameters to be used in a likelihood model.6 The PARAM function defines a parameter and its characteristics. The function should only be used within a MODEL statement. When models are “solved”, free parameters are estimated by iteratively plugging new values in for those parameters until the values that maximize the likelihood are found. In other words, free parameters are values that are to be estimated by mle —they are the unknowns in likelihood models. When the MODEL statement is run, mle will estimate the value of 6 The word parameter is used in a very specific way, as defined in Chapter 1. Parameters are the quantities to be estimated in a likelihood model 68 mle 2.1 manual that parameter, unless the parameter is constrained to some fixed value in the REDUCE part of the model statement. In the simplest case, parameters are specified as PARAM <p> HIGH = <expr> LOW = <expr> START = <expr> TEST = <expr> FORM = <formspec> END where <p> is the name chosen for the parameter. The keywords HIGH, LOW, START, and TEST specify characteristics for the parameter. HIGH and LOW specifies the minimum and maximum value allowed for the parameter. mle will not exceed these values while trying to maximize the likelihood. START tells the maximizer what value to start with. TEST denotes the value against which to test the parameter for significance. By default, TEST is zero. It is used for a Wald test as the parameter is being written to the output file. Additionally, this is the value that the parameter is constrained to when left out by the WITH command. Setting Parameter Information Five characteristics may be set for each parameter. They are: 1) the highest possible value that can be tried for the parameter, 2) the lowest possible value that can be tried for the parameter, 3) an initial value for the parameter, 4) a test value against which the parameter will be tested when standard errors are computed, and 5) a form for the parameter that defines simple algebraic transformations and the mathematical from for incorporating covariates. The following model statement defines all five characteristics for the parameters of a beta distribution: MODEL DATA PDF BETA(p) PARAM a LOW = 0.5 PARAM b LOW = 0.5 END {pdf} END {data} RUN FULL END {model} HIGH = 10 HIGH = 10 START = 1 START = 1 TEST = 1 TEST = 1 FORM = NUMBER FORM = NUMBER END END The two parameters of the beta distribution are limited to the range 0.5 to 10, whereas, mathematically, they are only restricted to positive values. The TEST = 1 specifies that the parameter will be tested against one instead of the default value of zero, after standard errors for the parameters are found. The START value of one simply gives mle a starting place that falls within the LOW and HIGH values. Use care when setting the HIGH and LOW limits. Most importantly, limits must be constrained to valid ranges for the intrinsic parameters. Thus, for the MIX mixing proportion parameter (the first of the three parameters) then, HIGH = 1 and LOW = 0, should be defined as is appropriate for a probability—unless some FORM like FORM = LOGISTIC is used to constrain the resulting parameter to between 0 and 1 for estimates from -∞ to ∞. Sometimes it is useful to impose narrower limits, perhaps to avoid getting hung-up at a local maximum or to solve the model more quickly. Be careful, though. Limits that are too narrow may exclude the global maximum—after all, the best parameter estimates for a set of data are presumably unknown. Excessively narrow limits may cause problems when numerical derivatives for the variance-covariance matrix are computed, as well. Also, likelihood confidence intervals will bump up and stop at the limits you set. The TEST = xxx part of a PARAM function provides a value against which the parameter will be tested (in some reports). In a sense, the TEST value is a null hypothesis value (h0). The test performed is t = ( pˆ − ho ) / SE ( pˆ ) , where p̂ is the maximum likelihood parameter estimate and 69 mle 2.1 manual SE ( pˆ ) is the standard error for the parameter estimate. The Wald test is provided for convenience only. mle does not make use of the test in any way. Modeling Covariate Effects The PARAM function allows covariate effects (and their associated parameters) to be modeled within the parameter statement. This is done as follows: PARAM x HIGH = <expr> LOW = <expr> START = <expr> TEST = <expr> COVAR <expr> PARAM z .HIGH = ... END COVAR <expr> PARAM z .HIGH = ... END ... END {param} FORM = <formspec> With covariates, the <expr> following COVAR is a covariate effect. Typically this is a variable like age, sex, income, etc. The effect of the covariate is multiplied by the value of the PARAM function that follows. The way in which covariates and parameters are modeled is discussed in more detail below. Here is an example of a likelihood hand-coded for an exponential PDF for exact failure times. PARAMs and built-in simple functions, and algebraic expressions are all shown in this likelihood: MODEL DATA PARAM lambda LOW = 0 HIGH = 1 START = 0.23 END * EXP(-lambda * t) END RUN FULL END Notice that lambda is first defined as a parameter, and thereafter is used as an ordinary variable. As mle iteratively seeks a solution, new values of lambda will be tried. As the likelihood itself is being computed, the PARAM function will simply return the current estimate of lambda. An alternative way to code this example is to define the parameter first and assign it to another variable: MODEL PREASSIGN lam = PARAM lambda LOW = 0 HIGH = 1 START = 0.23 END DATA lam*EXP(-lam*t) END {data} END {preassign} RUN FULL END {model} The PREASSIGN function is described in another chapter. In the next example, five parameters are defined, two each for the two PDF functions and one parameter that was added for the first argument to the MIX function call. Typically, parameters are defined for the intrinsic parameters of a PDF function. For example, the normal PDF has two intrinsic parameters µ and σ. The first parameter specified in the parameter list will be treated as µ. The second will be treated as σ. How can you know the proper order for parameters? Generally location parameters appear first (and are usually denoted a in this manual), scale parameters are second and shape parameters are third. You can get a quick synopsis of each type of PDF by using the -h option from the command line, e.g.: mle -h SHIFTWEIBULL 70 mle 2.1 manual Parameters are also used to model effects of covariates on other parameters. Here is an example in which two parameters, used in place of some fixed values of µ and σ for a normal distribution, are defined with two covariate parameters, each: PDF NORMAL(topen tclose) PARAM mean LOW = 100 HIGH = 400 START = 270 TEST = COVAR sex PARAM b_sex_mu LOW = -2 HIGH = 2 COVAR weight PARAM b_weight_mu LOW = -2 HIGH = 2 END PARAM stdev LOW = 0.1 HIGH = 100 START = 20 FORM COVAR sex PARAM b_sex_sig LOW = -2 HIGH = 2 COVAR weight PARAM b_weight_sig LOW = -2 HIGH = 2 END END 0 FORM = LOGLIN START = 0 END START = 0 END = LOGLIN START = 0 END START = 0 END In this example, the first parameter of the normal distribution (µ) has two covariates and their corresponding parameters modeled on it. The exact specification of how covariates and their parameters are modeled depend on the FORM of the intrinsic parameter. In the example, the FORM = LOGLIN specifies that a log-linear specification is to be used. The log-linear specification is µi = µ’exp(xiβ), where µ’ is the estimated intrinsic parameter (mean in this case). Thus, for the ith observation, the µ parameter of the normal distribution will be constructed as: µi=mean×exp(sexi×b_sex + weighti×b_weight). The second parameter, stdev, has the same two covariates modeled on it, but the parameter names are (and must be) different from the parameters modeled on mean. For some forms, the parameter itself is transformed. For example, when a parameter is a probability (as it is for the MIX function in above) the parameter can be defined as: PARAM p LOW = -999 HIGH = 999 START = 0 FORM = LOGISTIC END The logistic transformation permits the parameter p to take on any value from negative infinity to infinity, but the resulting value passed used by the likelihood will be constrained to the range (0, 1). In other words, mle will estimate a parameter over the range –999 to 999, but before that parameter is used in computation, it will undergo a logistic transformation as p = 1/[1 + exp(p’)], so that the value of p will be a probability. mle currently provides a limited number of specifications for how parameters and covariates are modeled (see the Reference Manual). Even so, this mechanism for modeling covariates on any parameter is extremely general and provides the basis for building unique and highly mechanistic (Box et al. 1978) or etiologic (Wood 1994) models. The PDF functions One of the most frequently used functions in the MODEL statement is the PDF function. The purpose of the PDF function is to specify the component of a pre-defined probability density or distribution functions. Although the name is PDF, the PDF function can return the probability density function, areas under the PDF curve including the cumulative and survival density functions, and the hazard function. In addition, the PDF function can return areas or densities that are left and right truncated. The structure of the PDF function call is: PDF <PDF name> ( <time variable1>, <time variable2>, ... ) <intrinsic parameter 1>, <intrinsic parameter 2>, ... <optional HAZARD> END The name following PDF is the name of the built-in distribution. mle predefines over 60 density functions, including most well-known ones like the normal, lognormal, weibull, gamma, beta, and exponential distributions. A complete summary of built-in distribution is given in a later chapter. 71 mle 2.1 manual Time variable list is a list of the time arguments passed to the PDF. Most univariate PDFs can take from one to four ‘time’ arguments.7 In fact, these four times describe a single observation in such a way as to incorporate a number of defects in the observation process, including right censoring, left truncation, right truncation, cross-sectional observations. A description of how the four arguments combine to specify a probability are given in the section that follows. Note that the time arguments can be any expression, so that time shifts and transformations can be incorporated in this list. Intrinsic parameter list provides specifications for the PDF’s intrinsic parameters. The order that the intrinsic parameters are specified is important; it corresponds to how the PDF is defined within mle.. The PDFs chapter lists the order for intrinsic parameters; alternatively, the command line mle -h can be used to determine the proper argument order. Note that any expression can be used for an intrinsic parameter. That is, you do not need to use a PARAM function for the intrinsic parameters, although this is the most common use. Here is an example in which the location parameter is fixed to a constant for a shifted lognormal distribution: PDF SHIFTLOGNORMAL ( tooth_eruption_age ) 9, {shift the time back to conception} PARAM location LOW = 1 HIGH = 4 START = 2.5 END, PARAM scale LOW = 0.0001 HIGH = 3 START = 0.9 END END PDF Time Arguments Most PDFs can have as few as one and as many as four time arguments specified. They are: tu, the last observation time before an event; te, the first observed time after the event; tα, the left truncation time for the observation or the PDF; and tω, the right truncation time for the observation or the PDF. Understanding how these four times act on the PDF statement is critical to creating the desired and proper likelihood. 7 These are called time variables in the context of survival analysis; however, they may represent other measurements (length, dose, height, etc.). 72 mle 2.1 manual Table 5. Likelihoods returned by PDF for one, two, three, and four time variables under different conditions. The Log Normal distribution is used as an example. Example When Class Resulting Likelihood LNNORMAL(te) 1 arg. Exact failure at te L = f ( te ) LNNORMAL(tu, te) tu=te Exact failure at tu=te L = f (tu ) = f (te ) LNNORMAL(tu, te) te=oo Right censored or cross-sectional non-responder at tu te < tu ∞ L = ∫ f ( z )dz = S (tu ) tu LNNORMAL(tu, te) tu = 0 Cross-sectional responder at te te L = ∫ f ( z )dz = F (tu ) 0 LNNORMAL(tu, te) LNNORMAL(tu, te, tα) tu ≠ te tu = t e Interval censored over the interval (tu, te). Includes, as a limiting case cross-sectional responder and right-censored. Left-truncated exact failure te L = ∫ f ( z )dz = S (tu ) − S (te ) tu L= ∞ f (tu ) = ∫ f ( z )dz f ( tu ) S (tα ) tα LNNORMAL(tu, te, tα) tu ≠ te Left-truncated, interval censored failure L= S (tu ) − S (te ) ∞ = ∫ f ( z )dz S (tu ) − S (te ) S (tα ) tα LNNORMAL(tu, te, tα, tω) tu = t e Left- and right-truncated, exact failure L= f (te ) tω = ∫ f ( z )dz f ( te ) S (tα ) − S (tω ) tα LNNORMAL(tu, te, tα, tω) tu < t e tα ≤ tu Left- and right-truncated, interval censored failure L= S (tu ) − S (te ) tω = ∫ f ( z )dz tω ≥ te S (tu ) − S (te ) S (tα ) − S (tω ) tα LNNORMAL(tu, te, tα) tu=te=tα Hazard L == f (tu ) = h(tu ) S ( tu ) LNNORMAL(tu, te, tα, tω) tu=te=tα Right-truncated hazard L == f (tu ) = h(tu ) S (tu ) − S (tω ) PDFs contribute to likelihoods in a number of ways. In survival analysis, for example, the likelihood for an exact failure time is given by the value of the PDF at the exact point of failure. For a right censored observation, the likelihood is given by summing up (integrating) all possible PDF values from the last observation time until the maximum possible time. The likelihood for a cross-sectional “responder” is the integral from zero to the time of first observation. Table 5 lists the likelihoods that result from the four time variables for different conditions. For example, when tu=te or when only one time variable is specified, mle returns the density at tu. This is the desired likelihood for an exact failure. Likelihoods for right and interval censored observations, with and without left and right truncation are given in Table 5. 73 mle 2.1 manual The Hazard Parameter For most parametric distributions (like the normal or lognormal distributions) the hazard function does not take on a simple or closed form. For this reason, most studies have modeled the covariates as acting on the failure time for these distributions. Nevertheless, there is no inherent reason why hazards models cannot be constructed using distributions without a closed form for the hazards functions. Most of the PDFs included in mle provide a general mechanism for covariates to be modeled as affecting the hazard of failure, rather than (or in addition to) affecting intrinsic parameters. Here is an example: PDF NORMAL(topen tclose) PARAM mean LOW = 100 HIGH = 400 START = 270 TEST = 0 FORM = LOGLIN END, PARAM stdev LOW = 0.1 HIGH = 100 START = 20 END, HAZARD COVAR sex PARAM b_sex LOW = -2 HIGH = 2 START = 0 END COVAR weight PARAM b_weight LOW = -2 HIGH = 2 START = 0 END END The covariates sex and weight are modeled to effect on the hazard of failure. Parameters b_sex and b_weight provide estimates of the effect. The HAZARD statement always provides a proportional hazards specification modeled directly on the hazard of the PDF. Usually, the specification is loglinear, so that the hazard for the ith observation including the covariate effects defined as hi (ti |xiβ) = h(ti )exp(xiβ), where h(t) is the baseline hazard for the specified PDF, and xiβ is a vector of covariates xi and parameters β, so that xiβ = xi1β1 + xi2β2+ xi3β3 . . . . Then, the survival function becomes Si (ti |xiβ) = S(ti)exp(xβ), and the probability density function becomes fi (ti |xiβ) = f(ti )S(ti)exp(xβ)–1exp(xiβ). This particular hazards model specification is commonly used. By exponentiating the xiβ array, the covariate effects will never cause the hazard to go negative (hazards are never negative). A multiplicative form for the proportional hazards specification can also be specified by setting the constant EXP_HAZARD = FALSE (it is TRUE by default). Then, the model is hi(ti|xiβ) = h(ti)xiβ, S(ti|xiβ) = S(ti)xβ , and f(ti|xiβ) = f(ti)S(ti)xβ–1xiβ. You must insure that xiβ never goes negative. The LEVEL function The LEVEL function provides a mechanism by which multilevel or hierarchical models can be constructed. The syntax of the LEVEL function is LEVEL <boolean expression> THEN <optional_form> <expression> END The effect of the LEVEL function is to test the <boolean expression> for each observaton and, while the condition is true, form the sum of loglikelihoods out of the observations. The <optional_form> provides alternative ways of tallying the likelihoods, and is specified as it is for the DATA function, save for one difference:The default form is .FORM = PRODUCT. The best way to understand the effect of the LEVEL command is by an example. Consider the likelihood N ω ni L = ∏ ∫ g ( z ) ∏ f (ti , j | θ, z) dz . i =1 α j =1 This is a standard model for which a distribution of clustering (or heterogeneity), g(z), is estimated along with the model's other parameters (θ). There are two levels that make up this model. Let us call the outer level, denoted by the outer product, the subject level—that is, we have N individual subjects and this outer product is taken over all subjects. For each of N 74 mle 2.1 manual subjects, there are multiple repeated observatons taken. For the ith subject, we have ni repeated observations. The inner level formed by the innermost product is the likelihood formed by ni repeated observations of the ith subject. The rationale for this type of model is that the repeated observations for individuals violate the condition that the likelihoods for each observation are independent. To fix this problem, we can compute an expected likelihood for each individual’s observations. The integral computes the expected likelihood for each subject. Here is a concrete example Say we have data in which levels are denoted by the number 1 or 2 as in 1 Tom Smith 2 23.4 26.8 . . 2 19.2 22.9 . . 2 26.8 -1 . . 1 Steven Jones 2 19.5 23.7 . . 2 26.8 -1 . . 1 Martin Johnson 2 0 44.1 . . 2 19.9 22.7 . . 2 19.9 -1 . . ... . . . . . . . . where the observations beginning with a 2 correspond to the individual at the preceding 1, so that Tom Smith has three observations beginning 23.4, 19.2, and 26.8. If we were to treat all observations, within and among individuals, as independent, we could simply drop all of the level 1 lines, and form a likelihood as the product of all observations. But, if we want to treat observations within individuals as correlated (non-independent), the we can integrate over a distribution of common effects as shown in the likelihood above. Usually, we will estimate one or more parameters for the distribution g(z), in addition to θ. If we assume that g(z) and f(t) are normal distributions, the likelihood in mle would be specified as MLE DATAFILE("example.dat") OUTFILE("example.out") DATA lev FIELD 1 topen FIELD 2 tclose FIELD 3 END MODEL DATA LEVEL lev = 2 THEN INTEGRATE z (-12, 12) PDF NORMAL (z) 0, PARAM sigmaz LOW = 0.0001 HIGH = 3 START = 0.2 END END {pdf} * PDF NORMAL(topen tclose) PARAM mu LOW = 10 HIGH = 100 START = 30 END PARAM sigma LOW = 0.0001 HIGH = 10 START = 1 END HAZARD COVAR z 1 END {pdf} END {integrate} END {level} END {data} RUN FULL END {model} END {mle program} 75 mle 2.1 manual The LEVEL statement advances through all of the individual level observations and computes the product of the likelihoods for each individual. The DATA statement only "sees" observations that begin with a 1, because the LEVEL statement "consumes" all of the observations that begin with a 2. The LEVEL statement returns a likelihood, which is the product of likelihoods taken within each subject; the DATA statement takes those likelihoods, one per subject, takes the natural log of each, and sums them over all subject. The LEVELDELTA function The LEVELDELTA function is very similar to the LEVEL function. LEVELDELTA provides a mechanism by which multilevel or hierarchical models can be constructed. The syntax of the LEVELDELTA function is LEVELDELTA <expression> THEN <optional_form> <expression> END The effect of the LEVELDELTA function is to evaluate <expression> for each observation and, while the expression does not change, form a product of likelihoods out of the observations. The <optional_form> is specified as it is for the DATA function, but with one difference: the default form is .FORM = PRODUCT. The only real difference between the LEVELDELTA and the LEVEL function is how each function decides when to "exit" the current level. The LEVELDELTA function simply looks for a change in the value of <expression> whereas LEVEL evaluates a boolean function <bexpr> for each observation and terminates when the expression evaluates to FALSE. In the example given under the LEVEL function, the only change necessary to use the LEVELDELTA function is replace the LEVEL line with LEVELDELTA lev THEN Here is an example program uses the LEVELDELTA function. The program estimates the change in oxygen consumption (∆V02) in individuals undergoing repeated exercise tests, using a variety of predictor variables like the increase in heart rate over the resting state. Since there are repeated measures on individuals, a distribution of individual effects is estimated along with other parameters. The likelihood is N L=∏ ∞ mi ∫ g ( z | 0, σ )∏ f (v i =1 −∞ z z k =1 v ik | µ + x'ik ß + z , σ) dz Where gz(z) is the distribution of individual effects, with a mean of zero and a variance of σz2, fv(v) is the distribution of ∆V02 values with parameters β, µ, and σ. 76 mle 2.1 manual MLE { -- does a linear regression w/ repeated measures model} DATAFILE("example.dat") OUTFILE(DEFAULTOUTNAME) DATA subject sex age weight height armcirc skinfold deltahr deltav02 END {data} FIELD FIELD FIELD FIELD FIELD FIELD FIELD FIELD FIELD 1 2 3 4 5 6 7 8 9 {subject ID} {individual’s sex 0=female, 1=male} {individual’s age} {individual’s weight} {individual’s height} {mid-upper arm circumference} {individual’s skinfold measurement} {heart rate adjusted for baseline rate} {volume of 02 used during exercise adjusted for baseline} MODEL PREASSIGN BEGIN sigz = PARAM sigmaz LOW = 0.001 HIGH = 50 START = 1 END upperlim = 6*sigz lowlim = -upperlim END, DATA INTEGRATE z (lowlim, upperlim) PDF NORMAL(z) 0, sigz END * LEVELDELTA subject THEN PDF NORMAL(deltav02) PARAM b0 LOW = -200 HIGH = 50 START=0 FORM=ADD COVAR sex PARAM bsex LOW=-10 HIGH=50 START=0 END COVAR age PARAM bage LOW=-10 HIGH=50 START=0 END COVAR weight PARAM bweight LOW=-10 HIGH=10 START=0 END COVAR height PARAM bheight LOW=-10 HIGH=10 START=0 END COVAR armcirc PARAM barmcirc LOW=-10 HIGH=10 START=0 END COVAR skinfold PARAM bskinfold LOW=-10 HIGH=10 START=0 END COVAR deltahr PARAM bdeltahr LOW=-10 HIGH=10 START=0 END COVAR z 1 END {param b0} PARAM sigma LOW = 0.00001 HIGH = 50 START=5 END END {pdf normal} END {leveldelta} END {integrate} END {data} END {preassign} RUN WITH sigmaz b0 sigma (bsex bage bweight bheight barmcirc bskinfold bdeltahr) END {model} END {mle} Setting the maximization method mle has four methods for maximizing the likelihood function. Each of the methods has strengths and weaknesses for different types of functions. Understanding some of the details of each method is useful for deciding which to use for any given application. The following sections describe each of the maximizers and points out strengths and weaknesses of each. The behavior of some methods can be modified considerably by the user. The maximization method is selected by setting the variable METHOD. For example, METHOD = ANNEALING will use the simulated annealing method. The default method is DIRECT. The overall goal of function maximization is to find the set of parameters that maximize a function. A simple analogy is to imagine that you are looking at a topographic map that codes altitude by color. You want to find the longitude and latitude coordinates (the "parameters") that will put you at the highest point on the map. By looking over the map, you may be able to 77 mle 2.1 manual quickly ascertain a mountain peak or some other maximum. In order to do this, however, you effectively scanned hundreds of thousands of points on the map until finding those places where the colors suggest the highest altitude. With a little more work, the highest peak is easily resolved. Visual evaluation of maximum elevation is easy and takes almost no time because the map shows the elevations evaluated at hundreds of thousands of points on the map, and our eyes can quickly scan those points. That is, each "function" evaluation was inexpensive—we merely had to look at a point to know its value. Now imagine that the map surface is covered by a piece of paper. You can only expose a tiny hole in the map in order to read the color at that point (that is, to evaluate the function at that point). Furthermore, each hole takes a long time to cut, perhaps minutes or hours. Then the question becomes this: how do we find the maximum elevation of the map in the shortest possible time? The map analogy will be used to understand how different computer algorithms finds the maximum of a likelihood surface. Many different function maximization methods have been developed at least since Isaac Newton developed methods out of the calculus. Nevertheless, no single method has emerged as superior for all types of problems. In general, function maximization is easiest to do when information is available for the derivative of the function. A traditional way of finding maximum likelihood parameters for simple functions is to symbolically find the derivatives of the function with respect to each free parameter. Each partial derivative is set to zero. This set of equations is collectively called the likelihood equations. Since the derivatives are defined as the slope of the function, it follows that any place where all the partial derivatives go to zero must be a minimum or a maximum of the function. If practical, the likelihood equations are "solved"; that is, the sets of parameter values are analytically found that simultaneously yields zero for each of the partial derivatives. The maximum likelihood estimates for a parameter is found from a particular series of observations by simply applying that equation on the set of observations. Unfortunately, this method is difficult and non-general and, therefore, not practical for general-purpose maximization as found in mle. Advances in computer-assisted symbolic mathematics (packages like Maple and Mathematica) may eventually prove this method feasible for many users, but the need for specialized mathematical knowledge and skills still limits this method. A general method must work for most types of likelihood functions, whether or not analytical derivatives are easy (or even possible) to find. Another class of fast maximizers estimates derivatives numerically. These methods are not robust for complex surfaces with many local maxima. From some starting point, they tend to rush up to the top of the nearest local maximum. A given function may have one or many points where the derivatives goes to zero, so this method may not find the global maximum. Numerical derivatives have limitations resulting, in part, from the inaccuracy of real number representation in computers, so that a number of derivative-free methods have been developed. One clever method solves a two dimensional maximization problem by trying to enclose the maximum within a triangle. The triangle grows and shrinks based only on information from the three points of the triangle at a given step. A rather unsophisticated method alternates between maximizing the function first by longitude, using as many evaluations as needed to find the maximum longitude for a given latitude, and then does the same for latitude. By repeating this many times, a maximum (usually the global maximum) is found. Needless to say, this method can be very slow. Finally, a newer method has been developed that mimics natures own maximization method. The method can be slow, but seems to be as robust at finding the global maximum as any iterative method. Conjugate gradient method The conjugate gradient method searches through parameter space for combinations of parameters where the slope of the likelihood function goes to zero. Now, the computer numerically computes a slope (or gradient) using the equation mi = [f(xi + ∆xi) – f(xi]/∆xi, for parameters x and 78 mle 2.1 manual small values ∆x. This procedure uses the slopes (mi) to figure out the next set of x under the idea that the slope will decrease as the maximum is approached (unless the surface is flat). The conjugate-gradient method used in mle was developed by Powell (1964), Brent (1973), and further developed by Press et al. (1989). For problems of more then two free parameters, the conjugate gradient method is usually much faster than the direct method. Caution must be exercised when using this method. At times a local maximum is latched onto by the solver and the rest of the parameter space is excluded. Furthermore, some conditions can cause the maximizer to leap to another part of the surface, where a local minimum might be reached. For example, when maximizing a likelihood function that includes numerical integration, the tolerance in the integrator must be several orders of magnitude smaller than that of the solver, or else the error in integration can lead the solver astray. Two forms of the conjugate gradient method are available, METHOD=CGRADIENT1 and METHOD=CGRADIENT2. Simplex The simplex method is a derivative-free maximization method described by Nelder and Mead (1965) and popularized by Press et al. (1989). The method is set with METHOD=SIMPLEX. Direct Method A simple method for finding a maximum is to consider only one dimension at a time. So, for our map, we would find the highest latitude for a given longitude by examining points along a line of longitude. We could use the method of bisection or even better ways to find the maximum along that line of longitude in the fewest number of evaluations (i.e. fewest holes). Once we have settled on a latitude, we can find the longitude of highest elevation along that latitude. We next go back and find a new latitude for the new longitude, etc. This is known as the direct method (Nelson 1983), and works well for some functions over a small number of dimensions. In fact, the method is usually more robust at finding a global maximum than the simplex or congugate gradient methods. Furthermore, it is easy to constrain the algorithm so that new parameter values never overstep the user-defined (or mathematically defined) limits—that is, it respects the boundaries of our map. Unfortunately, the number of function evaluations goes up as an exponent of the number of dimensions in the problem. When the number of parameters gets large, the solution is very slow in coming. Furthermore, some functions that have the maximum along a long narrow ridge at a 45° angle to the lines of longitude and latitude require a large number of tiny movements before reaching the maximum. The direct method and is set by METHOD=DIRECT. It uses the HIGH = value and LOW = values to constrain all parameters (as discussed below). The START = values define the initial starting parameters. The direct method uses Brent's (1973; see also Press et al. 1989) parabolic interpolation to find the maximum along a single direction (i.e. for a single parameter holding all other parameters constant). The maximizer uses the HIGH = value and LOW = value to define the extreme bounds of the problem. The START = value is the first "guess" at the maximum. A parabola is then fit through the set of three points, and the maximum is analytically computed. This procedure is repeated with the three points enclosing the maximum until the maximum in that dimension is found to some prespecified tolerance. There are three ways you can modify the Brent maximizer. First, the maximum number of iterations in a single dimension can be set with BRENT_ITS = value, which is sufficient for almost every function. The next modification is to change the value of BRENT_MAGIC to some other number. This number defines the interpolation point between two 79 mle 2.1 manual points of a parabola—the so-called golden mean of ancient Greece. With such a heritage, there is little reason to change it. Finally, the value BRENT_ZERO is an arbitrary tiny number used in place of zero for the difference of two equal function evaluations. Simulated Annealing Method The simulated annealing method is an exciting and relatively new idea in maximization. It was first proposed by Kirkpatrick et al. (1983) for combinatorial problems. The algorithm was further developed for functions of continuous variables by Corana et al. (1987) and refined by Goffe et al. (1994); both papers lucidity describe how the method works. As a metal is heated to its melting point, it loses its crystalline organization. Then as it again cools, the crystalline pattern reemerges. When cooled slowly, a process called annealing, small crystals of metal rearrange themselves and join other crystals with maximum orderliness (or minimum energy). This occurs as random movements of atoms and groups of atoms eventually fall into an alignments that minimize gaps. Once these structured alignments arise, they form a larger crystal and are subsequently less likely to fall out of alignment. As the temperature drops and the atoms move around less, large overall changes in structure become less probable. When absolute zero is reached, the structure becomes fixed (at room temperature, solid metals continue to anneal very slowly). Rapid cooling of the metal, called quenching in metallurgy because the metal is thrust into cool water or pickle, does not provide sufficient time for crystals to move about and organize. Thus, numerous vacancies and dislocations exist among many small crystals, and orderliness is minimal. Maximizing the crystalline order (or minimizing vacancies and dislocations) is done by cooling the metal very slowly and providing ample opportunity for the random crystal movements to fortuitously align themselves into more ordered structures. The simulated annealing method attempts to mimic the physical process of annealing. An initial "temperature" is set, and a cooling rate is specified. New parameters are randomly chosen over a large range of the parameter space. As the temperature cools, smaller and smaller ranges of the parameter space are explored. Additionally, the maximizer will not always travel up hill. At any given temperature, a certain fraction of downhill moves will be taken so that local maxima will not trap the maximizer. The advantage of simulated annealing over other methods is that it is very good at finding the global maximum, even in the presence of highly multimodal likelihood surfaces. The user can fine tune the behavior of the algorithm so that functions with complex topography can be searched more thoroughly for the maximum. Another advantage of simulated annealing is that it does not require computation of derivatives. In fact, simulated annealing can find the maximum of discontinuous functions and those otherwise without first derivatives. Finally, the simulated annealing algorithm is extremely simple and intuitive. The disadvantages of simulated annealing are that it usually takes from one to several orders of magnitude more function evaluations than do other methods and the user must have an understanding of the algorithm to set up initial parameters that lend themselves to efficient estimation. Sometimes it is worth experimenting to find the best combinations of input parameters to the simulated annealing algorithm so as to minimize the total number of function evaluations. Simulated annealing begins at some user-defined temperature (T) and a user-defined rate of cooling (r). At the end of one cycle of annealing, the temperature is reduced as T = T×r, and a new cycle of annealing is performed. Typically the temperature will be 1 for simple function to 100,000 for difficult functions, and it is cooled every cycle by r = 0.85. When the algorithm begins, the starting point is evaluated and becomes the best value, so far. Each iteration will then search the likelihood surface in a partially random way and always keep track of the best point so far. A single cycle of annealing (i.e. one iteration) consists of the following. First, a cycle of random movements is started. Nrand random steps are taken over one direction at a time. The 80 mle 2.1 manual maximum width of the random step for parameter i is controlled by the step length variable vi. For our map example, this would correspond to evaluating Nrand randomly picked points along a line of longitude or latitude. Initially we would use the entire height and with of the map for the maximum step length. As each point is evaluated, we keep track of the overall best maximum. Any time we find a point higher than our current maximum, we move to that point and consider it our new starting point. But, if a lower point is found we might accept that point according to the Metropolis criterion (Metropolis et al. 1953) by which the point is accepted with probability exp(–∆l/T), where ∆l is the difference between the current starting point and the downhill point we have just evaluated. In other words, we draw a uniform random number on [0, 1), and accept the move if that number is less than a negative exponential survival function of ∆l, with parameter 1/T. This criterion means that at high temperatures we will frequently accept downhill moves with large changes in the loglikelihood, but as temperature drops, downhill moves will only occur at small changes in the loglikelihood. After completing the Nrand movements and evaluations, we now adjust the maximum steplength vector v. The reduction or increase in steplength is done according to the proportion of accepted and rejected movements by an algorithm described in detail below. In short, the maximum step length is reduced or increased so that we can expect to accept about one half of all moves in the next cycle of random steps. Following this adjustment, a new cycle of random steps is initiated until a total of Nadj of these adjustments have been completed. Thus, after Nrand×Nadj function evaluations, a single iteration completes, and a new iteration is begun until convergence, the maximum number of iterations is reached, or the maximum number of function evaluations is reached. The simulated annealing method is set by METHOD=ANNEALING. The method does use the HIGH = value and LOW = values to constrain all parameters (as discussed below). The START = values define the initial starting parameters. A number of other variables should be set with this method. Since the simulated annealing method uses random numbers, the user must set a random seed, by calling the procedure SEED() with a positive integer. The starting temperature is set with SA_TEMPERATURE. The default value is 1000.0, which is too high for all but extremely wild functions. It is difficult to know what a good starting temperature is for a function, but values under 100 empirically seem to work for all but the most topographically complicated likelihood functions. When a likelihood is to be solved multiple times on similar data sets, like when running on bootstrapped data sets, it is worth exploring a couple of different temperatures and monitoring the progress of the annealing by using the verbose (–v) option. In fact, watching the entire annealing process is useful for developing and understanding of the algorithm. The variable SA_COOLING controls the cooling rate, and is 0.85 by default. Too high a value will slow down cooling and may lead to unnecessary evaluations, whereas too low a value may resulting in (simulated) quenching. The number of steps of random parameter perturbation is set using SA_STEPS. The number of step length adjustments taken every iteration is controlled by SA_ADJ_CYCLES. Finally, the size of each step adjustment can be controlled by SA_STEPLENGTH_ADJ, but the default value of 2.0 usually works well. The simulated annealing algorithm uses a different criterion for convergence than do the other solvers. An array of the best likelihoods of size SA_EPS_NUMBER (default is 4) is created and updated every iteration. Convergence is considered achieved when the likelihood for the current iteration differs from all SA_EPS_NUMBER likelihoods by the value of EPSILON. Several other variables can be used for fine tuning of the simulated annealing algorithm, but there is rarely a need to mess with them. SA_STEPLENGTH is the initial step length for all parameters. Empirically, the starting step length value has little effect on the outcome of the maximizer. SA_ALT_ADJUSTMENT uses an alternative formula for adjusting the step length. SA_ADJ_LOWERBOUND defines a "null" area for which step length is not adjusted. If the proportion of accepted moves is greater than SA_ADJ_LOWERBOUND and is less than 1 – SA_ADJ_LOWERBOUND, the current steplength will continue to be used. See Corana et al. (1987) for more details. 81 mle 2.1 manual Stopping Criteria There are three ways to terminate finding the solution of a model. The first way is to minimize the change in the log-likelihood to below some specified minimum value. You can specify this by setting, for example, EPSILON=1E-8. When the absolute difference between the loglikelihoods of the previous iteration and the current iteration falls below this value, the problem will be considered to have converged normally. The second way of controlling the stopping criteria is by specifying the maximum number of iterations permissible. For example, setting MAXITER=1000, would stop searching for the maximum after 1,000 iterations, regardless of the change in the likelihood. Note that a single iteration is that over all dimensions. The third stopping criterion is by specifying the maximum number of function evaluations permissible. You can specify, for example, MAXEVALS=10000, which would stop searching for the maximum likelihood after 10,000 evaluations of the likelihood. Looping Through Methods mle provides a mechanism to specify that different methods be used to solve the same likelihood. For example, you can set METHOD1=DIRECT MAXITER1=10 METHOD2=CGRADIENT1 MAXITER2=500 to begin the problem with the direct method and then switch to a conjugate gradient solver for the next 500 iterations. The variables METHOD, MAXEVALS, MAXITER, and EPSILON can have a digit appended in this way. When the variable METHOD_LOOP is set to true, mle will loop back to the first method and continue the solver sequence again until one of the methods converges normally. The Interactive Debugger mle incorporates an interactive debugger that provides some degree of control while models are being solved. Entries in the symbol table can be viewed and changed, so that convergence can be forced early or postponed, output variables can be changed, and the values of various debugging options can be set and reset. The debugger is called by typing <CTRL> C on most systems. The <BREAK> key also works on some systems. After mle gets to some reasonable stopping point—usually the end of an iteration—control will be passed to the user. The debugger responds with Exit: immediately exits the program. Resume: resumes running mle from where it left off. One step: continue from where it left off for one more iteration and then reenters the interactive debugger. Pick a symbol: selects a symbol to display. The value of the symbol is displayed between debugger commands, for this and all subsequent calls to the debugger. Change the value of a symbol: If no symbol is selected, the user will be prompted for a symbol to change and then a value to change it to. If a symbol is selected (with Pick), then that symbol will be changed. 82 mle 2.1 manual Search for symbols: Prompts the user for search text, and then searches the symbol table for symbol names that match any part of the search text. The name, types, and value of matching symbols are displayed. 83 mle 2.1 manual Chapter 5 Plots and graphs The PLOT command is used to create plots and charts in mle. This chapter discusses the command, and gives some examples of creating graphs. mle does not directly generate graphs. Instead, it writes graphing programs in the Gnuplot plotting language. The graphs can be printed using one of the many device drivers included in Gnuplot. Additionally, graphs can be imported into a number of text processing languages like ΤΕΧ or MSWord, or manipulated in graphics editing programs. Here is a list of the plotting capabilities offered by mle: • Two-dimensional data plots of data points, parametric functions, bar charts, histograms, graphs with error bars for x, y or both. • Three-dimensional plots including surfaces and contour plots. • Multiple curves or surfaces can be drawn on a single plot. • A simple mechanism to specify a grid of multiple plots on a single page. • Data points and fitted curves • Up to two x and two y axes on a single (two-dimensional) graph. • Cartesian or polar coordinates in two dimensions. Rectangular, spherical, or cylindrical coordinates in three dimensions. • Simple generation of estimated distributions with error bars. • One- and two-dimensional likelihood profiles Creating Plots There are four steps used for creating graphs in mle. • Define the plot file using the PLOTFILE(<name>) procedure in a program. 85 mle 2.1 manual • • • Define one or more plots using the PLOT . . . END statement in a program. Usually the statements within PLOT . . . END will include one or more CURVE . . . END statements that draw the curve on the current plot. Run the mle program. The plot file and its data files will be created as a Gnuplot program. At this point you have the option to edit the plot as a Gnuplot program. Run the Gnuplot program on the plot file to create, display, or print the graph. In some cases, this forth step can be done from within the mle program using the FINISHPLOT procedure. Defining the Plot File The first step in creating a graphic is to define a plot file using the PLOTFILE( <name> ) procedure. mle writes a Gnuplot program to the plot file (Gnuplot is discussed in a later section). The name of the plot file also determines the name of data files created for use by the plot file. Suppose we wish to create a plot called sincos.plt. The statement PLOTFILE("sincos.plt") will create a plot file by that name. Information will be written to this file that defines the plot. The information comes from six places: • • • • • The PLOTFILE() procedure writes an initialization string to the plot file. The string is stored in the variable GNUPLOTINIT. For example, in DOS-based operating systems, this variable is initially set to "set terminal windows; reset; set data style lines; set autoscale; set nokey". These Gnuplot statements specify that the terminal is Windows, plot parameters will be reset, lines will be plotted by default, Gnuplot will figure out a good scale to use, and a graph key will not be generated. You can change this initialization string by assigning a new string to the PLOTINIT variable. Alternatively, you can keep this string as is and add new program lines using the WRITEPLOTLN() statement (discussed next). The WRITEPLOTLN() and WRITEPLOT() procedures provide a simple way of writing Gnuplot statements directly to the plot file. These statements must be used after the PLOTFILE() statement. For example, if you want to add a title to the plot, the statement WRITEPLOTLN("set title 'Sin and Cos functions'"). You can insert any Gnuplot statement into the plot file this way. The difference between WRITEPLOTLN() and WRITEPLOT() is that the former adds a newline after writing, whereas the latter does not. The MULTIPLOT(<x>, <y>) . . . END statement can be used to create x by y grids of x×y plots on a single page. The statement writes commands to the plot file, and an initialization string taken from the variable MULTIPLOTINIT. The PLOT . . . END statement initiates a single plot, graph, or chart. It will write an initialization string to the plot file taken from the variable PLOTINIT. The CURVE . . . END statement writes a single curve to the current plot. This is the statement that writes the Gnuplot plot and splot statements to the plot file. Each CURVE statement also creates a data set used by the plot file. The name of a plot file should usually end in the file extension ".plt", because this extension is used by mle and Gnuplot. 86 mle 2.1 manual mle can select a plot file name based on the name of the program file by using the function. The statement PLOTFILE(DEFAULTPLOTNAME) will create a plot name that matches the name of the program file, but with the ".plt" extension replacing the ".mle" extension. DEFAULTPLOTNAME The plot file will accumulate graphics instructions from the mle MULTIPLOT, WRITEPLOTLN, PLOT, and CURVE commands until a new plot file is opened or the mle program terminates. The plot file is then processed through Gnuplot to display or print the plots. The Plot Statement The PLOT...END statement initiates a single graph or chart. The statement does not do the plotting itself, instead each CURVE...END statement executed within the PLOT...END statement will add a single curve to the plot. The format of the statement is PLOT [(<string_expr>. . .)] <statements> END When a PLOT statement is executed, a few statements may be written to the plot file. Then, the <statements> are executed. All CURVE statements executed before the END is reached will result in one curve being added to the current plot. The optional series of string expressions (enclosed within parentheses) can immediately following the PLOT statement. These strings will be written to the plot file. The purpose of these strings is to provide additional information to the Gnuplot program, such as titles, ranges, and borders. They are simply written verbatim to the plot file. In fact, plots can be written in the Gnuplot language with these strings. Here is an example: MLE PLOTFILE("gploteg.plt") PLOT ( "plot [0:2*pi][-5:5] sin(x), cos(x), tan(x)" ) END END The resulting Gnuplot file is: set terminal windows; reset; set data style lines; set autoscale; set nokey plot [0:2*pi][-5:5] sin(x), cos(x), tan(x) And, here is the resulting plot. 4 2 0 -2 -4 0 1 2 3 4 5 6 The PLOT statement writes the PLOTINIT string to the plot file. You can assign a string to the PLOTINIT variable, and it will be written for each PLOT. 87 mle 2.1 manual The Curve Statement The CURVE...END statement does the bulk of the work in creating plots. Each CURVE statement generally creates a single curve or surface. For simplicity, the curve statement will be discussed separately for two-dimensional and three-dimensional plots. Two-dimensional Plots The idea of the curve statement is to generate a series of points for a function. For simple curves two points must be defined: an x value and its corresponding y value. There are two forms for the CURVE statement (for producing two-dimensional plots). One form generates a series of REAL x values for use in computing y values. The second form generates an INTEGER series of points. The REAL version looks like this: CURVE [KEY <keystring> | WITH <withstring> | AXES <axesstring> . . . ] <x_var> ( <x_min> <x_max> [ <x_points> ] ) <x_expr> <y_expr> [ <expr> . . .] [ <strings> . . .] END The KEY, WITH, and AXES will be discussed later. This form of the CURVE statement creates a series of x points. It begins with the point <x_min> and ends with the point <x_max>; <x_points> points will be generated in total. Each point will be assigned to <x_var> in turn. The value of <x_var> will be used at each point to compute <x_expr> and <y_expr> (and perhaps other expressions as well). If the expression for <x_points> is missing, the value stored in PLOTPOINTS will be used instead (which is initially 100). Here is an example that draws two curves on a plot: MLE PLOTFILE(DEFAULTPLOTNAME) PLOT CURVE z ( 0, 15, 100 ) z, PDF NORMAL(z) 5, 2 END CURVE z ( 0, 15, 100 ) z, PDF WEIBULL(z) 5.5, 2 END END {plot} END END END 0.2 0.18 0.16 0.14 0.12 0.1 0.08 0.06 0.04 0.02 0 0 2 4 6 8 10 12 14 16 The second form for the two-dimensional curve statement generates a series of INTEGER x values for use in computing y values. It looks like this: CURVE [KEY <keystring> | WITH <withstring> | AXES <axesstring> . . . ] <x_var> = <x_min> TO <x_max> <x_expr> <y_expr> [ <expr> . . .] [ <strings> . . .] END This form of the CURVE statement creates a series of INTEGER x points. It begins with <x_var> set to <x_min> and ends with the point <x_max>. The value of <x_var> will be incremented by 1 for 88 mle 2.1 manual each point and will be used to compute <x_expr> and <y_expr> (and perhaps other expressions as well). Here is an example that draws two curves on a plot: MLE PLOTFILE(DEFAULTPLOTNAME) PLOT ("set data style boxes", "set xrange [-0.5:12.5]) CURVE i = 0 TO 10 i, PDF BINOMIAL(i) 0.5, 10 END CURVE i = 1 TO 12 i, PDF GEOMETRIC(i) 0.2 END END {plot} END END END 0.25 0.2 0.15 0.1 0.05 0 0 2 4 6 8 10 12 Each CURVE...END statement defines a single graph as a series of x and y points. The x and y values (and perhaps some values used for error bars and other things) are written to a data file. These data files (one per CURVE...END statement) are read by Gnuplot when creating the graphs. KEY There are three optional keywords that can be used in the CURVE...END statement. The first is KEY, followed by a string expression. This sets up a title for the plot key. AXES The AXES keyword defines the axis to which a curve will be plotted. A single string expression follows AXES. Valid values for this string are "x1y1", "x2y1", "x1y2", and "x2y2". WITH The WITH keyword defines the style of curve to be plotted, along with any options for that style. A single string expression follows WITH. The string begins with one of the Gnuplot plot styles, and is followed by options for that style. mle checks the first word of this string and makes sure there are enough PLOT expressions for the desired graph type. The information is also used to put together the Gnuplot plot or splot command. Valid values for the first word of this string are: WITH style string Number of expressions "boxerrorbars" 4 to 6 CURVE expressions (2d only) "boxes" 2 CURVE expressions (2d only) "boxxyerrorbars" 4 to 7 CURVE expressions (2d only) "candlesticks" 7 CURVE expressions (2d only) "dots" 2 (2d) or 3 (3d) CURVE expressions "errorbars" 3 to 4 CURVE expressions (2d only) "financebars" 7 CURVE expressions (2d only) "fsteps" 2 CURVE expressions (2d only) "histeps" 2 CURVE expressions (2d only) "impulses" 2 (2d) or 3 (3d) CURVE expressions 89 mle 2.1 manual "lines" 2 (2d) or 3 (3d) CURVE expressions "linespoints" 2 (2d) or 3 (3d) CURVE expressions "points" 2 (2d) or 3 (3d) CURVE expressions "steps" 2 CURVE expressions (2d only) "vector" 4 (2d) or 5 (3d) CURVE expressions "xerrorbars" 3 to 4 CURVE expressions (2d only) "xyerrorbars" 4 to 6 CURVE expressions (2d only) "yerrorbars" 3 to 4 CURVE expressions (2d only) Options can follow each plot style in the WITH string. The options are linetype <number>, linesize <number>, linewith <number>, pointtype <number> and pointsize <number> (the options can be abbreviated lt, ls, lw, pt, ps respectively). The Gnuplot manual discusses these options in more detail. Here is example of a simple plot that makes use of some of the CURVE options: MLE PLOTFILE(DEFAULTPLOTNAME) PLOT("set key bottom left; set y2tics") CURVE KEY "sin(x)" AXES "x1y1" WITH "lines linetype 3" x (0, 2*PI, 100) x, SIN(x) END CURVE KEY "cos(x)" AXES "x1y1" WITH "lines linetype 3" x (0, 2*PI, 100) x, COS(x) END CURVE KEY "tan(x)" AXES "x1y2" WITH "lines linetype 2" x (0, 2*PI, 100) x, TAN(x) END END {plot} END {mle} 1 80 0.8 60 0.6 40 0.4 20 0.2 0 0 -0.2 -20 -0.4 -40 -0.6 sin(x) -0.8 cos(x) tan(x) -1 0 1 -60 2 3 4 5 6 7 -80 ERRORBARS Additional expressions within CURVE...END define things like error bars. Gnuplot provides two standards for error bars. If only one additional (error bar) expression exist, that value is taken as a delta value to add and subtract from the y value. If two error bar expressions exist, the values are taken as the minimum and maximum (respectively) values for the error bars. Here is an example of plotting error bars for a binomial experiment involving 40 observations: 90 mle 2.1 manual MLE { -- Plots the probabilities of observing x boys in a families of exactly 5 children.} n = 5 {bernoulli trials -- for families of size 5} p = 0.502 {probability of a male child per trial} { -- Also plots the standard errors for each outcome assuming that} fam = 40 {a sample of fam families are observed} PLOTFILE(DEFAULTPLOTNAME) PLOT("set yrange [0:]; set xrange [-0.25:" + REAL2STR(n + 0.25, 6, 2) + "]") CURVE WITH "errorbars" x = 0 TO n x {x-axis value} PDF BINOMIAL(x) p, n END {y-axis value} SQRT(p*(1 - p)/fam) {errorbar delta} END {curve} END {plot} END {mle} The Gnuplot file and graph resulting from this program looks like this set terminal windows; reset; set data style lines; set autoscale; set nokey set yrange [0:]; set xrange [-0.25:5.2500] plot "eg5.001" using 1:2:3 notitle with errorbars \ 0.4 0.35 0.3 0.25 0.2 0.15 0.1 0.05 0 0 1 2 3 4 5 Other strings A series of one or more string expressions can follow the numeric expressions in the CURVE...END. These strings will be appended to the Gnuplot plot statement so that plot options or other functions can be plotted. The statements will be written to the plot file. The typical purpose is to re-plot curves in a different style. Suppose we want to plot the normal distribution with µ=0 and σ=5 over the range -10 to 10, and also show an 21-point histogram superimposed on the continuous curve. The mle code to do this is: MLE PLOTFILE(DEFAULTPLOTNAME) { open a plot file} PLOT("set ylabel 'normal pdf f(t)'; set xlabel 't' ") CURVE WITH "boxes" x (-10 10 21) x { the x value} PDF NORMAL(x) 0, 5 END { the function to plot} ", '' with lines" END {do} END { plot} END {mle} The plot file, written in the Gnuplot graphics language looks like this: 91 mle 2.1 manual set terminal windows; reset; set data style lines; set autoscale; set nokey set ylabel 'normal pdf f(t)'; set xlabel 't' plot "eg6.001" using 1:2 notitle with boxes \ , '' with lines The first line was written when the PLOTFILE() statement was executed. The next line is blank, because the PLOTINIT variable, written to the file when PLOT was executed, is empty. The next line came directly from the string argument list for the PLOT statement. The line beginning with plot was generated by the CURVE statement. Notice that the Gnuplot continuation character \ comes at the end of the line. This means that the next line (taken from optional string expression in the CURVE statement) is a continuation of the plot statement. That line, beginning with a comma, tells Gnuplot to re-plot the same data file using lines. The name eg6.001 is the data file containing the plot points. These file is written by mle, and read by Gnuplot. Here is the result of running Gnuplot on this plot file: 0.08 0.07 normal pdf f(t) 0.06 0.05 0.04 0.03 0.02 0.01 -10 -5 0 t 5 10 Three-dimensional Plots Three-dimensional plots follow the same syntax as do two-dimensional plots, except that both an <x_var> and a <y_var> must be defined in the CURVE statement along with their ranges. Here is the formal definition for one form: CURVE [KEY <keystring> | WITH <withstring> | AXES <axesstring> . . . ] <x_var> ( <x_min> <x_max> [ <x_points> ] ) BY <y_var> (<y_min> <y_max> [ <y_points> ] ) <x_expr>, <y_expr>, <z_expr> [ <expr> ... ] [<string>. . .] END Note that there is now a variable for both x and y. The specification for each variable is separated by the keyword BY. If the value of <x_points> or <y_points> is missing, it will be taken from the variable PLOTPOINTS (which is initially 100). Alternatively, the INTEGER from of the CURVE statement can be used: CURVE [KEY <keystring> | WITH <withstring> | AXES <axesstring> . . . ] <x_var> = <x_min> TO <x_max> BY <y_var> = <y_min> TO <y_max> <x_expr>, <y_expr>, <z_expr> [ <expr> ... ] [<string>. . .] END Additionally, the REAL and INTEGER forms can be combined: 92 mle 2.1 manual CURVE [KEY <keystring> | WITH <withstring> | AXES <axesstring> . . . ] <x_var> = <x_min> TO <x_max> BY <y_var> (<y_min> <y_max> [ <y_points> ] ) <x_expr>, <y_expr>, <z_expr> [ <expr> ... ] [<string>. . .] END or CURVE [KEY <keystring> | WITH <withstring> | AXES <axesstring> . . . ] <x_var> ( <x_min> <x_max> [ <x_points> ] ) BY <y_var> = <y_min> TO <y_max> <x_expr>, <y_expr>, <z_expr> [ <expr> ... ] [<string>. . .] END Gnuplot does not support error bars or boxes for three-dimensional plots. Thus, there are three required numeric expression (<x_expr>, <y_expr>, <z_expr>) following the <y_var> definition (although additional numeric expressions can be written to the data file for other uses). These three required expressions gives the x, y, and z values to be plotted for each combination of x_var and y_var. Here is an example of a simple three-dimensional plot. Suppose we want to plot the function SIN(x)^2 + COS(y)^2 over the range 0 to 2π with 30 points in each dimension. The mle code to do this is: MLE PLOTFILE(DEFAULTPLOTNAME) PLOT("set contour base; set hidden3d" "set view 50") CURVE x (0, 2*PI, 30) BY y (0, 2*PI, 30) x, y, SIN(x)^2 + COS(y)^2 END {curve} END {plot} END {mle} { open plot file} { plot a surface plot and a contour plot} { change the perspective a bit} { define the ranges } { the function to plot} The resulting Gnuplot file is: set terminal windows; reset; set data style lines; set autoscale; set nokey set contour base; set hidden3d set view 50 splot "eg7.001" using 1:2:3 notitle \ The file eg7.001 contains the points generated by mle. Here is the resulting plot. 93 mle 2.1 manual 2 1.8 1.6 1.4 1.2 1 0.8 0.6 0.4 0.2 0 7 6 5 0 4 1 2 3 3 4 2 5 6 1 7 0 Three-dimensional plots can include multiple curves. For example, to the previous curve, we can add to the graph, a plane through z = 1, and another plane through z = y/4. MLE PLOTFILE(DEFAULTPLOTNAME) PLOT("set nocontour" "set hidden3d" "set view 50") CURVE x (0, 2*PI, 30) BY y (0, 2*PI, 30) x, y, SIN(x)^2 + COS(y)^2 END {curve} CURVE x (0, 2*PI, 10) BY y (0, 2*PI, 10) x, y, 1 END {curve} CURVE x (0, 2*PI, 10) BY y (0, 2*PI, 10) x, y, y/4 END {curve} END {plot} END {mle} { { { { { open plot file} no contours} hide lines} change the perspective a bit} curve 1} {curve 2} {curve 3} The resulting Gnuplot file is: set terminal windows; reset; set data set nocontour set hidden3d set view 50 splot "eg8.001" using 1:2:3 notitle \ , "eg8.002" using 1:2:3 notitle \ , "eg8.003" using 1:2:3 notitle \ Notice that there were three plot data files created: one for each surface. The resulting graph looks like this 94 mle 2.1 manual 2 1.8 1.6 1.4 1.2 1 0.8 0.6 0.4 0.2 0 7 6 5 0 4 1 2 3 3 4 2 5 6 1 7 0 Multiple plots Multiple plots can be placed on a single page with the MULTIPLOT...END statement. The form of the statement is: MULTIPLOT( <xplots> <yplots> ) <statements> END The two arguments determine the number of plots that are placed across the page (<xplots>) and vertically down the page (<yplots>). In this way, <xplots> by <yplots> pages of plots are generated. Once a page is filled, a new page is automatically generated. The <statements> are any valid mle statements, including PLOT...END statements (typically two or more PLOT statements are executed). The PLOT...END statements may be executed within a userdefined procedure call. The PLOTFILE() procedure must be called before the MULTIPLOT statement. Here is an example. The following program shows a series of Weibull distributions. MLE PLOTFILE(DEFAULTPLOTNAME) nx = 3 ny = 2 MULTIPLOT(nx, ny) totp = nx*ny FOR mu = 1 to totp DO PLOT FOR sig = 1 TO 3 DO CURVE t (0, 10, 50) t, PDF WEIBULL(t) mu, sig END END {for sig} END {plot} END {for mu} END {multiplot} END {mle} 95 END mle 2.1 manual 1.2 1 0.8 0.6 0.4 0.2 0 0.6 0.5 0.4 0.3 0.2 0.1 0 0 2 4 6 8 10 0.4 0.35 0.3 0.25 0.2 0.15 0.1 0.05 0 0 0.3 0.25 0.2 0.15 0.1 0.05 0 2 4 6 8 10 0.25 0.2 0.15 0.1 0.05 0 0 2 4 6 8 10 0 2 4 6 8 10 0 2 4 6 8 10 0.2 0.18 0.16 0.14 0.12 0.1 0.08 0.06 0.04 0.02 0 0 2 4 6 8 10 The MULTIPLOT statement makes use of a multiplot routine available in Gnuplot. The Gnuplot statement does not work correctly for all terminal types. In particular, the x axis labels an plot titles do not always print correctly for the right-most plots. Also, plots with x axis labels and plot titles are sometimes scaled to an overly small size. mle attempts to scale the multi-plots so that none of the figures overlap, and so that the aspect ratio is unchanged. You can affect the scaling size from within mle by changing the variables MPLOTYSCALE and MPLOTXSCALE (both begin as 1.0). These variables control the relative degree of shrinkage or expansion beyond that required to fit a plot in its rectangle. Working with Gnuplot What is Gnuplot? Gnuplot is a function and data plotting program that is designed to work on a large range of computer systems. The program has many graphing capabilities, including the ability to plot directly from files. mle makes use of a relatively small subset of the Gnuplot capabilities to generate graphs. In fact, mle simply writes a Gnuplot program and creates data sets, Gnuplot does the rest. The authors of Gnuplot provide for free distribution of the software, including the source code. Over the years, many individuals have contributed to writing the program, but the main authors are Thomas Williams, Colin Kelley, Russell Lang, Dave Kotz, John Campbell, Gershon Elber, and Alexander Woo. How to Obtain Gnuplot mle requires Gnuplot version 3.7 (or later). Gnuplot and its documentation can be downloaded from many ftp and web sites. Gnuplot can be downloaded and compiled on your computer system. For some platforms (particularly DOS and Windows) executable packages are commonly available. Here are some ways of obtaining Gnuplot The official ftp distribution site for the Gnuplot source is ftp.dartmouth.edu. The file is called /pub/gnuplot/gnuplot.3.7.tar.Z. Most comp.sources.misc archive sites distribute Gnuplot. Executable versions of Gnuplot for MS-DOS and MS-Windows are available from oak.oakland.edu [141.210.10.117] as pub/msdos/plot/gpt37*.zip; garbo.uwasa.fi (Europe) [128.214.87.1] as /pc/plot/gpt37*.zip and archie.au (Australia) [139.130.4.6] as micros/pc/oak/plot/gpt37*.zip. The files are: gpt37doc.zip, gpt37exe.zip, gpt37src.zip and gpt37win.zip. • OS/2 2.x binaries are at ftp-os2.nmsu.edu [128.123.35.151], in /os2/2.x/unix/gnu/gplt37.zip. 96 mle 2.1 manual • • • There are many other web-sources are available. Give the name "Gnuplot" to any major search engine to find a location near you. Most sites that distribute software under the Free Software Foundation GNU Public License also distribute Gnuplot.8 Many Linux distributions contain Gnuplot as a package. Basics of Gnuplot Full documentation for Gnuplot is available for free with the program. Here are a few notes on the language. • • • • Gnuplot can be used interactively or in a batch mode. For example, you can read in a file created by mle into the Windows version of Gnuplot, and then modify the plot interactively. The Gnuplot language usually takes one statement per line. Multiple statements on one line by are formed by separating the commands by a semicolon(;). Also, a single statement can be spread across multiple lines by using the backslash (\) character as the last character on a line. The pound sign (#) is used as a comment delimiter. The Gnuplot language is case sensitive. Lower case is used for functions and key words. Also, algebraic operators follow the syntax of c. So, != in Gnuplot is equivalent to <> in mle, and % in Gnuplot is equivalent to mod in mle. Exponentiation in Gnuplot uses the operator **. Many options in Gnuplot are set with the set command. Here are some examples: set terminal hpljii; set key on; set title "fun with graphics"; set logscale xy; set size 0.5 0.5; set xlabel "time (hours)-4 "; set ylabel "density". There are many set options available in Gnuplot. These are usually inserted into the plot file using mle's WRITEPLOTLN() statement or in the initial string list in the PLOT statement. Setting the Output Device Gnuplot is relatively device independent. That is, it can work across a number of computer platforms, and write to different types of graphics devices. In order to plot or display a graph on a particular device, you must specify a "terminal" type. Gnuplot can then generate graphics for that specific device. As an example, in previous graphs in this chapter, the device was set to Windows (the graphs were copied and pasted into this document). The terminal Gnuplot statement set terminal windows is in all of these programs. You can set the terminal to another device. One type of device defined by Gnuplot is a dumb terminal, specified by set terminal dumb. You can the graphics device to a dumb terminal in two ways. First, you can editing the Gnuplot program (i.e. the program that ends in .plt) and add this statement before the plot command (and after any other set terminal statement). Alternatively, you can insert the command WRITEPLOTLN("set terminal dumb") in the mle program after the PLOTFILE() statement. The following example shows the result of plotting the previous sine and cosine example with the terminal set to dumb. 8 Even so, Gnuplot is not distributed under the same license. In fact, it is a coincidence that GNU appears in Gnuplot and is the name adopted by the Free Software Foundation. See the Gnuplot manual for details. 97 mle 2.1 manual 1 ###-------+-*******+---------+---------+---------+--------+###-----+ + ### *** *** + + + ### + 0.8 ++ ## ** ** ## ++ | ** ** ## | 0.6 ++ ** # * # ++ | ** # * # | 0.4 ++ * ## ** ## ++ | ** # * # | 0.2 ++* # * # ++ |** # * # | 0 **.............#..............*...............#..............*.....++ | ## * ## * | | # * # ** | -0.2 ++ ## * ## * ++ | # * # ** | -0.4 ++ ## * ## * ++ | ## * ## ** | -0.6 ++ # * # ** ++ | # ** ** | -0.8 ++ ## ## ** ** ++ + + + ### + ### + *** *** + + -1 ++--------+--------+--------######-----+---*******--------+--------++ 0 1 2 3 4 5 6 7 Some terminal types allow device-specific options to be included after the name of the terminal. For example, set terminal dumb 80 60 would set the size of the previous plot to 80 characters across by 60 characters high. Information on specific device options is available in the Gnuplot manual. Here is a synopsis of some commonly used terminal devices: • set terminal dumb <xsize> <ysize> for "dumb" terminals and printers. (see the previous example). • • • • • set terminal epson for printing bit mapped graphics to an Epson printer set terminal gpic for generating ΤΕΧ output for use with the gpic/groff package from the Free Software Foundation. set terminal hpljii <resolution> for printing printer. The <resolution> is 75, 100, 150, or 300. set terminal hpdj <resolution> for <resolution> is 75, 100, 150, or 300. set terminal latex <font> <size> to an Hewlett Packard LaserJet II printing to an Hewlett Packard Deskjet printer. The for generating ΤΕΧ output for use with LaTeX and EMTeX. • set terminal pcl5 <mode> <font> <size> for printing to an Hewlett Packard HGPL-2 printer or plotter. • set terminal postscript • set terminal table • set terminal windows <color> "<fontname>" <size> for for printing to a postscript printer or device. There are a number of mode, color, and font options for this device. for printing a table of values as an ASCII text file instead of a graph. 98 displaying in windows mle 2.1 manual The FINISHPLOT procedure The procedure FINISHPLOT provides a way to execute Gnuplot from within the mle program itself. The procedure takes a single boolean argument. Here is what the procedure does: • • • If the argument is TRUE, a “pause –1“ statement will be written to the plotfile. This will cause the graph to be displayed until you either press a key or click on a dialog box. If the argument is FALSE, the pause statement is not written to the plotfile. The plotfile is closed. No more curves can be written to this file. The Gnuplot program is executed with plotfile as its argument. This will cause the plot to be written to whatever terminal is defined. For example, if the command set terminal windows (Windows) or set terminal x11 (Unix) is specified in the plotfile, the graph will be displayed on the screen. Other drivers will cause the plot to be written to the file defined by a Gnuplot set output command. Additional details on how the Gnuplot program is executed, see the description of the FINISHPLOT procedure in the procedure summary chapter. More Examples Additional examples of graphical programming in mle are given here. Graphing PDFs, SDF, CDF, and HFs Here is an example of plotting all four basic probability functions for the Weibull distribution with three different sets of parameters. This example shows multiple plots in one program, and how key titles can be added to the plot. Also note that the keys are moved around for different sets of plots. MLE PLOTFILE(DEFAULTPLOTNAME) WRITEPLOTLN('set xlabel "t"; set autoscale; set key') minz = 0.01 maxz = 10 np = 100 titles : STRING[1 TO 4] = ["Probability Density", "Survival", "Cumulative Density" "Hazard"] ylab : STRING[1 TO 4] = ["f(t)", "S(t)", "F(t)", "h(t)"] MULTIPLOT(2, 2) FOR ty = 1 TO 4 DO {loop through PDF, SDF, CDF, HF} PLOT('set title "Weibull ' + titles[ty] + ' Function"' 'set ylabel "' + ylab[ty] + '"') FOR v = 1 TO 3 DO {use three different variances} CURVE z (minz, maxz, np) KEY 'Weibull[6, ' + INT2STR(z) + ']' z, PDF WEIBULL(z, IF ty = 2 THEN 0 ELSEIF ty = 3 THEN oo ELSE z END, IF ty = 3 THEN z ELSE 0 END) 6, v {these are the weibull parameters} END {pdf} END {curve} END {for v} END {plot} END {for ty} END {multiplot} END {mle} 99 mle 2.1 manual Here is the result of this program: Weibull Probability Density Function Weibull Survival Function 0.2 1 Weibull[6, 3] Weibull[6, 2] Weibull[6, 1] Weibull[6, 3] Weibull[6, 2] Weibull[6, 1] 0.9 0.16 0.8 0.14 0.7 0.12 0.6 0.1 0.5 S(t) f(t) 0.18 0.08 0.4 0.06 0.3 0.04 0.2 0.02 0.1 0 0 0 1 2 3 4 5 t 6 7 8 9 10 0 1 2 3 4 Weibull Cumulative Density Function 5 t 6 7 8 9 10 6 7 8 9 10 Weibull Hazard Function 1 1.4 Weibull[6, 3] Weibull[6, 2] Weibull[6, 1] 0.9 1.2 Weibull[6, 3] Weibull[6, 2] Weibull[6, 1] 0.8 1 0.7 0.6 h(t) F(t) 0.8 0.5 0.6 0.4 0.3 0.4 0.2 0.2 0.1 0 0 0 1 2 3 4 5 t 6 7 8 9 10 0 1 2 3 4 5 t Contour plots Contours can be drawn beneath the surface of a three-dimensional plot. Here is an example: MLE PLOTFILE(DEFAULTPLOTNAME) WRITEPLOTLN('set zrange[0:1]; set contour base; set hidden3d; set view 70') PLOT DO x y (-3 3 25) (-3 3 25) x, y, EXP(-(x^2 + 1.8*x*y + y^2)) {a type of bivariate normal} END {do} END {plot} END 1 0.5 0 2 -3 -2 -1 0 1 2 3 -3 -2 -1 0 3 1 A contour plot alone is generated from the previous example by turning off the surface and changing the perspective: MLE PLOTFILE(DEFAULTPLOTNAME) PLOT('set zrange[0:1]; set contour base; set nosurface' 'set yrange [] reverse; set view 180, 0') CURVE x (-3 3 25) BY y (-3 3 25) x, y, EXP(-(x^2 + 1.8*x*y + y^2)) {a type of bivariate normal} END {curve} END {plot} END 100 mle 2.1 manual 3 2 1 0 -1 -2 -3 -3 -2 -1 0 1 2 3 A Helix A helix is defined parametrically with simple functions. The following code generates a helix MLE PLOTFILE(DEFAULTPLOTNAME) WRITEPLOTLN('set zrange[-1:]; set view 60, 30, 0.75, 2; set hidden3d') PLOT CURVE x (0 2 15) BY y (-PI 4*PI 40) x*COS(y), x*SIN(y), y/3 END {curve} END {plot} END 5 4 3 2 1 0 -1 -2-1.5-1-0.5 0 0.5 1 2 1 1.5 0 0.5 -1-0.5 1.5 2 -2-1.5 Geometric Figures Mathematically defined geometric figures can be easily drawn. This example shows a number of useful tricks in Gnuplot, including turning off the axis borders, and graphing multiple plots. MLE PLOTFILE(DEFAULTPLOTNAME) WRITEPLOTLN('set zrange[0:]; set hidden3d; set view 70') WRITEPLOTLN('set noborder; set noxtics; set noytics; set noztics') PLOT CURVE x (0 2*PI 20) BY y (0 4 20) {plot a cone} SIN(x)*y, COS(x)*y, (-y + 5) END {curve} CURVE x (0 2*PI 20) BY y (0 2*PI 20) {Now plot a torus around the cone} COS(x)*(3 + COS(y)), SIN(x)*(3 + COS(y)), SIN(y) + 2.5 END {curve} CURVE x (0 2*PI 20) BY y (-PI/2 PI/2 20) {And place a sphere on top} COS(x)*COS(y), SIN(x)*COS(y), SIN(y) + 6 END {curve} END {plot} END {mle} 101 mle 2.1 manual Animation Example Multiple PLOT...END statements can be used to create animation in mle. Alternatively, the time dimension can be introduced with the use of a looping statement outside of the PLOT...END statement. Gnuplot has a pause command that helps control the length of time each plot is displayed. Here is an example: MLE { -- An animation example } PLOTFILE(DEFAULTPLOTNAME) { open plot file} WRITEPLOTLN("set contour both; set hidden3d") FOR f = 4 TO 9 DO PLOT("pause 2") {wait two seconds before showing the next plot} CURVE x (-10, 10, 30) BY y (-10, 10, 30) x, y, BESSELI(0, SQRT(x^2 + y^2) - f) END {curve} END {plot} END {for} END {mle} This example produces this sequence of plots: 1500 3500 3000 1000 2500 2000 1500 500 1000 500 0 0 10 10 5 -10 5 -10 0 -5 0 -5 5 10 0 -5 0 -5 5 -10 10 500 450 400 350 300 250 200 150 100 50 0 -10 200 150 100 50 0 10 10 5 -10 5 -10 0 -5 0 -5 0 -5 5 10 0 -5 5 -10 -10 10 300 700 250 200 600 500 150 400 300 100 200 50 100 0 0 10 10 5 5 -10 0 -5 0 -5 -10 0 -5 0 -5 5 5 10 -10 10 -10 102 mle 2.1 manual Creating Plots from the Model Statement The MODEL statement can create two types of commonly used plots that are related to model estimation. The first plot includes three graphs of distributions: the survival density function, the probability density function and the hazard function. Each of these is graphed with error bars. The second type of plot is a likelihood surface graph in either one or two variables. Before attempting to plot either one of these special plots, a plotfile must be defined with the PLOTFILE() procedure. This opens the plot file and defines the name of the plot data file. Additionally, the PLOT...END statement must surround the MODEL statement. Estimated Distributions The survival function, probability density function and hazard function can be plotted from a MODEL statement by setting the variable PLOT_DISTS to TRUE. (The mechanism is similar to that used for printing the values using the PRINT_DIST variable). In addition to PLOT_DISTS=TRUE, you must set three other values. DIST_T_START defines the lowest value over which the distribution is plotted, DIST_T_END is the highest value over which the distribution is plotted. DIST_T_N is the number of points to plot. An example of plotting these distributions is given after the description of likelihood surfaces. Likelihood Surfaces A likelihood surface can be plotted over one parameter or two parameters of a model. All other parameters are taken at their estimated value. Surface plots are made by adding SURFACE(<xparam>) or SURFACE(<xparam>, <yparam>) to the end of the RUN or REDUCE list part of the MODEL statement. Here is the format: PLOT {surrounds the model statement for plotting surfaces} MODEL <model statement> RUN FULL SURFACE(<xparam>) {plots a likelihood profile over one parameter} FULL SURFACE(<xparam>, <yparam>) {plots a likelihood profile over two parameters} REDUCE ... SURFACE(<xparam>) REDUCE ... SURFACE(<xparam>, <yparam>) END {model} END {plot} For each parameter being plotted, the minimum plotted value is taken from the PARAM function as the LOW = value, and the maximum is taken from HIGH = value. An Example Here is an example of statistical estimation and plotting of distributions and a likelihood surface. 103 mle 2.1 manual MLE TITLE = "Japanese tooth eruption: lower first incisor." DATAFILE("japan.dat") OUTFILE(DEFAULTOUTNAME) PLOTFILE(DEFAULTPLOTNAME) DATA li1o FIELD 5 LINE 1 {earliest eruption age for lower central incisor} li1c FIELD 6 LINE 1 {latest eruption age} sex FIELD 3 LINE 2 {Child's sex} END PLOT_DISTS = TRUE DIST_T_START = 5.0 DIST_T_END = 15.0 DIST_T_N = 25 PLOT MODEL DATA {Plot the distribution from 5} {to 10 months} {in 25 points} {surrounds the model statement} PDF NORMAL(li1o, li1c) PARAM mean LOW = 6 HIGH = 10 START = 8 END PARAM stdev LOW = 1.2 HIGH = 3 START = 1.7 END END {pdf normal} {data} END RUN FULL SURFACE(mean, stdev) END {model} END {plot} END {mle} {plots the surface for mean and stdev} The following four plots result: Survival Function Probability Density Function 1 0.25 0.9 0.8 0.2 0.7 0.6 0.15 0.5 0.4 0.1 0.3 0.2 0.05 0.1 0 -0.1 5 6 7 8 9 10 11 12 13 14 15 0 5 6 7 8 9 Hazard Function 10 11 12 13 14 Likelihood 2.5 2 -200 -240 -280 -320 -360 -400 1.5 1 0.5 0 6 5 6 7 8 9 10 11 12 13 14 6.5 15 104 7 7.5 8 8.5 9 9.5 10 1 3 2.62.8 2.22.4 2 1.61.8 1.21.4 15 Statistical examples 105 Statistical examples Chapter 6 Statistical examples This chapter provides a series of examples in creating likelihood models and estimating parameters of the models. The examples are categorized by the type of likelihood problem being done. Some of the examples include data files. Survival analysis—Exact measurements This first example not only provides an illustration of a simple mle program, but also shows the notation that will be used throughout this chapter. The problem at hand is finding one or more parameters θ of some distribution f(t|θ), given a series of observations, t=t1, t2, . . ., tN. The values of t are known exactly. For an individual observation, ti, the individual likelihood is Li = f(ti|θ), and the overall likelihood for the N observations is N (2) L(θ | t ) = ∏ f (t i | θ)dt . i=1 Data for this example (Table 6) are a series of 15 observations of times to breakdown for an insulating fluid at 32 kV. The times are arranged as one observation per line in a file named ex1.dat. The underlying distribution is believed to follow a negative exponential probability density function, with a single parameter lambda. The following mle program analyses these data. Comments are enclosed in curly brackets. Here is the code for this problem: 107 Statistical examples MLE TITLE = "32 kV Insulating Fluid Example from Nelson (1982:105)" DATAFILE("ex1.dat") {Input data file name} OUTFILE("ex1.out") {Name to which results are written} DATA failtime END {data are read from the data file here} FIELD 1 MODEL {this specifies the likelihood model} DATA {this corresponds to the product in the likelihood equation} PDF EXPONENTIAL(failtime) PARAM lambda LOW=0.00001 HIGH=1 START=0.05 END END {pdf} END {data} RUN FULL END {model} END {program} Here is the abridged output New model: 32 kV Insulating Fluid Example LogLike= -70.76273 Iterations= 2 Func evals= 26 Del(LL)= 0.0000000000 Converged normally Results with estimated standard errors. (7 evals) Solution with 1 free parameter Name Form Estimate Std Error lambda LOGLIN 0.024294254090 0.004468859626 t against 5.43634307759 0.0 The first part of the output shows the loglikelihood, and information about iterations, function evaluations, and convergence. This is followed a report of parameter estimates and their standard errors. Table 6 Times to breakdown for an insulating fluid at 32 kV, from Nelson W (1982:105). 0.27 0.4 0.69 0.79 2.75 3.91 9.88 13.95 15.93 27.8 53.24 82.85 89.29 100.58 215.1 Survival analysis—Exact Failure and Right Censored observations The standard problem in survival analysis is to find parameters of a parametric model when some observations are right censored. Typically we have N exact observations, and N+ right-censored observations, the likelihood is (3) N N+ i =1 i =1 L(θ | t ) = ∏ f (t i | θ)∏ S (t i | θ) , where S(t|θ) is the survival distribution, which is the area under f(t|θ) to the right of t. The area under a right censored observation is specified in the mle PDF 108 Statistical examples function by setting the second time variable to infinity (or something less than the first time variable). So, the function PDF NORMAL(14,-1) 10, 6 END would return the area from 14 to infinity of under a normal pdf with parameters µ = 10, and σ = 6, or about 0.2525. This would correspond to the likelihood of an individual surviving past 14 units of times under the specified model. For this example, we use the data in Table 6 and suppose that there were three additional observations that had not failed by time 220—the end of the experiment. The data will be coded so that the three right censored times are given as negative times, -220. The DATA statement now creates two variables, the first is the absolute value of time to failure, and the second is the unmodified time. Thus, failed observations have two identical failure times, for example [9.88, 9.88], which defines an exact failure. When the two identical observations are used in the PDF function, the probability density function at that point is returned. The rightcensored observations have a positive and a negative failure times [220, -220]. When the second failure time is less than the first, the PDF function gives the area under the pdf from 220 to infinity, which is the survival function. MLE TITLE = "32 kV Insulating Fluid Example" DATAFILE("ex2.dat") {Input data file name} OUTFILE("ex2.out") {Name to which results are written} DATA topen tclose END FIELD 1 = ABS(topen) FIELD 1 MODEL DATA PDF EXPONENTIAL(topen, tclose) PARAM lambda LOW=0.00001 HIGH=1 END {of the PDF} END RUN FULL END {of the MODEL} END START=0.05 END {of the MLE program} The abridged output is 18 lines read from file ex2.dat 18 Observations kept and 0 observations dropped. New model: 32 kV Insulating Fluid Example LogLike= -81.66833 Iterations= 2 Func evals= 28 Del(LL)= 0.0000000000 Converged normally Results with estimated standard errors. (8 evals) Solution with 1 free parameter Name Form Estimate Std Error lambda LOGLIN 0.011742333138 0.002142967492 109 t against 5.47947329296 0.0 Statistical examples Survival analysis—Interval censored Observations Interval censored observations, are those collected between two points of time. These observations frequently arise from prospective studies in which periodic observations are collected. The exact times to the event are not known. What is known is tu, the last time before the event occurred, and te, the time of the first observation after the event occurred. The likelihood for interval censored events is the area under the pdf between tu and te, N tei N i=1 tu i i=1 L(θ | t u , t e ) = ∏ ∫ f ( z | θ)dz = ∏ S (tui | θ) − S (tei | θ) (4) In mle, the area under the pdf (that is, the integral over the interval (tu, te] is specified for most distributions as the first two times, with the second time greater than the first. For example, PDF NORMAL(11, 15) 10, 6 END returns 0.231, which is the area between 11 and 15 under a normal distribution with µ=10, and σ=6. Here is an mle program that finds parameters of a lognormal distribution from interval censored data. MLE TITLE = "Example" DATAFILE("ex3.dat") OUTFILE("ex3.out") DATA topen tclose END FIELD 1 FIELD 2 MODEL DATA PDF LOGNORMAL(topen, tclose) PARAM a LOW=0.00001 HIGH=9 PARAM b LOW=0.00001 HIGH=2 END {of the PDF} END RUN FULL END {of the MODEL} START=1 END START=0.4 END END Current status analyses Current status analysis consists of observations that are collected cross-sectionally. The methods most commonly associated with current status analysis are probit and logit analysis. mle makes it easy to do current status analysis with any of the builtin distribution functions. Under a cross-sectional study design, each observation consists of (1) time of a single observation since the study began (t), (2) an indicator variable to determine whether or not the individual experienced the event. The result of the indicator 110 Statistical examples variable is that the individual is a responder (r) or non-responders (n). The likelihood from N observations made up of Nr responders and Nn non-responders is n r i =1 i =1 L(θ | t ) = ∏ S (t i | θ)∏ F (t i | θ) (5) This likelihood can be interpreted as follows. For the likelihood for the nonresponders is the area under the pdf from the time of observation to infinity. Thus, a responder contributes a likelihood that is exactly like a right-censored observation. The likelihood for a responder is the area under the pdf from -∞ (or 0 for pdfs defined to have positive arguments) to the time of observation, which is the probability of the event occurring at some time unknown time before the time of observation. In mle, the area under the likelihood for a responder is specified as PDF LOGNORMAL(-1, 5) 2, 0.5 END return 0.217, which is the area between 0 (or anything less than 0) and 5 under a lognormal distribution with µ=2, and σ=0.5. Consider a data set that contains a time of observation and an indicator variable that is 0 if the observation was a non-responder and 1 for a responder. One way of coding this model is to place an IF...THEN...ELSE...END statement to switch between responder and nonresponder likelihoods as appropriate for each observation: MLE TITLE = "Example" DATAFILE("ex4.dat") OUTFILE("ex4.out") DATA t resp END FIELD 1 FIELD 2 {time of observation} {1 if responder, 0 if nonresponder} MODEL DATA IF resp = 1 THEN {it is a responder} PDF LOGNORMAL(0, t) PARAM a LOW=0.00001 HIGH=9 START=1 PARAM b LOW=0.00001 HIGH=2 START=0.4 END {of the PDF} ELSE {non-responder} PDF LOGNORMAL(t, oo) a, b END END {of if then else} END {data} RUN FULL END {of the MODEL} END END END Alternatively, The following mle data statement will transform the observation time into a set of two times. For a responder, topen will be set to zero and tclose will take the value of the observed time. For a non-responder, topen will take the value of the observed time and tclose will be set to zero. Note that when the second time is set to zero, it will be less than topen, so mle returns the area from topen to infinity. 111 Statistical examples MLE TITLE = "Example" DATAFILE("ex4.dat") OUTFILE("ex4.out") DATA time resp topen tclose END FIELD FIELD = IF = IF 1 2 resp resp {read in observation time} {1 if responder, 0 if nonresponder} == 1 THEN 0 ELSE time END == 1 THEN time ELSE -1 END MODEL DATA PDF LOGNORMAL(topen, tclose) PARAM a LOW=0.00001 HIGH=9 PARAM b LOW=0.00001 HIGH=2 END {of the PDF} END RUN FULL END {of the MODEL} START=1 START=0.4 END END END Survival analysis—Left-truncated observations Left truncation arises in survival analysis when some early portion of an individual's period of risk is not observed. For example, in a prospective study of mortality, we might want to follow all living people in some area, instead of just following individuals from birth. This type of data collection can lead to unbiased results, provided observations are left-truncated at the age at which people are enrolled in the study. The idea is that, had the someone died prior to being enrolled in the study, that would not have been enrolled; therefore, their risk of mortality is know to be zero. For this example, we will use the Siler competing hazards mortality model for a fictitious prospective study of mortality. We will two types of observations: those who died and those who are right censored. For each observation we know three times: the time an individual was enrolled for prospective observation (tα), the last time an individual was observed as alive (tu), and the first time the individual was known to be dead (te). The first time, tα, defines the left truncation point, tu and te define an interval within which death took place. For right censored observations, te is set to infinity (or a number greater than the human lifespan). The likelihood is (6) N S (tui | θ) − S (tei | θ) i =1 S ( tα i | θ ) L(θ, t u , t e , t α ) = ∏ . From this likelihood it can be seen that an individual's probability of death is the area under pdf between tu and te and divided by the area from tα to infinity, which renormalizes the pdf for the period of actual observation. An individual likelihood is constructed in mle as PDF SILER(14, 15, 6) 0.05, 0.3, 0.0, 0.001, 0.05 END, which represents a person who died between ages 14 and 15, and were enrolled in the study at age 6. 112 Statistical examples MLE TITLE = "Example" DATAFILE("ex5.dat") OUTFILE("ex5.out") DATA talpha topen tclose END FIELD 1 FIELD 2 FIELD 2 {Left truncation time} {time last known alive} {time first known dead, or oo if censored} MODEL DATA PDF SILER(topen, tclose, talpha) PARAM a1 LOW=0.00001 HIGH=0.5 PARAM b1 LOW=0.01 HIGH=2 PARAM a2 LOW=0 HIGH=1 PARAM a3 LOW=0.0000 HIGH=1 PARAM b3 LOW=0.00001 HIGH=1 END {of the PDF} END RUN FULL END {of the MODEL} START=0.01 START=0.1 START=0.001 START=0.001 START=0.001 END END END END END END Survival analysis—Right-truncated observations Right truncation arises in survival analysis when the later risk is determined by the study design. For example, we might have data on child mortality for analysis. Each child was followed from birth to age five, and the only children available in the data set were those who died from birth to five. This type of data collection can lead to unbiased results, provided child's observations are right-truncated at age five. For this example, we will use the Gompertz competing hazards mortality model for a fictitious prospective study of mortality. We will have observations selected for mortality by age five and no right-censoring. A single age at death is known. The likelihood for exact times to death with right truncation is N (7) L(θ, t, t ω ) = ∏ i =1 f (ti | θ) . 1 − S (tωi | θ) From this likelihood it can be seen that an individual's probability of death is the pdf at the age of death, divided by the area from 0 to tω, which renormalizes the pdf for the period of actual observation. An individual likelihood is constructed in mle as PDF GOMPERTZ(2.1, 2.1, 6) 0.05, 0.3 END, which is a death at the age of 2.1. 113 Statistical examples MLE TITLE = "Example" DATAFILE("ex6.dat") OUTFILE("ex6.out") DATA tdeath END FIELD 1 talpha = 5.0 {Left truncation time} {set a constant for right truncation} MODEL DATA PDF GOMPERTZ(tdeath, tdeath, talpha) PARAM a1 LOW=0.00001 HIGH=0.5 START=0.01 PARAM b1 LOW=-2 HIGH=-0 START=0.1 END {of the PDF} END RUN FULL END {of the MODEL} END END END Survival analysis—Left-and right-truncated observations This example extends the previous one by including both left and right truncation, as well as interval censored observations. We will use a child mortality example again, but now each children is recruited at some age from 0 to 5 years. Their risk will be left-truncated at the age of entry. Again, only children who die before age 5 would be included in the analysis, so that all exposures are right-truncated. Finally, children are periodically visited, so all observations are interval censored. Again, we will use the Gompertz competing hazards mortality model for this fictitious prospective study of child mortality. The likelihood is (8) N S (tui | θ) − S (tei | θ) i =1 S (tαi | θ) − S (tωi | θ) L(θ, t u , t e , tα , tω ) = ∏ . From this likelihood it can be seen that an individual's probability of death is the area under pdf between tu and te and divided by the area from tα to tω, which renormalizes the pdf for the period of actual observation. An individual likelihood is constructed in mle as PDF GOMPERTZ(topen, tclose, talpha, tomega) 0.05, 0.3 END. For example PDF GOMPERTZ(2.1, 2.4, 1.0, 5.0) 0.05, 0.3 END returns the probability that a child, enrolled in the study at age one and selected for having died by age five, died between the ages of 2.1 and 2.4. 114 Statistical examples MLE TITLE = "Example" DATAFILE("ex7.dat") OUTFILE("ex7.out") DATA talpha topen tclose END FIELD 1 FIELD 2 FIELD 2 {Left truncation time} {time last known alive} {time first known dead, or oo if censored} tomega = 5.0 MODEL DATA PDF GOMPERTZ(topen, tclose, talpha, tomega) PARAM a1 LOW=0.00001 HIGH=0.5 START=0.01 PARAM b1 LOW=0.01 HIGH=2 START=0.1 END {of the PDF} END RUN FULL END {of the MODEL} END END END Survival analysis—Accelerated failure time model Frequently, one is interested in modeling the effects of covariates on the time to failure. A common model of this type is call the accelerated failure time model (AFT), in which covariates shift the time to failure to the right or the left. mle has a general mechanism for modeling the effects of covariates on any parameter that is defined, so that accelerated failure time models can be easily constructed. In this example, the mean of a normal distribution has two covariates that shift the failure time. MLE TITLE = "Example" DATAFILE("ex8.dat") OUTFILE("ex8.out") DATA topen tclose weight age END FIELD FIELD FIELD FIELD 1 2 3 4 {Last observation time prior to the event} {First observation time after the event} {the first covariate} {the second covariate} MODEL DATA PDF NORMAL(topen, tclose) PARAM mu LOW=0.00001 HIGH=100 START=25 FORM=LOGLIN COVAR weight PARAM b_weight LOW=-20 HIGH=20 START=0 COVAR age PARAM b_age LOW=-20 HIGH=20 START=0 END {param mu} PARAM s LOW=0.01 HIGH=50 START=3 END END {of the PDF} END RUN FULL END {of the MODEL} END 115 END END Statistical examples From this specification of covariates, the µ intrinsic parameter of the normal distribution will be computed for the ith observation as µi = mu×exp(weighti × b_weight + agei × b_age). Survival analysis—Hazards model An alternative to the accelerated failure time model is the hazards model. Under the hazards model, the effects of covariates is to raise or lower the hazard by some amount9. In general, if h(t) is the hazard function, covariates for the ith individual, xiβ, are modeled on the hazard as hi(t) = h(t)exp(xiβ). Most of the probability density functions in mle provide a mechanism for modeling the effects of covariates on the hazard. You can find out for any particular pdf by typing, for example, mle -h lognormal. A message will tell you whether or not covariates can be modeled on the hazard. In this example, the same normal distribution used in the previous example has had the two covariates moved from affecting µ to affecting the hazard. MLE TITLE = "Example" DATAFILE("ex8.dat") OUTFILE("ex8.out") DATA topen tclose weight age END FIELD FIELD FIELD FIELD 1 2 3 4 {Last observation time prior to the event} {First observation time after the event} {the first covariate} {the second covariate} MODEL DATA PDF NORMAL(topen, tclose) PARAM mu LOW=0.00001 HIGH=100 START=25 END PARAM s LOW=0.01 HIGH=50 START=3 END HAZARD COVAR weight PARAM b_weight LOW=-20 HIGH=20 COVAR age PARAM b_age LOW=-20 HIGH=20 END {hazard} END {of the PDF} END RUN FULL END {of the MODEL} START=0 START=0 END END END Survival analysis—Immune subgroup When observing times to events, there may be an unidentifiable subgroup for whom risk of experiencing the event is zero. These make up a so-called immune fraction, a sterile subgroup, or a contaminating fraction. It is possible to model 9 Except for the exponential and the Weibull distributions, accelerated failure time models are not proportional hazards models. 116 Statistical examples some fraction of individuals who are not at risk, so to statistically identify the subgroup. If complete records are available for all individuals, one could simply remove the sterile individuals from the analysis of the non-sterile fraction. When complete records are not available (i.e. we cannot tell a sterile individual from a rightcensored individual) maximum likelihoods methods are easily adapted to include estimation of an unknown fraction of individuals who are not susceptible to failure. The effect of the sterile subgroup on the survival distribution can be seen in Figure 5. Call s the non-susceptible fraction. Then the proportion of individuals who are susceptible at the start of risk is p(0)=1 – s. Inspection of Figure 5 suggests that the fraction of surviving individuals at time t must be made up of two fractions. One is Sf(t) weighted by the fraction not sterile, (1 – s). The second fraction is constant at s: S (t ) = (1 − s ) S f (t ) + s . The overall hazard at time t is simply the hazard of the non-susceptible subgroup weighted by the proportion of that group at time t. The proportion of susceptible individuals at time t will decrease as fecund individuals fail, and must depend on survivorship of the non-sterile group to time t and the initial fraction of sterile individuals, s. This fraction at time t is p (t ) = (1 − s ) S f (t ) s + (1 − s ) S f (t ) . The hazard at time t is h(t ) = p (t )h f (t ) = (1 − s )S f (t ) f f (t ) s + (1 − s )S f (t ) S f (t ) = (1 − s ) f f (t ) s + (1 − s )S f (t ) and the probability density function is found as 1 1 s 0 0 Time Time Figure 5. The effect of contamination by a sterile subgroup on the survivorship distribution. The subgroup makes up fraction s of the initial population at risk. The left panel shows survivorship for the uncontaminated group and the right panel shows the same distribution contaminated by the sterile subgroup. 117 Statistical examples f (t ) = h(t ) S (t ) = (1 − s )S f (t )h f (t ) = (1 − s ) f f (t ) . These forms for the PDF, SDF, and hazard function provide for reasonably straight-forward maximum likelihood estimation of the parameters of the distribution for the susceptible observations as well as s. The general form of the likelihood when sterility is included, becomes N (9) L(θ, s | tu , te ) = ∏ (1 − s ) f (tei | θ) i =1 δ{tui , tei } 1−δ{tui ,tei } S (tui | θ) − S (tei | θ) + sδ{tei , tωi } , where the δ{x,y} is the Kronecker's delta function, which equals one when x=y, and zero when x≠y. The following example estimates one such model. The likelihood begins with the MIX() function, which produces an average of the second and third arguments, weighted by first argument (which is a probability). The first PDF is PDF STERILE() END, which returns one if tclose is infinity or less than topen. Covariates are modeled on both the non-susceptible fraction as well as the hazard of the susceptible fraction. MLE TITLE = "Example" DATAFILE("ex.dat") OUTFILE("ex.out") DATA topen tclose weight age END FIELD FIELD FIELD FIELD 1 2 3 4 {Last observation time prior to the event} {First observation time after the event} {the first covariate} {the second covariate} MODEL DATA MIX( PARAM s LOW=-100 fraction} COVAR weight COVAR sex END {param s} HIGH=100 START=0 FORM=LOGLIN PARAM b_s_weight PARAM b_s_sex LOW=-20 LOW=-20 PDF STERILE(topen, tclose) END, observations} {define the immune HIGH=20 HIGH=20 END 118 END END {returns 1 for right censored PDF LNNORMAL(topen, tclose) PARAM a LOW=0.00001 HIGH=100 START=25 END PARAM b LOW=0.01 HIGH=50 START=3 END HAZARD COVAR weight PARAM b_weight LOW=-20 HIGH=20 COVAR sex PARAM b_sex LOW=-20 HIGH=20 END {hazard} END {of the PDF} {mix function} ) END RUN FULL END {of the MODEL} START=0 START=0 START=0 START=0 END END Statistical examples Linear regression in the likelihood framework This example shows how linear regression is treated within the framework of likelihood models. The linear regression model with n covariates specifies that the value of the ith observation is a combination of a y intercept term (α) an additive covariate-parameter term (xi1β1 + xi2β2 + ... + xinβn) plus an error (ei). Furthermore, distribution among all error terms (ε) is normally distributed with a mean of zero and a standard deviation of σ. The formal specification is: yi = α + xi1β1 + xi2β2 + ... + xinβn + ei ε ~ N(0, σ) Under the likelihood model, the equivalent specification can be given in a very different format. Y ~ f (µi , σ) µi = α + xi1β1 + xi 2β2 + ... + xinβ n . The difference in the two specifications exemplifies the two different philosophies in the methods. Under regression, difference between each observation and the line defined by parameters and covariates is treated as "error". Under the likelihood model, the observations are normally distributed, with a mean that is determined by a series of covariates. The data for this example are fictitious. The third column contains the values of yi, column 1 is xi1 and xi2. 0.4 53 64 0.4 23 60 3.1 19 71 0.6 34 61 4.7 24 54 1.7 65 77 9.4 44 81 10.1 31 93 11.6 29 93 12.6 58 51 10.9 37 76 23.1 46 96 23.1 50 77 21.6 44 93 23.1 56 95 1.9 36 54 29.9 51 99 The following shows the output from a regression analysis 119 Statistical examples VARIABLE Indept Variable: Y Depent Variable: 1 Depent Variable: 2 VAR. Alpha B(1) B(2) SOURCE REGRESS. RESIDUAL TOTAL COEFFICIENT 66.46540496 1.29019050 -0.11103677 SUM OF SQUARES 2325.1795 2101.2911 4426.4706 MEAN STD. DEVIATION COEF. VARIAT. 76.17647059 16.63293154 0.21834736 11.07058824 9.74453467 0.88021833 41.17647059 13.43612339 0.32630585 STD ERROR T STATISTIC 0.34276468 0.24858973 3.76407073 -0.44666675 DF 2 14 16 R SQUARE = 0.5253 STANDARD ERROR OF ESTIMATE = MEAN SQUARE 1162.5897 150.0922 276.6544 F RATIO 7.7458 12.251213 The following shows the mle code for the equivalent likelihood model. Notice that this program is similar to the accelerated failure time model, except that the form for modeling covariates on the mean is additive (FORM = ADD). MLE TITLE = "Test regression" DATAFILE("eg.dat") OUTFILE("eg.out") DATA y x1 x2 END FIELD 3 FIELD 1 FIELD 2 MODEL DATA PDF NORMAL(y) PARAM mu LOW = 7 HIGH = 500 START = 50 FORM = ADD COVAR x1 PARAM b1 LOW=-10 HIGH=10 START=0 END COVAR x2 PARAM b2 LOW=-10 HIGH=10 START=0 END END {param} PARAM sig LOW=0.1 HIGH=200 START=10 END END {pdf} END {data} RUN FULL END END The following output fragment shows the result from this model. LogLike= -65.06725 Iterations= 334 Func evals= 25383 Del(LL)= Converged normally Results with estimated standard errors. Solution with 4 free parameters Name Form Estimate mu ADD 66.46589883575 b1 1.290194199465 b2 -0.11104975496 sig 11.11779472801 9.745E-0011 (27 evals) Std Error 9.596050356992 0.453901547297 0.202022074279 2.630810510011 t against 6.92638078825 0.0 2.84245384742 0.0 -0.5496911927 0.0 4.22599601366 0.0 The results are nearly identical to the regression results presented earlier. All parameters of the likelihood model are given with a standard error. 120 Statistical examples For a series of data that are complete, as given in this example, there is little advantage to using maximum likelihood for parameter estimation. Maximum likelihood methods are most useful under some simple modificatons of the data or model used above. Suppose, that in addition to the above observations we had several observations that were less than the minimum or greater than the maximum value of y that could be measured by our instrumentation. The maximum likelihood model could accomodate such observations with ease. Another modification might be to change the underlying distribution to something other than a normal. For example, ε could take on an extreme value distribution or a Laplace distribution. Again, the likelihood framework easily accomodates such modifications. Case study —Mortality models Estimation of age-at-death distributions from skeletal indicators is an important task for ecologists and anthropologists alike. This case study discusses some likelihood models to estimate such distributions. The simplest case arises when exact skeletal ages at death are known for a representative sample of N skeletons covering the entire life span. Call f(a|θ) the probability density function that represents the age-at-death distribution with parameters θ. For example, it might be the SILER model, if individuals span the entire lifespan, or it might be the MAKEHAM (Gompertz-Makeham) model if the entire sample consists of adults. Under either model, the likelihood given a series of skeletal ages is Table 7. Ages at death for 608 Dall mountain sheep. Source: Deevey (1947). Minimum age Maximum age Number dying in interval 0 0.5 33 0.5 1 88 1 2 7 2 3 8 3 4 7 4 5 18 5 6 28 6 7 29 7 8 42 8 9 80 9 10 114 10 11 95 11 12 55 12 13 2 13 14 2 121 Statistical examples N L = ∏ f ( ti | θ ) (10) i =1 if exact ages are known, or N L = ∏ [ S (tu | θ) − S (te | θ)] (11) i =1 if ages are known over intervals. The data of Murie (1944) as reported in Deevey (1947) will serve as our example. The raw data consist of 608 Dall mountain sheep skulls collected in the Mt. McKinley Park (Table 7). The ages at death were determined from the annual growth rings on the horns. Causes of death were not determined, but predation by wolves was quite common. The data were fit by maximum likelihood to the mixed-makeham model. The most parsimonious model had all parameters except the α2 parameter. The following parameter estimates (and standard error) were found: p = 0.221 (0.018), α1 = 1.297 (0.211), α3 = 0.00146 (0.00032), β3 = 0.618 (0.023). The log-likelihood was 1461.350. 0.4 0.35 Probability of success 0.3 0.25 0.2 0.15 0.1 0.05 0 0 2 4 6 8 10 12 Treatment length (days) The interpretation of the mixed-makeham model is that there are two subgroups: a high-risk (infant-mortality) subgroup and low-risk (normal) subgroup. The results suggest that 22% of the deaths were to individuals in the first subgroup. The expected age at death can be found by taking ∞ (12) E (a) = ∫ S (a | θˆ )da 0 where θ̂ denotes that we are using the parameter estimates. Additionally, the expectation can be taken for each of the subgroups by fixing p = 0 or p = 1. The expectation comes to 7.11 years for the full sample, which is very close to the 7.09 years found by Deevey (1947) using the life table method.. For the first subgroup, the expectation of life is 0.77 years, and for the low risk subgroup the expectation of life is 8.90 years. A plot of the survival distribution for the most parsimonious model is shown in the following figure. 122 Statistical examples The following code show the final analysis and other statistics computed for this model. MLE {Analysis of the data from Murie (1944) as reported in Deevey (1947). The raw data consist of 608 Dall mountain sheep skulls collected in the Mt. McKinley Park. Ages at death were determined from the annual growth rings on the horns.} INPUT_SKIP = 2 TITLE = "Murie skull data -- Siler model" EPSILON = 0.0000001 DATAFILE("murie.dat") OUTFILE(DEFAULTOUTNAME) PLOTFILE(DEFAULTPLOTNAME) MAXITER = 500 DATA frequency last_alive first_dead FIELD 3 FIELD 1 FIELD 2 END MODEL DATA PDF MIXMAKEHAM(last_alive, first_dead) PARAM p LOW = 0 HIGH = 1 START = 0.25 END PARAM a1 LOW = 0 HIGH = 2 START = 0.5 END 0 PARAM a3 LOW = 0 HIGH = 4 START = 0.001 END PARAM b LOW = 0 HIGH = 3 START = 0.5 END END END RUN THEN e2 = INTEGRATE z (0, 120) z * PDF MIXMAKEHAM(z) p, a1, 0, a3, b END END e2a = INTEGRATE z (0, 120) z * PDF MAKEHAM(z) a1, a3, b END END e2b = INTEGRATE z (0, 120) z * PDF MAKEHAM(z) 0, a3, b END END PRINTLN("Expectation of life: MixedMakeham model = ", e2) PRINTLN("Expectation of life: Subgroup 1 = ", e2a) PRINTLN("Expectation of life: Subgroup 2 = ", e2b) plotoptions = "set ylabel 'Probability of success'; " + "set xlabel 'Treatment length (days)'; " lo = 0 hi = 12 pts = 50 PLOT (plotoptions) CURVE x (lo, hi, pts) x, PDF MIXMAKEHAM(x) p a1 0 a3 b END END {curve} CURVE WITH "lines linetype 2" x (lo, hi, pts) x, PDF MIXMAKEHAM(x) p a1 0 a3 b END + 1.96*SETRANSFORM(PDF MIXMAKEHAM(x) p a1 0 a3 b END) END {curve upper CI} CURVE WITH "lines linetype 2" x (lo, hi, pts) x, PDF MIXMAKEHAM(x) p a1 0 a3 b END - 1.96*SETRANSFORM(PDF MIXMAKEHAM(x) p a1 0 a3 b END) END {curve lower CI} END {plot} END {run} FULL END END 123 Statistical examples Logistic regression Tanner (1996) gives an example of logistic regression using data from Mendenhall et al. (1989). Twenty four patients were given radiotherapy for some number of days to treat a tongue carcinoma. Three years later, the treatment is classified as success, by the absence of the tumor after three years, or failure if the disease recurs. The observations are given in the file RADIOT.DAT, and the mle program file is RADIOT.MLE. MLE INPUT_SKIP = 8 {skip comments} TITLE = "Radiotherapy success" DATAFILE("radiot.dat") {Input data file name} OUTFILE(DEFAULTOUTNAME) METHOD = CGRADIENT1 EPSILON = 1E-10 DATA days success END FIELD 1 FIELD 2 {Days of treatment} {Success of treatment at 3 years} ALT_LOGISTIC = TRUE { use instead of exp(xb)/[1 + exp(xb)] 1/[1 + exp(xb)]} MODEL DATA PDF BERNOULLITRIAL(success) PARAM b_0 LOW = -500 HIGH = 500 FORM = LOGISTIC COVAR days PARAM b_days LOW = -10 HIGH = 10 START = 0 END END {param} END {pdf} END {data} RUN FULL END {model} END {of the MLE program} In this model, the variable days is the covariate of interest and the outcome is the variable success. The logistic regression model specifies the probability of success as (13) pi = exp ( β0 + β1 xi ) 1 + exp ( β0 + β1 xi ) , where xi is the number of days of treatment and the β coefficients are parameters to be estimated. Note that the variable ALT_LOGISTIC is set to TRUE for this particular form of the logistic model. The likelihood under the logistic model is probability pi for each patient for whom therapy is successful, and 1 – pi for each patient for whom therapy is unsuccessful. Hence, each observation is treated as a Bernoulli trial for success with parameter p modeled as (13). The likelihood is 124 Statistical examples N exp ( β0 + β1 x1i ) L = ∏ B t , . i =1 1 + exp ( β0 + β1 x1i ) The resulting parameter estimates suggest the log odds of recurrence by year 3 with zero days of treatment are 3.819. Paradoxically, the log odds of success decrease with each extra day of treatment by about 8.6 percent! Convergence at EPSILON = 1.000E-0010 LogLikelihood: -13.89411 AIC: 31.788220 Del(LL): 1.367E-0014 Iterations: 8 Function evaluations: 824 Converged normally Results with estimated standard errors. (10 evals) Solution with 2 free parameters Name Form Estimate Std Error b_0 LOGISTIC 3.819417361125 1.739572481596 b_days -0.08648243176 0.041100225123 t against 2.19560691005 0.0 -2.1041838944 0.0 The resulting logistic curve can be plotted with a 95% confidence interval by replacing the RUN…FULL part of the model statement with the following code: RUN FULL THEN {Code for plotting the logistic curve with CIs} PLOT ("set ylabel 'Probability of success'; " + "set xlabel 'Treatment length (days)'; " + "set yrange[0:1];") CURVE x = 20 to 60 x, LOGISTIC(p + x * b_days) END {curve} CURVE WITH "lines linetype 2" x = 20 to 60 x, LOGISTIC(p + x * b_days) + 1.96*SETRANSFORM(LOGISTIC(p + x * b_days)) END {curve upper CI} CURVE WITH "lines linetype 2" x = 20 to 60 x, LOGISTIC(p + x * b_days) 1.96*SETRANSFORM(LOGISTIC(p + x * b_days)) END {curve lower CI} END {plot} END {full then} 1 Probability of success 0.8 0.6 0.4 0.2 0 20 25 30 35 40 45 Treatment length (days) END {model} 125 50 55 60 Statistical examples Case study: Extended Poisson for modeling species abundance This example shows the use of a user-defined function for programming a pdf that is not built into mle. In fact, the Thomas distribution is available in mle, but we will ignore the built-in implementation for this example. This example also shows some graphics programming in mle. Thomas (1949) discusses the problem of clustering among a given species of plants in ecological surveys. Ecologists were using the Poisson distribution to describe the number of plants found in randomly selected square quadrats. The Thomas distribution (Thomas 1949; Christensen 1984) models the count of k plants in a quadrat as resulting from one or more clusters of plants, and is given by a j − jb ( jb)k − j e (k − j )! j =0 j ! k (14) f ( k ; a , b) = e − a ∑ Data are counts of Armeria maritima plants surveyed in 100 quadrats on Blakeney Marsh: 57 quadrats with 0 plants; 6 with 1 plant; 12 with 2; 5 quadrats each with 3, 4, and 5 plants; 7 quadrats with 6 plants; and 1 quadrat each with 7, 9 and 10 plants. The following mle program fits these data to the Thomas distribution as well as the Poisson distribution and graphs the distributions of observed versus expected number of plants. 126 Statistical examples MLE {Distribution of Ameria maritima in Blakeney Marsh using the Thomas distribution or Double Poisson distribution. Data are given by M Thomas (1949) A generalization of Poisson's Binomial Limit for use in Ecology, Biometrika 36:18-25.} FUNCTION thomas(k:INTEGER, a:REAL, b:REAL):REAL { -- returns the pdf for the thomas dist count k and parameters a and b} RETURN = EXP(-a)*SUMMATION j (0, k) ((a^j)/FACT(j))*EXP(-j*b)* (((j*b)^(k - j))/FACT(k - j)) END {summation} END {function thomas} DATAFILE("armeria.dat") OUTFILE(DEFAULTOUTNAME) PLOTFILE(DEFAULTPLOTNAME) INPUT_SKIP = 3 DATA numb_plants FIELD 1 numb_quadrants FIELD 2 FREQUENCY = numb_quadrants END TITLE = 'Thomas distribution' MODEL PREASSIGN BEGIN a = PARAM aa LOW=0.0001 HIGH=20 START=2.0 END b = PARAM bb LOW=0.0001 HIGH=40 START=0.5 END END DATA thomas(ROUND(numb_plants), a, b) END END {preassign} RUN FULL END {Plot obs & exp # of quadrants with k plants under the Thomas distribution} PLOT ("set title 'Thomas distribution'","set xrange [-0.5:10.5]; set key top right") CURVE KEY "Expected" WITH "boxes" i = 0 TO 10 i, 100*thomas(i, aa.1.1, bb.1.1) END CURVE KEY "Observed" WITH "impulses" d_idx = 1 TO 11 numb_plants, numb_quadrants END END {plot} TITLE = 'Poisson distribution' MODEL DATA PDF POISSON(numb_plants) PARAM m LOW = 0.001 HIGH = 100 END END RUN FULL END START = 1.5 END {Plot the obs & exp # of quadrants with k plants under the Poisson distribution} WRITEPLOTLN("pause -1") PLOT ("set title 'Poisson distribution'", "set xrange [-0.5:10.5]; set key top right") CURVE KEY "Expected" WITH "boxes" i = 0 TO 10 i, 100*PDF POISSON(i) m.2.1 END END CURVE KEY "Observed" WITH "impulses" d_idx = 1 TO 11 numb_plants, numb_quadrants END 127 Statistical examples END {plot} END The resulting parameter output are given in annotated form below. The difference in AIC between the two modesl suggests that the Thomas distribution fits the data much better than the Poisson. The plots in Figure 6 show how much better the Thomas distribution fits compared to the Poisson. 11 lines read from file armeria.dat 11 Observations kept and 0 observations dropped. NAME MEAN VAR STDEV MIN MAX numb_plant 5.00000000 11.0000000 3.31662479 0.00000000 10.0000000 numb_quadr 9.09090909 264.690909 16.2693242 0.00000000 57.0000000 FREQUENCY 9.09090909 264.690909 16.2693242 0.00000000 57.0000000 Model 1 Run 1 : Thomas distribution LogLikelihood: -158.0639 AIC: 320.12784 Del(LL): 0.0000016017 Iterations: 6 Function evaluations: 158 Converged normally Results with estimated standard errors. (6 evals) Solution with 2 free parameters Name Form Estimate Std Error aa 0.581452489433 0.088149263241 bb 1.717416986359 0.258883747023 t against 6.59622631041 0.0 6.63393127652 0.0 Model 2 Run 1 : Poisson distribution LogLikelihood: -225.3173 AIC: 452.63465 Del(LL): 0.0000000000 Iterations: 2 Function evaluations: 26 Converged normally Results with estimated standard errors. (3 evals) Solution with 1 free parameter Name Form Estimate Std Error m 1.579996571411 0.069292424625 t against 22.8018658598 0.0 Figure 6. Plots of observed and expected numbers of plant counts under two different distributions. 60 60 Thomas distribution 50 40 40 Expected Observed 30 Poisson distribution 50 Expected Observed 30 20 20 10 10 0 0 0 2 4 6 8 10 128 0 2 4 6 8 10 Programming tutorial 129 Programming tutorial Chapter 7 Programming tutorial The mle programming language is a general purpose algebraic programming language. This chapter provides a tutorial and examples of some of the language tools that can be used for many types of programming. Introduction to programming in mle People get passionate about programming languages the way they get passionate about religion.10 There are thousands of programming languages that have been written. Why should you use mle? Why indeed. With so many good general purpose programming languages available in the world, I will not try to make strong arguments that mle is the best general purpose programming language, and I will not even claim that it is the single best language for any specific purpose. Rather, I will argue that there some pretty good reasons to use mle. But, if you are already a crack Ada, Basic, COBOL, Fortran, Python, SAS, SNOBOL, Java, perl, or COBOL programmer, by all means use that language you know best. If you are an experienced programmer in any conventional programming language, the learning mle will be simple—the syntax is straightforward, and punctuation is minimal. If you are learning a programming language for the first time, mle is a good language beginner’s language. If not, here are some reasons to learn and use mle. • 10 It will make it easier to develop and estimate statistical models in mle. This is perhaps the biggest reason to learn mle instead of another language. Learning general-purpose computer programming in mle will simultaneously provide tools for scientific computing, model development and statistical estimation. Okay, this is an exaggeration. After all, hundreds, if not thousands, of wars have been fought over religion. Fortunately, programming language bigotry does not quite rise to that level of fanaticism! 131 Programming tutorial • • • • • It is free for non-commercial use. It is a simple language. It is almost as simple as early versions of Basic, but with some nice programming features like those found in Pascal. So many newer languages are badly bogged down with widget libraries, object oriented constructs, and other complexities; it makes it difficult to do simple data manipulation or calculation. It recognizes many different number formats. This can be helpful when you need to read in, say, Roman numerals, time formats, dates, etc. It comes with many useful numerical and mathematical functions. It comes with many useful statistical functions and predefined probability density functions. • It can work with complex numbers. • It has built-in help. • Learning how to program in mle will make it easy to move to another programming language. There is no single language that is good at handling all programming problems. All languages have strengths and weaknesses for particular programming tasks. mle is good for doing straightforward manipulation of data and scientific computation, and developing simple simulations. The extensive library of predefined functions is what makes mle useful for these tasks. The language is not suited for building complex interfaces (using the mouse, graphics, menus, etc.), and is not good for low-level development (like for writing an operating system). Additionally, mle is an interpreted language. Hence, if speed is an important criterion, then conventionally-compiled languages like C or Pascal should be used instead of mle. Elements of mle programming The first program The outline of an mle program looks like this: MLE <statement 1> <statement 2> <statement 3> . . . END {mle} 132 Programming tutorial Between the keywords MLE and END comes a series of statements. When the program is run, each statement is executed in turn. Let’s put a statement in. Type the following text into an editor, save it, and run it. MLE WRITELN('Hello Universe!') END This program consists of a single WRITELN() procedure. WRITELN() takes a list of zero or more arguments, writes them to the screen (or to a file in some circumstances), and puts the cursor at the start of the next line on the screen. The single argument is the string 'Hello Universe!'. The term string refers to a sequence of text characters. The single quote marks on each side serve to define the extent of the string. As it happens, you can also use double quote marks, so that "Hello Universe!" does the same thing. You cannot mix the two types of marks for a string. If all went well when you ran the program, the message Hello Universe! was sent to the screen, and you have successfully written your first mle program. If not, you have probably gotten an error message. For example, if you left off the second quote mark, the message is returned: Unclosed ' at end of a line or file Error found while parsing "(" line 2 column 10 in file eg1.mle mle, like all programming languages, requires you to follow some very strict rules. Here are a few to get you started. • • MLE Arguments to simple functions and procedures are enclosed in a set of parentheses (not square brackets or curly braces). Keywords and variables cannot have spaces and most punctuation within them. mle is a free-fromat language. Indentation, spacing and formatting are ignored, with some exceptions. The previous program could be written on a single line as: WRITELN ( "Hello Universe!" ) • END A space or valid punctuation mark must separate keywords. The program MLEWRITELN("Hello Universe!")END is not valid because MLE and WRITELN are run together. The program MLE WRITELN("Hello Universe!")END is a valid program. Notice that the )END does not require an additional space, because ‘)’ is punctuation. Identifiers, assignment statement, and functions Let’s expand on the first program a bit. The second program introduces assignment statements, identifiers, function calls, and comments. 133 Programming tutorial MLE { -- Writes a greeting card to the universe. Written 29 Mar 2003 } population = 6.3 {update from http://www.ibiblio.org/lunarbin/worldpop} greeting = 'Hello Universe!' { -- now create a signature that includes everyone} signature = ' -- from ' + REAL2STR(population, 3, 1) + '+ billion of us on earth.' { -- write the message here} WRITELN(greeting) WRITELN(signature) END The first thing to notice about this program is that it contains comments. The comments are contained within curly brackets, {}. Comments are ignored and are there to help programmers makes sense of the program months or years later. As a programmer, you should develop the discipline to document your program with comments. Try to develop a consistent and descriptive style for formatting your programs, including informative comments sprinkled throughout. In this program, we have created some variables. Variables are named “objects” that take on a value. In a spreadsheet program, there are “cells” available that can take on values. Variables are like the cells in a spreadsheet program, except that they are not laid out in a visual grid. The first variable created above is called population. The value 6.3 is assigned to this variable. Since 6.3 is a real number rather than an integer or a string of characters, the variable will be created to be a real number and initially assigned the value 6.3. The variable greeting is assigned to a string of characters: ‘Hello Universe!’. Consequently, the greeting is created as a STRING variable. The singlequotation marks are not actually part of the string. Rather, they serve to delimit where the string starts and where it ends. The quote marks can be single quote marks (') or double quote marks ("), but they must match. 'Hello" is not a valid way to specify a string. However, you can specify the string People’s world as "People’s world". What goes into a variable name? There are several rules that must be followed. • • • First, a variable name must begin with a letter. The letter can be upper-case or lower-case, it does not matter—mle treats uppercase and lowercase as identical for identifier names and keywords. After at least one letter, other letters, numbers, a period or an underscore may be used. You should avoid using predefined keywords, function names, and procedure names. Sometimes you will get an error (i.e. using a keyword) and other times, you will simply add confusion and disable the original purpose of the keyword (e.g. using a predefined function). 134 Programming tutorial • An additional point of good programming practice is to create variable names that are meaningful. Choose subject_birthdate over something less descriptive like sbd. Doing so will pay off in the extra time many times over. The payoff comes when you look at your program weeks, months or years later, and are able to quickly understand what the program does. On the other hand, some abbreviation is warranted, particularly if you do so consistently for all variables. If you always use subj in place of subject, the variable name subj_birthdate might work just as well. The variable signature is also assigned a string value. In this case, the string value is computed as the concatenation of three separate elements: first a string constant, secondly a string value returned by the REAL2STR() function, and third a string constant. Assignment statements serve two purposes. First, they create new variables. The variables population, greeting, and signature did not exist until they were defined in the assignment statement. When each variable is first used in an assignment statement, its type is determined by the type returned from the expression on the right-hand side of the assignment statement. The other purpose of assignment statements is to assign values to variables, as is done here. Once a variable is created, it can be assigned other values of the same type (or values that can be converted into the same type, an integer into a real, for example). Types Variables (and expressions, for that matter) in mle can take on one of the following types: REAL, INTEGER, COMPLEX, BOOLEAN, STRING, CHAR (character), and FILE. A detailed discussion of these types is given in the reference manual. A summery is given here. A variable's type refers to the domain of values that the variable can take on. For example, INTEGER variables can take on a limited range of integer values, BOOLEAN variables can only take on the values TRUE and FALSE. Variables can be defined for each of the seven types and expressions always take on one of these types. Here is an explanation of each: • • • • Real variables represent the continuous real number line. For example, 3.5, 1E-23, 7.0, and -19.999 are all real numbers. Integer variables take on whole number values over a machine-dependent range of numbers. For most versions of mle this range is [-2,147,483,648 to 2,147,483,647]. Complex variables include a real number part and an imaginary part. Complex numbers are specified by expressions such as 1.2 + 0.4i, or 0+ 1i. Boolean variables take on one of two states: TRUE or FALSE. No other value is allowed or recognized. Boolean expressions are frequently used to test conditions in the IF...THEN...ELSE...END function or statement. 135 Programming tutorial • • • String variables hold a sequence of character constants. A string written as a constant is a sequence of characters, enclosed within quotes ("). The single quote character (') can be used as well for strings greater than one character. String variables are typically used to assign file names, titles, etc. Character variables take on the value of a single character. When written as a constant in a program, character constants consist of a single character enclosed within single quotes ('). Character constants are not typically used within a user's program, but are available if needed. Usually, character constants and variables can be used anywhere string variables are allowed. File variables are used to reference files. Most of the time, file variables are transparent, and you need not explicitly define or manipulate file variables. This is because mle defines and does the bookkeeping for the data file, the output file, the plot file, and the screen (or standard output) file. File variables can be created should you wish to create and manipulate other files. Here are some examples, largely self explanatory, of typical assignment statements: large_data subtitle nine five one onealso = = = = = = N_OBS > 5000 "Analysis of " + INFILE 3 * 3.0 2 + 3 SIN(23)^2 + COS(23)^2 SIN(23+0i)^2 + COS(23)^2 {large_data is declared as type BOOLEAN} {subtitle is declared as type STRING} {nine is type REAL} {five is type INTEGER} {one is type real} {onealso is type COMPLEX} You can explicitly define a variable's type when the variable is first referenced in an assignment statement. Here are some examples: c:STRING = 'x' nine:REAL = 3 * 3 t:BOOLEAN = TRUE ang:REAL = SIN(2*pi) ang2:COMPLEX = GAMMA(1.5) {c would otherwise be CHAR} {nine would otherwise be INTEGER} {t is explicitly declared BOOLEAN, it is the default} {ang is explicitly declared REAL, it is the default} {force ang2 to COMPLEX} 136 Programming tutorial Table 8. Algebraic, boolean, and logical operators. Operator + ^ * / DIV MOD AND SHL SHR + OR XOR == or = <> < > <= >= Function Example Equivalent function uniary negation uniary positive power function multiply function divide function integer divide function integer modulo function boolean and logical and function logical shift left function logical shift right function addition subtraction boolean and logical or function boolean and logical xor function boolean “is equal” function boolean “not equal” function boolean “less than” function boolean “greater than” function boolean “less than or equal to” function boolean “greater than or equal to” function -x NEGATE(x) +x x^y POWER(x, y) x*y MULTIPLY(x, y) x/y DIVIDE(x, y) x DIV y IDIV(x, y) x MOD y MODF(x, y) x AND y ANDF(x, y) x SHL y SHIFTLEFT(x, y) x SHR y SHIFTRIGHT(x, y) x + y ADD(x, y) x - y SUBTRACT(x, y) x OR y ORF(x, y) x XOR y XORF(x, y) x == y ISEQ(x, y) x <> y ISNE(x, y) x < y ISLT(x, y) x > y ISGT(x, y) x <= y ISLE(x, y) x >= y ISGE(x, y) Statements with numeric, boolean, and logical expressions Algebraic expressions are expressions are created using a series of special operators and calls to functions. Operators include algebraic symbols like +, –, *, /, ^, and a series of algebraic keywords for integer operations, DIV, MOD, SHL, SHR (See Table 8). The right hand side of an assignment statement is an expression. Examples of valid assignment statements with expressions on the right-hand side are: n n n n i i = = = = = = 2*3 (HOURS/60)^2 12.5*first - 10*second SIN(2*PI) mask SHL 4 23 DIV 4 Boolean expressions evaluate to either TRUE or FALSE. The operators for creating boolean expressions are >, <, >=, <=, ==, <>, and boolean keywords, AND, OR, XOR, and NOT and some simple functions. These operators are used in the same way as they are in many other programming languages. b = a <> 42^2 b = (a <> 12) AND (a >= 0) 137 Programming tutorial The difference between boolean and logical expressions is that boolean expressions work with the values TRUE and FALSE only, whereas logical expressions work with bits on integers. For example, NOT TRUE is equal to FALSE; but NOT 767 is equal to -768. How does this work? The number 767 is represented by the computer as the binary sequence 00000000000000000000001011111111. The logical NOT operator flips all 1s to 0s and 0s to 1s, so that the number becomes 11111111111111111111110100000000. The first (left most) bit denotes a negative value, so the value is –768. The logical AND, OR, and XOR functions act bit by bit, as well. Thus the binary values 2X101101 AND 2X111000 (which is the same as 45 AND 56) evaluates to 40 (or 2X101000).11 The SHL and SHR operators shift bits to the left and right. So, 2X000111 SHL 3 (i.e. 7 SHL 3) evaluates to 56 (or 2X111000). See Table 9 defines the logical operators. Table 9. Definition of logical operators. Operator Descritpion Example Result NOT Flips all 0s to 1s and 1s to 0s NOT -143 AND Returns 1 if both bits are 1. 1 AND 1 à 1, 0 AND 1 à 0, 0 AND 0 à 0 2x10¹⁰ AND 2x1100 8 OR Returns 1 if either bit is a 1. 1 OR 1 à 1, 0 OR 1 à 1, 1 OR 0 à 1, 0 OR 0 à 0 2x10¹⁰ OR 2x1110 14 [2x1110] XOR Exclusive OR function. Returns a 1 if one of the bits is 1 and the other is 0. 1 XOR 1 à 0, 0 XOR 1 à 1, 1 XOR 0 à 1, 0 XOR 0 à 0 2x10¹⁰ OR 2x1110 6 [2x0110] 142 [2x1000] You might be wondering how mle decides whether an operator is boolean or logical. The answer is simple: if both operands are boolean types, the operator will be boolean. If both operands are integers, the operator will be logical. If one operator is boolean and one is logical, an error results. For the expression (x >= 4) OR (y <= 2), each of the expressions in parenthesis will evaluate to TRUE or FALSE, so that the OR will be a boolean operator. Operator precedence Mathematicians have developed a series of conventions on operator precedence. When you see the expression 4x2 + 2x + 3, you know, by convention, that the exponentiation occurs first, the multiplications take place second, and the addition is third. The built in operators in mle follow a more or less standard precedence. That is, an expression like 4+2*3 will evaluate 2*3 first and then 11 The 2X… notation is how numbers are specified in other bases (base 2 or binary in this case). For base 2 numbers, only the digits 0 and 1 are permitted on the right-hand side of the X. Octal (base 8) numbers can be specified as 8X…, where digits from 0 to 7 are permitted on the right hand side of X. 138 Programming tutorial add 4. The precedence of operators are defined in Table 10. Higher precedence Table 10. Operator precedence. Operator(s) Precedence Category - + not high Uniary operators ^ Exponent operator * / div mod and shl shr Multiplying operators + - or xor Adding operators = (or ==) <> < > <= >= low Relational operators operators will always be evaluated before lower precedence operators More on strings String constants are values that are enclosed within quotes. Here are a few rules for string constants: • • when you specify a string constant, you can use either the " or the ' characters. If you open a string constant with ", you must close it with ". If you open the string with ' you must close with '. Hence, the statements: foo = "My name is " bar = 'Kilroy' WRITELN(foo bar) are legal and produce the output: My name is Kilroy. The statements foo = "My name is ' bar = 'Kilroy" are invalid because the quote types do not match. Some languages do not allow this flexibility. In BASIC, for example, all string constants must be enclosed in the " character. In Pascal, all string constants must be enclosed in the ' character. mle allows either. Commas in lists of arguments Commas are always optional in mle. Hence, both WRITELN(foo, bar) WRITELN(foo bar) are valid. and they work exactly the same. There are several good reasons to use commas, however. First, they make it easier to read. Secondly, they are helpful when working with negative numbers. Consider the following: 139 Programming tutorial WRITELN(3, -1) This statement produces the output: 3-1 (There is no space between the 3 and the it is not asked for). Now, what if you leave the comma out? -1 because WRITELN( 3 -1 ) This program produces the output: 2. This is because 3 -1 was taken as a mathematical expression! The expression evaluated to the number 2. So the comma was useful in this context. You could, however, still avoid using the comma. Here are some ways of getting the same result: WRITELN( 3 (-1) ) WRITELN( 3 NEGATE(1) ) {put the -1 inside parentheses} {creates -1 with the negate function} Now, once you understand all that, you can make sense of statements like: WRITELN("My name is ", first, ' ' middle ' ', last) The "call" to procedure WRITELN has 6 arguments (some separated by commas, others not). Can you identify each of the six arguments? They are: "My name is " first ' ' middle ' ' last # # # # # # This is This is This is This is Another This is a string constant. a variable (defined earlier in the program) a one character string constant another variable one character string constant a third variable Suppose earlier in the program there was the statements: first = 'Thomas' middle = 'A.' last = 'Edison' Then the WRITELN statement above will write 6 different things to the screen. Here is a murkier statement: WRITELN("'", " " ',', ' ',"'") If you look carefully, you can deduce that the output is the 5-character sequence: ' , ' The same as if you had typed WRITELN("' , '"). A programmer with a more developed sense of aesthetics would do neither of the above two statements. Rather, s/he would recognize that it is very confusing and write the program this way: singlequote = "'" space = ' ' comma = ',' WRITELN(singlequote, space, comma, space, singlequote) As an aside, you can use the + operator to concatenate strings. So another way of writing the program is 140 Programming tutorial singlequote = "'" space = ' ' comma = ',' WRITELN(singlequote + space + comma + space + singlequote) Better yet, it could be written singlequote = "'" space = ' ' comma = ',' confusingstring = singlequote + space + comma + space + singlequote WRITELN(confusingstring) With so many ways of doing the same thing, you might well ask, "what is the best way?" The answer is that the best way is to write it in the way that is clearest to you, so that you can read the program a year later and be able to make sense of what you were doing. Reading from the keyboard Reading from the keyboard is sometimes very useful. Here is a program that prompts a user for information from the keyboard. It asks for sample sizes, means and standard deviations from two studies, computes a pooled standard deviation, and computes a paired t-test. MLE { -- This program computes a paired t test} { -- Define the variables to read} n1 : INTEGER n2 : INTEGER u1 : REAL u2 : REAL s1 : REAL s2 : REAL { -- Read in the sample sizes, means, and standard deviations} WRITELN("Paired t test") WRITE("Sample size 1: ") READLN(n1) WRITE("Sample size 2: ") READLN(n2) WRITE("Mean 1: ") READLN(u1) WRITE("Mean 2: ") READLN(u2) WRITE("Stdev 1: ") READLN(s1) WRITE("Stdev 2: ") READLN(s2) { -- Compute the values of interest} df1 = n1 - 1 df2 = n2 - 1 dfp = df1 + df2 s_pooled = SQR((df1*s1^2 + df2*s2^2)/dfp) t = (u1 - u2)/(s_pooled*SQR(1/n1 + 1/n2)) p = STUDENTT(t, dfp) { -- Now write the results to the screen} WRITELN("Pooled: t = ", t, " df = ", dfp, " END 141 One-tailed p = ", p) Programming tutorial The prompts for information are written using the WRITE procedure. This means that the cursor does not go to the next line when waiting for input from the keyboard. The READLN statements each read a value from the keyboard, and it expects the line to be terminated by the <Enter> key. In fact, the READLN statement (like WRITELN) can read multiple arguments in one statement. Write a program to see what the behavior is when multiple arguments are given to a READLN statement. Mathematical computation mle contains many common and some uncommon functions for doing mathematical computation. Summation Summation over a series of number is a commonly needed function in scientific programming. For example, the value n2 can be computed from the series n ∑ (2i − 1) . Here is a program that reads an integer from the keyboard and i =1 computes the series in this way. MLE { -- computes the square of an integer using a series } n : INTEGER WRITE("Integer to square: ") READLN(n) n2 = SUMMATION i (1, ABS(n)) 2*i - 1 END WRITELN(n, '^2 is ', n2) END The SUMMATION function takes four arguments. The first argument is an integer variable that is the variable of summation. In this program, i is used as the variable of summation. It is not previously defined, so it will be implicitly defined by the SUMMATION function. The next two arguments are in parentheses. They define the upper and lower limits of the summation. The fourth argument is the expression of summation. Notice that i appears within the function. Its value will be updated with each iteration of the function. Products Like summation, taking a product over a series of number is a commonly needed function in scientific programming. For example, the factorial function n! = 1 × 2 × … × (n – 1) × n can be computed as n ∏i . Here is a program that reads an i =1 integer from the keyboard and computes the series in this way. MLE { -- computes factorial function } n : INTEGER WRITE("Find factorial of what integer: ") READLN(n) factn = PRODUCT i (1, n) i END WRITELN(n, '! is ', factn) END 142 Programming tutorial Like the SUMMATION function, PRODUCT function takes four arguments. Integration Suppose you want to compute the integral ∫ π − π sin( x 2 + 2 x)dx . Here is an example of how that can be coded: myvalue = INTEGRATE x (-SQRT(PI), SQRT(PI)) SIN(x^2 + 2*x) END. (The expression assigns the result, about 1.525, to myvalue). Here is a description of the meaning of each part of the expression: MLE myvalue = INTEGRATE x ( -SQRT(PI), SQRT(PI) ) SIN(x^2 + 2*x) END writeln(myvalue) END {End of the {x is the variable of integration} {This is the lower limit of integration} {This is the upper limit of integration} {Close of the argument list} {The function to be integrated} {Integrate} integrate function} Like the SUMMATION and PRODUCT functions, there are four arguments to the INTEGRATE function (actually there can be more, see the reference manual). The first is x, the variable of integration, within parenthesis come the lower and upper limits of integration, followed by the integrand. Probabilities One of the strengths of mle is that it contains a large number of predefined probability density functions and functions derived from the PDF. Any of the predefined probability density functions can be used as part of an expression. For example, the following program will give the area between user-specified limits for a normal distribution with user-specified parameters. MLE a : b : mu : sig: REAL REAL REAL REAL WRITELN("Returns the area under a Normal distribution") WRITE("Lower and upper limits of the area: ") READLN(a, b) WRITE("Mean and Standard deviation: ") READLN(mu, sig) WRITELN(PDF NORMAL(a, b) mu, sig END) END Notice that the PDF function is called within the WRITELN function. This is perfectly valid. The arguments to WRITELN can be any expression no matter how complicated. Here is an example of what happens when this program is run. Returns the area under a Normal distribution Lower and upper limits of the area: 3, 4 Mean and Standard deviation: 10, 3 0.0129347552 143 Programming tutorial Random numbers Simulation programming often times requires drawing numbers from particular probability densities. Random numbers can be generated for nearly all of the densities supported by mle. The QUANTILE function facilitates this. Essentially, the QUANTILE will accept a value drawn from a uniform distribution and return a value that is randomly drawn from the base density. A uniform variate from zero to one is generated by the RAND function. Before the RAND function can be called, the random number generator must be seeded. This is done by a call to procedure SEED() with a positive integer argument. If you prefer not to choose an initial seed value, the function CLOCKSEED will generate one using the computer’s date and time. Here is an example of a program that prints out a number randomly drawn from a Weibull density with user-specified parameters. MLE a b : REAL : REAL SEED(CLOCKSEED) WRITELN("Returns a value drawn from a WEIBULL distribution") WRITE("a and b parameters of the WEIBULL distribution: ") READLN(a, b) WRITELN(QUANTILE WEIBULL(RAND) a, b END) END Flow control Normally, statements are executed, one at a time, in the order in which they appear. Frequently it is necessary to loop, branch, and otherwise modify the flow of programs. This section introduces statements and techniques that allow you to modify the flow of program statements. First the IF statement is introduced, followed by several looping statements. A loop is a programming concept that allows segments of code to be repeatedly executed. This allows the computer to do what computers do best: perform repetitive tasks. Almost all programs of any significance contains some type of looping (or iteration). mle has the FOR statement, the REPEAT statement and the WHILE statement for this purpose. IF statement The IF statement provides the means to conditionally executing statements. Here is a simple example 144 Programming tutorial MLE age : REAL WRITE("How old are you? ") READLN(age) IF age < 0 THEN WRITELN("That’s not possible!") ELSEIF age < 4 THEN WRITELN("Perhaps you were you giving your age in decades.") ELSEIF age >= 115 THEN WRITELN("Perhaps you are giving your age in months.") ELSE WRITELN("Live long and prosper.") END {if} END The IF statement will execute only one of the WRITELN statements, depending on the range of values entered. The statement works this way. First, it evaluates the expression after the IF. If the expression is true the first WRITELN will be executed and then flow will jump to the end of the IF statement. That is, all the other parts of the IF statement will be skipped. If the expression after IF is FALSE, the first ELSEIF expression will be evaluated. Again, if it evaluates to true the statement(s) that follows will be executed and control will jump to the end of the IF statement. As a last resort, when all IF and ELSEIF expressions evaluate to FALSE, the statement between ELSE and END will be executed. Generically, this is what the statement looks like. IF <bexpr> THEN <statements> ELSEIF <bexpr> THEN <statements> ELSEIF <bexpr> THEN <statements> ELSE <statements> END Notice that any number of statements can come within each section of the IF statement. The ELSEIF and ELSE clauses are always optional. When there is no ELSE clause, the IF statement doesn’t necessarily end up executing any of the statements. That is, if all IF and ELSE expressions evaluate to FALSE, the IF statement will skip to the end of the statement. Here is another example of using the IF statement: IF SYSTEM = "MS-DOS" THEN PRINTLN("Run from an MS-DOS system") SEP = '\' DATAFILE("C:" + SEP + DIR + SEP + NAME) ELSE PRINTLN("Run on a unix system") SEP = '/' DATAFILE(DIR + SEP + NAME) END FOR statement The FOR statement provides a means of looping through statements for some fixed number of iterations. mle contains several different types of FOR statements. Three of them are introduced here. The rest are introduced in the section on arrays. 145 Programming tutorial Here is an example program that creates a table of sine and cosine values: MLE FOR x = 0 TO 359 DO r = DTOR(x) WRITELN(x " degrees (" r " radians): SIN()=" SIN(r) ", COS()=" COS(r)) END {for} END {mle} The variable x is called the index variable. Its value will change with each pass through a loop. In this example, x is initially set to zero, and the statements sandwiched between the DO and the END are executed. The value of x is incremented by one and the statements are executed again, and so on until x is 359. After the last pass through the loop, execution continues after the END. Generically, the simplest form of the FOR statement looks like this FOR <v> = <expr> TO <expr> DO <statements> END The variable <v> must either not be previously defined or, if it already exists, it must be an INTEGER or a REAL variable. Its value will change as the FOR statement is executed. The first <expr> will be executed once at the beginning of the loop, and will define the starting value of v. The second <expr> will also be executed once and will define the last value of v. Here is another example. This program reads an integer and prints it out backwards. MLE { -- read an integer and print it out backwards} i : INTEGER WRITE('Type an integer: ') READLN(i) FOR x = 1 TO LOG10(i) + 1 DO tmp = i {temporarily save i} i = i DIV 10 {get rid of last digit} WRITE(tmp - i*10) {compute and print the least significant digit} END {for} WRITELN {with no argument, writeln goes to the next line} END {mle} FOR…STEP statement There are several variations on the FOR. The first, the STEP clause, allows the index variable to be incremented by something other than one. Here is an example that prints the sequence 9, 18, 27…. MLE FOR x = 9 TO 99 STEP 9 DO WRITELN(x) END {for} END {mle} The initial value of the index variable (here, x) is set to the first value (9 in this case), and x is incremented by the STEP value each iteration so long as x is less than or equal to the final value (99 here). The STEP value can be negative, providing a countdown statement. 146 Programming tutorial FOR…STEPS statement Another variation on the FOR statement includes the STEPS clause. This allows for a fixed number of steps between the first and last values of the loop. For example here is a program that prints the cumulative area under a standard normal PDF from -1 to 1 in 10 steps: MLE FOR x = -1 TO 1 STEPS 10 DO WRITELN(x, ' ', NORMALCDF(x)) END {for} END {mle} Here is the resulting output: -1.000000000 -0.777777778 -0.555555556 -0.333333333 -0.111111111 0.1111111111 0.3333333333 0.5555555556 0.7777777778 1.0000000000 0.1586552595 0.2183499460 0.2892573259 0.3694414036 0.4557640673 0.5442359327 0.6305585964 0.7107426741 0.7816500540 0.8413447405 The index variable of a FOR…STEPS statement is always type REAL. REPEAT statement The REPEAT statement provides a means of looping through statements until some condition is met. The REPEAT statement differs from the FOR statement in that there is no index variable and no start variable. Generically, the statement looks like this: REPEAT <statements> UNTIL <bexpr> The <statements> are executed and then the boolean expression<bexpr> is evaluated. If the result is FALSE, the loop repeats and <statements> are executed again. When <bexpr> evaluates to TRUE, the loop terminates. A REPEAT statement always executes <statements> at least once. The next example is a program that converts polar to rectangular coordinates. The REPEAT statement is used to verify that the angle falls in the proper range. 147 Programming tutorial MLE { -- Program to convert polar coordinates to rectangular coordinates} angle : REAL radius : REAL twopi = 2*PI REPEAT WRITE('Angle in radians? ') READLN(angle) good = (angle >= 0) AND (angle <= twopi) IF not good THEN WRITELN('Angle must be >= 0 and <= ', twopi) END UNTIL good WRITE('Radius? ') READLN(radius) x = POLARTORECTX(angle, radius) y = POLARTORECTY(angle, radius) WRITELN("Rectangular coordinates are ", x, ", ", y) END {mle} WHILE statement The WHILE statement provides a means of looping through statements while some condition is met. The format is WHILE <bexpr> DO <statements> END The boolean expression <bexpr> is executed first. If the value is TRUE, the <statements> are executed once and <bexpr> is evaluated again. The sequence continues until <bexpr> evaluates to FALSE. That is, when <bexpr> is FALSE, the loop terminates. The chief difference between a WHILE loop and a REPEAT loop is that the REPEAT loop is always executed at least once. The WHILE loop may be skipped the first time. Here is an example of a small program using a while loop: {Compute factorial} n : INTEGER WRITE("Enter an integer: ") READLN(n) tmp : REAL = 1 WHILE n > 1 DO tmp = tmp*n n = n - 1 END WRITELN(tmp) The Break Statement The BREAK statement is a special statement that works with FOR, WHILE, and REPEAT statements. When a BREAK statement is encountered, the loop is immediately exited. The behavior of a BREAK statement outside of a loop causes the current "scope" to be exited. This means that within the main program (outside of a user-defined procedure or function) a BREAK acts like a HALT and causes the program to terminate. Within a user-defined procedure or function, the procedure or function is exited back to the place from where it was called. 148 Programming tutorial Here is an example of how the BREAK statement can be used to shorten the section of code given in an earlier example. REPEAT WRITE('Angle in radians? ') READLN(angle) IF (angle >= 0) AND (angle <= twopi) THEN BREAK {exit the REPEAT loop} END WRITELN('Angle must be >= 0 and <= ', twopi) UNTIL 1=0 {that is, loop forever} The Continue Statement Like the BREAK statement, the CONTINUE statement works within loops (WHILE, REPEAT, and FOR). When a CONTINUE statement is encountered, all further statements are skipped until the end of the current loop. The CONTINUE statement is a convenient way to skip over sections of code and force another iteration of the loop. Arrays An “array” is a series of contiguous memory locations referenced by a single variable name. Arrays have many important uses in computer programming. They are almost always used with FOR loops or other looping structures. The important idea behind arrays is that an integer value serves as an offset (or index) to the array elements. For example, consider an array called myarray that is defined to be 20 REAL elements long. Each element of the array can be indexed by placing an integer expression within square brackets; e.g., myarray[3] = 3^2. Suppose we wish to create a table of squared values, and later in the program print the values out. The following code will accomplish this: MLE myarray:REAL[1 TO 20] FOR i = 1 TO 20 DO myarray[i] = i^2 END {for} {...} FOR i = 1 TO 20 DO WRITELN(i "^2 = " myarray[i]) END {for} END In this last example, a one-dimensional array was defined as a REAL and indexed over the range from 1 to 20. Arrays must always be explicitly declared in mle. They must be defined the first time the variable is mentioned in the program. A lower and upper index must be specified as integer constants. Multidimensional arrays of all types are supported by mle, as well. The format is var : type[min1 TO max1, min2 TO max2, . . . ]. Some examples of declarations are: s : STRING[1 TO 5] r : REAL[1 TO 10, 1 TO 10] b : BOOLEAN[0 TO 1, 0 TO 1, 0 TO 1] {Defines a one-dimensional array of strings} {Defines a 10 x 10 matrix} {Defines a 3 dimensional array} 149 Programming tutorial An entire array can be initialized to a single value in an assignment statement. Examples are: s : STRING[1 TO 5] = '' {Defines s and initializes all values to ''} r : REAL[1 TO 10, 1 TO 10] = 0 {Defines a 10 x 10 matrix and initializes to 0} Arrayed variables are accessed by using brackets for subscripting: r : REAL[0 TO 359] FOR i = 0 TO 359 DO r[i] = DTOR(i) writeln("Sin(" i ") = " SIN(r[i]) ) END Files Text files are widely used in computer programming, for statistical analysis, and for data files. mle provides tools for creating, reading, writing and appending to text files. There are four steps to working with files: • • • • First step, a variable must be declared as type FILE. The variable will be used to refer to a file; it acts as a, so-called, “file handle.” Next, a file must be “opened.” You must call one of the procedures: OPENREAD(), OPENWRITE(), OPENAPPEND(). Each of these procedures take two arguments. The first is the file variable, and the second is a string expression that is the name of the file. Now the file can be read from or written to (depending on how it was opened). The READ() and READLN() procedures can be used to read from a file. The first argument to the procedures must be the file variable. Likewise, WRITE() and WRITELN() procedures can be used to write (or append) to files. Again, the file variable must be the first argument. After operations on a file have been completed, the CLOSE() procedure ensures the file is properly closed. The close procedure forces the operating system to flush any buffers and update the directory information for a file. Here is a simple program that reads in a file and reverses the characters in each line. Notice the use of the EOF() function to check for the end of the file, and the EXISTS() function for checking to see if a file exists. 150 Programming tutorial MLE { -- reads filename : f : textline : text from a file and reverses the text} STRING FILE STRING READDELIMITERS = '' {read the whole line including spaces} REPEAT WRITE('File name: ') READLN(filename) ok = EXISTS(filename) IF NOT ok THEN WRITELN("Couldn’t find ", filename) END {if} UNTIL ok OPENREAD(f, filename) WHILE NOT EOF(f) DO READLN(f, textline) FOR x = STRINGLEN(textline) TO 1 STEP -1 DO WRITE(SUBSTRING(textline, x, 1)) END {for} WRITELN END {while} END {mle} User-defined procedures mle allows users to define their own procedures and functions. This section discusses procedure writing and variable passing. The next section discusses the related concept of user-defined functions. User-defined procedures serve a number of purposes. • • • Procedures can be used to extend the languages. Essentially, you can write your own “statements” that take a list of zero or more arguments. Procedures provide a way to collect commonly defined operations into a single place. This addresses the frequent need to have the same set of operations performed on different variables or in different parts of a program. Procedures provide a way to modularize programs. That is, programs can be composed of a small set of general operations, each that is a separate procedure. Each of those, in turn, can call a set of other procedures. This programming style (called top-down programming) can lead to more robust and readable code. Procedures must be completely defined prior to their first reference in a program. For example, suppose you want to write a procedure that returns the roots of a quadratic equation. You would first define the procedure quadratic (say) that takes 5 arguments: three real coefficients as inputs, and two complex numbers that are the roots as the outputs. Your program could then call that procedure repeatedly in your program with different inputs. Here is how the procedure could be written: 151 Programming tutorial MLE PROCEDURE quadratic( a:REAL, b:REAL, c:REAL, VAR root1:COMPLEX, VAR root2:COMPLEX ) tmpc : COMPLEX { -- This procedure takes coefficients a, b, and c, and returns the roots as complex roots root1 and root2 } tmpc = SQRT(b^2 – 4*a*c) {compute an intermediate result} root1 = (-b + tmpc)/(2*a) root2 = (-b - tmpc)/(2*a) END . . . END Defining the procedure The procedure definition begins with the word PROCEDURE and ends with a corresponding END. The word following PROCEDURE is the name of the procedure, in this case quadratic. The name is followed by a list, enclosed in parenthesis, of formal arguments—five in this case. The argument name and type must be specified for each of the argument. In this example, three arguments (a, b, and c) are defined to be type REAL, and two are defined as type COMPLEX. The argument names and, for that matter, all of the variables defined within the procedure (like tmpc) are "private" to the procedure. Names of preexisting variables outside of the procedure are not affected by and do not affect declarations of variables using the same name inside the procedure. Thus, the following bit of code causes no problems. Outside of the procedure a, b, and c refer to one set of variables, but the names have different meanings within the procedure. MLE a : STRING b : BOOLEAN c : CHAR tmpc : CHAR PROCEDURE quadratic( a:REAL, b:REAL, c:REAL, VAR root1:COMPLEX, VAR root2:COMPLEX ) tmpc : COMPLEX . . . END Any reference to the variables a, b, and c inside the procedure, refers to the local variable within the procedure, not the global variables defined at the top. The keyword VAR has a very important effect on the arguments root1 and root2. These arguments, once they are modified in the body of the procedure, will pass the modifications back to the original calling argument. Without the VAR keyword, changing the value of an argument has no effect on the calling arguments. In other words, VAR makes the argument variable—or changeable. Calling the procedure To call the procedure, the code might include something like this: 152 Programming tutorial MLE a : REAL a2 : REAL a3 : REAL r1 : COMPLEX r2 : COMPLEX PROCEDURE quadratic( a:REAL, b:REAL, c:REAL, VAR root1:COMPLEX, VAR root2:COMPLEX ) tmpc : COMPLEX ... END { -- The main body of the program starts here -- } quadratic(2, 3, -4, r1, r2) ... a=-4 a2=1.5 a3=-1 quadratic(a, a2, a3, r1, r2) END The statements within the procedure are executed, the values of root1 and root2 are updated, and control is passed back to the main program. In the main program, the variables r1 and r2 have been updated with the results from root1 and root2. Nested procedures New procedure and function definitions can be defined within existing procedures. In the same way that variables defined inside a procedure are “visible” from within a procedure, procedures defined within procedures are only visible from within that procedure. Here is an example of nested procedures: MLE PROCEDURE printthings(s1:STRING s2:STRING) PROCEDURE indent(VAR s:STRING n:INTEGER) {Indents a string by n spaces} FOR i = 1 TO n DO s = ' ' + s END {for} END {proc indent} indent(s1, 6) indent(s2, 12) WRITELN(s1) WRITELN(s2) END {proc printthings} ... END EXIT statement The EXIT statement causes the immediate exit of the current procedure or function. If EXIT is called from the main program, it has the same effect as a HALT statement—the program is exited. 153 Programming tutorial User-defined functions mle allows users to define their own functions. User-defined functions serve a number of very important purposes. • • • Functions are used to extend the types of expressions that can be created. Functions provide a way to collect commonly computed operations into a single place. This addresses the frequent need to have the result computed on different variables or in different parts of a program. Functions also help modularize programs into smaller, more maintainable components. Functions must be completely defined prior to their first reference in a program (just like procedures). For example, suppose you want to write a function that returns the average of two integers. You would first define a function that takes two integer arguments. The return type of the function must also be defined. The body of the function does the computation and then returns the results through the predefined variable RETURN. Here is how the function could be written: MLE FUNCTION average( v1:INTEGER, v2:INTEGER ): REAL { -- This function returns the average of two integers} RETURN = (v1 + v2)/2 END . . . END Defining the function The function definition begins with the word FUNCTION and ends with a corresponding END. The word following FUNCTION is the name of the function, in this case average. The name is followed by a list, enclosed in parenthesis, of formal arguments—two in this case. The argument name and type must be specified for each of the argument. In this example, both are defined to be type INTEGER. The argument names and, for that matter, any variables that might be defined within the function are "private" to the function (the same is true for procedures). Names of preexisting variables outside of the procedure are not affected by and do not affect declarations of variables using the same name inside the function. As with procedures, arguments can be preceded by the VAR keyword. This would have the side-effect of allowing the function to modify the argument. Without VAR keywords, changing the value of an argument within a function has no effect on the calling arguments. On general principles, it is considered bad programming practice to allow functions to modify arguments. Calling the function To call the function, the main program might include something like this: 154 Programming tutorial MLE FUNCTION myfunc( a:REAL, b:REAL):REAL ... RETURN = ... END { -- The main body of the program starts here -- } FOR x = 1 TO 20 DO a = myfunc(x, -x^2) WRITELN(a) END END The statements within the procedure are executed, the values of root1 and root2 are updated, and control is passed back to the main program. In the main program, the variables r1 and r2 have been updated with the results from root1 and root2. Nested procedures New procedure definitions can be defined within existing procedures. In the same way that variables defined inside a procedure are “visible” from within a procedure, procedures defined within procedures are only visible from within that procedure. Here is an example of nested procedures: MLE PROCEDURE printthings(s1:STRING s2:STRING) PROCEDURE indent(VAR s:STRING n:INTEGER) {Indents a string by n spaces} FOR i = 1 TO n DO s = ' ' + s END {for} END {proc indent} indent(s1, 6) indent(s2, 12) WRITELN(s1) WRITELN(s2) END {proc printthings} ... Example programs This section contains a few examples of programs written in mle. 155 Programming tutorial A simple simulation program MLE { This program simulates a simple data set. The output is an id and an age at which some developmental landmark is attained, drawn from a normal pdf.} nkids = 1000 mu = 6 sig = 1 {number of kids to simulate} {mean age of reaching the landmark} {stddev in reaching the landmark} fout : FILE SEED(CLOCKSEED) OPENWRITE(fout, "kids.dat") FOR cid = 1 TO nkids DO age = QUANTILE NORMAL(RAND) mu WRITELN(FOUT, cid, ' ', age) END CLOSE(fout) END sig END A less simple simulation program Rather than just simulating a data set, this program creates multiple data sets and also does analyses of each data set. This simulation program deals with aspects of study design (study length, censoring, and duration between prospective follow-ups) as well as the underlying parametric model. The last segment of the program computes some summary statistics for the repeated estimates of the model parameters. 156 Programming tutorial MLE { -- This program does 4 things: 1. It creates data sets, each with a single variable age, and observations of age. The observations are drawn from a normal distribution. 2. It fits a model (Normal) to each data set. 3. It simulates aspects of the study observation: a. children are initially recruited from ages minrage to maxrage months of age--uniformly distributed. b. Children are visited every obswidth months for studylength months c. censorprob % of children drop out between mincensor and maxcensor months 4. It computes the mean and standard deviation of the repeated parameter estimates } OUTFILE(DEFAULTOUTNAME) { -- seed the random number generator} s = CLOCKSEED SEED(s) PRINTLN('Clock seeded with ', s) { -- SEs must be computed with the alternative method because we are not using a DATA statement} info_method1 = FALSE info_method2 = TRUE minrage = 0 {minimum age of recruitment} maxrage = 0 {maximum age of recruitment} censorprob = 0.20 {probability of dropping out} obswidth = 4.0 {width of the observation interval} studylength = 10 {max # of months to observe over} mincensor = 1 {min number of months to censor at} maxcensor = 9 {max number of months to censor at} sitmean = 6 {mean age at sitting} sitsd = 1 {sd of age at sitting} { -- array for "observations"} ageo : REAL[1 TO 500] {last interval before sitting} agec : REAL[1 TO 500] {first observation after sitting} numbobs = 500 { -- save the estimates of mu and sig, one for each simulation} savemu : REAL[1 TO 200] savesig: REAL[1 TO 200] numbsims = 200 { -- Loop through data sets} FOR sim = 1 TO numbsims DO { -- create a new data set} FOR cid = 1 TO numbobs DO s_age = QUANTILE NORMAL(RAND) sitmean sitsd END r_age = RRAND(minrage, maxrage) {get age at sitting} {age at recruitment} { -- now determine how long to observe children} o_len = IF RAND < censorprob THEN RRAND(mincensor, maxcensor) ELSE studylength END {if function} { -- Now figure out open and closing interval } IF s_age < r_age THEN {cross-section responder} ageo[cid] = 0 agec[cid] = r_age 157 Programming tutorial ELSEIF s_age > (r_age + o_len) THEN {right censored} ageo[cid] = r_age + o_len agec[cid] = -1 ELSE FOR x = r_age TO o_len STEP obswidth DO IF (s_age >= x) AND (s_age < (x + obswidth)) THEN ageo[cid] = x agec[cid] = x + obswidth BREAK END {if} END {for} END { if } end {for cid} { -- now estimate params from the current simulated data} MODEL SUMMATION j (1, numbobs) LN(PDF NORMAL(ageo[j], agec[j]) PARAM mu LOW=1 HIGH=10 START=3 END PARAM sig LOW=0.01 HIGH=5 START=2 END END ) END {summation} RUN FULL THEN { -- save parameter estimates} savemu[sim] = mu savesig[sim] = sig END {then} END {model} END {for sim} { -- Now do two models: one to tally the mu's and one sig's } PRINTLN('Finding mean and stdev for mu parameters') MODEL SUMMATION j (1, numbsims) LN(PDF NORMAL(savemu[j]) PARAM mu_mean LOW=1 HIGH=10 START=3 TEST=6.0 END PARAM mu_sd LOW=0.0001 HIGH=5 START=2 END END {pdf} ) {ln} END {summation} RUN FULL THEN { print out simulation stats} PRINTLN('mu mean = ' , mu_mean, ', mu SD = ', mu_sd, ', true = ', sitmean) PRINTLN('Absolute bias = ', sitmean - mu_mean, ', % bias = ', 100*mu_mean/sitmean) PRINTLN('t test: (param<>0) t = ', mu_mean/mu_sd) PRINTLN('t test: (param=' sitmean, ') t = ', (mu_mean-sitmean)/mu_sd) END {then} end {model} { -- Now, collect info for the estimates of sig} PRINTLN('Finding mean and stdev for sig parameters') MODEL SUMMATION j (1, numbsims) LN(PDF NORMAL(savesig[j]) PARAM sig_mean LOW=0.00001 HIGH=6 START=3 TEST=1.0 END PARAM sig_sd LOW = 0.000001 HIGH = 2 START = 0.5 END END {pdf} ) {ln} END {summation} RUN FULL THEN { print out simulation stats} PRINTLN('sig mean = ' , sig_mean, 158 Programming tutorial ', sig SD = ', sig_sd, ', true = ', sitsd) PRINTLN('Absolute bias = ', sitsd - sig_mean, ', % bias = ', 100*sig_mean/sitsd) PRINTLN('t test: (param<>0) t = ', sig_mean/sig_sd) PRINTLN('t test: (param=', sitsd, ') t = ', (sig_mean - sitsd)/sig_sd) END {then} END {model} END An even more complicated simulation program This program simulates repeated datasets, each containing observations of a bilateral morphological trait. The simulation includes the ability to add, for example, a directional size bias. “Noise” of development is superimposed on the underlying trait, and different variances in the noise can be specified for each side. 159 Programming tutorial MLE { This program simulates Fluctuating Asymmetry data. creates 200 simulations with 150 subjects each } SEED(CLOCKSEED) outdir = 'sim\' outfilebase = 'sim' nsims = 200 nsubjects = 150 trait_a = 2.688 trait_b = 0.1979 da = 0.0 sd_left = 1 sd_right = 1 prob_AS = 0.0 fout:FILE { { { { { { { { { { { { It pick a random seed } directory where output goes } base name for output file } Number of simulations to do } Number of subject in each simulation } Trait mean parameter } Trait dispersion parameter } this param controls da (AS if prob_AS <> 0) } asymmetrical dispersion param } asymmetrical diserpsion param } da = 0.0; antisymmetry = 0.5 } the output file } FUNCTION drawtrait(dist:INTEGER a:REAL b:REAL):REAL { -- draws a random value from the trait distribution dist selects the distribution to use } IF dist = 1 THEN RETURN = QUANTILE NORMAL(RAND) a b END ELSEIF dist = 2 THEN RETURN = QUANTILE LOGNORMAL(RAND) a b END ELSEIF DIST = 3 THEN RETURN = QUANTILE EXPONENTIAL(RAND) a END ELSE WRITELN('Error: dist is invalid') HALT END {if} END {drawtrait} FUNCTION DRAWNOISE(mu:REAL sigma:REAL):REAL { -- draws a random developmental noise value } RETURN = QUANTILE NORMAL(RAND) mu sigma END END {drawnoise} PROCEDURE openoutfile(i:INTEGER) dig:STRING IF NOT DIREXISTS(outdir) THEN MKDIR(outdir) END {if} IF i < 10 THEN dig = '00' + INT2STR(i) ELSEIF i < 100 THEN dig = '0' + INT2STR(i) ELSE dig = INT2STR(i) END OPENWRITE(fout, outdir + outfilebase + '.' + dig) END {openoutfile} FOR s = 1 TO nsims DO {create nsims files} openoutfile(s) FOR j = 1 TO nsubjects DO { -- pick the individual's baseline trait} size = drawtrait(2, trait_a, trait_b) { -- create right and left measures } IF RAND > prob_AS THEN right = size + drawnoise( da, sd_right) left = size + drawnoise(-da, sd_left) ELSE left = size + drawnoise( da, sd_right) right = size + drawnoise(-da, sd_left) END {if} { -- write this observation to the file} WRITELN(fout, j, ' ', left, ' ', right) END {for j} 160 Programming tutorial CLOSE(fout) END {for s} END {mle} 161 References 162 References References Abramowitz M and Stegun IA, eds. (1972) Handbook of Mathematical Functions with Formulas, Graphs, and Mathematical Tables, 9th printing. New York: Dover. Agresti A (1990) Categorical Data Analysis. New York: John Wiley and Sons. Ahuja JC and Nash SW (1967)The generalized Gompertz-Verhulst family of distributions. Sankhya series A 29:141-56. Akaike H (1973) Information theory and an extension of the maximum likelihood principle. In Second International Symposium on Information Theory, ed. B.N. Petrov and F. Csaki, pp. 268-281. Budapest: Hungarian Academy of Sciences. [Reprinted in Akaike (1992) and Akaike (1998)]. Akaike H (1992) Information theory and an extension of the maximum likelihood principle. In Breakthroughs in Statistics, Volume III ed. S. Kotz and N. Johnson, pp. 610-624. New York: Springer Verlag. Akaike H (1998) Selected Papers of Hirotugu Akaike. New York: Springer Verlag. Bernoulli J (1713) Ars Conjectandi. Basel. Birnbaum ZW and Saunders SC (1969) A new family of life distributions. Journal of Applied Probability 6:319-27. Borel E (1925) Principes et formules classiques du Calcul des Probabilitiés. Paris. Borwein P (1995) An efficient algorithm for the Riemann zeta function. Working paper. http://www.cecm.sfu.ca/~pborwein/PAPERS/P155.pdf, http://citeseer.nj.nec.com/9477.html. Box GEP, Hunter WG, Hunter JS (1978) Statistics for Experimenters. New York: John Wiley & Sons. Bratley P, Fox BL, Schrage LE (1983) A Guide to Simulation New York: Springer-Verlag. Brent RP (1973) Algorithms for minimization without derivatives. Englewood Cliffs, NJ: Prentice-Hall. Burnham KP and Anderson DR (1998) Model Selection and Inference: A Practical InformationTheoretic Approach. New York: Springer Verlag. Chew V (1968) Some alternatives to the normal distribution. The American Statistician 22:22-4. Chhikara RA and Folks JL (1989) The Inverse Gaussian Distribution. New York: Marcel Dekker. Christensen R (1984) Data Distributions. Lincoln, MA: Entropy Ltd. Cox DR, Oakes D (1984) Analysis of survival data. London: Chapman and Hall. Cullen AC, Frey HC (1999) Probabilistic Techniques in Exposure Assessment: A Handbook for Dealing with Variability and Uncertainty in Model and Inputs. New York: Plenum Press. Daniels HE (1945) Proc Royal Soc London, Series A 183:405-35. 163 References Deevey ES Jr. (1947) Life tables for natural populations of animals. Quarterly Review of Biology 22:283-314. Dobson AJ (1990) An Introduction to Generalized Linear Models. Boca Raton: Chapman & Hall/CRC. Edwards AWF (1972) Likelihood. Cambridge: Cambridge University Press. Efron B (1982) The Jackknife, the Bootstrap and Other Resampling Plans. Philadelphia: Society for Industrial and Applied Mathematics. Eggenberger F, and Pólya G (1923) Über die Statistik verketteter Vorgänge. Zeitschrift für Angewwandte Mathematik und Mechanik 1:279-289. Elandt-Johnson RC, Johnson NL (1980) Survival Models and Data Analysis. New York: John Wiley and Sons. Evans M, Hastings N, Peacock B (2000) Statistical Distributions. Third edition. New York: John Wiley and Sons. Fisher RA (1921) On the 'probable error' of a coefficient of correlation deduced from a small sample. Metron 1:3-32. Fisher RA, Corbet AS, Williams CB (1943) The relation between the number of species and the number of individuals in a random sample from an animal population. Journal of Animal Ecology 12:42-58. Folks JL and Chhikara RS (1978) The inverse Gaussian distribution and its statistical applications—A review. Journal of the Royal Statistical Society, Series B 40:263-89. Forsythe G, Malcolm MA, Moler CB (1977) Computer Methods for Mathematical Computations. Englewood Cliffs, NJ: Prentice-Hall. Gage TB (1989) Bio-methematical approaches to the study of human variation in mortality. Yearbook of Physical Anthropology 32:185-214. Geoffe WL, Ferrier GD, Rogers J (1994) Global optimization of statistical functions with simulated annealing. Journal of Econometrics 60:65-99. Gillespie D (1989) p2c: Pascal to C translator. Gompertz B (1825) On the nature of the function expressive of the law of human mortality. Philosophical Transactions of the Royal Society of London, Series A 115:513-85. Gumbel EJ (1947) The distribution of the range. Annals Mathematical Statistics 18:384-412. Guttorp P (1995) Stochastic Modeling of Scientific Data. London: Chapman and Hall. Hammes LM, Treloar AE (1970) Gestational interval from vital records. American Journal of Public Health 60:1496-505. Harris JW, Stocker H (1998) Handbook of Mathematics and Computational Science. New York: Springer-Verlag. Hazelrig JB, Turner ME, Blackstone EH (1982) Parametric survival analysis combining longitudinal and cross-sectional censored and interval-censored data with concomitant information. Biometrics 38:1-15. Hilborn R and Mangel M (1997) The Ecological Detective Confronting Models with Data. Monographs in Population Biology 28. Princeton, N.J.: Princeton University Press. Holman DJ (1996) Total Fecundability and Fetal Loss in Rural Bangladesh. Doctoral Dissertation, The Pennsylvania State University. Holman DJ and Jones RE (1998) Longitudinal analysis of deciduous tooth emergence II: Parametric survival analysis in Bangladeshi, Guatemalan, Japanese and Javanese children. American Journal of Physical Anthropology 105(2):209-30. 164 References J∅rgensen B (1982) Statistical Properties of the Generalized Inverse Gaussian Distribution. Lecture Notes in Statistics, No. 9. New York: Springer-Verlag. Johnson NL, Kotz S (1969) Discrete Distributions. New York: John Wiley and Sons. Johnson NL, Kotz S, Balakrishnan N (1994) Continuous Univariate Distributions, (Volume 1, 2nd edition). New York: John Wiley and Sons. Johnson NL, Kotz S, Balakrishnan N (1995) Continuous Univariate Distributions, (Volume 2, 2nd edition). New York: John Wiley and Sons. Kalbfleisch JD, Prentice RL (1980) The Statistical Analysis of Failure Time Data. New York: John Wiley & Sons. King G (1998) Unifying Political Methodology: The Likelihood Theory of Statistical Inference. Ann Arbor: The University of Michigan Press. Kirkpatrick S, Gelatt CD, Vecchi MP (1983) Optimization by simulated annealing. Science 220 (4598):671-80. Kishor ST (1982) Probability and Statistics with Reliability, Queuing, and Computer Science Applications. Englewood Cliffs, NJ: Prentice-Hall. Laplace PS (1774) Mémoire sur la probabilité des causes par les èvénemens Mém. de Math et Phys., l'Acad. Roy. des Sci. par div. Savans 6:621-56. Lee ET (1992) Statistical Methods for Survival Data Analysis. New York: John Wiley and Sons. Levy P (1939) Composita Mathematica 7:283-339. Maxwell JC (1860a) Phil Mag 19:19 Maxwell JC (1860b) Phil Mag 20:21, 33. Metropolis N, Rosenbluth A, Rosenbluth M, Teller A, and Teller E (1953) Equation of state calculations by fast computing machines. Journal of Chem. Phys. 21:1087-90. Mohr PJ and Taylor BN (1999) CODATA Recommended values of the fundamental physical constants:1998. Journal of Physical and Chemical Reference Data 28(6):1-140. Morgan BJT (2000) Applied Stochastic Modeling. London:Arnold. Murie A (1944) The Wolves of Mount McKinley. (Fauna of the National Parks of the U.S.. Fauna Series No. 5 238 pp.) U.S. Dept. Int., National Park Service. Washington. Nelder JA, and Mead R (1965) A simplex method for function minimization. Computer Journal 7:308-13. Nelson W (1982) Applied Life Data Analysis. New York: John Wiley and Sons. Pearson K (1895) Phil. Trans. Roy. Soc. London, Series A 186:343-414. Pearson K (1900) Phil Mag and J Sci, 5th Series. 50:157-75. Pickles A (1985) An Introduction to Likelihood Analysis. Norwich: Geobooks. Powell MJD (1964) An efficient method for finding the minimum of a function of several variables without calculating derivatives. Comp. Journal 7:155-62. Press WH, Flannery BP, Teukolsky SA, Vetterling WT (1989) Numerical Recipes in Pascal: The Art of Scientific Programming. Cambridge: Cambridge University Press. Raftery AE (1995) Bayesian model selection in social research. Sociological Methodology 25:111-195. Rao CR (1973) Linear Statistical Inference and Its Applications. New York: John Wiley and Sons. Ridders CJF (1982) Advances in Engineering Software 4(2):75-6. Royall R (1999) Statistical Evidence: A Likelihood Paradigm. London: Chapman & Hall/CRC. 165 References Salvia AA (1985) Reliability applications of the alpha distribution. IEEE Transactions on Reliability 34:251-2. SAS Institute (1985) SAS User's Guide: Statistics. Version 5 edition. Cary, NC: SAS Institute, Inc. Schrödinger E (1915) Zür Theorie der Fall—und Steigversuche an Teilchenn mit Brownsche Bewegung. Physikalische Zeitschrift 16:289-95. Shah BK, Dave PH (1963) A note on log-logistic distribution, Journal of the M.S. University of Baroda (Science Number) 12:15-20. Subbotin MT (1923) On the law of frequency of errors. Mathematicheskii Sbornik 31:296-301. Tanner MA (1996) Tools for Statistical Inference: Methods for the Exploration of Posterior Distributions and Likelihood Functions, 3rd edition. New York: Springer-Verlag. Taylor BN (1995) Guide for the Use of the International System of Units (SI). National Institute of Standards and Technology, special publication 811, 1995 edition. Washington: US Government Printing Office. Thomas M (1949) A generalizaton of poisson's binomial limit for use in ecology Biometrika 36:18-25. Tuma NB, Hannan MT (1984) Social Dynamics: Models and Methods. New York: Academic Press. Tweedie MCK (1947) Functions of a statistical variate with given means, with special reference to Laplacian distributions. Proceedings of the Cambridge Philosophical Society 43:41-9 Van Canneyt M (2000) Free Pascal Programmers' Manual. (for FPC version 1.0.2) version 1.8. Vaupel JW (1990) Relatives' risks: Frailty models of life history data. Theoretical Population Biology 37:220-34. Vaupel JW, Yashin AI (1985) Heterogeneity's ruses: Some surprising effects of selection on population dynamics. American Statistician 39:176-85. Wald A (1947) Sequential Analysis New York:John Wiley & Sons. Wise ME (1966) Tracer-dilution curves in cardiology and random walk and lognormal distributions. Acta Physiologica Pharmacologica Neerlandica 14:175-204. Wood JW (1989) Fecundity and natural fertility in humans. Oxford Reviews of Reproductive Biology 11:61-109. Wood JW (1994) Dynamics of Human Reproduction: Biology, Biometry, Demography. Hawthorne, NY: Aldine de Gruyter. Wood JW, Holman DJ, O'Connor KA and Ferrell RE. (2001) Models of human mortality. In Hoppa R and Vaupel J (eds) Paleodemography: Age Distributions from Skeletal Samples. Cambridge: Cambridge University Press. Wood JW, Holman DJ, Weiss KM, Buchanan AV, LeFor B (1992) Hazards models for human biology. Yearbook of Physical Anthropology 35:43-87. Wood JW, Holman DJ, Yasin A, Peterson RJ, Weinstein M, Chang M-c (1994) A multistate model of fecundability and sterility. Demography 31:403-26. Zipf GK (1949) Human Behavior and the Principle of Least Effort. Reading: Addison Wesley. 166 mle 2.1 manual 167