1
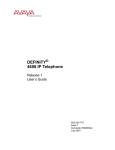
FFI RAPPORT WINDFARM IMPACT ON ELECTROMAGNETIC SYSTEMS (WIMP) Software Documentation MELAND Bente Jensløkken, ØHRA Hans FFI/RAPPORT-2007/00832 WINDFARM IMPACT ON ELECTROMAGNETIC SYSTEMS (WIMP) - Software Documentation MELAND Bente Jensløkken, ØHRA Hans FFI/RAPPORT-2007/00832 FORSVARETS FORSKNINGSINSTITUTT Norwegian Defence Research Establishment P O Box 25, NO-2027 Kjeller, Norway 3 UNCLASSIFIED FORSVARETS FORSKNINGSINSTITUTT (FFI) Norwegian Defence Research Establishment _______________________________ P O BOX 25 N0-2027 KJELLER, NORWAY SECURITY CLASSIFICATION OF THIS PAGE (when data entered) REPORT DOCUMENTATION PAGE 1) PUBL/REPORT NUMBER 2) FFI/RAPPORT-2007/00832 1a) 3) NUMBER OF PAGES UNCLASSIFIED PROJECT REFERENCE 2a) FFI-II/1013/912 4) SECURITY CLASSIFICATION 25 DECLASSIFICATION/DOWNGRADING SCHEDULE - TITLE WINDFARM IMPACT ON ELECTROMAGNETIC SYSTEMS (WIMP) - Software Documentation 5) NAMES OF AUTHOR(S) IN FULL (surname first) MELAND Bente Jensløkken, ØHRA Hans 6) DISTRIBUTION STATEMENT Approved for public release. Distribution unlimited. (Offentlig tilgjengelig) 7) INDEXING TERMS IN ENGLISH: IN NORWEGIAN: a) Windfarms a) Vindmølleparker b) Radar b) Radar c) Chart handling system c) Kartsystem d) Electromagnetic systems d) Elektromagnetiske systemer e) e) THESAURUS REFERENCE: 8) ABSTRACT This report is a description and user manual for the software developed at Teleplan according to the co-operation agreement between Teleplan and the FFI-project 1013 “The effect of windmill development on telecommunication and radar". The software is based on MARIA, a chart handling system developed by Teleplan in cooperation with the Norwegian Defence. The system delivered from Teleplan will be denoted WIMP (Windfarm Impact on electromagnetic systems). 9) DATE AUTHORIZED BY POSITION This page only 2007-03-30 ISBN 978-82-464-1135-4 Vidar S Andersen Director UNCLASSIFIED SECURITY CLASSIFICATION OF THIS PAGE (when data entered) 5 CONTENTS Page 1 INTRODUCTION 7 2 OVERALL DESCRIPTION 7 3 INSTALLING MARIA AND WIMP 8 3.1 Obtaining the software 8 3.2 3.2.1 3.2.2 Installing MARIA New MARIA installation Upgrading from MARIA 4 9 9 9 3.3 Installing WIMP 9 4 USING WIMP 10 5 OBJECT MANAGEMENT 11 5.1 Symbols 11 5.2 5.2.1 5.2.2 5.2.3 5.2.4 5.2.5 5.2.5.1 5.2.5.2 Object attributes Windfarm Windmill Radar Passive sensor Radio link and radio system Radio Link Radio 12 12 12 13 13 13 13 14 5.3 5.3.1 5.3.2 Placing of objects in the map Text entry Pointing on map 14 14 14 6 INFORMATION FROM WIMP 14 6.1 Object attributes 15 6.2 Height profiles 15 6.3 Height values in an area 16 6.4 Coordinate transformations 16 7 PRESENTATIONS IN WIMP 16 7.1 Presentation of grid 17 8 SUMMARY 18 References 18 A OBJECTS ATTRIBUTES AND FORMAT 19 A.1 Object attributes 19 6 A.2 Height profiles 24 A.3 Height area 24 B VISUALIZATION 25 B.1 Grid/bitmap 25 7 WINDFARM IMPACT ON ELECTROMAGNETIC SYSTEMS (WIMP) - Software Documentation 1 INTRODUCTION This report contains a description of the software developed at Teleplan according to the cooperation agreement between Teleplan and the FFI-project 1013 “Effekt av vindkraftutbygging på radiosamband og radar (VINDKRAFT)” (The effect of windmill development on telecommunication and radar). The software will be based on MARIA, a chart handling system developed by Teleplan in cooperation with the Norwegian Defence. The new software code will ensure new functionality in MARIA and communication modules between MARIA and software separately developed in the FFI project. The system delivered from Teleplan will be denoted WIMP (Windfarm Impact on electromagnetic systems). It is important to note that the MARIA – WIMP combination is only a tool to enter objects used in the analysis and to present results from the analyses. The calculation of the actual impact of the windfarms is done in the WTES (Wind Turbine and Electromagnetic Systems) software developed by FFI (3). The report starts with a description of the system and how to install the program. Chapter four to seven is a user manual, and the formats of the XML-files are given in appendix A and B. 2 OVERALL DESCRIPTION The WIMP module is using MARIA to have an effective user interface for the management and presentation of all geographical related information used in the handling of windfarm applications. Handling a windfarm application must take into account the electromagnetic system (EMS) (radar, passive sensor and radio), the wind farm and existing wind farms in the area. The collection of these objects is called a project, as sketched in Figure 2.2. The information building a project shall be stored as an XML-file. Detailed analyses of the windfarm impact to EMS require exact information of each windmill, but in some cases (“forhåndsmelding”) only a coarse description is given. A windfarm can be described as a set of separate windmills or as an area where windmills will be placed. 8 Figure 2.1 3 A Project contains wind farms and different electromagnetic systems. INSTALLING MARIA AND WIMP The WIMP has been developed as a .NET add-in to MARIA 5, and all the testing has been performed on MARIA 5.0.4. We have found that installation and configuration of MARIA is important to successful operation of WIMP. Following the steps below should ensure a successful installation. 3.1 Obtaining the software MARIA is commercial software developed and sold by Teleplan A/S. The software can be obtained by contacting the company at the following address: Teleplan Fornebuveien 31 – P.O. Box 69 NO-1324 Lysaker Norway Forsvaret (the Norwegian Armed Forces) is a large user of MARIA and there is a separate agreement on the use of MARIA between Forsvaret and Teleplan. For military users, the maps used in MARIA can be obtained from Forsvarets militærgeografiske tjeneste (FMGT). WIMP has been developed by Teleplan for Forsvarets forskningsinstitutt (FFI), but it is not a commercial product supported by Teleplan. WIMP can be obtained in an “as is” version from FFI by contacting: Forsvarets forskningsinstitutt, att: Bente Jensløkken Meland, Postboks 25, 2027 KJELLER. 9 3.2 Installing MARIA MARIA version 5 will, by default, be installed in a new directory (Program Files\Teleplan\MARIA5) and it will use <My Documents\My MARIA files> as the primary area for storage of user generated files. We have observed some unexpected behaviour if MARIA is not correctly installed. Since different problems have been experienced when MARIA is updated from an older version and when installed for the first time; the installation procedures for MARIA is described differently. 3.2.1 New MARIA installation Follow the instructions for installation. The program files will be stored in a default directory (Program Files\Teleplan\MARIA5) and <My Documents\My MARIA files> will be used as the primary area for storage of user generated files. 3.2.2 Upgrading from MARIA 4 If a MARIA version older than 5.0 is installed, an upgrade is necessary, and the following description should solve the problems. MARIA 5.0.4 installations are looking for previous installations of MARIA. The result of this is that some files are installed in the new default directory (Program Files\Teleplan\MARIA5) and it will use <My Documents\My MARIA files> as the primary area for storage of user generated files. But MARIA will also use the files in the previous MARIA installation, especially the map files and some other files. After the installation it is possible to see the use of files from the menu: Tools/Options/Files. 3.3 Installing WIMP WIMP must be installed after the installation of MARIA. You will need to have Microsoft .NET Framework 1.1 and Microsoft .NET Framework 2.0 installed on your computer. WIMP is distributed in zip-ed format (WIMP.zip) that contains tree files: Setup.exe, Setup.ini and Setup.msi. Installation is performed by these steps: • unzip the files to any directory • run Setup.exe • answer OK on all messages and warnings • open MARIA • on the main menu select .NET addins • navigate to <MARIA 5>\Programs\Addinmodules\WIMP • select WIMP.dll 10 • • • exit MARIA open MARIA check the main menu VIEW, WIMP Main Form and WIMP Map Plot The use of WIMP is described in the following chapters. 4 USING WIMP WIMP can only be used together with MARIA. First, start MARIA and select a map from your map directory. In the VIEW menu, select WIMP Main Form. The screen will be like Figure 4.1. Figure 4.1 The MARIA screen included the WIMP Main Form. You can then • • • • • Open an existing project by selecting the folder symbol Save a project by selecting the floppy disk symbol Create a new project by selecting the document symbol Create new objects from the pull down menu Save height values for an area by selecting the square symbol (see chapter 6) To use WIMP for visualization you need the WIMP Map Plot from the VIEW menu. 11 You can then • 5 Plot a bitmap file by selecting the folder symbol (see Figure 7.1) OBJECT MANAGEMENT The WIMP system manage different objects including • • • • • • Windfarm Windmills Radar Radio link Radio Passive sensor The operator will be able to create, deploy, edit, copy and delete objects. The map can be centred to a selected object. It is also possible to generate a height profile from one object to another. A pull-down-menu is used to create new objects, the other options are found in a menu obtained by right-click of the object. The common pull down menu, obtained by right-clicking, for all objects is: • • • • Copy Delete Centre to Profile to ... In addition to these, the Windfarm object has • • New Windmill Create Area or Delete Area (dependent of the existence of the area) The Radio link object has in addition to the common menu • New Radio The desired managing of these objects is described below. 5.1 Symbols If the symbols on your screen does not look like windmills, radars etc, you must do the following: 12 Select Track Module in the View menu, which gives a new window. Select Global Settings in the upper menu. In the upcoming widow select APP6(A) Symbol settings. Remove the mark by SEA, SURFACE. 5.2 Object attributes The objects in the database may take a number of attributes. However, it has been decided that the entry and management of objects in WIMP only shall cover those attributes that are used in WIMP. Other attributes will be added in the WTES program developed at FFI (3). The attributes in grey are not in use in WIMP version 1.1. 5.2.1 Windfarm The attributes of the windfarm are: • Name • Position (latitude, longitude, height) (centre) • Active (true/false) • ID • Type • Subtype • An area of windmills • A set of windmills A windmill inside a windfarm must be created from a windfarm. be done to create a windfarm area. 5.2.2 Windmill The most important attributes for each windmill will be: • • • • • • • • • • • • Name Position (latitude, longitude, height) Active (true/false) ID Type Subtype Height of tower Diameter (Bottom, top) Wing length Rotation speed (rpm) Windfram ID Nacelle parameters (Length, height, width) The same procedure must 13 5.2.3 Radar For the radar systems most attributes will be added in the separate programs. Actual attributes inside the WIMP will be: • • • • • • • Name Position (latitude, longitude, height) Active (true/false) ID Type Subtype Antenna height 5.2.4 Passive sensor Attributes for the passive sensors will, like for the radar, be added in the separate programs. Inside WIMP, the actual attributes will be: • • • • • • • Name Position (latitude, longitude, height) Active (true/false) ID Type Subtype Antenna height 5.2.5 Radio link and radio system The radio link system consists of a Radio Link object containing two or more Radio objects. The attributes of these two types of objects are described below: 5.2.5.1 Radio Link For each radio link system the following attributes are given: • • • • • • • • Name Position (latitude, longitude, height) Active (true/false) ID Type Subtype Radios (ID + number) Links (ID + number) 14 5.2.5.2 Radio For each separate radio in the radio link, the following attributes are given: • • • • • • • • • 5.3 Name Position (latitude, longitude, height) Active (true/false) ID Type Subtype Antenna height Link ID Radio number Placing of objects in the map To enter a new object into WIMP you must select the desired object from the object pull down menu. The object is then part of the object list. Placing the object in the map may be done in different manners as described below. 5.3.1 Text entry The objects position can be entered in the dialog box together with the actual attributes. 5.3.2 Pointing on map By selecting the object from the object list by pointing the name, the object can be placed on the map by the “drag-and-drop” principle. The actual attributes can then be entered in the dialog box. It is possible to change the position by editing the appropriate field of the dialog box. To move the object to another position, you must keep the ctrl-key down while moving the object. 6 INFORMATION FROM WIMP The information needed by WTES (3) from WIMP is • The objects with their attributes (chapter 6.1). By selecting Save (floppy disk symbol) in the menu, the objects are saved as a project into a xml-file. You may also use 15 • • Height profiles (section 6.2) Height values in an area (section 6.3) These functions store data in an xml-file, but be aware of the large amount of data generated specially from the Height values in an area. A sketch of the information exchange is shown in Figure 6.1. Figure 6.1 Information exchange between WIMP and WTES. The information exchange between WIMP and WTES is done by use of XML-files. The WTES program is implemented by use of LabVIEW, including functions and models implemented in other languages (3). 6.1 Object attributes It is possible to read the attributes of the objects created in WIMP. The format is specified to be an xml-file, and an example is shown in appendix A.1. 6.2 Height profiles To generate a height profile between two objects, follow these steps: 1. 2. 3. 4. Select the first object Right-click the object and choose <Profile to …> Select the second object from the pop-up list Write the file name The height profile data is then available on the following format: 16 • • Header o Start object o End object o Number of points o Range Point o Latitude o Longitude o Height Appendix A.2 shows an example of a Height profile. 6.3 Height values in an area Selecting the area height tool, writing a file name and drawing a square area on the map, shall return the position of the area and the height values in the area. The format of the data will be: • • Header o Start position Latitude Longitude o Number of points in latitude o Number of points in longitude o Delta value in latitude o Delta value in longitude Height array o Height Appendix A.3 shows an example of a Height area. 6.4 Coordinate transformations All positions are transferred as latitude and longitude (WGS84). 7 PRESENTATIONS IN WIMP The different WTES calculations (3) generate bitmaps, including xml-files containing information of the position (WGS84), size and orientation of the bitmap. WIMP may then load the bitmap and adjust it to the projection used in the display. An example of a bitmap produced in WTES is shown in Figure 7.1. 17 Figure 7.1 MARIA/WIMP showing results from a Visibility calculation done in WTES. The information exchange needed for these is handled the same way as sketched in Figure 6.1. 7.1 Presentation of grid To present a grid, an xml-file with the following format must be transferred to WIMP: • • • • • • Centre position of the grid o Latitude o Longitude Height and width (in meters) for the grid (not rotated) Rotation of the grid around the centre position (clockwise) Number of points in x axis (not rotated) Number of points in y axis (not rotated) Filename (bitmap file) The value for each point is expected to be an integer in an accompanying bitmap file. Appendix B.1 gives an example of an xml-file containing the information of the bitmap. 18 8 SUMMARY The installation and use of the WIMP system is described in the report. WIMP will only concern the entering of objects and presentation of results from WTES. The description of WTES is in a separate report (3). WIMP makes it possible to enter objects into a project, allocate some of the attributes, change or delete objects. All this information can be stored in XML-files in predefined formats. By reading the XML-files, WTES can perform different calculations and analysis, and the results can be displayed on the WIMP/MARIA map. References (1) Hans Øhra (2004): Vindkraftverks konsekvenser for Forsvarets installasjoner innledende studie for radar, FFI/RAPPORT- 2003/02784. (in Norwegian) (2) Teleplan (2005): MARIA 5.0 Getting Started. (3) Bente Jensløkken Meland et al (2007): Wind Turbines and Electromagnetic Systems (WTES) - Software documentation, FFI/RAPPORT-2007/00833, Unclassified 19 A OBJECTS ATTRIBUTES AND FORMAT The following sections are showing examples of the different types of xml-files generated by WIMP. A.1 Object attributes <?xml version="1.0" encoding="utf-16" standalone="yes" ?> - <Objects> - <WimpObject> <ObjectType>RADIO</ObjectType> <Name>Radio 3</Name> - <Position> <Lat>62.00971375695</Lat> <Lon>4.99377014857635</Lon> <Height>336.64</Height> </Position> <Active>True</Active> <ID>6e8a19ec-4c29-44cf-ae6e-191fa6e390c3</ID> <Type /> <SubType /> <AntennaHeight>0</AntennaHeight> <LinkID>e30ecc0d-193b-4046-afc7-6dc4f37b9b34</LinkID> <RadioNumber>3</RadioNumber> </WimpObject> - <WimpObject> <ObjectType>RADAR</ObjectType> <Name>RadarEx</Name> - <Position> <Lat>61.9987714384308</Lat> <Lon>5.05301517284134</Lon> <Height>486.91</Height> </Position> <Active>True</Active> <ID>b8024f3d-5953-4c48-9b12-f90f8d794bda</ID> <Type /> <SubType /> <AntennaHeight>10</AntennaHeight> </WimpObject> - <WimpObject> <ObjectType>WINDFARM</ObjectType> <Name>WindfarmEx</Name> - <Position> <Lat>62.0151444364386</Lat> <Lon>5.00515868176449</Lon> <Height>378.12</Height> </Position> <Active>True</Active> <ID>1cca4205-24ba-41c2-86d9-d237c5524fc4</ID> <Type /> <SubType /> <Area_ID>b7661131-43b8-4561-a1b2-9aac3715a013</Area_ID> <Area><poslist><pos>62.012672588005522 5.0136070688337329</pos><pos>62.011646860296409 20 - - - - - 5.0109638624521269</pos><pos>62.011694569328135 5.0087273032061521</pos><pos>62.012147801401412 5.0026784270636311</pos><pos>62.015034015797909 4.9966295509211092</pos><pos>62.017252159922954 4.9966803818130634</pos><pos>62.0184684929269 4.9989677719509915</pos><pos>62.018754681864912 5.0019159636843211</pos><pos>62.016965956859032 5.0053216334452371</pos><pos>62.015248681970078 5.0066432366360401</pos><pos>62.01427074603864 5.0131495908061474</pos><pos>62.01427074603864 5.0131495908061474</pos><pos>62.014342303391437 5.0130479290222389</pos></poslist></Area> <WindMills> <WindMill>5253abb1-5ccb-4087-ac57-875958da6ca5</WindMill> <WindMill>ccd03742-dd57-45c5-ab6c-f6874914d3e0</WindMill> <WindMill>2385454c-1c5a-4a1d-8b6b-39d29f1600f6</WindMill> <WindMill>5d73f330-635d-41d6-b4a3-e498629897a4</WindMill> <WindMill>95bea600-fa15-4e51-a013-d09243a68cae</WindMill> </WindMills> </WimpObject> <WimpObject> <ObjectType>WINDMILL</ObjectType> <Name>W4</Name> <Position> <Lat>62.0164721877429</Lat> <Lon>4.99936672625818</Lon> <Height>420</Height> </Position> <Active>True</Active> <ID>5d73f330-635d-41d6-b4a3-e498629897a4</ID> <Type /> <SubType /> <DiameterTop>2.8</DiameterTop> <DiameterBottom>3.3</DiameterBottom> <WingLength>26</WingLength> <RotationSpeed>0</RotationSpeed> <TowerHeight>50</TowerHeight> <WindFarmID>1cca4205-24ba-41c2-86d9-d237c5524fc4</WindFarmID> <NacelleLength>5.1</NacelleLength> <NacelleHeight>2.4</NacelleHeight> <NacelleWidth>2.6</NacelleWidth> </WimpObject> <WimpObject> <ObjectType>RADIO</ObjectType> <Name>Radio 2</Name> <Position> <Lat>62.01778564931</Lat> <Lon>5.01856687755201</Lon> <Height>277.97</Height> </Position> <Active>True</Active> <ID>36f6ecfb-6e8a-4eaa-8107-2f6faa8f12c0</ID> <Type /> <SubType /> <AntennaHeight>0</AntennaHeight> <LinkID>e30ecc0d-193b-4046-afc7-6dc4f37b9b34</LinkID> <RadioNumber>2</RadioNumber> 21 </WimpObject> - <WimpObject> <ObjectType>RADIO</ObjectType> <Name>Radio 1</Name> - <Position> <Lat>62.0252266668861</Lat> <Lon>4.99622748207844</Lon> <Height>38.57</Height> </Position> <Active>True</Active> <ID>7f9b24db-40db-4909-94ef-f0e604422745</ID> <Type /> <SubType /> <AntennaHeight>0</AntennaHeight> <LinkID>e30ecc0d-193b-4046-afc7-6dc4f37b9b34</LinkID> <RadioNumber>1</RadioNumber> </WimpObject> - <WimpObject> <ObjectType>RADIO_LINK</ObjectType> <Name>NewRadioLink</Name> - <Position> <Lat>0</Lat> <Lon>0</Lon> <Height>0</Height> </Position> <Active>True</Active> <ID>e30ecc0d-193b-4046-afc7-6dc4f37b9b34</ID> <Version>1</Version> <Type /> <SubType /> - <Radios> - <Radio> <RadioID>65ca2c20-e3fc-4fce-bae4-39de327f50f3</RadioID> <LinkRadioNumber>4</LinkRadioNumber> </Radio> - <Radio> <RadioID>6e8a19ec-4c29-44cf-ae6e-191fa6e390c3</RadioID> <LinkRadioNumber>3</LinkRadioNumber> </Radio> - <Radio> <RadioID>36f6ecfb-6e8a-4eaa-8107-2f6faa8f12c0</RadioID> <LinkRadioNumber>2</LinkRadioNumber> </Radio> - <Radio> <RadioID>7f9b24db-40db-4909-94ef-f0e604422745</RadioID> <LinkRadioNumber>1</LinkRadioNumber> </Radio> </Radios> - <Links> - <Link> <LinkID>d6ddc560-817f-4b79-9814-51f542c0b527</LinkID> <LinkNumber>3</LinkNumber> </Link> - <Link> <LinkID>da19d735-67c6-4084-9dc4-5dbdfdb3254b</LinkID> <LinkNumber>2</LinkNumber> 22 </Link> - <Link> <LinkID>709b105f-25c2-4cb3-a514-ee203dd27f74</LinkID> <LinkNumber>1</LinkNumber> </Link> </Links> </WimpObject> - <WimpObject> <ObjectType>RADIO</ObjectType> <Name>Radio 4</Name> - <Position> <Lat>62.0014299807783</Lat> <Lon>5.01901366546148</Lon> <Height>364.11</Height> </Position> <Active>True</Active> <ID>65ca2c20-e3fc-4fce-bae4-39de327f50f3</ID> <Type /> <SubType /> <AntennaHeight>0</AntennaHeight> <LinkID>e30ecc0d-193b-4046-afc7-6dc4f37b9b34</LinkID> <RadioNumber>4</RadioNumber> </WimpObject> - <WimpObject> <ObjectType>WINDMILL</ObjectType> <Name>W5</Name> - <Position> <Lat>62.018276354739</Lat> <Lon>4.99953543814202</Lon> <Height>394.11</Height> </Position> <Active>True</Active> <ID>95bea600-fa15-4e51-a013-d09243a68cae</ID> <Type /> <SubType /> <DiameterTop>2.8</DiameterTop> <DiameterBottom>3.3</DiameterBottom> <WingLength>26</WingLength> <RotationSpeed>0</RotationSpeed> <TowerHeight>50</TowerHeight> <WindFarmID>1cca4205-24ba-41c2-86d9-d237c5524fc4</WindFarmID> <NacelleLength>5.1</NacelleLength> <NacelleHeight>2.4</NacelleHeight> <NacelleWidth>2.6</NacelleWidth> </WimpObject> - <WimpObject> <ObjectType>WINDMILL</ObjectType> <Name>W3</Name> - <Position> <Lat>62.0146454490106</Lat> <Lon>5.00212952982025</Lon> <Height>405.69</Height> </Position> <Active>True</Active> <ID>2385454c-1c5a-4a1d-8b6b-39d29f1600f6</ID> <Type /> 23 - - - - <SubType /> <DiameterTop>2.8</DiameterTop> <DiameterBottom>3.3</DiameterBottom> <WingLength>26</WingLength> <RotationSpeed>0</RotationSpeed> <TowerHeight>50</TowerHeight> <WindFarmID>1cca4205-24ba-41c2-86d9-d237c5524fc4</WindFarmID> <NacelleLength>5.1</NacelleLength> <NacelleHeight>2.4</NacelleHeight> <NacelleWidth>2.6</NacelleWidth> </WimpObject> <WimpObject> <ObjectType>WINDMILL</ObjectType> <Name>W2</Name> <Position> <Lat>62.0133489872856</Lat> <Lon>5.00614815318326</Lon> <Height>366.25</Height> </Position> <Active>True</Active> <ID>ccd03742-dd57-45c5-ab6c-f6874914d3e0</ID> <Type /> <SubType /> <DiameterTop>2.8</DiameterTop> <DiameterBottom>3.3</DiameterBottom> <WingLength>26</WingLength> <RotationSpeed>0</RotationSpeed> <TowerHeight>50</TowerHeight> <WindFarmID>1cca4205-24ba-41c2-86d9-d237c5524fc4</WindFarmID> <NacelleLength>5.1</NacelleLength> <NacelleHeight>2.4</NacelleHeight> <NacelleWidth>2.6</NacelleWidth> </WimpObject> <WimpObject> <ObjectType>WINDMILL</ObjectType> <Name>W1</Name> <Position> <Lat>62.0129364651596</Lat> <Lon>5.01016677654627</Lon> <Height>347.99</Height> </Position> <Active>True</Active> <ID>5253abb1-5ccb-4087-ac57-875958da6ca5</ID> <Type /> <SubType>850kW</SubType> <DiameterTop>2.8</DiameterTop> <DiameterBottom>3.3</DiameterBottom> <WingLength>26</WingLength> <RotationSpeed>0</RotationSpeed> <TowerHeight>50</TowerHeight> <WindFarmID>1cca4205-24ba-41c2-86d9-d237c5524fc4</WindFarmID> <NacelleLength>5.1</NacelleLength> <NacelleHeight>2.4</NacelleHeight> <NacelleWidth>2.6</NacelleWidth> </WimpObject> </Objects> 24 A.2 Height profiles <?xml version="1.0" encoding="utf-16" standalone="yes" ?> - <Profile> - <Header> <StartObject>RadarEx</StartObject> <EndObject>W1</EndObject> <NumberOfPoints>31</NumberOfPoints> <Range>2733.76268431415</Range> </Header> - <Point> <Latitude>61.9987714384308</Latitude> <Longitude>5.05301517284134</Longitude> <Height>486.911529541016</Height> </Point> - <Point> <Latitude>61.9992438199093</Latitude> <Longitude>5.05158753502795</Longitude> <Height>484.781875610352</Height> </Point> . . - <Point> <Latitude>62.0124645116245</Latitude> <Longitude>5.01159569860356</Longitude> <Height>339.87663269043</Height> </Point> - <Point> <Latitude>62.0129364651596</Latitude> <Longitude>5.01016677654627</Longitude> <Height>347.988952636719</Height> </Point> </Profile> A.3 Height area <AreaHeights> - <Header> - <StartPosition> <Latitude>59.0533333333333</Latitude> <Longitude>6.485</Longitude> </StartPosition> <NumPointsLat>30</NumPointsLat> <NumPointsLon>55</NumPointsLon> <DeltaLat>0.000805555555555533</DeltaLat> <DeltaLon>0.00163636363636363</DeltaLon> </Header> - <HeightArray> <Height>677</Height> <Height>624</Height> <Height>640</Height> <Height>700</Height> <Height>740</Height> <Height>760</Height> 25 <Height>760</Height> <Height>760</Height> . . . <Height>760</Height> <Height>703</Height> </HeightArray> </AreaHeights> B VISUALIZATION The following sections are showing examples of the different types of files generated by WTES. B.1 Grid/bitmap <?xml version="1.0" encoding="UTF-8" standalone="no" ?> - <WimpBitmap> <Name>Visibility Project Example</Name> - <CenterPos> <Lat>62.0146251939951582</Lat> <Lon>5.00416336726596888</Lon> </CenterPos> <Height>1177.739501953125</Height> <Width>662.824951171874999</Width> <Rotation>304.64228302144312</Rotation> <Filename>Visibility Project Example.bmp</Filename> </WimpBitmap>