1
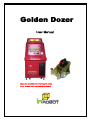
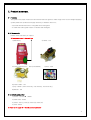
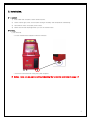
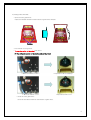
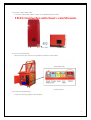
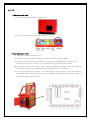
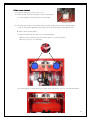
Golden Dozer
User Manual
Check the horizontal level before you set up.
If not, it cause balls are jammed frequently.
1
Contents
1. Notifications (※ must read)
1-1. Basic directions for safe use
3
1-2. Directions for installing and operation
3
1-3. Directions for robot handling
3
2. Product summary
2-1. Features
4
2-2. Components
4
2-3. Default configuration
5
3. Installation
3-1. Location
5
3-2. Setup
5
4. Game operation
8
5. Configuration
5-1. Control panel
9
5-2. Ticket dispenser
9
5-3. Main board Configuration
12
1) Coin set
12
2) Bill set
13
3) Etc
13
4) Default
14
5) Prize
14
6) Rate
14
6. Maintenance & First aid
6-1. Replace and clean tiers
15
6-2. Replace power Supplying pins
16
6-3. Etc
16
7. Specification & Part’s name
7-1. Specification
20
7-2. Part’s name
21
8. Q & A
24
9. Main Board and Display Board
26
2
1. Notifications
1-1. Basic directions for safe use
1) It must be avoid wet, dusty, or breakable place when you move or keep it long term.
(It can be damageable to keep it in too dry or moisture.)
2) Do not uninstall, fix, or tune.
3) Avoid a direct ray of light and heater.
4) Our game has a patent that the robot being recharged continuously. The ground a robot can move is
supplied electric. Do not put a wet hand or materials (especially conductors) on the ground when the power
is on. (It causes an electric shock. A short can damage a machine or cause a fire.)
5) Turn off when you clean the machine. Do not use water or chemicals directly. Please use wet towel then
dry up.
1-2. Directions for installing and operation
1) Install and operate after fully understand user manual.
2) Try to move and install a machine without shock.
3) Check the level before install it, then fix it with stoppers. (Balls can be jammed without checking level)
4) Use rated voltage and grounded outlet.
5) Do not put a wet hand or conductors on the playing ground (Robot’s moving zone). Conductors cause
short and fire. Remove them quickly with gloved hand.
It disconnects electric automatically when a conductor place on the ground, but the attention is always
needed. It connects electric automatically when a conductor displace from the ground.
6) Clean and check regularly so that prevents electric parts from damage with dust.
7) Clean the playing ground regularly to operate smoothly. (at least monthly)
Especially, clean frequently in dusty condition. (weekly) If you use wet towel or chemical cleaner, turn off
before clean then turn on after dry up.
1-3. Directions for robot handling
1) Check the switch is “ON” under the robot when the machine is installed.
(Check the switch is “ON” when you operate it because the default setting is “OFF”)
2) The Robot battery might be discharged when a robot is moving slowly or LED is blinking.
Put the robot on the playing ground with power on, a machine and a robot, for 30 minutes to recharge it.
Don’t play game for a while.
3) It is a precision material. Watch out the shock.
4) When it has a long term rest (more then a day). It needs warming up to proper working. Switch the robot on
for tens of minutes on the play ground then play game.
3
2. Product summary.
2-1. Features
This game is the player control the robot moves balls into goals to make a high score on the voltage supplying
system panel with a patent that supply electricity to wireless robot on it.
- It provide educational effects + Enjoyable effect with game
- To make new robot game culture to children and teenagers.
2-2. Components.
Please check first when you open it.
All components are in the coin box
1) Main Body
2) Robot : 1ea
3) Power supplying pin : 6ea (consumable)
4) ball : 70ea
6) Power Cable : 1ea
7) Key 3 kinds ( Case Cover Key, Coin box key, Coin door key )
8) Manual : 1ea
2-3. Default configuration
1) Credit : 1 pound Î 1 Game
2) Game level : 6level
3) Ticket : Fail (1), First (3), Silver (5), Gold (10)
3) Time : 60sec
※ Refer to the page 12 “ Main Board Configuration”
4
3. Installation.
3-1. Location.
1)
Find stable and flat place. Avoid moisture place.
2)
Avoid a direct light, heat, and the place changes humidity and temperature dramatically.
3)
All machines must use proper power outlet.
4)
Please check total amperage when you use an extension line.
3-2. Setup.
1) Fix and level.
- Fix the machine with stoppers under the machine.
- Check the horizontal level during fixing with stoppers.
※ Notice : Balls can be jammed without checking the horizontal level (refer to page 17)
5
2) Setting robot and balls.
- Open the front glass door.
Open the chemlok located on the bottom of glass door and pull.
Chemlok
- Put 70 balls on the ground.
- Turn on the switch of the robot then put in.
※ The switch is located on the bottom side of the robot.
< When the Switch is OFF >
< Expression LED is blinking>
< When the switch is on >
< Expression LED is on >
- Close the front glass door.
Close the chemlok located on the bottom of glass door.
6
3) Connect a main power cable
- Connect a main power cable AC input on the backside with an outlet.
※ Check the rated power(according to country) matches up to be set power before connection.
AC Input
Power Cable
4) Turn on the main switch
- Open the front door and turn on the switch located in control panel.
Main switch ON
< Control panel >
5) Check the proper working
- Insert coin and play game to work properly.
7
4. How to play
1) Insert coin or bill.
2) Push the start button.
Need to set First, Silver, Gold bonus rate (refer to page 12 Mainboard configuration)
It will be shown “Time” and “Double Chance” when started.
< First Bonus
Silver Bonus
< Double Chance
Time
Gold Bonus >
Your Point >
When “your point” matches up to “Double Chance” for a second, the player gets double score as twice as he
has gotten.
3) Move the robot with the joystick and steering.
Joystick
Coin FND
Start Button
Steering
Move Forward and backward
Show remaining credit
Start the game
Left and right turn
4) Control the robot let balls into the goal.
Each Goal has own score (FND on the goal shows). The score is laying aside each score whenever balls
come into the goal. Your point shows how many score you get.
8
When “your point” matches up to “Double Chance” for a second, the player gets double score as twice as
he has gotten.
5) The game is finished when the time is up.
Tickets will be dispensed according to “your point”. (refer to page 12, 5-3).
9
5. Configuration
5-1. Control panel
You can find control panel when you open the front door as following picture.
(1) Sound Volume : Turn right Æ Volume up , Turn left Æ Volume down.
(2) Service Coin : you can play without coin if you push the button.
The credit increase as many as you push the button.
(3) Reset : The credit go back to “0”.
To save configuration
(4) Test mode : To test a fan.
(5) ON/OFF : Main power switch
5-2. Ticket dispenser.
You can find a ticket dispenser when you open the front door as following pictures.
10
1)
Put tickets in the dispenser as following picture.
Left picture shows right way to put in.
Right picture shows wrong way to put in.
2)
It works when you push the DIP located on left side switch then it dispense tickets.
Control the ticket’s place with the DIP switch.
11
5-3. Main board configuration
.
You can find a main board on the left side of inner case.
It controls coin, difficulty, ticket’s amount as following picture.
COIN SET
Set the coin frequency with DIP switch
BILL SET
Set the game level.
DIFFICULTY
It’s not adopted.
Etc
It control demo music and demo moving when it is not played
Default
Set the ticket amount when player is fail the game.
Prize(left)
Set the ticket amount when a player makes first bonus level.
Prize(right)
Set the ticket amount when player make second bonus level (Silver Bonus).
Rate(left)
Set the ticket amount when player make third bonus level (Gold Bonus).
Rate(right)
Set the playing Time.
12
1) COIN SET
Set the coin frequency with DIP switch.
In case of UK
1 pound coin makes 10 signs.
If you set the DIP switch as following picture, 1 credit need 10 signs.
10 Pence * 10 coins Î 1 credit
20 Pence * 5 coins Î 1 credit
50 Pence * 2 coins Î 1 credit
1 Pound * 1 coin Î 1 credit
2) BILL SET
Set the game level.
It set the First, Silver, Golden Bonus score rate.
Dip Switch
Level
First Bonus
Silver Bonus
Gold Bonus
(White means switch)
ON
OFF
1
50-99
100-249
250-
2
50-149
150-399
400-
3
50-199
200-549
550-
ON
OFF
4
75-149
150-349
350-
ON
OFF
5
75-199
200-499
500-
ON
OFF
6
75-249
250-649
650-
ON
OFF
7
100-199
200-449
450-
ON
OFF
8
100-249
250-599
600-
ON
OFF
9
100-299
300-749
750-
ON
OFF
10
150-299
300-649
650-
ON
OFF
ON
OFF
13
z
11
150-349
350-799
800-
ON
OFF
12
150-399
400-949
950-
ON
OFF
13
200-399
400-849
850-
ON
OFF
14
50-199
200-998
999-
ON
OFF
15
100-299
300-998
999-
ON
OFF
16
150-499
500-998
999-
ON
OFF
Difficulty
It’s not adopted.
3) ETC
It control demo music and demo moving when it is not played for 30 seconds.
When you use this functions, robot moves with music for 2 sec when it’s not played.
ETC 1 : Demo music (on, off)
ETC 2 : Demo moving (on, off)
4) DEFAULT
Set the ticket amount when player is fail the game.
You can set form 0 to 9 (natural number).
No. 0 : Fail Æ Ticket : 0
No. 1 : Fail Æ Ticket : 1
No. 3 : Fail Æ Ticket : 3
14
No. 8 : Fail Æ Ticket : 8
5) PRIZE (Left)
Set the ticket amount when a player makes first bonus level (First Bonus).
You can set from 0 to 9 ( Multiply 3 )
No. 0 : First Bonus Æ 0 ticket ( 0*3 )
No. 1 : First Bonus Æ 3 ticket ( 1*3 )
No. 3 : First Bonus Æ 9 ticket ( 3*3 )
No. 8 : First Bonus Æ 24 ticket ( 8*3 )
It’s possible to set ticket amount from 0 to 27. (Multiple of 3)
PRIZE (Right)
Set the ticket amount when player make second bonus level (Silver Bonus).
You can set from 0 to 9 ( Multiply 5 )
No. 0 : First Bonus Æ 0 ticket ( 0*5 )
No. 1 : First Bonus Æ 5 ticket ( 1*5 )
No. 3 : First Bonus Æ 15 ticket ( 3*5 )
15
No. 8 : First Bonus Æ 40 ticket ( 8*5 )
It’s possible to set ticket amount from 0 to 45. (Multiple of 5)
6) RATE (Left)
Set the ticket amount when player make third bonus level (Gold Bonus).
You can set from 0 to 9 ( Multiply 10 )
No. 0 : First Bonus Æ 0 ticket ( 0*10 )
No. 1 : First Bonus Æ 10 ticket ( 1*10 )
No. 3 : First Bonus Æ 30 ticket ( 3*10 )
No. 8 : First Bonus Æ 80 ticket ( 8*10 )
It’s possible to set ticket amount from 0 to 100. (Multiple of 10)
RATE (Right)
Set the playing Time.
Time=60sec
Time=45sec
Time=50sec
Time=55sec
Time=65sec
Time=70sec
Time=75sec
Time=80sec
Time=85sec
Time=90sec
16
6. Maintenance & First Aid
6-1. Replace and clean tires.
The tires are consumables because of material. Check and clean regularly so that it lasts longer.
There is problem with it, replace it immediately.
1) Clean tires.
If you clean tires with wet towel regularly, the robot moves smoothly.
When you clean with wet towel, it has to be dried up.
The water can cause short and problems.
2) Replace tires
(1) Disentangle the wheel with a phillips head screwdriver.
(2) Remove the damaged tire on the wheel and set new tire
6-2. Replace power supplying Pins
The power supplying pins are for supplying the power from the power supplying board to the robot.
If the tip of pin is worn out, it needs to change with new one.(about three months period)
There are 6 extra pins in the package for replacing.
It is easy to take out pin by pulling it and push the pin until the gold color part is not showing when
replacing it.
17
6-3. ETC
1) When power has gone.
(1) Check the main power cable on the back side.
(2) Check the power switch on the control panel.
2) The robot doesn’t work
(1) Check the main power as above no. 1)
(2) Check the switch in on located on the bottom side of the robot. (refer to page6)
(3) Check the expression LED. If it’s blinking or out, the battery is discharged. Put the robot on the
playing ground for 30 min to charge. If it’s not work after charge, please call to service.
(4) Check the IR located on the wall of playing ground is blinking when player control the joystick to
move the robot. If the IR is not blinking although every power is on, call to service.
(5) If it’s still not working after checking 1 to 4, check the main board. The R13 on the main board has
to be blinking when control the joystick. If it’s’ not blinking although every power is on, it might be
main board problem. Call to service.
18
3) Balls are not circulated.
(1) Check the power first. (refer to 6-3, no.1)
(2) Check the fan. Push the test button on the control panel.
If it’s not working, check the power of fan beside it.
<Power of fan>
(3) Check the jam of balls to open back side door after opening the back door and ball gather.
If you stir the jammed balls with stick, balls moves into the playing ground again by pan.
★ How to open the ball gather.
① Open the back side door then you can find ball gather.
When you look at the both side of the balls gather, you can find latches.
When you pull up it, it is unlatched.
② The ball gather is opened when you unlatch each side latches, then you can find balls inside.
19
③ If balls are jammed, stir balls with long stick to unblock.
Turn on the fan when you stir (playing game or push the test button)
You can see Balls come up to the ground if you do properly.
④ Do it in reverse order when you close the ball gather.
Î If balls are jammed frequently, check the horizontal level.
To decline toward front side helps to be jammed.
4) Sound doesn’t work.
Adjust volume on the control panel.
(Turn right Æ Volume up, Turn left Æ Volume Down)
20
7. Specification
1) Dimension : 720 X 980 X 1780 (W x D x H)mm
1780
720
980
2) Weight : 160kg
3) Rated voltage :
AC 220V, 50/60Hz
21
8. Q & A
1. The main power is gone. (Refer to page 16)
Î Check the power cable.
Î Check the power switch on the control board.
2. The power is off when it’s playing.
Î Check the main power. (Refer to above no.1)
Î Check the play ground that lay a conductor. It is turned off automatically in this case to avoid short.
Remove a conductor from the playing ground. (Refer to page no.3 1-2)
3. The robot is not working.
Î Check the main power. (Refer to above no.1)
Î Check the switch is on locate on the bottom side of the robot
(refer to page 6, page 16)
4. The background music doesn’t working.
Î Check the volume on the control panel. (refer to page 19)
Î Check the cable is connected with speaker.
5. Balls don’t come up to the playing ground.
Î Check balls were jammed that open the backside door.
Unblock the jammed balls with stick (refer to page 18)
※Notice : Use a ball that we supplied only. The others can cause many problems.
22


![[MI 611-224] Model 875EC Intelligent Electrochemical](http://vs1.manualzilla.com/store/data/005702659_1-332404cfb3aec96feb6d622b9bb58c04-150x150.png)


![[MI 611-226] Remote Communications Program for 875](http://vs1.manualzilla.com/store/data/005776709_1-db0171e7d4f27da6c3915e3a18df8198-150x150.png)