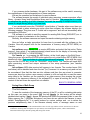
1
______________
CENZWORKS2K
_November 2010_
MIDI control Interface
for Yamaha Digital Mixer 01v
User Manual
ver. 3.4
1
INDEX
General warnings
Notes on this edition of the Manual
Setup
First software run
MIDI Settings and Yamaha connections
MIDI options
Main window
First operations(Mode Transmit / Receive)
Scene memories (Recall and Edit title)
Bulk Dump
Initial vision and using the controls
Saving files of Bulk Dump
Sending MIDI data to Yamaha
Reception MIDI data form Yamaha
Opening files of Bulk Dump
Channels strips
Home and Option I/O
Channels faders and Master fader
Buttons Sel, Solo, On/off (mutes)
Panning – BUS master Pan
The effects (send and return)
Effect Send
Effect Return
The effects libraries
Effect editing window
The Auxiliary channels (Aux1-4 and Masters)
The Busses (Bus 1-4 and Masters)
The Equalization
Using the EQ panel
The Equalization libraries
Visualization of MIDI data input
Signals Routing
Menu
Notes
pag. 3
pag. 4
pag. 5
pag. 6
pag. 6
pag. 8
pag. 9
pag. 11
pag. 12
pag. 14
pag. 15
pag. 16
pag. 17
pag. 17
pag. 19
pag. 20
pag. 20
pag. 21
pag. 22
pag. 23
pag. 24
pag. 24
pag. 25
pag. 26
pag. 28
pag. 29
pag. 30
pag. 31
pag. 32
pag. 36
pag. 37
pag. 38
pag. 39
pag. 42
2
General warnings
Although quite obvious, remember that being a digital mixer is essential not to put any
object on the Yamaha faders to avoid turning it or using this software can hinder their free
movement mechanical servo-controlled. As you know, it recalls the last status/faders position
reached before the shutdown, and whether they were moved with the mixer off, they back to
their last position.
At first use of the software is not recommended to apply input signals to the Mixer
Yamaha, and especially to amplify the output signals, although it was tested cannot exclude
sudden changes of output due to parameter variations uncontrolled (resonance filters, labels
sensitive moving fader to 0dB etc..), then you can start to use it with amplified signals,
preferably not at maximun gain.
BACK TO GENERAL INDEX
3
Notes on this edition of the Manual
The manual in Acrobat PDF format provides the ability to quickly move through the
document by using the links hidden under the chapter headings in the index. In each chapter,
in the end, there is a link to the MAIN as BACK TO GENERAL INDEX
The document is opened in read-only, the changes and saving are disabled.
In software manual buttons are highlighted with the same color with which they appear
in the program, eg. MSG DAT1 SELECT IN RECEIVE TRANSMIT RECALL EDIT Title.
The menus are highlighted in gray instead Menu File, Menu MIDI, Menu Visualize, Menu
?.
The buttons on the Yamaha are just "quotes".
The written warnings highlighted in blue are of particular importance.
As always the keyboard shortcuts and individuals keys are enclosed by <>
(eg.<CTRL> = control key).
To avoid confusion, the real Yamaha 01v Mixer is always called "Yamaha" unlike this
program (virtual mixer or interface or control panel etc.) referred to simply as "software".
BACK TO GENERAL INDEX
4
SETUP
The distribution of the setup file takes the form of compressed file (*. rar).
Uninstall any previous program MIDIMixer01v using the uninstaller in Windows (Control
Panel / Add or Remove Programs). This operation is not necessary but advisable.
Unrar the file to a temporary folder specially created and that you take note of the
position, then run the setup file.
The installation was created with a freeware program "Cyber Installer Suite 2009”. It is
easily configurable options (language, target folder, an association of *. 01v, system rollback
(restoring the old files) etc.. The only hassles are slow alerts about the use of program etc.. I
pray to ignore it.
Since the current version may be incompatible with files created with earlier versions,
please, if necessary use old file and *. 01v pref.00v, send them to the software company for
their update.
For the same reason is not avaliable a update-setup, as new features were added,
folders and files.
Specifically:
• are installed in the windows/system32 folder libraries I/O MIDI
MIDIIO32.ocx,libraries of controls (faders and knobs), the runtime VisualBasic
and some related files
• folder program is created and within it the EXE (MidiMixer01v.exe).
• In the same folder are copied two files for the background image and a program
file for preferences (pref.00v) with attribute "hidden" (viewable only with viewing
hidden files and/or system), but not read-only to be modified by the user through
the program.
• Documentation subfolder is created and within copies the files ManualeITA.pdf
(italian manual), ManualENG.pdf (this document), SavedParameters.pdf that
lists the parameters currently saved under a patch file and those of the individual
libraries, TabelleImplementazioniMIDI.pdf that contains the list of parameters
of the Mixer implemented and implementable in the future.
• Patches subfolder is created containing the default file Init00Memory.01v and
where other files will be saved patches with the same extension *.01v.
• are created subfolders setups, scenes, lib and subfolders of this latter, eff (with
further subfolder fxv where the effects library file default.fxv is copied), eq, dyn.
This folder is the default directories for each file opened for writing or reading.
Should not be moved or deleted but can be duplicated or nested with others.
All files and folders listed are considered vital to the functioning of the software. If they are corrupt or
deliberately removed the software will not work. Such a state will not cause any other problem.
BACK TO GENERAL INDEX
5
FIRST SOFTWARE RUN
Getting Started
Screen resolution
The program is intended to be used only with a screen resolution less than 1024 * 768
pixels (16 or 32 bits). Minors resolutions do not allow to view full resizable windows that are
not useful.
Higher resolutions may make it difficult to read the text labels.
Possible resolution 1152 * 864, 1280 * 800, 1280 * 960, 1280 * 1024 1600 * 900, 1600 *
1024.
The screen is fully used then, for better resolution of 1024 * 768, you should use the
opportunity to automatically hide the taskbar (right click on the taskbar, "Properties", select
"Auto Hide", OK.) Or, preferably move inferiorly.
BACK TO GENERAL INDEX
MIDI: Settings and Yamaha connections
Make MIDI connections as follows:
Connect the MIDI OUT of your sound card to Mixer MIDI In and MIDI In the back of the
PC to the MIDI Out of the Mixer. If you use a MIDI box you can connect other MIDI
devices to MIDI Through of the Mixer that is an exact copy of the MIDI signal from the
PC. Turn on the Yamaha. (Do not power amplification!)
Before starting the software, make the following settings on Mixer YAMAHA:
1. Press on it the button "MIDI" bring on the first page (MIDI setup). In it select the Tx CH
and Rx CH chosen (unless changed by the user they are both in default channel 1).
2. Select (darken) the two columns on the right Tx and Rx.
3. Unselect columns Omni and Echo if needed
4. Press MIDI button repeatedly to bring on the fifth page "LOCAL CONTROL" and make
sure to select "ON".
BACK TO GENERAL INDEX
6
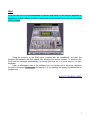
Start
As a first test run is not recommended to connect and switch on the monitor amplified or
amplifier to a mixer, always possible to avoid peak signals derived from a lack of knowledge
of the software.
Using the shortcut on the Start menu (created with the installation), you start the
program that appears with this splash form showing the version number. To continue (the
boot does not continue automatically) is enough just click on it or press any key on your
keyboard.
Later, in subsequent uses of the software, you can choose not to see more, selecting
the item in the menu Preferences and saving it, or by enabling the saving of preferences on
program exit.
BACK TO GENERAL INDEX
7
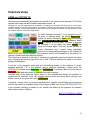
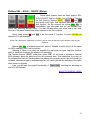
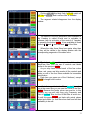
MIDI options
The window that appears (left) can not be
closed until you have selected the MIDI In and
Out be used, then activates the "DONE" button
that finally opens the main window.
By Default in the text boxes drop down on
will Displayed the first MIDI devices available.
Use that sound card or other virtual (YOKE NT,
Microsoft MIDI Mapper etc..)
To exit the program at this time without
selecting MIDI ports, press "Cancel". The button
stops and closes the program. Nothing changes if
you reopen the window during program
execution.
It 'still possible even after changing the MIDI
ports if necessary. In this regard it should be
noted that the names that appear in drop-down
menu are those of the installed devices (whose
drivers are in the system) but has not said they
are currently in memory, that is loaded and available (eg is. The case Creamware cards of the
picture, on a Pulsar card whose software has not been loaded yet). In the same case (drivers
loaded but not visible) software warns you about incongruous or unavailability of the drivers
will still be loaded without restarting either the PC or software. In case of multiple doors, only
work is physically connected.
The golden-yellow and pink boxes contain options for selecting MIDI channels using the
communication software from/to YAMAHA. By default is select channel 1 for both. So it's all
right is necessary that these settings are made manually also on the Yamaha on the MIDI
page as previously explained. Last opportunity in this window is to send the message to the
Yamaha MIDI "next page".
For the reasons set out above is not recommended to use the same MIDI channel
selected in the software into other devices or MIDI sequencer.
This window will continue to show itself at every new boot software. If will be saved
preferences in the menu preferences(menu preferences / save preferences) or will you be
selected in the same menu Save preferences on exit , following startup will no longer need
to rerun the selection of ports and channels of transmission, just press <Enter> to continue
keeping the options beforehand.
During program execution, as anticipated, you can call the MIDI settings window,
without risk, using the menu MIDI / Options and also through the button MIDI in the left main
panel.
BACK TO GENERAL INDEX
8
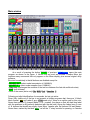
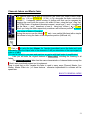
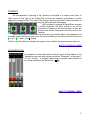
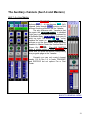
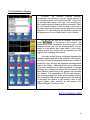
Main window
As a result of pressing the button "DONE" of previous MIDI Options opens the main
program as shown in the figure. It follows that as much as possible Yamaha Mixer but
contains many commands that only appear on the Mixer display, plus several original utility
software.
Be noted immediately is that all buttons are disabled except for:
• SELECT OUT (select mode transmission to YAMAHA)
• SELECT INi ( select mode reception from YAMAHA)
• Hide Help (exchanges the contents of the text box between the fast aid and block-notes)
• EXIT (end software)
• Most of the menu (active only File, MIDI, Pref., Visualize, ?)
Following an initial identification of commands, but not yet active.
Down (fully visible only if the bar is not present or hidden programs bar) there are 14 black
label channel 1-16 and under 8 grey 17-24 used only if there is an option card for this outs.
Above them are the 15 channel faders (1-16 + master), they have on their left dark blue label
with the positions in dB (perfectly balanced with the real one). Above the faders have 3 rows
of 14 buttons that double as exactly those Mixer Yamaha plus Sel buttons ON and Master.
Above them, marked by the label "PAN" on left the 17 rotary controls for panning, on Yamaha
9
Mixer only virtually present in the display "PAN/ROUTING". Still above the 14 channel sends
for the two effects. Appear also buttons for selection PRE or PST fader. Top right, marked
with different colors, we find two faders for master effect send, box of 2 effect returns,
including the 4 pan, two rotating for the amount of return and 6 buttons Sel, Solo, and On/Off.
In the upper right side, the 4 Master auxiliary faders (AUX1-4) with its on/off and under
4 MasterFader BUS and its on/off. On top center the window for equalization. Al suo fianco
sinistro il taccuino in questo momento utilizzato dal Fast Help, un'iniziale aiuto immediato.
Detta casella di testo sarà utilizzata anche per la visualizzazione dei messaggi esclusivi . I
messaggi di Control Change e Canale saranno invece visualizzabili nel riquadro blu a destra,
contrassegnato dalle etichette : MSG, DAT1 e DAT2 (Channel Message, DATA1 e DATA2).
Top left replication of all 17 buttons* existing on Yamaha Mixer with the same label, a button
"EXIT" to close the program at any time and at the top, circled in red in the image, two
essential buttons :" SELECT OUT " and " SELECT IN ".
* About this panel (top left in the previous figure), all buttons are active, once you set the Transmit mode.
Those colored in gray, must be considered currently active only for the poor function of pressure as the
corresponding buttons on the Yamaha, that is not yet implemented its functions and not open new windows but
do make proggress the pages on the Yamaha.
BACK TO GENERAL INDEX
10
First operations (Mode Transmit / Receive)
The software is now built with a double but alternative modes of operation that is MIDIonly transmission (Software -> Yamaha) or Receive Only (Yamaha -> software). This was
preferred to other possible ways to avoid dangerous conflicts of incoming and outgoing
messages contemporaries, perhaps due to transactions made by persons other than software
and interface directly on the mixer. Receive mode (indicated by the label RECEIVE) disables
the software commands and displays the results of operations performed on Yamaha Mixer,
conversely Transmission mode (indicated by the label TRANSMIT) is not able to disable the
controls Mixer real. To select from time to time according to momentary needs, the preferred
mode, just press the button "SELECT OUT" to transmit data to Yamaha MIDI (the button
pressed becomes into label TRANSMIT recalling the current state, while the other off) or
button "SELECT IN" to enable the reception of MIDI data transmitted by Yamaha. The case
status change is indicated by the label become RECEIVE the button. After the first press of
either button (both green and than start with no rules set) is always active either. Pressing the
labels TRANSMIT and RECEIVE has no effect because they are only signals of the status of
current mode, only buttons SELECT OUT and SELECT IN command transmission and
reception. In addition to these buttons you can switch from reception to transmission and vice
versa even clicking in the menu MIDI the test Transmit or Receive, or finally with the keyboard
shortcuts <CTRL+T> (Transmit-SelectOut) or <CTRL+R> (Receive-SelectIn ). IMPORTANT!
The Mixer Yamaha 01v has a few commands and buttons that do not transmit any MIDI
message on their status change, this means that it is impossible to see the effect in software
mode reception. It's the case with all 17 buttons on the left side of the Yamaha (from Utility to
Home). Note that instead they are controllable through software. For this reason is highly
preferable,using this software, do not press those buttons on Yamaha, but use in transmit
mode, the copies of the software. This is to avoid inconsistencies between the spin on the
Yamaha and not display in the software. It is understood that none of the PC or the Yamaha
suffer any violations of this rule, being a categorical imperative that adopted by
CENZWORKS2K not to create never the slightest possibility of damage the Mixer.
Selecting mode RECEIVE all controls of software are disabled except: SELECT OUT,
FastHelp, Wiev ExMessage, EXIT, Menu File, Menu MIDI, Menu Visualize, Menu ?. Others
will be rehabilitated and available only by pressing SELECT OUT and in this way passing in
mode transmission.
BACK TO GENERAL INDEX
11
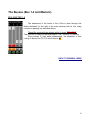
Scene memories (Recall and Edit title)
As suggested by fast help that appears early in the text box at the top left of the main window,
it is preferable that the first thing to do after boot program is to "synchronize" the software with
the Yamaha. The quotes above are due to the fact that currently the software is not yet able
to recognize the current mixer settings online, even when on the Yamaha will open a
previously stored scene (in this case the Yamaha only sends a channel message that informs
about the scene number and not all parameter values.)
So the syncronization is only recalling the scene 00, that is the scene that can not be
changed by Default in the software and in the Yamaha. To achieve this, with transmission
mode actived, in Menu Memory click on "Recall and Edit Title Scenes" .
The window appears on the right is where
you can retrieve the stored scenes on the
Yamaha, and easily edit the name. To invoke
the default scene 00, preset at the beginning,
just press the button RECALL , in this way
on Yamaha either on software the opening
scene is invoked. To invoke another of the
100 available (00-99) simply type the number
in the box circled in the figure and press the
button again. In these cases, as already
mentioned, the scene will be called only on
the Yamaha. To edit the name instead (always 8 characters maximum, including any spaces,
but the software automatically adds them if necessary and you can not type more) is
important first of all make sure that the memory is existing, that is already stored on the
Yamaha, to do this just type the number and press recall, if that memory is still empty, the
Yamaha did not recall, but, not yet implemented the functionality of storage memory and
instead it is possible to set its name, you may encounter the error of editing the name of an
empty memory, an operation carried out with the actual name change, but unfortunately with
a random parametric and dynamic approach, which do "crazy" for 1.5 seconds the mixer
without causing any damage. In this case, however, be strongly discouraged, to restore the
legibility of the display you must restart the Mixer Yamaha, and then move to the Memory Init
00 and save in the number of corrupt memory, making a copy that is free of defects. In fact
you can not erase a memory without write it again.
In short:
• to invoke a memory type in any number and press RECALL (if it is still empty, the memory
is not recalled, no problem)
• To edit the name of a previously edited memory (even manually on the Yamaha) call it as
above and make sure that the mixer has actually called (that is existing, full) [the same
number set in the software should appear in the left of the display of Yamaha ], then type the
new name in the box next to Title, and press EDIT Title .
12
These are the characters used and recognized by Yamaha:
A B
C
D
E
F G
K L
M
N
O
P Q
U V
W
X
Y
Z a
e f
g
h
i
j
k
o p
q
r
s
t u
y z
(space)
!
"
# $
( )
_ underscore `left <ALT+96>
/
: ;
+ ,
?
[
] ' right <ALT+39>
H
R
b
l
v
%
<
.
I
S
c
m
w
&
=
|
J
T
d
n
x
*
>
~ <ALT+126>
Special characters are available in the software (as in any text editor for Windows) by
pressing contemporary <ALT> and its ASCII code number.
The button Cancel test only serves to clear the current text of the software without any
influence on the Yamaha.
Pressing the button "DONE", only makes the window disappear to use the notebook.
The one show above is the only way to draw and edit the title of a scene. As discussed in Chapter BULK
DUMP, in a different window, you can change the number of scene and then copy it into a different memory of
the Yamaha, but in that case, the new allocation will retain the old title, to edit it in a new (xxxyyy2 eg.) it will
return to this page (frame, square amendment entitled "Memory Scenes").
BACK TO GENERAL INDEX
13
Bulk Dump
Introduction and software specifications
The Bulk Dump is the possibility to send/receive Mixer from Yamaha and from software
the content of these memories on the Yamaha.
The Yamaha stores these data types, stacked on the left in the MIDI fourth page
(Yamaha manual p.232) as:
ALL:
all the following memories
SETUP MEM: only memory containing settings Setup (Source, Listen,
Mono/St, Solo Setup, Groups, Pair, Dither ...)
PGM TABLE: Table assignment of scene memories to data Program Change
CTL TABLE: table assignment of parameters to data Control Change
and right column, inasmuch with other options (nr, type):
SCENE MEM: scene memories from 01 to 99 (00 read-only) containing all data
transmitted and received via MIDI (faders positions, assigning libraries,
pan etc..)
LIBRARY: 3 separate libraries: EQ (equalization), DYNA (dynamics processors) and
EFF (effects processors)
REMOTE: also with different types and parameters.
In implementing these features of the Yamaha Bulk Dump in the software we had
chosen to ignore the REMOTE because personally not used, and PGM and CTL TABLE
TABLE because a different allocation of PGM and CTL would prevent the proper functioning
of the same software deployed until now the match by default the same MIDI data. Assign
additional variables to this data, it would become more cumbersome than a program even a
little effort as helpful in this case the normal statistical and non-use of these opportunities.
This does not mean that these parameters can not be implemented one day, but given the timing and
other emergencies, we can say that this will be virtually impossible.
Summing up the software is currently implemented only previous titles in bold and
underlined, MIDI data sent from other (in italic) are not read by the software and this do not
sends them to the Yamaha.
BACK TO GENERAL INDEX
14
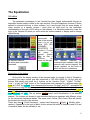
Initial vision and using the controls
To open the BULK DUMP window in the software click into menu MIDI the text Bulk
Dump or just keyboard <CTRL>+B. Closing this window is controlled by the button CLOSE
Window. Buttons SELECT OUT and SELECT IN are a copy and have the same function as
one in the main window of the software. Are shown to have the immediate ability to switch
between the two states (transmission-reception) and receive/send messages of bulk dump.
The window is divided into two sections (separated in pic. by dotted line Red): the left with the
options and buttons for receiving and sending data with adjacent fields date, the right which
has 3 text boxes for any display of data received (above) and sent (below). 1 The higher of
these are for the data in hexadecimal and decimal. The underlying data (files to
save/transmit) are in decimal because so saved the text file output, but sent in hexadecimal
format using the MIDI exclusive system messages. To view the overlying one in mode
reception from Yamaha you must check the related check boxes (red circled). In all this
window the only editable text by user with numeric keypad is the numeric field to select the
new scene or library to save and send the contents of memory, circled in blue in pic. All other
texts will be made automatically by the software.
The mode of operation of this window will not cover all the features offered by Yamaha
that assume the existence of a specific Hardware for Bulk Dump, maybe the same Yamaha.
1If you do not intend to display the data stream can be easily (but manually) resize the window hiding
these text fields.
15
If you possess similar hardware, this part of the software may not be useful, assuming
the completeness of the implementations of these machines.
We see the operation and limitations of current software.
The software accepts the receipt of individual setup memories, scenes memories, effect
library , dynamic library and Equalization library sent by Yamaha. This means that it is unable
to recognize the sending of all (ALL) libraries, but even the sending of multiple memory of a
scene or a single library (eff dyn, q) in one time.
If you accidentally press the TRANSMIT virtual button of Yamaha when more than one
option is selected or when selecting an option other than software, the software displays the
following message "Run-time error '5 'Invalid call or argument "and will end immediately after
pressing the OK button.2
The software is not able to send the request for sending Bulk Dump (REQUEST) nor to
receive it to enable its submission to the Yamaha.
Similarly, the software can save and open files each containing a single memory.
Now we follow a single procedure for know how to proceed with the software on the
Yamaha. Now will prepare both for the transmission of memory setup (SETUP MEM) on
Yamaha:
Into software press SELECT IN to receive MIDI data, and select the first option “Setup
memory”, then select (if not selected already) check boxes for the display of incoming data
“VIEW HEXADECIMAL” e “VIEW DECIMAL”
On Yamaha go , by pressing the MIDI button, at the fourth page on the Bulk Dump .
Using the cursor keys and the ENTER button select the only virtual button SETUP MEM. And
deselect all other. Only one button at a time will be darkened (selected). Again with the cursor
keys and the ENTER key, press the TRANSMIT virtual button. The Yamaha will send MIDI
data conceirning current and unique statement of the setup parameters (see Yamaha
Manual).
Into software MIDI data received will appear in two formats. The number boxes (Edit
and below) will be disabled and show the text "(no)" because it is a memory only and can not
be renumbered. Now that the data are into software and then they are stored in computer
memory we have four options: save memory contents to a file on hard disk, re-send the same
setup data to the Yamaha, get the contents of an other memory (thus erasing the current
contents of the temporary memory of the software/PC) or open an existing file on HD. The
content of the text boxes are copied but not editable.
BACK TO GENERAL INDEX
Saving files of Bulk Dump
The first chance:
To save the contents of the temporary memory of the PC on a file, containing data setup
as this case, we press in the menu FILE the text SaveAs (in this version will be always
disabled direct saving “Save”). Appear the window that opens the prepared folder to save the
Setup memory file (.../(program dir/setups/) and here we can choose the filename to save,
default “SetupMemory.txt”. It is useful rename for various settings and not to delete the
previous setupMemory data. If the filename already exists, a message warns us and
2 The problem is that the length of the transmitted data varies for each type and the software can not know in advance
whether the incoming data correspond to its expectations, selected through the options, which control both the
transmission than receipt, than the opening and saving files on HD.
16
overwrites the existing file by pressing YES, the procedure of saving ends instead if you press
NO, in this case you should press again the text "Save As" from the File menu.
BACK TO GENERAL INDEX
Sending MIDI data to Yamaha
The second chance, after receiving MIDI data from Yamaha containing the
parameters of its SETUP, is to return them intact to the Yamaha itself. Unnecessary operation
which involves replacing the original data with its exact copy. We use it just because of his
harmless for understanding the operation of transmission data by software.
The first thing to do on software is to prepare it for sending MIDI data, so you must
press the button SELECT OUT. Will appear TRANSMIT
Pressing the virtual button DONE on software,the memory is replicated in the right
window, which represents the contents of the data that are being saved to a file or sent to
Yamaha. Better to take note that this button is disabled until you have received MIDI data, or
opened a file from HD. After pressing, turns again disabled and instead enables the button
below Send Bulk Dump to Yamaha! In the same time the frame of orange field “Prewiev of
what are sending with bottom button Bulk Dump” display type (in this case “Setup Memory”),
the Title (in this case “not needed”) and the number (in this case does not present) of data
that are being sent to Yamaha. Only the pressure of last button Send Bulk Dump to Yamaha!,
actually send data to the Yamaha will use them to replace those that are in its memory,
without any prior or subsequent to confirm overwriting.
Unlike what was seen in the first footnote on the page, where software responds closing
to a submission incongruous, Yamaha is able to recognize that fairness and in case of
sending incorrect data, will only know by flashing with no clear void or jeopardize anything.
The only risks involved in using this part of the software are to override individual scenes or individual libraries
for your "voluntary" oversight, just like those that run when you save any file on your computer by overwriting a
good file with a full errors or incomplete.
Pressing the button will sends MIDI data to Yamaha without any confirmation appears
neither software nor on the same Yamaha. Your data will overwrite existing ones, and on
software the same button will be disabled.
BACK TO GENERAL INDEX
Reception MIDI data from Yamaha
The third possibility, after receiving data of Setup Mem from Yamaha, is to receive
other types. In this case we are aware that the previous data received will be deleted from the
temporary memory of the software and replaced with new ones arrive. For example, we
receive data of first Memory scene stored on a Yamaha number 1.
On software, we develop MIDI reception pressing SELECT IN (RECEIVE), choose
option “Single Scene memory” Remember that it is crucial to choosing the reception /
transmission/opening/saving files, as this is the only one that determines the amount of data,
the memory size. Also press the Clear button to clear the text (if any) of the three text
windows, let this once again selected or reselect, check boxes display HEX and DEC and we
move on Yamaha.
17
On Yamaha, select with the arrow keys and ENTER button the virtual button SCENE
MEM, Then go back on SETUP MEM, again ENTER to unselect, then we move to their right
to determine how many and which scenes we want to send to the software. Because we can
send one at a time, and we decided to send only the first, using the cursor keys and the wheel
PARAMETER select in both fields (FROM and TO) the number “1”. Control that only SCENE
MEM is selected, move the cursor on TRANSMIT and press ENTER.
On software, scroll bars for text boxes above begin to shrink, after fifteen seconds (wait
with confidence!) appear finally 2056*2 (HEX and DEC) data concerning the contents of only
first Yamaha's scene. The long wait is due only to formatting text, but is useful for the first
time expect to realize this textual output of receipt of MIDI data coming from Yamaha.
Through these scrollbars check that the first and last data are always “F0” (DEC 240) [Init Sys
Exlusive] and “F7” (DEC 247) End Of Exlusive.
Once established and understood the operation of the window BulkDump for all operations of bulk dump
data reception or open files, or better, for the only operations on the memory Scenes (the longest in terms of
bytes / data) can be easily do without the data on display, with remarkable savings in time. This will be sufficient
or uncheck the boxes for manually or set deselection by deselecting of “BulkDumpViewHexAndDec” in the menù
Preferences the main window of software, accessible even with that of BulkDump. This save in file pref.00v lthe
settings to be loaded with every subsequent startup of the software.
Also on the software, in the yellow box beside the option Scene Memory, appear the
title of resident memory on the Yamaha and its scene number. These data, title and number,
are derived from MIDI data sent from Yamaha, and are also replicated in the boxes below the
frame number and Edit "Prewiev ...". At this point we can save the file as is (with the same
title and number of Scene), simply repeat the previous operation with menu "Save File As". A
new saving-window appears, in the directory of the memory scenes this time, with the file
name formatted as ("scene number" + "SceneTitle"). If you want to change the scene number
to be able to copy to a different memory than the current Yamaha and / or save HD already a
number of different scenes and then different title for the original part number, we can edit the
number only in the appropriate box "Edit Number" and press "DONE".
It is important to clarify that: the number of scene that his title is part of the 2056 data
sent / received via MIDI; that the function of "Done" button is just to rewrite the 16th number
of the list related at the scene number and the penultimate, the checksum [sum of all data,
reversed sign of the two's complement ...]. This clarification is due to the fact that it is
obviously possible to save a disk file and rename it as you like maybe with a different number,
but this change of name and number is useless if made in the save dialog, as in the file the
number or the title will suffer, and once opened for reading this file, comparing the original
number and originale names contained in the file.
BACK TO GENERAL INDEX
Opening files of Bulk Dump
The fourth possibility, is to open a saved file on HD.
To do that clik on "Open" in "File" menu of this window Bulk Dump.
Again, the option that is selected among the 5 available (Setup, Scene, Eff, Dyn, Eq)
decide the type of file to open and click on the related directory. The contents of the
temporary memory of the software is replaced by the contents of the file. The title and number
depend on the content of the file and not on the file name saved. Once loaded, with or without
display in text boxes above, may be re-numbered and sent to the Yamaha or saved with the
18
new number set in the "Edit Number".
No confirmation of overwrite memory on the Yamaha, and the usual request for
overwriting when saving with the same number and name.
Recapitulating is preferable, before renaming or renumerare scenes of memory, or the
individual libraries, to make a full backup by saving the number and title also present on the
HD Yamaha [by sending from Yamaha scene to scene library to library, deleting the text with
"cleartext" whenever and Save As already suggested] phen, when the need arises, reopen
one of these scenes from files, renumber it at will, re-save a copy in HD and send it on
Yamaha's new memories.
For libraries on the Yamaha types can be recalled through the roller parameter (DYN,
EFF, EQ) once went with the cursor on the related line for [library].
Care in selecting on Yamaha fields FROM and TO always with the same number, to
send to software the contents of a single memory for once. Conversely, the Yamaha will
always be able to recognize the type of data received from the software and immediately
replace them in memories.
To rename Scenes titles, since it is already present in the main window (with a simpler
procedure due to the use of CTRL CHANGE Message), it was not necessary to repeat such a
possibility in this window BulkDump.
A typical mistake is to forget to select the MIDI output when sending data from software
and back the MIDI input to receive them. The software does not indicate in any way fail to
submit or failure to receive data in these cases.
Another tip is to make a full copy of the folders "scenes" "setups" and "lib" directory to
another dir after being filled with backup data on the Yamaha, so you can always to have
available the manually made data before the use of the software.
Text boxes containing the titles and numbers of the scenes and libraries will remain
visible even when you work with other types until their replacement done automatically on
opening a file or receive MIDI data from Yamaha. That's the important reason to always look
orange frame at the bottom to know what you are sending or saving.
For additional enhancements and bug fixes expect any suggestions and comments.
BACK TO GENERAL INDEX
19
Channels strips
HOME and OPTION I/O
Channels are implemented and appear very similar to the Yamaha, the channels 17-24 of the
optional card using the same channel strips than normal 1-8.
Currently it is not yet implemented the possibility to exchange the channels with the press of virtual button
GLOBAL "SWAP" in the fifth page of Option I/O Yamaha. This does not mean that we can not use the memory
scenes so septate, because the software works properly with all available commands, the only difference is that
the software does not indicate any Swap Mode.
To switch between channels 1-16 to optional ones 1724 press, in transmit mode, the button Option I/O it
remark its activity becoming Option I/O and pointing
with yellow text on black background channels labels
17-24 on bottom of the window. To return to manage
the channels 1-16 you press the button HOME that
things will reverse again. They are, as the Yamaha of
course alternative, and I repeat, being impossible
receive the corresponding messages of the Yamaha is
better to use only on the software. Their pressure lead to the illumination of the buttons on
charges Yamaha and their effective function.
Their function is identical to the real of Yamaha, by repeatedly pressing it behave the same
way, changing the relevant page from first to fifth. There is therefore no need to use more
physical counterparts.
If you are in the reception mode and you are working directly on the Yamaha, to switch
between channels 1-16 to the optional ones is therefore necessary, instead press the
OPTION I/O Yamaha press Select Out and OPTION I/O on software (back at the moment in
Transmit mode) and then return in Receive mode with its button.
However even if you press the Option button on the Yamaha and change the positions of
controls on the channels 17-24, the software receives them and stores them correctly, and
shows it soon as you press the button OPTION I/O.
In general, I repeat, when you press these buttons on Yamaha, the software can not respond
and this can mean for example turning off both ways HOME (ch1-16) and OPTION (CH17-24)
in the software resulting in inability to act virtually the faders up the pressure on software
either button (Home o Option).
BACK TO GENERAL INDEX
20
Channels faders and Master fader
The channel fader has a label at the bottom that turns color under current mode
HOME (ch 1-16) or OPTION I/O (17-24). in Fig. alongside the fader controls the
channel 7. It supports various modes of change and that can be operated by
dragging the cursor with the mouse, clik within its lane, using the keys <Pag Up>
and <Pag Down> of keyboard (discrete increase), arrow keys (↑ and → increase of
one the value, ← and ↓ decrement of one it) , using keyi <Home (
) >*** and
<End> you bring the fader respectively maximum and minimum position. Is normal
some noise of faders of Yamaha .
Moving the mouse over the labels 0 *** and ∞ see a white little hand with a simple
click allows to bring the fader on the respective position (0dB and -inf)
*** Click on 0 or using the key <Home> the Yamaha immediately move the fader and, most
importantly, raise the output level of the channel to 0 dB (no attenuation of the input signal) or
even to +6 dB!!!.
This can be harmful to your ears and monitors any active with high levels of amplification!
Later you will learn the original features of"Menu Utility" including the lowering of all
faders.
The STEREO MASTER fader has the same characteristics of channel faders except the
0 that it was considered prudent not to implement.
Keep in mind that on the Yamaha this fader is used in many ways (Channel Master, Aux
Master, Master Effect etc..) of these features otherwise implemented in software will be
speak later.
BACK TO GENERAL INDEX
21
Buttons SEL – SOLO – ON/OFF (Mutes)
Above each channel fader are three buttons SELSOLO-ON/OFF, that is a faithful copy of those of Yamaha
for their function. Buttons SOLO , SOLO, ON and OFF
are switch on/off type, their repeated pressure switches
that function. On the contrary the button SEL, SEL is
RadioButton type that mean that you can deselect one
button only selecting another button. It is also activated when you press one of two other
buttons on the same channel and when touched on the Pan or labels.
About using mutes ON and OFF it are the same of Yamaha. In mode OPTION I/O
channels 9-16 are disabled.
Using <Tab> followed by <Spacebar> or <Enter> you can move in sequence in the channels using only the
keyboard.
Buttons SEL SEL of software send their state to Yamaha, bur this do not do the same
(no MIDI message). But it isn't a problem.
Wanting to follow in as much as possible the real mixer we have kept this function,
which is essential to activate the window of Equalization.
The Yamaha buttons “SOLO” unlike than mutes “ON”, do not send to software a univocal
MIDI message about the state on/off but only pressure state, This means that if you turn on
the software and then on Yamaha without be passed into reception mode, their functionality is
reversed becaues its type is undifferentiated on / off switch.(As with the switches of the lights
when there is a diverter).
Later you will learn the original functionality of "Menu Utility" including the switching on
and off of all channels.
BACK TO GENERAL INDEX
22
PANNING
The management of panning in the Yamaha is entrusted to a single control body in
white found on the right of the display.This involves the awkward pre-selection of each
channel to change the Pan. The view of the changes made is entrusted to the small display in
different ways. After many years operating this dial numb and fail changes.
Utility software to manage a Digital Mixer revealed
in similar situations. We have chosen to put all the
commands of panning in the main window, so they are
always under control, even when obviously work on the
Yamaha.
Again it was done to include useful features such as sensitive labels ( the appearance of
the same white hand above) that move the pan immediately in the three positions most used
L ( Left ), C ( Center ) and R (Right).
Similar to the Pan faders on display also agree to be controlled via keyboard arrow keys etc..
BACK TO GENERAL INDEX
BUS MASTER PAN
An exception to what said before is that the 4 pan of Bus Master in the
Yamaha can be controlled through the wheel "Parameter" in the page. 3
of Pan / Routing ", in software rather have 4 separate rotary controls in
its routing switches to the Stereo Bus (STST).
BACK TO GENERAL INDEX
23
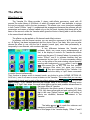
The effects
Effect Send 1-2
The Yamaha 01v Mixer provides 2 stereo multi-effects processors, each with 42
presets.The entire library of 99 effects, of which 42 presets and 57 user-definable, is unique
but can be variously used in the two processors. The effects user, once stored are available
in both "banks" Effects 1 and 2. I emphasized this arrangement because the software will edit
parameters and names of effects loaded only on the first bank, knowing that these will be the
same of the second, unlike the Yamaha which gives the illusion of being able to edit the effect
in the second bank individually.
The effects can be applied on 24 channels and effects returns.
In software, with the current version, you can send the command of all 24 channels(16
nr + 8 Option), has been implemented also the choice Pre or Post fader. Also you can now
choose the effect to use, edit the first 4 presets (reverb type), save them permanently or
temporarily in new libraries, with numbers and titles.
A key difference between the Yamaha and
software, which can cause some embarrassment at
first, is the display of controls. On Yamaha the effects
sends use the same 15 channel faders, by pressing the
button "Effect1" and 2. In software however they are
represented by two tiers of 14 new commands rotating
blue, on the center of the main window, above those for
panning with background light grey effect 1 and in dark
grey the second (pic on left). The box that contains
them becomes blue when you press any buttons
Effect1 - 2.They are nonexistent in the Yamaha. It is
preferred to have the ability to "split" these commands
to control them simultaneously.
Their function is always active in transmit mode, any button is active (HOME, OPTION I/O,
AUX1 etc.), even if not seen to move its faders on the Yamaha. This means that you can vary
the amount of signal sent to each of the two effects without first press Effect1 - 2. Or you can
press "Effect1" -2 on Yamaha and note the changes made in the software. Pressing button
Effect1 or 2 “light” their stripe, the recall show faders position and possible advancement in
the pages Effect of Yamaha.
To distinguish the effects sends of channels 1-16 from
17-24, they have yellow-gold and pale yellow (left). Note
that in this case (Option) buttons Pst of self-routing of
effects are disablied, because non-existent in the
Yamaha.
The lables m and M do reach the minimum and
maximum positions of the controls.
Buttons Pre and Pst are the same of third page of the Yamaha display “Effect 1” and 2
24
then you can choose whether the effects of the channel is sent regardless of the output
volume setting of the channel fader or not. They are usefully placed close to the effects
sends.
The ability to send the first effect to the second
and vice versa, this in the same effects third page of
Yamaha, software is located immediately above the
strip effects sends (as shown at right).
To note that the software fader Master Effect is not managed by Stereo
Master fader as on Yamaha, but has a dedicated faders, or rather two, one for
each effects processor. It is on the right of the EQ window. As depicted on left
to pressing the button Effect1 (indicates their active status becoming Effect1)
this fader changes its color to pink, to remember its replacement function of
fader "StereoMaster". Again both faders are always active in transmit mode.
Even the underlying on / off button replace the stereo master mutes of
Yamaha.
BACK TO GENERAL INDEX
Return Effect 1-2
The return effects on the Yamaha is managed in the box called
"1 RETURN 2" through two knobs and six buttons.
In our software the analogue box RETURN EFFECT 1-2 (on left) is on
the top right of the main window and contains the 4 knobs and the
usual sensitive labels for panning.
MIDI messages sent from two knobs Yamaha are different (CC and
Ex) and depend on how the internal display as well as the button
pressed and the one selected. (pages 32-_35 of Yamaha manual:
fader Mode)
The software (in receive mode) always react correctly in the presence
of MIDI messages related. Only on Fader Mode "AUX1-4 "and "Effect
1-2" (pag.35 Yamaha manual) are not yet recognized by the software
send levels from Return to Aux and from Return1 to Effect2 and vice
versa.
In transmit mode, as in the management of panning, as above for all
the buttons and rotary controls.
BACK TO GENERAL INDEX
25
The effects libraries
Since version 3.3 is available the choice of effects to be applied to two banks and other
functions. To access the window must be clicking the menu effects and Effects Window or
with the shortcut keyboard <CTRL+E>, but only if is selected mode Transmit. Appear the
following window.
The “page 2” of programs effects in Yamaha, with the choice among effects to load
(RECALL) and STORE and edit his title, is like this window. Of “page 3”, with options Pre and
Post Fader we spoken. Of “page 1”, where you can eidt the parameters we will speak later.
Opening this window you visualize two effects loadedi by default by Yamaha, “Reverb
Hall” (01) and “Chorus” (13). Scrolling down the two windows as in picture above you can
select others. After selected, as in Yamaha, you musr recall it pressing button RECALL.
Pressing RECALL, the button STORE is enabled to store the effect. If you try to store
the effect recalled, appear advide “read only”: In fact you can not change the first 42 memory
effects nor their name. To do so, in a new user memory (43-99) you must follow these steps:
Software is not yet able to recognize the effects on Yamaha invoked directly by his controls, nor to receive
any information about any user memories already full. Avoid inadvertently overwrite user memory already used
by you!
We follow the example of a simple copy of an effect with its parameters and its name in
a user memory of the Yamaha using this software.
1. Select the effect in the scroll-down window
2. Press RECALL
3. Select a blank memory from the same scroll-down [ - - - - ]
4. Press STORE. Appear the button TITLE EDIT
5. Press TITLE EDIT. Appear the window where cahnge the name and button OK. In this
case we decided not to change its name, which also appears regularly in that box
6. Press OK.
In so doing we have simultaneously recalled (if the Yamaha was turned on and connected to
the MIDI cables and correctly set), the effect memory and store same effect on memory user
selected, deleting prevoious content (if there was) and setting name.
If you cannot still receive information from Yamaha about the content of user libraries
and their parameters, it is possible to edit their names, do not overwrite their parameters. But
this, only in other types of effects instead reverb.
As we will see, has implemented the ability to edit all parameters of the first four effects,
26
namely : Reverb Hall , Reverb Room , Reverb Plate and Reverb Stage. In reality this is a
unique reverb algorithm with 14 parameters differently setted.
The Edit button we will talk later. Now add that the window is divided into three sections:
• The left has the assignment / recall of the effect selected in first processor and the two
buttons, first for Edit to change the parameters and the other simply to advance the
page in Yamaha
• That right, similar to the left minus the Edit button. In fact, as previously explained, the
effects libraries is to be considered single
• The third section below should be considered common and contains common
commands storage and editing of the title. In addition, without an equivalent in
Yamaha, three new buttons:
1. SAVE LIBRARY save on Hard Disk actual library, made by the possible new user
presets and parameters added, edited or not, in a file in subfolder \libraries with
extension *.fxv
2. LOAD LIBRARY loads the contents of files stored on HD in \libraries and makes
them available for use
3. CLOSE EFF WINDOWS simply closes the window effects and, if open, the editing
one.
For saving and opening files, currently you can only edit and recall memories of the first
four type, you can edit, and save files temporarily* parameters and the names of 57
different types of reverberations.
* "Temporarily" refers to software that is pressing the OK button on the software is not written yet no file on
the HD but is stored the corresponding operation on the Yamaha!
The EDIT button is available only after invoking the selected effect and if available.
Pressing RECALL close any editing window to be able to reopen the new effect loaded. The
opening of the next window will be joined at the bottom of the previous, while movable and
minimized as most of it in the software. Operations level effect send, receive level, panning
etc will continue to be made in the main window that will be always present.
BACK TO GENERAL INDEX
27
Effect editing window
If the recalled memory is existing, EDIT button becomes available only in the first section on
the left. Currently you can not edit the effect parameters 5-42 but only the first four and all
effects that were saved to a file. A sad message remember it to us.
The window that appears when you press the button EDIT, somewhat reminiscent of the
display of the Yamaha, but it condenses the parameters in a single screen (instead of the two
or three in the Mixer). Parameters can be edited easily through the thin sliders (In the usual
way of the software). In real-time MIDI messages change the settings of the Yamaha.
It should be noted that in some cases have not been able to understand the scaling of the
parameters adopted by Yamaha, absolutely arbitrary and undocumented, resulting in some
minor differences with the Yanah in the numeric display by the software.But what matters is that
the values of Yamaha are the original ones.
Upon reopening/recall of an effect stored in a user memory, will reappear the editing window,
with the related title. The Effect Types of 01v are the same of effects, 42, then the user
memory presets have associated the originary effect-type effect than the edited one.
Some choices of Yamaha seem absolutely ridiculous and grotesque, such as to allow variation
of the order of a millionth of a second (0.001 ms!!!!) besides completely virtual, imperceptible by
the ear and annoying to set spinning like a madman the Wheel Parameter.I'm certain that very
few of you have so far had the patience to manually edit the effect parameters, to change the
names etc..Even this feature of this software, it pays to the modest expenditure.
For all that concerns the meaning audio editing effects, see the manual of the Yamaha
acoustic and technical literature.
BACK TO GENERAL INDEX
28
The Auxiliary channels (Aux1-4 and Masters)
AUX 1-4 e Aux Master
In mode TRANSMIT pressing one of four
buttons Aux1 (1 – 4), that become Aux1 (left),
channel fader change colour pointing out the
different function activated, like the Yamaha.
The only difference with Yamaha is that
the again the STEREO MASTER is disabled
(light grey in pic on bottom right) is replaced by
a dedicated fader AUX MASTER (from grey to
pink) top right. The button (ON Off - mute)
replace the same on STEREO MASTER to
activate or not the Aux master, while is always
enabled in Master Fader the function Mute of
Stereo Out (ON/Off). The AUX MASTER
fader is always active in mode TRANSMIT!!!
Each time you press the button corresponding
Aux progress page on the Yamaha.
Currently you can only control channel
sends 1-16 to Aux 1-4, in mode TRANSMIT
and RECEIVE but not options Pre or Post
Fader.
BACK TO GENERAL INDEX
29
The Busses (Bus 1-4 and Masters)
BUS MASTER 1-4
The adjustment of the levels of the 4 Bus is done through four
faders dedicated (to the right of the main window) with its four rotary
controls for panning, as described above.
These Bus commands are always active in mode TRANSMIT.
Their function is visible on the third page of "Pan / Routing" of Yamaha.
Since version 3.3 has been implemented the possibility of their
routing to Stereo Out (TO ST) with 4 buttons ST.
BACK TO GENERAL INDEX
30
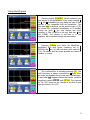
The Equalization
Activation
The parametric equalization in the Yamaha has been largely implemented through an
extensible window always visible in the main window. We could implement a series of knobs
splitted for channel strips as in other software, but it was thought that the mere display of
rotary controls to a specific location / value does not help much for the immediate
understanding of the type of EQ acting on that channel. It is therefore preferred to keep the
logic of the Yamaha for which you must select the desired channel to display and to change
digital filtering.
On the left is
represented
the
view of the window
when it is not yet
active. [EQ (NO
CHANNELL
SELECTED)] To
activate it, it must
first
select
a
channel
(button
SEL) so that it
becomes
as
No selected channel.
channel
selected.
All
shown on the right. First
No active and controllable
commands are available. After few
command.
seconds with mouse stopped, the
tip-text appears on the knob on
which the cursor is stationary.
Description of the window
On the left is the display window of the changes made, it is similar to that of Yamaha by
presenting the same vertical grid with references to 100-1000-10000 Hz. On the right are
buttons that identify and trace the 4 buttons on the Yamaha ("High", "Hi-Mid", "Lo-Mid",
"Low" ), in fact the "High" button of the Yamaha has been replaced by a different name HiPeak as "LOW" by Lo-Peak, this is because the functions "Hi-shelf" and "LPF", accessible on
the Yamaha moving the large rotary control after selecting the "Q" (Quality factor) at the ends
of its range, have been implemented in software with dedicated buttons, precisely Hi-shelf
and LPF. Similarly you will not find a button "LOW" because replaced by three buttons LoPeak Lo-Shelf and HPF. The top button EQ-ON switch on/off equalization of the selected
channel. The buttons are already in part described below are organized with different colors
for the concerned frequencial bands. The same colors Yellow, Red, Green, Blue will identify
the knobs at the bottom of the window.
These last three F (Cutoff frequency / center band frequency) G(Gain) Q (Quality factor camber). Depending on the type of band / button actived the knobs of frequency and of Q and
of sensitive labels can be activable or not.
31
Using the EQ panel
Pressing button HI-SHELF (default selected) you
have access to the parameters of the rotary controls F
and G, the Q is disabled (in grey) being the type of filter
selected is not compatible with this parameter. The
Gain label 0dB is sensitive (as the previous pan L-C-R)
and shows the command immediately at 0 deciBel.
Turning the knob F you can change the cutoff
frequency of filter (5646Hz in this eg.) and that G the
gain (6.5dB). The display is still kind of in line
segments, but it matches enough the intervention.
Pressing Hi-Peak you active the BandPass /
BandReject filter with center frequency set in F
(5981Hz), the Gain (-4.5 dB) and also in this case his Q
(3.15). All values and the range possible are those of
Yamaha, of course.
The LowPassFilter is activable pressing LPF. The
cutoff frequency is always controlled by F while other
two knobs are disabled being in this case unnecessary.
So also label 0dB Appears instead two labels sensitive
respectively named LPF Off and LPF On. They replace
the "On / Off "option on the Yamaha in the box of gain
when you select a Q = LPF.
32
Clicking LPF Off this label flash (LPF Off switch off
LPF On in LPF On) and LowPass filter is disabled.
The segment related disappears from the display
window.
The second of the four parametric filters available in
the Yamaha is called Hi-mid and is activable in
software (with its activation of the control of Yamaha)
by pressing the button Hi-Mid. It has available all three
controls F, G and Q, also the label 0dB of the Gain.
Where the other three filters have gains other than
0, they will be visible in the display window with the
corresponding segments of the same color.
The button Lo-Mid enables operation of the related
BandPass filter, with the use of controls and labels
similar to the previous Hi-Mid.
As you may have noticed each of the four colors
yellow, red, green and blue marks all the controls and
labels on one of the four filters available for immediate
identification.
Each time you press one of the 8 buttons ( except
EQ-ON) change knob's colors.
On left image the button/filter Lo-shelf is active
but at the same time you can see the curve of the filter
Hi-Mid. Because the knobs colour now are blu, in this
moment you can edit with they only Frequency and
Gain of Lo-Shelf filter, but the Hi-Mid filter is active too.
To edit this press Hi-Mid, red knob with actual values
setted and visible for that filter show itself and tell their
availability to be edit.
33
Compared to the previous situation was just
pressed the button Lo-Peak, remaining unchanged the
cutoff frequency (89Hz) and the Gain (-6.5dB).
The active Q now is by default to maximum
(10.00) that tell a curve very close that is a very small
band around the center frequency of the filter.
In addition at HighPassFilter (HPF) of group
Low(band), also other 3 filters are active as visualized in
the window. About using of all knobs, we remember, it
is still valid (as other software) the fine setting of
command clicking and holding pressed mouse button,
go far from the figure.
The greater the distance the smaller will be the
difference in values changed, but not less than the
minimum rate that varies according to the command.
If you plan to use a single filter for a particular channel, as illustrated this told is the preferable
view, because it does not invade the camp of the other commands of the virtual mixer.
For use all 4 filters you can use also an extese
view of equalization processor.
To extend the window as on picture on left, click
on "V" bottom right of the window, next to its label
Enlarge to appear the window on left that show the
same equalization of the previous frame.
In this manner you can view and set all
parameters for the 4 filters also note visually the effect.
The knobs are all active and not need to be
actived by 8 buttons to right up. To return to compact
and variable for type of filter, simply press the button
"V" inverted on bottom, near label Reduce.
34
Keep in mind that these are four independent filters with the same range 20~20khz for
all, then, beyond the assigned name from Yamaha (Hi, Hi-Mid, Mid, LowMid, Low) their
frequency and relative bandwidth of action is absolutely free and combined.
Note that the software is in continuous evolution and enormous final complexity, is not
currently able to view the curves that best match the performance of the filtering and
especially not in a position to calculate the graphic result due to partial overlap of the various
filters. This does not mean it does not work already fully informing the Yamaha the timely and
accurate information of the parameters. The Yamaha will correctly display the curves and the
interactions of the above in addition to just display the values set by the software. It will be
good make adjustments via software until the end and then take a look at the Yamaha display
to avoid surprises due to a lack of "intuition" of the resulting curves. Moreover any work on a
mixer is to be evaluated primarily (though not exclusively) always just by listening!
Let us finally remember that a good EQ preferably uses only small negative gains
(deemphasis) and that sudden large gains by the extreme sensitivity of the rotary controls
data, can create peaks due to the oscillation of the digital filters when the relative frequencies
are excited by input signals.
In this version we complete the save of changes to each channel, this means that
selecting different channels are displayed on the current parameters and their respective
curves. The equalization of each channel are now saved in the patch file but still without a
new name for the user presets. Instead will be reopened parameters and the names of the
libraries existing (original) when loaded on each channel.
So to create custom EQ for each channel, do not leave the loading of presets, and modify
the parameters, otherwise these changes will be lost at each selecting a different channel [the
software reading an existing preset recall it with the existing factory settings]. Instead, you
must select the channel, do not open the drop-down presets window, and manually change all
the parameters needed. When the settings are satisfactory save the patch. At its reopening
will be available all the parameters of EQ for each channel, those using presets with their Title
and those created on the "Init Default 0dB" with this Title and the parameters chosen and
saved.
BACK TO GENERAL INDEX
35
The Equalization libraries
Currently, the software enables retrieval,
visualization and editing of only 40 original presets of
the Yamaha over the "Init Default Gain 0dB". It 'just click
on the little black arrow to the right of the scrolling text
box located below the display window to access it. After
the first selected Preset is also possible to scroll all of
the other pressing the arrow keys (up and down) on the
keyboard. For each selection is immediately recalled all
the parameters in the software that is on the Yamaha.
On the left we see as an example the use of
preset“E.G. Dist 2” of the library of the Yamaha. As
stated above these parameters are active only on the
selected channel and can be changed freely, but not
saved in a new preset with a new name. If you modify
existing preset, the settings will be replaced from the
original, even changing the channel!
As is also evident from a comparison between the
sotware's display and that of the Yamaha of this presets
are still not made the necessary calculations to create a
single EQ curve, but they are separate and segmented
lines of the 4 filters. What that it still has its usefulness
in the easy identification of which parameter to change
following, as is always true without fail and needed, just
about listening rather than on the graphics too accurate
of a display. The parameters of EQ for each channel,
both existing presets that those will be created starting
from the default 0dB, will are reopened with the opening
of the patch file relative to the existing name of the
original library, were modified by the generic "Init
Default 0dB gain" or without a title.
BACK TO GENERAL INDEX
36
Visualization of MIDI data input
Channels messages
The software can check for incoming MIDI messages via two separate panes positioned
in the top left: one for channel messages (Parameter Change, Program Change and Control
Change) and that for the system exclusive messages (Ex). Off course the software must be in
receive mode RECEIVE. (Pressing SELECT IN)
In the left pane we see the first type of message is divided into
MSG which is given by the type of message channel
(175=control change)+ MIDI transmit channel (1). The “176”
indicates in this case, the channel fader.
DAT1 is DATA1 of the message, in this case related to channel
1 of the mixer.
DAT2 is DATA2 the parameter received, 29 = position 29 of
channell Fader 1 (values 0-127).
These data are not editable, and then can be sent to the mixer
or other device, but only received from any MIDI device
connected to the MIDI-IN.
System Esclusive messages
In the box in the upper left corner of the software, called "SysExIn / Notepad" we find a text
box with three features:
1. Fast help (immediate help for first operations)
2. Notepad (a notebook for notes on the current patch of the mixer)
3. System Exclusive messages (The window we are dealing with in this chapter.)
This feature is turned on whenever you press SELECT IN
The checkbox titled "View Ex messages" is
by default active and serves to switch
between viewing of exclusive messages and
that notepad, deleting every click (tick) the
content of the text box to his right. The text
box has a top bar that contains two options
for choosing the display of messages in hex /
decimal format and a button to clear it. In the
example have been placed manually the
words "----Es. esadecimale" etc. Also note
that in this instance there is no relationship
between the decimal and hexadecimal
The contents of the box can always be numbers except that they are 10 numbers
selected and copied if need. Again you can whose significance goes beyond this
not use it to send system exclusive discussion.
messages to a MIDI device, but only to
receive them.
BACK TO GENERAL INDEX
37
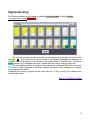
Signals Routing
The Routing window can be viewed by selecting Routing Window in Menù Routing.
It is active only in mode TRANSMIT.
The controls are quite intuitive and need no explanation being a series of buttons ot the
type On / Off . Each time you press the button is immediately forwarded the message to
Yamaha, which may display on its display in the second page of "Pan/Routing". The button
DONE serves only to disappear this page, callable with the current settings at any time.
The only difference lies in the version of Yamaha's lack of buttons D (Direct) of channels
9-12, due to a bug of software of the Mixer Yamaha (ambiguity of the messages so it cannot
be implemented via MIDI).
Pregarding the routing of signals on the option card (ch 17-24), currently the software does
not implement them.
BACK TO GENERAL INDEX
38
Menu
File
• New: (<CTRL+N> or <ALT+F> and <N>) is currently not possible to have multiple
windows open simultaneously with different settings, so each new file as every time you
open a file, the previous file will be closed. You are prompted to save the current file first
and if it is that case then see menu Salva. Then open a new window that is the initial
window exception made for the selection of MIDI drivers already made and preserved, and
the current mode of transmission or reception.
IMPORTANT: this version is adopted a method of reading and writing files that includes the addition of
new parameters that can be saved in the file implemented in future versions. Since version 3.01, the first
one allows the saving of files, new controls were implemented, and this unfortunately does not permit the
use by the new version, files saved with earlier versions. To use a major library already saved them, you
must open its files with Notepad in Windows, and another notebook with the read-only file
Init00memory.01v. Tile Horizontally will be fairly easy to identify the formal differences of blocks (length
and order) and then copying the tail of the new file ("Future saved parameters ...) and pasting it to the
old. Finally, save the old file with the same or different name but always with the extension *. 01v (all
files) and *. txt (Text Document). If in doubt, just send the files to be converted to CENZWORKS2K.
•
•
Open : (<CTRL+O> o <ALT+F> e <O>) Open a file [*.01v] existing (and formatted
according version 3.3 and subsequent), possibly after save and close the current.
Currently the file *.01v are not compatible with earlier versions of the program and
could create problems with its unexpected closure of the program. No problem for PC
or the mixer. Re-run the software. As for the types of parameters refer to the saved file
"SavedFiles.pdf.
Close: <CTRL+W> or <ALT+F> and <C>) Close active window with opportunity to
save it. Thus it becomes possible to create a new file or open an existing one. Pressing
button
•
•
•
of the secondary window is not possible to save the file before !
Save: (<CTRL+S> or <ALT+F> and <S>) Save the active file without prompt. If there
is a new file or the initial opening the Save As dialog box for choosing the name. As for
the types of parameters refer to the saved file "SavedFiles.pdf”.
SaveAs: (<CTRL+A> or <ALT+F> and <V>) Save with chosing name. As for the
types of parameters refer to the saved file "SavedFiles.pdf”.
Exit : (<ALT+F> and <E>) Close software asking to save actual file. In addition to this
menu, the program is closed by pressing the button EXIT or the close symbol of main
window
.
MIDI
•
•
Options: show initial window for select MIDI drivers
Transmit: (<CTRL+T>) The same of button SELECT OUT active transmission of data
MIDI to the Yamaha.
• Receive: (<CTRL+R>) The same of button SELECT IN active reception of data MIDI
from the Yamaha.
• Bulk Dump: (<CTRL+B>) Open the window for BulkDump operations.
39
Preferences
●
●
●
●
Save preferences save on (hide) file pref.00v actual preferences selected.
Show splash screen on startup show or hide initial window in the boot of software
Show MIDI panel on startup actually disabled and no desectable.
Load on start up last saved effects library after editing in the software some
libraries of effects ( currently Reverb only type) is possible and useful to reload
automatically every run of the software.
● BulkDumpViewHexAndDec if selected each time you run the software, the control
boxes for display of MIDI data in Hex and Decimal format will be active, resulting in
substantial increase in time for the receipt and opening data files Memory Scenes.
MEMORY
•
Recall and edit tilte scenes: (<CTRL+M>) Activated only in the mode TRANSMIT ,
brings up the window to retrieve the stored scenes on the Yamaha and possibly to
change its name. Only default scene (00) is called parametrically also in the software.
Others are invoked only on the Yamaha.
UTILITY
•
•
•
All channels off: (<CTRL+F>) Switch off all 24 channels, the Bus master, the Aux
Master, the Return Effect 1 and 2, the Master Effect and the Master Stereo Out.
All channels On: (<CTRL+G>) Switch on the same.
All faders -inf: (<CTRL+I>) Down all channel's faders 1-24 but no the effects, aux
and Masters.
VISUALIZE
•
•
•
•
•
•
•
Background Light: change the background of the main window in very light gray
Background Grey: change the background of the main window in light gray
Background Grey2: change the background of the main window in dark gray
Background Dark: change the background of the main window in very dark gray
BackDarkBlue: change the background of the main window in dark blu
Back Black: change the background of the main window in black
Background Jpg Grain: change the wallpaper with an image reminiscent of the
•
Background jpg grain Dark: change the wallpaper with an image 'elephant skin', is
Yamaha
the current default background.
40
EFFECTS
•
Effects window: (<CTRL+E>) Open effect window
ROUTING
• Routing window: (<CTRL+D>) Open routing window for route signals that can be
minimized or closed and eventually reopened later.
?
•
•
•
•
•
•
•
Manual PDF (ITA): (<F1>) Open Italian PDF manual
Manual PDF (ENG): Open this manual
MIDI Implementation Tables - complete list of all the existing implementations, and
those of future implementations and of those that are not possible
Saved parameters PDF: list of parameters and files that can be saved
Cerca upgrade sul sito (ITA): Opens the italian page dedicated to the software on
the site www.vincenzogrossi.it to see if there is a new version (which from now on must
be obtained from the author and do not auto send)
Search for upgrade (ENG): The english version of same page
Version: shows the initial window that contains the version number.
BACK TO GENERAL INDEX
41
NOTES
They would like to stress the program bugs, requests for specific improvements,
measurements errors and omissions in this manual, Setup problems and so on.
The Cenzworks2k does not assume any liability for damage caused to persons or objects
from improper use of the program and lack of vision of the information provided in this
manual.
It is not authorized by the copying, printing, modification and unauthorized disclosure of the
program and this manual, as well as the related tables.
Every file related to this program is marked uniquely cryptographically which identifies the
legitimate user.
Registered users that may violate these restrictions, if they had identified those files marked,
will be deprived of the right to be free of all future product upgrades.
printed on 11-11-2010
CENZWORKS2K
BACK TO GENERAL INDEX
42