1
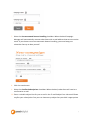
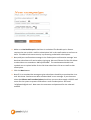
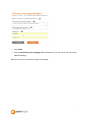
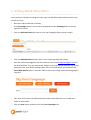
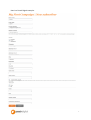
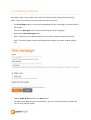
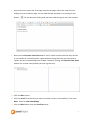
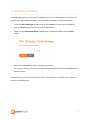
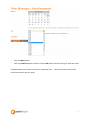
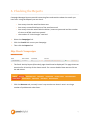
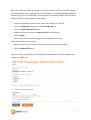
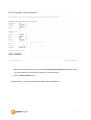
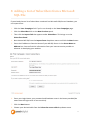
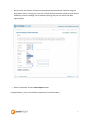
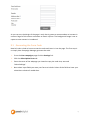
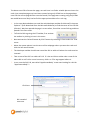
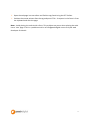
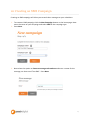
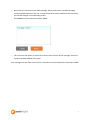
Another great idea from the people at Peach...
Campaign
Manager
Site User Manual
December 2011
1
Content
1
Creating Your First Email Campaign ................................................................................... 3
2
Adding Email Subscribers.................................................................................................... 7
3
Creating an Email ................................................................................................................ 9
4
Sending an Email ............................................................................................................... 12
5
Sending an Email at a Specified Time ............................................................................... 13
6
Checking the Reports ........................................................................................................ 15
7
Adding a List of Subscribers from a CSV File..................................................................... 19
8
Adding a List of Subscribers from a Microsoft SQL File .................................................... 22
9
Creating a Subscribe Page................................................................................................. 24
9.1
Generating the Form Code ................................................................................... 25
9.2
Using the Form Code............................................................................................. 26
10 Creating an SMS Campaign ............................................................................................... 29
11 Adding an SMS subscriber ................................................................................................ 31
12 Sending an SMS Message ................................................................................................. 31
13 Purchasing Credits ............................................................................................................ 31
14 Summary ........................................................................................................................... 32
2
1 Creating Your First Email Campaign
Campaign Manager allows you to manage emails you send to your clients and analyse the
success of these emails through our Reports section.
The first step in creating a Campaign is to configure your campaign settings.
1. Log into Campaign Manager by entering your username and password then clicking the
Login button.
Note: Login and password details are case sensitive.
2. On the Campaigns panel, click on the New campaign button.
3. For the campaign name use ‘My First Campaign’ or another descriptive name of your
choice, select E-mail for the Campaign Type and click the Next button.
4. In the Reply-to email box, enter the email address you wish subscribers to reply to if
they attempt to answer your email. We used [email protected], to see the fruits of
your labour, enter your own email address.
5. Next using the description box, enter a suitable description of the purpose of your
Campaign. For this demonstration we used Promote new product awareness but you
can use any other suitable description.
6. We haven’t created an ‘Unsubscribe confirmation page’ so for now make sure this input
box is blank. The ‘Unsubscribe confirmation’ webpage is simply a page with a message
to inform subscribers that they have removed themselves from your mailing list.
3
7. Select the Use automated bounce handling checkbox. When checked Campaign
Manager will automatically remove subscribers with e-mail address that cannot receive
email. If you choose not to use automatic bounce handling, you must keep your
subscriber lists up to date yourself.
8. Click the next button.
9. Select the Confirm Subscriptions checkbox. When checked, subscribers will receive a
confirmation e-mail.
10. Enter a suitable subject line for your e-mail in the ‘E-mail Subject’ box. We used ‘Please
confirm your subscription’ but you can choose any subject line you think is appropriate.
4
11. Make sure Use Double opt-in check box is unchecked The Double opt-in feature
requires the user to click a confirm subscription link in the confirmation e-mail sent to
them. This adds a little extra security in preventing undesirable subscription.
12. Next, add your confirmation message in the ‘Subscription confirmation message’ text
box that subscribers will receive when signing up. We used ‘Please click the link below
to subscribe to our newsletter. ##ConfirmLink##’. The text between double hash
symbols acts as a place holder for the link that subscribers click on to confirm their
subscription.
13. Click the Next button.
14. Now fill in an unsubscribe message to give subscribers the ability to unsubscribe via email. We chose ‘You have now been unsubscribed’ as our message. If you choose to
select the Allow e-mail unsubscriptions check-box you must also supply a POP3 E-mail
server for the system to process and collect e-mail unsubscriptions. We used
‘[email protected]’. Now enter the username and password for the selected
mailbox.
5
15. Click Finish.
16. Click the Go back to your campaign list link (bottom link in the list) to see your newly
added Campaign.
Well done, you’ve successfully created a Campaign.
6
2 Adding Email Subscribers
Now you have created a campaign the next step is to add subscribers who will receive any
emails you send.
1. Next we’ll add a subscriber manually.
2. If the Campaigns panel is not currently displayed click the Campaigns link at the top
right of the screen.
3. Click the Add subscribers link next to your new Campaign (See previous image).
4. Click the Add Subscribers button (we’ll cover importing subscribers later).
5. Here we used Peach Digital for the first and last names and [email protected] for
the email address. Then we entered our address in the input boxes beneath. For testing
purposes enter your details leaving ‘Other Info’ 1 & 2 boxes blank and make sure the
Send HTML Emails option is checked. Please refer to the image on the following page if
required.
6. The ‘other info’ boxes and additional boxes underneath allow the user to add more
fields for subscribers.
7. Click the Save button and then click the Your Campaigns link.
7
Here is a Peach Digital example:
8
3 Creating an Email
Next we’ll create a very simple email, which will demonstrate simple formatting using
tables. Then we’ll send it to our new subscriber list (ourselves!).
1. If the Campaigns panel is not currently displayed click the ‘Campaigns’ link at the top of
the screen.
2. Click on the Messages link in the box containing your new Campaign.
3. Now click the New Message button.
4. Enter ‘Test Email’ in the Name input box or any other suitable name for this email.
5. Enter ‘Test Email’ again in the E-mail Subject box or again, any other suitable subject
line.
6. Choose HTML & Text and click the Next button.
7. The New E-mail page contains many buttons, you can read the help file for details but
for now we’ll keep it simple.
9
8. Any email must contain the three tags listed on the page. Add in the email content
making sure to include the tags. You can add the tags manually or by clicking on this
button:
. For the purpose of this guide we have used the tags as the email content.
9. Now click the Generate Text Email button. You’ll notice here that the text only version
is not suitable as a marketing tool. It goes without saying that here you may want to
replace the text to something more suitable. However, clicking the Generate Text Email
button can in some cases provide you with a great start.
10. Click the Next button.
11. Click the Send link and choose to send it as either a test or live broadcast. Then press
Next. Select to send immediately.
12. Click the Next button then the Confirm button.
10
Congratulations you’ve sent a simple HTML email and an even simpler Text Only
version.
11
4 Sending an Email
Campaign Manager can send emails immediately or at a pre-determined time, which you
specify. Let’s look at both methods. First we’ll look at sending an email immediately.
1. From the Your Campaigns window click on the E-mails link next to your Campaign.
2. Click the Send link next to the test email created earlier.
3. Make sure the Send Immediately radio button is checked and then click the Next
button.
4. Now click the Confirm button to send out your email.
5. You will then be asked if you’re sure you want to send the email, click the OK button to
send the email.
Congratulations you’ve successfully sent out an email. Next, as promised, we’ll send an
email at a specified time.
12
5 Sending an Email at a Specified Time
In this section we explain how you can enter an email into campaign manager but not send
it until a later date or time.
1. As before click on the E-mails link next to your Campaign.
2. Click the Send link next to the test email created earlier.
3. This time click the Send Later radio button and click the Next button.
4. Using the calendar select the date for your email to be sent. For this example we set the
date to the 1st January 2012.
Note: The calendar by default is set to tomorrow’s date. Emails can only be sent later than
today and less than 12 months away from today.
5. Next select an appropriate time using the Time drop down menu. For this example, we
selected 9 am.
13
6. Click the Next button.
7. Click the Confirm button and then click the OK button on the warning to send the email.
Congratulations you’ve sent an email at a specified time … now all you have to do is wait
until tomorrow to see the result!
14
6 Checking the Reports
Campaign Manager Reports provide interesting facts and statistics about the emails you
have sent. Using the Reports you can check:
•
how many times the email has been sent
•
how many successful deliveries of the email occurred
•
how many times the email failed to deliver, how many bounced and the number
of times an HTML email was opened
•
the number of 'click-throughs’ received
1. Select the Campaigns link.
2. Click the E-mails link next to your Campaign.
3. Then click the Report link.
4. The Email Activity Report (Overview) page should now be displayed. This page shows an
overview for all activity of the chosen email. For a more detailed view we can click on
the tab menus.
5. Click the Bounces tab, currently it won’t say much as we haven’t sent it to a large
number of problematic subscribers.
15
The above example shows a typical report overview. The pie chart and figures opposite
quickly illustrate your email’s activity.
Q: What is a’ Unique’ user?
A: This value shows us the number of subscribers
who opened an email. Regardless of the number
of times a person may have opened an email the
value for ‘Unique’ users will not change. This gives
a more accurate idea of the percentage of
subscribers opening the email or clicking through.
6. Click the HTML Opens tab.
The Email Opens Report shows you how many
times an email has been opened. More
specifically it as before it indicates the date of
viewing, ‘Unique Users’ as well as Unique IP
addresses giving a rough idea of how many
different locations your emails are viewed.
16
Design of pages will need to incorporate space for headings and plentiful content
7. Click the Click Through tab.
The ‘Click Through’ Report page shows you how many
times any link in your email was followed. Notice on the
left you have the complete URL including the Query
String (extra data used to pass information such as
variables). On the right we have the total number of
clicks for each link listed.
17
18
7 Adding a List of Subscribers from a CSV File
Earlier we added a subscriber to our email campaign manually. That process, while effective,
can also be time consuming if you have many subscribers to add. Below we’ll look at
automatically importing subscribers from a spreadsheet that supports the CSV format
(Comma Separated Values).
Note: It is also possible to import subscribers from a Microsoft SQL Server database as well
as other database applications that can export information to the CSV format.
First, let’s take a look at a spreadsheet that contains all the necessary subscriber
information. The top row is a header row containing information to describe the content of
each column. Before we start let’s have a look at look at two possible sources: a Microsoft
Access database and an Excel spreadsheet.
Both examples contain data that can be used as headers. The top example (Microsoft
Access) contains column names, which when exported as a CSV can be used as our
Campaign Manager Subscriber database header. The Microsoft Excel example contains an
extra row (entered manually) that we can use for our database header.
19
Why is this important? Having a header as you will see later, eases the task of matching
source data (the file you already have) to its destination: a Campaign Manager database
containing a list of your subscribers. It is important to note that you don’t have to have a
header in order to import data but it does help.
8. Create a spreadsheet similar to one above and export it as a CSV file.
9. From the Campaigns page click on the Subscriber list link.
10. Click the Import subscribers button.
11. Choose CSV/Text File from the Import From drop down menu
and click Next.
12. Click on the ‘Browse’ button navigate to and double click on your
Leave the delimiter set to Comma.
13. Make sure the ‘Yes, first row contains field names’ check box is checked.
14. Click the Upload file button.
Next we’ll match up the data. This should be straightforward as the spreadsheet used
contains a header row.
20
15. Match up the information types by using the Select Source Column drop down menus
e.g. Email Address to Email and First Name to First Name etc.
16. Click the Start Import button.
Congratulations, you have successfully added a list of subscribers!
21
8 Adding a List of Subscribers from a Microsoft
SQL File
If you already have a list of subscribers contained in a Microsoft SQL Server Database, you
can import them.
1. Click the Your Campaigns link if you’re not already on the Your Campaigns page.
2. Click the Subscribers link on the New Products panel.
3. Then click the Import link that appears under Subscribers. This brings us to the
Subscribers Panel.
4. Next choose MS SQL from the Import From drop down menu and click the Next button.
5. Enter the IP address or Domain Name of your MS SQL Server in the Server Name or
Address box. You can find this information from your internet service provider or
whoever is developing your website.
6. Enter your Login Name, your password and Database name in the boxes provided (be
aware that the login name is case sensitive).
7. Click the Next button.
8. Choose your desired table from the Select the source table drop down menu.
22
9. Next, match your Source Columns to the appropriate Destination Columns using the
drop down menus. Having you, the user, match the data manually allows a great deal of
flexibility. Column headings can be named anything and you can match the data
appropriately.
10. When completed, click the Start Import button.
Congratulations, you’ve successfully imported a list of subscribers!
23
9 Creating a Subscribe Page
To get subscribers you’ll need a subscription page. Campaign Manager eases this task by
automatically generating the code needed to create the submission form. The code can then
be inserted into a web page of your choice.
From the list shown below select the criteria you want to appear on your subscription form.
Campaign Manager will now generate the code for your subscription form which you are
responsible for adding this code onto your website. The form will end up with the following
output:
24
As you can see, the design of the page is such that it grows to accommodate an increase in
content. Pages of this nature are known as Elastic Layouts. The background image is set to
repeat as new content is introduced.
9.1 Generating the Form Code
Now let’s take a look at how to create the code and insert it into the page. The first step is
to simply have Campaign Manager generate the code.
1. From the Your campaigns page click the Settings link.
2. Click the Subscription Form tab.
3. Enter the name of the webpage you intend to copy the code into, we used
‘SubscribePage’.
4. Next select input fields you want your form to include. Select all the fields to have your
subscribers submit all usable data.
25
5. Click the Create button.
6. Click anywhere in the code window then press CTRL + a on the keyboard to select all the
code. Next press CTRL + c to copy the code. The code is now in the clipboard (memory)
ready to be pasted into another document.
Note: Information in the clipboard is lost when copying something new or when your
computer is switched off.
9.2 Using the Form Code
Having a little HTML experience will help but all we need to do here is to copy and paste our
form code into a webpage.
26
The above uses CSS to format the page; our task here is to find a suitable place to insert the
code. Your template page may have been created using only HTML but as the page above
uses CSS the correct page division must be found; if the page was creating using only HTML
we would have most likely had to find the appropriate table cell or <td> tag.
1. In the case depicted above we used the web developer toolbar for Microsoft’s Internet
Explorer 7 (free download from the Microsoft Website) to find the name of the CSS DIV
(division). We then opened the page in a text editor, found the correct DIV tag and then
pasted in the form code.
2. To find the DIV tag using the IE7 toolbar, first activate
the toolbar by clicking its icon in the menu.
3. Next activate the ‘Select Element by Click’ feature by selecting it from under the ‘Find’
menu.
4. Move the mouse pointer into the area of the webpage where you want the code and
click the left mouse button.
5. The developer toolbar should now reveal the DIV or table cell where the code must be
inserted.
6. Take a note of the DIV’s or table cell’s ID. If it has no ID then either take a note of the
above DIV or cell’s Id or count how many <DIV> or <TD> tags appear before it.
7. In our case the DIV’s ID, was called ‘AppContentBody’ so we were looking for <div id=
“AppContentBody” >.
Click here
DIV revealed
here here
27
8. Open the webpage in a text editor and find the tag found using the IE7 Toolbar.
9. Position the mouse pointer after the tag and press CTRL + V to paste in the form in from
the clipboard and save the page.
Note: Avoid placing the code inside a form. This problem may occur when placing the code
into a ‘.Net’ page. If this is a problem email us at [email protected] or ask your web
developer for details.
28
10 Creating an SMS Campaign
Creating an SMS campaign will allow you to send short messages to your subscibers.
1. To create an SMS campaign click the New Campaign button on the home page. Now
enter the name of your campaign and select SMS as the campaign type.
2. Press Next.
3. Now select the option to Create a message to broadcast and enter a name for the
message, we have used ‘Test SMS’. Press Next.
29
4. Now enter the content of your SMS message. Please note that a standard message
containing 160 characters will cost 1 credit and that for every additional 153 characters
you will be charged a corresponding credit.
5. Press Next once the content has been added.
6. You now have the option to create an online or html version of the message. Once the
content has been added, press next.
Your message has now been saved, but it cannot be sent until subscribers have been added.
30
11 Adding an SMS subscriber
1. Click on the Subscribers link on the tab above.
2. Similar to adding subscribers for an email, you can either import a large numbers of
subscribers or simply add one at a time.
3. Follow the same steps as listed in the Email section to add either an individual or a
list of subscribers (See section 7).
12 Sending an SMS Message
1. Go back to the Messages tab and click the Send button.
2. You can choose to send the message immediately or later. Follow the same steps as
detailed above for sending an email.
13 Purchasing Credits
Please note that in order to send out email and SMS messages you will have to purchase
credits. If your account is not enabled for SMS you will have to contact Peach Digital on +44
(0)141 204 0499 so that we can activate this functionality for you.
There is a 48 hour waiting period between buying new credits and being able to use them –
please make sure you have enough credits before scheduling an email to be sent.
For SMS messages remember that the standard charge is 1 credit for the first message of
160 characters and an additional credit for every subsequent 153 characters.
31
14 Summary
We hope you have found this user manual a useful guide to Campaign Manager, however if
you have any further queries please contact us:
Come on by
134-138 West Regent Street,
Glasgow G2 2RQ
Give us a ring
+44 (0) 141 204 0499
Drop us a fax
+44 (0) 141 285 6471
32