1
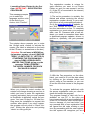
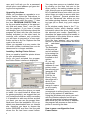
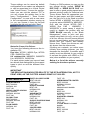
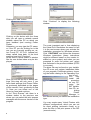
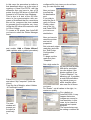
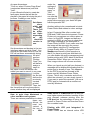
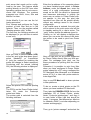
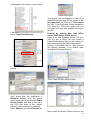
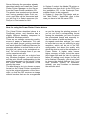
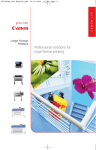
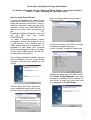
Quick Start: Installing and Using PowerPlotter
For further information, see the “Manual of Power Plotter”, accessing it from the
menu "?" menu, selecting the "Contents" item.
How to install Power Plotter
To start the installation of Power Plotter,
insert the CD-ROM into the CD drive and
follow the onscreen instructions. If the installation procedure does not start automatically, launch the STARTER.EXE file
that can be found in the root directory of
the
CD.
Double click Windows Explorer, then click
the CD icon, and then launch
STARTER.EXE.
To install a non-demonstrative version
you need to connect the dongle (if it is not
a LITE-version) to the parallel port (or
USB) before starting the installation. It is
advisable to shut down your computer
before connecting the dongle to the parallel port, while USB dongles may be connected with your system on.
Once you have read the license agreement, click “Next”.
In the next window, click “Next” to accept
the default installation directory
or click “Change” to select a custom one.
The following Windows Installer screens
will be displayed; you can accept default
settings or change them based on your
needs.
Choose the setup type, then press “Next”!
The Power Printer Manager setup may
be used on a different PC to create a Virtual Printer to send your print jobs from
any application to Power Plotter.
Use the “Back” and “Next” buttons in
every installation step to return to the
previous step or to go to the next one.
1
Congratulations! Installation has been
completed successfully, press “FINISH”
to end the setup procedure.
The following screen may be displayed at
this point, suggesting that you restart your
PC before launching the program. Restart
your computer and then, launch Power
Plotter.
Notes for the installation on Windows
NT-2000-XP
(only for versions with Hardware Key)
The information below only refers to the
installation on Windows NT-2000-XP.
To make sure that Power Plotter runs on
systems with NT kernel (NT4.0, W2000 or
WXP) you have to install the hardware
key driver. This procedure runs in automatic when necessary, but if the "NO
KEY INSERTED" message is displayed,
proceed as follows: login as “Administrator” and launch SETUP.EXE from the directory "UTILITIES\DRIVERS" on your
installation CD. Reboot the system to
complete the installation.
Notes for NT 4.0
Special note for W2000
For this operating system you should update at least to Service Pack 2, before
you proceed to the installation.
DevStudio provides the most recent Service Pack on the program CD.
Uninstall Procedure
To uninstall Power Plotter, proceed as
follows: Do not delete the program directory without having first uninstalled it.
Open Windows “Start” menu, open the
“Settings” menu and the “Control Panel”
submenu. Double click on "Add/Remove
Program" (according to the operating system you’ll find different names such as
"Program Installation") and locate the
item related to Power Plotter, click the
Add/Remove button and follow the instructions. Now you can delete the Power
Plotter directory.
How to save the list of print jobs after having uninstalled the software
When you delete the Power Plotter directory you
will loose all report files and previews of print jobs.
If you wish to save them, simply locate the
CODE.MDB file and SAMPLES folder (they
should be in the folder
c:\Programmi\Devstudio\Powerplotter) and save
them to another folder before proceeding to delete. You may replace them once you have installed the RIP again.
Start up
After having rebooted the PC you are
ready to start the program for the first
time.
You will see three new icons on your
desktop (you will also find them in Start /
Programs / Power Plotter):
As USB is not supported, it only works
with the parallel dongle. To make the
program access the parallel port you
need to install a printer driver (only if no
printer is already installed; otherwise, ignore the following procedure).
Login as Administrator, then install a
printer driver from the Control Panel. The
driver type is not important, but an HP
driver (such as HP LaserJet) is recommended.
At the end of the installation, open
the ”Properties" windows of the installed
driver and deselect the printer pooling.
Direct Prints: Starts a program
which allows sending already
calculated print jobs directly to the
printer(s) (for example .PRN or . PLT)
and manages the print job file queue.
Also, for the program to run correctly under Windows NT 4.0, you need to install
the latest Service Pack (that comes with
the CD).
Power
Plotter
Printer
Manager: allows creating and
managing the Power Plotter
virtual printers
2
Power Plotter: starts the main
program.
Launching Power Plotter for the first
time: IMPORTANT: REGISTRATION
PROCEDURE
This message prompts
you to select the
language and the units.
At the end of your
choice, click “Confirm”.
The registration number is unique for
each machine you want to run Power
Plotter on, and you can request it on-line
(1) (if the PC is connected to the Internet)
or by FAX (2).
1) The on-line procedure is certainly the
fastest and allows receiving the correct
registration number directly in your mailbox (this is a fully automated procedure).
Go to the www.devstudio.it website, select "SOFTWARE ACTIVATION" and follow the instructions on-line. To complete
registration you must enter your personal
data, user ID, Password and e-mail address; you need to remember these data
to download program updates, drivers or
profiles or, optionally, edit your personal
data.
The window above prompts you to enter
the 16-digit serial number to activate the
version (the label is attached on the back
of the CD case, or somewhere on the box).
Attention. Do not insert a WRONG serial number; anyway, do not CONFUSE
"ZERO" (0) WITH THE “O” LETTER (O)
OTHERWISE THE PROGRAM WILL
start as DEMO VERSION WITH
LIMITED FUNCTIONS giving you the
message "DEMO VERSION".
THE SERIAL NUMBER FOR EACH
PACKAGE IS UNIQUE.
2) With the Fax procedure, on the other
hand, you need to fill out the data sheet
by clicking on the relevant button and
send it using a Fax machine, or you can
fill out the form that comes in the program
box.
When you insert the serial number the
window will change showing a new box in
which you have to enter the registration
number (activation) that you must request
to DevStudio to definitely unlock the program. You have 30 days or 120 total running since the installation to request this
number, after which if you don’t register,
the program will only work in “Demo Version”, limiting the print size and printing
“demo“ on every print job.
To activate the program definitively with
the proper registration code you need to
close and restart the program.
The program license is valid only for installation on one PC, in the case you
have to proceed with a new installation on
a new PC or however, after format operations or damage of your hard drive, you
can proceed with a new registration that
will cancel the old code creating a new
one. By proceeding with the new registration the system will recognize you as a
3
user and it will ask you for a password,
which is the e-mail address you gave during the first registration.
Upgrading functions
When you purchase an upgrade to a superior version, follow the instructions inside the new package, from the interface
of the software select the menu “?” then
the item PROGRAM PROTECTION, enter the new serial number in the appropriate field and press “Next”, now you can
exit the program. If you have a version
with dongle, upon the following reboot the
program will start with the new functions
already activated; on the other hand, for
versions with software only protection,
you will have to proceed to a new registration on-line or by Fax. Replace the new
code to the old one.
When you upgrade to a new version, the
old serial number is deleted from our database and is no longer available.
Installing / Adding Printer Drivers
Now you need to install the printer drivers
for your plotters/printers.
Once you have activated the program,
the Power Plotter interface is displayed:
Here you can select the drivers you need
to install. You could install all drivers but,
for greater simplicity, we suggest that you
only install those that are really necessary.
It is possible to add new drivers anytime
you want, you can use the present standard ones from the installation CD or updated ones downloaded from our Internet
site, therefore you have to choose the
button BROWSE and then find the path
where the file had been saved before.
4
You may also remove an installed driver
by clicking on the blue link next to the
driver name in the setting window on the
right; this will open a new window with the
list of installed drivers from which you can
select those you wish to remove and then
click on “Remove”. Several printers also
have the "Advanced" tab, where you can
set further printing features, such as feeding type (roll or sheet, tray, print margins
etc.)
In the window nearby there is the "i" (information) button which displays useful
information about the driver settings and
the selected print media. Specifically, it
describes the paper setting that needs to
be selected on the plotter when a certain
type of print media is loaded.
From the item “printers” you can select
the port on which Power Plotter will send
the
calculated
print jobs.
The destination
of the print job
can be selected
by browsing the
printers already
installed on the
system.
Or, you can
enter the IP
address of a net
printer, select
the relevant port
(generally 515
for LPR and
9100 for Jet
Direct). Using
the printer on a
direct IP you
should also
assign it a name
so as to easily
find what it
corresponds to without having to remember all of the network IP addresses.
Using the Windows print queue you work
with the Windows spooler and the program will guarantee a faster processing,
while when you use the direct IP address
the program will process as fast as the
printer is receiving the data.
How to save a configuration from
Power Plotter.
These settings can be saved as default
configuration for an easier use afterwards,
or can be associated to a Virtual Printer
(see Virtual Printer). To save the configuration you can use the shortcut "F6" or
you can choose the relative item in the
menu "Configurations" / "Save Current
Configuration", to save with a new name
in the correspondent window coming up
(or you can choose it from the list and
overwrite the old one) and click “Save”.
Notes for Canon Lite Drivers
You have the following drivers on the installation CD:
Dye Inks: W7200 / W8200 Dye, W7200
CAD / W8200 Dye CAD
UV resistant Ink: W8200PG, W8200PG
Lite, W6200PGL, W6200 Lite.
For each printer model you have at least
two drivers that distinguish for the support
types to print on and the different color
quality.
Printing on CAD systems you can use the
two special drivers named “SERIE W
DYE CAD” or “SERIE W PG CAD” created to offer a good printing speed and a
discreet printing quality for technical use.
Those drivers have the appropriate profiles for plain paper and light coated paper, the first one is to be used on printer
series W7200 e W8200D, the other one
on printer series W6200PG e W8200PG.
Only with the drivers W7200 CAD /
W8200 Dye CAD / W8200PG /
W6200PGL in some cases it might be
useful to disable the profiles and set
PURE BLACK manually in the “Black
Management” menu to print real grey
scales using black ink only, not as a sum
of all four colours; this will ensure defined
but not too wet blacks, as they will not be
printed with four colours, and thereby
thinner lines. These four drivers are usually slower than the others ones.
If printing on a network, you notice a particularly slow printing process, you may
decrease the resolution, if possible and if
quality is not too affected; or you could try
to connect the plotter with USB2 or Firewire (when available on your system).
Below is a list of the drivers currently
existing for the above printers.
IMPORTANT
THE RESOLUTIONS INDICATED RELATE TO THE RIT RASTERISATION, NOT TO
PRINT JOBS, AS THE PLOTTER ALWAYS PRINTS AT 1200 DPI.
W7200 / W8200 Dye
COATED HR1010
BEST 600/300
NORMAL 300
FAST 150
HEAVY COATED CPXX0S
BEST 600/300
NORMAL 600/300
FAST 300
GLOSSY FILM
BEST 600/300
NORMAL 600/300
FAST 300
PLAIN PAPER
NORMAL 300
FAST 150
PHOTO GLOSSY PAPER
BEST 600/300
NORMAL 300
FAST 300
GLOSSY CANVAS
BEST 600
NORMAL 300
FAST 300
VINILE MATTE
BEST 600/300
NORMAL 300
FAST 150
GLOSSY PAPER GPXX0S
BEST 600/300
NORMAL 300
FAST 300
COATED IDRO
BEST 600/300
NORMAL 300
FAST 150
PREMIUM MATTE COATED
BEST 600/300
NORMAL 600/300
FAST 300
SEMI-GLOSSY PAPER
SGXX0S
BEST 600
NORMAL 600/300
FAST 300
W.ARISTEA JR660SL
BEST 600
NORMAL 300
FAST 300
WATER RESIST. GLOSSY
PAPER
BEST 600
BEST 300/300
FAST 300
5
CAD
ECCO-COATED
BEST 600
NORMAL 600
HEAVY COATED LFMCPxS
BEST 600
NORMAL 600/300
FAST 300
COATED HR1010
BEST 300
NORMAL 300
FAST 150
GLOSSY PAPER GPXX0S
BEST 600/300
NORMAL 600/300
HIGH GLOSSY PROOFING
PAPER
BEST 600
PHOTO GLOSSY PAPE
BEST 600
GLOSSY FILM
BEST 600
NORMAL 600/300
FAST 300
SEMI-GLOSSY PAPER
SGXX0S
BEST 600
NORMAL 600
FAST 300
VINILE MATTE
BEST 600
CARTA COMUNE
BEST 600
NORMAL 600/300
FAST 150
W8200PG / W6200PGL
ADHESIVE MATT
STRETCH VINYL
Adhesive Vinyl
BEST 600
NORMAL 600
FAST 300
ALL ROUND MATT PAPER
Coated Paper
BEST 600
NORMAL 300
FAST 150
BACK-LIGHT-FILM
Backlit film
BEST 600
NORMAL 600
FAST 300
FLAME RESISTANT
CLOTH
6
Flame Resistant Cloth
BEST 600
NORMAL 600
FAST 300
EXTRA MATT COATED PAPER
Coated Paper
BEST 600
NORMAL 300
FAST 150
HIGH GLOSSY PAPER
Photo Glossy Paper 240g
BEST 600
NORMAL 600
FAST 300
HIGH RES BARRIER PAPER
Heavy Coated Paper 180g
BEST 600
NORMAL 300
FAST 150
HEAVY COATED LFM-CPXS
Coated Paper
BEST 600
NORMAL 300
FAST 150
PH. GLOSSY PAPER GPXX1R
Photo Glossy Paper 185g
BEST 600
NORMAL 600
FAST 300
PH. SEMI-GLOSSY PAPER
SGXX1R
Photo semi-Glossy Paper 185g
BEST 600
NORMAL 600
FAST 300
WATER RESISTANT HIGH
GLOSS PAPER
Photo Glossy Paper 250g
BEST 600
NORMAL 600
FAST 300
WATER RESISTANT ART
CANVAS
Matt Canvas 360g
BEST 600
NORMAL 600
FAST 300
W8200PGLite / W6200 Lite
ALLROUND MATT COATED
PAPER
Coated Paper
BEST 600
NORMAL 600
FAST 300
BACKLITE ARISTEA 8935P
Backlit film Aristea Code 8935P
BEST 600
NORMAL 600
FAST 300
PLAIN PAPER
BEST 600
NORMAL 300
FAST 150
ECCO COATED
BEST 600
FLAG TEXTILE OUTDOOR
Opaque Textile for outdoor
BEST 600
NORMAL 600
FAST 300
HIGH GLOSSY PAPER
Photo Glossy Paper 240g
BEST 600
NORMAL 600
FAST 300HIGH RES
BARRIER PAPER
Heavy Coated Paper 180g
BEST 600
NORMAL 300
FAST 150
HIGH RES GRAPHIC
PAPER
Opaque Adhesive vinyl
BEST 600
NORMAL 300
FAST 150
MATT COATED PAPER
9171
Coated Paper
BEST 600
NORMAL 300
FAST 150
MATTE STRETCH ADH VINYL
Adhesive Vinyl
BEST 600
NORMAL 300
FAST 150
PREMIUM ART PAPER
Artistic Paper
BEST 600
NORMAL 300
FAST 150
W.RES ART CANVAS
Artistic Canvas
BEST 600
NORMAL 600
FAST 300
WATER RESIST. GLOSSY
PAPER
W.Resistant Photo Glossy
Paper
BEST 600
NORMAL 600
FAST 300
Installing a Virtual Printer
Direct printing from the application, Printing of documents not compatible with
Power Plotter.
The Virtual Printer is a printer that has to be installed on the Operating System from the
Power Plotter installation CD; it allows printing directly from your graphic program on the
printer that you want, not using the Windows drivers but our RIP.
This printer can be installed on any system and can be shared over a network; you can
install infinite copies with different settings.
This printer can be used for both printing from any program with default RIP settings previously saved to the Virtual Printer, and for moving the file from your program to the RIP
workspace and create a PS file (see next pages).
A Virtual Printer appears on your system as any other printer. Following the procedure described here you will find a new printer in the printer folder of your system (usually called
PowerPlotterPrinter).
Win or Mac Program
Power Plotter:
Virtual
Printer:
This means that you can print from any program directly on the printer set on the RIP
(automatic procedure) or you can move the file to the workspace by loading it from the
process list of the RIP, which you find in the right side of the main interface (manual procedure).
The picture shows a detail of the
options available by rightclicking on the print job coming
from the application.
Selecting to print automatically or manually from the interface of the Printer Manager is
explained on the next pages.
Installation procedure for the Virtual
Printer
To install, double-click the following icon on your desktop
When you start the program, the following
interface is displayed:
7
Clicking the “Add” button:
Click “Continue” to display the following
window:
Clicking on the button with the three
dots you will open a network search
window; select the PC on which you
have installed (and running) Power
Plotter.
Otherwise, you may type the PC name,
or if the PC you are looking for is the
one you are currently working on, select “Local PC” 127.0.0.1 (internal address, called Loop back, of the local
machine) and click “Continue”.
At the end of a quick search, a window
like the one shown below may be displayed:
Here you will find the list of default settings (this step will only occur if you
have made settings from Power Plotter
as previously described on the pages
of this manual, if not, go directly to step
3). Now you can select one of the
items (or none) and continue.
In the “Print Queues” tab there is a
window similar to the previous one
where you can select the print queues
managed with the server version of the
program.
8
The most important part is that displaying
the Virtual Port. Remember the name to use
it in the next screen where you activate the
installation procedure for Windows printers.
Click “CONTINUE” and follow the onscreen
Windows instructions (these instructions
might be different based on the version installed on your system) and when you are
prompted to enter the printer port, select
that indicated in the previous window (PPP5
in our case).
The driver file may be found on your installation CD or on your system: installation folder
of your program, PostScript printers, choosing the folder relating to the Operating System in use.
You
may
install
this
procedure
on any PC,
using
the
RIP installation CD, selecting
Printer
Manager in
the window where you select the installation
type.
You may create many Virtual Printers with
different configurations, which you can set
for direct printing (automatic mode) or to
store the files in the print queue of the RIP
(manual mode).
To do so, open the printer configuration, and select the printer you want to
configure
and then, select “Configure” to display
the following window.
When you have set a valid configuration (in this case it is called Test) and
Print is set in the options, your print
job will be automatically moved to the
active print job of the RIP and will be
printed on the printer chosen in the
configuration “Test”, otherwise if you
have set “Store” it will be placed in
stand-by, and finally when you have
set “Print and Store” it will be printed
and kept in the print queue for eventual
further printing.
If Power Plotter is set to print (directly)
on a printer to file, the RIP will automatically generate a print file (PRN) in
the PRN_FILE folder in the program
folder
(usually
C:\Program
Files\Devstudio\PowerPlotter\).
These files can be sent to a printer with
Direct Print (see the relevant chapter in
the program user manual).
Creating a PS File from Windows
To generate a postscript file to be read
by power plotter you have to print on
the virtual printer from any program.
This Ps file is needed when you wish
to print a file format not supported by
Power Plotter; so you have to convert it
into a compatible format such as TIFF,
BMP, JPG, PICT, TGA, EPS, PS, PDF,
HP-GL, HP-GL2 (driver hp-gl2 comSettings for prints from Autocad®
In some special cases, it is not advisable to print directly from vector programs because of a low output quality
(e.g. for printers without optimized
drivers or without HP-GL2 translator)
patible up to the version for Designjet
HP1050 plotter).
The best formats for photographic images
and rendering are TIFF or JPG.
The TIFF format is the best since it maintains the best image quality (also when ZIP
or LZW compression activated) and allows
including your ICC profiles to keep colours
matching to your screen (if your screen is
correctly calibrated).
The JPG format also preserves a rather
good quality (even giving some fault on
highly contrasted borders) with the advantage of generating small files that can easily
be stored and moved.
In both cases it is advisable to set a minimum resolution of 60 dpi (for final print size)
for photographic images with shades or
gradual passages of colours; a minimum
resolution of 100 dpi for rendering or also
images with very small details and highly
contrasted borders, and finally, 150 dpi for
text on white background.
When you are working on software generating vector or raster formats (e.g.
Corel ®Draw®, Adobe ® Illustrator ®,
Macromedia ® Freehand® etc.) or with
DTP programs (Adobe® PageMaker®
Quark® Xpress® etc.) it will be preferable
to export the file in eps or in pdf.
These formats do not raster vector data
(as TIFF or JPG formats etc. would do)
and this allows keeping high quality on
text and line objects.
To be sure to have readable text objects you
should export, if possible, a file using the
command “Include all fonts” or otherwise
convert text to curves (you should know that
you will get bigger files).
When you work on software not capable of
generating eps files (e.g. Microsoft® Word®)
the best thing to do is print the document “to
file” using the postscript printer.
or there could be problems to complete
prints due to large print dimensions, driver
limits or low printer memory.
For this reason it may be useful to print
through the Power Plotter RIP.
9
In this case, the procedure is similar to
that described above up to the step of
creating a Virtual Port PPPX, with the
difference that you have to use a PS
printer from the ADI driver of AutoCAD
instead of a PS printer from Windows.
This is due to a lack of the OS Windows in the communication with programs of AutoDesk that fix a maximum
size at 6m, moreover the time needed
to generate the file might be very long.
Using the ADI driver the maximum size
is 15m x 914mm.
To create a PS printer from AutoCAD
you have to select the Plotter Manager
menu
configured file, but since you do not have
any you can skip this step.
Now you have
to select the
file destination
port.
If you wish to
send the file directly to Power
Plotter, select
one of the Virtual Ports PPPX
you have created before.
Now you have to
name the printer
and set its
properties:
and enable “Add a Plotter Wizard”
(add a plotter with a guided procedure).
Set units and output
resolution and click
the “Edit Plotter
Configuration”...
button.
To begin, set the
resolution from
“Graphics”:
Set a high value for
Follow the instructions step-by-step
and select “My Computer” (local machine)
From the list of Models, select “Adobe
Æ PostScript Level2”
The next
window will
prompt you
to import a
previously
10
the colours and at least
600 dpi for resolution
(or even higher if the
printer supports it) on
“Vector Graphics”; for
dithering set, if possible,
a much diffused dithering (which gives you
softer images) otherwise use one of those
you have.
On “Raster”, set all values to the right, i.e.,
maximum quality.
For a defect on
AutoCAD 2000, it may
happen that some
images are moved to
low resolution; in this
case, try to close the
program and repeat
the print.
The second step may
be setting a custom list
of paper dimensions.
To do so, select “Custom Page Sizes”
(customised dimensions) and click
“Add”.
A new Wizard will start to create default paper sheets that will be displayed in the paper list during the print
process. Creating a new format:
Set dimensions,
width and
length.
There will
be different limits
depending
on
the
AutoCAD
version in
use.
Set dimensions and borders in the two
interfaces above and click “Next”. You
should set the border limits to 0 as the
RIP will set them automatically during
the print
process.
Clicking
“Next” you
will have to
assign a
name to
the paper format and define a file
where you want to save it (in our case
it will be
the file that
defines the
previously
created
printer).
Then, set
the format that will use these dimensions, whether they will be displayed
How to print from Macintosh or
other non-Microsoft systems
There are various possibilities to obtain
these conditions, the
most convenient is
the use of
a
Win-
under the
settings of
“Sheet of
paper” or
“Roll”.
Now you
can use this
new type of
printer driver and print your AutoCAD jobs
with the powerful RIP.
Another setting to be remembered is inside
Power Plotter and relates to colour settings.
In fact, Postscript files often contain both
RGB and CYMK items but at present, Power
Plotter only recognizes one colour space at
a time. In AutoCAD, images and data are
certainly in RGB, so you have to check that
the image imported to the workspace of
Power Plotter is RGB. If not, make sure that
the image will be opened in the correct
colour space using the PP configuration
(Image Quality Menu in Program PreferThe important benefit of this operation is
ences).
that if you have to print lines with black ink,
you can disable the profile management and
enable printing with 100% black in the Black
Generation Panel. When you use the profiles, image colours will be more accurate.
When you launch a print job from Autocad, a
message will be displayed indicating that the
printer port is already in use. This happens
as the PPPX port set on Autocad is the
same used by Windows Power Plotter
Printer. This is only a reminder and will not
affect the outcome: you can simply ignore it.
If you want to avoid this reminder, just use a
PPPX port for Autocad with a number not
used by Windows.
dows server or a MacLan® PC as they ensure higher speed and better handling of the
print process, whereas printing from the
LPR port has the advantage of being integrated in Power Plotter and therefore there
are no added costs.
Printing with LPR port integrated in
Power Plotter
Power Plotter has an internal active LPR
11
print server that needs not be configured by the user. This feature allows
printing directly on the RIP from other
operating systems that do not communicate with Windows. The systems
supported are: UNIX, Linux, Sun and
MacOs 9 or later.
Under MacOs 9 you can use the following procedure:
First, connect and configure the Tcp/Ip
protocol of both Mac and pc in the
network. Then, run the program called
“Desktop printers utility” in Mac.
The first time, the following window will
be displayed (or you will have to select
a new one).
Here you have to select Printer (LPR)
in the list, and in the drop-down menu,
select “AdobePS” or “LaserWriter
8“ (only the method for enabling the
printer will change in Select resources).
Continuing with the wizard (clicking
OK), the following window is displayed:
Enter the Ip address of the computer where
you have installed power plotter in Printer
address, under the Queue item, enter the
name of a valid configuration previously
saved on the RIP (be careful to uppercase
and lowercase characters) in exactly the
same way as written in Power Plotter without spaces. In this way, the print jobs
launched from Mac will be printed directly
without any settings saved in the chosen
configuration.
If an invalid name is entered, the print jobs
will be stored to the print queue and will be
in standby waiting for a user’s action. The
“verify” button checks the address typed in.
Clicking on “ok” will display a dialogue box
where you can enter the name of the desktop printer to be used to print from Power
Plotter.
Now you can print on any printer supported
by Power Plotter directly from any Mac program. For multipage print jobs, use the
same procedure as printing with the virtual
printer.
Otherwise it is possible to print from Mac
when you have configured a Power Plotter
printer shared by a PC using a software like
PC MacLan® from Miramar® or a Windows
server NT 4.0 or later with printer administrator AppleTalk.
How to use PC MacLan® to share printers
in Mac platforms.
Select the printer PPD and the printing
path.
The PPD is on the Power Plotter installation CD, under the Postscript
printer\mac folder.
The printer path is selected from the
following interface:
To do so, create a virtual printer on the PC
where you have installed PC MacLan®.
Then, take the POWERLO.PPD file from the
installation CD of Power Plotter, printer
folder “Postscript printers\mac\” and copy it
to main folder of Mac LAN that should be
under “c:\program files\Miramar\pc MacLan
for Windows 2000\” (or similar depending on
version and language).
Then, go to “printer manager” and select the
12
virtual printer you want to move to Mac.
Your printer will be displayed in the list of
AppleTalk printers and will be visible in Select resources (for OS9) or in Print center
for OSX. From the Power Plotter installation
CD, select the PPD once again: now you
can print from any Mac program directly to
the RIP.
Clicking with the right mouse button,
select “Apple Talk Sharing”
Printing by sharing Mac with NT4.0
server, 2000 Server o 2003 Server
Using a pc with Windows Server OS (version 4.0 sp6 or later), you can create a
Power Plotter printer that you can share in a
Mac network using the Mac LAN protocol.
Usually, in Windows Server, Mac services
are already enabled; if not, enable them
through the Windows Service:
A PC MacLan® window will be displayed.
Then, locate the Mac services item:
Assign a name, select the ps extension, check that the destination is
Windows Printer, that the printer
name is the previously selected Power
Plotter Printer and that in the list of
the PPD files there is the “powerplo.ppd” name and that it is selected.
Click “Options” and select Send as is.
Now, create the Power Plotter printer on the
13
Server following the procedure already
described above and install the Power
Plotter Printer Manager on the Server
from the Power Plotter installation CD.
The printer thus created can be shared
and, having enabled Apple Print services, each Mac will be connected and
you will find it in Select resources (for
Os9) or in Print center for OsX.
In System 9, select the Adobe PS printer or
LaserWriter and then link it to the PPD from
the installation CD, in the Postscript Printers\Mac folder (to be unzipped).
In System X, open the Print center and select “Add Printer” / AppleTalk. Also in this
case you have to link the same PPD.
Note for using the Power Plotter Printer drivers
The Virtual Printer described above is a
PostScript printer, and therefore has a
slightly different handling compared to
traditional Windows printers.
There are no settings concerning quality,
source of paper or destination. You can
only set paper format, printing resolution
and some specific PostScript features (for
example whether to include fonts or not in
the print job, option to be maintained active). Do not be change them if you are
not an experienced user.
Usually when you print on a device from
any Windows program, you will have to
set the print format corresponding to the
paper format present in the printer. Using
the Virtual Printer, the procedure is not
exactly the same.
The best thing to do is to choose a paper
format on the Virtual Printer corresponding to the original dimension of the document, so that the RIP receives an image
without borders that can be re-organized
14
as you like during the printing process. If
you do not find a corresponding format
among the standards you have to select
the customised format and manually insert the values of width and height.
As regards resolution settings, you need
to know that we are not referring to print
resolution, which will be set in the RIP
configuration, but about the quality with
which the data is sent to the workspace of
Power Plotter. A higher value means
higher accuracy of lines, but at the same
time bigger files and the risk of a printing
failure or waiting much longer for the job
to be finished. Generally, you do not need
to change the default settings, but if you
have troubles (quality or slownessrelated), you may increase or decrease
the relevant value.