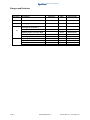
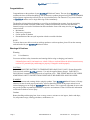
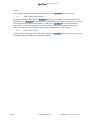
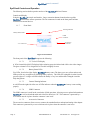
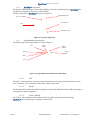
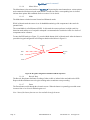
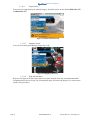
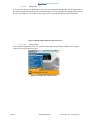
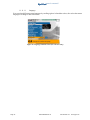
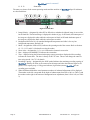
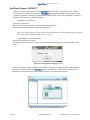
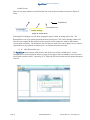
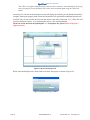
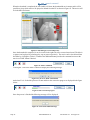
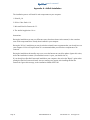
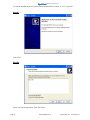
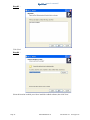
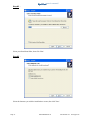
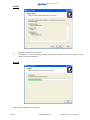
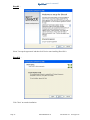
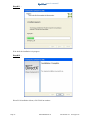
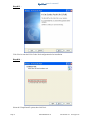
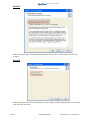
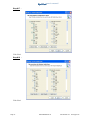
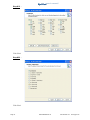
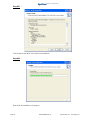
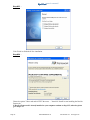
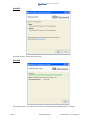
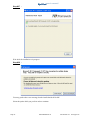
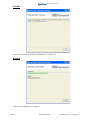
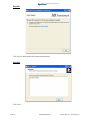
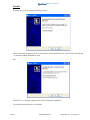
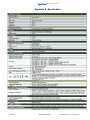
1
EyeCGas OGI (Optical Gas Imager) ® Infrared Gas Leak Detection System User’s Manual Distributed By: 9030 Monroe Road Houston, TX 77061 1-713-844-1300 1-800-HEATH-US www.heathus.com EyeCGas® user's manual Main Sections 1 32T CHANGES AND REVISIONS .................................................................................... 4 32T 32T 2 32T 32T CONGRATULATIONS ............................................................................................... 5 32T 32T 3 32T 32T WARNINGS & CAUTIONS ........................................................................................ 5 32T 32T 32T TABLE OF CONTENTS ............................................................................................ 6 TABLE OF FIGURES .................................... ERROR! BOOKMARK NOT DEFINED. 4 32T PACKING LIST ........................................................................................................ 10 32T 32T 5 32T 32T SYSTEM OVERVIEW .............................................................................................. 11 32T 32T 6 32T 32T EYECGAS® CONTROLS AND OPERATION ........................................................ 17 32T 32T 7 32T 32T EYECGAS® SOFTWARE "ARTSOFT" .................................................................. 33 32T 32T 8 32T 32T CONNECTIVITY TO OTHER DEVICES .................................................................. 39 32T 32T 9 32T 32T TROUBLESHOOTING / MAINTENANCE ............................................................... 40 32T 32T 10 32T 32T 32T 11 32T OPGAL ..................................................................................................................... 41 32T 32T TECHNICAL SUPPORT / SERVICE ....................................................................... 42 32T 12 32T 32T 32T 32T WARRANTY ............................................................................................................ 43 32T 32T APPENDIX A - ARTSOFT INSTALLATION ........................................................................... 44 32T 32T APPENDIX B –SPECIFICATION ............................................................................................ 62 32T 32T APPENDIX C – PROCEDURE FOR CHANGING BATTERY IN FIELD ................................ 63 32T 32T APPENDIX D – PROCEDURE FOR CHANGING LENS IN FIELD ....................................... 64 32T 32T 32T APPENDIX E - CERTIFICATIONS ......................................................................................... 65 Page 2 32T P/N PS8G9006-Rev E www.heathus.com www.opgal.com EyeCGas® user's manual NOTICE The content of this user’s manual are proprietary to Opgal Optronic Industries Ltd. Reproduction in whole or in part of this manual is prohibited without the express written consent of Opgal Optronic Industries Ltd. Opgal Optronic Industries Ltd. operates under a continual product improvement program and reserves the right to make improvements and or changes without prior notification. This manual supersedes all previous manuals for this instrument. EyeCGas is an Opgal Optronic Industries Ltd. registered trademark. © COPYRIGHT 2011 Opgal Optronic Industries Ltd. All rights reserved. Page 3 P/N PS8G9006-Rev E www.heathus.com www.opgal.com EyeCGas® user's manual Changes and Revisions Revision A Description Reference Date Approved by 14/10/12 Elad Vekstain 8/7/13 Elad Vekstain 8/7/13 8/7/13 8/7/13 3/9/13 17/6/15 17/6/15 Elad Vekstain Elad Vekstain Elad Vekstain Elad Vekstain Elad Vekstain Elad Vekstain 17/6/15 Elad Vekstain Release B C D E Page 4 Adding appendix D and E Deleting items Tripod, Monopod and bag pack from table 1 Adding items 11 and 12 in table 1 Updating Figure 6 of Glare shield Adding para. 5.10.1 and 5.10.2 Updating figure 1 Updating referral Updating referral Adding new item Update figures 6.1.3.4 6.1.5.11-3 4 P/N PS8G9006-Rev E www.heathus.com www.opgal.com EyeCGas® user's manual Congratulations Congratulations on the purchase of your EyeCGas®™ Infrared Camera. The new Opgal EyeCGas® combines the latest in infrared technology with an innovative product design to bring you the first handheld infrared camera engineered specifically for use in gas leak detection. The innovative, easy-to-use interface on EyeCGas® enables users to begin achieving results immediately. The benefits of using infrared technology as a tool for gas leak detection are many. Several particularly notable benefits include increased worker safety, reduced environmental emissions, and substantial financial savings as a result of leak detection and remediation. Some of the many uses for your EyeCGas® camera include: Maintenance Plant survey inspection On line update of database Documentation of the surveyed inspection with the recorded video data NOTE: To ensure that we are able to reach you with any product or software updates, please fill out the warranty card enclosed with your EyeCGas® Infrared Camera. Warnings & Cautions Warning 1.1.1 Li-ion Batteries You must read these safety instructions and warnings before using or charging your batteries. Lithium Polymer and Li-ion batteries are volatile. Failure to read and follow the below instructions may result in fire, personal injury and damage to property if charged or used improperly. CAUTION DO NOT EXPOSE THE BATTERY TO TEMPERATURES ABOVE 60°C (140°F). Do not disassemble. To be used only with the EyeCGas® camera. Use only the supplied battery charger. FAILURE TO FOLLOW these instructions may present risk of explosion or fire. THIS USER’S MANUAL INCLUDES ADDITIONAL SAFETY INSTRUCTIONS WHICH MUST BE OBSERVED AND FOLLOWED. WARNING Read all instructions and warnings before using this product. Your EyeCGas® Infrared Camera is like any other tool. It must be used properly and safely. All users should be trained on the proper and safe use of infrared imaging prior to using the EyeCGas® Infrared Camera. This is especially important for users who may use the product in potentially hazardous or explosive environments. Failure to follow this information could result in death or serious injury. Caution Battery handling and charging, heat, laser or energy sources, moisture or rain ingress, shocks and drops, fire, temperature range, cleaning procedures, maintenance, etc.. Page 5 P/N PS8G9006-Rev E www.heathus.com www.opgal.com EyeCGas® user's manual Table of Contents 1 32T CHANGES AND REVISIONS .................................................................................... 4 32T 32T 2 32T 32T CONGRATULATIONS ............................................................................................... 5 32T 32T 3 3.1 3.1.1 3.2 32T 32T WARNINGS & CAUTIONS ........................................................................................ 5 Warning ............................................................................................................................ 5 Li-ion Batteries ................................................................................................................. 5 Caution ............................................................................................................................. 5 32T 32T 32T 32T 32T 32T 32T 32T 32T 32T 32T 32T 32T 32T 32T TABLE OF CONTENTS ............................................................................................ 6 TABLE OF FIGURES .................................... ERROR! BOOKMARK NOT DEFINED. 4 32T PACKING LIST ........................................................................................................ 10 32T 32T 5 5.1 5.2 5.3 5.4 5.5 5.6 5.7 5.8 5.9 5.10 5.11 5.12 5.12.1 5.12.2 5.12.3 5.13 5.13.1 5.13.2 5.14 5.15 32T 32T SYSTEM OVERVIEW .............................................................................................. 11 EyeCGas® Camera- P/N 8G9A0000A .......................................................................... 11 EyeCGas® Carrying Case ............................................................................................. 11 ArtSoft CD Software for EyeCGas® .............................................................................. 11 Batteries X 3 ................................................................................................................... 12 Battery Charger............................................................................................................... 12 Glare Shield .................................................................................................................... 12 Shoulder Strap ................................................................................................................ 13 USB Boost cable and USB A to Mini USB B Cable ...................................................... 13 Head Set.......................................................................................................................... 13 Lens Cleaning Kit ........................................................................................................... 13 AC Adapter ..................................................................................................................... 14 Optional Accessories ...................................................................................................... 14 75mm f/1.2 Manual Athermal. Lens Assy. ..................................................................... 14 BATTERY POWER SUPPLY KIT ............................................................................... 14 BNC Video Adapter ....................................................................................................... 14 Features........................................................................................................................... 15 DVR - Digital Video Recorder ....................................................................................... 15 CCD –Video Camera ...................................................................................................... 15 Battery Charging............................................................................................................. 16 EyeCGas® Initial Operation .......................................................................................... 16 32T 32T 32T 32T 32T 32T 32T 32T 32T 32T 32T 32T 32T 32T 32T 32T 32T 32T 32T 32T 32T 32T 32T 32T 32T 32T 32T 32T 32T 32T 32T 32T 32T 32T 32T 32T 32T 32T 32T 32T 32T 32T 32T 32T 32T 32T 32T 32T 32T 32T 32T 32T 32T 32T 32T 32T 32T 32T 32T 32T 32T 32T 32T 32T 32T 32T 32T 32T 32T 32T 32T 32T 32T 32T Page 6 32T 32T 32T 32T 32T 32T 32T 32T 32T 32T 32T 32T 32T 32T 32T 32T 32T 32T 32T 32T 32T 32T 32T 32T 32T 32T 32T 32T 32T 32T 32T 32T 32T 32T 32T 32T 32T 32T P 32T 32T 32T P 32T 32T 32T 32T 32T 6 6.1 6.1.1 6.1.1.1 6.1.1.2 6.1.1.3 6.1.1.4 6.1.1.5 6.1.2 6.1.3 6.1.3.1 6.1.3.2 6.1.3.3 6.1.3.4 6.1.3.5 6.1.3.6 6.1.3.7 6.1.4 6.1.5 6.1.5.1 6.1.5.2 6.1.5.3 6.1.5.4 32T P 32T 32T 32T P 32T 32T 32T 32T P P 32T EYECGAS® CONTROLS AND OPERATION ........................................................ 17 Controls and Display ...................................................................................................... 17 Front Panel...................................................................................................................... 17 3.5" Color LCD Display ................................................................................................. 17 Battery Status LEDs ....................................................................................................... 17 Camera Warning Indicator ............................................................................................. 17 USB2 Connector ............................................................................................................. 17 Accessories Connector.................................................................................................... 17 EyeCGas® Components ................................................................................................ 18 Keypad Buttons and connectors ..................................................................................... 18 NUC ................................................................................................................................ 18 Polarity ........................................................................................................................... 18 Visible / Infrared ............................................................................................................. 18 Menu /Select ................................................................................................................... 19 Mode ............................................................................................................................... 19 Record / Stop .................................................................................................................. 19 Zoom............................................................................................................................... 19 Menu and Keypad Map .................................................................................................. 20 Setup Menu ..................................................................................................................... 21 File Manager ................................................................................................................... 21 Digital Zoom................................................................................................................... 22 Mode ............................................................................................................................... 22 LCD Brightness .............................................................................................................. 23 32T 32T 32T 32T 32T 32T 32T 32T 32T 32T 32T 32T 32T 32T 32T 32T 32T P P 32T 32T 32T 32T 32T 32T 32T 32T 32T 32T 32T 32T 32T 32T 32T 32T 32T 32T 32T 32T 32T 32T 32T 32T 32T 32T 32T 32T 32T P/N PS8G9006-Rev E www.heathus.com www.opgal.com EyeCGas® user's manual 6.1.5.5 6.1.5.6 6.1.5.7 6.1.5.8 6.1.5.9 6.1.5.10 6.1.5.11 6.1.5.12 6.2 6.2.1 6.2.1.1 6.2.1.2 6.2.2 6.2.3 6.2.4 6.2.5 6.2.6 Inactive Bluetooth menu option ...................................................................................... 23 Image Polarity................................................................................................................. 24 Mapping Control............................................................................................................. 24 Help and Quit Menu ....................................................................................................... 24 Background..................................................................................................................... 25 Analog Video.................................................................................................................. 25 Language ........................................................................................................................ 26 Status Row ...................................................................................................................... 27 EyeCGas Operation ........................................................................................................ 28 General ........................................................................................................................... 28 Power On & Off ............................................................................................................. 28 Non-uniformity Correction (NUC) Operation ................................................................ 29 EyeCGas® Set-up for Operation.................................................................................... 29 Snapshot /Video / Audio Recording ............................................................................... 29 Operational Modes ......................................................................................................... 29 Head Set mounting, connection and use ......................................................................... 32 Side straps, shoulder (neck) strap and lens cover ........................................................... 32 32T 32T 32T 32T 32T 32T 32T 32T 32T 32T 32T 32T 32T 32T 32T 32T 32T 32T 32T 32T 32T 32T 32T 32T 32T 32T 32T 32T 32T 32T 32T 32T 32T 32T 32T 32T 32T 32T 32T 32T 32T 32T 32T 32T 32T 32T 32T 32T 32T 32T 32T 32T 32T 32T 32T 32T 32T 32T 32T 32T 32T 32T 32T 32T 32T 32T 32T 32T 32T 32T 32T 32T 32T 32T EYECGAS® SOFTWARE "ARTSOFT" .................................................................. 33 Installation of the software ............................................................................................. 33 Connecting the EyeCGas® to the PC ............................................................................. 33 ArtSoft Screens ............................................................................................................... 34 Video Download screen .................................................................................................. 34 Setting date and time ...................................................................................................... 37 Verifying System Version .............................................................................................. 37 Updating software and firmware .................................................................................... 38 32T 32T 32T 32T 32T 32T 32T 32T 32T 32T 32T 32T 32T 32T 32T 32T CONNECTIVITY TO OTHER DEVICES .................................................................. 39 32T 32T 9 TROUBLESHOOTING / MAINTENANCE ............................................................... 40 32T 32T 32T 10 32T 32T 11 32T OPGAL ..................................................................................................................... 41 32T 32T TECHNICAL SUPPORT / SERVICE ....................................................................... 42 32T 12 32T P 32T 32T 32T P 32T 8 32T 32T 32T 32T 32T 32T 32T 7 7.1 7.2 7.3 7.3.1 7.3.2 7.3.3 7.3.4 32T 32T 32T 32T 32T WARRANTY ............................................................................................................ 43 32T 32T APPENDIX A - ARTSOFT INSTALLATION ........................................................................... 44 32T 32T APPENDIX B –SPECIFICATION ............................................................................................ 62 32T 32T APPENDIX C – PROCEDURE FOR CHANGING BATTERY IN FIELD ................................ 63 32T 32T APPENDIX D – PROCEDURE FOR CHANGING LENS IN FIELD ....................................... 64 32T 32T 32T APPENDIX E - CERTIFICATIONS ......................................................................................... 65 Page 7 32T P/N PS8G9006-Rev E www.heathus.com www.opgal.com EyeCGas® user's manual Table of Figures Figure 1: EyeCGas® Case with contents Figure 2: EyeCGas® Camera Figure 3: EyeCGas Case Figure 4: EyeCGas® Battery Pack Figure 5: EyeCGas® Charger Figure 6: EyeCGas® Glare Shield Figure 7: EyeCGas® Shoulder Strap Figure 8: EyeCGas® USB Cable set Figure 9: EyeCGas® Head Set Figure 10: Lens Cleaning Kit Figure 11: AC Adapter Figure 12: EyeCGas® 75mm Lens Figure 13: EyeCGas® Battery P.S Kit Figure 14: EyeCGas® BNC Video Adaptor Figure 15: Front Panel Figure 16: EyeCGas® Main Parts Figure 17: Keypad Buttons Functionality in Normal Mode Figure 18: Keypad Configuration in Enhanced Mode Operation Figure 19: Keypad Mapping on LCD Figure 20: Menu Display on LCD – Mapping Control ON Figure 21: File manager screen Figure 22: File selection screen for preview and deletion movies and pictures Figure 23: Digital Zoom Screen Selection Figure 24: Mode Selection Figure 25: LCD Brightness to 100% Figure 26: Bluetooth Set to Off Figure 27: Polarity Selection Screen Figure 28: Mapping Control On Figure 29: Background Temperature Selection Screen Figure 30: Analog Video Selection Screen Figure 31: Language Selection Screen (for reference only) Figure 32: Status Row Figure 33: Keypad, Multifunction Middle Button Figure 34: LED blinking During Cool Down Figure 35: Mode Screen Figure 36: Keypad Configuration in Enhanced Mode Operation Figure 37: Enhanced Mode of Operation Figure 38: Head set mounting to the hard hat Figure 39: Choosing Artsoft Language screen Figure 40: Welcome screen and communication search Figure 41: Artsoft Icons Figure 43: Movies download screen Figure 44: Download progress window Figure 45: File Manager Screen with preview Figure 46: Movie commands Figure 47: Convert to WMV confirmation Page 8 P/N PS8G9006-Rev E www.heathus.com 10 11 11 12 12 12 13 13 13 13 14 14 14 14 17 18 18 19 20 20 21 21 22 22 23 23 24 24 25 25 26 27 28 28 29 30 30 32 33 33 34 35 35 36 36 36 www.opgal.com EyeCGas® user's manual Figure 48: File conversion progress Figure 49: Conversion finished message Figure 50: Date and Time setting screen Figure 51: System version screen Figure 52: Camera Software and Firmware update screen Page 9 P/N PS8G9006-Rev E 36 36 37 37 38 www.heathus.com www.opgal.com EyeCGas® user's manual Packing List A complete EyeCGas® system consists of the items in the table below. Items 1, 3 through 10 are housed in a rugged Carrying Case and all 10 items are standard with the system. You may have purchased additional accessories with your camera. These are listed in the “Accessories” column below. No Standard Item Deliverables Part Number 1 EyeCGas® Camera ü 8G9A0000A 2 EyeCGas® Carrying Case ü 815034 3 EyeCGas® CD software ü 4 Batteries (x 3) ü 8G9M5000B 5 Battery Charger ü 8G9M6000B 6 Glare Shield ü 8G9A0020C 7 Shoulder Strap ü 8G9A0029A 8 Cable, USB A to Mini B ü 1001249A 9 USB Boost 5m ü 1001248A 10 EyeCGas® User's Manual ü PS8G9006- 11 Head Set Lens Cleaning Kit ü ü 8G9A0050A 12 13 AC Adapter 75mm f/1.2 Manual Atherm. Lens Assy Battery Power Supply Kit ü 1000514A BNC Video Adaptor Accessories 0618030019 8G9T7500A ü 8G9K0500A ü 8G9H0010A ü Table 1: Packaging List Figure 1: EyeCGas® Case with contents Page 10 P/N PS8G9006-Rev E www.heathus.com www.opgal.com EyeCGas® user's manual System Overview The following section highlights the key parts of the EyeCGas® System including accessories. EyeCGas® Camera- P/N 8G9A0000A EyeCGas® is a handheld infrared camera capable of autonomous imaging and recording operations for the detection of gas leaks. EyeCGas® runs on lithium ion polymer (Li-Ion) batteries. Figure 2: EyeCGas® Camera EyeCGas® Carrying Case The EyeCGas® Carrying Case is a plastic hard case containing custom made protective foam designed to securely house and cushion the EyeCGas® camera. The case also conveniently stores the neck strap, charger, battery set, power cord, glare shield, USB cable, software CD and head set. Figure 3: EyeCGas Case ArtSoft CD Software for EyeCGas® ArtSoft is a virtual “control panel” for EyeCGas®. Contained on a CD, ArtSoft facilitates various system operations for EyeCGas® including time and date setting, system version verification, software and firmware updating, file download, conversion and playback. Page 11 P/N PS8G9006-Rev E www.heathus.com www.opgal.com EyeCGas® user's manual Batteries X 3 Set of three lithium ion battery packs for powering the EyeCGas®. One battery pack runs the EyeCGas® camera continuously for over four hours and is custom designed with voltage and protection circuitry exclusively for use with EyeCGas® camera. Figure 4: EyeCGas® Battery Pack Battery Charger The 110/220 volt AC Battery Charger can charge 1-3 EyeCGas® battery packs simultaneously. Figure 5: EyeCGas® Charger Glare Shield The EyeCGas® Glare Shield is useful for direct sunlight and other bright light situations where screen glare impedes direct viewing of the liquid crystal display (LCD). The glare shield is easily applied to the back of the camera around the LCD, blocking outside light. An optical magnifier promotes easier viewing. Figure 6: EyeCGas® Glare Shield Page 12 P/N PS8G9006-Rev E www.heathus.com www.opgal.com EyeCGas® user's manual Shoulder Strap The Shoulder Strap provides hands-free transport for user and camera safety. Figure 7: EyeCGas® Shoulder Strap USB Boost cable and USB A to Mini USB B Cable The USB cable set connects the EyeCGas® to a PC via a USB port. The EyeCGas® is equipped with a mini-B connector on the front panel for quick connection. The USB cable set comprises one 5m USB extension cable and one 30 cm mini USB to USB cable. Figure 8: EyeCGas® USB Cable set Head Set The EyeCGas® Head Set enables audio overlays onto recorded video. The operator can embed an audio track during video recording, while the headset speakers output the recorded soundtrack during playback for field audio and video monitoring. The head set attaches to the user’s hard hat. Figure 9: EyeCGas® Head Set Lens Cleaning Kit This is a sophisticated in one brush and lens clean tip. Figure 10: Lens Cleaning Kit Page 13 P/N PS8G9006-Rev E www.heathus.com www.opgal.com EyeCGas® user's manual AC Adapter The AC Adapter allows the connection to different country sockets Figure 11: AC Adapter Optional Accessories These optional accessories, available for EyeCGas®, promote optimal ease-of-use and enhanced user experience (not supplied standard with EyeCGas®): 1.1.2 75mm f/1.2 Manual Athermal. Lens Assy. The &5 mm Lens telescope for EyeCGas® allows the detection of the gases at longer distances with a field of view of 7.°. Figure 12: EyeCGas® 75mm Lens 1.1.3 BATTERY POWER SUPPLY KIT The specially equipped Tripod/Monopod connects EyeCGas® for stationary, long-term viewing and recording. Figure 13: EyeCGas® Battery P.S Kit 1.1.4 BNC Video Adapter The BNC Video Adapter allows the real-time infrared video image to be displayed on an external device such as a projector or monitor. Figure 14: EyeCGas® BNC Video Adaptor Page 14 P/N PS8G9006-Rev E www.heathus.com www.opgal.com EyeCGas® user's manual Features These features maximize the functionality and capability of the EyeCGas® Infrared Camera: 1.1.5 DVR - Digital Video Recorder The Digital Video Recorder (DVR) for EyeCGas® records up to 16 gigabytes of audio and video. The DVR built into the EyeCGas® housing requires no additional hardware. Audio and video files are stored in its internal memory and are downloadable via USB to a PC. EyeCGas® can record and playback infrared video, visible video and audio files. Audio and video files can be deleted from the camera’s memory as needed. The Artsoft program can be used to download files in *.MP4 format. 1.1.6 CCD –Video Camera A Video Camera (CCD) adds CCD visible video capability to EyeCGas® enhancing operator orientation, component identification and text and number recognition. Page 15 P/N PS8G9006-Rev E www.heathus.com www.opgal.com EyeCGas® user's manual Prior to Operation Battery Charging To charge EyeCGas® batteries, connect the AC power cord to the battery charger and plug the cord into an AC outlet. Insert a battery into the EyeCGas® charger by loading the battery into the charger until it latches (the battery can only be loaded one way). Repeat for the other two batteries. The battery charger LEDs will indicate red while charging and turn to green when the corresponding battery is fully charged. A flashing red LED indicates an error such as incorrect battery placement on the charger or an improperly functioning battery. To fully charge a depleted battery takes about 6 hours. Caution • Use only EyeCGas® battery packs manufactured by Opgal (part number: 8G9M5000B). • Use only the supplied battery charger to charge the battery packs. • Damage to the EyeCGas® system caused by batteries manufactured by other companies may void the system warranty. • Do not charge the battery pack(s) while they are hot. • Do not charge the battery pack(s) or operate the battery charger in a hazardous environment. • Recycle the battery pack(s) at an approved disposal location. • Operating the battery pack(s) in high or low temperature environments will reduce operational run time. • Do not expose the battery pack(s) to fire or extremely high temperatures. • Do not cause damage to or attempt to short circuit the battery pack(s). • Fully charge a battery pack if it has not been used in two months. • Refer to Section 8, Troubleshooting and Maintenance for additional battery pack maintenance recommendations. EyeCGas® Initial Operation Before operating your EyeCGas® camera for the first time, ensure that all standard items and features and those accessories or features that you have purchased are included and/or installed per the Packing List. • Take out the EyeCGas® camera and remove the installed battery. • Take out the two additional battery packs from the carrying case. • Remove the adhesive tape from all battery contacts if installed. • Place the battery packs in the charger and perform a full charge. • Check if the battery packs have a full charge by verifying the green LED is lit on the charger for all three packs. When installed on the EyeCGas®, all three green LEDs will be lit to also indicate the battery pack is fully charged. OPGAL recommends that you fully charge any battery pack which is not fully charged prior to using. • Install a fully charged battery pack into the EyeCGas® camera. Page 16 P/N PS8G9006-Rev E www.heathus.com www.opgal.com EyeCGas® user's manual EyeCGas® Controls and Operation The following section details operation and use of the EyeCGas® Infrared Camera. Controls and Display Using the EyeCGas® is simple and intuitive. Large, convenient buttons located on the top of the EyeCGas® control most camera operations. The two connectors located on the front panel facilitate connection to external devices. 1.1.7 Front Panel Warning Indicator Battery Status LEDs USB2 Connector Accessories Connector 3.5" Color LCD Figure 15: Front Panel The front panel of the EyeCGas® comprises the following: 1.1.7.1 3.5" Color LCD Display A VGA format 640 x 480 LCD displays high resolution grayscale infrared and visible color video images. The glare resistant LCD is designed to be viewable in brightly lit areas. 1.1.7.2 Battery Status LEDs Five LEDs, from left to right, display EyeCGas® battery status. The three green, one yellow and one red LEDs provide easy recognition of remaining battery capacity. The LEDs will extinguish in order from left green to right red. A single red LED indicates the battery is very low and should be changed out with a fully charged one. 1.1.7.3 Camera Warning Indicator A red LED on the right side of the row of LEDs indicates when the EyeCGas® or battery is not working properly. 1.1.7.4 USB2 Connector The USB2 connector is useful at the conclusion of field operations, allowing a user to upload information to EyeCGas® as well as download audio and video files directly to a PC. This connector is protected by a cover which must be in place when the connector is not in use. 1.1.7.5 Accessories Connector The accessories connector allows a user to connect the standard head set and optional analog video adaptor. This connector is protected by a cover which must be in place when the connector is not in use. Page 17 P/N PS8G9006-Rev E www.heathus.com www.opgal.com EyeCGas® user's manual 1.1.8 EyeCGas® Components Designed to withstand the rigors of everyday handling in refineries and chemical plants, EyeCGas® also incorporates safeguards for use in hot air environments. The key components of EyeCGas® are shown in Figure 16. Right holding strap Top Cover Keypad Li-Ion Battery Lens Left holding strap Figure 16: EyeCGas® Main Parts 1.1.9 Keypad Buttons and connectors The default setup of the keypad buttons is shown in Figure 17. NUC Menu / Select Polarity Visible / Infrared Record / Stop Mode Zoom Figure 17: Keypad Buttons Functionality in Normal Mode 1.1.9.1 NUC The NUC, or Non-uniformity Correction, button refreshes the camera image as needed. Refer to section 6.2.1.2 for details. Also is used as the down arrow when in menu mode 1.1.9.2 Polarity The Polarity button switches the infrared image between white hot (WH) and black hot (BH) depending on user preference and scene dynamics. 1.1.9.3 Visible / Infrared The Visible / Infrared button switches between the CCD visible image and the infrared image. EyeCGas® can record both types of imagery with the DVR. Page 18 P/N PS8G9006-Rev E www.heathus.com www.opgal.com EyeCGas® user's manual 1.1.9.4 Menu /Select The Menu button is the main interface of EyeCGas®. Depressing the menu button shows various options and commands while depressing the menu button a second time while a corresponding item is selected initiates those options and commands. Refer to section 6.1.4 for details. 1.1.9.5 Mode The Mode button switches between Normal and Enhanced modes. While in Normal mode the camera is set for handheld monitoring of the components in the search for potential leaks. The second Mode is called Enhanced (ENH). In this mode the camera performs in a high sensitivity detection mode and the use of a tripod or monopod is recommended to visualize the leaks of a cluster of components and at a distance. To enter the ENH mode (see Figure 17), press the Mode button while in Normal mode. After the button is pressed the keypad configuration will change to that described below in Figure 18. Diff+ Normal Enh- Enh+ Record / Stop DiffZoom Figure 18: Keypad Configuration in Enhanced Mode Operation 1.1.9.6 Record / Stop The Record / Stop button facilitates recording of either visible or infrared video and audio to the DVR. Depress the Record button once to begin recording and a second time to stop recording. 1.1.9.7 Zoom The Zoom button scrolls through the electronic zooms. When the button is repeatedly pressed the zoom increases from x1 to x2 to x4 and back again to x1. Note: Most of the button functions are also available through the menu. Page 19 P/N PS8G9006-Rev E www.heathus.com www.opgal.com EyeCGas® user's manual 1.1.10 Menu and Keypad Map The Keypad map can appear on the screen to guide new users working the EyeCGas®, as shown in Figure 19. Figure 19: Keypad Mapping on LCD The EyeCGas® menu system allows advanced users to set up the camera configuration, as shown in Figure 20, according to their individualized needs. Figure 20: Menu Display on LCD – Mapping Control ON Page 20 P/N PS8G9006-Rev E www.heathus.com www.opgal.com EyeCGas® user's manual 1.1.11 Setup Menu By pressing the Menu button in Normal Mode, the Setup Menu will be displayed on the LCD. Pressing the up, down, left or right buttons will allow the navigation through the menu options. An orange highlighted color over the selection will show the actual selectable , when an option is selected the optional values for selection will appear on the right of the function name , moving right or left with the right and left arrows will, after pressing select, change the function to the selected value, which is then marked on its four corners 1.1.11.1 File Manager Selecting File Manager allows users to preview and delete files stored in the DVR. Figure 21: File manager screen Upon selecting File Manager, a list of infrared and visible image and movie files will appear. Selecting a file for preview will display it on the LCD. Selecting “X “(when its background is yellow) next to the file name and then pressing the “Select” button will delete the file from the DVR permanently. As shown in Figure 22, play is selected. Figure 22: File selection screen for preview and deletion movies and pictures Page 21 P/N PS8G9006-Rev E www.heathus.com www.opgal.com EyeCGas® user's manual 1.1.11.2 Digital Zoom Digital Zoom allows the user to electronically zoom EyeCGas® while viewing infrared imagery. Selectable options are 1x or no zoom (default), 2x zoom and 4x zoom. Figure 23: Digital Zoom Screen Selection 1.1.11.3 Mode Users can select between two modes of operation. Normal mode (Nor) is the default setting and appropriate for most applications. Enhanced mode (Enh) can be used in environments where scene dynamics make gas detection more difficult, allowing high sensitivity when using the EyeCGas® on a steady pose with a tripod or monopod. Figure 24: Mode Selection Page 22 P/N PS8G9006-Rev E www.heathus.com www.opgal.com EyeCGas® user's manual 1.1.11.4 LCD Brightness Users can adjust LCD brightness on EyeCGas®. Adjustable settings are 25%, 50%, 75% and 100% brightness levels. Less brightness conserves battery power. Figure 25: LCD Brightness to 100% 1.1.11.5 Inactive Bluetooth menu option Users should not try to activate Bluetooth functionality. Keep this setting set to Off to conserve power. Figure 26: Bluetooth Set to Off Page 23 P/N PS8G9006-Rev E www.heathus.com www.opgal.com EyeCGas® user's manual 1.1.11.6 Image Polarity Users can select image polarity for infrared imagery. Selectable options are the default White Hot (WH) and Black Hot (BH). Figure 27: Polarity Selection Screen 1.1.11.7 Mapping Control Users can select the keypad Mapping Control On or Off Figure 28: Mapping Control On 1.1.11.8 Help and Quit Menu Help text will appear at the lower part of the screen upon selection of the help command button while navigating menu items (see Figure 14). Selecting help again will remove the help text. To exit the menu system, select Quit Menu. Page 24 P/N PS8G9006-Rev E www.heathus.com www.opgal.com EyeCGas® user's manual 1.1.11.9 Background Users can select between St (Standard) or vHot (very hot) temperature backgrounds. The St background is the default background selected by the camera and whenever a very hot temperature background is present, the user may change to vHot to allow better image of the gas and the background without saturation. Figure 29: Background Temperature Selection Screen 1.1.11.10 Analog Video Users can turn analog video On or Off (infrared video output using the optional BNC Video Adapter, keeping it set to Off conserves power). Figure 30: Analog Video Selection Screen Page 25 P/N PS8G9006-Rev E www.heathus.com www.opgal.com EyeCGas® user's manual 1.1.11.11 Language User can select different present languages by scrolling right or left and then select, after select the camera language will change to the selected one. Figure 31: Language Selection Screen (for reference only) Page 26 P/N PS8G9006-Rev E www.heathus.com www.opgal.com EyeCGas® user's manual 1.1.11.12 Status Row The status row shows all the current operating modes and date and time of EyeCGas®. Specific indicators are described below. Figure 32: Status Row 1. Image Polarity – designated by either WH or BH refers to whether the infrared image is set to white hot or black hot. The infrared image is displayed in shades of grey. In WH mode, the hottest parts of the image are displayed in white while the coolest parts in black; in BH mode the hottest parts of the image are displayed as black while the coolest parts are white. 2. Background Selection. St is for standard background temperature and vHot is for very hot background temperature. Default is St. 3. Mode – designated as NOR or ENH, indicates the operating mode of the camera. Refer to Sections 6.1.3.5, 6.1.5.3 and 6.2.4 for details on using the modes. 4. Zoom value – designated as 1x, 2x, or 4x indicates the electronic zoom value. 5. Date – displayed as MM/DD/YY indicates the current date. 6. Time – displayed using the 24-hour timekeeping system (seconds are displayed while recording) indicates the current time. The time is factory set to UTC time. The user can change the camera’s time using Artsoft. See 7.2.2 for details. 7. Recording Capacity – designated by the DISK symbol indicates the remaining recording capacity of EyeCGas®. Initially all white, as the camera records images and video the indicator begins to fill green in 25% capacity steps. A fully green indicator (4 green bars) means EyeCGas® has no recording space available. 8. When in Enhanced Mode the actual parameter numbers of enhanced adjustment will be displayed. The number on the left corresponds to the depth of enhancement (from 005 to 100, see Table 1) and the number on the right is the amount of background scene adjustment (from 0.20 to 0.80, see Table 2). Page 27 P/N PS8G9006-Rev E www.heathus.com www.opgal.com EyeCGas® user's manual EyeCGas Operation 1.1.12 General 1.1.12.1 Power On & Off Before powering on the camera, ensure that the battery is properly inserted and fully charged. EyeCGas® Power Button: (see Figure 33) To power on the EyeCGas® camera, depress the middle Power/Menu Button for one second. A sequence of screens will appear as the camera initiates an internal calibration sequence. Middle Button Power On & Off. Also Menu and Select Figure 33: Keypad, Multifunction Middle Button During the initial 30 second (approximate) power up sequence, EyeCGas® will display a white screen followed by a color test screen. After this is completed, the Opgal logo will appear and will fade to black (the battery LEDs will also fade) during the next 30 seconds to conserve battery life while the internal cooler lowers to its required operating temperature. After the LCD dims to black, the left most LED battery indicator will blink indicating that the detector cooler is cooling to its required temperature. Blinking LED Figure 34: LED blinking During Cool Down The cool down sequence will take approximately 8 to 10 minutes. After cool down is done the camera will perform an automatic NUC. When completed, a video image will appear on the LCD. To power off the EyeCGas®, depress the Power/Menu Button for a minimum of 8 seconds. Note: While in Power ON sequence, the lens cap MUST be mounted on the lens Page 28 P/N PS8G9006-Rev E www.heathus.com www.opgal.com EyeCGas® user's manual 1.1.12.2 Non-uniformity Correction (NUC) Operation The NUC calibrates the EyeCGas® image making it ready for use. To perform a NUC, cover the lens with the lens cap and press the large NUC button (Figure 3). The image will freeze (indicated by no movement in background noise). Upon completion of the image freeze, a uniform image will be displayed on the LCD, and the EyeCGas® will be ready for use. 1.1.13 EyeCGas® Set-up for Operation 1. Ensure that the EyeCGas® camera is powered on and ready for use. 2. Perform a NUC (see section 6.2.1.2 for details). 3. Select the mode of operation via the Menu. 4. Select other desired parameters and exit the menu by depressing the Quit Menu button. 5. Aim EyeCGas® toward a desired component or area for inspection and manually focus the lens via the rubber ring until the image is clear. 6. The image can be adjusted as necessary to correspond to changing scene conditions. When detection proves difficult, adjust the camera’s polarity and mode (Normal or Enhanced) to enable better detection capability. 1.1.14 Snapshot /Video / Audio Recording 1. To record video and snapshot, depress the “Record” button once to begin and a second time to stop. The camera will make a snapshot of the current video (IR or VIS) first and then begin recording. 2. While recording users can change polarity, switch between infrared and visible CCD video, change modes and other settings. Connect the head set to the accessories connector to also record audio. 3. A red blinking indicator will be active when recording under the DISK icon. 4. To play back records, depress the Menu button and enter the File Manager menu. Browse the files, select the desired file ( for snapshot or for video) and depress menu again to view the file. A video file can also be deleted when selected. Note: you cannot recover deleted files. Note: Max recordable file size is 3.55G Note: Files bigger the 200M can’t be playback locally and need to be downloaded. 1.1.15 Operational Modes ® The EyeCGas camera has two basic operational modes: Normal and Enhanced, which are selectable by depressing the Mode button on the keypad. Figure 35: Mode Screen 1. Normal Mode (Nor). This mode provides standard detection functionality for normal environmental conditions being the common mode for operating the EyeCGas®. Page 29 P/N PS8G9006-Rev E www.heathus.com www.opgal.com EyeCGas® user's manual 2. Enhanced Mode (Enh). This mode provides enhanced sensitivity while operating in low-contrast backgrounds and/or where attempting to detect low gas flow leakages; EyeCGas® will provide greater sensitivity but the image will appear grainier while operating in enhanced mode. • From the Normal mode when the Mode button is pressed the keypad configuration will change to provide adjustments in the Enhanced Mode as shown in Figure 36. The adjustment is required for maximum detection while having a clear and steady image. The default values provide full detection capabilities, but in order to bring the camera to a clear and steady image without losing the gas leak detection change to lower values Enh+/Enhfirst and then Diff+/Diff- as shown in Table 2 on page 31. Diff+ Normal Enh+ Enh- Record / Stop DiffZoom Figure 36: Keypad Configuration in Enhanced Mode Operation Figure 37: Enhanced Mode of Operation Page 30 P/N PS8G9006-Rev E www.heathus.com www.opgal.com EyeCGas® user's manual • Up/Down (Diff+/Diff-) buttons adjust the depth of the enhanced function. The maximum enhanced level is 005 as indicated in the Status row. See Figures 32, 37 and Table 2 for settings and values. Diff+/ Diffmaximum 005 007 010 020 030 040 050 060 070 080 090 minimum 100 Enh+/Enh20% Background 40% Background 50% Background 60% Background 80% Background 0.2 0.4 0.5 0.6 0.8 Table 2: Enhanced values adjustment • Right /Left (Enh+/Enh-) buttons adjust the amount of background scene as a ratio used for the final image displayed. The maximum enhanced value is 0.2. See Figures 32, 37 and Table 2 for settings and values. 2.1 Enhanced Mode (Enh) operational explanation. The principle of use of the enhanced mode is related to the values of Diff and Enh commands. The higher the values are the more the image will appear clear and noiseless. For higher contrasting backgrounds, the higher the Enh value is the better the acquired image and detection will be. For the purpose of enhancing poor contrasts the value of Enh should be set to lower ones while keeping in mind that when the gas is visualized on the LCD the image should be as less grainy as possible by when adjusted with the (+) or (-) Enh command. The same holds for the Diff value, which in this case the highest value is used for detecting large leaks. For small leaks the Diff value should be adjusted lower until the leak is seen. A combination of the two values will allow the user to achieve the best image quality for finding leaks and performing best for video recording when desired. Page 31 P/N PS8G9006-Rev E www.heathus.com www.opgal.com EyeCGas® user's manual 1.1.16 Head Set mounting, connection and use Connect the Head Set to EyeCGas® through the Accessories connector located to the right of the display below the USB2 connector (see Figure 1). Mount the head set on your hard hat as shown in Figure 38. Figure 38: Head set mounting to the hard hat For recording audio, speak into the noise cancelling microphone during recording. Audio recording will automatically be recorded with the video track. The head set performs audio recording and play back. The head set earphones can be used to listen to embedded recorded audio from an EyeCGas® file and also provides basic hearing protection. 1.1.17 Side straps, shoulder (neck) strap and lens cover The side straps and neck strap are adjustable to adapt to each user. To adjust the side straps, lift up the flap, adjust the strap length and push the flap back down again. It is highly recommended to attach and use the neck strap for hands-free camera transport as well as user and camera safety. The lens cover may be attached to one of the side straps when the camera is in use to prevent the lens cable from being snagged. When the camera is not in use the lens cover must be attached over the lens to protect the lens. Page 32 P/N PS8G9006-Rev E www.heathus.com www.opgal.com EyeCGas® user's manual EyeCGas® Software "ARTSOFT" ArtSoft is a virtual “control panel” for the EyeCGas® infrared camera. Contained on a CD, ArtSoft facilitates various system operations for the EyeCGas® including time and date setting, system version verification, software and firmware updating and file management, conversion and playback. ArtSoft is a Windows XP, Vista and 7 compatible programs. Installation of the software Insert the CD into the PC. Run the Artsoft application file (as supplied in the installation CD). Follow the installation instructions located in Appendix A. Note: If the software Direct X, Dot Net Framework and K-lite are already installed in your computer there is no need to install them again. (Press cancel) Connecting the EyeCGas® to the PC Run the Artsoft software on the PC. A prompt message will appear for you to choose the available language of the Artsoft suitable to your needs. Figure 39: Choosing Artsoft Language screen Connect the camera to the PC through the mini USB to USB cable set (supplied) to the USB connection connector in the front panel of the EyeCGas® (Figure 15) and the PC USB connector. Wait until the connection is recognized and proceed to download movies or perform other functions. Figure 40: Welcome screen and communication search Page 33 P/N PS8G9006-Rev E www.heathus.com www.opgal.com EyeCGas® user's manual ArtSoft Screens There are two major windows in ArtSoft and the four icons for those windows are shown in Figure 41 below. Send Email Download Files File Manager Camera Settings Figure 41: Artsoft Icons Clicking the File Manager icon will allow opening the proper window to manage movie files. The Download Files icon is for manual operations and not typically used. The Camera Settings window will allow the user to adjust the date and time in the camera as well as update new software and firmware versions upon availability. The Send Email icon will allow an email to be sent to Opgal's service center or representative for any questions or failure report. An internet connection is needed. 1.1.18 Video Download screen The EyeCGas® camera contains a SD memory card which stores all the recorded movies. After a communication is achieved with the camera, a popup screen appears and asks whether to move the stored files from the camera to the PC. Answering "Yes" allows the files to be moved from the camera and copied to the PC. Page 34 P/N PS8G9006-Rev E www.heathus.com www.opgal.com EyeCGas® user's manual Note: There is an option to deactivate the cooler for noise reduction, cooler and battery life saving noise selecting the Cooler Off button. The cooler can be activated again using the Cooler ON button Answering Yes will start the download process and will display the following screen until the download is complete, showing the progress made. Before the download will be performed an additional question will be asked, "Do you want to delete the files from the camera at the end?" If answered “Yes”, all the files will be removed from the camera. It is recommended to answer “No” until downloaded. The movies will be located at the default folder: C: \Artsoft\EyeCGas_Movies unless changed to a different location Figure 42: Movies download screen While in the download process a small window will show the progress as shown in Figure 44. Figure 43: Download progress window Page 35 P/N PS8G9006-Rev E www.heathus.com www.opgal.com EyeCGas® user's manual When the download is completed, the left window will show the downloaded movie names and it will be possible to select which movie to be played or deleted from the PC as shown in Figure 45. The movies will be in the MP4 file format. Figure 44: File Manager Screen with preview Once the download is completed, it can be viewed in the right side of the screen when selected. The Movie or picture can be played by selecting play, stop or pause respectively. The movie can be also deleted from the folder by clicking the “Delete” command. An additional button provides the command to convert the movie to a WMV format if desired. Figure 45: Movie commands Clicking the "Convert to WMV" button will display the following message: Figure 46: Convert to WMV confirmation And when Yes is clicked the process will start and show the conversion progress as displayed in the figure below: Figure 47: File conversion progress Once the process is finished the following message will be displayed: Figure 48: Conversion finished message Page 36 P/N PS8G9006-Rev E www.heathus.com www.opgal.com EyeCGas® user's manual 1.1.19 Setting date and time Through this screen the date and time setting to the camera may be done as well as the date format. Setting the time takes about 1 minute to complete. Figure 49: Date and Time setting screen 1.1.20 Verifying System Version This screen allows the user to view the system version of the camera and Artsoft. Figure 50: System version screen Page 37 P/N PS8G9006-Rev E www.heathus.com www.opgal.com EyeCGas® user's manual 1.1.21 Updating software and firmware Through this screen Artsoft allows the user to update the software and firmware of the EyeCGas® camera. When an update is available, the upload process is performed automatically after selecting the folder where the file is located and clicking “Load”. When the load process is finished the EyeCGas® must turn off and on again to allow the update process in the camera to be completed. Figure 51: Camera Software and Firmware update screen Page 38 P/N PS8G9006-Rev E www.heathus.com www.opgal.com EyeCGas® user's manual Connectivity to other Devices The EyeCGas® camera, when connected to a PC using USB2, will appear to the PC as a removable flash drive. Experienced PC users will be able to explore the contents of the SD memory card which will contain the original uncompressed 264 video files, the WAV audio files and camera files. In the event Artsoft is not available and free space must be made available on the SD memory card, the 264, WAV and camera files can be downloaded to a PC and then deleted from the camera. A third party conversion program will then be required to merge and convert the original files to MP4 and / or WMV. The original files can also be uploaded back into the SD memory card at a later date and Artsoft then used. Note: Use the cables supplied with the camera in order to connect between the camera and the PC. The accessories connector (see Figure 15) can also be used with the optional BNC Video Adapter for realtime viewing of the infrared image on an external device such as a projector or monitor. Playback is not supported in the analog video output. The analog infrared video output is in composite form. A BNC to RCA adapter can be used along with a cable with the video adapter for easy connection to the “yellow” RCA input on the external device. The analog video output must be enabled (set to ON) in the Menu. See Section 6.1.5.10 for details. When not needed, the analog video output should be disabled (set to OFF) to conserve power. Page 39 P/N PS8G9006-Rev E www.heathus.com www.opgal.com EyeCGas® user's manual Troubleshooting / Maintenance To prevent the lens from becoming scratched, always attach the lens cover when the camera is not being used. If the lens becomes dirty or smudged, do not try to wipe or rub the lens clean with any cloth other than one intended for optics use. If necessary, dampen the optical cloth or tissue with water and lightly wipe the lens. Allow to air dry before use or attaching the lens cover. The LCD protective screen may also be cleaned with a dampened optical cloth or tissue. The camera body may be cleaned with a soft cotton cloth dampened with water. Do not use any solvents. It is normal for the batteries to wear out with use and they will need to be replaced after several hundred charge cycles. The Li-ion battery packs require special care when not used for extended periods of time. It is recommended to not leave a battery pack in the charger during storage. When charged, the battery pack(s) should be removed from the charger and stored at ambient conditions between 50 – 80oF and less than 70 % relative humidity as in a home or office. They should not be stored in a warehouse that is not climate controlled. It is also recommended that at least once every other month during storage the battery pack(s) be placed in the charger and topped off. The batteries should not be allowed to fully discharge and then be stored for extended periods of time. This will significantly shorten the charge cycle lifetime and capacity of the batteries. During normal use the battery pack(s) should also be charged at ambient conditions between 50 – 80oF. Significantly higher or lower temperatures will not allow the battery pack(s) to be charged to full capacity and will also shorten their charge cycle lifetime. Do not attempt to disassemble the camera. This will void the warranty. In necessary, contact your local sales office or the factory at [email protected] for service and support. Page 40 P/N PS8G9006-Rev E www.heathus.com www.opgal.com EyeCGas® user's manual OPGAL OPGAL Optronic Industries is a leading global manufacturer of innovative thermal imaging safety systems and infrared cameras. Its safety applications are used for detection of gas and hazardous material leaks and for aerial remote fire detection. OPGAL offers the widest selection of infrared cooled and un-cooled OEM cameras and engines for military, paramilitary, security and aviation applications. Its products have been field tested worldwide since 1983. The company’s creative R&D, cutting edge technology, speed and flexibility make us your best partner for IR applications. OPGAL’s diverse product line includes fully integrated thermal imaging systems customized to specific applications, as well as off the-shelf thermal imaging cameras and engines for private labeling, OEM partners and other systems integrators. Key applications: • Safety - fire detection, gas and hazardous material leak detection systems • Cutting-edge infrared camera for the avionic industry • Infrared defense OEM partnership • Strategic site protection & security • Law enforcement, rescue and fire fighting thermal Page 41 P/N PS8G9006-Rev E www.heathus.com www.opgal.com EyeCGas® user's manual Technical Support / Service NOTE: Before contacting Opgal on a technical support or service matter, please consult the Troubleshooting section of this manual. Many common issues are listed in this section and you may find a quick answer or solution by checking this section before contacting Opgal. Technical Support For technical support inquiries, please follow the inquiry submission instructions on our technical support page at www.eyecgas.com/support. Our team will assess your question or issue and respond back to you within 24 business hours. Service If your EyeCGas® Infrared Camera is not performing properly, please contact Opgal at +972 49953961. Describe the problem to the Opgal representative as completely as possible. For your convenience, your representative may try to help you diagnose or correct the problem over the phone. Before returning your EyeCGas® Infrared Camera, you should verify with your representative that the product should be returned to Opgal. Opgal Customer Service will provide you with written permission and a return authorization number. If the return is a non-warranty repair, an Opgal Customer Service Representative will provide you with a repair invoice estimate. To authorize repair, you must provide Opgal a purchase order for the amount of the estimate. Once Opgal receives your authorization, we will issue you a return authorization number so that you can return the unit for service. If the cost of repairs exceeds the stated quote by more than 15%, an Opgal representative will re-estimate your repair and will contact you for authorization to complete repairs. After repairs are completed and the goods have been returned to you, Opgal will invoice you for the actual repair amount. NOTE Do not attempt to disassemble the sealed case of your Opgal EyeCGas® Thermal Imager. If the unit is not functioning properly, return it to Opgal (as described in the Service section) for evaluation. Disassembling the unit voids all warranties. Prior to returning your product, decontaminate and clean it to remove any hazardous or contaminated materials that may have settled on the product during use. Laws and/or shipping regulations prohibit the shipment of hazardous or contaminated materials. Products suspected of contamination will be professionally decontaminated at the customer's expense. Page 42 P/N PS8G9006-Rev E www.heathus.com www.opgal.com EyeCGas® user's manual Warranty Opgal warrants to the original purchaser that the EyeCGas® and all features/accessories installed in the unit are free of defects in materials and workmanship under intended use and service for a period of one (1) year from date of manufacture. Opgal’s obligation under this warranty is limited to repairing or replacing, at its option, articles that are returned within the warranty period and that, after examination, are shown to Gas Leak Solution's satisfaction to be defective, subject to the following limitations: a) b) c) d) Article must be returned to Opgal with shipping charges prepaid. Article must not be altered from its original configuration. Article must not have been misused, abused, or damaged in transport. Maintenance and field replaceable items, if defective, are covered under warranty for a ninety (90) day period. These items include: Batteries Straps Display covers AC/DC adapters All other parts and accessories except those installed in the EyeCGas Opgal provides a limited lifetime warranty on the EyeCGas® outer shell. This warrants that the outer shell is free of defects in materials and workmanship under intended use and service for the original purchaser. Opgal's obligation under this warranty is limited to repairing or replacing, at Opgal's option, articles that after examination are shown to Opgal' s satisfaction to be defective, subject to the following limitations: 1. Article must not be altered from its original configuration. 2. Article must not have been misused, abused, or damaged in transport. 3. When the outer shell is obsolete and Opgal no longer stocks the part, the limited lifetime warranty will be terminated. In no event shall Opgal be responsible for damages, loss of use, or other indirect, incidental, consequential or special costs, expenses or damages incurred by the purchaser, notwithstanding that Opgal has been advised of the possibility of such damages. Any implied warranties, including warranties of merchantability and fitness for a particular purpose, are limited in duration to one (1) year from the date of manufacture. Some states do not allow the exclusion or limitation of incidental or consequential damages, or allow limitations on how long an implied warranty lasts, so the above limitations or exclusions may not apply to you. This warranty gives you specific legal rights, and you may have other rights which vary from state to state. Extended Warranty The extended warranty has all the same terms and conditions as the one-year warranty, except it is for a period totaling two years (standard one-year warranty plus one additional year). Page 43 P/N PS8G9006-Rev E www.heathus.com www.opgal.com EyeCGas® user's manual Appendix A - ArtSoft Installation The installation process will install 4 main components on your computer: 1. DirectX_9.0. 2. K-Lite Codec Pack 6.9.0 3. Microsoft Dot.Net Framework 3.5. 4. The ArtSoft Application 1.0.x.x Instructions: During the installation you may see different screens from those shown in the manual, in the event that some of the components have already been installed in your computer. During the "K-Lite" installation you may be asked to uninstall some components that you already have on your computer. K-Lite will replace them. It is recommended that you allow these components to be removed. During the installation, the installer may try to access the Internet to search for updates. Ignore this action, and let the installation continue. (If an Internet browser is open, you should close it.) If you already have Dot.Net Framework installed on your computer, then select the "Repair" option when starting the Dot.Net Framework install. An error message may appear after installing the Dot.Net Framework. Ignore this message, as the installation should still be OK. Page 44 P/N PS8G9006-Rev E www.heathus.com www.opgal.com EyeCGas® user's manual To start the installation process, please run the installation file "Artsoft_v1.0.2.5_setup.Exe". Step #1 ... Click 'Next'. Step #2 ... Select "I accept the agreement", then click 'Next'. Page 45 P/N PS8G9006-Rev E www.heathus.com www.opgal.com EyeCGas® user's manual Step #3 ... Click 'Next'. Step #4 ... Select the location in which you wish to install the ArtSoft software, then click 'Next'. Page 46 P/N PS8G9006-Rev E www.heathus.com www.opgal.com EyeCGas® user's manual Step #5 ... Select your Start Menu folder, then click 'Next'. Step #6 ... Select the shortcuts you wish the installation to create, then click 'Next'. Page 47 P/N PS8G9006-Rev E www.heathus.com www.opgal.com EyeCGas® user's manual Step #7 ... 1. 2. Read the review before installation. Click "Back" if you want to change an input or a selection you made in a previous window, or click 'Install' to start the installation. Step #8 ... Wait while the installation is in progress. Page 48 P/N PS8G9006-Rev E www.heathus.com www.opgal.com EyeCGas® user's manual Step #9 ... Select "I accept the agreement" and then click 'Next' to start installing DirectX-9.0. Step #10 ... Click "Next" to start the installation. Page 49 P/N PS8G9006-Rev E www.heathus.com www.opgal.com EyeCGas® user's manual Step #11 ... Wait while the installation is in progress. Step #12 ... DirectX-9.0 installation is done, click 'Finish' to continue. Page 50 P/N PS8G9006-Rev E www.heathus.com www.opgal.com EyeCGas® user's manual Step #13 ... Click 'Next' to start the K-Lite Codec Pack configuration before installation. Step #14 ... Select the "Simple Install" option, then click 'Next'. Page 51 P/N PS8G9006-Rev E www.heathus.com www.opgal.com EyeCGas® user's manual Step #15 ... Make sure that the option "Enable internal decoder for H.264 video" is selected, then click 'Next' to continue. Step #16 ... Make sure that the two options ("Media Player Classic" and the "Windows Media Player") are selected, then click 'Next' to continue. Page 52 P/N PS8G9006-Rev E www.heathus.com www.opgal.com EyeCGas® user's manual Step #17 ... Click 'Next'. Step #18 ... Click 'Next'. Page 53 P/N PS8G9006-Rev E www.heathus.com www.opgal.com EyeCGas® user's manual Step #19 ... Click 'Next'. Step #20 ... Click 'Next'. Page 54 P/N PS8G9006-Rev E www.heathus.com www.opgal.com EyeCGas® user's manual Step #21 ... Click 'Install' to start the K-Lite Codec Pack installation. Step #22 ... Wait while the installation is in progress. Page 55 P/N PS8G9006-Rev E www.heathus.com www.opgal.com EyeCGas® user's manual Step #23 ... Click 'Finish' to finish the K-Lite installation. Step #24 ... Choose the option "I have read and ACCEPT the terms …" then click 'Install' to start installing the Dot.Net Framework. If Dot.Net Framework is already installed on your computer continue to Step # 25, otherwise please go to Step # 30. Page 56 P/N PS8G9006-Rev E www.heathus.com www.opgal.com EyeCGas® user's manual Step #25 ... Select the "Repair" option, then click 'Next'. Step #26 ... The installer may try to connect to the internet. It will continue the installation after 5 attempts. Page 57 P/N PS8G9006-Rev E www.heathus.com www.opgal.com EyeCGas® user's manual Step #27 ... Wait while the installation is in progress. Step #28 ... You may get the above error message, but the install should still be OK. Select the option which you prefer in order to continue. Page 58 P/N PS8G9006-Rev E www.heathus.com www.opgal.com EyeCGas® user's manual Step #29 ... Click the 'Exit' button to continue the installation. Go to Step # 32. Step #30 ... Wait while the installation is in progress. Page 59 P/N PS8G9006-Rev E www.heathus.com www.opgal.com EyeCGas® user's manual Step #31 ... Click 'Exit' to finish the Dot.Net Framework Installation. Step #32 ... Click 'Next'. Page 60 P/N PS8G9006-Rev E www.heathus.com www.opgal.com EyeCGas® user's manual Step #33 ... You may now get now one of the following screens: Check 'Launch My Program' if you want to launch the ArtSoft application now. Click 'Finish' to launch and / or finish the ArtSoft installation process. OR - Select the "Yes, restart the computer now" option to finish the installation. The 'ArtSoft' installation process is finished! Page 61 P/N PS8G9006-Rev E www.heathus.com www.opgal.com EyeCGas® user's manual Appendix B –Specification Page 62 P/N PS8G9006-Rev E www.heathus.com www.opgal.com EyeCGas® user's manual Appendix C – Procedure for changing Battery in Field • • • • Page 63 Press on the Menu button for 3 seconds and release, the EyeCGas® camera will close. Disconnect the battery from the EyeCGas® camera. Connect the new battery and ensure it is in place and that the holding flange of the battery is secured to the EyeCGas® camera. Press the Menu button for 1 second and verify the EyeCGas® unit is initializing. P/N PS8G9006-Rev E www.heathus.com www.opgal.com EyeCGas® user's manual Appendix D – Procedure for changing Lens in Field • • • • Page 64 Press on the Menu button for 3 seconds and release, the EyeCGas® camera will close. Disconnect the Lens from the EyeCGas® camera by pressing on the quick release latch on the Lens and turning it CCW to its releasing position. Connect the new Lens and lock it in the position, make sure it is secured. Press the Menu button for 1 second and verify the EyeCGas®s unit is initializing. P/N PS8G9006-Rev E www.heathus.com www.opgal.com EyeCGas® user's manual Appendix E - Certifications This equipment is suitable for use as certified as follows: Page 65 • UL1604, Electrical Equipment for Use in Class I and II, Division 2, and Class III (Classified) Locations. • CSA C22.2 No. 213-M1987, Non Incendive Electrical Equipment for Use in Class I, Division 2 Hazardous Locations. • ANSI/ISA-12.12.01 - Non incendive Electrical Equipment for Use in Class I and II, Division 2 and Class III Hazardous (Classified) Locations. • ATEX II 3G Ex nL IIC T6. P/N PS8G9006-Rev E www.heathus.com www.opgal.com