1
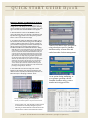
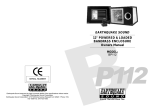
PETTERSSON D500X QUICK
S TA RT G U I D E
You Need:
1 Pettersson D500x Unit (with firmware version
“V2.1.*.D500X”; see – http://www.batsound.com/)
1 power supply (e.g., 4-AA alkaline batteries or external
power source)
1 (and up to 4) SanDisk Ultra II or SanDisk Extreme III CF
cards (2-32 GB size) with CF card reader
NOTE: Refer to the D500x User’s Manual for complete description of
detector, set-up, recording, and settings and to answer any questions not
covered here, including rationales for suggested settings.
Check Firmware Version - Install Latest Version
1. Remove metal plate on back of detector by unscrewing
the two large screws. Confirm “Power” toggle switch is in
the “off” (center) position. Insert CF card(s) beginning with
top left slot. Additional CF cards are added in sequence: (2)
bottom left, (3) top right, and (4) bottom right.
2. Switch “Power” toggle switch to the appropriate
selection, either EXT for “external power” or INT for
“internal power,” i.e., 4-AA batteries.
NOTE: At this point the detector will power up. “D500x” will show
briefly on the screen, then “Analyzing CF Cards” then a message with
“Unused Memory” for CF1 (thru CF4, if using), will appear.
3. With the detector turned “on” as above, press ENTER.
NOTE: Screen shows firmware version, list of installed CF cards with
name(s), size, and free space. Current date/time appears on bottom of
screen.To clear all space on card(s), they must be “formatted.”With
the release of Firmware Version 2.1.3, CF cards can be formatted
directly in the D500x unit. For best results, it is recommended that all
users install the most current firmware version and only format CF
cards using the D500x utility in the unit.The D500x display screen
includes prompts to complete the format process.
Preparing to Record
1. Press the F1 key to change Settings: 1-User Profiles, 2Recording Settings, 3-Timer On/Off, 4-Date and Time, 5Display. Up/Down and Left/Right arrow keys move thru the
list and change values. ENTER executes changes.
NOTE: For most passive recordings, the USER0 profile will be
appropriate. Other user profiles can be selected by hitting “ENTER” at
the “READY” screen instead of F1, browse profiles using the left/rightarrow keys, then select ENTER on the desired profile.
2. Press ENTER to confirm Settings, three of which will
appear across the top of the screen: “f” the sampling
frequency (500 is suggested), “PRE” the pre-trigger selection
for manual recording (this should read “OFF” for passive
recording), and “LEN” the recording length for each file (3
or 5 is suggested). The HP (high pass) filter attenuates lowfrequencies so if tonal content below ~15kHz is desired, be
sure to turn it to “OFF.” Auto-record should be set to “YES”
for passive recordings. The Trigger Sensitivity (TS) setting
will determine how long a signal must be before triggering a
recording. A “Very High” setting will initiate a recording at
the shortest signal duration. Environments with a lot of
ambient noise will return many noise files at this setting. Set
TS to Very Low to reduce noise files without losing bat calls.
3. Under “Recording Settings” a good standard setting, for
quiet recording situations without a lot of insect, wind, or
water noise is: INPUT GAIN = 80,
TRIG LEV = 80,
INTERVAL = 0.
NOTE: Settings can be adjusted by using the right/left arrow keys.
Adjust the INPUT GAIN down in value if the dB bar “maxes out”
during the test. Adjust the TRIG LEV down if Detector does not trigger
in response to appropriate test sounds or up if it appears to be too
sensitive.To help determine sensitivity, every time Detector triggers,
“***” will appear next to the TRIG LEV setting. A “field” test is best to
determine appropriate settings for the specific local conditions, which
will vary depending on ambient noise levels. Finally, time INTERVAL
between recordings should be “0.” Interval > 0 prevents CF cards from
filling in areas of high bat activity, but bats can be missed if setting >0.
4. Set TIMER ON/OFF accordingly. Timer setting uses a 24hour clock. Timers 2-4 can be used any time the recording
period needs to be separated into discrete portions.
5. If the Date/Time displayed is incorrect, it can be re-set by
adjusting the DATE AND TIME setting.
6. The DISPLAY setting allows for display preferences.
Generally there is no need for the display to be on for
passive recordings, so settings can remain conservative: E.g.,
MODE = AUTO, TIMEOUT = 05, BRIGHTNESS = 00
Recording
1. After completing steps under “Preparing to Record,” press
ESC until the “READY” screen appears.
2. Press REC. NOTE: At this time a “RECORDING
SETTINGS” screen will appear, allowing the INPUT GAIN,
TRIG LEV, and LEVEL to be confirmed, and tested, and
changed under field conditions if desired.
3. Adjust the RECORDING SETTINGS if necessary. These
can be changed directly from this screen by using the left/
right arrow keys to adjust the values and the up/down
arrows to navigate thru the settings.
4. If RECORDING SETTINGS are good, press ENTER.
NOTE: “SYSTEM POWER DOWN” appears briefly, then if the TIMER
ON time is not met, the detector is waiting and the LED under REC
will not blink red, but the LED under “ON” will blink green. If the
TIMER ON time is met, the detector is armed and the LEDs under
REC and “ON” icons will blink. NOTE:The detector can be tested with
an ultrasonic emitter to confirm that the unit is functioning. Upon
receiving an ultrasonic trigger, the screen will light and “RECORDING”
will appear, along with the CF card information, and the main settings
from the User Profile.When the recording is complete, the unit will
power down and the screen will go blank.
5. To stop recording manually before TIMER OFF time is
met, hit then hold down “Power” button for the READY
screen.
Janet Tyburec * Post Office Box 86493 * Tucson AZ 85754 * Tel: 520.404.7406 * [email protected] (REV: Fall 2011)
Q U I C K S TA RT G U I D E D 5 0 0 X
Removing, Reading, and Readying CF Cards for
Subsequent Recording Sessions
1. Do not remove a CF card from the detector when it is
writing data to a file. Always be sure to stop the recording
session manually by pressing the “Power” button once, then
again and hold it down until the READY screen appears.
!
2. With the detector “ON” and the READY screen lit,
remove the metal cover from the back of the detector and
flip the Power toggle switch to the OFF (center) position.
Now it is safe to remove the CF card(s).
3. To read the CF card(s) and offload the call data, insert a
CF card into the card reader and plug it into the USB port
of a PC or MAC.You don’t have to copy the *.wav files to
your hard drive. Simply post-process the calls directly from
the CF card using your favorite analysis software (e.g.,
SonoBat 2.9x/3.0x and the “D500x File Attributor” utility).
Transfer field data to store and process
using a hardware-specific SonoBat
Attributer utility to name files and
embed metadata for data management.
NOTE: Files on the CF card will be “locked” they can be copied, but not
moved, deleted, or re-named.To delete or change filenames, files will
need to be unlocked.The SonoBat “D500x File Attributer” utility will
unlock and rename files with the date/timestamps made at the time
of the recording, a user-specified file-name start, and full text header
information.To run the utility, simply drag the folder of files from the
CF card into the “files to batch process” window and specify a
destination for attributed files on your computer in the “output folder”
window, then add a prefix for the files if you want in the “file-name
start” window, and enter complete text header information in the
“note to attach to files in the batch” window.Then hit the “process
files” button and a progress bar will appear to confirm that the batch
processing is working. Hit “quit” when done.
!
4. Then delete files from the CF card(s) and re-insert
it(them) in the detector (after properly ejecting the card
reader from the computer). The easiest way to do this is to
follow the steps in “Preparing to Record” above.
As an option during attributing, or
as a separate operation with the
SonoBat Scrubber utility, remove
non-bat noise-triggered files.
!
!
Set up a batch processing job to analyze and
classify recorded sequences to species and execute.
! Inspect output, sort, and manually confirm results
as needed for acoustically ambiguous species
following recommendations in Echolocation Call
Characteristics Tables and Classification Notes. Page 2
Janet Tyburec * Post Office Box 86493 * Tucson AZ 85754 * Tel: 520.404.7406 * [email protected] (REV: Fall 2011)