1
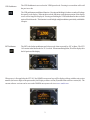
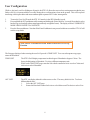
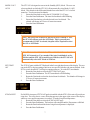
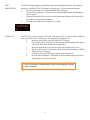
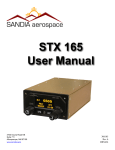
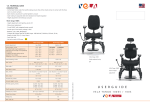
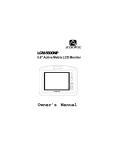
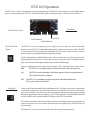
STX 165 Operation
The STX 165 is a Mode C transponder capable of transmitting 4076 different codes in response to ground radar interrogations. All operations of the STX 165 are controlled through the front panel controls. The controls are as follows:
Data Knob
Enter Pushbutton
Power/Mode Control
Select Knob
VFR Pushbutton
Ident Pushbutton
The Power/Mode
Control
The STX 165 will come on anytime power is applied to the rear connector. It is recommended
that power to the STX 165 is supplied through a panel mounted avionics master switch. The STX
165 can be turned off by pressing and holding the Power button for three seconds. It can be
turned on again by momentarily depressing the Power button.
The Power button has two additional functions. One is as an Escape mode. If the operator is in a
programing mode and wishes to escape to the main page, he can press the Power button momentarily. This will cancel all programming and show his normal display page.
The power pushbutton is also used to start the counters. This is explained in the counter section.
SBY:
The STX 165 is in standby mode and will not respond to radar interrogations.
ON:
ALT:
Data Knob
Enter Pushbutton
The STX is on and responding to radar interrogations but is not reporting altitude.
This is often referred to as Mode A
The STX 165 is responding to radar interrogations with altitude information.
This is often referred to as Mode C
These are dual concentric knobs with a pushbutton action. The larger Select knob is a momentary
switch that is spring loaded. It can be turned clockwise and counter clockwise and will return to
center when released. It is used to move the cursor during Code selection and to toggle through
the display options in the lower left display ( PALT, DALT and OAT). Note that DALT and OAT
are only available if the optional Sandia OAT probe model STP 78 is installed.
The smaller inner knob is the Data knob and is used to select the digit value when programing the
squawk code and to select the counter function in the lower right display when not in the cod
selection mode.
The Data know can also be pressed to Enter data after it has been programmed.
VFR Pushbutton
The VFR Pushbutton is use to select the VFR Squawk code. Pressing it a second time will recall
the previous code.
The VFR pushbutton an additional function. Pressing and holding it for three seconds will enlarge
the squawk code display. When in this mode the functions on the bottom portion of the display
screen will no longer be displayed. Pressing and holding the VFR Pushbutton for three seconds
again will exit this mode. This function is useful in high sunlight conditions, particularly with bubble
canopies.
IDT Pushbutton
The IDT is the Indent pushbutton and is depressed when requested by ATC to Ident. The STX
165 remains in the Ident mode for 22.5 seconds. When transmitting Ident, ID will be displayed in
the left portion of the display.
When power is first applied to the STX 165, the SANDIA aerospace logo will be displayed along with the unit version
number (the last two digits of the part number), the Display software version (D) and the Main software version (M). The
current software versions can be seen on the SANDIA aerospace web site at www.sandia.aero.
2
After the software versions are displayed, the STX 165 display will revert to the normal operating mode. The upper left
portion of the display will show the current tansmitter Mode. The upper right portion of the display will show the last code
that was selected prior to shut down, the Pressure Altitude (PALT) is displayed in the lower left and Elapsed Flight Time
(EFT) in the lower right of the display. The built-in encoder requires a warm up time and the PALT value will show dashes
until the proper internal temperature is reached.
The user can set the mode to come on in the ALT mode at start up or at a predetermined altitude differential after takeoff.
The same is true for the EFT display. See User Set Up for a discussion of these features.
Code Selection
To select a new squawk code you will use the Data/Select knob and pushbutton:
Note: The select knob is a spring load alternate action knob it can be turned
both clockwise and counter clockwise and will then return to center.
Press the Enter Pushbutton the first digit in the squawk code will blink.
Rotate the smaller Data knob until the value of the codes first digit is displayed.
Rotate the larger Select knob clockwise to the stop and then release. The second digit of the squawk code will be
blinking indicating that it can be changed.
Continue repeating the above steps until you have selected the desired s=code and then Press the Enter Pushbutton.
The new squawk code has been selected and is now being reported to ATC.
Mode Selection
To select the Mode of Operation you will use the Mode Control knob.
Rotate the Mode Control knob to select one of three transmitter Modes.
SBY Standby. The STX 165 is on but not responding to ATC interrogations
ON
The STX 165 is on and replying in Mode A (No Altitude Reporting)
ALT The STX 165 is on and replying in Mode C (Altitude Reporting)
3
Altitude/Temperature Displays
Altitude and temperature information is displayed in the lower left display quadrant. The operator can cycle through the
different information by turning the Select knb (the large right side knob).
Pressure Altitude
The STX 165 has a built-in TSO’d altitude encoder. The output of the encoder is pressure altitude
and is displayed a PALT. It can be displayed in either feet or meters depending on the user set up
configuration
Density Altitude
If an optional SANDIA aerospace OAT probe is installed with the STX 165 it will display Densitiy
Altitude, DALT. DALT is based on the current OAT and Pressure Altitude. DALT will be
displayed in either feet or meters depending on the user set up configuration
OAT
If an optional SANDIA aerospace STP 78 OAT probe is installed with the STX 165, it will display
the current Outside Air Temperature in either degrees Fahrenheit of Celsius depending on the User
Set Up selection.
Icing Alert
If an optional SANDIA aerospace STP 78 OAT probe is installed with the STX 165, it will display
an Icing Alert in the upper right hand corner of the display when the temperature reached a user
defined temperature. The Snow Flake symbol will bling for ten second once the Icing Alert
temperature is reached then remain on solid until the temperature goes above the preset number.
Pressure Altitude
Density Altitude
Outside Air Temperature
Icing Alert
Timers
The STX 165 has three timer functions that are displayed in the lower right hand corner of the display. These are
Elapsed Flight Time (EFT), an up counter (CNT UO) and a down timer (CNT DOWN). To select a timer rotate the
Data knob either clockwise or counter clockwise.
Elapsed Flight Time
When the STX 165 is first turned on the timer function will be initialized on the Elapsed Flight
Time (EFT) page. The EFT will begin counting at system turn on or at a predetermined altitude
set by the pilot in the User Set Up mode. The EFT can only be reset by turning the unit off.
4
Counter Up
The Counter Up (CNT UP) allows the pilot to time various auxilary functions. It can be activated and reset at any time.
To use the CNT Up function:
1.
2.
3.
3.
Rotate the Data Knob until CNT UP is displayed. It will initialize on 0.00S if has not been used since
system start up.
To start the CNT Up, press the Power/Mode control pushbutton.
Press the Power/Mode control pushbutton again and the timer will discontinue counting, and hold the
elapsed time.
To start a new timer function press, the Power/Mode control. The CNT UP will reset to zero and begin
counting up.
Counter Up
Counter Down
The counter down (CNT DOWN) allows the pilot to enter a specific time and then be alerted when that time has
expired. This timer is especially usefull for timed approached. When activated, the down time will count down to zero
and then begin counting up. During the counting up phase, the time will be preceded by a plus symbol (+).
1.
2.
3.
Rotate the Data Knob until the CNT DOWN legend is displayed. You will note that the CNT DOWN
time default is one minute and zero seconds.
To program a new time, press and hold the Data knob for three seconds. The second will begin to
blink.
Turn the Data knob to enter the new time. Note that you can program seconds and minutes form the
seconds positon as the time rools over whenever you reach 60 seconds. You can also rotate the Select
knob to the minutes position if desired.
Counter Down
5
User Configuration
While we obviously can’t be all things to all people, the STX 165 allows the user to select certain parameters that he may
find use full. It is recommended the user only change these configurations when on the ground. This will keep from
interfering with his pilot duties and ensure uninterrupted response to ATC radar interrogations.
1.
2.
3.
To enter the User Set UP mode the STX 165 must be in the SBY (Standby) mode.
Press and hold the IDT pushbutton while turning and holding the Select knob for 3 seconds (Note that the select
knob will go to a hard stop when rotated approximately an eighth of a turn). The display will read “USER SETUP
MODE. PRESS ENTER TO CONTINUE.
Press the Enter pushbutton. Note that if the Enter Pushbutton is not pressed within ten second the STX 165 will
exit the set up mode.
Note: The STX 165 must be in SBY mode to enter the User Set Up
Function.
The first page displayed when entering the user Set Up mode is TEMP UNIT. To access subsequent set up pages,
rotate the Data knob.
TEMP UNIT
The STX 165will display temperature in either degrees Fahrenheit or degrees Celsius. The
factory default setting is Fehrenheit. To select a different temperature unit:
While on the TEMP UNIT page rotate the Select knob counterclockwise to select Celsius and
clockwise to select Fahrenheit.
ALT UNIT
The STX can display altitude in either meters or feet. The catory default is feet. To select a
differnt altitude value,.
1.
Select the ALT UNIT page.
2.
Rotate the Data knb Counterclockwise to select Meters and Clockwise to select Feet.
6
MODE-C ALT
AUTO
The STX 165 is designed to turn on in the Standby (SBY) Mode. The user can
select an altitude at which the STX 165 will automatically select Mode-C (ALT)
Mode. This altitude is the differential altitude from when the STX 165 was first
turned on. To select an Auto On altitude:
1.
Rotate the Data knob to select the AUTO MODE C ALT page.
2.
Press the Enter Pushbutton. The Auto Alt On altitude will be blinking.
3.
Rotate the Data knob to select the desired Auto On Altitude. The
altitude will change in 25 foot or 10 meter increments.
4.
Press the Enter Pushbutton
Note: If 0 (zero) feet or meters is selected in AUTO MODE C ALT,
the STX 165 will turn on in the ALT Mode. This is generally not
recommended. If OFF is selected, the pilot will be required to select
the ON or ALT Mode.
Note: The Auto On Altitude is the differential Altitude from when the
STX 165 is turned on. For example if the Auto On altitude is set for
200 feet and the STX 165 is turned on at 1200 feet, the STX 165 will
automatically select ALT Mode at 1350 feet.
EFT START
ALT
The STX 165 starts with the EFT displayed in the lower right hand corner of the display. The user
can set the EFT to begin counting at turn on or at a specified Alt above the turn on altitude. It the
EFT is set at 0, then the EFT will begin counting at turn on. To set the EFT start altitude:
1.
Rotate the Data knob to select the EFT START ALT page.
2.
Press the Enter Pushbutton. The EFT start altitude will be blinking.
3.
Rotate the Data knob to select the desired Auto On Altitude. The altitude will change in
25 foot or 10 meter increments.
4.
Press the Enter Pushbutton
ICING ALERT
If a SANDIA Aerospace STP 78 OAT probe is installed with the STX 165 the unit will provide an
icing alert. The icing alert is a snow flake that appears in the upper right corner of the display
whenever a user preset temperature is reached. To set the Icing Alert temperature:
1.
Rotate the Data knob to select the ICING ALERT page.
2.
Press the Enter Pushbutton. The brackets will extinguish and the Temperature will blink
3.
Rotate the Data knob until the desire Icing Alert temperature is displayed.
4.
Press the Enter Pushbutton.
7
MIN
BRIGHTNESS
The STX165’s digital display automatically adjusts to ambient light conditions. The minimum
intensity to which the STX 165 will adjust is set by the user. To set the minimum intensity:
1.
Rotate the Data knob to select the MIN BRIGHTNESS page.
2.
Press the Enter Pushbutton. The brackets will extinguish indicating the Min Brightness
can be adjusted.
3.
Rotate the Data knob clockwise to increase the minimum brightness and counterclockwise to decrease the minimum brightness.
4.
Press the Enter pushbutton to select the new setting.
Default VFR
The STX 165 comes preset with 1200 as the VFR squawk code. In some instance a different
code is desirable for the VFR squawk. To change the VFR squawk code:
1.
Rotate the Data knob to select the DEFAULT VFR page.
2.
Press the Enter knob. The brackets will extinguish and the first digit of the squawk
code will be blink, indicating it can be programmed.
3.
Rotate the Data knob to select the first digit of the desired squawk code.
4.
Rotate the Select knob. The first digit will go solid and the second digit will blink
indication it can be changed.
5.
Continue as above unit all digits are change to the desired code.
6.
Press the Enter Pushbutton. The blinking will stop and the brackets will return
indicating the code has been selected
Note: It is the pilot’s responsibility to insure that the proper squawk
code is selected.
8