1
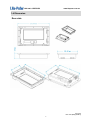
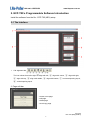
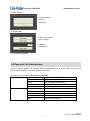
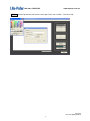
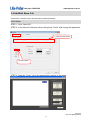
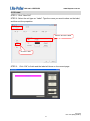
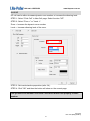
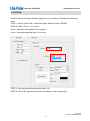
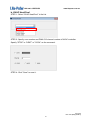
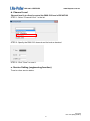
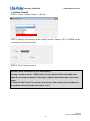
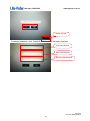
ISO 9001 CERTIFIED www.liteputer.com.tw ECP-T05 (NEX) Touch Screen 【User Manual】 Lite Puter Enterprise Co., Ltd. Website: www.liteputer.com.tw E-mail: [email protected] Lite-Puter ECP-T05 (NEX) [EUM-A] ISO 9001 CERTIFIED www.liteputer.com.tw INDEX 1.Introductions ................................................................................................................ 2 1-1 Features............................................................................................................. 2 1-2 Specifications ..................................................................................................... 2 1-3 Port Introduction ................................................................................................ 2 1-4 Dimension .......................................................................................................... 3 2. ECP-T05’s Programmable Software Introduction ....................................................... 5 2-1 The Interface ...................................................................................................... 5 2-2 Page and Cell Introductions ............................................................................... 6 2-3 Add a Page ........................................................................................................ 7 2-4 Common Properties of Cells .............................................................................. 9 2-4-1 Inactive/active status ................................................................................ 9 2-4-2 Background Color/Picture......................................................................... 9 2-5 Add/Edit Show Cell .......................................................................................... 12 2-5-1 Clock ...................................................................................................... 12 2-5-2 Picture .................................................................................................... 13 2-5-3 Label....................................................................................................... 14 2-5-4 Zone (Zone Number) .............................................................................. 15 2-5-5 EDX ........................................................................................................ 16 2-6 Add/Edit Click Cell............................................................................................ 18 2-6-1 Link ......................................................................................................... 18 2-6-2 SC Call ................................................................................................... 20 2-6-3 UP .......................................................................................................... 22 2-6-4 DOWN .................................................................................................... 23 2-6-5 EDX ........................................................................................................ 24 2-7 Save the project and upload data .................................................................... 30 3.Built-in Functions ....................................................................................................... 31 3-1. Log In Function ............................................................................................... 31 3-2. Clock ............................................................................................................... 33 3-3. Device Setting ................................................................................................. 34 Lite-Puter ECP-T05 (NEX) [EUM-A] 1 ISO 9001 CERTIFIED www.liteputer.com.tw 1.Introductions ECP-T05 (NEX) is the touch screen specifically designed to work with DP-NE100, which is based on NEX architecture, or other devices with NEX architecture. 1-1 Features 640*480 resolutions Programmable Windows-based software.. Up to 50 programmable pages 1-2 Specifications Power supply DC: 12V Signal input RS-485 Signal output DMX-512/1990 EDX terminal 4 PIN green terminal Connection port USB Screen size 5.7 inch Resolution 640 x 480 Screen single point resistive touch panel Dimension 215(W) x 140(H) x 39(D)mm 1-3 Port Introduction 1 2 3 4 1 USB port 3 EDX port 2 LAN port 4 DMX port (not applicable in ECP-T05 NEX version) Lite-Puter ECP-T05 (NEX) [EUM-A] 2 ISO 9001 CERTIFIED www.liteputer.com.tw 1-4 Dimension Rear side Lite-Puter ECP-T05 (NEX) [EUM-A] 3 ISO 9001 CERTIFIED www.liteputer.com.tw Front side Wall box Lite-Puter ECP-T05 (NEX) [EUM-A] 4 ISO 9001 CERTIFIED www.liteputer.com.tw 2. ECP-T05’s Programmable Software Introduction Install the software from the file - ECP-T05 (NEX).setup. 2-1 The Interface 1. Cell alignment bar 1 ○ 2 ○ 3 ○ 4 ○ 5 ○ 6 ○ 7 ○ 8 ○ The icon shows from left to right:○ 1 align with left, ○ 2 align with center, ○ 3 align with right, 4 ○ 8 ○ align with top, ○ 5 align with middle, ○ 6 align with bottom, ○ 7 horizontal spacing equal, vertical spacing equal. 2. Page edit bar --create a new page --edit page --delete page --move/copy page Lite-Puter ECP-T05 (NEX) [EUM-A] 5 ISO 9001 CERTIFIED www.liteputer.com.tw 3. Cell edit bar --create a new cell --edit cell --delete cell 4. Project bar --create a new project --open a project --save path --save project 5. Programming Area 2-2 Page and Cell Introductions Page is a friendly graphic user interface which includes cells such as button, label, bar, clock and picture. All the control functions are defined in the cells. There are 2 kinds of cells: Show Cell and Click Cell. Show Cell Click Cell Clock Display time on the ECP-T05 Picture Display picture Label For description and definition Zone Zone definition EDX Show EDX information Link Link to a page SC Call Recall a scene UP Increase zone number or dimming level DOWN Decrease zone number or dimming level EDX Send EDX command Lite-Puter ECP-T05 (NEX) [EUM-A] 6 ISO 9001 CERTIFIED www.liteputer.com.tw 2-3 Open New Project and Add a Page The sample project is located in "Document/ECP-T05_samples" folder. Click "Open Project" to open the sample project. To start up the programming, first create a new project and a new page. STEP-1 Open the software, and click "New Project". Select a path for the project. STEP-2 Click ”New Page.” STEP-3 Give the new page a name and choose from “Background Color” or Background Picture.” To change the background color, select “Background Color” and click ”Change.” Lite-Puter ECP-T05 (NEX) [EUM-A] 7 ISO 9001 CERTIFIED STEP-4 www.liteputer.com.tw Choose preferred color from the color pad. Then click “confirm”. The Click “OK.” Lite-Puter ECP-T05 (NEX) [EUM-A] 8 ISO 9001 CERTIFIED www.liteputer.com.tw 2-4 Common Properties of Cells 2-4-1 Inactive/active status Click cells have two inactive and active status. Inactive status is normal status. Active status shows when the click cell is pressed. Inactive/active properties can be edited in "display frame" when adding/editing the click cells. The inactive and active cell can have their own text and background. 2-4-2 Background Color/Picture The background of the cells can be either color or a picture. a. Background color: STEP-1. Choose "stand style" when adding or editing the cell. Lite-Puter ECP-T05 (NEX) [EUM-A] 9 ISO 9001 CERTIFIED www.liteputer.com.tw STEP-2: Click "Back Color" Click STEP-3: color can be selected in the color palette Lite-Puter ECP-T05 (NEX) [EUM-A] 10 ISO 9001 CERTIFIED www.liteputer.com.tw b. Background Picture STEP-1: Choose "Graphic style" when adding or editing the cell. STEP-2: Press "..." button to select a picture. Click Lite-Puter ECP-T05 (NEX) [EUM-A] 11 ISO 9001 CERTIFIED www.liteputer.com.tw 2-5 Add/Edit Show Cell "Show Cell" is controls on the touch screen to show information. 2-5-1 Clock STEP-1: Click “New Cell”. STEP-2: In the New Cell window, select cell type as “Clock” and change the properties. Location and size setting Choose “Clock” STEP-3: Drag the “Clock” cell to the appropriate location on the page. Lite-Puter ECP-T05 (NEX) [EUM-A] 12 ISO 9001 CERTIFIED www.liteputer.com.tw 2-5-2 Picture STEP-1: Click “New Cell”. STEP-2: Select the cell type as “Picture”. Set the properties and choose a picture. Choose the path of picture Choose “Picture” Clear current loaded picture STEP-3: Finish with OK and the chosen picture will show on the page. Lite-Puter ECP-T05 (NEX) [EUM-A] 13 ISO 9001 CERTIFIED www.liteputer.com.tw 2-5-3 Label STEP-1: Click “New Cell” STEP-2: Select the cell type as “Label”. Type the name you want to show on the label, and then set the properties. Edit the text of the label Choose “Label” STEP-3: Click “OK” to finish and the label will show on the current page. Lite-Puter ECP-T05 (NEX) [EUM-A] 14 ISO 9001 CERTIFIED www.liteputer.com.tw 2-5-4 Zone (Zone Number) Zone (zone number) cell is to show the "dynamic zone number". If you assign a "click cell" without property of zone number, its zone number will follow the dynamic zone number. The dynamic zone number can be changed by "zone up" button (click cell) (refer 2-6-3 and 2-6-4) STEP-1: Select "Zone" in New Cell page. Set the properties and click "OK" STEP-2: the zone number cell will show on the current page. Lite-Puter ECP-T05 (NEX) [EUM-A] 15 ISO 9001 CERTIFIED www.liteputer.com.tw 2-5-5 EDX EDX show cell is to show specific EDX information (HVAC controllers' information) STEP-1: Select "EDX" in New Cell page. STEP-2: Click "Edit" STEP-3: Select "HVAC Fan Control". And select which information you would like to show. Lite-Puter ECP-T05 (NEX) [EUM-A] 16 ISO 9001 CERTIFIED www.liteputer.com.tw HC: Heat or Cool. SPEED: Fan speed (low, medium, high, auto) TEMPS: Temperature set TEMPL: Real temperature Zone: The zone number of the HVAC controller. Channel: The DMX-512 channel number of the HVAC controller. If you don't assign zone number, the zone number of this control will follow the "dynamic zone number". Lite-Puter ECP-T05 (NEX) [EUM-A] 17 ISO 9001 CERTIFIED www.liteputer.com.tw 2-6 Add/Edit Click Cell "Show Cell" are controls/buttons on the touch screen that can control other EDX devices. 2-6-1 Link a. Link to user page: STEP-1: Select "Click Cell" in New Cell page. Select function "Link", "User Page" and the page which you want to link to. STEP-2: Set inactive/active properties (refer 2-4). STEP-3: Click "OK" and then link page button will show on the current page. Lite-Puter ECP-T05 (NEX) [EUM-A] 18 ISO 9001 CERTIFIED www.liteputer.com.tw b. Func Page (Function Page) STEP-1: Select "Click Cell" in New Cell page. Select function "Link", "Func Page" and the page which you want to link to. There are three types of function page: Log in: To lock the touch screen by password Clock Setup: To set to system clock Device Setup: To set the touch screen. (Please refer chapter 3) STEP-2: Set inactive/active properties (refer 2-4). STEP-3: Click "OK" and then the button will show on the current page. Lite-Puter ECP-T05 (NEX) [EUM-A] 19 ISO 9001 CERTIFIED www.liteputer.com.tw 2-6-2 SC Call STEP-1: Select "Click Cell" in New Cell page. Select function "SC Call" STEP-2: Select the zone number and scene number. STEP-3: Select background and text for inactive and active status.(refer 2-4) STEP-4: Set inactive/active properties (refer 2-4). STEP-5: Click "OK" and then the button will show on the current page. If you don't assign zone number, the zone number of this cell will follow the "dynamic zone number". The zone number is dynamic because the zone number is unchecked: Lite-Puter ECP-T05 (NEX) [EUM-A] 20 ISO 9001 CERTIFIED www.liteputer.com.tw SC Call function can also control the curtain controller by sending scene 7 (roll up) or scene 8 (roll down) or scene 9 (stop) Curtain can be controlled by two different way: If using "curtain control" in EDX click cell, the curtain will be controlled up or down by pressing the button. If the finger releases from the button, the curtain stops. If using SC Call (scene 7 and scene 8) to control, the curtain will be up/down to the topmost/lowest side by click scene 7 or 8. Lite-Puter ECP-T05 (NEX) [EUM-A] 21 ISO 9001 CERTIFIED www.liteputer.com.tw 2-6-3 UP UP cell can be either increase dynamic zone number or increase the dimming level. STEP-1: Select "Click Cell" in New Cell page. Select function "UP" STEP-2: Select "Zone +" or "Level +". Zone +: Increase the dynamic zone number Level +: Increase dimming level of the zone. STEP-3: Set inactive/active properties (refer 2-4). STEP-4: Click "OK" and then the button will show on the current page. The dynamic zone number is for click cells which without the property of zone number. Lite-Puter ECP-T05 (NEX) [EUM-A] 22 ISO 9001 CERTIFIED www.liteputer.com.tw 2-6-4 DOWN DOWN cell can be either decrease dynamic zone number or decrease the dimming level. STEP-1: Select "Click Cell" in New Cell page. Select function "DOWN" STEP-2: Select "Zone -" or "Level -". Zone -: decrease the dynamic zone number Level -: decrease dimming level of the zone. STEP-3: Set inactive/active properties (refer 2-4). STEP-4: Click "OK" and then the button will show on the current page. Lite-Puter ECP-T05 (NEX) [EUM-A] 23 ISO 9001 CERTIFIED www.liteputer.com.tw 2-6-5 EDX EDX click cell is for sending special EDX signal for controlling HVAC or other devices. The command of EDX click cell is totally customizable in terms of sending EDX signal. a. Control HVAC Fan Speed STEP-1: Select "Click Cell" in New Cell page. Select function "EDX". Select "Function" and press "Edit" STEP-2: Select "HVAC Fan Speed" in the list. STEP-3: Select the zone number of the HVAC controller and enter its DMX channel number. "UP" is to increase fan speed. "DOWN" is to decrease fan speed. STEP-4: Click "Save" to save it. Lite-Puter ECP-T05 (NEX) [EUM-A] 24 ISO 9001 CERTIFIED www.liteputer.com.tw b. HVAC Heat/Cool STEP-1: Select "HVAC Heat/Cool" in the list. STEP-2: Specify zone number and DMX-512 channel number of HVAC controller. Specify "STOP" or "HEAT" or "COOL" as the command. STEP-4: Click "Save" to save it. Lite-Puter ECP-T05 (NEX) [EUM-A] 25 ISO 9001 CERTIFIED www.liteputer.com.tw c. HVAC Temperature STEP-1: Select "HVAC Temperature " in the list. STEP-2: Specify zone number and DMX-512 channel number of HVAC controller. Specify "UP" or "DOWN" or "COOL" as the command. UP: increase temperature DOWN: decrease the temperature STEP-4: Click "Save" to save it. Lite-Puter ECP-T05 (NEX) [EUM-A] 26 ISO 9001 CERTIFIED www.liteputer.com.tw d. Channel Level Channel level is to directly control the DMX-512 level of DP-NE100 STEP-1: Select "Channel Level " in the list. STEP-2: Specify the DMX-512 channel and its level as heximal. STEP-3: Click "Save" to save it. e. Service Setting (engineering function) To set or clear service status. Lite-Puter ECP-T05 (NEX) [EUM-A] 27 ISO 9001 CERTIFIED www.liteputer.com.tw f. Curtain Control STEP-1: Select "Curtain Control " in the list. STEP-2: Specify zone number of the curtain controller. Specify "UP" or "DOWN' as the command to control the curtain. STEP-3: Click "Save" to save it. Curtain can be controlled by two different way: If using "curtain control" in EDX click cell, the curtain will be controlled up or down by pressing the button. If the finger releases from the button, the curtain stops. If using SC Call (scene 7 and scene 8) to control, the curtain will be up/down to the topmost/lowest side by click scene 7 or 8. Lite-Puter ECP-T05 (NEX) [EUM-A] 28 ISO 9001 CERTIFIED www.liteputer.com.tw g. CMD from file (engineering function) This function is to send a batch of customizable EDX command. Up to 128 commands can be sent at the same time. STEP-1:Select "Click Cell" in New Cell page. Select function "EDX". Select "CMD from file" and press "Edit" STEP-2: Enter the EDX command in the list. Lite-Puter ECP-T05 (NEX) [EUM-A] 29 ISO 9001 CERTIFIED www.liteputer.com.tw 2-7 Save the project and upload data STEP-1: Click "Save Project" button. STEP-2: A warning message showed. Press "OK" STEP-3: A message shows after saving the file. Press "OK" to start uploading data to the touch screen. STEP-4: Make sure the touch screen is connected to the PC by USB cable. Select the disk location of the touch screen. Press "Save" STEP-5: Wait till copying process finished. STEP-6: Restart the power of the touch screen to update data. Lite-Puter ECP-T05 (NEX) [EUM-A] 30 ISO 9001 CERTIFIED www.liteputer.com.tw 3.Built-in Functions 3-1. Log In Function After entering Log In, user can click “LOCK” to lock the screen. The user can click password field to unlock by small keyboard, and click “CHANGE KEY” to modify the password. Password field Click password field will pop up small keyboard, and the user can key the password. The default password is 123456. Password field Numeral keys Clear Enter Click “Enter” after entering the password: Lite-Puter ECP-T05 (NEX) [EUM-A] 31 ISO 9001 CERTIFIED www.liteputer.com.tw Unlock and quit To change password, click “CHANGE KEY” to enter the below interface Enter old password Enter new password Re-enter new password Lite-Puter ECP-T05 (NEX) [EUM-A] 32 ISO 9001 CERTIFIED www.liteputer.com.tw 3-2. Clock Screen idle time To edit date and time, click date or time and a small keyboard and direction keys will pop up. Set date and time by small keyboard or up/down/left/right keys. Press it to make synchronization Screen:Set the screen idle time. Click the white area and set screen idle time by up/down key. When the idle time is set, the screen will enter the protection status after the preset time. User can quit the screen protection status by pressing screen. “NC” means shut the function. The minimum idle time is 03 seconds. Lite-Puter ECP-T05 (NEX) [EUM-A] 33 ISO 9001 CERTIFIED www.liteputer.com.tw 3-3. Device Setting a. VOICE ON/OFF: Turn on or off the speaker. b. BACK LIGHT: Adjust background brightness by the left/right button. c. DEVICE MODE (not applicable for NEX version): Select to recall scene or sequence. (Sequence mode is not applicable for NEX version, please select "Scene" as the mode) d. INFRARED (not applicable for NEX version): ON= receive IR signal. OFF=not receive IR signal. e. IP ADDRESS/ MAC ADDRESS(not applicable for NEX version): Click the white column after IP ADDRESS/ MAC ADDRESS, 4 direction button and a small keyboard will appear for setting the numbers. MAC ADDDRESS also can be set by “RANDOM”. When using small keyboard to set, click “Enter” to save the changes. Lite-Puter ECP-T05 (NEX) [EUM-A] 34 ISO 9001 CERTIFIED www.liteputer.com.tw Limited Warranty 1. Lite-Puter is only responsible for the product itself. 2. Lite-Puter guarantees to keep Lite-Puter’s from manufacturing defects within a year since the distributing date. 3. Lite-Puter does not offer on-site service. If the defects appears in Lite-Puter’s product, please deliver the product to local distributors or to Taipei headquarters. 4. The warranty does not cover: a. Any fault caused by false usage, imprudence (collision, inadequate installation or adjustment, insufficient ventilation, or improper repairs) b. Force majeure factors (flooding, earthquake, volcanic eruption, or other factors beyond Lite-Puter control). c. The cost of installing, reinstalling, adjusting, repairing, or reprogramming the product. d. Other products or devices which are offered by Lite-Puter or not by Lite-Puter. 5. Lite-Puter does not warrant the product will operate without interruption or being free of error. Revision Record Version Record A First issued Issued: July, 2012 Lite-Puter ECP-T05 (NEX) [EUM-A] 35 ISO 9001 CERTIFIED www.liteputer.com.tw World Headquarters: Lite-Puter Enterprise Co., Ltd. Address: 11F, No. 189, Gangqian Rd., Neihu Dist., Taipei City 11494, Taiwan. Tel: +886-2-27998099 Fax: +886-2-27993828 Website: www.liteputer.com.tw E-mail: [email protected] Shanghai Factory: Lite-Puter Technology (Shanghai)Co.,Ltd. Address: Building B5, No. 298, Lane 3509, Hongmei S. Road, Shanghai, China Zip Code: 201108 Tel: +86-21-54408210 Fax: +86-21-64978079 Lite-Puter ECP-T05 (NEX) [EUM-A] 36


![DX-404 4 CH DMX Dimmer Pack [User Manual] Lite Puter](http://vs1.manualzilla.com/store/data/005637566_1-c679e36593f10ff673dd448c7922fea2-150x150.png)