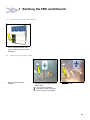
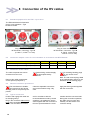
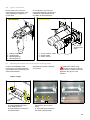
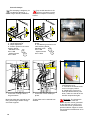
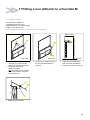
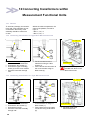
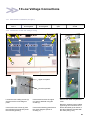
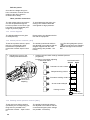
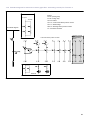
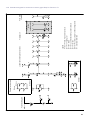
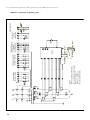
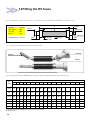
1
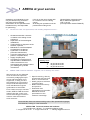
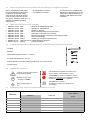
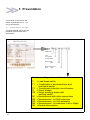
SF6 GAS-INSULATED SWITCHBOARDS
FBX
Installation
Commissioning
Instructions
AMTNoT131-02
AREVA T&D
Table of contents
1
AREVA at your service . . . . . . . . . . . . . . . . . . . . . . . . . . . . . . . . . . . . . . . . . . . . . . . . . .
1
1.1
1.2
Our Service Unit: our specialists, and suitably adapted services... . . . . . . . . . . . . . . . . . . . . . . . . . . . .
AREVA T&D Technical Institute: Together, let us develop our skills... . . . . . . . . . . . . . . . . . . . . . . . . . .
1
1
2
With regards to this User Manual . . . . . . . . . . . . . . . . . . . . . . . . . . . . . . . . . . . . . . . .
2
2.1
2.2
2.3
2.4
2.5
2.6
2.7
Responsibilities . . . . . . . . . . . . . . . . . . . . . . . . . . . . . . . . . . . . . . . . . . . . . . . . . . . . . . . . . . . . . . . . . . . . . . . .
Reminder concerning normal service conditions (in accordance with IEC 60694) . . . . . . . . . . . . . . .
* Permissible ambient temperature . . . . . . . . . . . . . . . . . . . . . . . . . . . . . . . . . . . . . . . . . . . . . . . . . . . . . . .
* Installation altitude . . . . . . . . . . . . . . . . . . . . . . . . . . . . . . . . . . . . . . . . . . . . . . . . . . . . . . . . . . . . . . . . . . . .
* Atmospheric pollution . . . . . . . . . . . . . . . . . . . . . . . . . . . . . . . . . . . . . . . . . . . . . . . . . . . . . . . . . . . . . . . . .
* Permissible atmospheric humidity level . . . . . . . . . . . . . . . . . . . . . . . . . . . . . . . . . . . . . . . . . . . . . . . . . .
Particular instructions for operations and interventions on energized equipment . . . . . . . . . . . . . . . .
Other technical notices to be consulted . . . . . . . . . . . . . . . . . . . . . . . . . . . . . . . . . . . . . . . . . . . . . . . . . . .
Tools and products (not supplied) required for the operations described in this notice . . . . . . . . . . . .
Symbols & conventions . . . . . . . . . . . . . . . . . . . . . . . . . . . . . . . . . . . . . . . . . . . . . . . . . . . . . . . . . . . . . . . . .
Tightening torque values for standard assemblies (nut + bolt) . . . . . . . . . . . . . . . . . . . . . . . . . . . . . . . .
2
2
2
2
2
2
3
3
3
3
3
3
Presentation . . . . . . . . . . . . . . . . . . . . . . . . . . . . . . . . . . . . . . . . . . . . . . . . . . . . . . . . . . .
4
3.1
3.2
3.3
3.4
3.5
3.6
3.7
3.8
Identification of the FBX . . . . . . . . . . . . . . . . . . . . . . . . . . . . . . . . . . . . . . . . . . . . . . . . . . . . . . . . . . . . . . . .
Presentation of the FBX-C (non-extendable model) . . . . . . . . . . . . . . . . . . . . . . . . . . . . . . . . . . . . . . . . .
Presentation of the FBX-E (extendable model) . . . . . . . . . . . . . . . . . . . . . . . . . . . . . . . . . . . . . . . . . . . . .
Presentation of “Measurement” functions . . . . . . . . . . . . . . . . . . . . . . . . . . . . . . . . . . . . . . . . . . . . . . . . .
Presentation of mimic diagrams for manual controls . . . . . . . . . . . . . . . . . . . . . . . . . . . . . . . . . . . . . . . .
Presentation of mimic diagrams for motorised controls (See legend § 3.5) . . . . . . . . . . . . . . . . . . . . .
Presentation of the mimic diagrams used on 'Measurement' functions (See legend § 3.5) . . . . . . . .
Presentation of the mimic diagram on the 'Sb' function (See legend § 3.5) . . . . . . . . . . . . . . . . . . . . .
4
5
6
7
8
9
9
9
4
Storage - Packing . . . . . . . . . . . . . . . . . . . . . . . . . . . . . . . . . . . . . . . . . . . . . . . . . . . . . .
10
4.1
4.2
4.3
FBX switchboard packing . . . . . . . . . . . . . . . . . . . . . . . . . . . . . . . . . . . . . . . . . . . . . . . . . . . . . . . . . . . . . . .
Specific transportation requirements . . . . . . . . . . . . . . . . . . . . . . . . . . . . . . . . . . . . . . . . . . . . . . . . . . . . . .
Temporary storage – less than 6 months . . . . . . . . . . . . . . . . . . . . . . . . . . . . . . . . . . . . . . . . . . . . . . . . . .
10
10
10
5
Handling and Unpacking . . . . . . . . . . . . . . . . . . . . . . . . . . . . . . . . . . . . . . . . . . . . . . . .
11
5.1
5.2
5.3
5.4
5.5
Reminder . . . . . . . . . . . . . . . . . . . . . . . . . . . . . . . . . . . . . . . . . . . . . . . . . . . . . . . . . . . . . . . . . . . . . . . . . . . . .
Unpacking . . . . . . . . . . . . . . . . . . . . . . . . . . . . . . . . . . . . . . . . . . . . . . . . . . . . . . . . . . . . . . . . . . . . . . . . . . . .
Revalorizing packaging waste . . . . . . . . . . . . . . . . . . . . . . . . . . . . . . . . . . . . . . . . . . . . . . . . . . . . . . . . . . .
Handling . . . . . . . . . . . . . . . . . . . . . . . . . . . . . . . . . . . . . . . . . . . . . . . . . . . . . . . . . . . . . . . . . . . . . . . . . . . . . .
Packing . . . . . . . . . . . . . . . . . . . . . . . . . . . . . . . . . . . . . . . . . . . . . . . . . . . . . . . . . . . . . . . . . . . . . . . . . . . . . .
11
11
11
11
11
6
Fixing to the floor . . . . . . . . . . . . . . . . . . . . . . . . . . . . . . . . . . . . . . . . . . . . . . . . . . . . . .
12
6.1
6.2
Opening the cable compartment cover . . . . . . . . . . . . . . . . . . . . . . . . . . . . . . . . . . . . . . . . . . . . . . . . . . . .
Fixing to the floor . . . . . . . . . . . . . . . . . . . . . . . . . . . . . . . . . . . . . . . . . . . . . . . . . . . . . . . . . . . . . . . . . . . . . .
12
12
i
7
Earthing the FBX switchboard . . . . . . . . . . . . . . . . . . . . . . . . . . . . . . . . . . . . . . . . . . .
13
7.1
7.2
Location of the connector terminal . . . . . . . . . . . . . . . . . . . . . . . . . . . . . . . . . . . . . . . . . . . . . . . . . . . . . . .
Connecting the earthing cable . . . . . . . . . . . . . . . . . . . . . . . . . . . . . . . . . . . . . . . . . . . . . . . . . . . . . . . . . . .
13
13
8
Connection of the HV cables . . . . . . . . . . . . . . . . . . . . . . . . . . . . . . . . . . . . . . . . . . . .
14
8.1
8.2
8.3
8.4
8.5
8.6
8.7
8.8
8.9
Standard equipment for the FBX – up to 24 kV . . . . . . . . . . . . . . . . . . . . . . . . . . . . . . . . . . . . . . . . . . . . .
Connection adapter cones for cross-members in accordance with NF-EN-50181. . . . . . . . . . . . . . . .
Connection of the cables . . . . . . . . . . . . . . . . . . . . . . . . . . . . . . . . . . . . . . . . . . . . . . . . . . . . . . . . . . . . . . . .
General connection precautions . . . . . . . . . . . . . . . . . . . . . . . . . . . . . . . . . . . . . . . . . . . . . . . . . . . . . . . . .
Type A connection . . . . . . . . . . . . . . . . . . . . . . . . . . . . . . . . . . . . . . . . . . . . . . . . . . . . . . . . . . . . . . . . . . . . .
Type C connection . . . . . . . . . . . . . . . . . . . . . . . . . . . . . . . . . . . . . . . . . . . . . . . . . . . . . . . . . . . . . . . . . . . . .
Attaching the cables and connecting the earthing braids . . . . . . . . . . . . . . . . . . . . . . . . . . . . . . . . . . . . .
Clip-fit clamps . . . . . . . . . . . . . . . . . . . . . . . . . . . . . . . . . . . . . . . . . . . . . . . . . . . . . . . . . . . . . . . . . . . . . . . . .
Screw-fit clamps . . . . . . . . . . . . . . . . . . . . . . . . . . . . . . . . . . . . . . . . . . . . . . . . . . . . . . . . . . . . . . . . . . . . . . .
Fitting of cables with a blanking-off flooring (optional) . . . . . . . . . . . . . . . . . . . . . . . . . . . . . . . . . . . . . . .
Assembly of 3 cables per phase (optional) . . . . . . . . . . . . . . . . . . . . . . . . . . . . . . . . . . . . . . . . . . . . . . . .
14
14
14
14
14
15
15
15
16
17
18
9
Switchboard extensions (FBX-E series) . . . . . . . . . . . . . . . . . . . . . . . . . . . . . . . . . .
19
9.1
9.2
9.3
9.4
9.5
Intervention levels . . . . . . . . . . . . . . . . . . . . . . . . . . . . . . . . . . . . . . . . . . . . . . . . . . . . . . . . . . . . . . . . . . . . .
Intervention Instructions . . . . . . . . . . . . . . . . . . . . . . . . . . . . . . . . . . . . . . . . . . . . . . . . . . . . . . . . . . . . . . . .
FBX switchboard lockout . . . . . . . . . . . . . . . . . . . . . . . . . . . . . . . . . . . . . . . . . . . . . . . . . . . . . . . . . . . . . . .
Reminder on the use of blanking plugs. . . . . . . . . . . . . . . . . . . . . . . . . . . . . . . . . . . . . . . . . . . . . . . . . . . .
Coupling accessories . . . . . . . . . . . . . . . . . . . . . . . . . . . . . . . . . . . . . . . . . . . . . . . . . . . . . . . . . . . . . . . . . . .
A box, containing: . . . . . . . . . . . . . . . . . . . . . . . . . . . . . . . . . . . . . . . . . . . . . . . . . . . . . . . . . . . . . . . . . . . . . .
Additional supplies . . . . . . . . . . . . . . . . . . . . . . . . . . . . . . . . . . . . . . . . . . . . . . . . . . . . . . . . . . . . . . . . . . . . .
Equipment for the Functional Unit extension (See § 9.5) . . . . . . . . . . . . . . . . . . . . . . . . . . . . . . . . . . . .
Supplementary equipment . . . . . . . . . . . . . . . . . . . . . . . . . . . . . . . . . . . . . . . . . . . . . . . . . . . . . . . . . . . . . .
Extendable switchboard equipment (See § 9.5) . . . . . . . . . . . . . . . . . . . . . . . . . . . . . . . . . . . . . . . . . . . .
Preparation the existing extensible unit (Version after 03/2008) . . . . . . . . . . . . . . . . . . . . . . . . . . . . . . .
Preparation and installation of the insulated extension connectors (5) . . . . . . . . . . . . . . . . . . . . . . . . .
Installation of the insulated extension connectors (5) . . . . . . . . . . . . . . . . . . . . . . . . . . . . . . . . . . . . . . . .
Preparation the existing extensible unit (Version before 04/2008) . . . . . . . . . . . . . . . . . . . . . . . . . . . . .
Preparation of the extension unit . . . . . . . . . . . . . . . . . . . . . . . . . . . . . . . . . . . . . . . . . . . . . . . . . . . . . . . . .
Switchboard assembly . . . . . . . . . . . . . . . . . . . . . . . . . . . . . . . . . . . . . . . . . . . . . . . . . . . . . . . . . . . . . . . . . .
Fixing to the floor and connecting . . . . . . . . . . . . . . . . . . . . . . . . . . . . . . . . . . . . . . . . . . . . . . . . . . . . . . . .
19
19
19
19
20
20
20
20
21
21
22
23
23
23
24
24
25
Fitting a protective cover (Function M Only) . . . . . . . . . . . . . . . . . . . . . . . . . . . . . .
26
10.1 For a LHS coupling . . . . . . . . . . . . . . . . . . . . . . . . . . . . . . . . . . . . . . . . . . . . . . . . . . . . . . . . . . . . . . . . . . . .
10.2 RHS coupling . . . . . . . . . . . . . . . . . . . . . . . . . . . . . . . . . . . . . . . . . . . . . . . . . . . . . . . . . . . . . . . . . . . . . . . . .
26
26
11
Fitting a rear deflector to a Function M . . . . . . . . . . . . . . . . . . . . . . . . . . . . . . . . . .
27
11.1 When required . . . . . . . . . . . . . . . . . . . . . . . . . . . . . . . . . . . . . . . . . . . . . . . . . . . . . . . . . . . . . . . . . . . . . . . .
11.2 Fitting the deflector to the rear of the Function M . . . . . . . . . . . . . . . . . . . . . . . . . . . . . . . . . . . . . . . . . . .
27
27
9.6
9.7
9.8
10
ii
Table of contents
12
Connecting transformers within Measurement Functional Units . . . . . . . . . . .
28
12.1 General . . . . . . . . . . . . . . . . . . . . . . . . . . . . . . . . . . . . . . . . . . . . . . . . . . . . . . . . . . . . . . . . . . . . . . . . . . . . . .
12.2 Connecting transformers in a type M2 or M3 functional unit . . . . . . . . . . . . . . . . . . . . . . . . . . . . . . . . . .
12.3 Connecting transformers in a Type M4 fonctional unit . . . . . . . . . . . . . . . . . . . . . . . . . . . . . . . . . . . . . . .
28
28
28
13
Low Voltage Connections . . . . . . . . . . . . . . . . . . . . . . . . . . . . . . . . . . . . . . . . . . . . . . .
29
13.1 Intervention conditions (see § 9.1) . . . . . . . . . . . . . . . . . . . . . . . . . . . . . . . . . . . . . . . . . . . . . . . . . . . . . . .
13.2 Connection of the low voltage wiring . . . . . . . . . . . . . . . . . . . . . . . . . . . . . . . . . . . . . . . . . . . . . . . . . . . . . .
Refit the panels . . . . . . . . . . . . . . . . . . . . . . . . . . . . . . . . . . . . . . . . . . . . . . . . . . . . . . . . . . . . . . . . . . . . . . . .
Other possible connections . . . . . . . . . . . . . . . . . . . . . . . . . . . . . . . . . . . . . . . . . . . . . . . . . . . . . . . . . . . . .
13.3 Circuit diagrams . . . . . . . . . . . . . . . . . . . . . . . . . . . . . . . . . . . . . . . . . . . . . . . . . . . . . . . . . . . . . . . . . . . . . . .
13.4 Switch position contacts [-Q11] . . . . . . . . . . . . . . . . . . . . . . . . . . . . . . . . . . . . . . . . . . . . . . . . . . . . . . . . . .
13.5 Earthing switch position contacts [-Q81] . . . . . . . . . . . . . . . . . . . . . . . . . . . . . . . . . . . . . . . . . . . . . . . . . .
13.6 Standard diagram for motorised control (type AB2 - alternating current) for Function C . . . . . . . . . .
13.7 Standard diagram for motorised control (type AB3) for Function C . . . . . . . . . . . . . . . . . . . . . . . . . . . .
13.8 Standard diagram for motorised control (type AB2) for Function T1 . . . . . . . . . . . . . . . . . . . . . . . . . . .
13.9 Standard diagram of a WIC1 protection (type AB3) for Function T2 . . . . . . . . . . . . . . . . . . . . . . . . . . .
“Measure - protection - signalling” part . . . . . . . . . . . . . . . . . . . . . . . . . . . . . . . . . . . . . . . . . . . . . . . . . . . .
“Control” part . . . . . . . . . . . . . . . . . . . . . . . . . . . . . . . . . . . . . . . . . . . . . . . . . . . . . . . . . . . . . . . . . . . . . . . . . .
29
29
30
30
30
30
30
31
32
33
34
34
35
14
Fitting the HV fuses . . . . . . . . . . . . . . . . . . . . . . . . . . . . . . . . . . . . . . . . . . . . . . . . . . . .
36
Dimensions (mm) of the fuses – in accordance with standards CEI60282-1 and 62271-105 . . . . . .
Fitting of an adapter for fuses of upto 12 kV . . . . . . . . . . . . . . . . . . . . . . . . . . . . . . . . . . . . . . . . . . . . . . .
Selection table for AREVA fuses (FDwT) with integrated strikers (for Function T1) . . . . . . . . . . . . . .
SIBA fuse selection table . . . . . . . . . . . . . . . . . . . . . . . . . . . . . . . . . . . . . . . . . . . . . . . . . . . . . . . . . . . . . . .
Fitting a fuse . . . . . . . . . . . . . . . . . . . . . . . . . . . . . . . . . . . . . . . . . . . . . . . . . . . . . . . . . . . . . . . . . . . . . . . . . .
Open the access cover to the standard fuse holders . . . . . . . . . . . . . . . . . . . . . . . . . . . . . . . . . . . . . . . .
Opening of the access cover to the leaktight fuse holders (by key or handle) . . . . . . . . . . . . . . . . . . .
Fitting the fuses in place . . . . . . . . . . . . . . . . . . . . . . . . . . . . . . . . . . . . . . . . . . . . . . . . . . . . . . . . . . . . . . . .
14.6 Mechanical trip test on blown fuse . . . . . . . . . . . . . . . . . . . . . . . . . . . . . . . . . . . . . . . . . . . . . . . . . . . . . . .
36
36
36
37
37
37
37
38
38
15
Protection Relays WIC1 or DPX-1 . . . . . . . . . . . . . . . . . . . . . . . . . . . . . . . . . . . . . . . .
39
15.1
15.2
15.3
15.4
15.5
Location of the protection relays . . . . . . . . . . . . . . . . . . . . . . . . . . . . . . . . . . . . . . . . . . . . . . . . . . . . . . . . .
Access to the relays of a single T2 function (See markings in § 15.1) . . . . . . . . . . . . . . . . . . . . . . . . .
Setting of the protection relays . . . . . . . . . . . . . . . . . . . . . . . . . . . . . . . . . . . . . . . . . . . . . . . . . . . . . . . . . .
The protection relays WIC1 & DPX-1 . . . . . . . . . . . . . . . . . . . . . . . . . . . . . . . . . . . . . . . . . . . . . . . . . . . . .
Fault indicator WI1-SZ5 . . . . . . . . . . . . . . . . . . . . . . . . . . . . . . . . . . . . . . . . . . . . . . . . . . . . . . . . . . . . . . . .
39
39
39
40
40
16
Commissioning . . . . . . . . . . . . . . . . . . . . . . . . . . . . . . . . . . . . . . . . . . . . . . . . . . . . . . . .
41
16.1
16.2
16.3
16.4
Reminder . . . . . . . . . . . . . . . . . . . . . . . . . . . . . . . . . . . . . . . . . . . . . . . . . . . . . . . . . . . . . . . . . . . . . . . . . . . . .
Carry out an inventory of all tools and accessories on completion of the work . . . . . . . . . . . . . . . . . .
Pre-commissioning information . . . . . . . . . . . . . . . . . . . . . . . . . . . . . . . . . . . . . . . . . . . . . . . . . . . . . . . . . .
Principle pre-commissioning checks . . . . . . . . . . . . . . . . . . . . . . . . . . . . . . . . . . . . . . . . . . . . . . . . . . . . . .
41
41
41
41
14.1
14.2
14.3
14.4
14.5
iii
16.5 Energizing the FBX switchboard . . . . . . . . . . . . . . . . . . . . . . . . . . . . . . . . . . . . . . . . . . . . . . . . . . . . . . . . .
16.6 VDS – Voltage Detection Systems . . . . . . . . . . . . . . . . . . . . . . . . . . . . . . . . . . . . . . . . . . . . . . . . . . . . . . .
HR System (High Resistance) . . . . . . . . . . . . . . . . . . . . . . . . . . . . . . . . . . . . . . . . . . . . . . . . . . . . . . . . . . .
IVIS (Intelligent Voltage Information System) . . . . . . . . . . . . . . . . . . . . . . . . . . . . . . . . . . . . . . . . . . . . . .
Verification of phase concordance (for IVIS) . . . . . . . . . . . . . . . . . . . . . . . . . . . . . . . . . . . . . . . . . . . . . . .
Capdis KRIES . . . . . . . . . . . . . . . . . . . . . . . . . . . . . . . . . . . . . . . . . . . . . . . . . . . . . . . . . . . . . . . . . . . . . . . . .
16.7 VPIS (Voltage Present Indicating System) . . . . . . . . . . . . . . . . . . . . . . . . . . . . . . . . . . . . . . . . . . . . . . . . .
Voltage Present Indications verifications with a standard unit . . . . . . . . . . . . . . . . . . . . . . . . . . . . . . . . .
Voltage Present Indications verifications with a Kries unit . . . . . . . . . . . . . . . . . . . . . . . . . . . . . . . . . . . .
16.8 Starting up the switchboard . . . . . . . . . . . . . . . . . . . . . . . . . . . . . . . . . . . . . . . . . . . . . . . . . . . . . . . . . . . . .
16.9 Short-circuit indicators (optional) . . . . . . . . . . . . . . . . . . . . . . . . . . . . . . . . . . . . . . . . . . . . . . . . . . . . . . . . .
41
42
42
42
42
43
43
43
44
44
44
17
45
iv
Notes . . . . . . . . . . . . . . . . . . . . . . . . . . . . . . . . . . . . . . . . . . . . . . . . . . . . . . . . . . . . . . . . . .
1 AREVA at your service
Operations and maintenance may
only be carried out by personnel
who have received suitable
authorisation for the operations and
manœuvres they are responsible
for performing.
1.1
”General Safety Instructions boo‐
klet for Electrical Applications”
UTE C 18 510
(or its equivalent outside FRANCE).
Our Service Unit: our specialists, and suitably adapted services...
F
F
F
F
F
F
F
F
1.2
If this is not the case, please refer
to our Service Unit or Training
Centre.
All locking-out operations must be
performed according to the
Guarantee extension contracts
in relation to the selling of new
equipment,
Supervision of HVA switchgear
installations,
Technical advice, diagnoses of the
facilities, expertise,
Maintenance contracts adapted
to operational constraints,
Systematic or conditional
preventive maintenance,
Corrective maintenance in case of
partial or complete failure,
Supply of spare parts,
Overhauling of equipment and
requalification of installations in
order to benefit from new
technologies and extend the life of
your switchgear by limited
investments.
Contact the AREVA Service Unit for diagnoses and advice:
Working hours
'
7
or
33 (0)3 85 29 35 00
33 (0)3 85 29 36 30
33 (0)3 85 29 36 43
AREVA T&D Technical Institute: Together, let us develop our skills...
We can place at your disposal
all of our trainers' expertise,
our teams' pedagogical expe‐
rience and the wealth of our
equipment, to help you face
the challenge of encouraging
the personal development of
each individual through the
optimisation of their skills.
F
F
F
F
From a few hours up to several
weeks, AREVA T&D Technical
Institute has the control over
all of the teaching processes in
order to meet the needs of
each customer.
Specific training, directly
operational with practical
work on real machines.
Small groups to facilitate
communication.
Balance between theory
and practice.
Evaluation and
management of the skills:
Measurement and
optimisation of the
trainees' knowledge.
Faced with the direct and indirect training costs of the operational stoppages
and shutdown, training is a real investment
AREVA T&D Technical Institute Aix-les-Bains
1 rue Paul Doumer - BP 601 - F-73106 Aix-les-Bains Cedex
' 33 (0)4 79 34 76 70 7 33 (0)4 79 34 76 76 * [email protected]
1
2 With regards to this User Manual
© - AREVA- 2006. AREVA, the
AREVA logo and their figurative
forms are AREVA registered trade‐
2.1
whether they be copyright or not,
belong to their respective holders.
accordance with the indications
given in this document, must be
observed.
- of any possible aggressive clima‐
tic conditions (humidity, pollution,
etc.) acting in the immediate envi‐
ronment of the materials that are
neither suitably adapted nor protec‐
ted for these effects.
This user manual does not list the
locking-out procedures that must
be applied. The interventions des‐
cribed are carried out on de-energi‐
zed equipment (in the course of
being installed) or locked out (non
operational).
Responsibilities
Our devices are quality controlled
and tested at the factory in accor‐
dance with the standards and the
regulations currently in force.
Apparatus efficiency and apparatus
life depend on the compliance with
the installation, commissioning and
operation instructions described in
this user manual. Non respect of
these instructions is likely to invali‐
date any guarantee.
Local requirements especially
about safety and which are in
2.2
marks. The other brand names
mentioned within this document,
AREVA declines any responsibility
for the consequences:
- due to the non respect of the
recommendations in this manual
which make reference to the inter‐
national regulations in force.
- due to the non respect of the ins‐
tructions by the suppliers of cables
and connection accessories during
installation and fitting operations,
Reminder concerning normal service conditions (in accordance with IEC 60694)
* Permissible ambient temperature
The ambient air temperature should
be comprised between - 15°C and
+ 40° C.
The mean measured value for a 24
hour period must not exceed 35°C.
* Installation altitude
HV equipment is defined in accor‐
dance with European Standards
and can be used up to an altitude
of 1,000 m.
Beyond this, account must be
taken of the decrease in dielectric
withstand.
For these specific cases, contact
the AREVA Sales Department.
* Atmospheric pollution
The ambient air must not contain
any dust particles, fumes or smoke,
corrosive or flammable gases,
vapours or salts.
* Permissible atmospheric humidity level
The average atmospheric relative
humidity level measured over a
24-hour period must not exceed
95%.
The average water vapour pressure
over a period of 24 hours must not
exceed
22 mbar.
The average atmospheric relative
humidity value measured over a
2
period of one month must not
exceed 90 %.
The average water vapour pressure
over a period of one month must
not exceed 18 mbar.
Condensation may appear in case
of any sharp variation in tempera‐
ture, due to excessive ventilation, a
high atmospheric humidity level or
the presence of hot air. This
condensation can be avoided by an
appropriate lay-out of the room or
of the building (suitably adapted
ventilation, air driers, heating etc.).
Whenever the humidity level is
higher than 95 %, we recommend
that you take appropriate corrective
measures. For any assistance or
advice, contact the AREVA
After-Sales department (See § 1.1).
2.3
Particular instructions for operations and interventions on energized equipment
When commissioning and opera‐
ting the equipment under normal
conditions, the General safety
instructions for electrical applica‐
tions must be respected, (protec‐
tive gloves, insulating stool, etc.), in
addition to standard operating
instructions.
2.4
F
F
F
F
F
F
F
F
F
F
2.5
All manipulations must be
completed once started.
The durations (for completing the
operations mentioned) given in the
maintenance tables are purely an
indication and depend on on-site
conditions.
Other technical notices to be consulted
AMTNoT110-02
AMTNoT132-02
AMTNoT137-02
AMTNoT140-02
AMTNoT150-02
AMTNoT153-02
AMTNoT161-02
AMTNoT164-02
AGS531751-01
AGS531753-01
FBX
Guide to Civil Engineering Work
FBX
Operations - Maintenance
FBX
Handling - Storage
FBX
Motor-controlled mechanical commands
FBX
Assembly on an internal arc channel
FBX
Mechanical key-type interlocking Assembly-operation
DPX-1
Self Powered Relay
FBX-E
Handling of Coupled Functional Units
IVIS and IVIS-F Voltage Detection Systems
MS100
Phase Comparator
Tools and products (not supplied) required for the operations described in this notice
- Crowbar
- Scissors
- Open-ended spanners sizes 7, 13 and 17
- 2 x open-ended spanner - size 16
- Ratchet handle + extension with socket sizes 8, 10, 13 and 16 mm
- Torque wrench
2.6
Symbols & conventions
- Code for a product recommended
and marketed by AREVA
CAUTION! Remain vigilant! Precautions to be
taken in order to avoid CAUTION
accidents or injury
1.6
- Tightening torque value
Example: 1.6 daN.m
FORBIDDEN! Do not do it! Compliance with this
indication is compulsory, non compliance with this
stipulation may damage the equipment.
10
- Mark corresponding to a
key
INFORMATION - ADVICE
Your attention is drawn to a specific point
or operation.
06
2.7
Tightening torque values for standard assemblies (nut + bolt)
Zinc plated steel fasteners without grease (daN.m)
Diameter
Stainless steel fasteners with
grease (daN.m)
Class 6.8
Class 8.8
A2-70
M6
0.7
0.9
0.7
M8
1.6
2.1
1.6
M 10
3.2
4.3
3.2
M 12
5
6.6
5
M 14
8.7
11.6
8.7
M 16
13.4
17.9
13.4
3
3 Presentation
This manual covers FBX-C and
FBX-E switchboards for 12, 17,5
and 24 kV networks.
3.1
Identification of the FBX
The technical data ranges give the
individual characteristics of the
switchboard.
FBX-C / 24-16 / C-C-T1
Switchboard
Type :
C = Compact
E = Extendable
Rated voltage
24kV
Short circuit current
rated
16kA
Functions making up the switchboard
C = Load-break switch
T1 = Combinated or associated fuse and
load-break switch
T2 = Transformer protection circuit breaker
R = Direct linkage
RE = Direct incoming feeder with
earthing switch
M1 = Measurement with cable connections
M2 = Measurement - for RHS extension
M3 = Measurement - for LHS extension
M4 = Measurement - for extension (Left or Right)
Sb = Busbar disconnector
4
3.2
Presentation of the FBX-C (non-extendable model)
10
9
1
2
3
11
4
5
6
7
0
- 1
-
2
3
4
5
- 6
- 7
- 8
- 9
- 10
- 11
Legend
Voltage presence indicator
light and low voltage
compartment panel
Mimic diagram panel
Fuse compartment
End plug
Fuse compartment access
panel
Cable compartment cover
HVA connections
Adjustable cable mounts
Lifting ring
Removable top panel - low
voltage connections
Technical data rating plate
8
5
3.3
Presentation of the FBX-E (extendable model)
3
2
5
6
7
4
10
8
1
9
0
-
1
2
3
4
5
6
- 7
- 8
- 9
- 10
6
Legend
Functional Unit - Extension
Bus bar connector
Functional Unit - Top Coupling
Functional Unir coupling Points
Mimic diagram panel
Voltage presence indicator light and low
voltage compartment panel
Extension system access panel
Blanking panel
Cable compartment cover
Technical data and rating plates
3.4
Presentation of “Measurement” functions
Function M1
Cable connection
1
3
Function M2
RHS Extension
4
5
6
7
2
Function M3
LHS Extension
0
-
1
2
3
4
5
6
7
Legend
Technical data rating plate
Bolted panel
Bus bar connector
Bushing
Current transformer
Voltage transformer
HVA connections
Function M4
Right or left hand side extension
7
3.5
Presentation of mimic diagrams for manual controls
Not
extendable
23
8
8
2
7
1
5
1
5
2
6
2
9
Extendable
3
3
4
4
Function C “Extendable”
Function T1 “Non extendable RHS”
Not
extendable
1
2
3
4
Function RE “Non-extendable LHS”
23
10
24
11
12
13
16
1
15
2
14
3
Function T2
8
0
- 1
- 2
- 3
- 4
- 5
- 6
- 7
- 8
- 9
- 10
- 11
- 12
- 13
- 14
- 15
- 16
- 17
- 18
- 19
- 20
- 21
- 22
- 23
- 24
Legend
Lever socket for the earthing switch
Earthing switch position indicator
Cable compartment cover latch
Descriptive plate
Load-break switch position indicator
Lever socket for the load-break switch
Lever socket for the load-break switch
Load-break switch or disconnector locking latch
Fuse blown indicator
Circuit breaker position indicator (O and I)
Lever socket for the circuit breaker
Circuit breaker locking latch
Fault Trip indicator
Disconnector locking latch
Disconnector position indicator
Lever socket for the disconnector
Technical data rating plate
Voltage transformers
Current transformers
Cable connections
Busbar connections
Location of the backup handle (load-break
switch or circuit breaker)
Operations counter (optional)
Tripping push button (optional)
3.6
Presentation of mimic diagrams for motorised controls (See legend § 3.5)
22
22
22
Function C 'Motorised': Socket
to insert the emergency manual
load-break switch operating
handle.
F
3.7
F
Function T1 'Motorised': Socket
to insert the emergency manual
load-break switch operating
handle.
F
Function T2 'Motorised': Socket
to insert the emergency manual
control for the circuit-breaker.
Presentation of the mimic diagrams used on 'Measurement' functions (See legend § 3.5)
21
18
18
19
17
20
19
17
Function M1
Function M3
21
21
17
21
18
18
19
19
20
Function M2
3.8
20
17
Function M4
Presentation of the mimic diagram on the 'Sb' function (See legend § 3.5)
21
8
21
2
6
1
5
22
9
4 Storage - Packing
4.1
FBX switchboard packing
Instructions
for handling
and unpacking
For road and rail transport:
- attached to the pallet using
two plastic ribbon strips,
- Covered by a protective
plastic film.
F
4.2
The packaging of a Functional Unit
for air and maritime transport:
- Under a heat-sealed cover with
bags of desiccant,
- packed in wooden crates.
Leave the FBX switchboard in its
original packing until it arrives onsite ready for installation.
F
2
2
Status of the equipment on
delivery:
1. load-break switches,
disconnectors and circuit
breakers all `open',
2. Earthing switch `closed'.
Respect the instructions
given on the sheet attached
to the front panel of the switch‐
board.
Temporary storage – less than 6 months
When the switchboard is not installed on
delivery it can be stored for a period not
exceeding 6 months under the following
conditions:
. Preserve the equipment in its original
factory packaging.
. Any parts unpacked for testing should then
be repacked in their original packing.
. The site chosen for storage must be
capable of protecting the material against
possible damage due to: water, water
vapour, saline atmospheres, all types of
pollution, micro-organisms.
Contact AREVA for any derogations to these criteria
or for storage durations of greater than 6 months
10
2
1
Specific transportation requirements
Ensure the FBX switchboard can‐
not slide or tip. If necessary, nail or
chock the transport pallet in place
on the truckbed.
4.3
ÁÁÁÁÁÁÁ
ËË
ËË
ËËË
ËË
ËË
ËË
ËË
ËËË
ËË
ËË
ËË
ËË
ËËË
ËË
ËË
ËËËË
ËËË
ËËËË
ÁÁÁÁÁÁÁ
ËË
ËË
ËËË
ËË
ËË
ËË
ËË
ËËË
ËË
ËË
ËËËË
ËËË
ËËËË
ÁÁÁÁÁÁÁ
ËËËË
ËËË
ËËËË
F
1
1
ÎÎÎÎÎ
ÎÎÎÎÎ
ÎÎÎÎÎ
+ 50° C
- 25° C
5 Handling and Unpacking
5.1
Reminder
The FBX switchboard must
remain on its pallet, within its
original packaging during any even‐
tual storage period and until it arri‐
ves at the location of its installation.
5.2
Unpacking
Proceed with unpacking the Functio‐
nal Units only where they are to be
installed on site.
5.3
Tools required:
- Cutter for road and rail
transport packaging
- Crowbar for air and sea
transport packaging
Use suitable protective gloves for
any handling operation.
Revalorizing packaging waste
After unpacking, the materials
remaining (cover, wooden floor
panel, etc) should be sorted and
sent to the appropriate recycling
services.
5.4
Handling
1 to 4 functions
1 to 4 functions
5 functions
>45°
When transporting on a
pallet, do not tilt the
switchboard.
Respect the location of the
Centre of Gravity.
5.5
When transporting using
slings – always use the
2 lifting rings.
This switchboard can be
transported:
- either by slings using the 4 lifting
rings,
- or by 2 hand trucks positioned at
each extremity.
Packing
The standard pack includes the
installation, user and maintenance
manuals and the operating
handles.
Other accessories may be included
depending on the configuration of
the switchboard itself (fuses,
fixings, panels, etc.).
11
6 Fixing to the floor
6.1
Opening the cable compartment cover
3
1
2
The earthing switch must be
closed (if not – see the
operating manual - §
AUCUN LIEN ).
F
F
F
1 - Lift the latch.
2 - Lift and pull the cable
compartment cover.
F
3 – Pull the panel towards
yourself then extract it.
Exception for Functions R and Sb:
Before removing the panel,
remove the locking pin, fixed in
place with an M6x16 CBHC bolt.
When re-fitting the cable
compartment cover, re-position
this locking pin then attach it with
the M6x16 CBHC bolt.
6.2
Fixing to the floor
Position and fix the FBX switch‐
board to a concrete floor or suppor‐
ting surface using 4 x M10 bolts
(Class 8.8) with flat washers (exte‐
rior diameter – 30 mm, thickness –
3 mm). For rear fixings, there are
two possible settings.
Ensure the unit is no way deformed
when fixing to the floor. Chock it in
place if necessary.
Top view
See Civil Engineering Guide
(AMTNoT110-02).
5
Fixing
Standard
Optional
FBX-M
Fixing points
1 or 3 ; 4 ; 6 ; 8
2;5;7;9
1;4;6;8
Tightening
4
4
3
2
1
12
ÉÉÉÉÉÉÉÉÉÉÉÉ
ÉÉÉÉÉÉÉÉÉÉÉÉ
ÉÉÉÉÉÉÉÉÉÉÉÉ
ÉÉÉÉÉÉÉÉÉÉÉÉ
ÉÉÉÉÉÉÉÉÉÉÉÉ
FBX-C
ÉÉÉÉÉÉÉÉÉÉÉÉ
ÉÉÉÉÉÉÉÉÉÉÉÉ
C
C
T1
ÉÉÉÉÉÉÉÉÉÉÉÉ
ÉÉÉÉÉÉÉÉÉÉÉÉ
9
8
7
6
7 Earthing the FBX switchboard
7.1
F
7.2
Location of the connector terminal
The earthing connector terminal
can be found in the FBX unit's
cable compartment on the LHS
side panel.
Connecting the earthing cable
7.2
F
Lightly clean the contact
surfaces.
F
Connect the earthing terminal to
the building's grounding network
(HM12 bolt).
The grounding network
connection cable and fixings
are not supplied by AREVA.
7.2
F
Optional: Supply of a
H M12x35 bolt.
13
8 Connection of the HV cables
8.1
Standard equipment for the FBX – up to 24 kV
The FBX switchboard is fitted with
plug-in cross members – Type
PF250 or PF630.
C / T2 / T1 (optional):
Plug-in cross member PF630
NF-EN 50181, Connector - Type C
(lr: 630 A ; ∅ M16 0/-0.04 mm)
8.2
T1 (basic):
Plug-in cross member PF250
NF-EN 50181, Connector - Type A
(lr: 250 A, contact finger
∅ M7.9 +0.02/-0.05 mm)
Connection adapter cones for cross-members in accordance with NF-EN-50181.
Switchboard function
R/RE
C
T1
T2
Connection adapter cone – Type A (250 A)
...
...
X
...
Connection adapter cone – Type C (630 A)
X
X
X(optional)
X
8.3
Connection of the cables
The cable compartments can be
accessed from the front.
Before fitting, read and apply
the appropriate safety
instructions.
Remove the cable compartment
access panels (Chapter 6.1).
8.4
General connection precautions
The manufacturer's installa‐
tion instructions (and torque
settings) must be scrupulously res‐
pected.
8.5
Clean the separable connectors
and cross members using a dry
cloth.
Apply the silicon grease supplied
with the connectors.
and in accordance with the
recommendations made by certain
suppliers, it is standard to use the
wires supplied with the connector to
fill in the space between the cross
member and the connector itself.
During this connection operation,
the cable must run freely and
naturally into the bottom of its
connector stirrup.
Type A connection
Position and engage the cable into
its clamping stirrup.
Plug in the connector without using
tools then hand-tighten the fixing
device. For the initial connection,
14
Fit insulating blanking plugs
on any unused cross
members.
Note: The red coloured plugs fitted
to the switchboards when they are
delivered are not isolating plugs.
8.6
Type C connection
Please refer to the connector
manufacturer's instructions, espe‐
cially regarding the tightening
torque value.
Type A (250 A)
As an indicator, the maximum
permissible tightening torques are
4 daNm for brass fasteners and
8.4 daNm for steel fasteners.
2
Type C (630 A)
2
3
1
1
4
3
20 - 35 mm
Screw thread
depth
1 - Cross member - Male
2 - Support plate
3 - Screw contact
1 - Sliding contact pin
2 - Support plate
3 - Mounting flange
4 - Mounting device
8.7
Attaching the cables and connecting the earthing braids
Position the adjustable cable
mountings in accordance with the
type of tightening (see below) and
cable characteristics.
Adjustments are both horizontal
and vertical.
Attach the cables using
clamps or stirrups, ensuring
that no stress or tensile forces are
applied to the plug-in cross
member.
Clip-fit clamps
2
1
1.5
F
Assembly - 1 cable per phase:
1- height adjustments using
three fixed positions.
2- Depth adjustment using the
two lateral slides.
F
3
Mountings for the cable
supports for clip-on clamp
fixing.
3- Three M8 fixing screws for
the cable earthing braids.
F
Fitting the clip-on clamps.
15
Screw-fit clamps
This clamping is obligatory for
a 2 cable per phase (or 1
cable + surge arrestor) installation.
Pay careful attention to the
choice of connectors as the
compartment depth is extremely
limited.
2
2
1
1
3
3
F
Assembly - 1 cable per phase:
1 - Height adjustments.
2 - Depth adjustment.
3 - Fixation points for the cable
earthing braids:
- Standard screw
1.5
size: H M8
- Optional screw
3
size: H M10
F
Assembly of 2 cables per
phase:
3 - Six M8 fixing screws for the
cable earthing braids:
Standard screw
1.5
size: H M8
- Optional screw
3
size: H M10
F
1
Max. 445 mm
Max. 445 mm
Cable clamp for C function.
2
F
F
Connection of single cables +
surge arrestors.
Mounting plates are required for the
fitting of the surge arrestor fixings
and cable supports.
16
F
Connection of two cables per
phase.
These plates can be ordered from
AREVA.
To replace the cable
compartment cover:
1 - The tab of the interlock has
to be in its upper position.
2 - Replace the cover in the
holes provided and then push
down, make sure the tab of the
interlock drops down again.
Reminder: The clamps are
sufficient to resist the
electro-dynamic forces generated
by the passage of a short circuit
current but are not guaranteed to
provide sufficient support to autho‐
rise operators to handle them once
connected.
8.8
Fitting of cables with a blanking-off flooring (optional)
Top view
C
F
C
T2
1
Place the complete flooring on
the ground, at the
switchboard s definitive
location (represented here by
2 cables per phase for the C
Functional Units).
F
F
Position the FBX switchboard
on the flooring.
Fix the switchboard (and the
flooring) on to the ground
(see § 6.2)
L1
4
L2
F
Remove the lower (1) front
cross member (4 H M8 bolts).
L3
ÓÓ
ÓÓ
ÓÓ
ÓÓÓÓÓÓ
2
4
3
Top view
F
At the bottom of the first C
Functional Unit, remove:
- the 6 blanking panels (2),
- the front plate (3),
- the rear plate (4).
Pass the 3 cables of the first
Functional Unit to be
connected.
Position and fix the plate (4) in
accordance with the marks on
the cables.
F
F
Top view
Top view
ÄÄ
ÓÓ
ÓÓ
ÄÄ
ÓÓ
ÄÄ
ÓÓÄÄ
ÄÄ
ÓÓÄÄ
ÓÓ
ÄÄ
ÓÓ
ÓÓ
ÄÄ
ÓÓ
ÄÄ
ÓÓ
ÄÄ
ÓÓ
ÄÄ
ÓÓ
ÄÄ
ÓÓ
ÓÓ
ÓÓ
ÓÓÓÓÓÓ
2
F
F
F
F
Cut the cables to the required
length.
Cut and fit each grommet on to
its cable.
Proceed in an identical way for
the connection of the first
3 cables.
Fit the cross member (1) in
place.
3
F
F
F
Fit the plug-in connectors.
Connect and strap the cables.
Clip the blanking pieces (2) into
their housings.
F
F
Pass the following 3 cables.
Position and fix the front plate
(3) in accordance with the
marks on the cables.
(6 H M6 bolts).
17
8.9
Assembly of 3 cables per phase (optional)
1
3
2
Parts kit for the plug-in
connectors mounting.
F
F
1. Position an angle bracket,
Position the angle bracket
horizontally.
3. Drill the plate through the
second hole (drill bit Ø 8.5mm).
F
horizontally, on the left-hand side.
F
F
2. Slide a notched nut between
the plate and the wall.
Screw in and tighten the first
threaded bolt.
F
5
6
4
7
7
4. Slide a notched nut between
the plate and the wall.
Screw in and tighten the second
threaded bolt.
F
F
F
5. Fix the bar on to this angle
bracket (H M8x40 bolt).
F
F
F
6. Fix the second angle bracket.
Position this angle bracket in the
same way as the one facing it.
7. Mark the 2 holes.
Bar
Ï
10
8
F
F
F
8
Remove the angle bracket.
Ensure that the adjacent
compartment is accessible and
not obstructed.
8. Drill the 2 holes (drill bit Ø
8.5mm).
9
F
F
F
F
Reposition the angle bracket.
Engage the threaded bolts by
the compartment on the
adjacent Functional Unit.
Screw on and tighten.
Remove the bar.
F
F
F
F
18
Position and fix the support (9)
by the spacers (10).
Note: this mounting support is
inverted in relation to the two
others.
Connect the cables.
Fit the bar after connecting the
second cable per phase.
9 Switchboard extensions (FBX-E series)
9.1
Intervention levels
Description
Levels
1
Operations as noted as instructions in the ”Operation - Maintenance” notice, carried out by trained
personal capable of intervening whilst respecting the rules of security.
2
Complex operations, requiring specific expertise and the use of support equipment in accordance
with the constructor's procedures. These are carried out by the constructor himself or by a speciali‐
sed technician who has received regular training by the constructor (See § 1.2) as part of the imple‐
mentation of procedures and who is equipped with specific equipment.
3
All preventive and corrective maintenance, all renovation and reconstruction work is carried out by
the constructor.
Extensions may be put together by
personnel qualified in HVA
equipment and HVA/LV substation
interventions, equipped with this
manual.
9.2
Intervention
Busbar
Cables
Load-break switches
Earthing switches
Level 1
De-energized
De-energized
Open
Closed
Tools required:
- Scissors
- Open-ended spanner sizes 13 & 17
- 2 x open-ended spanner - size 16
- Ratchet wrench and extension
+ 13 mm socket
- Torque wrench
Parts required:
- 1 x FU Extension
- 1 set of coupling fittings
(See § 9.5)
FBX switchboard lockout
The switchboard must be de-ener‐
gised, all load-break switches ope‐
ned and earthed. All earthing
switches must be closed.
9.4
tions is similar to the skills required
for the connection of a separable
HVA connector.
Intervention Instructions
Locking out the Functional Unit
Apply the general safety instructions
for electrical locking-out operations
and the special rules for the network
concerned
9.3
Apart from mechanical assembly
skills, the electro-technical
knowledge required for the connec‐
During the intervention, the
time during which the female
bushings are not covered by their
blanking plugs must be reduced to
a minimum.
If, for whatever reason, the installa‐
tion operation is interrupted for
more than 24 hours, the blanking
plugs must be re-fitted and the
cover screwed into place.
Reminder on the use of blanking plugs.
One must be careful when
using blanking plugs as there
are two different types:
Insulated Plugs: When these are
used the switchboard can be ener‐
gised. A protective cover holds
these plugs in place.
(Plastic) Protective Cover: Fitted to
cross members to be connected
on-site. This cover is only to be
used to protect the bushing against
dust.
19
View of a bushing without
protection – just prior to
connection.
F
9.5
F
Plastic protective cover.
This cover should never
be fitted to an energised
switchboard.
F
Insulated blanking plugs are
compulsary for sealing off
bushings on an energised
switchboard.
The plug in the photograph
is shown without the cover
plate used to compress it in
place.
Coupling accessories
A box, containing:
0
- 1
-
2
3
4
5
6
Legend
Assembly Manual
for extensibility kit
Cleaning wipe
Glove
Tube of grease
3 Extension connectors
3 Adapters (optional)
1
2
6
4
5
3
Additional supplies
- 7
- 8
9.6
Foam strip seal
1 bag of fasteners, including:
7
- 2 spacers,
- 2 guide pins + 4 M10 nuts,
- 2 H M8x60 bolts plus washers and nuts,
- 1 H M8x20 bolt plus washers and nut.
Equipment for the Functional Unit extension (See § 9.5)
The earth is on the
extendable switchboard.
There is no independent earth on
the extension unit.
20
Position the extension unit a
short distance (approximately
50 centimetres) from the extenda‐
ble switchboard unit on steel shims.
8
Supplementary equipment
F
Attach a guide pin (8) to the
front of the unit using two M10
nuts.
F
Fix an identical guide pin (8) to
the rear of the unit.
1
F
Remove the cable compartment
cover (See § 6.1).
F
F
9.7
F
2
Remove screw 1 and store
carefully.
Loosen screw 2 by a few turns.
F
Tap the head of screw 2 with a
hammer to remove the internal
nut insert.
Extendable switchboard equipment (See § 9.5)
1
F
Tighten using two 16 mm
spanners.
Remove the cable compartment
cover (See § 6.1).
F
F
Remove screw 1 from the side
panel and use it to fix a spacer
(8) in its place, passing the
screw through from the inside of
the compartment.
Tighten, without locking.
2
F
F
Loosen screw 2 a few turns
then tap the screw head with a
hammer to remove the internal
nut insert.
Remove the screw 2 completely
and store carefully.
21
F
F
Attach the second spacer (8)
using the screw 2.
Tighten, without locking.
F
Attach the self-adhesive strip
vertically along the edge.
F
At the bottom, cut off any
excess material.
Preparation the existing extensible unit (Version after 03/2008)
F
F
F
Loosen, alternately, the
two fixing bolts of the insulated
end cap compression plate.
Wear gloves to remove the
plugs.
Apply an alternative side to side
force on each plug, so that air
can progressively enter into the
plug-crossmember interface
whilst pulling towards the rear.
22
Light pressure is
applied by the insulated
blanking plugs to this plate.
F
Clean the inside of the three
bushings with a cleaning cloth
(2).
F
F
Remove the plate.
Put on the glove (3) to cover the
insides of the bushings with a
thin coating of grease (4).
Preparation and installation of the insulated extension connectors (5)
F
Clean each extension connector
(5) with the cleaning cloth (2).
F
Put on the glove (3) and cover
them with a thin coating of
grease (4).
Installation of the insulated extension connectors (5)
2
F
Firmly push each extension
connector onto its contact
assembly.
F
F
Link together the three earthing
braids.
Position the cable ends as
shown above.
F
Fix and tighten the braids using
1 x H M8x20 screw + flat
washer + locking washer + nut.
Preparation the existing extensible unit (Version before 04/2008)
F
F
Clean the internal and external
surfaces of the adapter (6).
First apply a light coating of
grease to the internal surface.
F
Then apply a light coating of
grease to the external surface.
F
Place an adapter into each of
the bushings.
23
Assure each adapter is pushed
to the base of the bushing.
F
The three extension connectors
in position.
F
F
F
F
The three adapters in position.
Link together the three earthing
braids.
Position the cable ends as
shown above.
F
F
Firmly push each extension
connector onto its bushing
contact.
Fix and tighten the braids using
1 x H M8x20 screw + flat
washer + locking washer + nut.
Preparation of the extension unit
Remove the three white plastic
covers.
F
9.8
Switchboard assembly
The pins (8) are used to guide the
insulated tubes and ensure the
holes are lined up to bolt together
the upper section of the switch‐
board.
24
F
Clean inside the three bushings
with a cleaning cloth (2).
F
Put on the glove (3) and apply a
thin coating of grease (5) to the
insides of the bushings.
F
Gently push the extension unit
towards the existing extendable
switchboard unit.
F
Ensure that the earthing
connection is correctly centred
in the middle of the extension
connector.
F
F
Align the pins to the holes.
Push the extension unit towards
the existing extendable
switchboard unit.
2
2
F
F
At the front, fit the first bold
(H M8x60 + locking washer
+ nut).
Tighten a few turns.
F
F
At the rear, fit the first bold
(H M8x60 + locking washer
+ nut).
Tighten a few turns.
F
Continue to alternate between
tightening the front and rear
nuts until the two reference
faces touch each other.
1
2
3.6
F
Screw into each spacer using
1 x H M8x12 screw through the
inside of the cable compartment
on the extendable switchboard.
Once assembly has been
completed, wait 15 minutes
before energizing the
installation.
Fixing to the floor and connecting
The extension unit must be atta‐
ched to the floor in accordance with
the instructions given in chapter 6.
Pay careful attention to avoid
stressing the extension unit when
fixing to the floor (chock in place if
necessary).
Proceed with the connection of the
cables as described in chapter 8.
25
10 Fitting a protective cover
(Function M Only)
10.1 For a LHS coupling
2
2
4
Top view
1
3
3.6
F
F
F
Screw in the two spacers (1)
using the washers (2) through
the upper mounting points.
Attach the cover (4).
Fix the cover in place using 5 x M8
screws (3).
10.2 RHS coupling
4
1
Top view
2
2
3.6
F
F
F
26
Screw in the two spacers (1)
using the washers (2) through
the upper mounting points.
Attach the cover (4).
Fix the cover in place using 5 x M8
screws (3).
3
11 Fitting a rear deflector to a Function M
11.1 When required
The internal arc deflector is
compulsary when the unit is
installed within a room with a ceiling
height of ≥ 2m and < 2.4m.
11.2 Fitting the deflector to the rear of the Function M
220 mm max.
1
3
2
4
Rear view
F
F
Attach the rear deflector
mounting (1) to the five M8
nuts (3) on the rear of the unit.
Position the FBX in its
definitive location.
NB: The distance, with respect
to the rear partition, must not
exceed 220 mm.
Side view
Rear view
F
Loosen the 3 fixing screws (4)
for the removable blanking
plate (2).
ÉÉ
ÉÉ
ÉÉ
ÉÉ
ÉÉ
ÉÉ
ÉÉ
ÉÉ
ÉÉ
ÉÉ
ÉÉ
F
F
Lower the removable plate
until it touches the partition.
Tighten the 3 fixing screws (4).
4
2
1
F
Details of the assembly.
27
12 Connecting transformers within
Measurement Functional Units
12.1 General
To avoid any damage, the transfor‐
mers and cross members are not
connected in the factory. Final
assembly should be carried out
on-site.
Within the cable compartment, the
order of the phases, from left to
right, is:
- M2: L1, L2, L3
- M3: L3, L2, L1
12.2 Connecting transformers in a type M2 or M3 functional unit
L1 L2 L3
1
2
2 4.8
1 4.8
F
F
F
F
State on Delivery: The upper
connection is not established.
Unscrew the two screws (1).
Unscrew the upper mounting
screw (3) on the cross member.
Pivot the connection through
180°.
F
F
Fix the connection to the
transformer using 2 x M12
screws (1).
Fix the end of the connection to
the cross member using an
M16 screw (2).
Function M3
The order of the phases is
inverted from those in the
M2 functional unit.
12.3 Connecting transformers in a Type M4 fonctional unit
L1 L2 L3
1
2 6.8
1 4.8
2
F
F
F
F
State on Delivery: The upper
connection is not established.
Unscrew the two screws (1).
Unscrew the bolt (3).
Pivot the connection vertically
through 180°.
28
F
F
Fix the bottom of the connection
to the transformer using 2 x
M12 screws (1).
Fix the other end of the upper
connection using an M12 bolt
(2).
Function M4
F
Sectional view of the
M4 functional unit.
13 Low Voltage Connections
13.1 Intervention conditions (see § 9.1)
Intervention
Busbars
Cables
Interrupters
Earthing switches
Level 1
de-energized
de-energized
open
closed
13.2 Connection of the low voltage wiring
1
1
5
1
2
2
3
4
3
4
6
Upper roof panel
Knock-out panels
Loosen the two holding screws (3)
and remove the mimic diagram
panel.
Unscrew and remove the upper
roof panel, attached using two
screws (1).
Unscrew the two screws (2) from
the indicator light protection panel
then lift off by pivoting.
Unscrew the blanking panel below
the mimic diagram (loosen 2
screws) (4).
Remove the cable compartment
cover.
Route the external control cables
(6) through and connect them to
the flat terminals (5) as shown in
the wiring diagram provided with
the order (see § 13.3).
29
Refit the panels
Once the low voltage wiring has
been connected, continue with the
refitting of the other panels in
reverse order of fitting.
Other possible connections
The low voltage wiring connections
can also be passed through the
knock-out panels on the left or right
hand side of the switchboard (see
image on previous page).
To avoid damaging the wiring, the
oblong holes must be fitted with
cable glands or edge-protection.
13.3 Circuit diagrams
The following diagrams are given
as examples only.
Please refer to the diagrams delive‐
red with the equipment.
13.4 Switch position contacts [-Q11]
These have positive actions, opera‐
ted by the corresponding loadbreak switch in parralel to the
mechanical 'Closed'-'Open' indica‐
tor.
F
Adjusting the cams on the
auxiliary load-break switch
The auxiliary load-break switches
are adjusted in accordance with the
diagram supplied with the order
(other settings are possible - see
below).
F
The wiring diagrams (electri‐
cal connections) are supplied
with the switchgear's documenta‐
tion.
Auxiliary selector-switch settings available (selector
programme)
Position of cams when adjusting
Load-break switch
Open
Load-break switch
Closed
Open
Premature 'at rest' contact
Delayed working contact
Premature working contact
Direction to
check when
adjusting
At rest contact delayed
Passage contact
Auxiliary
selector closed
13.5 Earthing switch position contacts [-Q81]
These also have positive actions,
operated by the corresponding ear‐
thing switch in parrallel to the
mechanical 'Closed' - 'Open' indica‐
tor.
30
The auxiliary load-break switches
are adjusted in accordance with the
connections diagram (other settings
are possible - see above).
13.6 Standard diagram for motorised control (type AB2 - alternating current) for Function C
External motor control
To Open
To Close
Functional diagram
0
0
0
0
0
0
0
0
Legend
-K11A: Opening relay
-K11E: Closing relay
-Q11-M1: Motor
-Q11-S1: Load-break switch position contact
-Q11-V1: Diode bridge
-Q81-S1: Earthing switch position contact
-X1: Connector terminals
Load-break switch position contacts
Position Contacts
for the earthing
switch
External
31
13.7 Standard diagram for motorised control (type AB3) for Function C
Load-break switch
position contacts
0
0
0
0
0
0
0
0
0
0
0
0
To next feeder
32
Position contacts
for the earthing switch
Legend
-G1: Auxiliary supply
-K10FF-K20FF-K220FF: Tripping relay
-K10N-K20N-K220N: Closing relay
-K301: Printed circuit board (relay, diodes, ...)
-M: Motor
-Q11-S1: Load-break switch position contacts
-Q81-S1: Position contacts for the earthing switch
-S11: Local/remote selector switch
-S61: Closing push button
-S62: Opening push button
-X1: Connector terminals
To next feeder
Position contacts
for local/remote
Functional diagram
To Open
External
External
To Close
External motor control
0
0
0
0
0
0
0
0
Tripping coil
Position contacts
for the
earthing switch
Legend
-F1-S31-F1-S32: Fuse blown contacts
-Q11-F11: Tripping coil
-Q11-M1: Motor
-Q11-S1: Load-break switch position contacts
-Q11-V1: Diode
-Q81-S1: Position contacts for the earthing switch
-X1: Connector terminals
Load-break switch position contacts
Fuse blown
contacts
13.8 Standard diagram for motorised control (type AB2) for Function T1
33
0
0
0
0
0
0
34
Purple
Black
Brown
WIC1
-H301
Switch disconnector
position contacts
Blue
Blue
Black
Fault signalling
Selector switch
signalling
remote/local
ÉÉÉÉÉÉÉÉÉ
ÉÉÉÉÉÉÉÉÉ
ÉÉÉÉÉÉÉÉÉ
ÉÉÉÉÉÉÉÉÉ
ÉÉÉÉÉÉÉÉÉ
ÉÉÉÉÉÉÉÉÉ
Legend
-H301: Fault detector (WI1-SZ5)
-S11: Local/remote selector switch
-Q01-F12: Tripping coil
-Q01-F31: Tripping coil
-X1: Connector terminals
Circuit breaker
position contacts
Position contacts
for the
earthing switch
13.9 Standard diagram of a WIC1 protection (type AB3) for Function T2
“Measure - protection - signalling” part
Legend
-H301: Protection relay (WIC1)
-AP: Auxiliary relay
-F11-F12: LV circuit breaker
-G1 : Auxiliary supply
-S11: Local/remote selector switch
-X1: Connector terminals
0
0
0
-K10FF-K220FF-K20FF: Tripping relays
-K10N-K220N-K20N: Closing relays
-M: Motor
To next feeder
Yellow
Green
0
0
0
-Q01-F11: Tripping coil
-S61: Closing push button
-S62: Opening push button
To next feeder
“Control” part
35
14 Fitting the HV fuses
14.1 Dimensions (mm) of the fuses – in accordance with standards CEI60282-1 and 62271-105
Voltage
upto 12kV*
17.5 kV
24 kV
D (mm)
292
442
442
D
38 max.
Ø 45±1
Ø 20 max.
striker pin
33+2
* Possible also in 442 mm
33+2
Ø 88 max.
Ø 88 max.
Ø 50 min.
14.2 Fitting of an adapter for fuses of upto 12 kV
End plug
Adapter
Striker
14.3 Selection table for AREVA fuses (FDwT) with integrated strikers (for Function T1)
Power of the transformer (kVA)
Un
(kV)
25
3/3,3
10
16
25
25
31,5
40
50
63
80
100
5,5
6,3
10
16
16
25
25
31,5
40
50
6/6,6
6,3
10
16
16
25
25
31,5
40
10/11
6,3 6,3
10
10
16
16
25
13,8
6,3 6,3 6,3
10
10
16
15
6,3 6,3 6,3
10
10
6,3 6,3 6,3 6,3
10
20/22
50
63
80
100
125
160
200
250
400
500
630
800
-
-
1000 1250 1600
Fuses (A)
125
160
(2)
(1) (2)
63
80
100
50
63
80
100
25
31,5
40
50
16
16
25
31,5
16
16
16
25
10
16
16
16
1) With optional mechanical delaying mechanism on the controls (80 ms)
2) Length 442 mm
36
315
-
-
-
-
-
-
-
-
125
160
(2)
(1) (2)
125
160
160
(2)
(2)
(1) (2)
63
80
100
125
125
160
31,5
40
50
50
63
-
-
31,5
31,5
40
50
50
63
80
-
25
25
31,5
40
63
63
63
-
14.4 SIBA fuse selection table
Type
of
Fuses
Siba
HH-DIN
Power of the transformer (kVA)
Un
(kV)
100 160 200
250
315 400 500
630
800
1000
Uk = 4%
1250
1600
2000
Uk = 6%
6
25
40
-
50
63
80
100
125
100
125
160
-
-
-
10
16
25
-
32
40
50
63
80
63
80
100
100
160
160
15
16
20
-
32
32
40
50
63
50
63
63
80
-
-
20
10
16
-
20
25
32
40
40
40
40
50
80
100
125
(2)
(1)(2)
(1)(2)
1) With optional mechanical delaying mechanism on the controls (80 ms)
2) Specific type SSK fuses with `slow' breaking curves
14.5 Fitting a fuse
The earthing switch must be closed
(See the operating manual - § 2.4).
Open the access cover to the standard fuse holders
F
Unlock the fuse compartment
using the appropriate key.
F
Lift the latch and open the
panel.
F
The end plugs of the fuse
holders are now accessible.
Opening of the access cover to the leaktight fuse holders (by key or handle)
F
F
Lift up the lock.
Introduce the corresponding key
and turn it to the left.
F
F
Pull the cover towards the front
until it stops.
Turn the key in the reverse
direction to unlock it.
F
Open the cover completely to
gain access to the leaktight fuse
holders' plugs.
37
Fitting the fuses in place
F
F
Pull the plug forwards without
turning it.
Insert the fuse cartridge into its
housing.
F
F
Remove the plug.
Insert the fuse support lug into
the slot in the insulated tube
and press firmly.
F
F
F
F
Insert the new fuse into the
housing and lightly tighten the
small screw.
Reclose the fuse access cover.
Lift the latch and push the panel
fully open.
Lock the panel with the key.
14.6 Mechanical trip test on blown fuse
It is possible to test the mechanical
trip mechanism activated by a
blown fuse
F
Check the tripping mechanism
with the load-break switch
`closed'.
38
F
Insert a Ø 2.1mm rod,
W > 80 mm into the hole
created for this purpose.
F
F
Push it until it stops.
Check that the fuse symbol is
displayed red.
15 Protection Relays WIC1 or DPX-1
15.1 Location of the protection relays
C-T2
T2
2
1
3
4
2
1
0
- 1
- 2
- 3
Legend
Relay WIC1 or DPX-1 (behind the panel)
Panel fixing screws
Front panel
15.2 Access to the relays of a single T2 function (See markings in § 15.1)
F
Remove the 2 screws (2) which
hold the front panel (3).
F
Lift the panel slighty and then
slide to the left (4).
F
The relay (1) is now accessible.
15.3 Setting of the protection relays
The relays are delivered set
to their maximum values by
default.
For the setting of the relays
please refer to the instruc‐
tions delivered with the equipment.
39
15.4 The protection relays WIC1 & DPX-1
LED
F
WIC1: Stand alone protection
relay (without earth fault
detection).
Option: with earth fault
detection.
F
DPX-1: Stand alone protection
relay with earth fault detection
and LED indicator:
- Flashing green LED: OK
- Permanent green LED:
problem with the relay
- Permanent red LED: detection
of fault current.
15.5 Fault indicator WI1-SZ5
F
Indicator showing a fault (red).
White
Green
Black
Normal indicator view (no fault).
Red
F
Push the green button to reset
the indicator.
Orange
40
Yellow
Purple
Blue
F
Brown
Wiring of the WI1-SZ5
16 Commissioning
16.1 Reminder
Prior to dispatch, FBX Switch‐
boards are mechanically and elec‐
trically tested.
Also check the leaktightness of the
room, the cable troughs, ventila‐
tion, etc.
16.2 Carry out an inventory of all tools and accessories on completion of the work
Recover, verify and tidy away all
assembly tools and objects not
required in the switchboard.
Store away, in their respective loca‐
tion, the operating accessories for
the switchboard.
Attach the FBX technical notice in a
visible location within the room.
16.3 Pre-commissioning information
Respect the General Safety Ins‐
tructions booklet for Electrical
Applications and the particular
regulations for the network concer‐
ned with regard to locking-out pro‐
cedures.
Check and record the serial num‐
bers and identifying marks on
equipment and switchgear while
they are accessible.
Refer to the drawings and diagrams
supplied with the equipment. They
describe the functionalities
employed to carry out the level of
operation required.
16.4 Principle pre-commissioning checks
Visual inspections
Date
Remarks
Signature
Date
Remarks
Signature
Date
Remarks
Signature
- Ensure there are no foreign bodies inside the switchboard
- Check the external appearance (no signs of blows, scratches
on the paintwork) -- > carry out touch-up repairs if needed.
- Check the conformity with the Protection Index (leaktightness of
the Functional Units, various blanking panels, etc.).
- Ensure that the insulating blanking plugs are fitted on
extendable switchboards.
Tightening torque verifications
- Inspection of mechanical tightening torques, (assemblies, elec‐
trical connections, earthing circuits, cables, etc.).
Operational verifications
- Repeat a couple of operations to check the functioning of the
system for the circuit breaker and the earthing switch.
- Verify, after each operation, the status of the
position indicator
16.5 Energizing the FBX switchboard
Before commissioning, the
load-break switches,
disconnectors and earthing switch
must all be `open'.
When the switchboard incoming
feeders are energise the voltage
present indicators should flash or
come on (depending on the
equipment).
41
16.6 VDS – Voltage Detection Systems
HR System (High Resistance)
The voltage (or total absence of
voltage) is detected by a separate
VDS – in accordance with
IEC 61243-5.
F
The measurement plugs are
fitted to each function of the
FBX switchboard and blanked
off during normal operations.
The three phases must, in all
cases, be verified.
F
Horstmann Luminous Indicators
(HR-ST).
Use the recommended
voltage present indicators.
F
Luminous Indicator (DSA2).
IVIS (Intelligent Voltage Information System)
The IVIS, with its integrated indica‐
tors, can be used to check for the
absence of voltages in accordance
with IEC 61243-5.
The lightning bolt symbol signifies
that a voltage is present.
The IVIS unit does not require ini‐
tial operating tests prior to detecting
a voltage.
box, insensitive to climatic condi‐
tions and completely maintenancefree.
The IVIS unit does not need an
external power source.
For phase comparison, use an
MS100 device.
It is an electronic unit in a sealed
See the corresponding manual for
the use of the IVIS (See § 2.4).
Verification of phase concordance (for IVIS)
1
4
This voltage indicator system is
guaranteed in accordance with
IEC 61243-5 (4).
For each of the phases L1, L2 and
L3 [1] there is a corresponding
indicator in the form of a bolt of
lightning [2].
2
F
IVIS display
42
F
3
Lift off the small protective
cover to gain access to the
terminals (3) and to visualise
the indication of the standard
(4).
For each phase there is a
connector terminal [3], accessible
from the front panel, used to
connect the phase comparator.
F
Ensure the proper phase
balance with the aid of an
MS100 device.
If the phases seem to be out of
balance, check the cable
connections.
Capdis KRIES
16.7 VPIS (Voltage Present Indicating System)
The VPIS unit is an integrated
voltage detection system in
accordance with IEC 61958. Used
to indicate that a voltage is present
across the cables.
This equipment cannot be
used to check for an absence
of voltage.
Voltage Present Indications verifications with a standard unit
L1
F
Standard unit (15-20 kV).
F
Phase concordance can be
verified with a specific phase
comparator.
F
L2
L3
Check the comparator between
2 phases of a voltage present
indicator light: The lamp should
light up.
43
Check phase concordance
F
F
F
F
L1
L2
L1
L3
L2
L3
Connect the now verified
comparator between the L1
phases on the two switchboard
incoming feeder functions.
Phases balanced:
The lamp on the unit is
extinguished.
Phases out of sequence:
The lamp on the unit is lit.
Repeat operation for L2 and L3.
Voltage Present Indications verifications with a Kries unit
F
VOIS + (Kries) unit
F
Kries Phase Comparator.
F
See the manual provided with
the comparator for operating
instructions.
16.8 Starting up the switchboard
Close the breaking devices on the
`Incoming feeder' functions.
`Transformer outgoing feeder' func‐
tion.
Close the load-break switch on the
See the specific instructions given
in the appropriate manual
(See § 2.4).
16.9 Short-circuit indicators (optional)
The switchboard may be fitted
with short circuit indicators
In principle, there are two
possible uses for short-circuit
indicators:
- The short circuit indicators are
attached directly to the HV
cables. In this case, the cable
compartment must be fitted with
an inspection port (optional).
- The short-circuit indicators are
integrated into the LV
compartment. The three phases
are displayed separately.
44
The short circuit indicators can be
used with various functions:
- with manual reset,
- with automatic reset,
- with remote reset,
- with remote visualisation contact,
- with earthing fault indicator.
See the instructions
supplied by the manufacturer
of the short circuit indicators.
F
Horstmann short circuit
indicator.
17 Notes
If you have any comments on the use of this document or on the use of the equipment and services that
are described in it, please send us your remarks, suggestions and wishes to:
AREVA Service Technique BP 84019 F-71040 Mâcon Cedex 9 - FRANCE
Fax: 33 (0)3 85 29 36 36
45
AREVA T&D
Boulevard de la Résistance BP84019 F-71040 Mâcon Cedex 9 - FRANCE
Tel.: +33 (0)3 85 29 35 00 - Fax.: +33 (0)3 85 29 36 36
The other names mentioned, registered or not, are the property of their respective companies. - 389191982 RCS PARIS - Creation: AREVA Mâcon - Printed in France.
AMTNoT131-02 09 (10/2006) E - AREVA - 2006. AREVA, the AREVA logo and any alternative version thereof are trademarks and service marks of AREVA.
Our policy is one of continuous development.
Accordingly the design of our products may
change at any time. Whilst every effort is
made to produce up to date literature, this
brochure should only be regarded as a guide
and is intended for information purposes only.
Its contents do not constitute an offer for sale
or advise on the application of any product
referred to in it. We cannot be held
responsible for any reliance on any decisions
taken on its contents without specific advice.