1
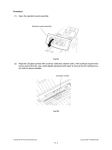
07/02 Rev. 2.16-00
USER MANUAL
AP 3.4
Maintenance and Troubleshooting
Troubleshooting ............................................ 2
Printer Status ............................................ 2
Problems on media ................................... 2
Problems on ribbon ................................... 3
Miscellaneous ........................................... 3
Recovery ................................................... 4
Caring for your printer ................................... 5
Cleaning the print head ............................. 5
Cleaning the roller ..................................... 5
Cleaning the media compartment ............. 5
Seite / Page 1
07/02 Rev. 2.16-00
USER MANUAL
Maintenance & Troubleshooting, page 2
AP 3.4
Troubleshooting
à
Generally, when a malfunction or an abnormal condition occurs, the READY
LED will keep blinking and printing and communication between the host and
printer will stop.
To understand what the problem is, please check the LEDs.
m For details refer to topic section „Commissioning and Operation“, chapter
„Printer Status“.
Printer Status
There are three LED indicators on the front panel, READY, MEDIA and
RIBBON. These indicators display the operation status of the printer.
Blinking
LED
Description
MEDIA
The printer is at pause state. Press PAUSE or CANCEL to
return to normal state.
MEDIA
READY
The media is uninstalled or used up. Load new media to the
printer.
RIBBON
READY
The ribbon is uninstalled or end-of-ribbon occurred. Load new
ribbon to the printer. If you just use thermal media set bit 1 of
DIP switch to OFF position.
READY
The format or baud rate of the RS232 communication is inconsistent between the printer and host.
READY
The cutter can not cut off the media, check the media and cutter.
READY
The printer buffer is full caused by the loaded soft fonts, graphics or forms. Check the format of these data. Call for service.
Tab. 1: LED blink signals, showing the printer status.
Problems on media
Possible Problems Solutions
Remarks
Missing gap
Check the media path
Check the position of
label sensor.
If you use continuous
media, check your application soft ware and driver.
You should select continuous.
Media out
Supply the media roll
Media not installed
Install the media roll
Media jam
Recover the jam
Tab. 2: Possible Problems on Media.
07/02 Rev. 2.16-00
USER MANUAL
Maintenance & Troubleshooting, page 3
AP 3.4
Problems on ribbon
Possible Problems
Solutions
Remarks
Ribbon has run out
Supply the ribbon roll
Does not apply to direct
thermal. If you use direct
thermal, set bit 1 of DIP
switch to OFF.
Ribbon jam
Recover the jam
Not for direct thermal.
Ribbon sensor error
Replace the ribbon
sensor
Not for direct thermal.
Tab. 3: Possible Problems on ribbon.
Miscellaneous
Printer Time out
The host shows ”Printer Time out“.
Ô Is the communication cable (parallel or serial) connected securely to your
parallel or serial port on the PC and to the connector on the printer ?
Ô Is the printer power turned on ?
à
No output
If the power cord is connected, the power switch is at position ‘1’ and the power LED is still not illuminated, call for service.
The data has been sent, but there is no output from the printer.
Ô Check the active printer driver, it should be Label Dr. for your Windows system and the label printer.
Ô Check the emulation and the print (command) file.
Vertical streaks
Vertical streaks in the printout (see Fig. 1) usually indicate a dirty or faulty
print head.
Ô Clean the print head first, if they still persist, replace the print head.
Fig. 1: V ertical streaks in the printout.
Unstable rotation
Unstable ribbon roll rotation.
Ô Check the label path and make sure the head latch is securely closed
Poor printout
Poor printout quality.
Ô The ribbon may be not qualified.
Ô The media may be not qualified.
07/02 Rev. 2.16-00
USER MANUAL
Maintenance & Troubleshooting, page 4
AP 3.4
Ô Adjust the Darkness (heat temperature).
Ô Slow down the print speed.
Ô Refer to the following paragraphs and clear the related modules.
Recovery
In order to continue your print jobs after any abnormal conditions have been
recovered, simply press the CANCEL button or restart the printer. Make sure
that the LED indicator is illuminated and not blinking and remember to resend
your files.
07/02 Rev. 2.16-00
USER MANUAL
Maintenance & Troubleshooting, page 5
AP 3.4
Caring for your printer
à
à
Before maintenance, be sure to turn off the printer power!
Cleaning the print head
The print head should be cleaned at least every time the ribbon is replaced
and more often depending on actual usage and conditions!
1. Turn off the printer.
2. Open the cover and the print head module and remove the ribbon.
3. Rub the print head with a piece of cotton, which has been moistened with
alcohol.
4. Check for any traces of black coloring or adhesive on the cotton after
cleaning.
5. Repeat if necessary until the cotton is clean after it is passed over the head.
à
Cleaning the roller
The roller should be cleaned whenever it has been in contact with foreign materials such as dust or adhesives!
Ô Using a cotton moistened with alcohol, clean the roll and rip off the attached
glue.
à
Cleaning the media compartment
Every time a media roll is printed this compartment should be cleaned to reduce the incidence dust!
Ô Clean the media compartment with cotton, which has been moistened with a
mild detergent.
07/02 Rev. 2.16-00
USER MANUAL
AP 3.4
Index
C
Cleaning 5
Continue print job 4
M
Maintenance 5
Media problems 2
N
No output 3
P
Poor printout 3
Printer Status 2
Printer Time out 3
R
READY LED keeps blinking 2
Ribbon problems 3
S
Streaks 3
U
Unstable ribbon roll rotation 3
V
Vertical streaks 3
page 6