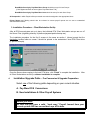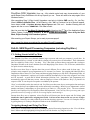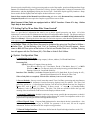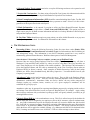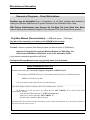
1
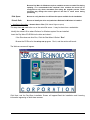
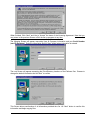
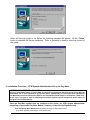
PAY WARE - t h e P F W P a y r o l l / H u m an R e s o u r c e s S o l u t i o n STC Standalone System Manager Pay-Ware from PFW Menu Installation & Set-Up Guide – for PFW Menu Access see STC System Manager User Guide for external interface • i Contact Information on Service Technologies Corp. We value our customer relationships and take pride in being a responsive Software Developer. Since we never stop refining our products, our user partners (you) are a key source of desired new product features as well as occasionally finding the odd “glitch” in our software (there is no such thing as a perfect program - ask Bill Gates about Windows 95 ‘er 98 ‘er 2000). We enjoy hearing from you and here’s how you can contact us. (336) 768-1787 Phone (“Live Bodies” generally available 8AM - 5:30PM Eastern M-F) Fax Web Site (with E-mail link) E- mail (direct) (336) 768-1602 www.pay-ware.com [email protected] payroll system. Thanks for purchasing Service Technologies’ Pay-Ware Pay-Ware has been designed to provide Platinum software users with an easy to use, flexible Payroll Processing Module in tune with today’s demanding pay reporting and benefits plans. At the same time, Pay-Ware for Windows combines the familiar “look and feel” of PFW with user-friendly Menus and fast, efficient processing to make users comfortable processing their payroll in house. Our import tools simplify transition from other systems with minimal conversion effort. After the installation and set-up routine outlined in this booklet, Pay-Ware’s efficient processing and enhanced features can be put to work for you. The full 200 page manual is available on the CDROM (see Manual.doc). Pay-Ware comes with 30 days of unlimited support, so if after reading the enclosed materials you have additional questions, please contact us. Full Telephone Support is available for $150 annually or $100 per single incident (see following pages). • ii Pay-Ware Maintenance and Support Agreement This Maintenance Agreement (“Agreement”) states terms and conditions applicable to the delivery of software maintenance and support services. All software, documentation and media provided to you under this agreement are also subject to the terms and conditions of the Service Technologies Corporation (STC) Software License Agreement, including the Disclaimer of Warranty and Limitation of Liability. 1. Pay-Ware Maintenance Plan -- Benefits. Maintenance Plan subscribers shall receive the following without additional charge: All updates (typically released several times per year) for the registered software program. “Updates” include changes to Payroll & Withholding Tax calculation formulas (i.e., Annual Tax updates). Subscribers will also receive new releases of a particular software version, which provides functional enhancements and error corrections. Subscribers may obtain interim updates on the STC Bulletin Board as well. 2. Pay-Ware Telephone Support Plan -- Benefits. Telephone Support Subscribers receive telephone and facsimile support related to Pay-Ware during the hours of 8:00 AM-5:00 PM Eastern Time. 3. Term. This agreement becomes effective and services are provided hereunder when STC receives your payment of the appropriate Maintenance fee. The registered user will be invoiced for annual renewals unless STC receives written notification canceling the subscription 60 days prior to the expiration date. 4. Limited Warranty. STC warrants that the support services will be performed in a workmanlike, professional manner. STC disclaims all other warranties, either express or implied. THIS LIMITED WARRANTY GIVES YOU SPECIFIC LEGAL RIGHTS. YOU MAY HAVE OTHERS, WHICH VARY, FROM STATE TO STATE. 5. Limitation Of Liability & Consequential Damages. STC’s entire liability to you and any other party for any loss or damage resulting from any actions, demands or claims arising out of this agreement shall not exceed the Maintenance/ Support fee paid for the Software notwithstanding any failure of essential purpose of any limited remedy. In no event shall STC be liable for any indirect, incidental, consequential, special or exemplary damages whatsoever arising out of the use of or inability to use the Software or the performance or failure to perform supports services, even if STC has been advised of the possibility of such damages. Since some states prohibit limitation of liability for consequential or incidental damages, the above limitation may not apply to you. 6. Conditions. Software that has been altered or modified outside of the parameters allowed in the program is excluded from this agreement. If Maintenance or Support Plan is allowed to expire, the subscriber must pay a catch up fee for lapsed coverage at the then current program rate. No refunds (pro-rata or otherwise) will be given for Program cancellations at subscriber request. This Agreement may not be assigned to any third party without the prior written consent of STC. Service Technologies Corporation may be reached by the following: Phone: Fax & Bulletin Board: Web or E-mail: Address: Street Address: 336-768-1787 336-768-1602 www.pay-ware.com [email protected] PO Box 24756, Winston-Salem, NC 27114-4756 3880 Vest Mill Rd., Suite 201, Winston-Salem, NC 27103 Pay-Ware( Maintenance and Support Agreement • iii License Information IMPORTANT SERVICE TECHNOLOGIES SOFTWARE LICENSE AGREEMENT - READ CAREFULLY BEFORE OPENING SOFTWARE This is a legal agreement between you (an individual or an entity) the end user, and Service Technologies Corporation (STC). If you do not agree to the terms of this Agreement, promptly return the unopened disk package and all accompanying written materials to the place obtained for a refund. 1. GRANT OF LICENSE. This STC license agreement (“license”) permits you to use one copy of the STC software product (“software”) on any single computer, provided the software is “in use” on only one computer at any time. You may have as many copies of the software in use as you have licenses. The software is “in use” in a computer when it is loaded into the temporary memory (i.e. RAM) or is installed into the permanent memory (e.g. Hard disk, or other storage device) of that computer; however a copy installed on a network server for the sole purpose of distribution to other computers is not “in use.” You must have a reasonable mechanism in place to assure that the number of persons using the software concurrently does not exceed the number of licenses. If the software is permanently installed on the storage device of a computer (other than a network server), then the person authorized to use such computer may also use the software on a portable computer or home computer. If such person’s authorization to use such computer ceases for any reason, then such person’s authority to use the software on the portable or home computer shall cease. 2. COPYRIGHT. The software is owned by STC or its suppliers and is protected by United States copyright laws. Therefore you must treat the software like any copyrighted material (e.g. a book or musical recording) except that you may either (a) make one copy of the software for backup or archival purposes, or (b) transfer the software to a single hard disk provided you keep the original solely for backup or archival purposes. You may not copy written material accompanying the software. 3. OTHER RESTRICTIONS. You may not rent or lease the software, but you may transfer your rights under this license on a permanent basis provided you retain no copies and the recipient agrees to the terms of this license. Any transfer must include the most recent update and all prior versions. You may not reverse engineer, decompile or disassemble the software. 4. LIMITED WARRANTY. STC programs are provided “as is” without any expressed or implied warranty of any kind, except that the disk will boot up within 90 days of purchase. The entire risk as to the quality and performance of the programs is with you, the licensee. Should the programs prove defective, you assume the risk and liability for the entire cost of all necessary repair, service or correction. Some states do not allow the exclusion of implied warranties, so the above limitations may not apply to you. This warranty gives you specific legal rights, and you may have other rights which vary from state to state as well. 5. LIMITATION OF REMEDIES. STC’s entire liability and your exclusive remedy shall be replacement of any non-bootable disk at no charge. 6. NO LIABILITY FOR CONSEQUENTIAL DAMAGES. In no event shall STC or its suppliers be liable for any damages whatsoever (including, without limitation, lost profits or revenue, loss of use of software, loss of data, or costs of recreating lost data). Some states do not allow the exclusion or limitation of consequential damages, so the above limitation may not apply to you. 7. U.S. GOVERNMENT RESTRICTED RIGHTS. The software and documentation are provided with RESTRICTED RIGHTS. Use, duplication, or disclosure by the United States Government is subject to restrictions as set forth in subparagraph (c)(1)(ii) of The Rights in Technical Data and Computer Software clause at DFARS 252.227-7013 or subparagraphs (c)(1) and (2) of the Commercial Computer Software – Restricted Rights at 48 CFR 52.227-19, as applicable. Manufacturer is Service Technologies Corp./ P.O. Box 24756 / Winston-Salem, NC 27114-4756. 8. GOVERNING LAWS. This agreement shall be governed by, and interpreted in accordance with, the laws of the State of North Carolina. License Information • iv Pay-Ware General Information And Features • • • • • Enhanced Data Entry Features Suppress Display of Pay Rates Automatic Line Scrolling On-Screen Running Total for Pay Units “Hot Windowing” to File Maintenance Mid Cycle “Emergency” Single Employee Check Processing • • • • • • Payroll Processing / System Integration Features Automatic Calculation of Overtime Option Pay Rates Based Upon Employee Pay Rate or on Position Worked Shift Differentials Time Card File Import Utility Unlimited Attendance/Earnings Tracked Proven Interfaces to Project Costing, Bank Book & General Ledger Modules - • Easy Custom Report Generation Available Report Period Summaries - MTD, Q1 - Q4 &YTD Reprint Key Prior Year Reports - Qtr or YTD User-Defined Government Report Formats üPayroll Tax Summary (941 Schedule B) üEmployee Detail - Employment Security Comm. üWorkmen’s Compensation Report üCertified Payroll Report üFormatted Quarterly Reports Magnetic Media File Output – W-2 & Quarterly Reports • • • • Easy Output /Check & Electronic Deposit Generation Check Size Options 11” 3-Panel & 7” 2-Panel MICR Output Option to several Popular Solutions Simplified Void Check (only Date & Ck #) ACH File Generation for Electronic Payments (EE Pay Deposit & EFTPS Credit Tax Payments) • • • Cafeteria Benefit Plan Capability (user-defined) Enhanced D/R/A Processing & Reporting incl. Employer Contributions Employer 401k, Depend. Care, Medical, Savings Bond, etc. Accounts Payable Interface for Withholdings Payments • • • • • • • • Human Resource Management Enhancements Employee History - Online or Batch Reports Vacation & Sick Pay Time Tracking Training / Credential Renewal Tracking New Hire Reporting Capability Tracking of Company Property issued to Employees Employee Census Reporting (Salary Statistics, Workforce Diversity, etc.) Attendance Tracking Workmen’s Comp Tracking • • • Pay-Ware General Information And Features • v Installation Congratulations on your purchase of Pay-Ware for Windows: the only Payroll/Human Resources Module 100% integrated with Platinum for Windows. Besides installing right into the PFW System Menu, Pay-Ware for Windows (PWW) shares Platinum’s Database Engine, Processing Architecture, Printer Resources, User setups and Security. Pay-Ware’s Interfaces to PFW’s Accounts Payable, Bank Book and Project Costing Modules are seamless, reliable and proven by hundreds of users. System Configuration Requirements Pay-Ware for Windows requires that Platinum for Windows Ver 4.6 or higher be already installed. To work in a Demonstration mode, the GLSDEM Company subfolder must be present in the platinum system directory. Pre-Installation Checklist It is strongly recommended that a PFW Authorized VAR or Consultant make new Pay-Ware for Windows installations. Before installing Pay-Ware you should back up the entire PFW system & all companies. Pay-Ware System files must install in the “Platinum” System Folder/Directory (regardless of name) on the Server drive. Client Files install in the PFW “Client” Folder/Directory resident on each Workstation. Users upgrading from Pay-Ware DOS, be sure you are running Pay-Ware Ver. 4.65. Be sure that all Btrieve versions on your system are 6.15 or higher. Installation Overview Pay-Ware for Windows installation procedure parallels that for Platinum for Windows client/server installation. PFW and any other Windows-based programs should be closed and virus-detection programs disabled before installing PWW. Please read through the entire procedure before starting any Installation activities 1. Server Installation - PWW’s executable program files are installed from the CDROM to newly created Pay-Ware subdirectory (X:\platinum\payware) on the network file server. Other PFW Resource/Menu files are updated and the Pay-Ware Client Setup files are installed. 2. Module User Setup - Pay-Ware’s administrative functions (user access and security) are handled by PFW. They are set up by the PFW System Administrator for existing and new users to insure confidentiality. 3. The individual Client Workstation set-ups are made from the Server’s Client Files (originating directory X:\platinum\payware\pwclient\setup.exe). 4. Installation/Upgrade process for converting or setting up data for each payroll company. Remove the CD and NOTE THE SERIAL NUMBER ON THE ENVELOPE –you will need it. Pre-Installation Backing Up Be sure to have at least one good backup of your payroll data and a hard copy printout of your latest Payroll Journal. Installation • 6 Because Pay-Ware for Windows requires read/write access to certain files updating, it is recommended that continual virus checkers be turned configured to only check executable files during the upgrade process. programs may change the access rights of the files or cause errors processing. during off or These during Disk Space Be sure to verify that there is sufficient disk space available for the installation. Drive & Path Be sure to identify the drive and path where Platinum for Windows is installed. 1. Installation Procedure – Network Server Files (PFW Admin Rights required) This step does not need to be run on the actual file server. It may be done from a workstation. Identify the network Drive where Platinum for Windows system files are installed. Insert the Pay-Ware CD-ROM into the drive and close it. If the Drive does not Auto Run, Click the Start Menu & Select: “Run”. Browse the CD Drive for the set-up.exe program. Run it, and the routine will launch. The Welcome screen will appear. Click Next, and the Pay-Ware Installation Screen will appear-Read the Installation and Licensing information appearing on both these screens. Installation • 7 When finished, Click ‘Next” and Yes to “Accept” the terms of the Licensing Agreement. Note that you may return to the previous Screen or Exit the set up program at any time. The following Screen will appear requesting User & Company Information and your Serial Number (see CD Envelope). Enter the information and Hit “Next” button when information is entered. The next Screen will appear requesting the Drive/Directory locations of the Platinum files. Browse to change the default information and hit “Next” to confirm. This Screen allows confirmation of all information provided thus far. Hit “Next” button to confirm this information and begin copying files. Installation • 8 When all files are copied to the Server the following message will appear. Hit the “Finish” button to complete the Server installation. There is generally no need to reboot as a result of this install. 2. Installation Procedure – PFW System Administrative Set up for Pay-Ware IMPORTANT CONFIDENTIALITY NOTE Given the Confidential nature of Payroll Data, it is strongly recommended that User Access to Pay-Ware be immediately set up and restricted to appropriate Users. Additionally, we recommend that Transactions File Maintenance access to Employee Balance and Transactions Items always be restricted to "Read Only" for all Users. This data is used in generating Government required reports and should not be subject to unsupervised user Maintenance. Once the Pay-Ware system files are installed on the server, the PFW System Administrator should log on and enable Pay-Ware Module, Company & User Access Rights/Security. User Group Pay-Ware Module Access should be set up for appropriate Users [Pay-Ware appears at the bottom of the Module List] Installation • 9 Read/Write Security by Pay-Ware Menu Group should be set up for User Groups [Click Rightmost button to arrow right to Pay-Ware Menu Tab] Read/Write Security by Pay-Ware Menu Item should be set up for each User Group. All Companies in which Payroll will be processed must also be assigned to the appropriate Users. Printer Setups and Sharing should also be reviewed to ensure payroll reports are not sent to unattended shared/network Printers 3. Installation Procedure – Client Workstation Set Up After all PFW server/system set up is done, the individual PFW Client Workstation set-ups are run off the Server Files (originating directory X:\platinum\payware\pwclient\setup.exe). The installation procedure for the first 3 screens is the same as section 1 (above) except that the destination location folder on screen 3 should be pointed to the workstation’s local PFW Client drive (c:\pfw for example). Once the files are done copying to the local PFW drive, click “Finish” to complete the installation. After all Client Workstations are set up, software installation is complete. 4. Installation /Upgrade Paths – Pre-Conversion & Upgrade Preparation Select one of the following paths depending on your current situation. A. Pay-Ware DOS Conversions B. New Installations & Other Payroll Systems Before you start: Be sure that you have a valid, “hard copy,” Payroll Journal from your current system AND two current back ups of its data. Installation • 10 Path A. – for Pay-Ware DOS Upgrades Pay-Ware DOS Upgrades (from ver. 4.6x) should make hard copy documentation of your saved Report Setup Parameters for all key Reports you run. These will need to be setup again in the Windows version. After completing Step 3 (Client Install) Upgraders need only to Initialize ONE new file. Go into PayWare's Utilities >Initialize Files. At the Warning, click “Yes” to Continue & a list of files will appear. Arrow down to #40 – Pay-Ware Windows Report Options and Click on it. Another Warning box will appear with the File Name: PBWRPTOP -Click Yes to finish. Next, be sure that the Pay-Ware GL Interface switch (found on the 2nd Tab of the Application Setup Option (System Configuration SubMenu) is set to PFW 4.6 or Later. Also verify the Bank Book, Project Costing & A/P Interface options. After resetting your Report Setups, you’re ready to process payroll. Now, repeat the above procedures for any other Payroll Companies . Path B - NEW Payroll Processing Companies (not using Pay-Ware ) C1. Getting Started with Pay-Ware Like Platinum, Pay-Ware uses relational database logic to process and track your company’s payroll data. Its many different files are “related” to each other by sharing one or more pieces of information. These information links are called Key Fields (“Keys” for short). “Key” data fields are almost always equipped with a Lookup or Dropdown Window to the source database (Press the Magnifying Glass Icon or <F9> to activate) which allows for quick selection without keying. Pay-Ware uses these Keys to interface data from several different files to reduce need for data entry. For example, many companies set up Departments as GL Account Cost Centers. By assigning individual Pay-Ware Department codes to these GL Cost Centers and then assigning Employees to Pay-Ware’s Department Codes, all earnings for a department’s employees will (unless modified) automatically be sent to the assigned Cost Center and GL Accounts. A good deal of default information (Position Code, Attendance Code, Department) will automatically appear on data entry screens when an Employee’s Name or ID (Both are “Keys”) is placed in its respective field. It can always be accepted or overridden by the operator. “Keys” work similarly on the data retrieval end. Pay-Ware uses these same keys to sort/organize data and report on it. Records always sort alphabetically and/or numerically (ascending). Most Keys are alphanumeric (mixed numbers and letters), and numbers are given priority over letters (i.e. 1G9 precedes 1GA). The most common Sort Keys are Employee Key/ID, Employee Name and Department. Nearly all Pay-Ware processing and report generation consists of setting up a Sort or Processing Sequence and running it. Because these Keys are so important to how Pay-Ware will format your data in reports and file listings, you should take time to plan before assigning these fields. It is best to base them on the way you are set up to do business. Often Keys are abbreviated forms of the data item they represent. You can view examples of Keys by pulling data up via Lookup or Dropdown Windows in the GLSDEM Company. Navigating through and Using Pay-Ware Tasks may be accomplished in Pay-Ware by finding the desired Processing Operation on the “View All Menu Items” Button and then highlighting/clicking the desired Task from the very long list of items. Installation • 11 Selection can be simplified by viewing processing tasks on each of the smaller, preselected Submenu Item Group Buttons (File Maintenance, Reports, Print & Post, Utilities, System Configuration, Listings & Transactions File Maintenance) and then highlighting/clicking the desired Task. Each Menu Option typically launches a Setup Screen used to Define/Update, Run and Output the desired Process or report. Print & Post contains all the Manual Payroll Processing task items while Document Entry contains all the Computed Payroll task items required to complete a payroll from start to finish. Most Screens & Data Fields are equipped with a “HELP” function - Press <F1> key. Online Topic Help is also available C2. Setting Up Pay-Ware Data Files “from Scratch” There is a good deal of information that must be set up before payroll processing can begin. All of this information is entered in the File Maintenance and System Configuration Menu Groups. The purpose and logic of these files is overviewed here. Details about data entry to these files are available in Help and in the PayWare User Manual. Following the below data-entry/file-activation sequence, rather than the alphabetized menu order sequence, will result in the quickest, most efficient set-up. a. Initialize Files--All Pay-Ware files must be Initialized by going into Pay-Ware's Utilities > Initialize Files. At the Warning, click “Yes” to Continue & a list of files will appear. Arrow down to ALL-All Files option at the bottom of the list and Double Click on it. Another Warning box will appear with the File Name (All) -Click Yes to finish & Exit Utilities. b. System Configuration Files 1. Application Set Up Items Address Tab specifies the processing company’s Name, Address, Fed ID and Bank Name. Processing Tab Specify Printing of Company Name on checks Size (Seven or Eleven) x 8.5” Dot Matrix, Ten & ½”Dot Matrix, Laser 11”, or MICR Whether to Generate Tax Deposit check with each processing period & Bank Name Earnings Classes for Vacation & Disability Interfaces Tab – Enable (√ ) or Select- Platinum Interfaces (GL, Bank Book, Project Costing & A/P) , Manual Payroll Retention of GL History & Time Card When all tab fields are completed, Click the Save (diskette) icon to save the settings. 2. Process Defaults - Sets up several items that control Time Card Entry processing and miscellaneous employee master fields. Automatic Overtime Processing Option(s) may be enabled. The Time Card processing options are (1) Specifying the Position Code & Job Cost default (Previous line, Employee Master misc. code or None), (3) “Warning” if Hours exceed “x” message, (4) Saturday/Sunday Attendance Codes. (5)Display Pay Rates. The Misc. Tab fields are utilized to define the type and meaning of the miscellaneous field located on the Employee Master record. 3. Automatic Numbering shouldn’t require any setup except, possibly the current quarter or check #. If you are going to transfer Quarterly balances for the current year, set the Current Quarter switch to 1, in preparation for inputting the balances through Manual Payroll. 4. Direct Deposit Setup Company Bank Information for Auto-deposit checks is entered here. Also if direct deposit for Employee pay or EFTPS Tax payments is to be used, fill out all required information. Refer to the Manual for this complex set-up procedure. 5. General Ledger Interface - Entries here define how the Payroll sub-ledger interfaces to the G/L. Installation • 12 6. General Ledger Tax Accounts need to be set up for all Earnings and taxes to be reported as well as interface to Platinum GL. 7. Project/Job Cost Interface - For those using a Project/Job Cost System, this information should be provided to automatically interface Payroll information to Project/Job Cost breakouts. 8. State Unemployment Information (SUI) should be entered including State Codes, Tax IDs, SUI Rates/percentages and Payee Names for all states where payments are made. Select Yes or No to autogeneration of the deposit check with each Payroll. 9. Bank Information - to be entered if you plan to utilize any Direct Deposit/Electronic Payment options. The information required here is Bank Name and FRB/ABA ID#. This option provides a single-source entry for all Bank Account information and feeds it to Lookup Windows in Direct Deposit setup and the Employee Master. 10. Pay Rate Tables should not require any setup unless you utilize shift differentials or set pay rates based upon the position worked. See Manual for information on this feature c. File Maintenance Items Processing Codes - Set-up the following Processing Codes first since these codes (Ethnic, EEO, Workmen’s Comp, Termination Reasons and Activity Type) feed information to other fields that you will subsequently set-up. This information is not used in calculating payroll but is very useful to automatically generate Human Resource/ Workforce data reports of interest to Management. Once the above 5 Processing Codes are complete, you may set up Position Codes. Position Codes are used to group Employees who have similar jobs. Consequently they will share a Workmen’s Comp and EEO code (just Set-Up - above) as well as a Pay Rate Code-if pay rate tables are used. These Employees will also probably work similar schedules. This Position Code information is fed to the Employee Master and will come up automatically on the Time Card Entry Screen when an Employee ID/Key or Name is entered. Some examples of Default Processing Codes (In the Lookup Window) are “Office, Sales, Standard Hourly, Std Salary, Supervisor.“ You must edit this list to fit your Company’s reporting needs. Attendance Codes are the last Processing codes to be set-up. They are fed to the Employee Master and to the Time Card Entry Screen. There are virtually unlimited attendance codes (99 numeric plus alphanumeric combinations). Attendance Codes are used to “define” the way various categories of earnings (regular pay, overtime, bonus, vacation, etc.) of a given employee’s attendance will be calculated on a given pay cycle. Attendance codes may be grouped (for reporting/consolidation purposes) by assigning similar codes to an Earnings Class (third field on the screen) to report all “Regular Hours” for example. Again, setting these items up consistent with your business reporting up-front, will greatly enhance your ability to get meaningful data out later. Cafeteria Plans (D/R/A) is the next database to set-up. This file is utilized to specify the defaults for Benefit Plans that will be assigned to your employees such as 401k, insurance, expense reimbursement, etc. Any D/R/A information keyed in the Employee Record will overwrite default data fed from this file. Each D/R/A is assigned a unique code/priority consisting of D (deduction after taxes), R (reduction before taxes) or A (allowance) PLUS a 2-digit Priority Number. The Priority indicates the order in which the Items will be applied to available earnings, (e.g. deduction code D02 will be deducted before D03), if earnings are insufficient to cover all D/R/A’s. D/R/A‘s affect earnings as shown below: Installation • 13 Earnings + Allowances - Reductions (=Adj Gross Income) - Taxes - Deductions = Net Pay Deductions do not affect taxes, they are subtracted from Net Pay. Reductions are taken from AGI before Taxes, immediately lowering Tax liability Allowances are considered to be additional earnings and may raise Tax liability All the fields must be completed to insure each D/R/A is processed correctly Department File Maintenance should be set up next. You must have at least ONE Department Code entered to process payroll. As mentioned earlier, Department Codes should be set-up to maximize the usability of reporting the way your business works. For example, one large multi-state employer assigns each State a separate Department Code for tracking. Most users tend to use a traditional functional department/cost center approach. The purpose of this screen is to set up groupings by which Employee/Labor-related costs can be reported, including their respective GL Account numbers (optional). If entered, the Department key determines the default GL posting accounts that will be used for Employee-related costs (earnings, D/R/A’s, Taxes, etc.) assigned to this Department Code (they may be overridden for any given pay period). Separate G/L account codes were entered in Attendance Code Maintenance for regular, premium and WIP (Project cost environment). These codes can be modified for each Department by entering a different G/L account code or by using a “Masking” approach. “Masking” places a “#” sign for each place in the assigned GL account codes that should remain intact. Any other characters typed will overwrite and/or add digits in the indicated positions. Vacation & Sick Day Accrual If Vacation and Sick/Disability days are to be tracked by Pay-Ware, information on the accrual levels must be set up in Period End Processing and current unused balances must be entered in File Maintenance>Employee Master (see below). Savings Bonds File Maintenance [If Used] should be the next item to set-up. This option will automatically generate the Savings Bond purchase file for transmission to the Federal Reserve. Set up all information required on these short screens. Employee Master File The Employee Master contains personal information and payroll data for each employee. The following types of information input into this file along with each employee’s Name and Key/ID include: *Pay Processing Information such as Base Earnings Rates, Attendance Withholdings and Direct Deposit Bank Information. & Position Codes, Tax *D/R/A and Benefit Plan Information *Human Resource Tracking Information such as Hire Date, Review Date, Remaining Vacation & Disability Time for the calendar year (if tracked by calendar year) or until the update routine will be processed again (see Manual for information), EEO Status, Job Code, Supervisor, Department, Location, Workmen’s Comp Claims, Training or Credentials Renewal status, etc. *Personal Information such as Address, Phone Number, Dependents, Emergency Contacts, etc. The Manual & Help Screens aid in entering this information. This completes set-up of Pay-Ware’s Defaults and Processing Files for this Company. YOU MUST REPEAT THIS PROCEDURE FOR ALL COMPANIES YOU PAY. C3. Input Quarterly Payroll Balances for each employee into the system. Next, input Employee balances into Pay-Ware through the Manual Payroll function. Entering your historical data through Manual Payroll (versus directly entering balance data to history files) allows you to use Pay-Ware’s Installation • 14 editing/reporting capability to insure that accurate, in-balance data is entered and provides an automatic conversion audit trail. To take full advantage of Pay-Ware’s reporting capability, each quarter’s balances should be entered separately for each employee. This can be optimally accomplished as follows: 1. Have the following quarterly payroll balance information available on hard copy for each employee so the information can be keyed into Manual Payroll. All Tax Withholdings (Fed, FICA, St., SUI, SDI, Local) for the period, Earnings Units & Dollars (broken out by type/attend code [REG. OT, DT, VAC, etc.] if desired) and all D/R/A’s withheld for the period. 2. Go to System Configuration submenu, and choose the 2nd item, Automatic Numbering. Verify that in AUTOMATIC NUMBERING, the Current Quarter box is set to the 1st quarter. (Be sure to Save). 3.Go to Document Entry/Computed Payroll submenu, then into Pay Period Information and specify a Payroll Date and Pay Period End Date of 03/31/YR (or the date of the last Payroll processed, if the Quarter is not over). Specify the Pay Period Start Date as 01/01/YR. You may ignore the D/R/A Group field (used for Computed Payrolls). Save these Parameters. 4a. Go to the Manual Payroll/View Print/Post submenu, and then into the Transaction Entry screen. Type (or select from the Lookup Window) the Key/ID of the first employee to be entered from the hard copy report. Ignore the Check No. & Date fields (enter through them). Be sure that the UPDATE MTD, QTD, YTD boxes are checked. But, be sure that the Void Check box is Not checked. 4b. Enter all earnings, withholdings, and D/R/A information for this employee’s first quarter. If you know the employee’s YTD Net Pay, enter that also. When all fields are complete, click the Save Button to process. If you have not entered Net Pay, you will get an error message with the calculated Net Pay $ needed to balance the entry. Enter that amount in Net Pay and click the Save Button again. Once the entry is in balance, it will Process. 5. Move to the next employee, repeating steps 4a, & 4b. 6. When all Employees’ first quarter balances have been input, go to the MANUAL EDIT (just below Transaction Entry/Maintenance on the Manual Payroll Menu). Select ALL EMPLOYEES to be processed. To save Paper, you may Output the Edit to SCREEN and Process. 7. When the Edit is complete, a list of any Warnings or Errors will appear at the top of the Edit. Error items must be corrected and a new Edit run before you can proceed further. Warnings do not stop the process, but they should also be reviewed to insure that entries are correct. You must adjust all discrepancies until an Error-free Edit is run. 8. After generating an Error-free Edit, move down to the next item on the Manual Payroll Menu, Preliminary Payroll Register. Select the Sort option that will best sync it up with your hard copy printout and Process the Register. Compare these two Registers Employee by Employee to verify accuracy of all amounts. Go back to Transaction Entry/Maintenance and make any necessary corrections. You may also decide to run a Preliminary D/R/A Report to verify individual D/R/A’s. Run a final Edit and verify all corrections. Installation • 15 9. Once a good Edit is run, we recommend you back up this information by copying all files in your company directory starting with PB before proceeding further, (just in case). 10. The next step is Print/Posting this good Edit to move all the balances into the history files. From the MANUAL PAYROLL Menu, select PRINT CHECKS. Arrow through all fields (Check #, etc.) and Process to the Crystal Viewer to save paper. When complete, a prompt will ask if you wish to Post the checks. Click “Yes” Button to Post checks. Entry of Q1 history into Pay-Ware is now COMPLETE. Follow the above & following steps for Quarters 2,3,4 (as required) until you have all YTD Payroll data posted up to date This exercise has given you a good feel for navigating and operating Pay-Ware payroll processing. 11. Once all prior history is entered and posted, go to the REPORTS and run a PAYROLL JOURNAL. Select the Sort Option that most closely mirrors your hard copy report. On the Parameters Screen, specify all Employees (FIRST - LAST) for that time period (Check (√) Q1, Q2 and YTD to get a first half recap by quarter, for example). Output the report to PRINTER. Verify these totals against your source document (they will agree if you have successfully completed the above). Retain this Journal as Validation of Conversion. 12. The final step in conversion is to insure that the historical data now in the Pay-Ware balance files does not Interface or Post to your GL. This is prevented by REINITIALIZING (setting back to zero) the GL DISTRIBUTION FILE which has been generated. To do this, go to the Pay-Ware Utilities Menu> Initialize Files. At the Warning, click “Yes” to Continue & a list of files will appear. Arrow down to #16 – G L Distribution and click on it. Another Warning box will appear with the File Name: PBDIST -Click Yes to finish. Exit Utilities and you are ready to process a Payroll. If you want to test Pay-Ware’s new features without impacting your “live data,” change over to GLSDEM Company to review Report or D/R/A set-ups. A full year of 1999 data is available. Installation • 16 Miscellaneous Information Removal of Programs – Client Workstations Pay-Ware may be Uninstalled from a Workstation (i.e. its Client interface files deleted) by running the Windows Add/Remove Programs Routine on the Windows Control Panel PFW System Administrators may Remove the Pay-Ware Tab from Client User Menu (without affecting the underlying Program Files) using the PFW User Group Set Up process Pay-Ware Manual (Documentation) – 2.5MB disk space; ~180 Pages Pay-Ware’s Documentation is included on the CDROM in this package. The file is a Microsoftâ Word Document (Filename MANUAL.doc) To Install: Select or create the Drive/Directory where you want to store it (2.5 MB Req’d) Insert the CD into the Drive and use Windows Explorer to “Edit>Copy” the file from the CD-ROM and “Edit>Paste” it into to the destination Folder. It may then be located and opened from MS Word. Printing the 200-page Manual to hard copy typically takes 30 to 80 minutes. SOME TROUBLESHOOTING TIPS Installation Error Message: Can’t load or Register component ACBTRV32.OCX Check Windows\SYSTEM Directory to verify whether the following File is Installed & current WBTRV32.dll with size of 42K If it is not current, can be copied from C:\pvsw\bin directory .____________________________________________________________________________________________________________________________________________________________________ Error 163 - Illegal Character in Numeric Field - Environment space is too low. On Windows 95 or 98 Increase it by adding the line “SET COBSW= -F” as the first line in the autoexec.bat as follows: From the MS DOS Prompt type C:>EDIT AUTOEXEC.BAT Add a line to the file and enter “SET COBSW= -F” . Do a File>Save, then File>Exit and restart On Windows 2000 this is entered from the Control Panel, System, Advanced, Environment, New—then in the Variable box enter cobsw and in the Value box enter -f Installation • 17