Download Foxit PhantomPDF Standard User Manual

Transcript
Foxit PhantomPDF Standard
User Manual
1
Foxit PhantomPDF Standard
User Manual
Copyright © 2004-2014 Foxit Software Incorporated. All Rights Reserved.
No part of this document can be reproduced, transferred, distributed or stored in any format without the prior
written permission of Foxit.
Anti-Grain Geometry - Version 2.4
Copyright (C) 2002-2004 Maxim Shemanarev (http://www.antigrain.com) Permission to copy, use, modify, sell
and distribute this software is granted provided this copyright notice appears in all copies. This software is
provided "as is" without express or implied warranty, and with no claim as to its suitability for any purpose.
1
Foxit PhantomPDF Standard
User Manual
Contents
Contents .......................................................................................................... 2
Chapter 1 – Introduction ......................................................................... 5
PhantomPDF Overview ..................................................................................................... 5
About the User Manual ..................................................................................................... 6
Quick Installation Guide................................................................................................... 6
Foxit Plug-In Platform ....................................................................................................... 6
Chapter 2 – Get Started...........................................................................10
Workspace Basics ............................................................................................................. 10
Customize the Workspace ............................................................................................. 18
Set Preferences ................................................................................................................. 19
Chapter 3 – Read ........................................................................................20
Open & Close & Save PDFs ........................................................................................... 20
Bundle with IFilter ............................................................................................................ 22
Standards Validation ....................................................................................................... 22
Read....................................................................................................................................... 23
Select & Copy..................................................................................................................... 46
Check the Accessibility of PDFs................................................................................... 48
Others ................................................................................................................................... 49
Chapter 4 – Create .....................................................................................53
Create a PDF in Different Ways................................................................................... 53
Create and Customize a PDF Portfolio...................................................................... 67
Create a table of contents from bookmarks .......................................................... 68
Chapter 5 – Edit ..........................................................................................69
Undo and Redo .................................................................................................................. 69
Header & Footer, Watermark & Background to PDFs.......................................... 69
Adding Format Page Numbers ..................................................................................... 73
Links ...................................................................................................................................... 74
File Attachments ............................................................................................................... 78
Bookmarks .......................................................................................................................... 81
Images.................................................................................................................................. 84
PDF Optimizer .................................................................................................................... 90
2
Foxit PhantomPDF Standard
User Manual
Work with Video & Audio ............................................................................................... 91
Objects ................................................................................................................................. 97
Spelling Check ................................................................................................................. 107
Chapter 6 – Organize .............................................................................. 109
Insert Pages...................................................................................................................... 109
Delete Pages..................................................................................................................... 112
Extract Pages ................................................................................................................... 113
Replace Pages .................................................................................................................. 114
Swap Two Pages.............................................................................................................. 115
Duplicate Pages ............................................................................................................... 116
Move Pages ....................................................................................................................... 116
Split Document ................................................................................................................ 116
Crop Pages ........................................................................................................................ 117
Rotate Pages .................................................................................................................... 118
Flatten Pages.................................................................................................................... 119
Chapter 7 – Comments .......................................................................... 120
Use Different Comments Tools .................................................................................. 120
Change the Appearance of Comments ................................................................... 132
Work on Comments ....................................................................................................... 135
Chapter 8 – Share PDFs ......................................................................... 144
Email Documents ............................................................................................................ 144
Send to Evernote ............................................................................................................ 144
SharePoint Integration ................................................................................................. 145
Shared Review and Email Review ............................................................................ 151
Chapter 9 – Forms ................................................................................... 154
Interactive Form and Non-interactive form .......................................................... 154
Fill in PDF Forms ............................................................................................................. 155
Comment on Forms ....................................................................................................... 157
Manage Form Data......................................................................................................... 157
Form Fields........................................................................................................................ 159
JavaScript .......................................................................................................................... 182
Chapter 10 – Security............................................................................. 185
Check PDF Security ....................................................................................................... 185
Password Protection & Certificate Protection ....................................................... 185
AD RMS Protection ......................................................................................................... 190
3
Foxit PhantomPDF Standard
User Manual
Remove Hidden Data .................................................................................................... 195
Chapter 11 – Signature ......................................................................... 196
Digital Signature ............................................................................................................. 196
Sign PDFs on DocuSign® ............................................................................................. 204
Quick PDF Signature ..................................................................................................... 206
Chapter 12 – Print.................................................................................... 208
Print a PDF document ................................................................................................... 208
Print Dialog Box .............................................................................................................. 209
Set Foxit PhantomPDF Printer Properties .............................................................. 212
Chapter 13 – Appendices ...................................................................... 218
Quick Installation Guide............................................................................................... 218
GPO Manual ...................................................................................................................... 229
SharePoint Configuration ............................................................................................. 241
Quick Start for Azure Active Directory Rights Management .......................... 243
Shortcut Keys................................................................................................................... 244
Command Lines............................................................................................................... 247
Contact Us ................................................................................................... 249
4
Foxit PhantomPDF Standard
User Manual
Chapter 1 – Introduction
PhantomPDF Overview
Welcome to Foxit PhantomPDF™- Business Ready PDF! Award-winning Foxit PhantomPDF
provides the right features at the right price, allowing you to produce great looking PDF
document and forms quickly, affordably, and securely. Foxit PhantomPDF comes in two editions:
Foxit PhantomPDF Standard to fit the small and medium sized businesses, and Foxit
PhantomPDF Business to fit the large enterprises.
Foxit PhantomPDF Standard
Foxit PhantomPDF Standard enables businesses to create, edit, and secure reliable PDF
documents quickly, easily, and at a cost you can afford.












XFA Form Filling
Direct Editing
Read out Loud
Robust Document Security
Form Fields
Optical Character Recognition(OCR)
Export PDF to Image
Industry Validation
PDF Optimizer
SharePoint Integration
DocuSign
Shared Review
Foxit PhantomPDF Business
Foxit PhantomPDF Business provides business the security that ensures regulatory compliance
and corporate governance of their important documents and archives and to ensure documents
don’t change after they are approved. The Foxit PhantomPDF Business also provides experienced
PDF authors with unique editing capabilities to generate great looking PDF documents. It stands
up to the demands of large enterprises but lightweight enough to easily deploy to thousands of
users without exhausting resources. Supports the right features at the right price with the quality
and support you expect from an enterprise solution.


Redaction
Document Certification
5
Foxit PhantomPDF Standard
User Manual








XFA Form Filling
Bates Number
Read out Loud
Microsoft® Active Directory® Rights Management Service Protector and Policy Manager
High Compression
SharePoint Integration
DocuSign
Send for Shared Review
About the User Manual
This user manual covers all features included in Foxit PhantomPDF Standard.
Quick Installation Guide
To get installation, registration, uninstallation and update instructions step by step, please refer
to Foxit PhantomPDF Quick Installation Guide.
Foxit Plug-In Platform
For flexible and convenient management of plugins, Foxit PhantomPDF offers a Plug-in Platform,
in which you can view the plug-in status, learn the information about the plugins installed, as
well as manage the plug-ins as needed.
To open Foxit Plug-in Platform, please choose Help > Product > About Foxit Plug-Ins
, and
Foxit Plug-in Platform will show up as below.
6
Foxit PhantomPDF Standard
User Manual
Foxit Plug-in Platform
Plug-in Status
Certified: Shows whether the signature of the plug-in is valid or not.
Loaded: Shows whether the plug-in has been loaded successfully or not.
Plug-in Information
In addition to plug-in status, you can learn more information about the plug-in installed,
including the name, date, description and legal copyright.
To learn the details of a plug-in, please click More… under the general description of the plug-in
in the Foxit Plug-in Platform. Then a dialog box showing the details of the plug-in will pop up (as
shown below).
7
Foxit PhantomPDF Standard
User Manual
Detailed Information about Foxit Updater Plugin
Plug-in Management
Within Foxit Plug-in Platform, you can manage the plug-ins as needed, including installing,
enabling, disabling and uninstalling plug-ins.
Installing a Plug-in
To install a plug-in, please follow the steps below:
Select Help > Product > About Foxit Plug-Ins to open Foxit Plug-In Platform;
Click Install Plugin > choose the plug-in file (in .xml format) > click Open.
Then Foxit PhantomPDF will verify whether the signature of the plug-in to be installed is valid or
not. If it is valid, Foxit PhantomPDF will load the plug-in directly; if not, a prompt message will
pop up (as shown below), and the installation will be terminated.
Note: The .xml and .fpi files of a plug-in to be installed should be placed in the same folder,
otherwise, installation will fail.
Disabling a Plug-in
To disable a plug-in, please follow the steps below:
Select Help > Product > About Foxit Plug-Ins to open Foxit Plug-in Platform.
Select the plug-in you want to disable, and click the Disable button
to disable it.
Enabling a plug-in
8
Foxit PhantomPDF Standard
User Manual
To enable a plug-in, please follow the steps below:
Select Help > Product > About Foxit Plug-Ins to open Foxit Plug-in Platform.
Select the plug-in to be enabled, and click the Undo Disable button
to enable it.
Uninstalling a plug-in
To uninstall a plug-in, please follow the steps below:
Select Help > Product > About Foxit Plug-Ins to open Foxit Plug-in Platform.
Select the plug-in to be uninstalled, and click the Uninstall button
to uninstall it.
Note:
1. All the operations to the plug-ins will take effect after you restart Foxit PhantomPDF.
2. Foxit PhantomPDF includes plug-ins that are necessary for the realization of its functionalities
or are necessarily required for maintenance. To ensure normal operation, you are not allowed to
disable or uninstall these plug-ins (such as Foxit Updater plugin, Foxit Plug-in Platform plugin,
etc.)
9
Foxit PhantomPDF Standard
User Manual
Chapter 2 – Get Started
The Foxit PhantomPDF workspace is packed with tools that help make working with PDF files
easier, and is organized into a document pane, a navigation pane, toolbar pane menu bar and
status bar. A good way to get up to speed in using Foxit PhantomPDF is by familiarizing yourself
with its workspace.
Workspace Basics
Foxit PhantomPDF provides an intuitive user interface with a menu bar, a toolbar, a navigation
pane, work area and status bar.
About Start Page
The Start Page appears when you first start Foxit PhantomPDF and shows the recent documents
opened, helpful product tutorials and more. You can click any document you recently opened
from the recent document list or choose one tutorial for any feature to learn about our product.
The Start Page will continue to appear every time you start the program until you uncheck the
Show Start Page at FILE > Preferences > General > Application Startup.
10
Foxit PhantomPDF Standard
User Manual
Menu Bar and Context Menus
Ordinarily, it is a good idea to keep the menu bar visible so that they are available as you work. It
is possible to hide them, in classic toolbar mode, using the View > uncheck Menu Bar or press F9.
Of course, you can temporarily display the Menu Bar again by right-clicking toolbar and checking
Menu Bar. By default, the toolbar mode is set to Ribbon Mode when you open a PDF document.
Foxit PhantomPDF has numerous context-sensitive menus. These menus appear when you
right-click an object in the workspace. A context menu displays commands that relate to the item
or area clicked.
Toolbar
The toolbar displays the FILE page (the backstage view like Office 2013) and other tabs with
different tools.
Toolbar under HOME Tab
Note: Position the pointer over a tool to see a description of the tool.
Click FILE to create, open, save to manage your PDF files.
11
Foxit PhantomPDF Standard
User Manual
FILE Page
Show/Hide Toolbar
To show/hide all toolbars, please do the following:
In Classic Toolbar Mode,
Choose View > Toolbars > show/hide Toolbars.
In Ribbon Mode, please do either of the following:
To collapse/expand the toolbar, please click
or
in the upper right corner.
Right-click toolbar and check Minimize the Ribbon option to hide the ribbon toolbar and
uncheck the option to show it.
Set Favorite Toolbar
The Ribbon is designed to help you find the commands in an easy and convenient way. Foxit
PhantomPDF gives you the capability to personalize and fine-tune the Ribbon in the way you
want. With this feature, you can customize the default Ribbon, and create custom tabs or groups
with your favorite commands.
To customize the Ribbon, you can right click the Ribbon, choose Customize the Ribbon from the
context menu to bring out the Customize Tools dialog box first, and then follow the steps below.
12
Foxit PhantomPDF Standard
User Manual
Context Menu
Customize Tools Dialog Box
Create a new tab
To create a new tab, please do one of the following:


Select the tab after which you want to add the new tab, and then click New Tab.
(Alternatively) Right-click the tab after which you want to add the new tab, and then choose
New Tab from the context menu.
Add a new group to a tab
To add a new group to a tab, please do one of the following:


Select the tab to which you want to add the group, and then click New Group.
(Alternatively) Right-click the tab to which you want to add the group, and then choose New
Group from the context menu.
Rename a tab or group
13
Foxit PhantomPDF Standard
User Manual




Select the tab or group to be renamed, and click Rename.
(Alternatively) Right-click the tab or group to be renamed, and choose Rename from the
context menu.
In the Rename dialog box, input the new name and click OK.
For a custom group, you can also choose the display symbol from the Rename dialog box.
Add commands to a group



Select the group under which you want to add a command.
Choose the command category and the desired command from the Choose command from
list.
Click Add to add the selected command to the desired group.
Remove a tab, group or command
To remove a tab, group or command, please do one of the following:


Select the tab, group or command to be removed, and click Remove.
(Alternatively) Right-click the tab, group or command to be removed, and choose Delete
from the context menu.
Reorder the tabs or groups
To reorder the tabs or groups, please do one of the following:

Select the tab or group you want to reorder, then click the Up

to move accordingly.
(Alternatively) Right-click the tab or group you want to reorder, and then select Move Item
Up or Move Item Down to move accordingly.
or Down
arrow
Reset the Ribbon
14
Foxit PhantomPDF Standard
User Manual

Click Reset in the Customize Tools dialog box to reset the Ribbon to the default settings.
Import a customized Ribbon


Click Import.
In the Open dialog box, select the Ribbon customization file (.xml file), and click Open.
Note: After importing a Ribbon customization file, you will lose all the arrangements you have
customized previously. If you want to revert to the customization you currently have, it is easier to
export the customized Ribbon before importing any customization.
Export a customized Ribbon


Click Export.
In the Save As dialog box, specify the file name and path and click Save.
Note:
1. After customization, you need to click OK in the Customize Ribbon tab to save and apply your
customizations to the Ribbon.
2. To help you distinguish a default tab or group from the customized ones, the custom tabs or
groups in the Customize the Ribbon list are tabbed with “(Custom)” after the name (like this:
), but the word “(Custom)” will not appear in the Ribbon.
3. The commands in the default group under a default tab are displayed in grey, and they cannot
be renamed, reordered or removed.
4. You cannot remove default tabs in Foxit PhantomPDF.
To set favorite toolbar in Classic Toolbar Mode:
Choose View > UI Options > Customize Toolbars, and the Customize Tools dialog box pops
up.
In the Favorite Toolbar tab, please do the following:
 Add - Select your preferred tools from the left “Command” pane, click Add and see
them appear in the right “Favorite Toolbar” pane.
 Remove - Select the tools you accidently added to the right “Favorite Toolbar” pane,
click Remove, and see them disappear from the right pane.
 Reset - Reset the Favorite Toolbar pane to the default settings.
Click Up/Down button on the right side to adjust the position of your favorite toolbars, and
click OK.
To show/hide Favorite Toolbars, you can either right-click toolbars to check/uncheck Favorite
or go to View > Toolbars > check/uncheck Favorite.
15
Foxit PhantomPDF Standard
User Manual
Move toolbars in Classic Toolbar Mode
Any toolbars can float or be docked. Docked toolbars appear in the toolbar area. Floating toolbars
appear as independent palettes that you can move anywhere in the work area. Each toolbar has
a grabber bar
at the left edge of the toolbar.
To rearrange the docked toolbars, use the toolbar grabber bars to drag them from one
position to another.
To float a docked toolbar, drag it by its grabber bar from the toolbar area.
To move a floating toolbar, drag it by its title bar to another location in the work area.
To dock a floating toolbar, double-click its title bar or drag it by its title bar to the toolbar
area.
To move all floating toolbars to the toolbar area, choose View> Toolbars > Reset Toolbars.
Note: No need to move toolbars in Ribbon mode, where all tools are displayed under each ribbon.
Return toolbars to their default configuration in Classic Toolbar Mode
Choose View > Toolbars > Reset Toolbars or right-click to choose Reset Toolbars.
Press the hotkey Alt+F8 on your keyboard.
Navigation Panels
Show or hide the navigation panels
The buttons on the left side of the navigation pane provides easy access to various panels, such
as the Bookmarks panel button
and the Pages thumbnails button
.
To show the navigation panels, use keyboard shortcut F4.
To open a navigation panel, click its button on the left side of the navigation pane.
To hide the navigation panels, use keyboard shortcut F4.
Adjust the navigation pane
Like the toolbars, the navigation pane can be docked in the navigation pane or float anywhere in
the workspace. You can choose to hide or close the panels that you don't need and open the
ones you do. What’s more, you can also adjust the width of the navigation pane easily.
1. Viewing a panel in the navigation pane
16
Foxit PhantomPDF Standard
User Manual
By default, all the panels dock in the navigation pane with a set of panel buttons appearing
on the left side of the work area. Do the following:
Select the button for the panel on the left side of the navigation pane.
2. Changing the display area for navigation pane
To change the view area of the navigation pane, drag its right border to adjust the width.
To minimize or maximize the navigation pane, click on the button
corner of the navigation pane.
/
at the top right
3. Docking or floating a navigation pane
To float a navigation panel, drag the panel button into the document pane.
To move a panel, drag it by its panel button to another location.
To dock a floating panel, double-click its title bar.
Working with Layers
A layer or as it is more formally known Optional Content Groups (OCG) is a dictionary
representing a collection of graphics that can be made visible or invisible dynamically by users of
viewer applications. In a PDF file, each layer may hold any portion of the document's objects, and
layers may be made visible or invisible, showing or hiding their contained objects, in any
combination.
With Foxit PhantomPDF, you can control the display of PDF layers with the Layer panel. For
example, you may divide background imagery, main content areas, and advertisements amongst
their own top-level layers, and easily hide the layers that you don't want others to view.
Show or hide PDF layers
In a PDF, information can be stored on different layers. To show or hide related content stored in
a variable number of separate layers, you can simply refer to the Layer panel on the left side of
the work area. Please note that you cannot create or edit layers in Foxit PhantomPDF; however,
you can view layers and choose to show or hide the content associated with each layer.
A
B
17
Foxit PhantomPDF Standard
User Manual
Layer Panel
A. A checkmark indicates a displayed layer
B. Hidden layer
1. Open the Layer panel, and then do one of the following:


To hide a layer, uncheck the layer.
To show a hidden layer, click the empty box and a checkmark will appear.
2. From the Option menu at the top right corner of the Layer panel, choose one of the following:





List Layers for All Pages - Shows every layer across every page of the document.
List Layers for Visible Pages - Shows layers only on the visible pages.
Reset to Initial Visibility - Resets layers to their default state.
Expand All – Expands all layers.
Collapse All - Collapses all of the current layers in the view.
Status Bar
The status bar is an area of the workspace that displays the page number where you are, the
number of total pages, page transition buttons, zoom buttons, etc. for view setting. The status
bar is open by default when you open a PDF. In the VIEW ribbon, the items on the View Setting
tab help you to show or hide the status bar.
Show Status Bar: If you check it, the status bar will appear in the bottom of the workspace.
Auto-hide Status Bar: If you check it, the status bar is hidden. But if you put the cursor near the
bottom of the page, the status bar will appear.
Hide Status Bar: If you check it, the status bar will be hidden.
Customize the Workspace
As you get acquainted with workspace of Foxit PhantomPDF, you can set up your work
environment on your demand.
18
Foxit PhantomPDF Standard
User Manual
Customize the Skin and the Interface Style
Skin and Interface Style
There are five kinds of skin, Classic, Black, Blue, Orange and Purple for you to change the look of
your software. Also, two kinds of interface style, Classic Toolbar Mode and Ribbon Mode for you
to change the interface of your software.
To change the skin of the workspace, please do the following:
Go to FILE > Change Skin.
Check the skin you like and click OK.
To change the interface style of the workspace, please do the following:
Go to FILE > Change Toolbar Mode > Check Classic Toolbar Mode or Ribbon Mode.
Set Preferences
Many program settings are specified in the Preferences dialog box, including settings for File
Associations, Forms, Full Screen, General, History, JavaScript, Languages, OCR, Page Display,
PDF/A, Reading, RMS Setting, Signature, and Trust Manager. Once you set preferences, they
remain in effect until you change them.
1.
2.
Choose FILE > Preferences.
Under Categories, select the type of preference you want to change.
19
Foxit PhantomPDF Standard
User Manual
Chapter 3 – Read
After getting acquainted with the workspace and the basic tools, you can start the journey of PDF
reading. You can open a PDF, reach a specific page easily, adjust the view of a document, read
pure texts by text viewer tool, view documents while listening to them, and more. Foxit
PhantomPDF also provides a new feature to view PDF portfolios.
Open & Close & Save PDFs
Open PDFs
Open PDFs in Foxit PhantomPDF
Do one of the following:


Choose FILE > Open, or click the Open button
on Quick Access toolbar. In the Open
dialog box, select the file name, and click Open. PDF documents are usually identified
with .pdf extension.
Open the Foxit PhantomPDF window, drag and drop the PDF file into the Foxit PhantomPDF
window.
Note: You can open more than one PDF document within the same Foxit PhantomPDF application.
When you open more than one file at a time, you can navigate the PDF files easily by
clicking the corresponding tabs or file names under the Window menu.
Open PDFs from Desktop or within Other Applications
If you set Foxit PhantomPDF as your default viewer for PDF files, you are able to launch and open
PDF files in the following applications:



Email Application: in your email applications, you can double-click the attachment icon to
open the document.
Web Application: you can open a PDF document by clicking on the PDF file link in your web
browser. Also, you can view the PDF content embedded in the HTML.
File System: double-click the PDF file icon in your file system.
Open a secured PDF document
If you receive a PDF that is protected by security features, you may need a password to open the
document. Some protected documents have other restrictions that prevent you from printing,
20
Foxit PhantomPDF Standard
User Manual
editing, copying, etc.



When opening a protected PDF, you will be prompted to enter the password.
When trying to copy or edit a secured PDF, you will be prompted that you are prohibited to
do it without the owner’s permission.
If you open a PDF which is encrypted by AD RMS feature of PhantomPDF, please refer to AD
RMS Protection.
Retrieve recently opened documents from within Foxit PhantomPDF
In “FILE” pull-down menu, you will be able to instantly retrieve recently opened documents. Foxit
PhantomPDF provides a list of recently opened PDF documents. Choose FILE > Open > Recent
Documents.
Note: To customize the number of document in recently used list, please choose FILE >
Preferences > History.
Save PDFs
When saving or saving as PDFs, Foxit PhantomPDF will optimize PDFs by removing redundant
data including deleted pages, objects or annotations.
Save a copy of a PDF
1.
2.
Choose FILE > Save As.
In the Save As dialog box, enter the filename and location, and click Save.
Save a PDF as a TXT
1.
2.
3.
Choose FILE > Save As.
Choose the extension name from the Files of Type Option in the Save As dialog box.
Enter the filename and location, and click Save.
Note: This function allows PDF documents to appear, for confidential purposes; in different file
types as if they were created on a different platform other than PDF.
Close a PDF
Do the following:
If you are in multi-tab browsing, to close the current PDF file click the file’s Close button in the
tab bar instead of the Foxit PhantomPDF application window, or double-click the tab, or click FILE >
Close. To close all PDF files, click the Close button in the Foxit PhantomPDF application window.
21
Foxit PhantomPDF Standard
User Manual
If you are in single document interface mode, just click the Close button on the PDF file, or click
FILE > Close.
Export PDFs
Export PDF to Word, RTF, Excel, PPT or HTML file
1.
2.
3.
Select FILE > Export, or click CONVERT > Export.
Select the format you want to convert PDF to.
You can select the language used in the PDF from Setting before you save as to ensure the
quality of the exported Word document.
Export a PDF as an image
1. Select FILE > Export to Image, or click CONVERT > Export.
2. Specify the file type of images and the page range (all pages, current page, a range of pages),
and click OK.
3. You can set the quality, colorspace, resolution from “Setting” in the Save As dialog box
before you save as. Click OK to continue.
4. Click Save.
Bundle with IFilter
Foxit PhantomPDF has been bundled with Foxit PDF IFilter– Desktop which allows users to index
a large amount of PDF documents and then quickly find text within these documents on desktop
system. You can trigger Foxit PDF IFilter under the installation location of your Foxit PhantomPDF.
For more information, please refer to the user manual of Foxit PDF IFilter
.
Standards Validation
With the Industry Standard of Foxit PhantomPDF, you can detect and fix problems for different
usage. Foxit PhantomPDF has the PDF/A, PDF/E and PDF/X compliance validation as the industry
standards. Click CONVERT > Compliance > Industry Standard button
, and select one of the
compliances and click Analyze or Analyze and Fix in the pop-up dialog box.
22
Foxit PhantomPDF Standard
User Manual
Read
Foxit PhantomPDF enables you to retrieve recently opened documents, as well as provides
different ways for you to read PDF files: multi-tab reading and single document reading.
Multi-tab Reading & Single Document Reading
Multi-tab Reading
The multi-tab browsing feature enables you to open multiple files in a single instance. Newly
opened PDFs will be displayed in tabs.
To enable tabbed browsing, go to FILE > Preferences > Documents > Open Setting > uncheck
Allow Multiple Instances.
Tab Bar
Single Document Reading
Create a new window when you double-click to open a new PDF file.

To enable single document interface mode, go to FILE > Preferences > Documents > Open
Setting > check Allow Multiple Instances.
Read Contents
Go to Specified Page
Click the First Page, Last Page, Previous Page and Next Page in the Go To ribbon under the View
menu or in the status bar to view your PDF file. You can also input the page specific page number
to go to that page. The Previous View lets you return to the previous view and Next View goes to
the next view.
23
Foxit PhantomPDF Standard
User Manual
Read with Bookmark
To jump to a topic using bookmarks, click the Bookmark button
on the left Navigation pane.
And then click the bookmark or right-click the bookmark and choose “Go to Bookmark”. Click the
plus (+) or minus (-) sign to expand or collapse the bookmark contents.
Read with Page Thumbnail
To jump to a page with page thumbnails, click the Page Thumbnails button
on the left
Navigation pane and click its thumbnail. To move to another location on the current page, drag
and move the red box in its thumbnail. To resize a page thumbnail, right-click on the thumbnail
and choose “Enlarge Page Thumbnails” or “Reduce Page Thumbnails”.
24
Foxit PhantomPDF Standard
User Manual
View PDF Portfolios
PDF portfolios are a combination of files with different formats such as Word Office files, text
documents and Excel files. Foxit PhantomPDF provides viewing and printing PDF portfolios and
searching keywords in PDFs in the portfolio.
25
Foxit PhantomPDF Standard
User Manual
A Sample PDF Portfolio



Download a Sample PDF portfolio (preferably with files in different formats).
Open it in Foxit PhantomPDF by right clicking and “Open with Foxit PhantomPDF”.
You can view the coversheet, details and layout of the portfolio. To open and read the
files in the portfolio, please do any of the following:

Double-click a file.

Click
button in the upper right corner of the document area.

Right-click a file and choose Open File in Native Application.

Right-click the document area and choose Show Information or click

upper right corner of the document area to view the properties of the document.
Search in portfolio by typing keywords in Search box or using shortcut keys CTRL+ Shift
+ F.
button in the
Search & Index in PDFs
Find Text
To quickly find text you are looking for, follow the steps below:

Select the Find Field
on the menu bar. Click
to set the search
criteria.
A. Whole words only -- limits the search to match only whole words. For example, if you
search for the word Read, the word Reader will not be found.
B. Case-Sensitive -- makes the search case-sensitive. For example, if you search for the word
text, the words Text and TEXT will not be found.
C. Include Bookmarks -- enables you to search for a word in the whole text, including
bookmarks.
D. Include Comments -- enables you to search for a word in the whole text, including
comments.
E. Include Form Data – enables you to search for a word in the whole text, including form
data.

Type the text in the field and press Enter button. Foxit PhantomPDF jumps to the first
instance of the search term, which appears highlighted.

Click
and
or press shortcut keys Shift+F3 and F3 to find previous or next result, or
press Enter to find the next result.
Foxit PhantomPDF supports the advanced search function which enables you to search a string in
a single PDF file, multiple PDF files under a specified folder or PDFs in a PDF portfolio. When the
26
Foxit PhantomPDF Standard
User Manual
search finishes, all occurrences will be listed in a tree view, allowing you to quickly preview the
context and jump to specific locations.
To do the advanced searching, do as below:

Click the search button
, and select a document or folder you want to search in the
Search Panel. Then in the Searching box, type the text you want to search for and click


button to set the search criteria. See also Search Criteria.
Click Search button. Foxit PhantomPDF jumps to the first instance of the search term, which
appears highlighted. And all occurrences will be listed in a tree view, allowing you to quickly
preview the contexts and jump to specific locations.
Press New Search in the search panel to start a new search or press the close button in the
top of the search panel to finish search.
Move and Resize Search Box
The advanced search box can float or be docked. You can also resize the box with ease.




To float the docked search box, please double-click the title bar.
To move the floating search box, drag it by its title bar to another location in the work area.
To resize the search box, drag any corner point to adjust.
To dock the floating search box, double-click again the title bar.
OCR Function
Optical Character Recognition, or OCR, is a software process which enables images or printed
text to be translated into machine-readable text. OCR is most commonly used when scanning
paper documents to create electronic copies, but can also be performed on existing electronic
documents (e.g. PDF).

Recognize text
Foxit PhantomPDF can detect whether a PDF file is scanned or image-based and make
corresponding suggestions to initiate OCR when opening a scanned or image-based PDF as
below:
To recognize image-based or scanned text in a file, perform one of the following:
Click HOME > Convert > OCR > Current File, in the Select OCR Engine dialog box, specify the
27
Foxit PhantomPDF Standard
User Manual
range you need,
1.
2.
Choose the language used in your document. You can select multiple languages as well.
In the output type, check Searchable Text Image to make the image searchable when
finding text. Click OK to recognize the text.
Note: If you check Editable Text, the image objects will be deleted with only the text remaining.
3.
A recognition text process bar will pop up to show the progress.
4.
Do the search function, the text on your image or scanned document will be searchable.
You can also recognize text from an opened image-based or scanned PDF document.
To recognize text in multiple files:
1. Click HOME > Convert > OCR > Multiple Files.
2. In the OCR Multiple Files dialog box, click Add Files to add files or folders. Use Move up,
Move down, and Remove to adjust the order of the files and click OK.
3. In Output Options dialog box, select the destination folder and choose to name the new file
or overwrite an existing one.
4. Click OK. After recognition, a message box will pop up to prompt you the recognition is
28
Foxit PhantomPDF Standard
User Manual
finished.
See also “To recognize text in a file”
Note: When you are using the CJK OCR engine for the first time, the system will remind you to
download and install the engine from Foxit server.

Find and Correct OCR Suspects
After recognizing image-based or scanned texts in the PDF file, you can pick out and correct the
texts or characters that are uncertain as the steps below:
1. Click HOME > Convert > OCR > Suspect Results > First Suspect. A pop-up Find OCR Suspects
dialog box appears with a Foxit PhantomPDF box appearing to prompt you Find Completed.
Find OCR Suspects dialog box
Note: By default, the suspect results are based on the Search Document. You can also select
Search Page to find suspects on the current page and redo this step.
2. The Find OCR Suspects dialog box shows both the original document text and the OCR text.
You can edit text in the OCR text box directly if needed. If the highlighted text is incorrectly
identified, click Not Text. Click Find Next to find the next suspect or click Accept and Find to
accept the suspect and find next suspect.
3. If you choose HOME > Convert > OCR > Suspect Results > All Suspects. The Find OCR
Suspects dialog box also pops up and all the OCR suspects will be highlighted with red boxes
as below:
29
Foxit PhantomPDF Standard
User Manual
Original Document Text in the PDF file
Suspect Results of the OCRed Text
You can check the highlighted text by clicking any highlighted parts. Click the place where is
incorrect and input the correct text in the OCR text box in the Find OCR Suspects dialog box.
4. Click Close to exit the Find OCR Suspects dialog box.
Adjust Page View
Foxit PhantomPDF provides multiple tools that help you adjust the view of your PDF documents,
such as the page magnification and the display of pages.
Adjust Page Magnification
Do one of the following procedures:
1.
Click the Zoom In tool
or Zoom Out tool
2.
Right-click the document pane and select Zoom In or Zoom Out.
3.
Select or input a magnification percentage in the Zoom To Area
4.
same tab.
Adjust a
magnification
percentage
in HOME > View.
in
the
Magnification
on the
Percentage
Area
on the status bar.
5.
Using the Marquee tool

Choose the Marquee tool

The cursor changes into
in VIEW > Assistant.
, drag a rectangle on the page or just click on the page to
30
Foxit PhantomPDF Standard
User Manual
increase the magnification by one preset level, centering on the point where you clicked.

Choose the Marquee tool, the cursor changes to
as Ctrl-click on the page. Drag a
rectangle on the page or just click on the page to decrease the magnification
5. Using the Loupe tool

Choose the Loupe tool

Move the loupe tool to the places you want to view, you will see the amplificatory or
decreased objects in the Loupe Tool dialog box.
(Optional) Select the Lock option in the Loupe Tool dialog box. Click the area of the
document you want to view in closer detail. A red rectangle appears in the document,
corresponding to the area shown in the Loupe Tool window. You can drag or resize the
rectangle to change the Loupe tool view.
To change the scale ratio of the Loupe Tool, you can either enter a value in the zoom text
box, or drag the slider in the Loupe Tool dialog box.


6.
in VIEW > Assistant.
Using the Magnifier tool
You can easily magnify areas of the PDF files as you work on Foxit PhantomPDF with this
free tool. It is especially useful for visually impaired people with some functional vision.
Magnifier
Fisheye Magnifier

Choose the Magnifier

Move the Magnifier to the places you want to view.
To switch between Magnifier and Fisheye Magnifier, press the left mouse button.
To change the size of magnifier window, press the right mouse button.


in VIEW > Assistant > Magnifier.
31
Foxit PhantomPDF Standard
User Manual

To turn off the Magnifier, choose any other tools.
Resizing a Page to Fit the Window
There are three types for you to choose:

To resize the page to fit entirely in the document pane, click the Fit Page button
in HOME > View, or right-click the Document Pane and choose Fit Page.

To resize the page to fit the width of the window, click the Fit Width button
in
HOME > View, or right-click the Document Pane and choose Fit Width. Part of the page may
be out of view.

To resize the page to its actual size, click the Actual Size
in HOME > View, or right-click
the Document Pane and choose Actual Size.

To resize the page to fit the visible width of the window, removing the margins, click the Fit
Visible button
in HOME > View.
Adjust the Page Display
To change the Page Orientation, do one of the following:
Click the Rotate View button
Click the Rotate Left button
in VIEW > Page Display.
or the Rotate Right button
in HOME > View.
Right-click the document pane and choose the Rotate Right tool.
Note: You can change the page view in 90-degree increments, but the change only affects screen
display instead of its actual orientation. You cannot save the changes in page view.
To change the page display, Foxit PhantomPDF provides the following page layouts:

Single Page
- Displays one page in the document pane at a time.

Continuous
- Arranges the pages in the document pane in a continuous vertical column.

Facing

Continuous Facing
- Arranges the pages side by side, displaying only two pages at a time.
- Arranges the pages side by side in a continuous vertical column.
32
Foxit PhantomPDF Standard
User Manual

Show Cover Page During Facing
-If a document has more than two pages, the first page
can be displayed alone on the right side of the document pane in Facing and Continuous
Facing views.

Split
- View a PDF with the document pane divided into two panes (Split command)
or four panes (Spreadsheet Split command).
Note: To restore single-pane view, choose VIEW > deselect Split/Spreadsheet Split.
With Split view, you can scroll, change the magnification level, or turn to a different page in the
active pane without affecting the other pane.
The Spreadsheet Split view is useful if you want to keep column headings and row labels visible
while scrolling through a large spreadsheet or table. In this mode, changing the magnification in
one pane changes the magnification in all panes. Also, scrolling is coordinated between the panes.
Scrolling a pane horizontally also scrolls the pane above or below it; scrolling vertically also scrolls
the pane to the left or right of that pane.
View Mode
Read Mode
User interface settings, such as the navigation pane, toolbar, and status bar, will be hidden when
a PDF is displayed in Read Mode. The document pane is enlarged, reducing wasted reading space
while leaving the menu bar available for necessary operations.
To view a document in Read Mode, please choose one of the following:

Click the Read Mode button

Press the shortcut key “Ctrl + H” on the keyboard.
Right-click the document pane and select Read Mode.

in VIEW > Document Views.
In Read Mode, a basic toolbar will float when the cursor is put at the bottom of the screen. This
offers basic tools, such as save, print, zoom in/out, etc.
If you open multiple PDFs, please press “Ctrl + Tab” on the keyboard to switch through them in
Read Mode.
To exit the Read Mode, please do any of the following:

Click the Read Mode button
in VIEW > Document Views.
33
Foxit PhantomPDF Standard
User Manual

Press the shortcut key “Ctrl + H” on the keyboard.

Click the Read Mode button
on the floating basic toolbar at the bottom of the screen.
Full Screen Mode
In Full Screen mode, Foxit PhantomPDF Document Pane fills the entire screen, with Menu Bar,
Toolbar, Status bar, and Bookmarks pane hidden behind. The mouse pointer remains active in Full
Screen mode so that you can click links.
1.
2.
To set Full Screen preferences, please go to FILE > Preferences > Full Screen.
To enter Full Screen mode, please do one of the following:


3.
Right-click the Document Pane and select Full Screen.
Press the shortcut key F11.
To adjust the view in Full Screen mode, right-click the document and work with the Context
Menu.
Note: This feature will not be available unless you clear Left click to go forward one page; right
click to go back one page checkbox in the Preference > Full Screen.
4. To exit Full Screen mode:
 Press Esc key.
 Press the shortcut key F11.
5.
Page Transition in Full Screen
Foxit PhantomPDF supports page transition to turn pages in Full Screen mode. It helps you to
turn pages as the transition feature in Microsoft Power Point. There are 10 transition types: Split,
Blinds, Box, Wipe, Dissolve, Glitter, Push, Cover, Uncover and Fade. Also, you could set the
direction, speed and page range for the transition.
To edit page transition, click the Page Transitions
in VIEW > Page Display.
34
Foxit PhantomPDF Standard
User Manual
Note:



This change only works for the current PDF.
The pages will be turned in the same way the next time you open and view the document in
full screen mode.
If you want to set page transition to all PDF documents opened by Foxit PhantomPDF, please
choose FILE > Preferences > Full Screen.
Reverse View
To read documents in a backward order, please do one of the following:

Choose VIEW > Document Views >Reverse View

Right-click on the document pane and choose Reverse View.
.
35
Foxit PhantomPDF Standard
User Manual
Text Viewer
With Foxit Text Viewer, you can work on all PDF documents in pure text view mode. It allows you
to easily reuse the texts scattered among images and tables, and acts like Notepad. Also, you can
adjust some settings to meet your needs.
To Enter Text View mode, do one of the following:

Choose VIEW > Document Views > Text Viewer

Press the shortcut key Ctrl + 6.

.
Customizing Text Viewer
As soon as Text Viewer is activated, you can use the Font Setting Tools to customize your own
work area. Right-click the text area to select Font Setting.
1. To change text font when reading with Text Viewer


Right-click and choose Font Setting > Font….
Choose Font name, Font Style, Font Size, Effects, Color and Script from respective fields in
Font dialog box. The suggested font for best screen display is Courier New.
2. Toggle between regular style and Bold style, choose Font Setting > Bold.
3. Toggle between regular style and Italic style, choose Font Setting > Italic.
4. Change the text color and the background color


Right-click and choose Font Setting > Color….
Text Viewer Colors dialog box pops up.
36
Foxit PhantomPDF Standard
User Manual

Drag respective sliders or type the value to change the Foreground (Font) Color and
Background (page) Color. You can preview the changes in the box with a word “Sample”.
Click OK to complete the procedure, or click Cancel to abandon the changes.

5. Change Text Viewer settings


Right click the text area > select Setting…
The text Viewer Settings dialog box pops up.

Below are the text viewer settings:
A. Set page width at three different levels: Current page width, Current document width
and System default width.
B. Minimal width – the valid value for this field is 0-1024. It is set to 78 by default.
C. Keep Column – for PDF tables or text columns, you can check Keep Column to retain
37
Foxit PhantomPDF Standard
User Manual
appropriate column in text viewer mode. It is checked by default.
D. Auto Width – for PDF tables or text columns, you can check Auto Width to keep
proper width between texts automatically. It is checked by default.
E. Auto Rotate – you can check Auto Rotate to ensure consistent orientation with that
of the printer. It is checked by default.

Navigating in text viewer mode
1. To go to next or previous page, do one of the following:

Choose VIEW > Go To > Previous Page

Click the Previous Page icon

Put the cursor in the Document Pane, press the Left or Right Arrow on keyboard to move
the pages up or down.
or Next Page
or Next Page icon
.
on the Status Bar.
2. To go to the first or last page, do one of the following:

Choose VIEW > Go To > First Page

Click the First Page icon

Press the Home or End keys.
or Last Page
or Last Page icon
.
on the Status Bar.
3. To go to a specific page, do one of the following:


Choose VIEW > Go To > input the specific page number > press Enter.
Input or select the specific page number on the Current Page Number Box
on Status Bar, and press Enter.

Changing the magnification level of a document
Do one of the following procedures:
1. Click the Zoom Out button
or the Zoom In button
2. Choose HOME > View > Zoom In
Note: The Zoom To box

or Zoom Out
on the status bar.
.
is unavailable in Text Viewer mode.
Finding text in Text Viewer mode
38
Foxit PhantomPDF Standard
User Manual
To find text you are looking for, please refer to Find Text.

Copying and pasting text in Text Viewer mode
1. Select text



Select a word: Double-click the word you want to select.
Select a line of text: Click and drag the cursor on the line of text you want to select.
Select all the text: Press Ctrl + A or right-click the Document Pane > choose Select All.
2. Copying text, do one of the following:


Right-click the selected text > choose Copy.
Select the text and then press shortcut key Ctrl + C.
3. Pasting text
To paste the selected text on Clipboard to another application, please follow the paste command
of the specific application.
Read Out Loud
What’s Read Out Loud?
Read Out Loud is a Text-to-Speech (TTS) tool. This tool can read the text in comments and
alternate text descriptions for images and fillable fields. With this feature, you can obtain
information without having to view the page, helping to effectively relieve eyestrain. It also
enables you to view other materials while listening to a PDF’s content.
To use the Read Out Loud, please do as below:

Choose VIEW > Assistant > Read > Read Current Page/Read from Current Page.
Setting Reading Preferences
Please go to FILE > Preferences > Reading.
Page vs Document:
1. Only read the currently visible pages - Read the visible page displayed on the current
window.
2. Read the entire document - Read every page of the document in order.
3. For large documents, only read the currently visible pages - If you open a large PDF, the
system will only read the current, visible page.
39
Foxit PhantomPDF Standard
User Manual
4. Minimum number of pages in a large document - Set a minimum number of pages to define
a PDF as a “large document”.
Reading Actions
In Read Out Loud Mode, some simple actions are offered for users to control the reading status,
including read this page, read this document, pause, resume, rate up, rate down and stop.
1. In Normal Mode, choose an action in VIEW > Assistant.
2. In Classic Toolbar Mode, a simple reading toolbar will be floated on the user interface after
you click View > Toolbars > check Read.
Read Out Loud uses the available voices installed on your system. If you have SAPI 5 voices
installed from text-to-speech or other language applications, you can choose to have them read
your PDFs.
Note: Read Out Loud isn’t a screen reader. Some operating systems may not support it.
Rulers & Guides & Measurements
Using Rulers & Guides
Foxit PhantomPDF provides horizontal and vertical ruler guides to help you align and position text,
graphics or other objects on the page. They can also be used to check their size and the margins
in your documents.
40
Foxit PhantomPDF Standard
User Manual
Rulers & Guides
A. Rulers B. Guides
To show or hide rulers/guides, select VIEW > check or uncheck Rulers/Guides.
To create ruler guides, follow the steps as below:


Drag down from the horizontal ruler to create a horizontal guide, or drag to the right of the
vertical ruler to create a vertical guide.
Double-click a location on the horizontal ruler to create a vertical guide, or double-click a
location on the vertical ruler to create a horizontal guide.
To move ruler guides, select the Hand tool, click and hold the guide, and then drag it to a new
location.
To change unit of measurement, right-click the horizontal ruler or the vertical ruler, and select a
measurement system for the rulers.
To delete ruler guides, please do one of the following:



To delete a guide, click the guide to select it, and then press the Delete key.
To delete all guides on a certain page, scroll to the page, right-click in the ruler area and
choose Clear Guides on Page.
To delete all guides, right-click in the ruler area and choose Clear All Guides.
Using Measuring
The Measure Tools enable you to measure distances and areas of objects in PDF documents. The
measure tools are especially useful when you need to know the distances or areas associated
with objects in a form or computer-aided design (CAD) drawing or when you want to measure
certain areas of a document before sending to a professional printer. The measure tools are
available to Reader users only if the PDFs are measurable.
When you use a measure tool, the tool dialog box displays the measurements of the line
41
Foxit PhantomPDF Standard
User Manual
segments you draw.

Measuring the objects
Choose COMMENT > Measure > [measure tool name], and do any of the following:

Select the Distance Tool
to measure the distance between two points. Click the first
point, move the pointer to the second point, and click again. The measurements will appear
on the page.

Select the Perimeter Tool
to measure a set of distance between multiple points. Click
the first point to start, and then click each point you want to measure. Double-click the last
point to end measuring.

Select the Area Tool
to measure the area within the line segments that you draw. Click
the first point to start, and then click each point you want to measure. After you have
clicked at least two points, click the first point or double-click the last point to complete the
area measurement.
Note: You can also choose to complete or cancel measurement by right-clicking the measurement
and choosing options from the context menu.
Before measuring, you can set the scale ratio or other options. The COMMENT FORMAT tab
appears after you select the measuring tool, and then do any of the following:



To change the scaling ratio (such as 2:1, say, when the distance on the screen is 2 inch then
the actual distance is 1 inch.) on the drawing areas, specify the appropriate numbers. If
necessary, change the unit of measurement next to this ratio.
Check Show result information if you want to see the current measuring result, including
real distance, angle, horizontal and vertical position, etc.
Check Measurement markup to type text as a comment in the Annotation box. When you
42
Foxit PhantomPDF Standard
User Manual

put the pointer over the measurement with the Hand tool selected you can view the
measurement result and annotation you typed in the Annotation box. Or when you
double-click the measurement, the pop-up note of the measurement will also show the
measurement result and the annotation.
Click Rulers to show the rulers.
Note: The object you draw will disappear when the Measurement Markup is deselected in
the Distance dialog box.

Working on the measurement object
After you complete the measurement, you are able to do further operations on it, such as move,
resize, flip, and even work on it the way you work on comments.
1.
Moving the measurement object

With the Hand Tool

object you want to move.
Place the cursor over the object when the pointer changes into
mouse to move it to the intended place.
2.

3.
selected, click the measurement
, hold and drag the
Changing the length and orientation of the line segment
With the Hand Tool
corners

or Annotation Selection Tool
, you will see the pointer change into
selected, select one of the resize
.
Hold and drag the mouse to change the length and orientation of the line segment.
Flipping the measurement and annotation
You can reverse measurement and annotation of the object you draw.
Before flipping
After flipping
To flip the measurement and annotation of the object, do the following:

Select the Hand Tool

Right-click the object you draw > select Flip.
or Annotation Selection Tool
.
43
Foxit PhantomPDF Standard
User Manual

Working on measurement objects as comments
The measurement objects can also be used as comments, as a result of which, you cannot only
set status, open popup note, delete, reply to the objects, but you can also set properties, and set
current properties as default for them.
For the information of how to work on the objects as comments, please refer to the
corresponding section of “Chapter 7 – Comments”.
Line Weights View
In Line Weights View, the lines will be displayed with the weights defined in the PDF file. When
Line Weights View is turned off, the lines will be displayed with the constant stroke width (1 pixel),
regardless of zoom. The following screenshots show the comparison of the PDF file displayed in
Line Weights View and Non-Line Weights View.
PDF in Line Weights View


PDF in Non-Line Weights View
To enter Line Weights View, please choose VIEW > Page Display, and then check Line
Weights option.
To exist Line Weights View, please choose VIEW > Page Display, and then uncheck Line
Weights option.
Compare PDF Files
The Document Compare feature lets you see the difference in two versions of a PDF, as well as
select the type of differences you’re looking for to verify that the appropriate changes have been
made. The Document Compare feature does not compare comments in the PDF.
Comparing a revised PDF to an earlier version

Choose VIEW tab > Compare group > Compare
.
44
Foxit PhantomPDF Standard
User Manual
Compare PDF Files dialog box




Specify the two documents to be compared. Click Choose… to select the file and choose the
specific pages you want to compare by dragging the slider or clicking the list box to select
the page number.
Type of Comparison:
Page by page visual differences – Compares by visual differences, including texts, images,
annotations, etc.
Textual differences – Compares texts only between the two documents. Check Include font
information (style, size, typeface) if needed. You can also set to highlight differences when
documents differ by less than a percentage to easier find out the differences.
Include page reassembled changes – If you check this option, the application will
automatically ignore the textual differences of the pages that were replaced or inserted and
will indicate that the pages will be inserted in the comparison result.
You can preview pages after you check Show preview option. Choose the specific page you
want to preview by dragging on the page range bar or select the page number by clicking
the list box near the range bar.
Click OK. And then a PDF document named “The result of Comparison.pdf*” will be
automatically created and opened with PhantomPDF. The first page shows a summary of
the comparison results and the differences will be classified with different colors.
45
Foxit PhantomPDF Standard
User Manual
Select & Copy
With Foxit PhantomPDF, you can copy texts and images to other applications.
Select and Copy Text
The Select Text tool lets you select horizontal and vertical text or columns of text in a PDF.
PhantomPDF sets its each ribbon with hand tool and Select tools for user’s convenience. To copy
text, click Select Text Tool
and do the following:
Select text

Select a line of text: Drag the cursor

Select a column of text: Put the cursor between the lines, drag the cursor
toward a
column of text you want to select.
Select a word: Double-click the word you want to select.
Select multiple paragraphs through pages: Click at the start of the selection, scroll to the end
of the selection without releasing your mouse.
Select all the text: Press Ctrl + A, or select some text, right-click it and then choose Select All.
Deselect all the text: Click any area of the text.




toward a line of text you want to select.
Copy text
After selecting the text, do one of the following:


Right-click the selected text > choose Copy.
Press shortcut key Ctrl + C.
Tip: The style (including font, bold, color, etc.) of the text will be copied to the clipboard as well
when you copy text in PDF.
Paste text
46
Foxit PhantomPDF Standard
User Manual
To paste the selected text on Clipboard to another application, please follow the paste command
of the specific application.
Copy Images
You can copy and paste individual images from a PDF to the clipboard, to other applications, or
to other files.
Take a snapshot of an image
To copy an image, please switch to the Snapshot tool





:
Choose HOME > Snapshot and the cursor changes into a Cross
automatically.
Hold the cursor over the image and drag a rectangle around it.
You will be prompted that the selected area has been copied to the clipboard.
(Optional) Right-click the selected area, and then choose Copy Select Graphic.
Paste the selected image to other applications.
Note: The selected area will be highlighted in blue.
Take a snapshot of a page
You can use the snapshot tool
to copy the entire page. Both text and images will be
copied as an image.


Select the Snapshot tool by choosing HOME> Snapshot.
Click anywhere in the page, or right-click anywhere in the page and choose “Select All” to
copy the entire page.
Tip: To deselect it, please click anywhere in the page.



You will be prompted that the selected area has been copied to the clipboard.
(Optional) Right-click the selected area, and then choose Copy Select Graphic.
Paste the selected image to other applications.
Note: The selected area will be highlighted in blue.
Copy a Combination of Text and Images as an Image
You can use the snapshot tool to copy the all selected content (text, images, or both) to the
clipboard or other applications. Text and images will be copied as an image.
47
Foxit PhantomPDF Standard
User Manual
To copy a combination of text and images as an image, do the following:





Select the Snapshot tool by choosing HOME > Snapshot.
Drag a rectangle around the text and images.
You will be prompted that the selected area has been copied to the clipboard.
(Optional) Right-click the selected area, and then choose Copy Select Graphic.
Paste the selected image to other applications.
Check the Accessibility of PDFs
A document is accessible if it can be used by people with disabilities, such as the visually
impaired people. Foxit PhantomPDF allows users to evaluate the accessibility of your documents
and identify areas that may be in conflict with Foxit’s interpretations of referenced guidelines
with Accessibility Checker.
Use Accessibility Full Check to check whether a PDF is compliant with accessibility standards of
Section 508. You can choose which kinds of accessibility items to check for and how to view the
results.
To check accessibility with Full Check, please do as below:
1. Choose FILE > Accessibility Checker > Accessibility Full Check
.
2. In the Accessibility Check dialog box, select options you need to check for.
3. In Report Options section, check Create Accessibility Report option if needed to save the
48
Foxit PhantomPDF Standard
User Manual
results as an HTML file and specify its Save Path.
4. Click Options button and specify the page range to do a full check.
5. Click Start Checking.
6. When the check is completed, the accessibility report appears in the Accessibility report
panel
in the left Navigation Pane. And the result report file is also created in the
specified folder.
The report includes the name of the PDF document, Detailed Report and Summary.
Detailed Report displays if there are any areas with problems. Summary clearly lists one
of the following statuses for each item check:

Passed automatic verification - The item is accessible.

Needs manual verification by user - The Full Check feature couldn’t check the item
automatically. Please verify the item manually.


Not applicable - There is no applicable content for this item.
The items with problems are totaled. For detailed information, please refer to
Detailed Report.
Note: Because some content types are difficult to be distinguished clearly by the checker,
some issues reported may not affect readability. It would be better to review all issues to
definitely decide which ones are not accessible.
7. (Optional) If you didn’t choose to create a report in Step 3, you can click
button in
the Accessibility report panel to save the results. You can also open a report by clicking
button.
To view Full Check results:
1.
Choose FILE > Accessibility Checker > Open Report
2.
In the Open dialog box, select the report file from the folder where you saved the report file
and click Open.
The report file will be opened with the associated PDF.
3.
.
Others
Asian Languages
If you try opening PDF files directly that contain Eastern Asian Languages such as Traditional and
simplified Chinese, Japanese, and Korean, you can open them with Foxit PhantomPDF directly
49
Foxit PhantomPDF Standard
User Manual
now. The add-on of Eastern Asian Language has been integrated into Foxit PhantomPDF package,
so you won’t be prompted to download and install the required language font kits. Foxit
PhantomPDF lets you view, search, and print PDF documents with Asian language text.
Note: To update the Eastern Asian Language font kits, users still have to go to HELP > Check for
Update to download and HELP > Install Update to install the updated version.
PDF Properties
To view the PDF properties, please choose FILE > Properties. You can acquire all relevant
information as follows:
Description
This tab shows some basic information about the document. The title, subject, author, and
keywords may have been set by the person who created the document in the source application.
You can easily edit the document information within the PDF document, a useful way for
searching and indexing files.
Initial View
When a user opens your PDF document, they see the initial view of the PDF. You can set the
initial view to the magnification level, page and page layout that you want. If your PDF is a
presentation, you may want to set the initial view to Full Screen Mode. After you define the initial
view of the PDF, you can add page transitions to selected pages of the entire document.
Define the initial view as Full Screen mode
When setting the initial view of a PDF to Full Screen mode, you must define how the document
opens.
1. Choose FILE > Properties.
2. In the Document Properties dialog box, select Initial View.
3. For best results, do the following:
 Choose Page Only from the Navigation tab menu.
 Choose Single Page from the Page layout menu.
 Set Open to page to the page on which you want to start the presentation.
4. Select Open in Full Screen mode to open the document without the menu bar or toolbar
displayed. Click OK. (You have to save and reopen the file to see the effects.)
Note: Users can exit Full Screen mode by pressing Esc if their preferences are set this way.
However, in Full Screen mode, users cannot apply commands and select tools unless they know
50
Foxit PhantomPDF Standard
User Manual
the keyboard shortcuts. You may set up page actions in the document to provide this
functionality.
Security
This tab describes security permissions and what functionality is allowed within a PDF. All the
security information is listed here if a password has been applied to the PDF.
Security tab of the Document Properties
See also “Checking PDF Security”
Fonts
The Fonts tab lists the fonts and the font types used in the original document, as well as the
encoding used to display the original fonts.
GPO
Group Policy (GPO), a feature of the Microsoft Windows NT family of operating systems, is a set
of rules that control the working environment of user accounts and computer accounts. It offers
the centralized management and configuration of operating systems, applications, and users'
settings in an Active Directory environment.
51
Foxit PhantomPDF Standard
User Manual
For instructions to use group policy of Foxit PhantomPDF, please refer to Foxit PhantomPDF GPO
Manual.
52
Foxit PhantomPDF Standard
User Manual
Chapter 4 – Create
Up to 3 times faster than other PDF tools, Foxit PhantomPDF makes creating PDF and PDF/A
documents simple and streamlined. With a click you can quickly convert virtually any kind of file
to PDF without having to open the source application.
Create a PDF in Different Ways
With Foxit PhantomPDF, you can easily create PDF files from files in other formats.
One-click PDF Creation from Any File
Foxit PhantomPDF can create any kind of printable files to PDF simply by dragging the file into
the program window; alternatively you can use Foxit PhantomPDF to quickly convert files to PDF
directly from within Windows® Explorer.
To create a PDF with one click:

Drag the document you want to convert on to the Foxit PhantomPDF desktop icon

If Foxit PhantomPDF is open, drag the file directly into the application window.
Right click the document icon you want to convert and choose Convert to PDF in
PhantomPDF.

.
Create PDFs in the Foxit PhantomPDF Application Window
Create a PDF from a File
You can create a PDF from Office, email, a web site, or from any file that prints.
1. Launch Foxit PhantomPDF, choose FILE > Create > From File, or choose CONVERT > Create >
From Files > From File.
2. In the Open dialog box, select a file. You can browse all file types when you select All
Supported Files (*.xls, *.xlt, …) from the File type menu.
3. Select a file you want to convert and click Open to convert the file to a PDF.
4. Type a filename and specify a location in pop-up Save dialog box.
Note: Depending on the type of file being converted, a progress dialog box appears and Foxit
53
Foxit PhantomPDF Standard
User Manual
PhantomPDF opens automatically.
Create a PDF from multiple files
You can easily merge files of different types into a single PDF.
1. Choose FILE > Create > From Multiple Files, or choose CONVERT > Create > From Files >
From Multiple Files.
2. In the Convert Multiple Files dialog box, click Add Files… to select the files you want to
combine.
3. Adjust the order of files as desired by using Move Up/Down, click the title of the table or
drag and drop the change the file order.
4. Choose a type of converted PDF files and click Convert:


Convert multiple files to PDF files – All the files will be converted to different PDF files.
Merge multiple files into a single PDF file – All the files will be converted to a single PDF file
Tip: Foxit PhantomPDF uses original filename as a bookmark as default when combining multiple
files into a single PDF.
Create a PDF from a blank page
You can create a PDF from a blank page rather than beginning with a file, a clipboard image, or
scanning.
1.
2.
3.
4.
5.
Choose FILE > Create >Blank, or choose CONVERT > Create > Blank.
Choose EDIT > Edit Content > Add Text tool or COMMENT > Typewriter > Typewriter.
Click on the blank page to start typing the text you want to add to the blank page.
As needed, select other tools and options that you want to apply to the PDF.
Choose FILE > Save, and select a name and location for the PDF file.
Create a PDF from Clipboard
You can create a PDF directly from your clipboard.
1. Choose FILE > Create > From Clipboard, or choose CONVERT > Create > From Clipboard.
2. The texts or images in the clipboard will be converted to a new PDF file.
Create a PDF in Other Applications
Foxit PhantomPDF enables you to create intelligent PDF files from other applications such as
Microsoft Office (Word, Excel, PowerPoint and Outlook), automatically keeping bookmarks, links,
hyperlinks, outline and more of the source files in the created PDF.
54
Foxit PhantomPDF Standard
User Manual
Microsoft Office (Word, Excel, PowerPoint and Outlook)
In Microsoft Office 2007/2010/2013, Foxit PhantomPDF appears as a tab, allowing you to quickly
create PDF files and change your conversions settings with just a few clicks.

Microsoft Word, Excel and PowerPoint
Microsoft Word 2010 Foxit PDF Tab
To create a PDF in Microsoft Word, Excel and PowerPoint, please do as below:
Open a file in Microsoft Word or PowerPoint, click Foxit PDF tab and do one of the following:
To create a PDF using the current settings, click Create PDF
button. Then enter the file
name, specify the location and click Save.
To create and email a PDF using the current settings, click Create PDF and Email
button.
Then enter the file name, specify the location and click Save. The created PDF file will be
attached to your mail system automatically for you to send out.
To customize your PDF conversion settings before creating PDF, check desired options in
General Settings group.
View PDF Results – Once the conversion finishes, the converted PDF will be opened with
PhantomPDF automatically. This option is checked by default.
Prompt for File Name – Before conversion, a dialog box will pop up for you to name the PDF
file to be created. This option is checked by default.
Convert Document Information – Keeps the document properties information of the source
file in the converted PDF during the conversion. This option is checked by default.
Support PDF/A-1b Standard – Creates a PDF that is compliant with PDF/A-1b standard.
Create Bookmark – Keeps the bookmarks of the source file in the converted PDF. (Word
Only) This option is checked by default.
55
Foxit PhantomPDF Standard
User Manual
For more settings, click Advanced
button and the Foxit PhantomPDF Add-in dialog box
pops up. You can add headers/footers, watermarks, security, etc. See also Setting Foxit
PhantomPDF Printer Properties.

Microsoft Outlook
Foxit PhantomPDF helps you quickly to create a PDF file or PDF portfolio from the selected email
message(s) or folder(s).
Microsoft Outlook 2010 Foxit PDF Tab
To create a new PDF or PDF portfolio from the selected message(s), please select the
message(s) you want to convert and click Selected Message > Create New PDF…, or
right-click the selected message(s) and choose Convert to Foxit PDF. Then specify the name
and the location of the created PDF to begin the conversion.
Note:
1)
2)
3)
To create a new PDF portfolio, the Output PDF Portfolio option should be checked in
General Settings group. Each message will be converted to a single PDF.
If the Output PDF Portfolio option is not checked, the selected message(s) will be
merged into one continuous PDF according to the time of each message was sent or
received, i.e. the latest message is on the first page.
The default name of the created PDF or PDF portfolio will be the title of the selected
message or the folder name of the selected messages.
To create a new PDF or PDF portfolio from the selected folder(s), please click Selected
Folder > Create New PDF…, or right-click a folder and choose Convert to Foxit PDF. Select
folders you want to convert in the pop-up Convert folder(s) to PDF dialog box. Then specify
the name and the location of the created PDF portfolio to begin the conversion.
56
Foxit PhantomPDF Standard
User Manual
Note:
1)
2)
To create a new PDF portfolio, the Output PDF Portfolio option should be checked in
General Settings group. Each message will be converted to a single PDF and then the
created PDF will be put into corresponding folders in the portfolio.
If the Output PDF Portfolio option is not checked, all messages in the selected folders
will be merged into one continuous PDF. If you create a PDF file from one folder, the
latest email message will be arranged on the first pages of the created PDF file. If you
create from multiple folders, the order is based on the order how each folder is
displayed on Convert folder(s) to PDF dialog box first and then the time of each
message was sent or received.
To append to an existing PDF or PDF portfolio from the selected message(s), please select
the message(s) you want to convert and click Selected Message > Append to Existing PDF…,
or right-click the selected message(s) and choose Append to Foxit PDF. Select the existing
PDF or PDF portfolio you want to append to and click Open. The selected message(s) will be
appended to the end of the existing PDF. If the existing PDF is a PDF portfolio, the selected
messages will be created to single PDF files and then put into corresponding folders in the
existing PDF portfolio.
To append to an existing PDF or PDF portfolio from the selected folder(s), please click
Selected Folder > Append to Existing PDF…, or right-click a folder and choose Append to
Foxit PDF. Select folders you want to convert in the pop-up Convert folder(s) to PDF dialog
box. Select the existing PDF or PDF portfolio you want to append to and click Open. All
messages of the selected folder(s) will be appended to the end of the existing PDF. If the
existing PDF is a PDF portfolio, each message of the selected folders will be created to single
PDF files and then put into corresponding folders in the existing PDF portfolio.
57
Foxit PhantomPDF Standard
User Manual
To customize your PDF conversion settings before creating PDF, check desired options in
General Settings group.
View PDF Result – Once the conversion finishes, the converted PDF will be opened with
PhantomPDF automatically.
Output PDF Portfolio – Creates a new PDF portfolio from the selected email message(s)
or folder(s) and keeps the folder information of the selected folders in the created PDF
portfolio (i.e., the location path information of the folder in your email system). If you don’t
want to keep the folder information during conversion, please click Advanced button and
uncheck Convert folder information option in the Settings tab. For instructions on how to
modify a PDF portfolio, please refer to Customize PDF Portfolios.
Include Attachment – Keeps the attachments of the selected email messages or folders
as the created PDF’s attachments, with the file types of the attachments unchanged.
Support PDF/A-1b Standard – Creates a PDF that is compliant with PDF/A-1b standard.
For more settings, click Advanced
button and a Foxit PhantomPDF Add-in dialog box
pops up. You can add headers/footers, watermarks, security, etc. See also Setting Foxit
PhantomPDF Printer Properties.
Foxit PhantomPDF supports automatic email archiving based on your settings. Click Automatic
Archival
button and check Enable Automatic Archival option in the pop-up Automatic
Archival dialog box to do archival settings:
58
Foxit PhantomPDF Standard
User Manual
Specify the frequency and the time of the day to do the automatic archiving.
(Optional) Enable “Maintain Log of Archival” to create a record for each archiving. Click
Choose File … to name the log file and specify its storage location.
In Choose Folders for Automatic Archival box, click Add to select email folders you
need to archive and specify the name and location of the archived email PDF. You can also
click Delete to remove folders from the list or click Change Archive File… to modify the
name and location of the archived email PDF.
(Optional) You can start archiving email right after you choose the folders for automatic
archival by clicking Run Archival Now button in the top right corner of the Automatic
Archival dialog box.
Click OK to complete setting.
Note: All archived email PDFs are PDF portfolios.
Windows Notepad
1.
2.
Open a .txt file.
Select from main menu File > Print.
Internet Explorer
1. Run your Windows web browser, open a website or stay on a web page.
2. Select from main menu File > Print.
3. Select Foxit PhantomPDF Printer from the Pinter list;
59
Foxit PhantomPDF Standard
User Manual
4. If you need to deploy printing settings, click the Preferences button on the right (Refer to
Setting Foxit PhantomPDF Printer Properties).
5. Click OK;
6. A dialog box will pop up for you to specify the folder and file name of the PDF document to
be generated, after done, click Save button.
Outlook Express
1.
2.
3.
4.
5.
6.
Run your Email client software and open an E-mail by clicking its title.
Select from main menu File> Print.
Select Foxit PhantomPDF Printer from the Printer list.
If you need to deploy printing settings, click the Preferences button on the right (Refer to
Setting Foxit PhantomPDF Printer Properties).
Click OK.
A dialog box will pop up for you to specify the folder and file name of the PDF document to
be generated, after done, click Save button.
Create a PDF using the Print command
Foxit PhantomPDF Printer works like a standard printer, so you can use it to print your files from
any windows applications as if you would print to a real printer.
1. Open the file in its authoring application.
2. Choose FILE > Print.
3. Select the printer named Foxit PhantomPDF Printer, and click OK button to start printing.
After the printing is finished, the generated PDF file will be opened directly.
4. You can click FILE > Save to save the PDF file. Specify the name of the PDF file and where to
store. Click Save.
5. Or you can just close the generated PDF and click No in the pop-up message to prompt you
whether to save the PDF file.
Foxit PhantomPDF supports to append newly generated PDF files to a previously generated one
which are created by Print command in other application using Foxit PhantomPDF Printer. More
details please refer to the steps below.
1. Do some settings to Foxit PhantomPDF. Run and open the application window. Click FILE >
Preferences > Documents > uncheck Allow Multiple Instances, if it is checked. And click FILE >
Preferences > Create PDF > check Insert printed PDF into previous generated one, exclude the
PDF files created from PhantomPDF application.
60
Foxit PhantomPDF Standard
User Manual
2. Open the file you want to convert to PDF and use the Print command to generate a new PDF.
The generated PDF file will be opened automatically with PhantomPDF. A Print Job pane appears
in navigation pane and the name of the file will be displayed on the pane. Do not close and save
the PDF file.
3. Open another file you want to append to the PDF file generated on Step 2. Convert the file
with Print command to PDF.
4. You will see that the name of the file in Step 3 is also added to the Print Job pane. That is to
say, the generated PDF file on Step 3 is appended to the generated PDF file on Step 2.
61
Foxit PhantomPDF Standard
User Manual
5. Click FILE > Save. In the pop-up Save As dialog box, specify the name and location and click
Save.
Create a PDF using Print to Evernote
Foxit PhantomPDF adds a new printer “Print to Evernote” after installation. This feature enables
you to send the PDF file as an attachment to the Evernote as well as creating a PDF as Foxit PDF
printer does.
To create a PDF using Print to Evernote, do as below:
1. You should sign in an Evernote account online and install the Evernote application.
2. Open the file you want to convert to PDF format, choose FILE > Print > Print to Evernote.
3. Set the print properties and then click Print. Name the PDF file and specify the storage
location.
4. You will see the PDF file is created and also attached to your Evernote.
Create a PDF using Scanner
Foxit PhantomPDF provides you with an easy way to create a PDF directly from a paper
document using your scanner. In total there are three methods for you to scan paper documents
to PDFs: Quick Scan, Custom Scan and Scan by the configured presets.
62
Foxit PhantomPDF Standard
User Manual
Quick Scan:
Foxit PhantomPDF allows users to create PDFs from scanner with just one click.
Choose CONVERT > Create > From Scanner > Quick Scan. If there is more than one scanner
device on your system, then you will be prompted to set one as the default quick scanner
the first time you use Quick Scan feature.
A dialog box will pop up upon completion. You can click Yes to continue scanning more
pages, or click No to complete scanning.
Choose FILE > Save, and specify a name and location for the created PDF file.
Note: By Quick Scan, PDFs will be created by default settings and default scanner. To change the
default settings, please check Set as default quick Scanner in Configure Presets dialog box and
then change the settings as needed. See also Configure Presets.
Custom Scan
You can specify the scanning options and scan paper documents to PDFs at your command.
63
Foxit PhantomPDF Standard
User Manual
To custom scan paper documents to PDF:
1.
2.
3.
4.
Choose CONVERT > Create > From Scanner > Custom Scan.
Select the input, output, and documents options in the Custom Scan dialog box, and then
click Scan.
A dialog box will pop up upon completion. You can click Yes to continue scanning more
pages, or click No to complete scanning.
Choose FILE > Save, and specify a name and location for the created PDF file.
Custom Scan dialog box
Scanner: select an installed scanner. You must have the manufacturer’s scanning software
installed on your computer.
Scanner Options (Windows only): click to open the Scanner Options dialog box. (Available
only after you select a scanner.)

Transfer Mechanism: Native mode transfers data by default in your scanner. Buffered
memory mode scans in resolutions of over 600DPI.
 User Interface: Hide scanner’s interface option bypasses the windows and dialog boxes
provided by the scanner manufacturer. Instead, scanning from Foxit opens the Foxit
Scanner dialog box.
Input
Sides: choose single-sided or double-sided scanning.
Color Mode (Windows only): select a basic color mode (Color, Black and White, or Grayscale)
supported by your scanner. This option is enabled if your Scanner Options are set to use the
64
Foxit PhantomPDF Standard
User Manual
Foxit scanning dialog box instead of the scanner application.
Resolution (Windows only): select a resolution supported by your scanner. This option is
enabled if your Scanner Options are set to use the Foxit scanning dialog box instead of the
scanner application.
Note: If you select a Color Mode or Resolution option not supported by your scanner, a
message appears and your scanner’s application window opens, where you can select
different options.
Paper Size (Windows only): select a paper size or specify a custom width and height.
Prompt for continuous scanning: a pop-up message box to prompt you whether to continue
scanning when the current scanning is completed.
Output
New PDF Document: select this to create a new PDF; deselect it if you want to append the
scanned page to an existing PDF.
Append: select this if you want to add the converted scan to an existing PDF. Click Browse to
find and select another PDF.
Documents
Optimization: click Options to customize compression and filtering. The Optimization
Options dialog box for image settings controls how scanned images are compressed for the
PDF. Default settings are suitable for a wide range of document pages, but you may want to
customize settings for higher quality images and smaller file sizes.
Color/Gray settings:

JPEG: applies JPEG compression to the entire gray or RGB input page.
Low/High Quality: drag the slider to set the balance point between file size and quality.
65
Foxit PhantomPDF Standard
User Manual
Monochrome: when scanning black-and-white or monotone images, select one of the following:


CCITT Group 4: applies CCITT Group 4 compression to black-and-white input page
images.
JBIG 2: an image compression standard for bi-level images which is suitable for both
lossless and lossy compression.
Text Recognition: see “Recognize Text”.
Scan by the Configured Presets
You can configure scan parameters or options and save several presets. When you are ready to
scan you can choose one of the presets with just one click.

Configure presets
To configure a new preset, please do as the following:
1. Click CONVERT > Create > From Scanner > Configure Presets, or choose FILE > Create > From
Scanner > Configure Presets…. A Configure Presets dialog box pops up.
2. Select New Preset… in the list box of Presets item, and specify the name of the preset.
3. Select a scanner and then do the settings of Input and Documents items (See also “Custom
Scan”). You can also set the scanner as the default quick Scanner.
66
Foxit PhantomPDF Standard
User Manual
4. For the Preset menu setting item, you can set the maximum number of presets in Presets
menu.
5. When finishing configuring, click Save. Or click Delete Preset to remove the preset.

Scan by the configured presets
1. Click FILE > Create > From Scanner, and select a scanner and a preset.
2. Click Scan… button. After scanning is finished, you can choose to continue scanning or stop.
Then specify a name of the created PDF file and the location. And click Save to finish.
Create and Customize a PDF Portfolio
You can use Foxit PhantomPDF to quickly create a blank PDF portfolio or a new PDF portfolio
from any file. After creation, you can also add more files/folders, create folders, delete
files/folders and more within the PDF portfolio.
To create a blank PDF portfolio, please click CONVERT > Create > PDF Portfolio > Create a blank
PDF portfolio, or click FILE > Create > PDF Portfolio > Create a blank PDF Portfolio. In the ribbon
appears the PORTFOLIO tab with buttons to add files/folders and create folders.
To create a new PDF portfolio from a file, please click CONVERT > Create > PDF Portfolio > Create
a new PDF portfolio, or click FILE > Create > PDF Portfolio > Create a new PDF Portfolio from
67
Foxit PhantomPDF Standard
User Manual
existing files. Select the files you want to attach to a PDF portfolio and click Open. You can also
add more files or folders after creation.
Tip: To quickly add files/folders, you can also copy-and-paste or drag-and-drop files/folders to the
portfolio.
To customize a PDF portfolio, you can edit PDF files in the portfolio using PhantomPDF’s tools as
needed and do any of the following:


To delete a file, select it and click
button in the upper right corner of the document
area, or right-click it and choose Delete.
To extract a file from the portfolio, select it and click
button in the upper right corner of
the document area, or right-click the file and choose Extract from Portfolio…. Then specify
the name and location of the extracted file.
Tip: You can do more actions by right-clicking a file in the portfolio.
Create a table of contents from bookmarks
You may want to conveniently create a table of contents from existing bookmarks for a hierarchy
structure when viewing a PDF file. Foxit PhantomPDF offers two ways to create a table of
contents. The new table of contents page will be inserted as the first page of the PDF.

To create a table of contents when merging multiple files into a single PDF file, please select
“Add a new table of contents page converted from bookmarks” in the Convert Multiple Files
dialogue box. The table of contents page will be created from the filenames of the selected
files.

To create a table of contents in a current PDF, please click the button
on the
bookmark panel. The table of contents page will be created from the bookmarks of the
current PDF.
68
Foxit PhantomPDF Standard
User Manual
Chapter 5 – Edit
Foxit PhantomPDF provides not only general editing features to create bookmarks, add links,
attach files, add images, play and insert multimedia files on PDF files, but also advanced editing
features to select, insert, modify, remove and rotate texts, images, graphics and shadings. You
can go to the EDIT tab directly to use different editing features to easily and efficiently change
contents in any existing PDF files.
Undo and Redo
When making quick adjustments to your document, you may want to undo or redo the most
recent action performed. You can undo and redo up to 10,000 actions in Foxit PhantomPDF.
Undo your last action

Click Undo

Press Ctrl + Z.
on the Quick Access toolbar of Foxit PhantomPDF window.
Note: Some actions can’t be undone, such as clicking any command on the File menu. If you can’t
undo an action, the Undo command will be grayed out
.
Redo actions

Click Redo

Press Shift + Ctrl + Z.
on the Quick Access toolbar of Foxit PhantomPDF window.
Header & Footer, Watermark & Background to PDFs
Add Header/Footer, Watermark/Background to PDFs with Text, image and PDF, making your PDFs
more professional and help you to easily view, navigate watermark and place marks on
documents.
Header & Footer

To add a new header & footer, please do the following:
1.
2.
Choose ORGANIZE > Page Marks > Header &Footer > Add.
Edit the text of header & footer in the “Add Headers and Footers” dialogue box.
69
Foxit PhantomPDF Standard
User Manual
Add Headers and Footers Dialog Box
3.
4.
(Optional) Click Save Settings at the top of the dialog box to save the current settings as a
profile which can be applied directly to future documents.
Click OK to activate the operation.

To update the header & footer, please do the following:
1.
2.
3.
Choose ORGANIZE > Page Marks > Header &Footer > Update.
Update the content in the “Update Headers and Footers” dialogue box.
Click OK to activate it.

To remove the header & footer, please do the following:
1.
2.
Choose ORGANIZE > Page Marks > Header &Footer > Remove.
Click “Yes” in the pop-up message box.
Background

To add a new background, please do the following:
1.
Choose ORGANIZE > Page Marks > Background > Add.
2.
Edit the background in the “Add Background” dialogue box.



Choose one color as the background, or add the file from your computer via clicking
the browse button. If the file has many pages, you can select one of them.
Set the appearance by choosing the rotation degree, the opacity. You also can choose
to make the scale relative to target page or not. Click “Appearance Options” to set
when to display the background.
Set the vertical and horizontal distance between the target page and the background.
70
Foxit PhantomPDF Standard
User Manual


3.
Choose the page range to play the background. You can select all pages or specify the
page range, or choose even pages or odd pages via clicking the right items in the
subset list.
Check or uncheck the Show Preview option to preview the changes or not.
4.
(Optional) Click Save Settings at the top of the dialog box to save the current settings as a
profile which can be applied directly to future documents.
Click OK to activate it.

To update the background, please do the following:
1.
2.
3.
Choose ORGANIZE > Page Marks > Background > Update.

To remove the background, please do the following:
1.
Choose ORGANIZE > Page Marks > Background > Remove.
2.
Click “Yes” in the pop-up message box.
Update the content in the “Update Background” dialogue box.
Click OK to activate it.
Watermark

To add a new watermark, please do the following:
1.
Choose ORGANIZE > Page Marks > Watermark > Add.
71
Foxit PhantomPDF Standard
User Manual
2.
Edit the watermark in the “Add Watermark” dialogue box.


Input the text as the background and choose the font, size and the color, or add the file
from your computer via clicking the browser button. If the file has many pages, you can
select one of them.
Set the appearance by choosing the rotation degree, the opacity. You also can choose
to make the scale relative to target page or not. Click “Appearance Options” to set
when to display the watermark.





3.
4.
If you choose the “appear behind page”, the page content will obstruct your view
of some part of the watermark.
If you choose the “appear on the top of page”, the watermark will cover some
content, but you can adjust it via setting the opacity of the watermark.
Set the vertical and horizontal distance between the target page and the watermark.
Choose the page range to play the watermark. You can select all pages or specify the
page range, or choose even pages or odd pages via clicking the right items in the
subset list.
Check or uncheck the Show Preview option to preview the changes or not.
Click Save Settings at the top of the dialog box to save your current settings as a profile
which can be applied to other documents directly next time.
Click OK to activate it.
72
Foxit PhantomPDF Standard
User Manual

To update the watermark, please do the following:
1.
2.
3.
Choose ORGANIZE > Page Marks > Watermark > Update.
Update the content in the “Update Watermark” dialogue box.
Click OK to activate it.

To remove the watermark, please do the following:
1.
2.
Choose ORGANIZE > Page Marks > Watermark > Remove.
Click “Yes” in the pop-up message box.
Adding Format Page Numbers
If your PDF file contains front matter likes document cover and copyright page, the page numbers
on the document pages (i.e. printed page number) may not start from the document cover but
from the body pages. You may need to synchronize the page numbers displayed below the page
thumbnails (i.e. format page number) with printed page numbers. Foxit PhantomPDF enables
users to add format page numbers to meet different needs.
To add custom format page number, please do as below:
1.
2.
3.
4.
Click ORGANIZE > Page Marks > Format Page Numbers
. Or right-click a page
thumbnail and select Format Page Numbers….
In the Page Numbers dialog box, specify a range of pages you want to number and set the
style of page number and the number you want to start at. You can also add a prefix to the
number, like adding a letter “P” before the number. You can preview the result viewing the
Sample at the bottom of the dialog box.
If you need to continue the numbering sequence from previous pages without interruption,
please check Extend numbering used in preceding section to selected pages.
Click OK to finish.
73
Foxit PhantomPDF Standard
User Manual
Page Numbers dialog box
Links
This function helps you to lead the readers to related articles, references, or the intended web
page.
Generally speaking, there are three options of links for you: rectangle link tool
Links
and Bookmark
, Web
in Foxit PhantomPDF.
Rectangle Link
Add a rectangle link
Rectangle Link tool enables you to add a link with the shape of rectangle on the PDFs.
To add a rectangle link, please do the following:

Choose EDIT > Links > Link

Position the cursor on the place you want to add the link, hold and drag your mouse button
to draw a rectangle.
.
Tip: To draw a square link, press Shift key when you hold and drag your mouse button.

Pops up Create Link dialog box. Specify the appearance and destination of the link.

Appearance
A. Thickness – the thickness of the four sides of the rectangle. The higher of the value, the
thicker of the sides. You can choose the thickness from 0-12, while the default is 1.
B. Border Style – the style of the rectangle’s border. There are three types of the border
styles:
Solid: the border is solid, but not hollowed out.
Dashed: the border is drawn as a dashed line.
Underline: the sides are visible except the underline.
74
Foxit PhantomPDF Standard
User Manual
Solid Style
Dashed Style
Underline Style
Three types of border style
C. Highlight - the effect when you click the rectangle link. There are four types of the
highlighting effects:
None: doesn’t change the appearance of the link.
Invert: changes the link’s color to its opposite.
Outline: changes the link’s outline color to its opposite.
Inset: creates the appearance of an embossed rectangle.
None
Invert
Outline
Inset
Four types of highlight
D. Color - the border color of the rectangle. Click the color button to choose any colors you
like, or you may choose Other Color to add a customized color. The default color is red.
Choose the color

Destination
The destination refers to any point or location, for example, a web page, a named file or
position the link goes to. There are four options for you to choose:
75
Foxit PhantomPDF Standard
User Manual
A. Go to a page view – designate the link to a specific page view. Not only can you designate
the link to a page in the current PDF, but you can also set the link to the page in another
PDF. Also, you may change the current zoom setting and then set the position.
To go to a page view, choose this option, click the Next button and do one of the following:

Set the position in current document – scroll the current document, go to a new
position where you want to set and click Set this position.

Set the position in another PDF document – click the Open button
on the Quick
Access toolbar of the application window > select the PDF you want to set position >
scroll this document and go to a position where you want to set > click Set this
position.
Note: The new PDF document should be opened in the existing window but not a new
window.


Change the view magnification -- scroll in the current document or another document >
go to a new position where you want to set > change the magnification of the position >
click Set this position.
Click Cancel to cancel out of your operation.
B. Go to a named position – designate the link to a named position that has been set by the
creator of the current document.
To go to a named position, choose this option and click the Next button > select a named
position for the pop-up list > click OK.
Note: An empty pop-up list indicates that no position has been named by the document’s
creator.
C. Open/execute a file – designate the link to open another file. To do this, please follow the
steps below:

Choose Open/execute a file > click the Next button > select the destination file and
click Select.
D. Open a web page – designate the link to open a web page. Do the following:

Choose Open a web page > click the Next button > enter the URL of the destination
web page or click the drop-down button to select a web site you have opened before.
E. Others (use action property page) – add an action to the link. Please refer to “Actions tab
for the button properties” for more details.
76
Foxit PhantomPDF Standard
User Manual
Move or resize a link
You can move and resize the link after you create it.
Select one of the link tools or the Annotation Selection Tool
cursor over the link until the cursor turns into an arrow
Then do one of the following:
, and then move the
.
A. To move the link, drag it to the desired area.
B. To resize the link, drag any corner point to adjust.
Delete a link
Select one of the link tools or the Annotation Selection Tool
cursor over the link until the cursor turns into an arrow
Select the link you want to delete.
Press the Delete key.
, and then move the
.
Web Links
Foxit PhantomPDF allows users to check URLs in the PDF document automatically and add link
annotations directly to the related URLs.
Create web links from URLs
To create web links, please do as following:
1. Click EDIT > Links > Create links from URLs
. A message box will pop up to prompt you
whether to proceed because the operation cannot be undone. Click Yes to continue.
2. In the pop-up Create web links dialog box, choose All to create links from all URL in the
document, or choose From …To and enter a page range to create links on selected pages. Click
OK.
3. A message box will pop up to prompt you how many web links were added to the document.
To remove all web links, choose EDIT > Links > Remove all links
.
77
Foxit PhantomPDF Standard
User Manual
Bookmark
Please refer to “Add a bookmark”.
File Attachments
You can attach PDF files and other types of files to a PDF. There are two options for you to add an
attachment: attaching a file as a comment and attaching a file to the entire PDF. An attached file
as a comment will appear in the page with the File Attachment icon
by default, while the
attached file to the PDF file acts invisible and only can be seen when you click the Attachment
panel in the navigation pane.
Add a file as a comment
1.
2.
3.
Choose COMMENT > Pin > File.
Position the cursor to the place where you want to attach a file as a comment > click the
selected position.
In the Open dialog box, select the file you want to attach, and click Open.
4.
The File Attachment Icon
appears at the place you designated in the PDF file.
Work on the attachment comment
You can open the attachment, add a description, move and delete it, and set the preferences.

Open an attachment
Select the Hand Tool
or Annotation Selection Tool
and do the following:
1.
Double-click the File Attachment icon
.
2.
In Open file attachment dialog box, select one of the three options and click OK.
78
Foxit PhantomPDF Standard
User Manual
Open file attachment dialog box
A. Open the file attachment – open this file attachment and the dialog box will always pop
up when you double-click the File Attachment icon.
B. Always open file attachments of this type – open this file attachment and the files of
this type will be opened automatically when you double-click the File Attachment Icon
next time.
C. Never open file attachments of this type – forbid to open the file attachments of this
type. Whenever you double-click the File Attachment Icon, the files of this type will be
forbidden to open and you’ll be prompted that “File attachment of this type cannot be
opened because of your security settings”.
See also “Doing security settings”.
Note: If you are in Safe Reading Mode, you cannot choose the way to open the attached file.
Please go to FILE > Preferences > Trust Manager to uncheck the Enable Safe Reading Mode
option.

Move a file attachment icon
Select the Hand Tool
or Annotation Selection Tool
, click and drag the File Attachment
Icon to move it to other place.

Delete an attachment comment
Select the Hand Tool
or Annotation Selection Tool
Right-click the File Attachment icon
, and do one of the following:
and choose Delete.
Click the File Attachment icon and press Delete key.

More options with an attachment comment
You are able to work on the attachment comment just like an ordinary comment, including set
status, mark with checkmark, open popup note and add some descriptions, reply to the
comment, and change the icon’s appearance. For all the operations, please refer to “Chapter 7 –
Comment”.
Add a file to the entire PDF as an attachment
1. Click the attachment button
on the navigation pane and click Add button
, or choose
79
Foxit PhantomPDF Standard
User Manual
EDIT > Insert > File Attachment
.
2. In the Add Attachment dialog box, select the file you want to attach, and click Open.
3. Click OK after adding the desired files.
4. The added document will be displayed in the attachment panel.
Tip: An easy method to add a file attachment to PDFs, you can just drag and drop the file you
want to attach to the attachment panel. Foxit PhantomPDF will pop up a window to ask you
whether to attach the selected file to current PDF document. Click OK to complete the operation.
Check “Always attach file when dragging files to the attachment panel” option and the next time
you the file will be attached directly without this pop-up window.

Work on the attachments
You can open, save, edit descriptions, delete and do settings to the attachments. Click the
attachment button
on the navigation pane > Open button
/Edit Description button
/Settings
/Delete button
/Save button
/Add button
.
Attachments Panel

Security settings
To change the security settings you have set when you open the attachment file as a comment,
Click the Settings button



in the Attachment Panel and do one of the following:
To add a new extension, click the Add button to input the file extension in the Security
Settings dialog box.
To delete an extension, click one of the existing extensions and click the Delete button.
To change the settings of how to open the attachments of the type, choose one of the three
options listed.
80
Foxit PhantomPDF Standard
User Manual
Bookmarks
Bookmarks are navigational tools that make your PDF files easier to read. They are usually
generated automatically during the PDF creation.
Bookmarks are useful for users to mark a place in a PDF file so users can return to it with ease. Or
you may like to have your own bookmark structure and new bookmark names. With Foxit
PhantomPDF, you can easily nest, edit, or delete bookmarks in a PDF file if the security settings
allow.
Add a bookmark
1. Go to the page where you want the bookmark to link to.
2. (Optional) If there is no bookmark in the document, click EDIT > Links > Bookmark
the New Bookmark icon
, or click
at the top of the Bookmarks panel.
3. Select the bookmark after which you want to place the new bookmark. If you don’t select a
bookmark, the new bookmark is automatically added at the end of the bookmark list. Click
EDIT > Links > Bookmark, or click the New Bookmark icon
at the top of the Bookmarks
panel, or right-click the selected bookmark and choose Add Bookmark.
81
Foxit PhantomPDF Standard
User Manual
4. Type or edit the name of the new bookmark, and press Enter.
Move a bookmark
Select the bookmark (named “Bookmark A”) you want to move, and then do one of the
following:

Hold the mouse button down and then drag “Bookmark A” icon
place. The Line icon

directly to the desired
shows the place where the icon will be located.
Right-click “Bookmark A” icon
and choose the Cut option > right-click the
bookmark(named “Bookmark B”) under which you want to place “Bookmark A”, choose
“Paste after Selected Bookmark” if you want to put “Bookmark A” after “Bookmark B”,
which will be in the same hierarchy with “Bookmark A”; or choose “Paste under Selected
Bookmark” if you want to put “Bookmark A” under the “Bookmark B” which will be the
parent bookmark.
Note: The bookmark links to its original destination in the document although it is moved.
Organize a bookmark hierarchy
A bookmark hierarchy is an outline or stratified structure that places some bookmarks within
others. In Foxit PhantomPDF, multilevel bookmark hierarchy can be defined by properly dragging
the bookmark icon in the Bookmark panel.
To nest a bookmark or move a bookmark out of nested position, please refer to Move a
bookmark.

To expand or collapse a bookmark
Click the plus sign (+) next to the bookmark icon to show any children. Click the minus sign (-) to
collapse the list. Or click
to collapse all bookmarks.
82
Foxit PhantomPDF Standard
User Manual
Edit a bookmark
In Foxit PhantomPDF, you are able to rename a bookmark, reset a bookmark’s destination, or
customize the text appearance of a bookmark with ease if the security settings allow.

To rename a bookmark
Right-click the bookmark you want to rename in the Bookmarks panel > Rename> type the new
bookmark name. Or you double click the bookmark you want to rename and then type the new
name.

To reset a bookmark’s destination


In the document pane, move to the location you want to specify as the new destination.
(Optional) Adjust the view magnification.
Right-click the bookmark, choose Set Destination and select Yes.

To customize the text appearance of a bookmark

In the Bookmarks panel, right-click the bookmark > choose Properties.
In the Bookmark Properties dialog box, click the Appearance tab, and select the font style
and color for the text.


Note: After defining a bookmark’s appearance, you can set it as bookmarks’ default property by
right-clicking the bookmark and then selecting the option of Use Current Appearance as New
Default.

To add an action to a bookmark

Right-click a bookmark, and choose Properties.
In the Bookmark Properties dialog box, click Actions.
Choose an action from the Select Action menu and click Add, and then refer to the section
of “Actions tab for the button properties”.



To delete a bookmark, please do one of the following:

Select the bookmark you want to delete and click the Delete button

Bookmarks panel.
Right-click the bookmark you want to delete and choose Delete.
at the top of the
Note: Deleting a bookmark deletes all the bookmarks that are subordinate to it.
83
Foxit PhantomPDF Standard
User Manual
Images
You can specify a rectangle on any part of a PDF page and then insert an image into that
rectangle. This feature is helpful when you want to explain or show something more dynamically.
Add an image
You can add an image to a PDF with the Image Annotation tool
. After you insert a new
image, you can adjust its size and position, change the appearance and other settings, etc.
To add an image, do the following:

Choose EDIT > Insert > Image Annotation


Drag a rectangle on the page to define the canvas area for the image.
In the Add Image dialog box, click the Browse button to select the image that you want to
insert and click the Open button. You will see the URL of this image has been added to the
Location field.
Click the Advanced… button to edit the setting of the image.

.
Image Placement dialog box
A. When to scale – choose when to scale the image you insert.
B. Scale – choose to scale the image non-proportionally or proportionally. This option will be
disabled when you select Never in the field of When to scale.
84
Foxit PhantomPDF Standard
User Manual
C. Border – drag and move the scroll bar to change image’s position in the rectangle. The
coordinates change when you move the scroll bar.


Click OK for your changes to take effect, or click Reset to reset the data to the original
settings.
Click OK.
Apply an image to other pages
After adding an image, you may want to place the same image on additional pages while
maintaining the original location and settings.
To apply an image to other pages, please do the following:
1.
2.
3.
4.
Right click on the image you wish to apply to other pages.
Choose the option Place on Multiple Pages in the menu.
Specify the page range.
Click OK.
Move and resize an image
To move an image, please do the following:
1. Select the Annotation Selection Tool
or the Image Tool
and the cursor changes into an arrow
, put the cursor over the image
.
2. Click and drag the image to another place you like.
To resize an image, please do the following:
1. Select the Annotation Selection Tool
image and the cursor turns into an arrow
or the Image Tool
, put the cursor over the
, and then click the image.
2. Place the cursor on any corner point. The cursor changes into the cursor showing the
direction at which the rectangle will be resized.
To resize the image
85
Foxit PhantomPDF Standard
User Manual
3. Drag the cursor outside, it will increase the size of the rectangle proportionally. Drag the
cursor inside, it will decrease the size of the rectangle proportionally.
Set properties of an image
1. Double-click the image or right-click it and select Properties….
2. In the Appearance tab, do any of the following:
Annotation is hidden from view – The image annotation will be invisible in Hand tool mode.
Border – Select the border width of the image and the border’s style and color.


Locked – When selected, prevents any further changes to any image properties.
Close – Applies and saves the current properties, and closes the image properties
dialog box.
3. In the Settings tab, follow the steps in “To add an image”.
4. For the Actions tab, Please refer to “Actions tab for the button properties”.
Delete an image
1. Select the Annotation Selection Tool
or the Image Tool
image and the cursor turns into an arrow
, put the cursor over the
, and then click the image.
2. Press Delete or right-click the image > Delete.
Select multiple images
1. Select the Annotation Selection Tool
or the Image Tool
.
2. Press and hold Shift or Ctrl and click the images you want to edit.
Align images


Select two or more images that you want to align.
Click EDIT tab > Arrange group > Arrange button > select a type of alignment, or right-click
the anchor > Align, and then choose a command as follows:
A. To align a column of images, choose Left, Right, or Vertically to align them respectively to
the left edge, right edge, or vertical axis of the anchor image.
B. To align a row of images, choose Top, Bottom, or Horizontally to align them respectively
to the top edge, bottom edge, or horizontal axis of the anchor image.
Note: When you right-click or Ctrl-click one of the selected images, it will be highlighted in red,
indicating that it’s the anchor image. The align menu commands move the other selected images
86
Foxit PhantomPDF Standard
User Manual
to line up with the edges of the anchor image.
Below is an example:
A
A.
Suppose that you want to set A
as the anchor image.
B.
Select these two images >
right-click A and choose Align >
Left. You will see the other
image is placed to the left edge
of A.
Center images
This function enables you to center the rectangle enclosed by the images you select vertically,
horizontally or both.
Below is an example:
87
Foxit PhantomPDF Standard
User Manual
A.
Select two images. You can see
these two images consist of an
area with the shape of rectangle
(marked with red).
B.
Right-click one of the images >
Center > Vertically. You will
find that the red rectangle is
centered vertically in the page.
Distribute images
This function will be available when selecting three or more images.


To distribute the images evenly between the topmost and bottommost images, choose
Distribute > Vertically.
To distribute the images evenly between the leftmost and rightmost images, choose
Distribute > Horizontally.
Below is an example:
88
Foxit PhantomPDF Standard
User Manual
A
B
A. Select three images A, B and C. A
is the topmost image and C is
the bottommost image.
C
A
B.
B
Right-click any one of the images >
Distribute > Vertically. And you
will see that B is distributed evenly
between A and C.
C
Resize images
You can adjust multiple images with the same height, width, or both. Select one of the images as
the anchor, and the rest of the images will be resized with the same height or width as that of the
anchor image.
Below is an example:
89
Foxit PhantomPDF Standard
User Manual
A
A. Select images A and B. Suppose
that you want to set A as the
anchor image.
B
A
B
B.
Right-click A > Size > Height. And
you will see that the height of B
is resized to be the same as that
of A.
Setting properties of multiple images


Select multiple images > right-click one of them > Properties…
A dialog pops up with an Appearance tab. Follow the steps specified in “Setting properties of
an image”.
PDF Optimizer
With the PDF optimizer, users can compress the images, clear out the data redundancy of PDF
objects and update your PDFs.
Choose FILE > PDF Optimizer.
Setting the properties in the PDF Optimizer dialogue box.
90
Foxit PhantomPDF Standard
User Manual
PDF Optimizer Dialog Box



Select the compatibility level to save the current PDF file in the list box of Make compatible
with item.
Click Audit space usage to see the space usage of the current PDF file and then you can
decide which items are needed to be optimized.
For Images, you can specify color/grayscale and monochrome image settings, including
image downsampling and image compression. Choose the appropriate down sampling
method in the Downsample list box (including average the downsampling, subsampling and
the bicubic downsampling) or you can choose off item to turn off the option. Set the right
pixels and image compression (including retaining existing, JPEG and high compression).
Note: If you check the option “Optimize images only there is a reduction in size”, the images will
not be optimized when there is no reductions.





For Fonts, move the embedded fonts to the right list to lift to embed.
For Discard Objects, please check the objects settings you want to discard.
For Discard User Data, please check the user related information you want to discard.
For Clean Up, please check the Cleanup settings you want to optimize the document.
Click OK button and save the optimized PDF file.
Work with Video & Audio
Foxit PhantomPDF does not only support playing videos and audios in PDFs, but only allows users
to add and edit multimedia files to a PDF.
91
Foxit PhantomPDF Standard
User Manual
Play a Movie or a Sound Clip
Some PDF files may be multifaceted with multimedia, including sound, music and video clips.
Each movie and sound file usually includes a play area from which the media can be activated.
The play area typically appears on the PDF page as an image or a blank rectangle, but can also be
invisible. To play the media files, please make sure you have the necessary media player installed
on your computer.
To play a movie or a sound, please do the following:

Select the Hand tool
, and click the play area of the movie or sound file.
Note: To protect your computer from viruses, Foxit PhantomPDF pops up a dialog box soliciting
your approval before playing multimedia files.
Remember choice until close the document – check this option means to apply this setting to
the media content which can be played directly without Multimedia Content dialog box pop-up
the next time you click to play the media content.
Adding a movie or a sound clip
Adding movies or sounds to PDFs is as easy as inserting an image. "Movies" are desktop video
files with formats such as FLV, AVI, QuickTime, and MPEG, and file extensions such
as .avi, .wmv, .mov, .qt, .mpg, and .mpeg. An animated GIF file always has a .gif file extension,
while “Sounds” are like midis, wavs, and mp3 files.
Note: If an alert message tells you that no media handler is available, you must install the
appropriate player before you can add clips to the PDF. For example, you must install QuickTime if
you want to embed an MOV file in a PDF.
Adding movies or sounds
1.
2.
Choose EDIT > Insert > Video & Audio
.
Press and hold mouse button down, drag to select an area on the page where you want the
92
Foxit PhantomPDF Standard
User Manual
3.


movie or sound to appear. For movies, the play area is the exact size of the movie frame.
In the pop-up Add Video & Audio dialog box, you will see some options listed below:
Embed content in document: includes the media file into the PDF file. This option will
increase the file size of the PDF. It is selected by default. If the check box is cleared, you will
not be able to play it if you open this PDF file on other computers.
Poster Settings: choose whether to display an image in the play area when the movie isn’t
playing. You can choose to use no poster, or create poster from file.
Edit the play area
To move, resize, align, center or distribute a multiple clip, please refer to “Images”.
Set Video & Audio properties
In Foxit PhantomPDF, you can specify properties for the multimedia files you added, such as the
appearance of a movie’s play area, whether the movie plays once or continuously, create
alternate renditions, etc.
To set video & audio properties, please do the following:
1.
Select the Video & Audio tool
, or the Annotation Selection Tool
2.
3.
Double-click the play area or right-click the play area > Properties.
For the Appearance tab, please refer to “Setting properties of an image”.
.
Note: If you select Locked on any tab, it will lock all options for this multimedia file, but not just
the options on that tab.
4.
In the Settings tab , there are many options listed below:
93
Foxit PhantomPDF Standard
User Manual

Annotation Title -- Type the title of the movie or sound in the Annotation Title box. This title
does not determine which media file is played.

Alternate Text -- Type a description of the media file in the Alternate Text box.

Renditions – Allows you to create alternate or other renditions to ensure that users can play
the movie or sound clip on their systems.
A. List Renditions for Event -- You can assign different renditions to different actions but
Mouse Up is chosen by default. Mouse Up means that when the mouse button is clicked
and released, the rendition is played.
B. Add Rendition – There’re three ways for you to choose: Use a File, Use a URL, By Copying
an Existing Rendition
C. Edit Rendition – When clicking the Edit Rendition button, the Rendition Settings dialog box
appears, which allows you to specify the playback location, and other settings to
differentiate it from other renditions.
Media Settings -- Specifies the general properties for the movie or sound clip:
94
Foxit PhantomPDF Standard
User Manual






Rendition Name: Enter the name for the rendition, which will appear in the list of
renditions. (This name does not determine which media file is played.)
Media Clip Location: Specify the clip by typing or navigating to it.
Content Type: Will be selected automatically when you specify the clip location.
Changing the Content Type setting may cause problems playing the media.
Embed content in document: Includes the media file into the PDF file. This option
will increase the file size of the PDF. It is selected by default. If the check box is
cleared, you will not be able to play it if you open this PDF file on other computers.
Rendition Alternate Text: Type a description of the rendition.
Allow temp File: Specify whether writing a temp file is allowed and when. Some
media players write a temp file when they play a movie or sound clip. If you want to
prevent users from easily copying the media content in a secure document, you may
want to disallow the creation of temp files. However, selecting this setting may
prevent the movie from being played by media players that require the use of temp
files.
Playback Settings – Use this tab to determine how the movie or sound clip is played.





Keep Player Open: Select whether you want the player to close after it plays the
movie or sound clip.
Volume: Lets you specify how loud the movie will be played.
Show Player Controls: Select to display a controller bar at the bottom of the play
area allowing users to stop, pause, or play the media, provided the media player
supports player controls.
Repeat: Lets you replay a clip two or more times, or continuously.
Player List: Click Add to specify a player and the settings that are required, preferred,
or disallowed to play the movie or sound clip. Select the name of the player and the
status. If you set the status of more than one player to Required, only one of the
required players may be used to play the rendition. If you set the status of players to
95
Foxit PhantomPDF Standard
User Manual

Preferred, these players are selected over nonpreferred players (but not over
required players). If you set the status of players to Disallowed, they are not used to
play the rendition.
Add/Edit/Delete button: Allows you to add a new player, as well as edit or delete
the selected player in the Player List.
Playback Location – Determines whether a movie or sound clip is played in the PDF,
remains hidden while played (recommended for sound clips), is played in a floating window,
or is played full screen. The options for Floating Window Settings are unavailable except
you choose Floating Window.









Playback Location: Selects the location for playing a movie or sound clip.
Background Color: Selects the background color for the media player.
Show title bar: Selects to show or hide title bar when playing the media in a floating
window.
Show control closing window: Selects to show or hide the close button at the top
right corner in a floating window.
Title Text: Adds a title for the media that will be showed on the title bar when
playing the media in a floating window.
Resize: Determines to allow or forbid users to resize the floating window. There’re
three options for you to choose: Don’t allow user to resize window, Allow user to
resize window but maintain original aspect ratio, or Allow user to resize window.
Window Position: The window position is determined relative to the document
window, application window, the virtual desktop or document monitor.
Width/Height: Specifies the width and height of the floating window.
If Window is Off-screen: Selects to play, do not play, or move window onto screen to
play the media file if the floating window is off-screen.
D. Delete Renditions – Deletes the selected renditions.
96
Foxit PhantomPDF Standard
User Manual
E. Up/Down – Arranges the order of the renditions. If the first rendition cannot be played, the
next available rendition is played.
5.
Actions tab for the Video & Audio properties
Please refer to “Actions tab for the button properties”.
Objects
When reading a PDF, you may need to frequently edit text, image, or other objects in this PDF file.
With Foxit PhantomPDF, you can add and edit text content as well as editing objects.
Add Text Objects
To add text objects, please do the following:



Select EDIT > Edit Content > Add Text tool
.
Click on the specific page you want to input the text and type new text in the position where
the cursor is blinking. You can also paste or delete the text you input.
You can choose the text font format as you want in the Font group. In Paragraph group, you
can also align the text and set other paragraph formats including word spacing, character
scale, line spacing, etc.
OBJECT FORMAT tab
Paragraph Editing
With Edit Text tool
, you can edit texts in a paragraph like Microsoft Office Word as well as
changing their font, font size and color.
To edit texts in a paragraph, please do the following:

Select EDIT > Edit Content > Edit Text tool

Click on the desired paragraph to start editing. Foxit PhantomPDF will automatically change
.
97
Foxit PhantomPDF Standard
User Manual

a line when the text comes to the margin of it. You can also start a new line by pressing
Enter.
You can set the font, paragraph in the EDIT > Font/Paragraph. More editing features please
refer to Edit Objects.
Link and Join Text Objects
To make editing easier, Foxit PhanotmPDF supports linking multiple text blocks together or
connecting separate text blocks into one single paragraph.
Link and Unlink Text Objects
Using Link tool, you can link multiple text blocks together and then editing text in these blocks
will be treated as editing one paragraph. Text will reflow in these linked blocks and will not cover
the page contents which are located among these blocks.
To link text blocks, please do the following:

Click EDIT > Edit Content > Link & Join Text and a FORMAT tab appears in the ribbon. Select
text blocks you need to link together and the selected blocks will be marked with numbers
as you click them (See the example as below.).

Click Link tool
in the FORMAT tab, or right-click the selected blocks and choose Link
Text Boxes. Then the three blocks will be linked together.
98
Foxit PhantomPDF Standard
User Manual

Then when you add or edit text in these blocks with Edit Text tool
, the text will reflow
in these linked blocks and will not cover the image among them. And when the text added
exceeds the final block, content followed the linked blocks will be covered because they
have not been linked together.
To unlink a text block, please click EDIT > Edit Content > Link & Join Text, select the text block you
99
Foxit PhantomPDF Standard
User Manual
need to unlink and then click Unlink tool
in the FORMAT tab. You can also right-click the
selected block and choose Unlink Text Blocks.
Note:
1.
2.
You can select and link text blocks which are discontinuous or in different columns, or that
are not arranged from top to bottom or from left to right on the page.
All selected blocks should be on the same page.
Join and Split Text Objects
With Join tool, you can connect blocks of text into one single paragraph in a block to improve text
reflow. Blocks of text may be joined together when you need to join text as one object.
Otherwise, a block of text can be divided up into several parts with Split tool.
To join text blocks, do the following:
1.
2.
Click EDIT > Edit Content > Link & Join Text button.
Click the text blocks you want to join. The text blocks you selected will be numbered.
3.
Click Join tool
in the FORMAT tab, or right-click the selected blocks and select Join Text
Boxes. Then the selected blocks will be joined together as one block.
To split a text block, please click EDIT > Edit Content > Link & Join Text button and click the text
block you want to split. Click Split tool
in the FORMAT tab, or right-click the selected block
and select Split Text Boxes. Then the selected block will be divided.
Note: All selected blocks should be on the same page.
Merge and Split Text Objects
You can also merge and split text objects by using Merge Text tool and Split Text tool. To merge
text objects, Shift-click the objects with Edit Object tool and click EDIT > Split > Merge Text
.
To split a text object, please do the following:

Select the object and click EDIT > Split > Split Text
. The Split Text dialog box pops up.
100
Foxit PhantomPDF Standard
User Manual

Drag the slider and click the position you want to split. Click OK and the text object is split
into parts.
Edit Objects
A selected object usually is outlined by a bounding box. When you click the selected objects, the
selection handles appear and you can drag them to a defined place. You can also modify them
through the tools in the ARRANGE tabs which appear after you select objects.
Select EDIT > Edit Content > Edit Object tool
> select All/Text/Image/Shape/Shading, and
do one of the following:
1.
To select one or multiple objects, please do one of the following:



Click the object to select it, or press Ctrl and select more objects.
Hold the pointer over the objects and drag a rectangle around them.
Press Ctrl + A on keyboard. All objects on the current page are selected.
Note: To deselect all the objects, click any blank area in the document.
2.
Move and resize an object


3.
To move an object, select the object and drag the object to the desired place. Or
right-click the object and choose Cut from the context menu and then right-click the
desired place and choose Paste.
To resize an object, drag a handle of the object. Drag the handles of the four corners to
retain the original aspect ratio.
Rotate an object
101
Foxit PhantomPDF Standard
User Manual
To rotate an object, put the cursor over the selected object, the cursor will change to
do one of the following:
4.

In ARRANGE tab, click Rotate group > Rotate


90 degrees.
Click and drag
to rotate the image as you need.
Right-click the selected and choose Rotate.
, then
> Clockwise/Counter-clockwise by
Arrange objects
After selecting multiple objects, you can arrange them in the documents. In the ARRANGE tab
you can align, page-center or distribute objects. Or choose Align/ Center/ Distribute after
right-clicking one of the selected objects. (See also “Align Images”, “Center Images” and
“Distribute Images”.)
5.
Move an object in front or behind other elements
Select an object and click Z-order > Send to Back
or Bring to Front
in the ARRANGE
tab to send it to the front or back of the other elements on the page.
6.
Delete an object

Select one or more objects, press Delete key or right-click and choose Delete from the
context menu.
Object Properties
When you right-click an object and choose Properties…, you can view and change the options in
it.
Set objects properties
1.
2.
With Edit Object tool, right-click text objects, images objects, shape objects (or path objects)
and shading objects, and choose Properties....
There are General tab and Appearance tab in the properties dialog box. The general tab is as
below: (Take image objects properties for example.)
102
Foxit PhantomPDF Standard
User Manual
Image Object Properties Dialog Box
You can specify a number of properties that are common to all objects in the General
properties.


3.
In Image Object Properties dialog box, please do as the following.

4.
Position X and Y: Allow you to set the precise horizontal and vertical position of the
objects.
Width and Height: Displays the selected object’s width and height values.
In the Appearance tab, drag the slider or enter a value to specify the opacity of the
image object. Opacity can range from 1% to 100%. For transparent paint or a weak
effect, specify a low percentage value; for more opaque paint or a strong effect, specify
a high value.
In shape object properties dialog box, please do any of the following:
103
Foxit PhantomPDF Standard
User Manual
Shape Object Properties



Stroke Color: The stroke color is used to paint the border of paths and text that are
stroked.
Fill Color: The fill color is used to paint the interior of paths and text characters that are
filled.
Line Width: The line width specifies the thickness of the line used to stroke a path and
is measured in user space units. A line width of 0 specifies the thinnest line that can be
rendered on the output device. The default value is 1.
Note: A line width of 0 is an inherently device-dependent value. Its use is discouraged
because the line may be nearly invisible when printing on high-resolution devices.

Miter limit: When two line segments meet at a sharp angle it is called a Miter join and
have been specified as the line join style. It is possible for the miter to extend far
beyond the thickness of the line stroking the path. The miter limit imposes a maximum
on the ratio of the miter length to the line width, as shown in the following figure.
When the limit is exceeded, the join is converted from a miter to a bevel.
The value for miter limit is a number that must be greater than or equal to 1, and has a
default value of 10.
Miter length
104
Foxit PhantomPDF Standard
User Manual

Line Join Style: The line join style specifies the shape to be used at the corners of paths
that are stroked. The allowed values are Miter joins, Round joins and Bevel joins.



Miter — the outer edges of the strokes for the two segments are continued until
they meet. If the extension projects too far, as determined by the miter limit, a
bevel join is used instead.
Round — a circular arc with a diameter equal to the line width is drawn around
the point where the segments meet and filled in, producing a rounded corner.
Bevel — the two path segments are drawn with butt end caps (see the discussion
of line cap style), and the resulting notch beyond the ends of the segments is filled
in with a triangle.
Miter
Square line cap style



Flat line cap style
Square: --- the stroke is squared off at the endpoint of the path.
Round: --- a semicircular arc with a diameter equal to the line width is drawn
around the endpoint and filled in.
Flat: --- the stroke extends beyond the end of the line by a distance which is half
the line width and is squared off.
Square
5.
Round line cap style
Bevel
Line Cap Style: The line cap style specifies the shape to be used at the ends of open sub
paths when they are stroked. Allowed values are Butt end caps, Round end caps, and
Projecting Square End.



Round
Round
Flat
Dash: Select a type of line, dashed or solid.
Opacity: Enter a value, or drag the slider to specify the opacity. Opacity can range from
1% to 100%. For transparent paint or a weak effect, specify a low percentage value; for
more opaque paint or a strong effect, specify a high value.
In text object properties dialog box, please do any of the following:
105
Foxit PhantomPDF Standard
User Manual
Text Object Properties
Font Name– Changes the font used by the selected text to the font you specify.
Font Size – changes the font size to the size that you specify.
Horizontal Scaling – adjusts the width of characters by stretching or shrinking them in the
horizontal direction. The scaling is specified as a percent of normal width of the characters,
with 100 being the normal width. The scaling always applies to the x coordinate. The
following figure shows the effect of horizontal scaling.
Text Mode – determines whether text is stroked or filled. There are four types of text
modes: Fill Text, Stroke text, Fill then stroke text and Text with no fill and no stroke.
1
1. Fill text
2
3
2. Stroke text 3. Fill then stroke text
4
4. Text with no fill and no stroke
106
Foxit PhantomPDF Standard
User Manual
Character Space – inserts uniform spacing between two or more characters in selected
text.
Word Space – inserts uniform spacing between two or more words in selected text.
For stroke color, fill color and opacity, please refer to Path Object Properties.
Spelling Check
Foxit PhantomPDF allows users to check the spelling of PDF files and provides suggestions to
correct misspelled words. This feature is useful when users want to proofread text. You can check
for possible mistakes and then confirm each correction.
To perform a spellcheck, please do the following:
Click EDIT > Edit Content > SpellCheck button
.
In the pop-up Spelling dialog box, you will see the suspect word and suggestions for
correction.
Ignore – Click Ignore if no correction is needed.
Ignore All – Click Ignore All to skip all further occurrences of the current “misspelling”.
Change – Click Change after selecting one suggestion to make the suggested correction.
Add To Dictionary – Click Add to Dictionary if the suspect word is spelled correctly but
doesn’t appear in Foxit PhantomPDF’s dictionary. Choosing Add to Dictionary adds the word
to Foxit PhantomPDF’s custom dictionary, which is a supplemental list of spelled-correctly
words used to proofread a document.
Cancel – Click Cancel to exit the Spelling dialog box.
107
Foxit PhantomPDF Standard
User Manual
Spelling dialog box
108
Foxit PhantomPDF Standard
User Manual
Chapter 6 – Organize
Foxit PhantomPDF comes with a built in functionality to combine various PDF files & split one
PDF into various small single & multiple page PDF files according to page numbers as well as page
range. Organize PDF files by re-arranging pages, composing page outlines, etc. Foxit PhantomPDF
displays an overview page without any additional software so you can easily know what you are
working on. It allows you to split, merge, and reorganize pages in your PDF document.
Insert Pages
Insert pages from file
Foxit PhantomPDF allows you to insert pages from a file or multiple files into a PDF.
To insert pages from a file or multiple files into a PDF, open the PDF and do either of the
following:

Directly drag the page thumbnails from a PDF file or files (not limited to PDFs) to the Page
panel of navigation pane and drop at the place where you want to insert. If you need to
insert certain pages from a non-PDF file, please choose the other method.

Choose ORGANIZE > Pages > Insert
> From File, or click the Insert button
on Page
panel of navigation pane, or right-click one page thumbnail and choose Insert Pages… > From
File. In the pop-up dialog box, select the files that you want to insert into the target
document, and click Open. If the files are non-PDF files and you only want to add certain
pages not the whole files, please choose to preview first in the pop-up Foxit PhantomPDF
message. Then do the following steps to finish:
Insert Files dialog box
109
Foxit PhantomPDF Standard
User Manual
1. In the Insert Files dialog box, you can still add files, folder and open files further by
clicking Add Files… button.
2. Then choose one file you added, specify where you want to insert to the current PDF
document (at the beginning or the end, or before or after a designated), and page range
(insert from …to …) of the file that you want to insert.
3. Check Show Preview in the lower left corner, and you can preview the target page and
the insert page in preview boxes. Click OK to insert the pages.
4. To leave the original PDF intact as a separate file, choose FILE > Save As, and type a new
name for the merged PDF.
Note: When a whole file is inserted, all the bookmarks will be inserted into the combined file.
Insert pages from folder
1. Open a PDF file, and choose ORGANIZE > Pages > Insert
> From Folder, or right-click one
page thumbnail and choose Insert Pages… > From Folder.
2. The Browse For Folder dialog box pops up. Select the folder that you want to insert into the
target document, and click OK. (See also “Insert pages from file”.)
Insert pages from open files
1. Open a PDF file, and choose ORGANIZE > Pages > Insert
> From Open Files, or right-click
one page thumbnail and choose Insert Pages… > From Open Files.
2. (Optional) Directly drag the page thumbnails from an open PDF file and drop at the target
place of the current PDF file.
3. In the pop-up Open PDF Files dialog box, select files you want to insert and click Add Files to
continue. (See also “Insert pages from file”.)
110
Foxit PhantomPDF Standard
User Manual
Insert pages from a scanner
You can insert pages from a paper document using Foxit PhantomPDF and your scanner.
1. Open the PDF that you want to serve as the basis of the combined file, and choose
ORGANIZE > Pages > Insert
> From Scanner, or right-click one page thumbnail and
choose Insert Pages… > From Scanner. In the pop-up From Scanner dialog box, specify the
place you want to insert pages.
2. Then select a scanner, the input and documents options in the Custom Scan dialog box, and
then click Scan.
Custom Scan dialog box
See also “Create a PDF Using Scanner”
111
Foxit PhantomPDF Standard
User Manual
3. To leave the original PDF intact as a separate file, choose FILE > Save As, and type a new
name for the merged PDF.
Insert pages from clipboard
1. Open a PDF file, and choose ORGANIZE > Pages > Insert
> From Clipboard, or right-click
one page thumbnail and choose Insert Pages… > From Clipboard.
2. In the pop-up From Clipboard dialog box, specify the place you want to insert pages. Then the
content in the clipboard will be inserted.
3. To leave the original PDF intact as a separate file, choose FILE > Save As, and type a new name
for the merged PDF.
Insert pages from a blank page
1. Open the PDF that you want to serve as the basis of the combined file, and choose
ORGANIZE > Pages > Insert
> From Blank Page, or right-click one page thumbnail and
choose Insert Pages… > From Blank Page.
2. In the Insert Blank Pages dialog box, specify where you want to insert the blank and page
count (how many blank pages you want to insert), and click OK.
Insert Blank Pages dialog box
3. To leave the original PDF intact as a separate file, choose Save As, and type a new name for
the merged PDF.
Delete Pages
After combining PDF files, you can delete unwanted or blank pages.
112
Foxit PhantomPDF Standard
User Manual
Delete Pages using the Delete command
1.
Open the PDF document where you want to delete pages.
2.
Choose ORGANIZE > Pages > Delete
.
Delete Page dialog box
3.
Specify a page range and click OK to delete the selected pages.
Note: If you want to retain a copy of the original PDF, make sure that you save the new document
using Save As rather than Save.
Delete Pages using page thumbnails
1. In the Pages panel, select a page or group of pages:


Drag the mouse to select the page thumbnails.
Shift-click or Ctrl-click to select a range of page thumbnails.
2. Press Delete to delete the selected pages. Or right-click the selected pages, choose “Delete
Pages…” in the context menu and click OK.
Extract Pages
Extraction is the process of reusing selected pages of one PDF in a different PDF. Extracted pages
contain not only the content but also all form fields, comments, and links associated with the
original page content.
You can leave the extracted pages in the original document and create a new PDF that includes
all of the extracted pages during the extraction process - comparable to the familiar processes of
cutting-and-pasting or copying-and-pasting, but on the page level.
Note: Any bookmarks or article threading associated with pages are not extracted.
113
Foxit PhantomPDF Standard
User Manual
1.
Open the PDF in Foxit PhantomPDF and choose ORGANIZE > Pages > Extract
. Check
2.
Show Preview to preview the current document in the pop-up Extract Pages dialog box.
(Optional) Right-click the page thumbnails that you want to extract and choose Extract
Pages… to open Extract Pages dialog box.
Extract Pages dialog box
3.
4.
5.
6.
In the Extract Pages dialog box, specify the page range to be extracted. To extract even or
odd pages, the page range should include both one even page and one odd page at least.
In the Extract Pages dialog box, check the item Immediately save extracted pages to save
the extracted pages into a new PDF file after you click OK. The saved file will not be opened
in Foxit PhantomPDF automatically. If the item is not checked, a new PDF file that includes
the extracted pages will be opened without being saved. You will have to manually save it.
In the Extract Pages dialog box, check the item Delete the pages after extraction to delete
the selected pages from the original document.
Click OK after setting. The extracted pages are placed in a new PDF document named
“Extracted pages from [original document name].pdf”.
Note: The creator of a PDF document can set the security to prevent the extraction of pages. To
view the security settings for a document, choose FILE > Properties, and select Security tab.
Replace Pages
You can replace an entire PDF page with another PDF page. The text, images and comments on
the original page will be replaced.
To quickly update a PDF, you can replace individual pages.
114
Foxit PhantomPDF Standard
User Manual
1.
Open the PDF that contains the pages you want to replace. Choose ORGANIZE > Pages >
Replace
2.
or right-click the page thumbnails that you want to replace and choose
Replace Pages….
Select the PDF document containing the replacement pages, then click Open.
Replace Pages dialog box
3.
4.
In the pop-up Replace Pages dialog box, from the original PDF file select pages you want to
replace and select replacement pages from the selected file. You can click Browse to change
the selected file.
Click OK to finish.
Note: The bookmarks associated with the original pages will be unavailable after the
replacement.
Swap Two Pages
The Swap feature is useful sometimes if you want to swap two different pages within a PDF
document.
1.
2.
Open the PDF document within which you want to swap pages.
(Optional) Directly drag and drop the page thumbnail to the target location in the Page
panel of navigation pane.
3.
Choose ORGANIZE > Pages > Swap
4.
5.
, or right-click the page thumbnail and choose Swap
Pages….
In the Swap Two Pages dialog box, select or enter two different page numbers in the Swap
and For options.
Click OK.
115
Foxit PhantomPDF Standard
User Manual
Duplicate Pages
The Duplicate Pages feature allows you to copy pages within a PDF document.
1.
Open the PDF document within which you want to copy pages.
2.
Choose ORGANIZE > Pages > Duplicate
3.
4.
, or right-click the page thumbnail and choose
Duplicate Pages….
In the Duplicate Pages dialog box, specify where you want to copy pages within the
document and the page range that you want to copy.
Click OK.
Move Pages
The Move Pages feature allows you to move pages within a PDF document.
Move one or more pages within a PDF document
1.
Open the PDF document within which you want to move pages.
2.
Choose ORGANIZE > Pages > Move
3.
4.
, or right-click the page thumbnail and choose
Move Pages….
In the Move Pages dialog box, specify where you want to move pages within the document,
and page range that you want to move.
Click OK.
Note: Tagged bookmarks affect the order that reading devices follow, such as devices for the
visually impaired. Tagged bookmarks do not change the sequence of pages in a PDF.
Move one or more pages within a PDF, using page thumbnails
1. Click the Pages button to open the Pages panel, and select one or more page thumbnails.
2. To move a page, drag the page thumbnail(s) to the new location.
Split Document
The Split Document feature is a process of splitting one or more documents into multiple
smaller-size documents.
1. Open the PDF document you want to split.
116
Foxit PhantomPDF Standard
User Manual
2. Choose ORGANIZE > Pages > Split
, or right-click on the target page thumbnails and choose
Split Document in the context menu.
3. In the Split Document dialog box enter the maximum number of pages or file size after splitting,
or choose whether to split by the top-level bookmarks if the document has bookmarks.
4. Click Select More Files… to split more files. Click Output Options to specify the storage
location, the file names and other settings.
5. Click OK.
Crop Pages
The Crop Pages feature allows you to adjust the visible page area. You can create a PDF
document with pages of different sizes.
Crop one or more pages
1. Open the PDF document you want to crop.
2. Right click the target page(s) on the Pages thumbnails, choose Crop Pages.
3. In the pop-up Crop Pages dialog box, specify the settings in the Margin Control: select
CropBox, ArtBox, TrimBox, or BleedBox (they are displayed in the preview box in
black, red, green and blue respectively) and adjust the proportions to crop. You can
preview all the boxes on the right after checking the item Show All Boxes.
CropBox – Defines the content boundary of the page when it’s displayed or printed.
117
Foxit PhantomPDF Standard
User Manual
ArtBox – Defines the meaningful content of the page including blank space.
TrimBox – Defines the final dimensions of the page after trimming.
BleedBox – Defines the clipping path when the page is printed professionally to allow
for paper trimming and folding. Printing marks may fall outside the bleed area.
Constrain Proportions – Locks the cropped proportions and each margin will have the
same distance from each side to the border.
Remove White Margins – Crops the page to the artwork boundary, which is useful for
trimming the edges of presentation slides saved as PDFs.
Set To Zero – Restores all the crop margins to zero.
Reset – Resets all the margins to the original dimensions.
4. A rectangle in the page thumbnail showed in the preview box shows the boundaries
of the cropped area.
5. Choose the page range you want to crop.
6. Choose the unit of the margin cropping values.
7. Click OK.
Crop one page
1. Choose ORGANIZE > Transform > Crop
, the cursor will change to
. Drag the
cursor to select an area you want to crop. Then double-click the area you cropped.
2. In the pop-up Crop Pages dialog box, the margin measurement indicates the size of the
area you selected. You can directly click OK or provide new settings in the dialog box.
Note: Cropping does not reduce file size because information is not discarded but merely
hidden. So you can restore the page and its content to its original dimensions by resetting
the page size.
Rotate Pages
You can rotate all or selected pages in a document.
1.
2.
Open the PDF document within which you want to rotate pages.
(Optional) To rotate one page, choose ORGANIZE >Transform > click Rotate Pages
> Left/Right. Rotation is based on 90° increments.
118
Foxit PhantomPDF Standard
User Manual
3.
To rotate one or more pages, please use one of the following methods:
 Choose ORGANIZE > Transform > click Rotate Pages
> Multi-page rotate.
 Right-click the selected page thumbnails and choose Rotate Pages.
 Select multiple page thumbnails in Page panel and click the Rotate
Counterclockwise button
and Rotate Clockwise button
. Rotation is
based on 90° increments.
4.
5.
In the pop-up Rotate Pages dialog box, specify the direction you want to rotate the
pages and the page range.
Click OK.
Note: To temporarily change your view of the page, choose VIEW > Page Display > Rotate
View > Rotate Left or Right. The original page orientation is restored the next time you open
the PDF.
Flatten Pages
The Flatten Pages feature can discard interactive annotations in the PDF file and make them
become part of objects of the PDF pages.
1.
Open the PDF document where you want to flatten pages.
2.
Choose ORGANIZE > Transform > Flatten
3.
In the Flatten Pages dialog box, specify the page range (current page, all pages, a range of
pages), and click OK.
.
Note: If you want to retain a copy of the original PDF, make sure that you save the new document
using Save As rather than Save.
119
Foxit PhantomPDF Standard
User Manual
Chapter 7 – Comments
A comment is a written note intended as an opinion, an explanation, an illustration, or a
statement of fact or opinion, especially a remark that expresses a personal reaction or attitude.
You can type a text message or add a line, circle, or other shape to make comments on PDFs you
are reading with Foxit PhantomPDF commenting tools. You can also edit, reply, delete, and move
the comments with ease.
Use Different Comments Tools
There are various annotation tools with different functions for you to choose: Text Markup Tools,
Pin Tools, Typewriter Tools, Drawing Tools, Measure Tools and Stamp Tools. You can add different
comments by selecting the annotation tools from the Comments tab or Toolbar.
Text Markup Tools
You can use Text Markup tools to indicate where text should be edited or noticed. Text Markups
do not change the actual text in the PDF. Instead, they indicate which text should be deleted,
inserted, highlighted or underlined. Text Markup tools include Highlight Tool, Squiggly Tool,
Underline Tool, Strikeout Tool, Replace Tool, and Insert Tool.
To select a markup tool:
Choose COMMENT > Text Markup > select [Markup tools name]. Then click and drag from
the beginning of the text you want to mark up.
120
Foxit PhantomPDF Standard
User Manual
Text Markup Tools
Button
Tool Name
Description
Highlight Text Tool
To mark important passages of text with a fluorescent (usually) marker as
a means of memory retention or for later reference.
Squiggly Text Tool
To draw a squiggly line under. Similar to Underline Tool.
Underline Text
Tool
To draw a line under to indicate emphasis.
Strikeout Text
Tool
To draw a line to cross out text, making others know the text is deleted.
Replace Text Tool
Insert Text Tool
To draw a line to cross out text and provide a substitute for it.
A proofreading symbol (^) used to indicate where something is to be
inserted in a line.
Note: If you want to add multiple comments without reselecting the same tool, you can check
Keep Tool Selected at COMMENT > Manage Comments.
Pin Tools
You can use pin tools to add comments by adding notes and attaching a file. In note comments
you can type a text message. Using the tool
, you can attach a file in the document as a
comment.
Add a Note Comment
To add a note comment, please click the Note tool
, click where you want to place the note
and make comments in the box.
121
Foxit PhantomPDF Standard
User Manual
Add a file attachment
To add a file attachment as a comment, do the following:

Click the button

Position the pointer to the place where you want to attach a file as a comment > click the
selected position.
In the Add Attachment dialog box, select the file you want to attach, and click Open.

on the Pin group under the COMMENT tab.
Note: If you try to attach certain file formats (such as EXE), Foxit Phantom PDF warns you that
your attachment is denied because of your security settings.

The File Attachment Icon
appears at the place you designated.
Typewriter
The Typewriter tools include Typewriter Tool, Callout Tool, and Textbox Tool.
Typewriter Tool
You can use the Typewriter Tool to add comments anywhere on a PDF, which doesn’t appear as
annotations.
Note: The Typewriter Tool can be used to fill forms. See also “Filling non-interactive forms”.
Typewriter comment

Add comments with typewriter
Choose COMMENT > Typewriter > Typewriter Tool.
Put the cursor on the area to type any text you want. The COMMENT FORMAT tab
appears for you to specify the font format.
Press Enter if you want to start a new line.
To finish typing, click anywhere outside the text you have inputted.
Tip: It’s easy to copy-and-paste text to PDF document as a typewriter annotation from a text
document or webpage.

Editing the typewriter comment
122
Foxit PhantomPDF Standard
User Manual
Choose COMMENT tab > Typewriter group > Typewriter tool.
Put the pointer between the letters and double-click to activate the typewriter text
field.
Do any changes to the text you have inputted by using the COMMENT FORMAT tab.
Use Backspace or Delete keys to delete the characters before or after the pointer.
To finish editing, click anywhere outside the text field.
Tip: You can use the Arrow Keys to move the pointer right and left or up and down.

Spell Checking Typewriter Input
You are able to use the Spell Checker to check your typewriter input give you correcting
suggestions if the security settings allow. The Spell Checker component has been integrated into
Foxit PhantomPDF. However in the future when an update of this component is available on the
Foxit server, you have to manually download the component by going to Check for Updates in
the Help menu of Foxit PhantomPDF.
If you have installed Spell Checker, when you use typewriter to insert any English text, this tool
will try to find any spelling errors and highlight them with squiggly lines.
Right click on the misspelled words, and you will see a list of suggested words.
Choose one of the suggested words to correct your input or ignore the squiggly line.

Move the typewriter comment
Do one of the following:

Choose COMMENT tab > Typewriter group > Typewriter Tool and put the cursor on the
typewriter comment when the cursor turns to be an arrow
, hold down the mouse and
drag the typewriter comment to the intended place.
Tips:
You can use Home, End or Arrow Key to move the cursor among characters.
When moving the typewriter comment, a rectangle appears.

Select Hand Tool
or Annotation Selection Tool
, click the typewriter comment, and
move it to the intended place.

Delete the typewriter comment
Choose COMMENT tab > Typewriter group > Typewriter Tool. Position the cursor to the
ending or the beginning of the text, drag the cursor to select them all, and press the Delete
key.
(Recommended method) Click the Annotation Selection Tool
or Hand Tool
, right-click
the text field, and choose Delete.
123
Foxit PhantomPDF Standard
User Manual
Callout Tool and Textbox Tool
Callout Tool and Textbox Tool are designed for users to create comments in a callout text box or a
box.
Callout text boxes are especially useful when you want to single out (but not obscure) a particular
area of a document.
A textbox is a rectangle of any size, possibly with a border that separates the text box from the
rest of the interface, allowing the user to input text information. A text box usually remains
visible on the document page. It doesn’t close like a pop-up note.
Note: You can add comments to Japanese, Chinese, and Korean text with the Callout Tool or
Textbox Tool, but you must have the Eastern Asian Language module installed. Callout text boxes
and Text boxes allow for horizontal text only.

Add a callout or textbox




Choose COMMENT > Typewriter > Callout/Textbox.
Click the place where you want to insert the callout or text box. The COMMENT
FORMAT tab appears for you to specify the font format.
Type the text. Text wraps automatically when it reaches the right edge of the box.
Resize, move, edit or delete a callout or textbox
124
Foxit PhantomPDF Standard
User Manual
Select the Hand Tool
, Annotation Selection Tool
or the corresponding annotation tool,
and do one of the following:





To resize the callout or textbox, select it and drag any of the handles to resize it.
To move the callout or textbox, select it and drag to the intended place.
To edit the callout or textbox, double-click it and do the editing by using the COMMENT
FORMAT tab.
To delete the callout or textbox, select it and press Delete, or right-click it and then choose
Delete.
Setting callout or textbox preferences
Please refer to “Editing the typewriter comment”.
Drawing
Drawing Tools allow you to mark up a document with rectangles, ovals, polygons, clouds, arrows,
lines, polylines, etc. It is quite useful when you have to make some shapes to mark the text or
image.
Drawing Tools
Button
Tool Name
Description
Rectangle Tool
To draw a four-sided plane figure with four right angles. Press Shift
key to draw a square.
Oval Tool
To draw an oval shape or a circle with pressing Shift key.
Polygon Tool
To draw a closed plane figure bounded by three or more line
segments.
Cloudy Tool
To draw cloudy shapes.
Arrow Tool
To draw something, such as a directional symbol, that is similar to an
arrow in form or function.
Line Tool
PolyLine Tool
To mark with a line.
To draw an open plan figure with three or more line segments.
Pencil Tool
To draw free-form shapes.
Rubber Tool
An implement, acts as a piece of rubber, used for erasing the pencil
markups.
Area Highlight
Tool
To mark important area as a means of memory retention or for later
reference.
Note:
If you draw a cloud shape in a counterclockwise direction, the cloud comes out inward
. If you
125
Foxit PhantomPDF Standard
User Manual
draw the lines forming the shape in a clockwise direction, the cloud is created with the points
outward
.
Tips:
To draw a line in horizontal, vertical, or at a 45 degree angle, press Shift while you draw.
To draw a square or circle with Oval Tool or Rectangle Tool, press Shift while you draw.
Adding Free-form Annotation with PSI (Pressure Sensitive Ink)
Foxit PhantomPDF adds PSI support for free-form annotation. You can use Surface Pro Pen or
Wacom Pen to add free-form annotations with PSI in PDFs. Detailed steps are as follows:
(For Surface Pro users) Choose COMMENT > Drawing > Pencil, and then add free-form
annotation as needed with Surface Pro Pen;
(For Wacom tablet users) Connect your Wacom tablet to the computer, choose COMMENT >
Drawing > Pencil, and then add free-form annotation as needed with Wacom Pen.
Edit, resize or move the markup
Select the Hand Tool
, Annotation Selection Tool
or the corresponding Drawing Tool.
To edit the drawing markup, right-click, select Properties and do settings as needed.
To resize the drawing markup, select it, put the cursor on one of the green points, and drag
one of the handles to make your adjustments.
To move the drawing markup, select it and drag it to the target place.
To add a pop-up note to the markup, select it and double-click the markup or right-click it
and choose Open Popup Note.
If you draw a line or arrow, you can enable the comment to be shown on the line or arrow
by checking Show text in line in the line properties box.
Check Set Current Properties as Default so that the current settings can be applied next
time by default.
Arrow Comment
126
Foxit PhantomPDF Standard
User Manual
The Properties of the Arrow Comment
Delete the markup
Select the markup and press the Delete key. Or right-click the markup and select Delete.
Group the markups
Grouping drawing markups enables you to combine them so that you can work with them as
though they were a single object. You can move or delete the group, set its status, change its
appearance, etc.
Select the Hand Tool


or Annotation Selection Tool
, and do one of the following:
To group/ungroup markups, select the markups you want to group/ungroup by pressing
Ctrl > right-click group/ungroup.
To work with a group, select one of the markups and then work with the group as other
comments.
Measure Tools
See also “Using Measuring”
127
Foxit PhantomPDF Standard
User Manual
Stamps
The Stamp Tools in Foxit PhantomPDF are a group of advanced tools that enable you to stamp
content and watermarks into a PDF document. Foxit PhantomPDF supports image stamps with
various image formats (JPEG, GIF, BMP, WMF, etc.) and PDF file stamps. You can either create
dynamic stamps which can obtain information from your system including name, date and time,
or import existing dynamic stamps. Stamping PDF files is a very useful feature especially when
you need to give reviewers some advices about the document's status or sensitivity.
Standard Stamp
Dynamic Stamp
Create a Custom Stamp
Create a Custom Dynamic
stamp
Stamp a PDF
You can choose from a list of predefined stamps, or create custom stamps before stamping a PDF.
All the stamps that you import or create are listed in the menu of Stamp Tool and Stamps Palette.
To apply a stamp, please do the following:
1.
2.
Choose COMMENT tab > Stamps group > Stamp button > choose a stamp from the menu.
Or choose COMMENT > Stamps > Create > Show Stamps Palette…. In the Stamps window,
select a category from the menu, and then select a stamp.
The cursor changes into a rectangle. Click on the position where you want to place the
stamp.
128
Foxit PhantomPDF Standard
User Manual
Note: All the stamps that you import or customize will be listed after you click Stamp button, you
can choose directly a stamp from the menu.
Create a Stamp
You can create custom stamps and dynamic stamps.

Creating a Custom Stamp
1.
2.
Choose COMMENT > Stamps > Create > Create Custom Stamp.
In the Create Custom Stamp dialog box, click Browse… and choose an image file or a PDF
file. If the selected file contains multiple pages, you can drag the scroll bar to select a page.
Type a new category name or choose a category from drop-down menu, name the stamp,
and then click OK.
3.
Note: If the stamp you choose is an image file, you can adjust the opacity of the image via
dragging the scrollbar as needed.
Create Custom Stamps Dialog Box
You can also create a stamp from the clipboard. Please do as the following:
Copy the image to the clipboard.
Choose COMMENT > Stamps > Create > Paste Clipboard Image as Stamp Tool, the cursor
will be changed into a rectangle.
Put the cursor over the desired place and you’re done.

Create a Custom Dynamic Stamp
You can create a Custom Dynamic Stamp to add text, author name and date time on stamps.
Please do the following:
1.
2.
Choose COMMENT > Stamps > Create > Create Custom Dynamic Stamp….
In the Create Custom Dynamic Stamp dialog box, choose one stamp template from the left
129
Foxit PhantomPDF Standard
User Manual
3.
4.
5.
6.
list or create your own stamp template which can be an image or a PDF file. Choose a
category from drop-down menu or name a new one, then name the stamp.
Specify Font, Font Size and Font Color.
From the Stamp Text option, if you choose <author name>, <date and time>, <date> or <
author name, date and time> category without typing any text, it will automatically obtain
current user, date, time from your system when you click Add button.
You can instantly adjust the added content to fit your needs when you preview current
stamp on the right top preview pane.
Click OK.
Create Custom Dynamic Stamp Dialog Box
Manage a stamp
To manage a stamp, please do the following:




Choose COMMENT > Stamps > Create > Manage Stamps, open Management Custom
Stamps dialog box, and select a stamp.
Click Create and choose one option from the drop-down menu to create a stamp. Please
refer to Creating a stamp.
Click Edit to edit the selected stamp, such as changing category, stamp name, or replacing
the image or PDF files etc. Please refer to Creating a stamp.
Click Delete to remove the stamp.
130
Foxit PhantomPDF Standard
User Manual
Manage Custom Stamps Dialog Box
Note: Deleting a custom stamp category will delete all stamps that are subordinate to it.

Cut/Copy and Paste a Stamp
To cut/copy and paste a stamp, please do the following:



Select the stamp you want to cut or copy.
Right-click the stamp > Cut/Copy. Or use the shortcut keys Ctrl + X/C to cut and copy.
Right-click on the page you want to paste the stamp and select Paste. Or use the shortcut
keys Ctrl + V to paste.

Undo/Redo a Stamp
To undo/redo a Stamp, please click the undo button
and redo button
on the Quick
Access toolbar.

Resize/move a stamp





Select the Hand Tool
or the Annotation Selection Tool
.
To resize a stamp, select it, put the cursor on one of the red points, and drag one of the
handles to make your adjustments.
To move a stamp, select it to drag.
To add a pop-up note to a stamp, select it and double-click the stamp or right-click it
and choose Open Popup Note.
Delete a stamp
131
Foxit PhantomPDF Standard
User Manual
Do one of the following:

Select the Hand Tool
or the Annotation Selection Tool
, select the stamp you want to
delete and then press the Delete key.

Select the Hand Tool
or the Annotation Selection Tool
, right-click on the stamp, and
choose Delete from the Context Menu.
Set Favorite Stamps



Choose COMMENT > Stamps > Create > Set Favorite Stamps….
Select a stamp in All Stamps panel, and then click Add to Favorite, then the stamp you
select will be added to Favorite Stamps panel.
To remove a stamp from Favorite Stamps panel, select the stamp you want to remove and
then click Remove from Favorite.
Set Favorite Stamps
Change the Appearance of Comments
You can change the color and appearances of comments or markups after you create them. Also,
you can set the new look as the default appearance for that tool.
Change the appearance of Note Comments
1. After you create a note comment, right-click the note icon and choose Properties…, or click
Options at the top-right corner of the note popup box and choose Properties….
132
Foxit PhantomPDF Standard
User Manual
2. In the Note Properties dialog box, do any of the following, and then click Close:
Click the Appearance tab to change the color and opacity of the comment.
Click the Note Type tab to change the type of icon used.
Click the General tab to change the author’s name and subject of the comment.
Click the Review History tab to see the history of changes people have made to the status of
a comment during a review.
See also “Set a status”.
Check Locked at the bottom of the Note Properties dialog box to prevent the comment from
being moved, altered or deleted.
Set Current Properties as Default – Sets the current property settings as default so that all
the settings can be applied by default next time.
Change the appearance of Text Markups
Follow the steps of “Change the appearance of Note Comments”.
There is no Note Type tab in Text Markups settings.
Change the appearance of Drawing Markups
133
Foxit PhantomPDF Standard
User Manual
In the Properties dialog box, do any of the following, and then click Close:
Click the Appearance tab to change such options as the border style, color and opacity. The
type of the comment selected determines which options are available.
Click the General tab to change the author’s name and subject of the comment.
Click the Review History tab to see the history of changes people have made to the status of
a comment during a review.
See also “Set a status”.
Select Locked at the bottom of the Properties dialog box to prevent the comment from
being altered or deleted.
Set Current Properties as Default – Sets the current property settings as default so that all
the settings can be applied by default next time.
Change the appearance of Typewriter Markups
In the Typewriter Properties dialog box, do any of the following, and then click Close:
Click the Appearance tab to change the opacity.
Click the General tab to change the author’s name and subject of the comment.
Click the Review History tab to see the history of changes people have made to the status of
a comment during a review.
See also “Set a status”.
134
Foxit PhantomPDF Standard
User Manual
Select Locked at the bottom of the Properties dialog box to prevent the comment from
being altered or deleted.
Set Current Properties as Default – Sets the current property settings as default so that all
the settings can be applied by default next time.
Change the appearance of a textbox or callout
Please refer to “Change the appearance of Drawing Markups”.
Set the default appearance for a comment
You can set default properties for any type of comments or markups so that subsequent
comments you create share the same icon and color properties.
Choosing the Hand tool, or the Annotation Selection tool, or with the current comment tool
selected, right-click the comments, and select Set Current Properties as Default in the
pop-up Context Menu.
All comments you create using this tool will display the properties you set.
Work on Comments
View all comments
The comments panel displays all comments in the PDF so that you can easily find the comments.
In addition, it also provides a toolbar with basic options: Search box, Expand All, Collapse All,
Previous, Next, Sort By and Hide/Show all comments.



The comment is displayed in the popup note or on the markup icon and acts as a tooltip
when the popup note is closed.
If you input the comment with too many lines, it will only show some of the comment while
the rest will be displayed as suspension points when the cursor is moved outside the popup
note. Click inside the message box to view it with scroll bar.
The Comments Panel displays all the comments in the PDF. When you navigate through
comments, the selected comment will automatically be kept in sync with the current
comment being displayed. And you click on a comment to go to the specify comment on
page.
To view comments in Comments panel,

Click the comments button

In Comments panel, there are the following functions to provide you:
in Navigation pane to open Comments panel.
135
Foxit PhantomPDF Standard
User Manual

Search box

Expand All

Collapse All

Previous
- Type a string to search comments that contains the string.
– Click Expand All button to expand individual comments.
– Click Collapse All button to collapse all comments.
/Next
– Browse through the comments. Click the Previous button or
the Next button to go to the previous or next comment. The two buttons are
unavailable if no comment is selected.

Sort By
– you can sort comments by author, page, type, date. In a thread of replies,
only first message is sorted, and the reply messages are sorted in the same category as
first message.

Show/Hide all comments
– you can show/hide all comments in the PDF document.
Note:
1.
2.
3.
You can click the plus and minus signs next to comment to expand or collapse comments.
The page on which comment is located is kept in sync with the selected comment. To go to
the page where a comment is located, only simply click the comment in the comment panel.
To show/hide all comments on the Comments panel, you can also choose COMMENT >
Manage Comments > Comments
> Show All/ Hide All.
Cut, copy and paste comments
Cut comments
Cutting removes selected comments from the current location. Once you cut the comments, you
can paste within the same document, into a different document.



Select comments to be cut.
Select Cut from the right-click menu, or press Ctrl + X.
You are now ready to paste.
Copy comments
Once you copy the comments, you can paste within the same document, into a different
document.


Select comments to be copied.
Select Copy from the right-click menu, or press Ctrl + C.
136
Foxit PhantomPDF Standard
User Manual

You are now ready to paste.
Paste comments
You can paste comments within the same document, a different document in Foxit PhantomPDF.



Copy or cut the selected comments.
Place your cursor where you want to paste comments within the same document or to
another opened document.
Select Paste from the right-click menu, or press Ctrl + V.
Undo and Redo comments
See also “Undo and Redo”
Set and change a status
Set a status
Setting a status is useful for keeping track of comments that you have read or that require further
action. You can use the status to indicate which comments you want to accept, reject, cancel,
complete or export to other documents.
By setting the review status, you can show or hide a certain set of comments, and let review
participants know how you are going to handle the comment. Once the review status is set, you
cannot remove the review status display from history in the Review History list, even if you
change the review status to None.
Change the status of a comment
With the Hand tool, Annotation Selection tool or the corresponding tool selected, right-click
a comment you want to change the status of, choose Set Status > choose one option from
the pop-up Context menu, and then select an option.
To view a markup’s history of changes:
A. Right-click the markup, and then choose Properties.
B. In the Properties dialog box, click the Review History tab to view the history of status
changes people have made to a markup.
Reply to comments
Replying to comments is useful in shared reviews, when participants can read each other’s
comments. They can also be used by review initiators to let reviewers know how their
137
Foxit PhantomPDF Standard
User Manual
suggestions are being implemented. All replies appear in the popup note and are listed below the
original comment. You can view the respective reply with the reply title and mark.
1.
2.
3.
To reply to original comments in the pop-up note, do any of the following:
Using the Hand tool, Annotation Selection tool, or the corresponding comment tool, open
the pop-up note for the comment and select Reply in the Options. And then type your
reply in the textbox that appears in the pop-up window.
Right-click the original comment and select Reply. And then type your reply in the textbox
that appears in the pop-up window.
To respond to the reply, please do as below:
Using the Hand tool, Annotation Selection tool, or the corresponding comment tool, and
open the pop-up note for the comment.
Right-click the reply and select Reply to this Reply. And then type your reply in the
textbox that appears in the pop-up window.
Delete the reply message
In the note pop-up window, right-click the Text message window and click Delete this reply.
4.
5.
Change the color of reply message window
In the note pop-up window, right-click the reply message window and choose Change Color.
Flag comments with a checkmark
You can mark with a comment with a checkmark by right-clicking the comment and selecting
Mark with a Checkmark. The checkmark icon
6.
will appear in the Comments pane in the
navigation pane. Or you can directly make the checkmark for a comment in the Comments
pane. With the checkmark you can sort comments.
Change the author name
Right-click the comment and select Change Author Name.
Note: To open/close all comments’ popup notes, please choose COMMENT > Manage Comments >
Popup notes
> Open All/ Close All.
Arrange comments
You can arrange multiple comments by aligning, centering and distributing them. Please follow
the steps below.
Select multiple comments
1. Select the Annotation Selection Tool
.
2. Press and hold Shift or Ctrl and click the comments you want to edit.
138
Foxit PhantomPDF Standard
User Manual
Align Comments
Select two or more comments that you want to align. Then do one of the following:

Choose COMMENT > Drawing > Arrange > Alignment, and then choose a command as
follows:
A. To align a column of comments, choose
,
, or
to align them respectively
to the left edge, right edge, or vertical axis of the anchor comment.
B. To align a row of comments, choose
,
, or
to align them respectively to
the top edge, bottom edge, or horizontal axis of the anchor comment.
Note: When you right-click or Ctrl-click one of the selected comments, it will be highlighted in red,
indicating that it’s the anchor comment. The align menu commands move the other selected
comments to line up with the edges of the anchor comment.

Refer to Align Images for more information.
Center Comments
This function enables you to center comments vertically, horizontally or both.
To center comments, select two or more comments that you want to center. Then do one of the
following:

Choose COMMENT > Drawing > Arrange > Page Center, and then choose
,
, or
to center them vertically, horizontally or both.

Please refer to Center Images for more information.
Distribute Comments
In the context of laying out comments on a page, you can give a group of comments uniform
spacing, based on the centers of adjacent comments. This function will be available when
selecting three or more comments.

To distribute the comments, choose COMMENT > Drawing > Arrange > Distribute, and then
choose

and
to distribute vertically or horizontally.
Please refer to Distribute Images for more information.
139
Foxit PhantomPDF Standard
User Manual
Summarize comments
Summarizing comments is an easy way to help you directly obtain a synopsis of comments
associated with the PDF. Foxit PhantomPDF supports to create a comment summary PDF. To
create a comment summary, do as below:
1.
Choose COMMENT > Manage Comments > Summarize Comments.
2.
In Create Comment Summary dialog box, do the following:
A.
Choose the layout of the summary and there are five types of layouts for you to choose:

L1--Document and comment with connector lines on separate pages

L2-- Document and comment with connector lines on single pages

L3—Comments only

L4-- Document and comment with sequence numbers on separate pages

L5-- Document and comment with sequence numbers on single pages
L1
L2
140
Foxit PhantomPDF Standard
User Manual
L3
L4
L5
B.
Comment Type - Choose the comment type you want to summarize.
C.
Paper Size-Select the paper size of the summary
D.
Font Size - Select the font size of the summary.
E.
Sort comments by – Choose how to sort the comments.
F.
Include pages– Specify the page range you need to summarize.
3.
Click OK and a PDF named “Summary of Comments on [original document name].pdf” will
be opened automatically. You can rename it before you save.
Send annotated PDFs
Foxit PhantomPDF makes it easy for users to share reviews. You can send your annotated PDFs to
any reviewers to check and respond to your comments.
To send an annotated PDF file, do the following:

Click on the Save button

Choose SHARE > Send To > Email
to save all the comments you have made.
to send it out.
141
Foxit PhantomPDF Standard
User Manual
Import/export comments data
This feature is especially useful for PDF reviewing. When you receive an email invitation to a PDF
review, the invitation typically includes the PDF as an attachment or provides a URL to the PDF.
Alternatively, you may receive a Form Data Format (FDF) attachment. When opened, an FDF file
configures your review settings and opens the PDF in a web browser. At this moment, you need
to know how to import the comment data from the FDF file. Similarly, you may export comment
data and send them as an FDF file to the other participants.
Import comments data
Do as the following:

Double-click a FDF file to open it directly with Foxit PhantomPDF.

Choose COMMENT > Manage Comments > Import
> navigate to where the desired
file is, select it (if you want to import multiple comments file, you can select them by
holding Ctrl/Shift or by dragging the mouse to select), and press “Open”. You will be
prompted that the comments data has been imported successfully.
Export comments data
To export comments data, please do one of the following;

To export comments data as a FDF
A. Choose COMMENT > Manage Comments > Export
.
B. You will be presented with a standard Windows “Save As” dialog box. Navigate to where
you want to save the FDF file (e.g., your Documents folder), specify its name and click
Save button.
C. You will be prompted that the data has been exported successfully.

To export and send in an e-mail
A. Choose COMMENT > Manage Comments > FDF via Email
.
B. Your default e-mail program will pop up, and the comments data will be exported as a
FDF file and attached in the email automatically.
C. Type the e-mail address and title > click Send.
142
Foxit PhantomPDF Standard
User Manual
D. The comments in FDF will be sent separately.
Note: The option of Export comments data will be available only when the comments have been
added to the PDFs.
Tip: The users of Foxit PhantomPDF can import the comments data from txt and dbf files or
export the data of PDFs and save in FDF formats file. You can also export the data in FDF format
and email as an attachment.
143
Foxit PhantomPDF Standard
User Manual
Chapter 8 – Share PDFs
Foxit PhantomPDF supports different methods to share PDF documents with others. You can
easily email documents to share with others by one-click and, check out and check in PDFs in
your SharePoint server. Foxit PhantomPDF Standard also allows you to participate in a Shared
Review initiated by Foxit PhantomPDF Business.
Email Documents
E-mailing documents is a useful feature. You may need to send a PDF file you are reading to the
customers to speed up your daily work, or an interesting story that you want to share with your
friends.
To e-mail a PDF file, please do the following:




Choose SHARE > Send to > Email.
System default e-mail application runs.
The PDF will be attached in the e-mail automatically.
Type the subject and e-mail address, and click Send.
Send to Evernote
Directly send current PDF document to Evernote as an attachment.



Prerequisites – You should set up an Evernote account
https://www.evernote.com/Registration.action.
Download and install – http://evernote.com/evernote/?file=Win&btn=grey.
Open a PDF file.

Choose SHARE > Send to > Evernote

You will see the current PDF document is attached to your Evernote ready.
from
.
144
Foxit PhantomPDF Standard
User Manual
SharePoint Integration
Foxit PhantomPDF has been integrated with Microsoft SharePoint, which helps you better
manage and share PDFs. You can access PDFs in a SharePoint repository by any of the following:
•
•
•
Open a PDF file in the SharePoint mapped drive by Open dialog box within Foxit
PhantomPDF. You can open and check out a PDF, modify it and then check in and save to the
SharePoint network drive.
You can also use Foxit PhantomPDF’s Open and Save As dialog box to work on PDFs in your
SharePoint repository, whether the SharePoint repository is SharePoint online or SharePoint
on-premise. More details please refer to Open and Save As PDFs with Foxit PhantomPDF.
Directly check out and check in PDFs in your SharePoint repository on SharePoint
on-premise through the SharePoint web interface using a browser after configuring your
server. Please refer to SharePoint Configuration to configure your server first. More details
please refer to Open and Save As PDFs with a Browser.
Open and Save As PDFs with Foxit PhantomPDF
Open PDF files in a SharePoint repository
To open PDF files in a SharePoint repository, please do the following: (Take opening PDFs in a
SharePoint repository on SharePoint online for example)

Run Foxit PhantomPDF and choose FILE > Open > Add a place
> SharePoint
. In the
Add dialog box, type the SharePoint URL to sign in and click Next to continue.

In the pop-up dialog box enter the email address and the password to sign in.
145
Foxit PhantomPDF Standard
User Manual

In the Open dialog box, select the Shared Documents folder and click Open.

Choose the PDF file you want to open and click Open.
146
Foxit PhantomPDF Standard
User Manual

In the Foxit PhantomPDF dialog box, if you choose Check out and Open, other users cannot
edit the PDF at the same time; if you only choose Open, others are able to modify the PDF
as well when you are editing.

(Optional) If you want to cancel the Check Out status, please go to SHARE > SharePoint
Integration > Discard Check Out


.
Edit the PDF according to your requirements.
To set the PDF properties, please do as the following steps:
1. Please go to SHARE > SharePoint Integration > Prepare Document Properties
.
2. In the Document Properties dialogue, double-click the column name to edit the value in
the Edit text box. For example, double-click Title, the Edit text box will pop up, type the
content you want and click OK to finish the editing.
147
Foxit PhantomPDF Standard
User Manual

Go to SharePoint > Check In.
In the Check In dialogue box, select a version number for the modified document along with
the appropriate the version comments. To not allow other people to modify the document,
you can check Keep the document checked out after check in this version.

Click OK, the modified PDF will be loaded to the server automatically.
148
Foxit PhantomPDF Standard
User Manual
Save as PDF files to a SharePoint repository
To save as PDF files to a SharePoint repository, please do the following: (Take saving as PDFs to a
SharePoint repository on SharePoint online for example)

Choose FILE > Save As > Add a place
> SharePoint
. In the Add dialog box, type the
SharePoint URL to sign in and click Next to continue.

In the pop-up dialog box enter the email address and the password to sign in.
149
Foxit PhantomPDF Standard
User Manual

In the Save As dialog box, select the Shared Documents folder and click Save.
Open and Save As PDFs with a Browser
To work on PDFs in your SharePoint repository on SharePoint on-premise with a browser, you just
need to log on to your SharePoint web portal, navigate to a PDF and click it. You will be prompted
whether to check out and open the PDF. See also Check Out and Open. Then you can check in to
save it back to your SharePoint repository.
Tip: If you need to save to your local folder, after editing the PDF you can click FILE > Save As >
150
Foxit PhantomPDF Standard
User Manual
Computer
and choose a local foder to save.
Shared Review and Email Review
Shared Review
After receiving the invitation from the review initiator, reviewers can mark-up PDFs using a full
set of commenting tools. Comments from reviewers will be stored in the internal server and
synchronized by Foxit PhantomPDF to download them at a regular interval. Reviewers will be
notified if new comments are added by others and they can also reply to these comments.
To review a shared review document:
Upon the review initiator sending out the document, the specified reviewers will receive an email
invitation to a PDF review. The email includes an attached document named “[original document
name]_review.pdf” or provides a URL to the PDF. To review the document:




Download the document and open it with Foxit PhantomPDF.
If it is your first time opening a shared review document, you will be prompted for your
identity information. Please enter at least your name and email address.
Enter an account name and password for the shared folder where the shared review
document is located.
A message bar appears in the application window with three buttons: Check for New
Comments, Publish Comments and a button with three options.

You can add your comments using annotation tools and then click Publish Comments button
to publish your comments which will be saved to the shared server.
Check for New Comments button allows you to view comments made by the initiator or
other reviewers. You can also reply to the comments. In normal situations, comment
publishing and checking will happen automatically.

For the button

with three options:
Track Reviews – To track all reviews you initiated or participated in, which is very useful
when you are involved in multiple reviews. See also Review Tracker.
Save As Archive Copy – Saves a copy of the document with review comments to your hard
151
Foxit PhantomPDF Standard
User Manual
drive when the review has ended.
Work Offline – If you don’t want to publish comments right after you make the comments,
this option can keep your work offline, until you click Work Online to be able to publish
comments.
Email Review
Email Review is useful when reviewers don’t have access to a common server or initiators don’t
need collaborative reviews.
To participate in an email review:
The recipients can download the document sent from the initiator and open it with Foxit
PhantomPDF, add their comments and click Send Comments button in the message bar to send
their comments back to the initiator.
Likewise, you can manage your reviews by using the Tracker. See also Review Tracker.
Review Tracker
The Review Tracker tool helps you easily manage document reviews in real time. The tracker
shows all reviews you joined and the detailed review status including review deadlines, reviewers,
comments, etc. You can also email reviewers/initiators with the tracker.
To track all of your reviews, please click SHARE > Review > Tracker
.
152
Foxit PhantomPDF Standard
User Manual
153
Foxit PhantomPDF Standard
User Manual
Chapter 9 – Forms
Foxit PhantomPDF is extremely useful for form filling and form designing. Please read below for
more information.
Interactive Form and Non-interactive form
There are two kinds of “form” files. One is a PDF file with fillable fields, which enables you to fill
the form directly by clicking the form fields without using other features. This is called an
Interactive PDF Form. The other kind of form is a plain PDF file with lines and texts, which should
be filled with the typewriter feature in Foxit PhantomPDF. This is called a Non-interactive PDF
Form.
Interactive Form
For interactive forms, you will see a document message bar appear between the toolbars and the
form itself. If you do not want to see it again when reopening this file, please choose FILE >
Preferences > Forms > Always hide document message bar. To show it, redo the steps.
The left side of the message bar typically informs you that this document is a fillable form. The
right side of the message bar has two buttons. One is a Highlight Fields button, which colors the
backgrounds of all blanks to be filled in and outlines any required blanks, making it easy to see
them at a glance. Click it to highlight all fields or cancel the highlight. Another button is a Close
button.
Acro Form and XFA (XML Forms Architecture) Form
Foxit PhantomPDF now supports both Acro Form and XFA Form. You can fill in XFA forms with the
Hand Tool
, the same which you were able to do with normal fillable forms (also known as
Acro Form).
Non-interactive Form
The document message bar will not appear. This kind of form acts like an ordinary PDF document
that has plain text and you will need to use the Typewriter feature to fill in this form.
154
Foxit PhantomPDF Standard
User Manual
Fill in PDF Forms
Foxit PhantomPDF not only allows you to fill in PDF forms and print them out, but also supports
advanced form operations, such as saving filled-out forms and importing/exporting forms data.
Fill Interactive Forms
If a PDF form contains interactive form fields, you can fill in the form with the Hand Tool
.
When you place the pointer over an interactive form field, the pointer icon changes to one of the
following:

Hand icon
-- Appears when mousing over a button, radio button, check box, or item
on a list.

I-beam icon
-- Appears when you can type text into the form field.
To fill in an interactive form, please do the following:

If necessary, select the Hand tool

(Optional) To make form fields easier to identify, click the Highlight Fields on the document
message bar. Form fields appear with a colored background (light blue by default).
Choose FORM > Form Recognition > Run Form Field Recognition. Then click on the first

.
form field you want to fill in, either to select that option or to place an I-beam pointer



in
the field so that you can start typing.
Right-click the text fields, and choose Paste or Select All to do other operations.
After making a selection or entering text, do any of the following:
A. Press Tab or Shift + Tab to accept the form field change and go to the next or previous
field.
B. Right-click the form field and press the Up arrow key to select the previous option in an
item of list, or press the Down arrow key to select the next option.
After you fill in the form fields, do one of the following:
A. Click the submit button if one exists. Clicking this button sends the form data to a
database across the web or over your company intranet.
B. Click Save icon
on toolbar, or choose FILE > Save.
C. Choose FILE > Save As, and specify a location for the copy.
155
Foxit PhantomPDF Standard
User Manual
Clear a form entry
Click one of the form fields, and use the Backspace key or Delete key.
Reset unsaved form entries
Choose FORM > Form Data > Reset Form
Clear a form in a browser
Do either of the following:


Select the reset form button if one exists. You can’t undo this action.
Quit the browser, and start again.
Note: Clicking the web browser’s Reload or Refresh button, the Back or Go Back button, or
following a link to another page may not complete clearing the form.
Fill lengthy entries in forms
Some PDF forms can contain dynamic text fields, which changes the text you input in size to
accommodate the text fields. The text appears smaller and smaller when the words you type
exceed the current size of the field.
Spell-checking form entries
You can spell- check the text you typed in form fields after purchasing Foxit PhantomPDF if the
security settings allow.
If you have installed the Spell Checker, when you insert any English text in the form fields, the
spelling errors will be highlighted and underlined with squiggly lines.
To spell-check entries, do the following:



Right-click on the misspelled words and you will see a list of five suggested words.
Choose one of the suggested words to correct your input or ignore the squiggly line.
If all the suggested words are not the exact words you want to input, try to correct them
with other words.
Fill Non-interactive Forms
If a PDF form contains non-interactive form fields, you can fill in the form with the Typewriter
.
When you place the pointer over a non-interactive form field, the basic pointer icon doesn’t
156
Foxit PhantomPDF Standard
User Manual
change.
Non-interactive PDF forms can be printed and filled in by hand. Or choose COMMENT tab >
Typewriter group > Typewriter Tool
to type information over the blank form fields and then
save or print a copy of the completed form. To use the Typewriter Tool to fill the non-interactive
forms and spell-check the entries, please refer to “Typewriter Tool” .
You can also recognize form fields with Run Form Field Recognition tool
and then fill in
forms with Hand Tool.
Note: To add text before or after the form fields, you can either choose to use Edit > Edit Content >
Add Text or refer to the Typewriter Tool.
Comment on Forms
You can comment on PDF forms, just as on any other PDF. You can add comments only when the
form creator has extended rights to the users.
Whether or not these comments are included when the form is submitted depends on how it is
submitted. For example, if you use Foxit PhantomPDF to print the form for mailing or faxing, the
comments do not appear. But if you attach the filled-in form to email as a complete PDF, the
comments are included. Also, you can send the comments separately as an email attachment.
See also “Chapter 7 - Comments”.
Manage Form Data
You can import form data from other file formats to a PDF form, or export form data on a PDF
form to other file formats. You can also export form data from multiple PDF forms to a CSV file. In
addition, for PDF forms with Ultraform technology, Foxit PhantomPDF supports to create and
display 2D barcode that contains form data you filled in.
Import/Export Form Data
To import and export form data is similar to the way of importing and exporting comment data.
However, this function is only for PDF interactive forms. All the options for importing and
exporting form data will be unavailable when you open other ordinary PDFs or non-interactive
forms.
To learn how to import and export form data, please view “Import/Export Comments Data”.
157
Foxit PhantomPDF Standard
User Manual
You can also export form data to an existing CSV file by clicking FORM > Form Data > Export >
Append to an Existing Sheet. In the Open dialog box, select a CSV file you want to append the
form data to and click Open. A Foxit PhantomPDF message will pop up to prompt that the form
data has been exported successfully and let you decide whether to open the file.
Tip: The users of Foxit PhantomPDF can import the form data from txt, xml, CSV, dbf or Excel
format files or export the data of PDFs and save in FDF formats file, and it also can import and
export the form data of PDFs and save as txt, xml, CSV, dbf or Excel format files.
Combine forms to a sheet
To export form data from multiple PDF forms to a CSV file, please do as following:
1. Choose FORM > Form Data > Combine Forms to a Sheet.
2. In the Export multi-forms to a sheet dialog box, click Add Files to add files that you want to
combine into a sheet. You can also click Close button
in the dialog box to remove files.
3. (Optional) Check the option Contain forms you closed recently to add the PDF files you closed
recently. You can also append the exported form data to an existing file by checking the option
Append to an existing file.
4. Click Export. In the Save As dialog box, specify a folder and file name (“data source.csv” by
default) for the CSV file and click Save. A Foxit PhantomPDF message will pop up to prompt that
the form data has been exported successfully and let you decide whether to open the file.
Generate 2D Barcode
For forms integrated with Ultraforms technology, Foxit PhantomPDF supports the generation of
2D barcodes, making the form data easily to be scanned, captured and incorporated into a
database. Steps are as follows:


Open and fill in the form.
Upon completion, click the barcode generation button (if any) on the form file to generate
2D barcode.


Click the save button
on the Quick Access Toolbar to save the form.
(If needed) Choose FILE > Print to print the form; and then you can use a supported scanner
to scan, read and incorporate the form data into a database.
158
Foxit PhantomPDF Standard
User Manual
Note:
1. Currently, Foxit PhantmPDF only supports the generation of 2D barcode for forms integrated
with Ultraforms technology.
2. The triggering method for 2D barcode generation may vary as the form creator may define
when integrating Ultraforms technology into the form file. You can click the barcode
generation button (if there is any) on the form file, or choose Print directly to generate 2D
barcode.
Form Fields
Foxit PhantomPDF uses a group of buttons that can be used to create and design form fields in
interactive forms. You are able to add push buttons, text fields, check boxes, combo boxes, list
boxes or radio buttons to create an interactive PDF form and specify their properties.
Create Interactive Forms
You can either create an entirely new interactive form from a blank page or add form fields to an
existing electronic form.
To start from a blank page, please do the following:


Create a blank PDF from FILE > Create > Blank, or choose CONVERT > Create > Blank.
Open the blank page with Foxit PhantomPDF, and then add form fields.
159
Foxit PhantomPDF Standard
User Manual
To create forms from non-interactive table:

Open it with Foxit PhantomPDF and choose FORM > Form Recognition > Run Form Field
Recognition

. All fillable fields in the document will be recognized and highlighted.
Add form fields from FORM > Form Fields > click a type of form field button and the cursor
changes to crosshair


. And the Designer Assistant
is selected automatically.
All the corresponding type of form fields will be automatically named with the text near
the form fields (Take the text fields for an example as below).
Click the place you want to add the form field. To edit the form field further, please refer to
the properties of different buttons from “Buttons”.
Creating Text Fields
Buttons
There are seven basic buttons to add form fields for you to create an interactive PDF form:
Button
Tool Name
Description
Push
Button
Creates an interactive form element to initiate certain predefined
actions, such as opening a file, submitting data to a web server, or
resetting a form. This button can also be customized with images and
text.
Check Box
Presents yes-or-no choices for individual items. If the form contains
multiple check boxes, users can select what they want.
Radio
Button
Presents a group of choices from which the user can select only one
item.
Combo
Box
Lets the user either choose an item from a pop-up menu or type in a
value.
List Box
Displays a list of options the user can select.
Text Field
Lets the user type in text, such as name, address, phone number, etc.
Signature
Field
Creates a blank digital signature field for reviewers to sign the document
160
Foxit PhantomPDF Standard
User Manual
A PDF Form
Push Button

Create a new push button
Choose FORM > Form Fields > Push Button
, and your cursor changes into
. Then do the
following:



Drag an area in the desired place to create a push button.
A box appears under the button for you to input the button name and the name of label.
You can also click the All Properties to do more settings.
161
Foxit PhantomPDF Standard
User Manual

Move and resize a push button

To move a push button, select Annotation Selection Tool
or push button
, click and
drag the button to move it to a new location.

To resize a push button, select Annotation Selection Tool
or push button
, click to
select the button, and then drag a border handle.

Delete a push button


Select Annotation Selection Tool or push button
delete.
Press Delete, or right-click the push button > Delete.

Create multiple copies of a push button
, click the push button you want to
You can create multiple copies of a push button. The new push button names are based on the
original push buttons and appended with a number. However, you are able to create them with
the same names. In addition, all the new push buttons are created sequentially, using standard
array format.

With the Annotation Selection Tool


buttons that you want to copy (press Shift or Ctrl when clicking to select more buttons).
Right-click one of the buttons > Create Multiple Copies…
In the Create Multiple Copies of Fields dialog box, do the following:
or push button
, select one or more push
The Create Multiple Copies of Fields dialog box
A. To specify the rows to be created, enter or select a number in Copy Selected fields down
(times). The default number is set to 2.
162
Foxit PhantomPDF Standard
User Manual
B. To specify the columns to be created, enter or select a number in Copy Selected fields
across (times). The default number is set to 2.
C. To specify the width of the area in which the columns of fields appear, enter or select a
number in Change Width (in). The default number is set to 0.04.
D. To specify the height of the area in which the columns of fields appear, enter or select a
number in Change Height (in). The default number is set to 0.04.
Note: The width and height values don’t change the dimensions of individual fields but
designate the size of the entire area for all the selected and newly created fields.
E. To change the position of buttons, use the Up, Down, Left, and Right buttons in the
dialog box.
F. Click Preview to apply the results.
G. Click Same Name to apply the names of original buttons to the newly created buttons.

Click OK.
Note: Copies of push buttons function independently of each other. You can use a different
procedure to duplicate push buttons, creating an information- sharing relationship among
these buttons.

Duplicate a push button across multiple pages


Select the push button that you want to duplicate.
Right-click the button > Duplicate…
Note: The Duplicate command isn’t available for forms with only one page.

Then do one of the following:
A. To duplicate the push button on every page in the form, select All, and click OK.
B. To duplicate the push button on odd/even page in the form, select Odd pages or Even
pages, and click OK.
C. To duplicate the push button on a limited range of pages, type the starting and ending
page on which you want the button to appear. Click OK.
Note: Enter the page number including or not including the page on which the button originally
appears doesn’t affect the duplication process. Including that page won’t create a second
copy on top of the original one, and not including it won’t remove the original button.

Set tab order
You can set the tab order of the buttons you created. The order number will show on the top left
corner.
163
Foxit PhantomPDF Standard
User Manual


Choose the Annotation Selection Tool , select the buttons you want to order and move
the cursor to one of the buttons you selected.
Right click the button and choose Set Tab Order on the context menu.

Set push button properties
You can set properties that apply formatting, determine the appearance and actions, and so
forth.
The push button has a General tab, Appearance tab, an Options tab, and an Actions tab. Besides,
there are two items on every tab:


Locked – When selected, prevents any further changes to any push button properties.
Close – Applies and saves the current button properties, and closes the button properties
dialog box.
Note: If you select Locked on any tab, it will lock all options for the button, but not just the options
on that tab.
1. General tab for the button properties
The General tab in push button properties contains the following options:






Name – Specifies the unique name of the selected push button.
Tooltip – Displays text that the hesitant user may find helpful in clicking the button. Tooltips
appear when the pointer hovers over the push button.
Form Field – Specifies whether the push button can be seen, either on screen or in print.
There are four choices for you: Visible, Hidden, Visible but doesn’t print, and Hidden but
printable.
Orientation – Rotates the push button by 0, 90, 180, or 270 Degrees.
Read Only – Prevents the user from clicking the push button.
Required – This option is not available for the push button.
2. Appearance tab for the button properties
The Appearance properties determine how the push button looks on the page. The Appearance
tab in push button properties contains the following options:

Line Style – Alters the appearance of the frame. Select Solid, Dashed, Beveled, Inset or
Underline.
164
Foxit PhantomPDF Standard
User Manual
Solid
Dashed
Beveled
Inset
Underline
The appearances of Push Button with different line styles
Note: You may not see the difference if no color is chosen as the border color.



Thickness – Specifies the width of the frame surrounding the push button: Thin, Medium, or
Thick.
Border Color – Opens a color picker in which you can select a color for the frame
surrounding the button. To leave the button without a frame, select No color.
Fill Color – Opens a color picker in which you can select a color for the button. To leave the
button uncolored, select No color.
Note: A Fill Color choice other than No color will block any images on the PDF page that are
behind the button.



Font Size – Sets the size of the label for the button. You can either choose Auto, various
preset values, or type in a different value.
Text Color – Opens a color picker in which you can select a color for the label.
Font – Lists the fonts available on your computer.
Font Size: 30
Text Color: Green
Font: Times New Roman
Push Button
3. Options tab for the button properties
The Options properties determine how labels and icons appear on the button. A button can
have a label, an icon, or both. The Options tab in push button properties enables you to add any
labels you like. The Options tab in push button properties contains the following options:

Layout – Specifies the layout of label and icon of the button. There are seven choices:
A
B
C
D
E
F
G
165
Foxit PhantomPDF Standard
User Manual
A. Label only B. Icon only
Label left, icon right
C. Icon top, label bottom
D. Label top, icon bottom
E. Icon left, label right F.
G. Label over icon
Button Layouts

Advanced – Does the details settings to the icon.
A.
When to scale – choose when to scale the icon you insert. There are four options:
Always: scale the icon to fit the button you draw.
Never: never scale the icon. Show the icon with its original size all the time.
Icon is too Big: zoom out the icon to fit the button if the former one is bigger than the
latter one, or show the icon with its original size.
Icon is too Small: zoom in the icon to fit the button if the former one is smaller than
the latter one, or show the icon with its original size.
B. Scale – choose to scale the icon non-proportionally or proportionally. This option will
be disabled when you select Never in the field of When to scale.
Proportionally: scale the icon in its proportion.
Non-proportionally: scale the icon to fit the button when the magnification is changed.

C. Fit to bounds – check this option to scale the icon to fit fully within the bounds of the
button without taking into consideration the line width of the border.
D. Border – drag and move the scroll bar to change icon’s position in the button. The
coordinates change when you move the scroll bar.
Behavior – Specifies the display of the button when clicked. The button behavior options
include:
None: Keeps the appearance of the button the same.
Push: Specifies appearances for the Up, Down, and Rollover states of the mouse. Select an
option under State, and then specify a label or icon option:
Up: Determines what the button looks like when the mouse button is not clicked.
Down: Determines what the button looks like when the mouse is clicked on the button,
but before it is released.
Rollover: Determines what the button looks like when the pointer is held over the
button.
166
Foxit PhantomPDF Standard
User Manual
Outline: Highlights the button border.
Invert: Reverses the dark and light shades of the button.
Push
The Button Behaviors

To define the label or icon that appears on the button, do the following:
A. If a label option is selected from the Layout menu, type the text in the Label box.
B. If an icon option is selected from the Layout menu, click Choose icon… > click Browse… >
Select the file type from the Objects of Type menu, double-click the file name, and click
OK. (To remove the selected icon, click Clear button.)

Click Close to accept these display properties.
4. Actions tab for the button properties
The Actions properties specify any actions that you want to associate with the push button,
such as jumping to a specific page or going to a web site. The Actions tab in push button
properties contains the following options:


Select Trigger – Specifies the user action that initiates an action: Mouse Up, Mouse Down,
Mouse Enter, Mouse Exit, On Receive Focus, or On Lose Focus.
Select Action – Specifies the event that occurs when the user triggers the action: Go to a
page view, Open/execute a file, Open a web link, Show/hide a field, Execute a menu item,
Submit a form, Reset a form, Import form data, and Run a JavaScript.
A. Go to a page view – designate to a specific page view. You can not only designate to a
page in the current PDF, but also to the page in another PDF. Also, you may change the
current zoom setting and then set the position.
To go to a page view, choose this option, click Add button and do one of the following:
a)
b)
Set the position in current document – scroll the current document, go to a new
position where you want to set and click Set this position.
Set the position in another PDF document – click the Open button on the toolbar >
select the PDF you want to set position > scroll this document and go to a position
where you want to set > click Set this position.
167
Foxit PhantomPDF Standard
User Manual
Note: The new PDF document should be opened in the existing window but not a new
window.
c)
d)
Change the view magnification -- scroll in the current document or another document >
go to a new position where you want to set > change the magnification of the position >
click Set this position.
Click Cancel to revoke your operation.
B. Open/execute a file – designate to open another file. To do this, choose Open/execute a
file > click Add button > select the destination file and click Select.
C. Open a web link – designate to open a web link. To do this, choose Open a web link >
click Add button > enter the URL of the destination web page.
D. To show/hide a field, select the option > click Add… > choose to show or hide the
selected button when the user triggers the action, and click OK.
E. To execute a menu item, select the option > click Add… > select one of the items in
Menu Item Selection dialog box, and click OK.
F. To submit a form, select the option > click Add… > choose the submission method,
decide which fields should be submitted, and click OK.
G. To reset a form, select the option > click Add… > select the fields that will be reset, and
click OK.
H. To import form data, select the option > click Add… > choose the FDF file that contains
the form data you want to import, and click Open.
I. To run a JavaScript, select the option > click Add… > enter JavaScript, and click OK and
Close.



Actions – Displays the list of triggers and actions that you have defined.
Up and down buttons – Change the order in which the selected action appears listed under
the trigger. (Available only when you have defined multiple actions for the same trigger.)
Edit – Opens a dialog box with specific options for the selected action. You can also
double-click the actions to open a dialog box.
Delete – Removes the selected action.

Set push button properties as default

After setting button properties for a new push button, you can set your settings as the new
default for all the push buttons you create in future. To set the current properties as default,
right-click the push button > select Use Current Properties as New Defaults.
Check Box Button
A check box button is a button to present yes-or-no choices for individual items. For creating,
moving, resizing, deleting, creating multiple copies, duplicating a check box button and setting
tab order, please refer to “Push button”.
168
Foxit PhantomPDF Standard
User Manual

Set Check Box Button Properties
There are also four tabs a General tab, Appearance tab, an Options tab, and an Actions tab for
you to set check box button’s properties.
For General tab, Appearance tab and an Actions tab, please refer to Set Push Button Properties.
Options tab
Check Box Style - Specifies the style of the check box button. There are six choices:
A
B
C
D
E
F
Check Box Style
A. Check
B. Circle
C. Cross
D. Diamond
E. Square
F. Star
Export Value - Identifies the check box button and differentiates it from other check box buttons
that share the same Name value.
Checked by default – Sets the selection state of the button when the user first opens the form.
Note: If you create multiple copies of the check box button, please make sure both the form filed
names and the export value are all different in related check boxes.
Radio Button
A radio button is a type of graphical user interface widget that allows you to choose one of a
predefined set of options. For creating, moving, resizing, deleting, duplicating the buttons and
setting tab order please refer to “Push button”.
Tip: How to toggle radio buttons
Related radio buttons must have exactly the same form field name but different export values.
This ensures that the radio buttons toggle and that the correct values will be collected in the
database.
1.
2.
Please use copy-paste to create multiple copies if having more than one form field with the
same name. After this, to make the value usable, you have to change the value of the radio
buttons to make sure all radio buttons have the same field name but different export value.
Please note you cannot use “Create Multiple Copies” option if there is more than one radio
button with the same name. A warning message will pop up if you right click and choosing
Create Multiple Copies.
169
Foxit PhantomPDF Standard
User Manual

Set radio button properties
How a radio button behaves is determined by settings in the Radio Button Properties dialog box.
You can set properties that apply formatting, determine the appearance and actions, and so
forth.
The radio button has a General tab, Appearance tab, Actions tab, and an Options tab as push
button. Also, there are two items on every tab:


Locked – When selected, prevents any further changes to any radio button properties.
Close – Applies and saves the current button properties, and closes the button properties
dialog box.
Note: If you select Locked on any tab, it will lock all options for the button, but not just the options
on that tab.
1. General tab for the radio button properties
The General tab in radio button properties contains the following options:






Name – Specifies the unique name of the selected radio button.
Tooltip – Displays text that the hesitant user may find helpful in clicking the button. Tooltips
appear when the pointer hovers over the radio button.
Form Field – Specifies whether the radio button can be seen, either on screen or in print.
There are four choices for you: Visible, Hidden, Visible but does not print, and Hidden but
printable.
Orientation – Rotates the radio button by 0, 90, 180, or 270 Degrees.
Read Only – Prevents the user from clicking the radio button.
Required – Forces the user to click the radio button. If the user attempts to submit the form
while a required radio button is not chosen, an error message appears.
2. Appearance tab for the radio button properties
The Appearance properties determine how the radio button looks on the page. The Appearance
tab in push button properties contains the following options:

Line Style – Alters the appearance of the frame. Select Solid, Dashed, Beveled, Inset or
Underline.
Solid
Dashed
Beveled
Inset
Underline
170
Foxit PhantomPDF Standard
User Manual
The appearances of Radio Button with different line styles
Note: You may not see the difference if no color is chosen as the border color.



Thickness – Specifies the width of the frame surrounding the radio button: Thin, Medium, or
Thick.
Border Color – Opens a color picker in which you can select a color for the frame
surrounding the button. To leave the button without a frame, select No color.
Fill Color – Opens a color picker in which you can select a color for the background behind
the button. To leave the background uncolored, select No color.
Note: A Fill Color choice other than No color will block any images on the PDF page that are
behind the button.

Text Color – Opens a color picker in which you can select a color for the button.
Border color
Text color
Fill color
Radio Button
Note:The items of Font Size and Font are not available in the Appearance tab for the Radio
Button properties.
3. Actions tab for the radio button properties
Please refer to “Actions tab for the button properties” .
4. Options tab for the radio button properties
The Options tab in radio button properties enables you to change the button style and do other
additional settings. The Options tab in radio button properties contains the following options:




Button style – Specifies the shape of the maker that appears inside the button when the
user selects it. There’re six choices in total: Check, Circle (the default), Cross, Diamond,
Square, or Star. This property does not alter the shape of the radio button itself.
Export Value – Identifies the radio button and differentiates it from other radio buttons that
share the same Name value. The status of a radio button is “yes”. You can give them other
names with this box.
Checked by default – Sets the selection state of the button when the user first opens the
form.
Radio buttons with the same name and value are selected in unison – Allows single-click
selection of multiple related radio buttons. If the user selects a radio button that has the
171
Foxit PhantomPDF Standard
User Manual

same field name and export value as another, both radio buttons are selected.
Click Close to accept these display properties.

Set radio button properties as default
After setting radio button properties for a new radio button, you can you’re your settings as the
new default for all the radio buttons you create in future.
To set the current properties as default, right-click the radio button, select Use Current
Properties as New Defaults.
Combo Box Button
A combo box is a commonly-used GUI widget. It is a combination of a drop-down list or list box
and a single-line textbox, allowing the user either to type a value directly into the control or
choose from the list of existing options.
For creating, moving, resizing, deleting, duplicating the combo box and setting tab order, please
refer to “Push button”.

Set combo box properties
How a combo box behaves is determined by settings in the Combo Box Properties dialog box. You
can set properties that apply formatting, determine the appearance and actions, perform
mathematical operations, and so forth.
The combo box has a General tab, an Appearance tab, an Options tab, a Format tab, a Validate
tab, a Calculate tab and an Actions tab,. There are two items on every tab:


Locked – When selected, prevents any further changes to any combo box properties.
Close – Applies and saves the current properties, and closes the combo box properties
dialog box.
Note: If you select Locked on any tab, it will lock all options for this combo box, but not just the
options on that tab.
1. General tab for the combo box properties
Please refer to “General tab for the radio button properties” .
2. Appearance tab for the combo box properties
Please refer to “Appearance tab for the button properties” .
3. Actions tab for the combo box properties
172
Foxit PhantomPDF Standard
User Manual
Please refer to “Actions tab for the button properties” .
4. Options tab for the combo box properties
You can create a list of items from which the user selects with the Options tab.




Item – Accepts the text and space character that you type for options that you want to
appear in the menu for the field.
Add – Moves the current entry in Item to Item List.
Export value – Where you type in a value to represent the item if the data will be exported.
If left blank, the entry for Name in the General tab is used as the export value.
Item list – Displays the choices that will be available in the list.
Note: The highlighted item in the Item List box appears as the default selected item in the combo
box field. To change the default item, highlight another item from the list.





Delete – Removes the selected item from the list.
Up/Down – Change the order in which the items are listed in the combo box list. These
buttons are not available if Sort Items is selected.
Sort items – Arranges the listed items numerically and alphabetically. A numerical sort (if
applicable) is performed before an alphabetical sort.
Allow user to enter custom text – Enable users to enter a value other than the ones in the
list.
Commit selected value immediately – Saves the value as soon as the user selects it. If this
option is not selected, the value is saved only when the user tabs out of the current field or
clicks another form field.
5. Format tab for the combo box properties
The Format tab in the combo box properties dialog box enables you to format the field values.
Select one of the categories listed below:


None – No additional options are available. The input in a combo box with this property
does not require any specific formatting.
Number – Automatically imposes the selected formatting options on numeric data entries.
A.
B.
C.
D.

Decimal places – Sets the number of digits that appear to the right of the decimal point.
Separator style – Sets the placement of commas and periods.
Currency symbol – Sets the type of currency, such as Dollars, Euros, or Pounds.
Negative Number Style – Sets how negative numbers are displayed. You can choose
Show parentheses, Use red text, neither, or both.
Percentage – Automatically imposes the selected formatting options on numeric data
expressed as a percentage.
173
Foxit PhantomPDF Standard
User Manual
A. Decimal places – Sets the number of digits that appear to the right of the decimal point.
B. Separator style – Sets the placement of commas and periods.



Date – The list includes one-, two-, and four-digit variations where d stands for the day, m
stands for the month, and y stands for the year. Also, you can choose Custom option and
type your format.
Time – The list includes display variations where h stands for the hour on a 12-hour clock, H
stands for the hour on a 24-hour clock, MM stands for minutes, ss stands for the seconds,
and tt stands for AM or PM. Also, you can choose the Custom option and type your format.
Special – There are five options for you:
A. Zip Code – For a five-digit postal code.
B. Zip Code + 4 – For a nine-digit postal code.
C. Phone Number – For a ten-digit telephone number.
D. Social Security Number – For a nine-digit US Social Security Number.
E. Arbitrary Mask -- Changes the format category to Custom and makes another text box
available, in which you can type a custom format. Use this option to specify which types
of characters the user can enter in any given position, and how the data displays in the
field.
a. A -- Accepts only letters (A–Z, a–z).
b. X -- Accepts spaces and most printable characters, including all characters available
on a standard keyboard and ANSI characters in the ranges of 32–126 and 128–255.
c. O -- The letter “O” accepts alphanumeric characters (A–Z, a–z, and 0–9).
d. 9 -- Accepts only numeric characters (0–9).
For example, a mask setting of AAA--p#999 accepts the input BDF--p#367. A mask
setting of OOOOO@XXX accepts the input vad12@3Up.
174
Foxit PhantomPDF Standard
User Manual
Example of an Arbitrary Mask entry

Custom -- Makes additional options available to form designers who want to write their own
JavaScripts for formatting and keystrokes. For example, a custom script could define a new
currency format or limit the user entry to specific keystroke characters.
A. Custom Format Script – Displays any custom scripts you have added for formats. The
Edit button opens a JavaScript Edition dialog box in which you can write and add new
scripts.
B. Custom Keystroke Script –Displays any custom scripts you have added to validate
keystrokes. The Edit button opens a JavaScript Edition dialog box in which you can write
and add new scripts.
6. Validate tab for the combo box properties
The Validate properties restrict entries to specified ranges, values, or characters, ensuring that
users enter the appropriate data for a combo box.



Field value is not validated – Turns off validation.
Field value is in range – Sets a numeric range for a combo box using values you enter in
either as a number or a percentage. It is available only when Number or Percentage is
selected in Format tab.
Run custom validation script – Validates by a JavaScript that you create or provide. The Edit
button opens a JavaScript Edition dialog box in which you can write and add new scripts.
175
Foxit PhantomPDF Standard
User Manual
7. Calculate tab for the combo box properties
With this option, you can perform mathematical operations on existing form field entries and
display the result.


Value is not calculated – Select this option if you want the users to type.
Value is the – Select this to make further options available:
A.
B.



The List includes the mathematical functions to apply to the selected fields. Choose
Sum to add the values entered in the selected fields, Product to multiply them, Average,
Minimum, or Maximum.
Pick – Opens a Field Selection dialog box with a list of the available fields in the form
that you select to add or deselect to remove from the calculation.
Simplified field notation -- Uses JavaScript with field names and simple arithmetic signs. The
Edit button opens a JavaScript Edition dialog box in which you can write, edit, and add
scripts.
Custom calculation script -- Displays any custom scripts you have added for calculations. The
Edit button opens a JavaScript Edition dialog box in which you can write and add new scripts.
Set combo box properties as default
After setting combo box properties for a new combo box, you can set your settings as the new
default for all the combo boxes you create in future.
To set the current properties as default, right-click the combo box > select Use Current Properties
as New Defaults.
List Box and Text Field Button
A list box is a GUI widget that allows the user to select one or more items from a list contained
within a static, multiple line text box. Also, you can set a list box property that enables the user to
Shift-click or Ctrl-click/Control-click to select multiple items on the list.
A text field is a common element of graphical user interface of computer programs, as well as the
corresponding type of widget used when programming GUIs, which let the user type in text, such
as name, address, phone number, etc.
For creating, moving, resizing, deleting, duplicating the list box and text filed and setting tab
order please refer to “Push button”.

Set list box properties
Please refer to “Set combo box properties”.
176
Foxit PhantomPDF Standard
User Manual

Set text field properties
Although most of the properties are common to those of combo boxes, the Options tab is
exclusive.
1. For all the other properties of a text field, please refer to “Set combo box properties”.
2. Options tab for the text field properties






Alignment – Aligns the text left, right, or center within the field.
Default Value – Specifies the text that appears until the user overwrites it by typing in the
field. Enter the default value by typing in this option.
Multi-line – Allows more than a single-line entry in the text field.
Scroll long text – Compensates for text that extends beyond the boundaries of the text field.
Allow Rich Text Formatting – Allows users to apply styling information to the text, such as
bold or italic. This might be useful in certain text fields where such styling information is
important to the meaning of the text, such as an essay.
Limit of Characters – Allows entries of up to the number of characters you specify.
Note: If you entered a default value, that value is clipped to this limit.




Password – Displays the user-entered text as a series of asterisks (*). This option is available
only if Check Spelling is deselected.
Field is used for file selection – Allows the user to enter a file path as the field’s value when a
file is submitted along with the form. This option is available only when Scroll long text is the
only selected option in the Options tab.
Check spelling – Checks the spelling of user-entered text.
Comb of Characters -- Spreads the user-entered text evenly across the width of the text field.
If a border color is specified, Solid or Dashed Line is selected in the Appearance tab, each
character entered in the field is separated by lines of that color. This option is available only
when no other check box is selected.
A
B
Text fields with and without the Comb property
A. Text field with a border color, using the Comb property
B. Text field without the Comb property

Set text field properties as default
177
Foxit PhantomPDF Standard
User Manual
To set the current properties as default, right-click the text field > select Use Current Properties
as New Defaults.
Signature Field Button
The signature field is specially designed by to create blank digital signature fields for reviewers to
sign. You can place the field anywhere you want the reviewers to sign.

Create a new Signature field
Choose FORM > Form Fields > Signature Field button
, your cursor will change into
and
do the following:



Drag an area in the desired place to create a signature field button.
A box appears under the button for you to input the name.
You can also click the All Properties to do more settings. Or double-click the button to open
the signature Properties dialog box.
For moving, resizing, deleting, duplicating the signature field and setting tab order, please refer to
“Push button”.
To set signature field’s General, Appearance and Actions tab properties, please refer to “Set push
button properties”.
Foxit PhantomPDF supports to sign and verify digital signatures on XFA forms created by Adobe
LiveCycle. To sign and verify digital signatures, please refer to Digital Signature.
Signed tab for the signature field properties


Nothing Happens When Signed – it is set as default.
Mark As Read-Only - Prevents other readers to change the digitally signed form.




All Fields - Prevents any changes to any form field.
All Fields Except These - Allows changing the selected form fields. Click the Pick
button and select check boxes for the fields that you want the reviewers to edit
after signing.
Just These Fields – Prevent to change the form fields you pick.
This Script Executes When Field is Signed:
Activate a custom JavaScript when the user digitally signs the form. Click the Edit button to
change or create a new JavaScript action.
178
Foxit PhantomPDF Standard
User Manual
Arrange form fields
You can arrange form fields in a page, such as aligning, centering and distributing form fields.
Before arranging form fields, select multiple form fields.
Select multiple form fields
To arrange the form fields, you have to select multiple form fields that you want to arrange first.
To select multiple form fields, do one of the following:


Choose the Annotation Selection tool
select them.
> Shift-click or Ctrl-click each form field.
> drag a selection marquee around the area to
To deselect an individual form field, Ctrl-click the specific field.
Note: The form field highlighted in red is the anchor. When you select multiple form fields by
clicking, the last field selected is the anchor.
Align multiple form fields
You can align the selected form fields left, right, top, bottom, vertically or horizontally. Select one
of the form fields as the anchor, the rest of the form fields will be placed respectively to the left
edge, right edge, top edge, bottom edge, vertical axis or horizontal axis of the anchor form field.
Select two or more form fields that you want to align and do one of the following:


Right-click the anchor, choose FORM > Edit > Arrange, and in the Alignment category select
one to align the form fields.
Right-click the anchor, and then choose a command as follows:
A. To align a column of form fields, choose Left, Right, or Vertically to align them
respectively to the left edge, right edge, or vertical axis of the anchor form field.
B. To align a row of form fields, choose Top, Bottom, or Horizontally to align them
respectively to the top edge, bottom edge, or horizontal axis of the anchor form field.
Note: When you right-click or Ctrl-click one of the selected form fields, it will be highlighted in red,
indicating that it’s the anchor form field. The align menu commands move the other selected
form fields to line up with the edges of the anchor form fields.
Center multiple form fields
This function enables you to center the rectangle enclosed by form. Select form fields. You can
179
Foxit PhantomPDF Standard
User Manual
imagine that these form fields consist of an area with the shape of rectangle. Then do one of the
following:


Choose FORM > Edit > Arrange, in the Page Center category select one as the anchor to
center the form fields.
Right-click one of the form fields > Center > Vertically/Horizontally/Both. You will find that
the rectangle is centered respectively vertically, horizontally or both in the page.
Distribute multiple form fields
This function will be available when selecting three or more form fields. Select the form fields to
be distributed, and do one of following:


Choose FORM > Edit > Arrange, in the Distribute category select one as the anchor to
distribute the form fields.
To distribute the form fields evenly between the topmost and bottommost form fields,
choose Distribute > Vertically. To distribute the form fields evenly between the leftmost and
rightmost form fields, choose Distribute > Horizontally.
Resize multiple form fields
Select one of the form fields as the anchor, and the rest of the form fields will be resized with the
same height or width as that of the anchor form field. For example,

Select form field A and B with the Annotation Selection Tool

set A as the anchor form field.
Right-click A > Size > Height/Width/Both. And you’ll see that the height/width/height and
width of B is resized to be the same as that of A.
. Suppose that you want to
Set Form-field Tab Order
After you create the form fields, you can set the tab order with ease. If you deselect to set the tab
order, it will be automatically determined in a normal order. Do the following:



With the Annotation Selection Tool
selected, right-click a form field, and choose Set Tab
Order.
Click anywhere in the field that you want to be first in the tabbing order. The number in the
upper left corner is set as 1.
Click each of the other fields in the order that you want tabbing to occur.
180
Foxit PhantomPDF Standard
User Manual
Note: If you decide not to change the tabbing order, click a blank area of the page or a part of the
page that is not part of a field. This hides the tabbing order numbers so that clicking a field no
longer changes the tabbing order.
Set the field calculation order
When you define two or more calculations in a form, the order in which they are carried out is
the order in which you defined the calculations. In some cases, you may need to modify the
calculation order to obtain correct results.
For example, if you wanted to use the result obtained from calculating two form fields to
calculate the value of a third form field, the first two form fields must be calculated together first
to obtain the correct final results.

Choose FORM > Edit > Calculation Order
.
The Calculation Order dialog box displays all calculable fields in your form and the order in which
the calculations are performed.


To change the field calculation order, select the field from the list, and then click the Up or
Down button as needed.
Click OK to finish.
Edit Static XFA Forms
Foxit PhantomPDF supports editing of static XFA forms.
To edit static XFA forms, please do as below:
1. Open the static XFA form with Foxit PhantomPDF and choose FORM > Edit > Edit Static XFA
Form
. You’ll be prompted to save a copy of the original file to continue to edit.
2. Click Yes to edit the form as needed.
Set properties of multiple form fields


Select multiple form fields > right-click one of them > Properties….
There pops up a dialog with a General tab and an Appearance tab, and then follow the steps
specified above.
181
Foxit PhantomPDF Standard
User Manual
JavaScript
JavaScript is a dynamic, prototype-based language with first-class functions, which serves as a
means to easily create interactive web pages. In Foxit PhantomPDF, you can easily integrate this
level of interactivity into your PDF documents.
With Foxit PhantomPDF, you can invoke JavaScript code using actions associated with documents,
bookmarks, links, and pages. Foxit PhantomPDF provides three options for you to do it –
Document JavaScript, Document Action and JavaScript Console. The Document JavaScript lets
you create or access document level scripts in Foxit PhantomPDF. The Document Action lets you
create document-level JavaScript actions that apply to the entire document. The JavaScript
Console provides an interactive and convenient interface for testing portions of JavaScript code
and experimenting with object properties and methods.
Document JavaScript
Document JavaScripts are variable and function definitions that are generally useful to a given
document, but are not applicable outside the document.
Variable definitions: Define variables at the document level to make them visible to any
executing script.
Function definitions: Define functions at the document level that support the user
interaction with the document. These functions may be utility functions for handling
common tasks for string or number manipulation, or functions that execute lengthy scripts
called by actions initiated by a user interacting with form fields, bookmarks, page changes,
etc.
To create or access document level scripts in Foxit PhantomPDF, select FORM > JavaScript >
Document JavaScript. The pop-up Java Script Functions dialog box enables you to add, edit, or
delete document level scripts. All the document level scripts are stored within the PDF document.
In Java Script Functions dialog box, you will see the following buttons:
Close – Closes the dialog box.
Add – After typing a new Script Name, a JavaScript Editor dialog box pops up. You can create
and edit document level scripts here. To change the font of JavaScripts, click the Font
button.
Edit – The JavaScript Editor dialog box pops up, enabling you to modify the JavaScripts you
create.
Delete – Delete the JavaScript you selected.
182
Foxit PhantomPDF Standard
User Manual
Document Action
You can create the document-level JavaScript actions that apply to the entire document. For
example, selecting Document Did Save runs the JavaScript after a document is saved.
JavaScript Console
JavaScript Console is a control panel for the execution and debugging of JavaScript code. Serving
as a debugging aid, it is quite useful for displaying debug messages and executing JavaScript. To
active the JavaScript console, select FORM> JavaScript > JavaScript Console, and do the
following:
A. In the pop-up JavaScript Console
dialog box, type your JavaScript
code, or click Open and select one
of the file with JS format.
183
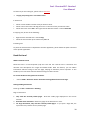
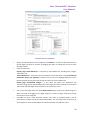
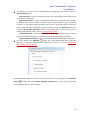
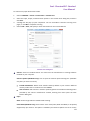
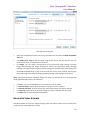
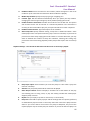
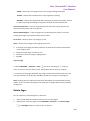
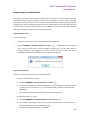
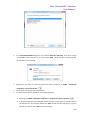
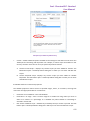
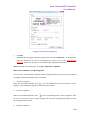
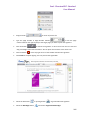
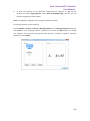
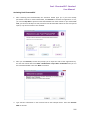
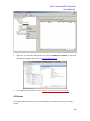
Foxit PhantomPDF Standard
User Manual
B.
Click Run button to run your
JavaScript code. You will be
prompted that the code has run
successfully. When the code goes
wrong, it gives you an error
message.
You can click Save to save a copy of your JavaScript code, or click Cancel to revoke your
operation.
Optional Database connectivity to Windows ODBC
The Optional Database Connectivity plug-in is a JavaScript object inside Foxit PhantomPDF PDF
Suite, allowing you to connect to Windows ODBC (Open Database Connectivity) data sources. It
provides some basic JavaScript properties and methods to gain increased customization options
and data accuracy to access to information databases. More importantly, JavaScript can be used
to execute SQL commands and retrieve data, which can, in turn, be used to populate a PDF file.
Also, developers can create document level-scripts to connect to a database for the purposes of
inserting new data, updating information, and deleting database entries.
Currently, ADBC is a Windows only feature and requires Open Database Connectivity (ODBC)
provided by Microsoft.
184
Foxit PhantomPDF Standard
User Manual
Chapter 10 – Security
The security feature of PDF gives you an exceptional control over the PDF files you create. To
provide adequate protection for PDF’s contents, you can encrypt and secure PDF files to prevent
unauthorized access, restrict sensitive operations, etc.
Check PDF Security
Some PDF files may contain restrictions preventing actions such as printing, editing, copying, etc.
To check if you have these permissions, please do the following:

Choose FILE > Properties > Security, or PROTECT > Secure Document > Security Properties.
Password Protection & Certificate Protection
In Foxit PhantomPDF, you can add password protection, certificate protection, MS AD RMS
protection, and security restrictions to PDF files, limiting who can open the file, can copy, edit or
print the file, etc.
Password Protection
You can add a password to a PDF document to limit access and restrict certain features, such as
printing, copying and editing.
There are two kinds of passwords that could be applied to a PDF file: a Document Open
password and a Permissions password. When you set a Document Open password, anyone who
tries to open the PDF file must type in the password that you specified. When you set a
Permissions password, anyone who wants to change the restrictions must type the Permissions
password. Please note that if a PDF is secured with both types of passwords, it can be opened
with either password, but only the Permissions password allows you to change the restrictions.
Tip: There’s no way out to recover password from the PDF if you forgot it. To keep a backup copy
of the PDF that isn’t password-protected is a good choice.
Add a password security
1.
2.
Choose Protect > Secure Document > Password Protect.
In the Password Protection dialog box, do the following:
Document Open Settings:
185
Foxit PhantomPDF Standard
User Manual
Require a password to open the document – selects to require users to type the password you
specify to open the document.
Password Input: specifies a password that users must type to open the document.
Password Confirm: type the password again to confirm the password.
Document Restriction Settings:
Add Document Restriction – restricts actions to PDF files, such as printing, editing, etc.
Password Input: specifies a password that is required to change the permissions settings. If the
file is opened in Foxit PhantomPDF, the user can view the file but must enter the permissions
password to change the file’s security and permissions settings.
Password Confirm: type the password again to confirm the password.
Permission Specification:
The security details you specified are shown on the left. Click Permission to set the restriction
settings. In the PDF Permission dialog box:
Permission setting – you can check options to specify file’s permission setting. Click any of
options to view the detail information in Permission Item Specification field below.
Print Permission – specifies the level of printing which users are allowed for the PDF
document.
A.
B.
Print with low resolution – allows users to print at no higher than 150-dpi resolution.
Print with high resolution – allows users to print at any resolution.
Change Permission – defines which editing actions are allowed in the document.
A.
B.
C.
D.
Fill in a form – lets users fill in forms. The option doesn’t mean that users can create
form fields.
Comment in the document – lets users add comment to the PDF document.
Manage pages and bookmarks – lets users insert, rotate, delete pages, as well as add
bookmarks.
Modify document - lets users modify the PDF document, but not add comments. If you
check the option, both Fill in a form and Management pages and bookmarks options
are automatically selected.
Content Extraction Permission - defines the contents that are allowed to be extracted in the
PDF document.
186
Foxit PhantomPDF Standard
User Manual
A.
B.
Enable text access for screen reader devices for the visually impaired.
Extract the contents of the document – lets users extract text and graphics, copy text,
take snapshot, and play media clip, etc.
Encrypt Settings:
Encryption Algorithm- defines data transformations that cannot be easily reversed by
unauthorized users. Foxit PhantomPDF supports 128-bit AES, 256-bit AES and 128-bit ARC-FOUR.
Don’t encrypt metadata – encrypts the contents of a PDF file but still allow search engines access
to the document metadata.
Save the setting as a new policy – save the current security settings as a policy so that you can
apply it to other documents.
3.
Click Ok and save the document to make setting take effect.
Modify password and security settings
1. Choose PROTECT > Secure Document > Security Properties, or choose FILE > Properties.
2. In the Security tab of the Document Properties dialog box, choose Document Security >
Password Protection, and then click Change Settings…
3. Do the settings as “Add a password security” and then click OK.
Remove password and security settings
To remove password and security settings from a PDF file, you must have the permissions to do
so.
1.
Open a PDF file, and choose either way of the following to remove password and security
settings.


Choose PROTECT > Secure Document > Remove Security.
Choose PROTECT > Secure Document > Security Properties, or choose FILE > Properties. In
the Security tab of the Document Properties dialog box, choose No Encryption from Security
Method menu.
A Foxit Security message box will prompt to ask whether you are sure to remove security
from this document.
2.
187
Foxit PhantomPDF Standard
User Manual
Certification Protection
The advantage of securing documents with certificates is that authors can specify unique
permissions for each person. For example, authors can permit a person to fill in forms and
comment in document, and permit another person to edit text or delete pages. You can choose
certificates from files on disk, or from the Windows certificate store. Only a specific set of users
whose identities can be verified and managed can have access to the document. A certificate that
contains public key and other identifying information is used to encrypt documents, or verified a
digital signature. Only corresponding private key decrypts the document that was encrypting
using the certificate.
Generally, if possible, encrypt documents using certificates from third-party provider. If the
certificate is lost or stolen, the issuing authority can replace it, if a self-signed certificate is
deleted, all PDF encrypted using the certificate is forever in accessible.
Add a certificate security
1.
2.
Choose PROTECT > Secure Document > Certificate Protect.
In Certificate Protection dialog box, create intended recipient list for the encrypt document:

Click New ID to create and store your self-signed digital ID in:
New PKCS#12 digital ID file – Stores the digital ID information to a file with the
extension .pfx on Windows and .p12 on Mac OS. You can use the files interchangeably
across different operating systems.
Windows Certificate Store – Stores the digital ID to a common location. Other Windows
applications can also retrieve it.




3.
4.
5.
6.
Click Import to import certificate from Windows Certificate store.
Click Browse to import certificate from disk.
Click Remove to delete a recipient from recipient list.
Click Permission to set document restriction for the selected recipient. About
Permission options, please refer to “Add document restrictions” of Password security
options.
Select Encryption Algorithm (support 128-bit AES, 256-bit AES and128 bit ARC-FOUR.
Check Don’t Encrypt metadata to encrypt the documents except metadata.
(Optional) Check Save the settings as a new policy to save the current security settings as a
policy so that you can apply it to other documents.
Click OK and save the document.
See also “About digital ID”
188
Foxit PhantomPDF Standard
User Manual
Change or remove certificate protection
To change or remove security settings, you must have permission to do so. If you want to change
or remove security encrypted with certificate, you must have all access to the document, or you
can’t do changes or remove security settings.
To change certificate protection, please do the following:
1.
2.
3.
4.
Choose PROTECT > Secure Document > Security Properties, or choose FILE > Properties.
In the Security tab of the Document Properties dialog box, choose Document Security >
Certificate Protection, and then click Change Settings…
In Certificate Protection dialog box, refer to Add a certificate security.
Click OK and save the document to apply your changes.
To remove certificate protection, please do one of the following:
1.
2.
Choose PROTECT > Secure Document > Remove Security.
Choose PROTECT > Secure Document > Security Properties or choose FILE > Properties, in
the Security tab of the Document Properties dialog box, choose No Encryption from Security
Method menu.
Set Security Policies
If you often apply the same security settings to multiple PDFs, you can save your settings as a
policy that you can apply to other PDFs. Security policies include the security method, encryption
password, permission settings, etc.
Create a security policy
1.
2.
3.
4.
5.
Choose PROTECT > Secure Document > Security Policies.
Click New.
Choose security method from menu and specify the policy name and description.
Click Edit Details to set restriction settings or passwords.
Review the policy details, and then click Close.
Secure PDFs using policies
You can apply any security policy to a PDF file. To secure a PDF with a security policy that you
specified, do the following:
1.
2.
3.
Open a PDF document.
Choose PROTECT > Secure Document > Security Policies.
In the Manage Security Policies dialog box, select a policy which you want to apply to the
189
Foxit PhantomPDF Standard
User Manual
4.
5.
PDF file.
Click Apply to this Document.
Save the document to apply the security policy.
Manage security policies
After you create security policies, you can manage them by copying, editing, and deleting.
1.
2.
Choose PROTECT > Secure Document > Security Policies.
In the Manage Security Policies dialog box, select a policy from left panel and do one or
more of the following:

Click New to create a new policy.

Click Copy to copy a policy. This option is useful when you create a new policy that’s
based on the settings of the selected policy.

Click Edit Details to edit a policy.

Click Delete to delete a policy.

Click Close.
AD RMS Protection
Microsoft Windows Rights Management Services is an information technology that works with
AD RMS enabled applications to help safeguard digital information from unauthorized use. If you
are authorized you can use Foxit PhantomPDF to open an RMS-Protected document to improve
information security and meet compliance requirements. To meet more users’ need, Foxit
PhantomPDF is also compliant with Microsoft® AD RMS 2.1.
Note: If you open a PDF which is encrypted by AD RMS feature of PhantomPDF with other PDF
programs, a wrapper (which is actually a PDF page) will prompt you to download Foxit
PhantomPDF to open the PDF. If you want to edit the wrapper content, please save the updated
content as a PDF file named “wrapperPDF.pdf” and place it within the Foxit PhantomPDF
installation directory.
As for using Windows Azure AD Right Management (AAD RMS), please refer to the Quick Start
for Windows Azure AD Right Management.
Foxit Configuration Tool
Foxit PhantomPDF RMS protector provides a handy configuration tool for administrators to audit
logs and set valid network printers.
190
Foxit PhantomPDF Standard
User Manual
Auditing Logs
Foxit PhantomPDF enables you to track on the usage of RMS protected files to record the
actions on the files during workflow and save to SQL server, including who accessed the
document, what document was accessed, when it was accessed, how it was accessed and
the success of that access, and more.
To audit logs, please do the following:
1. Follow the codes below to create the database table on the server.
USE [Database]
GO
/****** Object: Table [dbo].[Table_Name] ******/
SET ANSI_NULLS ON
GO
SET QUOTED_IDENTIFIER ON
GO
CREATE TABLE [dbo].[Table_Name](
[User] [nvarchar](50) COLLATE SQL_Latin1_General_CP1_CI_AS NOT NULL,
[Action] [nvarchar](50) COLLATE SQL_Latin1_General_CP1_CI_AS NOT NULL,
[FileName] [nvarchar](max) COLLATE SQL_Latin1_General_CP1_CI_AS NOT NULL,
[DateTime] [datetime] NOT NULL,
[IP] [nchar](25) COLLATE SQL_Latin1_General_CP1_CI_AS NOT NULL
[PrinterName] [nvarchar](max) COLLATE SQL_Latin1_General_CP1_CI_AS NULL,
[Copies] [numeric](18, 0) NULL,
[Result] [nchar](10) COLLATE SQL_Latin1_General_CP1_CI_AS NULL
) ON [PRIMARY]
2. Click Audit Log tool in Foxit Configuration Tool window. Enter all SQL Server information
shown as below, including SQL Server Name, the name of Database and Table, User Name and
Password. Then click on Test Connection button to test if the connection works well. A message
box will pop up to tell you if the test connection is successful.
191
Foxit PhantomPDF Standard
User Manual
3. Click on the Export button and choose to export to Foxit Reader registry or Foxit
PhantomPDF to generate a .reg file for the administrator’s configuration. The administrator
can distribute the .reg file to client-end computers.
4. Click View Log to view the operations records. You can search the records by different key
words and export the log to a .csv file.
Restrict Local Printing
You can also set the printing permissions by specifying certain network printers to protect
the sensitive information from being printed arbitrarily.
192
Foxit PhantomPDF Standard
User Manual

Network Printers Configuration
To avoid unauthorized printing of sensitive documents, you can limit the printing permissions to
certain network printers. To configure network printers, please click the Valid Network Printer
Setting tool and in the “Foxit Configuration Tool” window and then do the following:
1. You should get the Printer Port first. Please go to Start > Devices and Printers > right-click a
network printer > Printer Properties. In the printer properties dialog box, choose Ports tab and
get the information, e.g. the “IP_192.168.3.239” is the printer port.
193
Foxit PhantomPDF Standard
User Manual
2. Click Add button in the “ConfigTool” dialog box to add the Printer Port.
Note: About how to add a network printer, please see “Add a Network Printer”.
3. Click on Export button to generate a .reg file for the administrator’s configuration.
4. The administrator can distribute the .reg file to client-end computers.

Add a Network Printer
There are two devices to add a network printer as below:

Go to Start > Devices and Printers > Click Add a printer. In the Add Printer dialog box, click
The printer that I want isn’t listed to go to the next step.
Follow the instructions shown in the Add Printer dialog box as below and complete adding a
printer.
194
Foxit PhantomPDF Standard
User Manual

Open the Run box by pressing shortcut keys Win + R, enter the printer URL you want to add
and click OK.
In the pop-up dialog box, right-click the printer and choose Connect on the context menu.
Remove Hidden Data
Foxit PhantomPDF supports to sanitize documents by removing the hidden information that is
private or sensitive for users from their PDFs, generally including metadata, embedded content
and attached files, scripts, etc.
You can remove hidden data from a PDF by one-click, please go to PROTECT > Hidden Data >
Sanitize Document
.
195
Foxit PhantomPDF Standard
User Manual
Chapter 11 – Signature
Foxit PhantomPDF provides robust, secure and quick signature features, including digital
signature, DocuSign and quick PDF Sign.
Digital Signature
A digital signature acts as a traditional handwritten signature that can be used to authenticate
the identity of a user as well as the document content. It stores information about the signer
along with the date, time, and state of the document when it was signed.
About Digital ID
Digital ID is the identity of a person/organization, which contains your name, Email address, a
serial number, an expiration date, and the name of the company. A digital ID contains two keys,
one is a public key (certificate) that is used to encrypt or lock data, and the other is a private key
that is used to decrypt or unlock data that is encrypted.
You can distribute your certificate that contains the public key and other identifying information
to those people who need to use it to verify your identity, validate your signature, or encrypt a
document for you. Only your private key can unlock information that was encrypted using your
certificate, so make sure to store your digital ID in a safe place.
You can not only obtain a digital ID from a trusted third-party provider called a Certificate
Authority (CA) but also create a self-signed digital ID with Foxit PhantomPDF. Digital IDs are
usually protected by password; you can store it on computer in PKCS#12 file format, or in the
Windows Certificate Store.
Place a signature
Before you sign a document, you need to draw a signature field where the signature is placed,
get a digital ID, and create the signature.
1.
2.
3.
4.
Choose PROTECT > Protect > Sign & Certify > Place Signature.
Press and hold the mouse button down, and drag to draw a signature filed for your
signature.
In Sign Document dialog box, choose a digital ID from drop-down menu. If you can’t find the
specified digital ID, you will need to get a certificate from the third-party provider or create
a self-signed digital ID.
(Optional)To create a self-designed digital ID, choose New ID from drop-down menu. In the
Add Digital ID dialog box, select a location to store the digital ID. Click Next to type your
196
Foxit PhantomPDF Standard
User Manual
5.
6.
identity information such as name, organization unit, e-mail address, etc. to be used when
generating the self-signed certificate. In Use Digital ID for, choose one option as needed.
Click Next to enter a file name, storage location and password for your new digital ID file.
Confirm your password and click Finish.
Choose an appearance type from menu. There are two types to choose, one is Standard
Style, and the other is to Create New Style for your signature. Please refer to Creating
signature appearance. You can view your signature in Signature Preview panel.
Click Sign. In the Save As window, input the password of the signature, specify the location
and file name of the signed document.
Note: You can’t move or resize a signature after placing it on document, so be sure to the
signature location and size before signing document.
By default, the document is signed after you place the signature and then you will not be able to
move or resize it. To change the setting, please uncheck the Sign the document immediately
after the signature is placed option in FILE > Preferences > Signature.
Create signature appearance
You can set the appearance of your digital signature by selecting different options in Sign
Document dialog box. For example, a signature can include an image of your handwritten
signature, a company logo, or a photo, date and so on. Furthermore you can create dynamic
signature appearance to user for different purpose. A signature appearance also includes
information that helps others verify your signature, such as reason for signing, contact
information, and more.
197
Foxit PhantomPDF Standard
User Manual
Different appearances of signatures




Choose PROTECT > Protect > Sign & Certify > Place Signature.
Press and hold the mouse button down, and drag to draw a signature filed for your
signature.
In Sign Document dialog box, choose Create New Style from Appearance Type menu.
Check the options that you want to appear in digital signature. A signature appearance can
include lots of information showing the users attributes, including name, organization,
country, logo, location, etc. Click OK to continue.
198
Foxit PhantomPDF Standard
User Manual
Configure Signature Style Dialog Box


Click Sign.
(Optional) After placing the signature, right-click it and choose Properties…. In the Signature
Properties dialog box, you can set the appearance, actions, etc. See also Signature Field
Properties. (Note: This operation is not available after signing the document.)
Note: To manage the created styles, go to FILE > Preferences > Signature.
Move, resize and delete an unsigned signature
You can move, resize and delete signatures before signing the document, but you aren’t allowed
to change certificate and appearance of certificate.
1.
To move a signature
Select the Annotation Selection Tool
or the corresponding tool, put the pointer over the
signature, click and drag the signature to another place you like.
2. To resize a signature
Select the Annotation Selection Tool
or the corresponding Tool, click the signature. Place
the cursor on any corner point. Pointer changes into the cursor showing the direction at which
the rectangle will be resized.
3. To delete a signature
199
Foxit PhantomPDF Standard
User Manual

Select the Annotation Selection Tool

Right-click the signature and choose Delete from context menu, or press Delete key.
.
Note: If you have checked the Locked option in Signature Properties dialog box, the operations to
the signature above are not available.
Sign a PDF
A PDF is signed to indicate your approval. The signature isn’t resized and moved when you sign
the document. A PDF can be signed more than once by more than one person. When you sign a
document, your digital signature appears in the signature filed. The appearance of the signature
depends on options you select.
1.
Sign a PDF after placing, please choose one of the followings to sign the document:




2.
Choose PROTECT > Protect > Sign Document.
Select Hand Tool and right-click the signature, choose Sign Document.
Select Hand Tool, and click the signature.
Set your signature preferences in Preferences dialog box. Choose FILE > Preferences >
Signature, check the option of “Sign the document immediately after the signature is
placed” to sign the document immediately when the signature is placed.
Type file name and specify location in pop-up Save As dialog box.
Note: By default, the document is signed after you place the signature. To change the setting,
please uncheck the Sign the document immediately after signature is placed option in FILE >
Preferences > Signature.
Validate Signatures
Check the validity of a signature
If you want to automatically validate all signatures in a PDF when you open the document, please
check Verify signatures when the document is opened option in FILE > Preferences > Signature.
An icon appears on the left top of Signature Validation Status message box to indicate the
signature status. The signature state appears in the Signature Panel.

The question mark icon

The check mark icon

The icon
indicates the signature is not validated.
indicates that the signature is valid.
indicates that the signature is invalid. The document has been altered or
200
Foxit PhantomPDF Standard
User Manual
corrupted since the signature was applied.

The caution triangle icon
indicates the document was modified after signature was
added; however, the signature is valid.

The icon
indicates the signature validity is unknown because the signer’s certificate
isn’t in your list of trusted identities.
Validate a signature
1. Open the PDF containing the signature, do one of the followings:



Choose PROTECT > Protect > Validate.
Right-click the signature with Hand tool, choose Validate Signature from context menu.
Select Hand tool on toolbar and click the signature.
2. Pop-up a Signature Validation Status message box which describes the validity of signature.
Tip:
1.
2.
You can validate signatures by setting your signature preferences. Choose FILE >
Preferences > Preferences > Signature.
Check the Verify signatures when the document is opened option to automatically validate
signatures in a PDF when you open the document.
Modify a signed signature
To modify a signature after signing the document:

Validate the signature first. And right-click the signature with hand tool and choose Clear
Signature. The signature will be cleared and only a blank signature field will be left.

Click the blank signature field with the hand tool, and create a new signature. See also
“Creating signature appearance”.
To delete a signed signature:

Validate the signature first. And right-click the signature with hand tool and choose Clear
Signature. The signature will be cleared and only a blank signature field will be left.

Choose the Annotation Selection Tool
signature field and choose Delete.
or the corresponding tool, right-click the
201
Foxit PhantomPDF Standard
User Manual
View Signature Properties
Signature Properties dialog box provides basic information about the signature, including the
signer, reason, date, location validity summary and details of certificate, etc.
1. Select the hand tool.
2. Right-click the signature, and choose Show Signature Properties from context menu.
3. In Signature Properties dialog box, you can get the information as follows:






Signed by – shows the signers that sign the document.
Reason – displays the reason that you create the signature.
Date – shows the date time when you signed the document.
Location - shows which page the signature is located on.
Validity Summary - checks whether the document was modified after it was signed, and
other information.
Show Certificate – click it to show the details of certificate, such as the validity of
certificate, certificate path, etc.
Signature Properties Dialog Box
Note: If the status is unknown, click Show Certificate… to view the details of the certificate. Check
whether the certificate has been included in your list of trusted identities. If your certificate is not
trusted, click Install Certificate to install it to the trusted Windows Certificate Store. If you use a
self-signed digital ID, confirm that the certificate details are valid. If the certificate isn’t valid, a
valid certificate from signer is requested.
202
Foxit PhantomPDF Standard
User Manual
Uses Windows Certificate Store to Manage Trust List
Windows Certificate Store in Foxit PhantomPDF helps you manage certificates which are trusted
when you validate the digital signature. To use this feature, do the following:
1.
2.
3.
4.
5.
6.
Open a signed PDF document, click the digital signature or right click the signature to select
Validate Signature.
A warning message pops up to show the signature validation status.
If the signature validity is unknown, click Signature Properties > Show Certificate > Install
the Certificate if you trust it.
The certificate will be successfully imported.
Click the digital signature again and a message will show you the Signature is Valid.
If you don’t trust the certificate any more, you can delete it from Windows Certification
Store by choosing PROTECT > Protect > Digital IDs
.
Signature Panels
The signature panel shows information about each signature in the document as well as the
change history of the document since the first signature.
Signature Panel
Open the signature panel
Click Signature button
on the left of Navigation Pane.
203
Foxit PhantomPDF Standard
User Manual
Sign PDFs on DocuSign®
Allows users to easily send, sign and save PDF documents and forms using the industry's most
widely used eSignature solution.
Sign a PDF File
Sign a PDF on DocuSign, please refer to the following steps:

Choose PROTECT > Protect > DocuSign button
on toolbar.

Choose Login to DocuSign. Type your Email account and password of DocuSign and click
Login. If you do not have an account, please sign up first.

Click the button
and choose Sign with DocuSign. The application will upload your PDF to
DocuSign and you will enter into the DocuSign user interface.

Sign the Document
On DocuSign user interface, click More Options, you can view history, certificate, and
choose Finish Later or Sign on Paper.
204
Foxit PhantomPDF Standard
User Manual

Drag the slider
can zoom in/out the file.

Type the page number in Page Number textbox
or click the page
number listed on the right to jump to the target page you want to place the signature.

Click the button
to choose the signature or other items from the list. Click and
drag a rectangle to the desired location. You can place several items at the same time.

Click the button
at the top right corner of the textbox to delete the signature.

Click Finish to complete signing. You can preview the signed PDF.

Select the download

Select the DocuSign button
or printing button
to get the PDF with signature.
and choose Logout from DocuSign.
205
Foxit PhantomPDF Standard
User Manual
Send a PDF via DocuSign

Open a PDF you want to send with PhantomPDF.


Click DocuSign button
Login to the website.

Click
and choose Send via DocuSign.
to choose the signature or other items from list and drag it to the location
where you want to sign. You can place several items at the same time.

Click the button
to add the recipients address.

Click the button
to edit the email subject line and content.

Click Send to send the PDF.
Quick PDF Signature
Quick PDF Sign enables you to create your self-signed signatures and add the signature to the
page directly. You don’t need to create different signatures for different roles or other
complicated settings.
To create your own handwriting signature and sign a PDF, follow these steps.
1.
2.
3.
4.
Choose PROTECT > Protect > PDF Sign > Create Signature.
In the Create Signature dialog box, you can choose to draw a signature, import a file or from
clipboard to create a signature.
(Optional) If you choose Draw Signature, click Draw to draw your signature in Draw
Signature box, and click OK.
If you choose Import File, then click Browse. And choose the image and click Open. You can
preview the image in the Preview tab.
TIP: You can sign your signature on a clean white sheet of paper using a black pen and scan it to
an image file. To create the best signature you had better scan your signature in monochrome at
600 DPI.
5.
6.
7.
8.
You can set your name as your signature.
To add a password to your signature, check the item Require password to use the signature.
Specify a password that users will be required when they sign the document with the
signature. Enter the password again to confirm it.
Click Save. The cursor will be changed into a rectangle.
Put the cursor to the place you want to sign. You can resize it by clicking and dragging the
handle. You can also move the signature by dragging it to other places. To remove it, select
the signature and press Delete.
206
Foxit PhantomPDF Standard
User Manual
9.
To apply the signature to the document, double-click the signature or right-click the
signature and select Apply signature. Select Place on Multiple Pages, and then you can
specify the page(s) you want to place.
Note: Once applied, the signature can no longer be edited or deleted.
To manage signatures, do the following:
Choose PROTECT > Protect > PDF Sign > Manage Signature. In the Manage Signature dialog box,
click Create to create a signature. Select a signature you created, click Edit and you can change
your signature. You can preview the signature after you edit it. To delete a signature, select the
signature and click Delete.
207
Foxit PhantomPDF Standard
User Manual
Chapter 12 – Print
Printing is a process for reproducing text and images. When you have finished reading a helpful
article or designing a PDF form, you may need to send it to an inkjet or laser printer and print it
out with custom page sizes. With this section, you can get the help to set options in the Print
dialog box to ensure that the finished document appears as intended.
Print a PDF document
1.
2.
3.
4.
Make sure you have installed the printer successfully.
Choose Print from the FILE page.
Specify the printer or plotter, page range, number of copies, and other options.
Click Print.
Print a portion of a page
To print a portion of a page, you need to refer to the Snapshot tool



.
Select the Snapshot tool by choosing HOME >Tools > Snapshot.
Drag around the area you want to print.
Right-click in the selected area > choose Print…, and then refer to the “Print Dialog”.
Print a portion of a page
208
Foxit PhantomPDF Standard
User Manual
Print multiple pages with page thumbnails
To perform a quick print, you can select multiple pages from a document from the thumbnail list.



Open the document that you want to print, and then click Pages button on the left
navigation pane.
Shift-click / Ctrl-click/ drag the mouse to select a range of page thumbnails from the
document.
Select Print Pages from the right-click menu, and then click OK.
Print tabs
You can print one tab you are opening from the tab bar or print out all documents opened in the
tab bar at a time.
1.
2.
Move the pointer to the tab bar.
Right-click it > Choose Print Current Tab/Print All Tabs.
Print Dialog Box
The print dialog is the final step before printing. You can modify the printer in this dialog as well.
Be aware that changing the printer may affect the page setup if the new selected printer has a
different paper size, for instance.
To open the Print dialog box, choose FILE > Print. Choose a printer from the menu at the top of
the Print dialog box and specify the copies to print. Click Properties for more settings. (Refer to
“Set Foxit PhantomPDF Printer Properties”)
Collate – Assembles the printouts in a proper numerical or logical order when printing
several copies. This option will be disabled when printing just one copy.
Print as Grayscale –Converts color images in the file to shades of gray.
Print as image –Prints pages as bitmap images. If normal printing doesn’t work or doesn’t
produce well, check this option and specify a resolution next to it.
209
Foxit PhantomPDF Standard
User Manual
The Print Dialog Box
Print Range
Specify the page range you want to print.
 Subset – Provides options for setting noncontiguous page range.
All Pages in Range – Prints all the pages within the specified range.
Odd pages only – Prints only pages with odd numbers within the specified range.
Even pages only – Prints only pages with even numbers within the specified range.
Note: This option is especially helpful for two-side printing.
 Reverse pages – Prints pages in reverse order. If page ranges are entered, the pages print
opposite of the order in which they were entered. For example, if you select to print the
document from page 5 to page 30, selecting Reverse pages option will print page 30 to
page 5.
Print Handling
 Scale – None, Fit to Printer Margins, Reduce to Printer Margins and Custom Scale.
Choose Paper Source by PDF Page Size – Automatically selects the paper type according to
the page size of the PDFs when printing.
 Tile Large Pages – means to tile the pages that are larger than the selected paper size at a
specified scale.
 Multiple Pages Per Sheet – multiple pages will be printed on the same sheet of paper. You
210
Foxit PhantomPDF Standard
User Manual
can specify the settings like Pages Per Sheet, Page Order, Margins, etc.
 Booklet – Booklet printing enables to print multiple pages on the same sheet of paper in
correct order if the pages are folded. This requires the printer support to print on both
sides.
Auto-Rotate – Adjusts the PDF document’s orientation to match the orientation specified in
the printer properties.
Auto-Center – Places the PDF pages in the center.
Advanced – Provides an option to auto-detect printers that support PCL for PCL optimization
to improve the printing speed.
Print Optimization allows you to optimize print jobs from a PCL driver, for features such as
font substitution or scanning for vertical and horizontal rules. Foxit PhantomPDF provides an
option to auto-detect printers that support PCL for PCL optimization to improve the printing
speed. To enable print optimization, please follow the steps below:
Choose FILE > Print to open Print dialog.
Click Advanced on the left lower corner of the Print dialog.
In the Advanced dialog, do the following:
 Check PCL Optimization option;
 Select a printer from Printers list, and click Add to add the selected printer to PCL
Optimization Drivers list.
 Click OK.
Then you can execute printings with the optimized driver. And you can also remove the
printer from the PCL Optimization Drivers list if you are not satisfied with the printing results
it delivers. Just select the driver to be removed from the PCL Optimization Drivers list, click
Remove and then choose OK to confirmation the operation.
Print What – Specifies to print documents only, annotations only or both.
Document – Prints the document contents without annotations.
211
Foxit PhantomPDF Standard
User Manual
Document and Annotations – Prints document contents and annotations.
Annotations – Prints annotations only.
Summarize Comments – Prints the summarized comments to a separate and printable PDF
file named “CommentsSummaryPrint.pdf”. See also “Summarize Comments”.
Preview – Foxit PhantomPDF provides an instant preview in the Print dialog box. Drag the
slider to preview each page.
Set Foxit PhantomPDF Printer Properties
Before you create a PDF file, you may wish to access PDF Printing Preferences to set up options
for your PDF files, there are two ways to access PDF Printing Preferences.
1. Accessing the PDF printing Preferences from Control Panel:


Go to Start > Settings > Control Panel > Devices and Printers > Printers and Faxes.
Right-click on the Foxit PhantomPDF Printer and then select Printing Preferences.
2. Accessing the PDF Printing Preferences from the Print dialog box.

When you print a file and open the Print dialog box, simply click on the Properties button,
you can bring up the PDF Printing Preferences.
General tab







Target Folder - specifies a destination folder to place the PDF files after generations.
Overwrite existing PDF file without confirmation - By default, this option is checked. If you
don’t hope your file is overwritten without any prompt, you should uncheck this option.
Use default filename and save to default folder – If you don’t want to change the original
filename, just check this option and the generated PDF file will be automatically saved to
the default folder you have assigned.
View PDF results – By default, this option is checked; the generated PDF file will
automatically open after conversion.
Support PDF/A – 1b Standard – allows you to archive PDF files.
PDF Specification Version - With Foxit PhantomPDF, you can choose PDF reference version
from 1.3 to 1.7 when creating PDFs. Choosing the right PDF reference version can help the
PDFs you created better compatible with different PDF viewers.
Conversion Quality
 Compressibility– allows you to specify the compressibility.
 Color – Prints content in a color PDF file to shades of gray, in colors or only in black and
white colors.
212
Foxit PhantomPDF Standard
User Manual
 Image Resolution - allows you to input a DPI (dot per inch) level for image resolution.
The valid level value is between 72 -2400.

Save As Default - If you hope all your settings can be applied to all documents, you must
keep the option checked. If you uncheck it, your settings will be effective for the current
document only.
Advanced settings… - In the pop-up Advanced settings dialog box, there are three tabs:
Watermarks, Headers/Footers and Security.
Watermarks tab
Add watermarks to the document – If you want to add watermarks to your document, you can
select this option and choose to add Image Watermarks or Text Watermarks.
Image watermarks–You can browse your computer for an image and change the Opacity,
Rotation and Offsets of the image which will be added into your document as a watermark.
Text Watermarks
Font
This option is activated only when Text Watermarks is selected and you can choose the font name,
font size and font color from the drop-down menus.
Text
You can enter text in the Content box and change the Opacity and Rotation of the text which will
be added into your document as a watermark.
Offsets
This option allows you to change the unit of measurement and specify the width, height of the
image/text, etc.
Scale
A. To resize the watermark in relation to the original image size, check Absolute Scale and enter a
number in the percentage box.
B. To resize the watermark in relation to the PDF page dimensions, check Relative Scale and enter
a number in the percentage box.
Preview
You can see how the watermark will look like with the selected options.
213
Foxit PhantomPDF Standard
User Manual
Headers/Footers tab
Add Headers/Footers to the Document
This option allows you to add headers/footers to your PDF document. By checking this option,
the following options will be activated.
Font
You can choose the font name, font size and font color from the boxes.
Edit
This option allows you to edit headers/footers and you can specify their styles.
Click Insert Date to insert date to the PDF document.
Click Insert Page Num to insert page number to the PDF document.
You can enter text in the columns (Left Column, Center Column and Right Column) if needed.
Offsets
This option allows you to change the unit of measurement and specify the margins for all 4 sides.
Preview
You can see how the headers/footers will look with the selected options.
Security tab
The security feature of PDF gives you exceptional control over PDF files. Choose a protection
type.
1.
Password Protection
Password


Require a password to open the document – selects to require users to type the password
you specify to open the document.
Document Open Password – specifies a password that users must type to open the
document.
Permission
214
Foxit PhantomPDF Standard
User Manual

Require to add document restriction – restricts actions to PDF files, such as printing, editing,
etc.
Permission Specification

Printing Allowed – specifies the level of printing that users are allowed for the PDF
document.
A. Print with low resolution – allows users to print at no higher than 150-dpi resolution.
B. Print with high resolution – allows users to print at any resolution.

Changes Allowed – defines which editing actions are allowed in the document.
A. Fill in a form – lets users fill in forms. The option doesn’t mean that users can create
form fields.
B. Comments in the document – lets users add comment to the PDF document.
C. Manage pages and bookmarks – lets users insert, rotate, delete pages, as well as add
bookmarks.
D. Any except extracting pages – let users do all editing actions listed above except
extracting pages.
Enable copying of text, image and other context - defines the contents that are allowed to be
extracted in the PDF document.
Enable text access for screen reader device for visually impaired - Facilitates the visually
impaired users to use voice recognition software in screen reader devices to read the generated
PDF files.
Protection Setting

Protection Algorithm - defines data transformations that cannot be easily reversed by
unauthorized users. Foxit Creator supports 128-bit AES and 128-bit ARC-FOUR.

Don’t encrypt metadata – encrypts the contents of a PDF file but allow search engines
access to the document metadata when it is checked.
2.
Certificate Protection
Recipient List




Click Import to import certificate from Windows Certificate store.
Click Browse to import certificate from disk.
Click Remove to delete a recipient from recipient list.
Click Details to view the detail of the certificate.
Permission Specification
215
Foxit PhantomPDF Standard
User Manual

Printing Allowed – specifies the level of printing that users are allowed for the PDF
document.
A. Print with low resolution – allows users to print at no higher than 150-dpi resolution.
B. Print with high resolution – allows users to print at any resolution.

Changes Allowed – defines which editing actions are allowed in the document.
A. Fill in a form – lets users fill in forms. The option doesn’t mean that users can create
form fields.
B. Comments in the document – lets users add comment to the PDF document.
C. Manage pages and bookmarks – lets users insert, rotate, delete pages, as well as add
bookmarks.
D. Any except extracting pages – let users do all editing actions listed above except
extracting pages.
Enable copying of text, image and other context - defines the contents that are allowed to be
extracted in the PDF document.
Enable text access for screen reader device for visually impaired - Facilitates the visually
impaired users to use voice recognition software in screen reader devices to read the generated
PDF files.
Protection Setting

Encryption Protection - defines data transformations that cannot be easily reversed by
unauthorized users. Foxit Creator supports 128-bit AES and 128-bit ARC-FOUR.

Don’t encrypt metadata – encrypts the contents of a PDF file but allow search engines
access to the document metadata when it is checked.
Layout tab


Orientation - Allows you to change the page orientation.
Paper Size - When you click Custom-size Form from the Page Form, this option is activated,
and you can enter dimensions in the Width and Height boxes.

Page Size - This option is for you to click one of paper types, or click Custom Page Size and
then add a new page size where you can specify the paper size dimensions in the Add/Edit
Custom Page Sizes box.

Unit of Metrics - Allows you to change the unit of measurement, including inches,
centimeter and millimeters.
You can see how your document layout will look with the selected options.
216
Foxit PhantomPDF Standard
User Manual
Fonts tab
Embed Fonts
Embed all fonts – All fonts in the Font Source list will be embedded into your PDF document
when you choose this option. To ensure that the PDF file you create is fully portable and
readable on computers that may not have the same fonts installed, you should embed all
fonts to guarantee that none are missed.
Embed nonstandard fonts – This option allows you to embed nonstandard fonts installed in
your computer to your PDF document.
Note: This will increase the size of your document considerably, particularly if you are using
Unicode languages like Asian languages. The font embedding list will be disabled when this
option is selected.
Use the font embedding list below – Font embedding list will be available when you select
this option. You can check and uncheck the fonts in the list to choose the fonts you want to
embed into PDF files.
Don’t embed any fonts – All fonts in the embedding list will be unchecked when this option
is selected. And when you read the created PDF files, fonts installed on your computer will
be used.
Show warning message when the document contains fonts that are not allowed to be
embedded – If you check this, when you open a document which contains fonts that are not
allowed to be embedded, a warning message will prompt.
Document Info tab
Add information to the document –This option allows you to set PDF document properties, such
as Title, Subject, Author, etc. You can add information when it is checked.
PDF Information – You can enter the title, subject, author, keywords and creator of the document.
Producer is the Foxit PhantomPDF.
About tab
This tab shows the information of Foxit PhantomPDF and the related copyrights and information.
217
Foxit PhantomPDF Standard
User Manual
Chapter 13 – Appendices
This section is a collection of supplementary materials for this user manual as well as Keyboard
Shortcuts, and Command Lines.






Quick Installation Guide
GPO Manual
SharePoint Configuration
Quick Start for Azure Active Directory Rights Management
Shortcut Keys
Command Lines
Quick Installation Guide
This section gives you an overview of Foxit PhantomPDF, including installation, activation,
uninstallation and update.
Installation, Activation and Uninstallation
Installing Foxit PhantomPDF

System Requirements
Operating Systems







Microsoft Windows® XP Home, Professional, or Tablet PC Edition with Service Pack 2 or
3 (32-bit & 64-bit).
Windows Vista Home Basic, Home Premium, Business, Ultimate, or Enterprise with or
without Service Pack 1 (32-bit & 64-bit).
Windows 7 (32-bit & 64-bit).
Windows 8.x Full Version.
Microsoft Office® 2003 or later version (required for some PDF creation features).
For users utilizing the Active Directory Rights Management Service and SharePoint
integration capability, Windows 7 or Windows Vista with Service Pack2 (SP2) is required.
Verified as Citrix Ready® with Citrix XenApp® 6.
Recommended Minimum Hardware for Better Performance



1.3 GHz or faster processor.
512 MB RAM (Recommended: 1 GB RAM or greater).
1G of available hard drive space.
218
Foxit PhantomPDF Standard
User Manual


1024*768 screen resolution.
How to Install
The installer format of Foxit PhantomPDF is MSI. Please download the installer to your computer,
and then do the following (Take Business Edition for example):
1.
Double click the “FoxitPhantomPDF_Business_enu_Setup.msi” file, and you will see the
setup wizard pop up. Click Next button to continue.
2.
This program is protected by copyright law and you have to accept the License Agreement
to proceed. Check the I accept the terms in the License Agreement item to continue.
3.
There are two setup types for you in this step. You can also change the installation directory
219
Foxit PhantomPDF Standard
User Manual
or keep the default settings.
Typical — installs all features by default but requires more disk space.
Custom — Allow users to choose which program features will be installed
4.
For Typical Setup, just click Install. For Custom Setup, do the following:
A) Click on “Browse” to change the installation directory of the PDF Viewer plug-in.
B) Click “Disk Usage” to check the disk space available for the selected features.
C) Check the options you want to install and click “Next” to continue.
D) Select the additional tasks you would like the Setup to perform then click “Install” to
start the installation.
220
Foxit PhantomPDF Standard
User Manual
5.
When the process is complete, a message tells you that Foxit PhantomPDF is installed. You
can choose to check the Launch Foxit PhantomPDF item to run the application right now.
Click Finish to complete the installation.

Command-line Installation
You can also use the command-line to install the application:
msiexec /Option <Required Parameter> [Optional Parameter] [PROPERTY=PropertyValue]
For detailed information on msiexec.exe options, required parameters, and optional parameters,
type “msiexec” on the command line or visit Microsoft TechNet Help Center.
221
Foxit PhantomPDF Standard
User Manual
Public Properties of the Foxit PhantomPDF MSI Installation Package.
Foxit PhantomPDF installation properties supplement the standard MSI public properties to give
administrators greater control over the installation of the application.
For the complete list of standard public properties please refer to:
http://msdn.microsoft.com/en-gb/library/aa370905(VS.85).aspx
The Foxit PhantomPDF properties are:
--------------------------------------------------------------------------------------------------------------ADDLOCAL
<list of features> The value of the ADDLOCAL property is a comma delimited list
of features which the installation of Foxit PhantomPDF will
make available locally. Foxit PhantomPDF installer defines the
following features:
FX_PDFVIEWER - Foxit PDF Viewer and its components;
FX_FIREFOXPLUGIN - Plugin which is used for opening PDF files
in Mozilla Firefox, Opera, Safari, and Chrome browsers. This
feature requires FX_PDFVIEWER to be installed.
FX_SPELLCHECK - Spell check tool which is used for searching
any misspelled words in typewriter or form filler mode and
suggesting the correct spellings. This feature requires
FX_PDFVIEWER to be installed.
FX_PDFA – A module which is used for verifying compliance
with PDF/A-1a and PDF/A-1b. This feature requires
FX_PDFVIEWER to be installed.
FX_OCR – A module which is used for making scanned or
image-based PDF documents selectable and searchable. This
feature requires FX_PDFVIEWER to be installed.
FX_CREATOR - Foxit PhantomPDF Creator installs a virtual
printer on your system. You can use Creator to convert any
printable documents into high-quality PDFs conveniently and
efficiently. This feature requires FX_PDFVIEWER to be installed.
FX_CONVERTEXT - Shell extension which is used for converting
PDF or combining supported files from right click menu. This
feature requires FX_CREATOR to be installed.
222
Foxit PhantomPDF Standard
User Manual
FX_CREATORWORDADDIN - MS word toolbar add-in to create
PDFs by just one click. This feature requires FX_CREATOR to be
installed.
FX_CREATOREXCELADDIN - MS Excel toolbar add-in to create
PDFs by just one click. This feature requires FX_CREATOR to be
installed.
FX_CREATORPPTADDIN - MS PPT toolbar add-in to create PDFs
by just one click. This feature requires FX_CREATOR to be
installed.
FX_CREATOROUTLOOKADDIN - MS Outlook toolbar add-in to
create PDFs by just one click. This feature requires FX_CREATOR
to be installed.
FX_SE - Plugins for Windows Explorer and Windows shell. These
extensions allow viewing PDF thumbnails in Windows Explorer,
previewing PDF files in Windows Vista and Office 2007. This
feature requires FX_PDFVIEWER to be installed.
FX_IFILTER – Foxit PDF IFilter is a plugin for Windows search
engines that can help search PDF documents quickly.
INSTALLLOCATION
Specifies the folder location of the product installed.
MAKEDEFAULT
Default value of "1", Foxit PhantomPDF will be set as the
default application for opening PDF files.
VIEW_IN_BROWSER
Default value of "1", Foxit PhantomPDF will be configured to
open PDF files inside browsers.
DESKTOP_SHORTCUT
Default value of "1", installer will place a shortcut for the
installed application on Desktop.
STARTMENU_SHORTCUT
Default value of "1", installer will create program menu group
for installed application and its components.
SETDEFAULTPRINTER
Default value of "1", installer will install Foxit PhantomPDF
Printer and set it as the system’s default printer.
LAUNCHCHECKDEFAULT
Default value of "1", Foxit PhantomPDF will check if Foxit
PhantomPDF is the default reader when it’s launched.
KEYPATH
Specifies a license key file and save it to the PhantomPDF
223
Foxit PhantomPDF Standard
User Manual
installation folder.
REMOVENEWVERSION
Forces an installation to overwrite the higher version of Foxit
PhantomPDF with the value of “1”.
CLEAN
Executes with the command /uninstall, removing all of
PhantomPDF’s registry data and related files with the value of
“1”. (Note: This is a command for uninstallation.)
AUTO_UPDATE
Do not download or install updates automatically with the
value of “0”; Automatically download updates, but let users
choose when to install them with the value of “1”;
Automatically install updates with the value of “2”.
Command-line Examples:
1. Silently install the application (no user interaction) to folder "C:\Program Files\Foxit Software":
msiexec /i "Foxit PhantomPDF.msi" /quiet INSTALLLOCATION="C:\Program Files\ Foxit
Software "
2. Install only the Foxit PDF Viewer:
msiexec /i "Foxit PhantomPDF.msi" /quiet ADDLOCAL="FX_PDFVIEWER"
3. Use the license key file saved in disk C to activate the application when running the setup:
msiexec /i "Foxit PhantomPDF.msi" KEYPATH="C:\fpmkey.txt"
4. No installation of Foxit PhantomPDF Printer:
msiexec /i "Foxit PhantomPDF.msi" ADDLOCAL=ALL, ADVERTISE="FX_CREATOR" /qn
5. Force an installation to overwrite the same or higher version of Foxit PhantomPDF:
msiexec /i "Foxit PhantomPDF.msi" REMOVENEWVERSION="1"
6. Remove registry and user data when performing silent uninstallation:
msiexec /x "Foxit PhantomPDF.msi" /quiet CLEAN="1"
224
Foxit PhantomPDF Standard
User Manual
Activating Foxit PhantomPDF
1. After launching Foxit PhantomPDF, the activation wizard pops up. If you have already
purchased a license for Foxit PhantomPDF, click Activate to activate the application. If not,
you can click Buy Now to purchase Foxit PhantomPDF from Foxit website. If you choose Free
Trial, you can have 30-day free trial period for Foxit PhantomPDF. When the free-trial period
expires, only the free features are available.
2. After you click Activate, the box will prompt you to input the code of the registration key.
You can also activate later from HELP > Get Business > Buy it Now > Activation when you run
the Foxit PhantomPDF. Then click Next to continue.
3. Type Licensee information in the licensee field as the example below. Then click Activate
Now to activate.
225
Foxit PhantomPDF Standard
User Manual
4. If you activate successfully, a message box will pop up. Click OK.
5. You should restart the application for the changes to take effect. To restart it now, please
click OK; or click Cancel to restart it later.
Uninstalling Foxit PhantomPDF
How to Uninstall
Please do one of the following:
Click Start > All Programs > Foxit PhantomPDF > Uninstall.
226
Foxit PhantomPDF Standard
User Manual
Click Start > Control Panel > Programs and Features > Select Foxit PhantomPDF and click
Uninstall.
Double click the file uninstall.exe under Foxit PhantomPDF installation directory Drive
name:\...\Foxit Software\Foxit PhantomPDF\.
Foxit PhantomPDF Add-ons
Foxit PhantomPDF provides separate add-ons for you to download on demand. These add-ons
fall into critical add-ons and advanced add-ons. Most of add-ons, including JPEG2000/JBIG
Decoder, Eastern Asian Language Support, Spell Checker and Firefox Plugins, have been
integrated into Foxit PhantomPDF package, so users don’t need to install them again after the
installation of Foxit PhantomPDF. But if there’re any upgrades of those add-ons, users can go to
HELP > Check for Update to download and install the latest add-ons.
Critical Add-ons
Critical add-ons are essential components for proper display and execution.
Free Critical Add-ons in Foxit PhantomPDF
Name
Multi-langue
OCR Text
Recognition
Engines
Function Description
Enables selecting and searching text in scanned or image-based
PDFs. This add-on supports multi-language: Portuguese, Polish,
Russian, Japanese, Korean, Simplified Chinese & Traditional
Chinese, Turkish and Dutch, etc. (For Chinese, Japanese and
Korean, you should download from our website, and the others
have been integrated into Foxit PhantomPDF package.)
Size Remark
Download
NOTE: To manually install a critical add-on, please extract it to the same directory where you
install Foxit PhantomPDF. See also “Updating Foxit PhantomPDF”.
Purchasing Foxit PhantomPDF
To purchase Foxit PhantomPDF, please do one of the following:
1.
2.
Order online: go to Foxit website to order directly: http://www.foxitsoftware.com/shopping
Email: write an e-mail to the Foxit sales department at [email protected] with your
order information.
227
Foxit PhantomPDF Standard
User Manual
Updating Foxit PhantomPDF
Foxit files along with add-ons can be updated in several ways. Some updates are available if you
open a PDF document that triggers the updating process. For example, if you open a file that
contains Chinese characters, Foxit PhantomPDF will ask if you want to download the Eastern
Asian Language Support. Other updates are available only from the HELP menu, where you have
to manually install them. However, all updates can be downloaded directly from Foxit website.
Foxit PhantomPDF supports auto-update checking. When there is a new version detected, Foxit
PhantomPDF will prompt users to update.
Updating from the Help Menu
1.
2.
Choose HELP > Check for Update.
Select updates from the column on the left, and click Add to move them to the right column.
Only the updates and components appropriate for your product will be listed.
Updating From Foxit Website
1.
2.
3.
4.
Visit Foxit Download page at http://www.foxitsoftware.com/downloads/ .
Select and download the files or add-ons you want to update.
Extract them to the same directory where you installed Foxit PhantomPDF.
Re-run the Foxit PhantomPDF program to implement the update files.
Help & Support
User Manual
If you have trouble finding help for a particular topic or the help provided is not sufficient, enter a
trouble ticket via our Support Portal and our support team will contact you. Your feedback helps
us to improve our documentation.
Ticket Support
Visit Foxit Ticket Support System by choosing HELP > Help > Report Error, to send your bug
report/suggestion/comment directly to Foxit Customer Support Center.
On-Line Support 24/7
Our ticket support system is staffed with product experts round the clock to provide you with fast
and efficient answers to all of your technical questions. Plus, our on-line user forums provide a
228
Foxit PhantomPDF Standard
User Manual
wealth of information.
Foxit Forum
Visit Foxit forum at http://forums.foxitsoftware.com/ to see if you can find the answer to your
questions there immediately.
GPO Manual
What is Group Policy?
Group Policy (GPO), a feature of the Microsoft Windows NT family of operating systems, is a set
of rules that control the working environment of user accounts and computer accounts. It offers
the centralized management and configuration of operating systems, applications, and users'
settings in an Active Directory environment.
Group Policy can configure most system settings, save power by utilizing smart power settings,
give individual users more control over their machines with administrator privileges and increase
system security.
This guide will introduce steps to help you master how to quickly add and modify the new GPO
template for configuring your installation of Foxit PhantomPDF.
Personal Computer Setting
There are two file types of group policy template of Foxit PhantomPDF: .adm and .admx.
Different types are compatible with different operation systems, but have the same settings. The
template of .adm file type is compatible with Windows XP and later, while .admx is compatible
with Server 2008, Server 2012, Windows Vista and later.
Set Template Preference
For .adm file, follow the steps as below:


Please click Start >Run or use the shortcut key Ctrl + R and type gpedit.msc to open Group
Policy Editor.
Right-click the management template and choose Add/Remove Template in the context
menu. In the opened dialogue box, add the group policy template of Foxit PhantomPDF. The
Foxit PhantomPDF template will appear in the left navigation pane and you can set its
template preferences.
229
Foxit PhantomPDF Standard
User Manual
For .admx file, put the .admx file in C:\Windows\PolicyDefinitions and do the setting. The .admx
file should be used in combination with an .adml file. And the .adml file should be put in
C:\Windows\PolicyDefinitions\language. For example, if in the English OS, the .adml file should
be put in C:\Windows\PolicyDefinitions\en_us.
Example: Not Show Community Language



Choose Foxit PhantomPDF > Preferences > Application Language.
Double-click Application Language to open the dialog box and check the option Enabled and
check Not Show Community Language. Then only the official languages will show in the
FILE > Preferences > Language.
If the option Not Configured or Disabled is checked, the languages translated by community
will be displayed.
230
Foxit PhantomPDF Standard
User Manual


Other settings can be configured in the same way.
To add tools to the default toolbar menu, please go to Foxit PhantomPDF > Toolbars >
Custom Toolbars > double-click the target menu, check Enabled and check the desired tools
to be shown on the default toolbar.
Note: Group Policy setting includes computer configuration and user configuration.
Computer configuration takes precedence over user configuration. The application will use the
computer configuration if both the computer and user configure a specific function at the same
time. Please note that if the option Disabled is a valid configuration, the setting will be shown in
the help information. Otherwise, the corresponding registry entry will be removed as selecting
Unconfigured. (The value of the option Disabled in the Group Policy Template of Foxit
PhantomPDF is invalid.)
GPO Deployment (for Server)
Create GPO Management


If you already have an Active Directory domain and organizational unit configured, please
skip to “Apply the Foxit Template” section.
Choose Start > Administration Tools > open “Active Directory Users and Computers” >
right-click the field “wx.com” > choose New > Organization Unit.
231
Foxit PhantomPDF Standard
User Manual

In the opened New Object - Organization Unit dialogue box, type the unit name (For this
example, we have named the unit “qa”) and click OK.
232
Foxit PhantomPDF Standard
User Manual

Right click the created organization unit “qa” and choose New > User. For this example, we
have named the user “King”.

Click Start > Programs > Administration Tools > open the Group Policy Management console
233
Foxit PhantomPDF Standard
User Manual
and right-click the created organization unit “qa” and choose Create a GPO in this domain,
and Link it here….
If you cannot find the Group Policy Management in Administration Tools, please install the
application package GPMC.MSI. You can download the package by clicking the link
http://www.microsoft.com/en-us/download/details.aspx?id=21895.
234
Foxit PhantomPDF Standard
User Manual
Apply the Foxit Template

Type the GPO name in the “New GPO” dialogue box and click OK.

Right-click the new GPO and choose Edit… in the right-click menu to open Group Policy
Editor.
235
Foxit PhantomPDF Standard
User Manual

Right-click the Template Management and choose Add/Remove Template to add Foxit
PhantomPDF template. Please refer to Set Template Preference.

For configuring options, please refer to Example: Not Show Community language.
GPO Items
The following table introduces some simple manipulations in GPO to speed up your working
process.
236
Foxit PhantomPDF Standard
User Manual
Items in GPO Template
Folder Path
Foxit PhantomPDF >
Toolbars > Custom
Toolbars (Classic Mode
Only)
Item
Basic
View
Edit
Options
Description
Select the tools to be
displayed in the default
toolbar.
Format
Property
Forms
Comments
Drawing
Measurements
Measurement Format
Protect
Convert
Organize
Find
DocuSign
Image Editor
Shape
Shape Format
Read
Foxit PhantomPDF >
Toolbars > Delete
Button (Classic Mode
Only)
Basic
View
Edit
Format
Delete buttons from the
default toolbar. To
remove all the buttons,
remove the toolbar.
Property
Forms
Comments
Drawing
Measurements
Measurement Format
Protect
Convert
Organize
Find
DocuSign
Image Editor
Shape
Shape Format
237
Foxit PhantomPDF Standard
User Manual
Read
Foxit PhantomPDF >
Menus > menu name
(Classic Mode Only)
The items layout is the
same with Foxit
PhantomPDF User
Interface under Classic
Toolbar Mode.
Remove selected
menus from the menu
list. The selected menu
will be removed once
all sub-menus have
been removed.
Foxit PhantomPDF >
Plugin
Remove Specific Plugins
Input the plugin name
which needs to be
removed.
Only applications
with .fpi extensions
can be removed from
Foxit PhantomPDF.
Remove Plugins
Updater
Speech
RMSV1
Remove the selected
plugins.
RMSV2
SharePoint
DocuSign
CommentsSummary
ComparePDF
PageEditor
Foxit PhantomPDF >
Preferences
‘About Foxit
PhantomPDF’ Dialog
ShareReview
Copyright
Copyright Content
BackGroundPath
Foxit PhantomPDF >
Preferences
Default PDF Viewer
Web Browser PDF
Viewer
System PDF Viewer
Set the new contents in
'About Foxit
PhantomPDF' dialog.
Set Foxit PhantomPDF
as the default PDF
viewer for 'System PDF
Viewer' and 'Web
Browser PDF Viewer'.
This setting requires
Administrator
permission. In a domain
238
Foxit PhantomPDF Standard
User Manual
environment, if the
client doesn’t have the
Administrator
permission, there will
be a UAC prompt after
the boot.
Foxit PhantomPDF >
Preferences
Forbid Checking of
Default PDF Viewer
Hide the 'Set to Default
PDF PhantomPDF'
dialog when Foxit
PhantomPDF isn't the
default PDF viewer.
Foxit PhantomPDF >
Preferences
Home Page Settings
Foxit PhantomPDF >
Preferences
Main Program Name
Main Program Name
Change the program's
name. The default is
'Foxit PhantomPDF'.
Foxit PhantomPDF >
Preferences
Start Page
Hide Start Page
Change the settings of
Start Page.
Foxit PhantomPDF >
Preferences
Enable Safe Reading
Mode
Foxit PhantomPDF >
Preferences
Toolbar Mode
Settings (Ribbon Mode
or Classic Toolbar Mode)
Change the settings of
Toolbar Mode.
Foxit PhantomPDF >
Preferences
Application Language
Not Show Community
Language
Change the application
language settings.
Menu Name
URL
Set the new menu
contents of 'Help > Foxit
Corporation Home
Page' menu item.
Change the settings of
Safe Reading Mode.
Default Application
Language
Foxit PhantomPDF >
Preferences
Default Toolbar
Settings (Forbid
Modification or Forbid
Modification And Hide
Toolbar)
Change settings of the
toolbars: 'Forbid
Modification’ or ‘Hide
Toolbar’.
Foxit PhantomPDF >
Preferences
Status Bar
Settings (Auto-hide
Status Bar, Hide Status
Bar or Show Status Bar)
Change the settings of
Status Bar.
Foxit PhantomPDF >
Preferences
Insert Printed PDF into
Previously Generated
PDF
Set to append PDF files
generated with Foxit
PhantomPDF Printer to
previously generated
files.
239
Foxit PhantomPDF Standard
User Manual
Foxit PhantomPDF >
Ribbon
TabElements (the
button items in Quick
Access Toolbar and
menu bar)
Hide the selected
button items in Ribbon
Mode.
RibbonCategory (the
button items in each
tab)
Foxit PhantomPDF >
RMS > Preferences
Use
Deprecated
Encryption Algorithms
Use deprecated
encryption algorithms
(RSA 1024 encryption
algorithm) to be
compatible with the
previous version and
disable the setting in
'Preferences > RMS
Setting'.
Encrypt metadata
Encrypt document
metadata. This disables
the setting in
'Preferences > RMS
Setting'.
Forbid Web Viewing of
Protected Content
Forbid viewing of
protected content in
browsers using the Foxit
plugin.
Use AD RMS Plug-in V1
Use the AD RMS plugin
version 1, which
supports Windows XP.
The protected PDF files
will be saved in Foxit
protected PDF format
and can only be opened
by Foxit products. RMS
plugin version 1 only
supports SHA-1/RSA
1024 algorithm for
encryption and
decryption.
Add ‘protected’ to the
name of encrypted files
Append “(protected)”
to the end of the file
name of encrypted files.
Save As
Turn on the Save As
240
Foxit PhantomPDF Standard
User Manual
feature for RMS
protected files.
Extended Rights
Turn on the extended
rights feature in the
client. Extended rights
allow the document
owner to control the
following items:
Access times: Limit
times that users can
access a document.
Print times: Limit times
that users can print a
document.
Dynamic Revocation
Turn on the dynamic
revocation feature in
the client. Revocation is
a mechanism that
revokes a PDF
document that has
already been issued.
The primary purpose of
revocation is to prevent
entities that are no
longer trusted from
participating in an RMS
system.
SharePoint Configuration
Before using the check in/check out features in Foxit PhantomPDF, please configure the
SharePoint Server.

Download PDF icon from http://www.foxitsoftware.com/images/icons/pdficon.gif.

SharePoint 2007: Copy the downloaded.GIF file to "Drive: \Program Files\Common
Files\Microsoft Shared\Web Server Extensions\12\Template\Images".
SharePoint 2010: Copy the downloaded.GIF file to "Drive:\Program Files\Common
Files\Microsoft Shared\Web Server Extensions\14\Template\Images"
241
Foxit PhantomPDF Standard
User Manual

SharePoint 2007: Edit the file “Drive:\Program Files\Common Files\Microsoft Shared\Web
server extensions\12\Template\Xml\DOCICON.XML”.
SharePoint 2010: Edit the file “Drive:\Program Files\Common Files\Microsoft Shared\Web
server extensions\14\Template\Xml\DOCICON.XML”.
SharePoint 2013: Edit the file “Drive:\Program Files\Common Files\Microsoft
Shared\Web server extensions\15\Template\Xml\DOCICON.XML”.
To edit the file, please refer to the following steps:
a. Right-click DOCICON.XML file > click Open With > select Notepad.
b. Add an entry for the file with .pdf extension and take it as the file’s name. For example,
type the ICPDF as the name of the .gif file:
<Mapping Key="pdf" Value="pdficon.gif"
OpenControl="FoxitPhantomPDF.OpenDocuments"/>
c.

Click Save on the File menu, and then quit Notepad.
Perform an iisreset:
a. Click Start > Run > type “cmd” in the Open dialog box>click OK > type “iisreset” in
the command prompt window>click Enter.
242
Foxit PhantomPDF Standard
User Manual
b. Close the windows.
Quick Start for Azure Active Directory Rights Management
1. Enable Windows Azure AD Rights Management for your organization:




Download the Windows Azure AD Rights Management administration module
(WindowsAzureADRightsManagementAdministration.exe) for Windows PowerShell
from here.
In the local folder where you downloaded and saved the Rights Management
installer file, double-click the file
WindowsAzureADRightsManagementAdministration.exe to launch installation of
the Rights Management administration module.
Open Windows PowerShell.
Type the following commands:




Import-Module AADRM
Connect-AadrmService -Verbose
Enter your Office 365 credentials when prompted, for
example“[email protected]”.
Type the following commands:


Enable-Aadrm
Disconnect-AadrmService
2. Install Active Directory Rights Management Service Client 2.1:
X86 Download
X64 Download
243
Foxit PhantomPDF Standard
User Manual
Shortcut Keys
There are number of keyboard shortcuts that you can use to speed up your navigation within the
Foxit PhantomPDF. You can both use the default keyboard shortcuts and customize your own
shortcuts.
To customize the keyboard shortcuts, please do as below:


In Classic Toolbar Mode, please go to Tools > Customize Toolbars > Keyboards or right
click on the toolbar to choose Customize….
In Ribbon Mode, please right-click any area on the ribbon and choose Customize Quick
Access Toolbar …. In the pop-up Customize Tools dialog box, choose Keyboard tab.
Some particularly important ones are listed here.
File Keys
Result
Shortcut
Open File
Ctrl + O
Close File
Ctrl + W, or Ctrl + F4
Save As
Ctrl + Shift + S
Close All
Ctrl + Shift + W
Print a Document
Ctrl + P
Exit Foxit PhantomPDF
Ctrl + Q, or Alt+F4
Save
Ctrl + S
Create PDF from file
Ctrl + N
Document Properties
Ctrl + D
View Keys
Result
Shortcut
Full Screen
F11
Exit Full Screen Mode
ESC, or F11
Switch to Text Viewer
Ctrl + 6
Zoom In
Ctrl + +
Zoom Out
Ctrl + -
244
Foxit PhantomPDF Standard
User Manual
Zoom To
Ctrl + M
Actual Size
Ctrl + 1
Fit to Page
Ctrl + 0
Fit Width
Ctrl + 2
Fit Visible
Ctrl + 3
Rotate Clockwise
Ctrl + Shift + Plus
Rotate Counterclockwise
Ctrl + Shift + Minus
Reset Toolbars
Alt + F8 (Classic Mode Only)
Show/Hide Toolbars
F8 (Classic Mode Only)
AutoScroll
Ctrl + Shift + H
Stop AutoScroll
ESC
Show or hide Menu Bar
F9 (Classic Mode Only)
Switch between tabs
Ctrl + Tab
View file in read mode
Ctrl + H
Preview page by page in Print Preview
Page Up/Down
Go to Page
Ctrl + G
First Page
Ctrl + Home
Previous Page
Ctrl + Page Up
Next Page
Ctrl + Page Down
Last Page
Ctrl + End
Previous View
Alt + Left
Next View
Alt + Right
Marquee Zoom
Alt + 5
Read Current Page
Ctrl + Shift + V
Read from Current Page
Ctrl + Shift + B
Stop
Ctrl + Shift + E
Rulers
Ctrl + R
Show or hide Navigation pane
F4
Edit Keys
Result
Shortcut
Copy
Ctrl + C, or Ctrl + Insert
245
Foxit PhantomPDF Standard
User Manual
Cut
Ctrl + X
Paste
Ctrl + V
Undo (Undo an action)
Ctrl + Z
Redo (Redo or repeat an action)
Ctrl + Shift + Z
Select All (Select all items in a document or
window)
Ctrl + A
Add Bookmark
Ctrl + B
Preferences
Ctrl + K
Go to fillable field by tab order
Tab
Go to fillable field by tab in reversed order
Shift + Tab
Tool Keys
Tool
Shortcut
Hand Tool
Alt + 3
Select Text
Alt + 6
Snapshot
Alt + 7
Find Text (Open the Navigation task pane to
search document.)
Ctrl + F
Find Next
F3
Find Previous
Shift + F3
Search
Ctrl + Shift + F
Document Keys
Result
Shortcut
Page Down
Space
Page Up
Shift + Space
Expand the selected area to the next character on
the right
Shift + Right
Expand the selected area to the next character on
the left
Shift + Left
Expand the selected area to the end of a word
Ctrl + Shift + Right
Expand the selected area to the beginning of a
word
Ctrl + Shift + Left
Expand the selected area to the end of a row
Shift + End
246
Foxit PhantomPDF Standard
User Manual
Expand the selected area to the beginning of a
row
Shift + Home
Expand the selected area next Row
Shift + Down
Expand the selected area previous Row
Shift + Up
Expand the selected area to the beginning of a
document
Ctrl + Shift + Home
Expand the selected area to the end of a
document
Ctrl + Shift + End
Move left by a character
Left
Move right by a character
Right
Move left by a word
Ctrl + Left
Move right by a word
Ctrl + Right
Move up by a row
Up
Move down by a row
Down
Move to the end
End
Move to the beginning
Home
Move to the top of next page
Ctrl + Page Down
Move to the top of previous page
Ctrl + Page Up
Move to the end of the document
Ctrl + End
Move to the beginning of the document
Ctrl + Home
Help Keys
Result
Shortcut
Help
F1
Command Lines
Here are some command lines that can be used to Foxit PhantomPDF:
Command
Result
-Register
Set Foxit PhantomPDF as default reader.
247
Foxit PhantomPDF Standard
User Manual
-pwd<password>
Input the password of the protected PDF documents.
/p <PDF path>
Print the document with default printer
/t <PDF Path> [Printer]
Print the document with designated printer
<PDF Path> /A […][…]..
Open a PDF document with a command to exactly specify what to
display and how to display
248
Foxit PhantomPDF Standard
User Manual
Contact Us
Feel free to contact us should you need any information or have any problems with our products.
We are always here, ready to serve you better.

Office Address:
Foxit Software Incorporated
42840 Christy Street, Suite 201
Fremont, CA 94538
USA

Mailing Address:
Foxit Software Incorporated
42840 Christy Street, Suite 201
Fremont, CA 94538
USA

Sales:
1-866-680-3668 (24/7)

Support & General:
1-866-MYFOXIT or 1-866-693-6948(24/7)

Fax:
1-510-405-9288

Website:
www.foxitsoftware.com

E-mail:
Sales and Information - [email protected]
Marketing Service - [email protected]
Support & General - enter a trouble ticket via our Support Portal
Website Questions - [email protected]
249