1
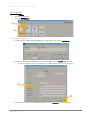
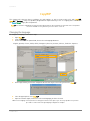
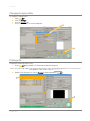
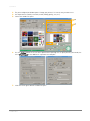
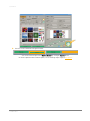
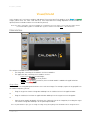
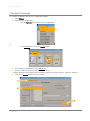
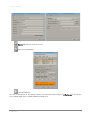
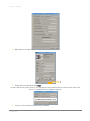
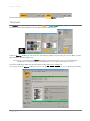
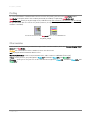
T A B L E O F C O N T E N T S Table of contents Table of contents _____________________________________________________ 2 Introduction _________________________________________________________ 3 The Caldera packages _________________________________________________4 Software package____________________________________________________________________4 Hardware package ___________________________________________________________________4 Installation and registration _____________________________________________5 Installations ________________________________________________________________________5 Installing Caldera Debian ________________________________________________________________________ 5 Caldera software installation _____________________________________________________________________ 5 Caldera workstation restoration ___________________________________________________________________ 6 Open the RIP _______________________________________________________________________7 Registration and Licensing_____________________________________________________________8 Asking for a demo key ___________________________________________________________________________ 8 Installing the license key ________________________________________________________________________ 10 Installing patches and updates_________________________________________________________ 10 Installing printer drivers _____________________________________________________________ 10 Installing profiles ___________________________________________________________________ 11 Services available___________________________________________________________________ 13 Caldera desktop icons _______________________________________________________________ 14 Configuring the drivers ______________________________________________________________ 15 Open the server administration___________________________________________________________________ 15 Configure the IP address ________________________________________________________________________ 16 Add a new roll/page size ________________________________________________________________________ 17 CopyRIP ___________________________________________________________ 18 Changing the language ______________________________________________________________ 18 Changing the input profiles ___________________________________________________________ 19 Printing a file ______________________________________________________________________ 19 Visual/Grand _______________________________________________________ 22 Main interface _____________________________________________________________________ 22 Changing the language ______________________________________________________________ 23 Changing the input profile ____________________________________________________________ 24 Open a file ________________________________________________________________________ 25 Viewing a file ______________________________________________________________________ 28 Print a file_________________________________________________________________________ 28 The Spooler _______________________________________________________________________ 32 Profiling __________________________________________________________________________ 33 Other modules _____________________________________________________________________ 33 Network/Devices/Connections __________________________________________ 34 Removable devices _________________________________________________________________ 34 Shared folders _____________________________________________________________________ 34 Using the shared folders created by Caldera ________________________________________________________ 34 Accessing a shared folder from a Caldera workstation ________________________________________________ 35 Remote connection using VNC _________________________________________________________ 36 Documentation _____________________________________________________ 40 On Caldera Workstation ______________________________________________________________ 40 In the software ________________________________________________________________________________ 40 PDF files on the workstation _____________________________________________________________________ 41 The Usernet _______________________________________________________________________ 41 2 Caldera 2013 I N T R O D U C T I O N Introduction This guide will take you through the configuration process of a Caldera Workstation, from the system installation to the first print you will perform. • The first chapter explains what you will find out of the box, when you receive your software (and possibly your hardware). Page 4 • The second chapter covers the installation and registration procedures, the patches, drivers and profiles installation and how to configure your printer drivers. Page 5 • The third chapter explains how to print a file with CopyRIP. Page 18 • The fourth chapter gives basic instructions for using a Visual / Grand product (VisualRIP, VisualRIP+ and GrandRIP+). Page 22 • The fifth chapter covers different technical issues, such as sharing your folders on the network using VNC (Virtual Network Computing). Page 34 • The last chapter explains how to find the documentation on the workstation and on Caldera’s Usernet. Page 40 3 Caldera 2013 T H E C A L D E R A P A C K A G E S The Caldera packages Two Caldera packages exist: software packages that contain only installation DVDs and hardware packages that contain the whole Caldera Workstation. Software package The software package includes: - 1 Caldera V9.10 DVD 1 Caldera Debian 1.1 DVD 1 Installation Manual 1 USB hardware dongle On Caldera’s package box and on your dongle connection document, you will find your Access number; this is the serial number of your software and consists of four or six digits. On the USB dongle, you will also find a sticker with a four or five-digit number; this is the serial number of the dongle and is called the Dongle-Number. These numbers are required to register your product on the Usernet and for any communication with Caldera services. Please keep them safe. Hardware package Caldera complete workstation includes: - 1 Caldera DELL workstation (1 case, 1 keyboard, 1 mouse + connectors; Dell screen in option) 1 restoration DVD 1 guide explaining the workstation restoration procedure 1 leaflet explaining the Dell computer warranty and ownership transfer process The exact hardware configuration depends on OEM agreements. The manufacturer serial number is directly indicated on the workstation. The workstation is configured to adapt its resolution to the monitor. The Caldera workstation has two network cards, both configured in DHCP. If you need to change the display or the network settings, please refer to this document, only available for Caldera Kubuntu: HowTo – Configure Linux.pdf. 4 Caldera 2013 I N S T A L L A T I O N A N D R E G I S T R A T I O N Installation and registration Installations You will find the complete installation procedures in Caldera Installation manual. The first step is to choose or install an operating system. Caldera software works on Mac OS X (10.5, 10.6, 10.7 or 10.8) and on Linux (Caldera Debian or Caldera Custom Kubuntu 8.04) only. For further information and to see Caldera software compatibilities with the several operating systems, please refer to our website: http://www.caldera.com/support/table-of-compatibilites/ Installing Caldera Debian In Caldera software package, the operating system included is Caldera Debian. We recommend you to use it. We also recommend you to install Caldera on a dedicated computer. Pre-installation requirements Please ensure that your CPU is 64-bit compliant (AMD Athlon 64, Phenom, Intel Core 2) and that your BIOS is set with the CD/DVD drive as the first item to be launched in the boot sequence. Caldera cannot guarantee that the Linux OS will install correctly on all hardware. Installation process 1. Insert Caldera Debian installation DVD then reboot your system. Then follow these steps. You are guided by the wizard. 2. 3. 4. 5. 6. System language selection Location and Time zone selection Keyboard selection Computer and domain name selection Hard disk partitioning We recommend you to keep default settings. 7. Finalizing the installation For further information please refer to the Installation manual. Caldera software installation The process launch depends on the operating system. On Caldera Debian 1. 2. 3. Log as root (on Caldera workstation both login and password are “caldera”). Insert the Caldera Installation DVD. A window will open, displaying the contents of the disk. Double-click on the Install icon. Be careful: do not click on CalderaInstall.app! 4. The installation program should start. If a window with label “Granted permissions without asking for password” pops up, click “Do not display this message again” and then Close. 5 Caldera 2013 I N S T A L L A T I O N A N D R E G I S T R A T I O N On Mac OS X 10.5/10.6/10.7/10.8 1. 2. 3. 4. Log in with any account. Insert the Caldera Installation DVD. Double-click the CD-ROM icon, then the Caldera Install icon. When asked for authenticate, enter an administrator name and password. You need to enter this password as the following procedures will require the installation of some system files. Admin appears by default in the Name field, since it is the first account that has been created after the installation. If you do not have an X11 server, it will be installed now. This procedure may take a few seconds. The installation wizard will then open. Caldera software requires a frequent use of the three buttons of the mouse. If you have a single-button mouse, you can emulate the second button using the Alt (Option) key and the third button using the Apple (Command) key. If you possess a “Mighty Mouse”, please note that a document explaining its set up is available from our technical support. Installing Caldera Once launched, follow these nine steps to precede the installation. To go from one step to the following, click on the arrow at the bottom right of the window. 1. 2. 3. 4. 5. Language selection Starting window Licence agreement Installation mode (choose simple) System services selection Do not select the services if you are installing Caldera on an existing Mac OS X system that is also used for other tasks. It may partly break your system configuration (network, printer queue lines…). On the other hand, if your system is dedicated to Caldera, do not hesitate to install these services. Product selection among CopyRIP, VisualRIP, VisualRIP+ and GrandRIP+ Printers selection Cutters selection Finally, launch the installation. Once the installation is done, reboot your workstation. Caldera will then open in demonstration mode. 6. 7. 8. 9. Caldera workstation restoration Caldera workstation packages include a restoration DVD that allows to reinstall the whole system (Caldera software included). A guide explaining the procedure is also included in the package. Please note that the restoration will delete all data from the machine. Please refer first to the specific guide to use backup procedure and save your Caldera settings: HowTo – Use the backup procedures.pdf 6 Caldera 2013 I N S T A L L A T I O N A N D R E G I S T R A T I O N Open the RIP Whether it is on Linux or on Mac OS X, the installation process creates a new user named caldera (this one does not require any password). Once the installation is completed, just log out and log in as “caldera”, then double-click on the Caldera icon on the desktop, your product will start automatically. Button and overview of Caldera CopyRIP. Button and overview of Caldera RIP Visual and Grand ranges. On Mac OS X, you can also use your existing account, but you will have to locate the Caldera icon in the Applications folder, since it has not been placed on your desktop. 7 Caldera 2013 I N S T A L L A T I O N A N D R E G I S T R A T I O N Registration and Licensing Besides the installation, you also need to register and get your license file. Indeed, even if a USB dongle is shipped in your package, you will also need a license file to get a fully working software. This is a mandatory procedure, since the license file is never pre-installed, even if you did get a pre-configured Caldera workstation. The key needed to unlock the Caldera software is a file that has to be imported in your system. In order to retrieve this License file, you will have to register on-line on Caldera’s Usernet: http://usernet.caldera.com The registration procedure can be done from any workstation with an internet access. During the registration step, you will have to enter the details of your account: company name, address, e-mail… as well as the dongle number and the access number. The access number stands on Caldera’s package box and on the dongle connection document. It is a four or six-digit number. You automatically subscribe to Caldera’s newsletter after registering. The Usernet allows you to download several drivers, profiles and documents. You can also re-download your license file on the extranet. At the end of the registration procedure, you will be invited to download your license file. This is basically a gzipcompressed text file called accessXXXX.txt.gz (XXXX being your access number). Please do not uncompress this file. Copy it exactly as is, without renaming it, on the Caldera workstation desktop. This key will remain valid for 60 days (in this case you will be informed when you download it). This is Caldera’s standard licensing policy. In this case, as soon as the payment conditions are met, you will receive an e-mail with your final license file. During this 60-day period, you can access Caldera support even without any maintenance contract. Asking for a demo key You can ask for a temporary key (demo license). To do so, you need to send information below to: [email protected] Your request will be treated and you will be informed if a demonstration key will be sent to you or not. Requested information: • The computer HostID • The operating system used (Mac OS X, Caldera Debian, Caldera Kubuntu…) • The number and specifications of devices you want to drive (printers and cutters) • Details about your business: name, address • A valid email address to sent the key To register the product and to retrieve the associate license, please refer to the installation manual available on Caldera’s demonet. Find the HostID In CopyRIP 1. 2. 3. 4. Open CopyRIP. Click on the Settings button Then click on Advanced settings… And on Key manager… 8 Caldera 2013 I N S T A L L A T I O N A N D R E G I S T R A T I O N 4 3 2 5. See next under the Key manager section. Visual and Grand ranges 1. Open Caldera in demonstration mode. 2. In the main window, open the Settings tab. 3. Double-click on the Key Manager icon. 2 3 4. See next under the Key manager section. The Key Manager 1. Following the previous indications for both Visual and Grand ranges and CopyRIP, you opened the Key Manager. 2. The HostID is the third field. In our example it is: “00 30 4f 66 e8 b2”. 9 Caldera 2013 I N S T A L L A T I O N A N D R E G I S T R A T I O N 2 Be careful, there is no O ("o") but only 0 (“zero”). Installing the license key The complete installation procedure is described in the installation manual, available for download on our online platforms. 1. 2. 3. 4. 5. 6. 7. Save your license file on your desktop (the file looks like: accessXXXX.txt.gz) Open the Key Manager as shown previously Use the right part of the window to find and import your key The message “all keys are ok” appears informing you imported the key successfully Close the Key Manager Click on Yes to save the licenses Enter Caldera’s administration password: caldera. You can still try the RIP software in demonstration mode, with the following restrictions: the Caldera logo will be tiled on all of your prints, and random annoying pop-ups will also tell you that you do not have keys. Installing patches and updates Patches and updates are available from Caldera Usernet web-server: http://usernet.caldera.com There is usually only one downloadable official update, which will include all the previous ones, so that you do not have to install them one after the other. A patch/update consists of one file called XXXX.calpatch. The file is a compressed archive; please make sure that you do not decompress it before proceeding to the installation. After downloading the file, double click it. You will be prompted for an administration password. On Linux, this password is “caldera”; on OS X, you will be asked for a username and a password of an “admin” user. After you type in the password, the Caldera installer will open. Then you will only have to press the Next button until the installation is finished. Installing printer drivers Printer drivers are available from Caldera Usernet web-server: http://usernet.caldera.com A driver consists of one file called XXXX.calpatch, which is to be installed exactly the same way than described above. Once the installation is finished, simply restart Caldera software, and your driver will be available and automatically added to the application tab. 10 Caldera 2013 I N S T A L L A T I O N A N D R E G I S T R A T I O N Installing profiles Profiles are available from Caldera Usernet web-server: http://usernet.caldera.com A profile (or a set of profiles) consists of one file called XXXX.calpatch, which is to be installed exactly the same way than described above. However, we recommend you to use the procedure described below to install the profile patch: 1. 2. 3. Ensure first that the file has not been decompressed. Open Caldera RIP software. Then open EasyMedia module (or EasyMedia Light): • In CopyRIP: click on the Settings button then, in Profiles tab, click on the Open EasyMedia button. 3 • 4. For the Visual/Grand ranges: in the application tab, click on EasyMedia icon (or EasyMedia Light). Then double-click on the printer icon or select it and click on Next. 11 Caldera 2013 I N S T A L L A T I O N 5. 6. 7. A N D R E G I S T R A T I O N Select your printer in the list and click on Next or directly double-click on the printer. Then click on Install Patch. The file selection pop-up opens. Find the patch on your computer and select it. Then click on Load. 7 6 8. A new pop-up opens displaying the list of the profiles contained in the patch. Select the profile(s) you want to install then click on Install selection or click directly on Install all. 12 Caldera 2013 I N S T A L L A T I O N A N D R E G I S T R A T I O N 8 9. You will be prompt for a password, enter caldera. 10. Finally, a message informs you on the number of profiles installed or updated. Services available Once the software is installed, your Caldera workstation (if properly configured on the network) will be sharing the following services/folders: By default, the workstation name is caldera-desktop and the Windows workgroup is: WorkGroup. For any major modification, the Caldera software administration password is always caldera. A web-server You can access to the services page through a regular web browser, by just typing the IP address of the Caldera workstation within your local network. From the workstation, just type "localhost” in the address field to open the services page. The page contains in particular: • • • • A VNC client to remotely connect to the Caldera monitor. Postscript drivers/PPD for remote printing Access to the Public shared folder The software documentation 13 Caldera 2013 I N S T A L L A T I O N A N D R E G I S T R A T I O N Three network shared folders These folders are automatically created during Caldera’s installation process. • • • Public (to copy files to the RIP station) Tools (to retrieve various tools, as you would do with the web-server) Save (to retrieve backup files) The Caldera hotfolder Named caldera, it is located in the Public directory and automatically transfers its files to the RIP station (using the default parameters). Please refer to the user manual for further information about hotfolders. A VNC server This will let you remotely control the Caldera workstation from another Windows or Mac computer. For more details, see page 36, chapter: Network, devices, connection: Remote connection using VNC. Caldera desktop icons Icons are automatically added to the desktop to allow you to quickly perform the following actions: : Start Caldera Visual/Grand range : Open the CalderaTools share : Start CopyRIP. : Open the Public. share : Start Caldera Spooler 14 Caldera 2013 I N S T A L L A T I O N A N D R E G I S T R A T I O N Configuring the drivers Before printing anything, you’ll have to configure the IP address of your printer(s) driven through the network. This can be done using the Server Admin tool. Open the server administration The server administration is the same for every Caldera RIP. The window opening depends on the RIP range: With CopyRIP 1. 2. 3. 4. Open CopyRIP. Click on Settings. Then on Advanced settings… Finally, click on Server admin… 4 3 15 Caldera 2013 2 I N S T A L L A T I O N A N D R E G I S T R A T I O N With Visual/Grand Open Caldera. Go to the Settings tab. Click on ServerAdmin. 1. 2. 3. 2 3 Configure the IP address 1. From the Servers administration window, select your printer then click on Configure… 2. The printer configuration window opens. Enter the IP address in the Host/IP address field. Here you can change the printer connection type, for example USB instead of network connection. 2 3 3. Once all fields are correctly set up, do not forget to click on Proceed to save the changes. 16 Caldera 2013 I N S T A L L A T I O N A N D R E G I S T R A T I O N Add a new roll/page size In the configuration window, you also can add a new roll or page size. 1. 2. Open the Pages tab. Click the New button then fill the fields as wanted. Use the New/Dup (duplicate)/Delete/Edit buttons to manage the pages and rolls sizes. 3. Once all page sizes are correctly set up, do not forget to click on Proceed to save the changes. 17 Caldera 2013 C O P Y R I P CopyRIP This chapter will show you how to configure the main options, as well as how to print a file with CopyRIP. CopyRIP is Caldera’s entry level product, designed to be simple and easy to use. It is slightly more limited than the Visual/Grand ranges, but still powerful. CopyRIP user manual is available by clicking on the blue button with the question mark. Be also aware that a “help online” function is available for every button if you let the mouse cursor on. Changing the language To change the language, follow these steps: 1. 2. 3. Open CopyRIP. Click on Settings. On the first line of the opened tab, choose the new language between: English, Spanish, French, Italian, Polish, Portuguese, Russian, German, Chinese, Turkish or Japanese 3 2 4. A message informs you that the change will be effective only the next time you will start CopyRIP. 5. 6. Close the pop-up then close CopyRIP. Open the software again, it launches in the new language you have selected. Whatever the language chosen, buttons are always placed at the same spot so you can easily reproduce the previous procedure to switch from a foreign language to English for example. 18 Caldera 2013 C O P Y R I P Changing the input profiles To change the input profiles: 1. 2. 3. 4. Open CopyRIP. Click on Settings. Go to the Profiles tab. Select, for each input, its associated profile. 3 2 Printing a file See below the big steps to print a file: 1. From CopyRIP main window, use the buttons to find your image file. Please refer to the chapter about connections to know the way to connect shared folders and to have access to its directories from a Windows or Mac machine. Page 34: Shared folders 2. Double-click on your file or click on Preview to open and load it in CopyRIP. 1 2 19 Caldera 2013 C O P Y R I P 3. The print configuration window opens. Change your printer if it is not the one you want to use. 4. Set all parameters (media, resolution, mode, loading, quality, size, etc.). 5. Choose the number of copies. 3 4 5 6. Use the Settings button to access more options before printing such as print position, print mode, the use of Step&Repeat or the addition of crop marks for examples. 7. Click then on the green button to submit the print. 20 Caldera 2013 C O P Y R I P 7 8. You can see the evolution in the green frame. You can also follow the print run in Caldera Spooler by clicking the Spooler button. For further explanation about Caldera Spooler, see the following chapter. Page 32: The Spooler. 21 Caldera 2013 V I S U A L / G R A N D Visual/Grand In this chapter, we’ll see how to configure and operate (at least the basics) the products of the Visual and Grand ranges (which share the same Look and Feel, their main differences being dependent on the number of options/features available and the size of the driven printers). Please note that a “help online” function is available for every button if you let the mouse cursor on. Be also aware that the user manual and the guides are available directly on the software in the tab: About -> Documentations. Main interface The software is divided into two main windows: • • The image bar, containing the thumbnails of all the loaded files. The application bar, containing all the modules such as: - Features like Fileman to load images - Options like EasyMedia to create profiles - Printers: after the driver installation, the associated module is added to the application bar. - Cutters using VisualCUT. Drag & Drop The software uses a drag & drop mechanism to use a tool on an image. For example, to print the target.pdf file on the CalderaJet printer, you can: • Drag the target icon from the image bar and drop it on the CalderaJet icon in the application bar • Drag the CalderaJet icon from the application bar and drop it on the target icon in the image bar • Open the print module by double-clicking on the CalderaJet icon in the image bar, then drag the target icon from the image bar and drop it on the opened print module. or or Once the print module is open, you can change the image at any time by drag a new thumbnail from the image bar into it. 22 Caldera 2013 V I S U A L / G R A N D Changing the language To change the language, open the user configuration module. 1. Open Caldera. 2. Open the user configuration: or • Click the Special menu then click User configuration. • In the Settings tab, click on the Config module. 3. In the software configuration, click on Advanced. 4. On the second line, choose the new language between: English, Spanish, French, Italian, Polish, Portuguese, Russian, German, Chinese, Turkish or Japanese 5. Click on the Restart button to save the change. 3 4 5 23 Caldera 2013 V I S U A L / G R A N D 6. A message pops-up informing you that the restart will stop all running modules including the print modules. 7. Click Yes to restart and Yes to all open print module asking for a stop. 8. Caldera closes then opens again in the chosen language. Whatever the language chosen, buttons are always placed at the same spot so you can easily reproduce the previous procedure to switch from a foreign language to English for example. Changing the input profile 1. Open Caldera. 2. Click the Special menu then click Color Configuration. 3. Select, for each input, its associated profile. 4. Click on Ok to save the changes. 24 Caldera 2013 V I S U A L / G R A N D To get further information about input profiles, please consult the following document: HowTo Manage the input ICC profiles Open a file Shared directory: Public The installation program automatically installs a Samba server, which allows to share the hard drive, or more exactly a specific folder of the Caldera workstation. On a Linux system, this folder is /home/public; on a Mac OS X system, it is //CALDERADATA/public. Once the connection is established, make your file available to the RIP by copying them into this folder. For further information about the shared directory Public, please go to page 34: shared folders. Uploading files using Caldera Fileman 1. From Caldera application bar, double-click on Fileman. 1 2. In Fileman, click on Setup… 25 Caldera 2013 V I S U A L / G R A N D 2 3. The setup window opens. Here you can set up images import options (preview resolution, APPE, GhostScript, etc.). 4. Then use the browser on the left side to locate your file. When you select your file, a preview might appear on the right side, or not; this depending on the type of the file. Buttons represent the most used directories to pick up image files: the parent folder, your personal folder, the Public folder, the CD/DVD-ROM, an USB key and the desktop. The last two buttons allows you to create a new folder and to refresh the list. 5. Double-click on your image or use the Open button to import your file in the image bar. 26 Caldera 2013 V I S U A L / G R A N D 4 5 6. At the bottom left you can see the loading process and cancel it if you need it. 7. Once the loading reaches 100%, the image appears in the image bar. 8. Finally, close Fileman. 27 Caldera 2013 V I S U A L / G R A N D Viewing a file Display is a module to display the files. It does not appear in the application bar. It opens by a simple drag of the file thumbnail from the image bar to the desktop (or by doing a double click on the thumbnail). You can zoom in and out, and scroll in the image, with the three buttons of the mouse (left and right buttons to zoom, middle button to scroll). You can also crop the file in this module. To get further information, please see the document: HowTo crop an image before printing.pdf Print a file 1. Select your printer within the available ones then double-click on it to open it. 1 2. Drag and drop your image from the image bar to your printing module. You can also directly drag and drop your image from the image bar to the printer’s icon on the application bar. In this case the module will open with the image. 28 Caldera 2013 V I S U A L / G R A N D 3. Set your printing configuration. The profiles are selected automatically. If the combination you have selected does not have a profile, the menus will turn RED. More parameters are available using the buttons: Page setup Here you can change the printing scale and position in the Main Settings tab, select some crop marks in the Crop Marks tab, manage the cut, the white, etc. Printer parameter The displayed options depend on the printer. 29 Caldera 2013 V I S U A L / G R A N D Spooler Opening (see the next section) Spot Color management Color management Here are set up: profiles for this particular printer, the activation or deactivation of InkPerformer (if the specific key is owned) and all that is needed to globally manage color. 30 Caldera 2013 V I S U A L / G R A N D 4. When you have set up all the options, go back in the main Print window. 5 5. Finally, launch the print by clicking Print. For printers driven by files (offline printers), a message pops up to ask information about the output file (name and location). This file is created by Caldera after ripping the original file. 6. You can see the evolution at the bottom of the window. 31 Caldera 2013 V I S U A L / G R A N D To follow more precisely the print evolution, you can use Caldera Spooler (see below). The Spooler The Spooler is the same whether you are using a Copy or a Visual/Grand product. A button is installed on the desktop to launch it quickly but you can also open it from the RIP interface. From the Spooler window, you can check the state and the progress of your jobs, you can also block, release, delete them or check the log files, etc. Not all jobs are re-printable from the Spooler. To be able to reprint a job, you have to select an action involving the computation of a “Reprint file” (select “Keep ripped file” or use the “Rip” or “Rip then print” actions). You will also find details about the job in the different tabs: Job, Colors, Settings, etc. Please also note that the Spooler window does not have to be opened all the time; even if you close it, jobs will go on normally. 32 Caldera 2013 V I S U A L / G R A N D Profiling To create and calibrate a medium and create the associate ICC profile, you have to use EasyMedia module. EasyMedia is an option, when it has not been purchased; the module is replaced by EasyMedia Light. EasyMedia Light allows you to go through all the calibration steps (Ink transitions, Linearization and Ink limiting), but you will not be able to create an ICC profile (however, the option to import an ICC profile made with another software is available). For full documentation about EasyMedia, please see the addendum file: EasyMedia_EN.pdf Other modules In this tutorial, we have briefly reviewed the usage of most common modules, which are: Fileman, Display, Print, Spooler and EasyMedia. Caldera RIP contained more others modules that are also often used: Info: displays detailed information about the files. WorkFlow/Hotfolders: can be used to automate tasks, and to connect to a Windows (Postscript). Tiling+: allows you to tile your jobs (option in VisualRIP, standard in VisualRIP+ and GrandRIP+). Compose: allows you to nest your files on the same document (option in VisualRIP, standard in VisualRIP+ and GrandRIP+). 33 Caldera 2013 N E T W O R K / D E V I C E S / C O N N E C T I O N S Network/Devices/Connections Removable devices On both Mac OSX and Linux, removable devices (external drives, USB keys, DVD/CD, as well as network drives) are attached (mounted) to a local folder. On Linux The Caldera Debian CD/DVD workstation opens using the folder: /media/cdrom0 USB devices open with: /media/<device name> Both USB devices and CD/DVD will mount automatically on the desktop. Network folders open with: /mnt/<server>/<share> FAT16 and FAT32 devices are supported under Linux; NTFS formatted drives are readable only (no write permissions), and might sometimes fail. On Mac OS X The Caldera Debian CD/DVD workstation opens using the folder: /Volumes/<name of the device> USB devices open with: /Volumes/< name of the device > Network folders open with: /Volumes/<server>/< name of the device > Shared folders Using the shared folders created by Caldera Once the Caldera software is installed, your workstation will be sharing three folders: Public, Save and Tools. For further information, please see page 13 the Services available section. To connect to the Caldera workstation, you need to know the IP address. To find it please refer to the following document: HowTo – Configure Linux.pdf Connect from Linux On Linux, the workstation should be found under Workgroup. Connect from Windows Use one of the followings: • • Use the network explorer to find the workstation using its name From the network explorer, enter \\<IP address>\<folder name> where <IP address> is Caldera workstation IP address and <folder name> one of the three shared folders (public, save or tools). Example: \\192.168.1.1\Public • In the file explorer, enter \\<IP address> where <IP address> is Caldera workstation IP address Example: \\192.168.1.1 Connect from Mac OS X To connect from a Mac OS X to Caldera workstation, in the Finder menu, select Go then Connect to server. Then choose between the followings depending on your network configuration: • Type: smb://<IP address> using Caldera workstation IP address 34 Caldera 2013 N E T W O R K / D E V I C E S / C O N N E C T I O N S Example: smb://192.168.1.1 • Type: afp://<IP address> using Caldera workstation IP address Example: afp://192.168.1.1 Accessing a shared folder from a Caldera workstation See below how connect a shared folder to the Caldera workstation. Using a Caldera Mac OS X workstation To connect from a distant machine to Mac OS X Caldera workstation, in the Finder menu, select Go then Connect to server. Then choose between the followings depending on your network configuration: • Type: smb://<IP address> using the distant machine IP address Example: smb://192.168.1.1 • Type: afp://<IP address> using the distant machine IP address Example: afp://192.168.1.1 The remote drive will be accessible under /Volumes within Caldera. Using a Caldera Debian workstation Use the Smb4k tool automatically installed with Caldera Debian. Caldera Shortcuts menu or directly from the bottom of the Linux screens using the icon: Search your workgroup, the distant server and the folder you want to mount: Enter a username and a password if prompted so. The remote folder will be accessible under: /mnt/<server>/<folder> <server> is the machine where you can found the shared <folder>. 35 Caldera 2013 N E T W O R K / D E V I C E S / C O N N E C T I O N S Remote connection using VNC Caldera installs a VNC server on your workstation. VNC is a remote-desktop tool that will let you take over the Calder workstation from another workstation (Windows or Mac) within your local network. To enables the connection a VNC client has to be installed on the machine from where you want to drive the Caldera workstation. On Linux, VNC enables multiple remote users to work simultaneously. Please note that this is optional, and requires a special license. If you wish to try this, just replace the :1 entered after the IP address by :0. From Windows 1. 2. Open a web browser and connect to your Caldera workstation web server: enter its IP address. On the resources page, click on “VNC Client for Windows and Mac Download”. 3. Then double-click on “Viewer VNC for Windows” and download the file. 4. Save the file on your Desktop so you can easily find it. The following steps have to be done each time you want to use the remote-desktop tool. 5. Execute the vncviewer.exe file. 6. In the server field, enter Caldera workstation IP address followed by: • “:1” as shown in the example if you want to connect to a Linux workstation. • “:0 to connect to a Caldera Mac OS X workstation. 36 Caldera 2013 N E T W O R K / D E V I C E S / C O N N E C T I O N S 7. 8. Click ok. When prompted for a password, enter caldera. You should see the screen of Caldera workstation appear in a window. You can act with your proper mouse and keyboard like you do on your own computer. From Mac OSX Relatively new Mac OS X versions integrate directly VNC in their system so you just have to follow these instructions to connect to a Caldera workstation: 1. Select Go then Connect to Server… 2. In the Server Address field, enter “vnc://<IP address>” using Caldera workstation IP address you want to connect to. Then click Connect. 3. 3 4. Enter “caldera” in the password field then click Connect again. 37 Caldera 2013 N E T W O R K / D E V I C E S / C O N N E C T I O N S If another message pops up following the password prompt, click on Connect to continue. 5. You should see the screen of Caldera workstation appear in a window. To remote, you also can use ChickenOfTheVnc. Follow these steps: 1. 2. Open a web browser and connect to your Caldera workstation web server: enter its IP address. On the resources page, click on “VNC Client for Windows and Mac Download”. 3. Then double-click on “Viewer VNC for Mac OS X” and download the file. 38 Caldera 2013 N E T W O R K / D E V I C E S / C O N N E C T I O N S 4. Double-click on the .dmg file you’ve just download then drag the ChickenOfTheVnc icon to your desktop. The following steps have to be done each time you want to use the remote-desktop tool. 5. Double click on the ChirckOfTheVnc application. 6. 7. 8. 9. On New Server, enter, in the Host field the IP address (as shown in the example). In the Display field, type 1 for a Linux OS and 0 for a Mac one. Enter “caldera” as Password. Finally, click Connect to launch the connection. 10. You should see the screen of Caldera workstation appear in a window. You can interact with your proper mouse and keyboard like you do on your own computer. 39 Caldera 2013 D O C U M E N T A T I O N Documentation On Caldera Workstation In the software User manuals are directly available from Caldera software. CopyRIP In CopyRIP click the help button (the one with the question point). The PDF version of the manual opens. Visual and Grand ranges For VisualRIP and GrandRIP ranges, a most complete documentation is available in the software. 1. Click on the menu: About. 2. Select Documentations. There you can see user manuals about the software and its main options. 3. The under menu How to… displays the guide created to help you in more precise procedures. This menu is also available by doing a right-click anywhere in the application bar then select Documentations. 2 3 40 Caldera 2013 D O C U M E N T A T I O N PDF files on the workstation Whether on a Linux or Mac OS X workstation, PDF format documents are also available from the directory: /opt/caldera/lib/DOC The Usernet You’ll find all the documentation on Caldera online platform: the Usernet. New documents are available on the extranet since there launch date and can be available only there at the beginning. Manuals are in Support -> Documentation. Guides are in Documentation -> “How to’s”. 41 Caldera 2013