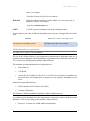
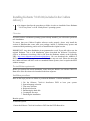
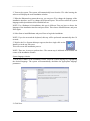
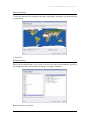
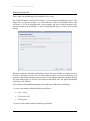
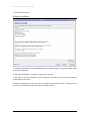
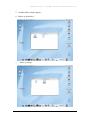
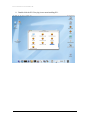
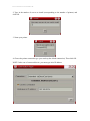
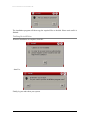
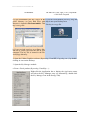
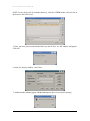
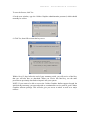
1
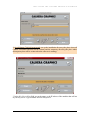
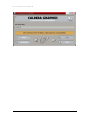
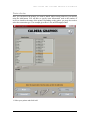
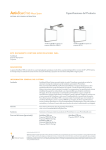
C ALDER A GR AP H ICS Installation Manual Caldera Graphics 2010 Caldera Graphics® and all Caldera Graphics products mentioned in this publication are trademarks of Caldera Graphics Table of contents Introduction .......................................................................................................................................... 2 Organization and content of this manual ...................................................................................................... 2 Conventions used in this manual.................................................................................................................. 2 Minimum hardware requirements ................................................................................................................ 3 For a Mac OS X v 10.4/10.5/10.6 installation ................................................................................... 3 For a Kubuntu 7.04/8.04 installation (included in Caldera Graphics delivery) .................................... 3 Software requirements ................................................................................................................................ 4 Installing Kubuntu 7.04/8.04 (included in the Caldera delivery)......................................................... 5 Overview.................................................................................................................................................... 5 Pre-installation requirements ....................................................................................................................... 5 Installation procedures ................................................................................................................................ 5 Boot the system............................................................................................................................... 5 System language selection ............................................................................................................... 6 Time zone selection......................................................................................................................... 7 Keyboard selection .......................................................................................................................... 7 Partitioning the hard disk ................................................................................................................. 8 Creating the first user ...................................................................................................................... 9 Finalizing the installation............................................................................................................... 10 Installing X11 without reinstalling Mac OS X ................................................................................... 11 Installing X11 ........................................................................................................................................... 11 Installing the Caldera Graphics software .......................................................................................... 15 Starting the installation ............................................................................................................................. 15 Language selection ................................................................................................................................... 16 Starting window........................................................................................................................................ 17 Installation mode ...................................................................................................................................... 17 System services selection .......................................................................................................................... 18 Product selection....................................................................................................................................... 19 Advanced configuration ............................................................................................................................ 20 Printers selection....................................................................................................................................... 23 Cutters selection ....................................................................................................................................... 25 Scanners selection..................................................................................................................................... 26 Summary screen ....................................................................................................................................... 27 1 I N S T A L L A T I O N M A N U A L Finishing the installation ........................................................................................................................... 28 Appendix - Registration & Licensing ................................................................................................. 29 Registration .............................................................................................................................................. 29 Installing the license key ........................................................................................................................... 29 Introduction C ongratulations on acquiring your new Caldera Graphics Raster Image Processing (RIP), imaging and scan-to-print solution. This manual is designed to take you through the installation process, whether it is for an initial installation or simply for an update. NOTE: THE PROCEDURES DESCRIBED IN THIS MANUAL ARE EITHER FOR A DEDICATED KUBUNTU 7.04/8.04 SYSTEM INSTALLATION OR FOR A MAC OS X v 10.4/10.5/10.6 ONE. IF ANOTHER OPERATING SYSTEM IS INSTALLED, IT WILL BE PERMANENTLY DELETED! Organization and content of this manual Specifically, this manual contains the following chapters: Chapter 1 – Installing Kubuntu 7.04/8.04 This chapter provides procedures to successfully install Kubuntu 7.04 or 8.04. Chapter 2 – Installing X11 without having to reinstall Mac OS X This chapter provides procedures to install X11 without having to completely reinstall your existing OS. Chapter 3 – Installing the Caldera Graphics software This chapter provides instructions to successfully install your Caldera Graphics software. Appendix – Caldera Graphics registration and licensing This appendix provides procedures to register your Caldera software and to activate your licensing key. Conventions used in this manual The present manual uses the following conventions: Bold Bold characters in the middle of a text string refer to keys or to the graphic interface. For instance: “Press the Return key”. “Click the OK button”. Italic Italicized characters in the middle of a text string refer to screen 2 I N T R O D U C T I O N labels. For example: “From the Package Group Selection window...” Bold and Italicized characters in the middle of a text string refer to unique text entries. For example: Bold-Italic “Type the <machine name> in...” A NOTE provides information for the preceding procedure. NOTE In cases where a procedure is different depending on the systems, a background color will be used: Kubuntu Procedures on a Kubuntu system. Mac OS X v 10.4, v 10.5 and v 10.6 Procedures on a Mac OS X system. Minimum hardware requirements For a Mac OS X v 10.4/10.5/10.6 installation The use of the Caldera software is only supported on systems that are dedicated to that use. A complete system matching the following hardware requirements must be dedicated to the Mac OS X v 10.4/10.5/10.6 operating system and the Caldera Software. The minimum recommended hardware requirements are: • Power Mac G5 • 1 Gb RAM • At least 20 Gb available for Mac OS X v 10.4/10.5/10.6 and software installation on your hard drive, and enough space to properly use our products, depending on your needs Optional recommended hardware: • SCSI controller (ATTO Express PCI 4L4S) • 3 buttons USB mouse. For a Kubuntu 7.04/8.04 installation (included in Caldera Graphics delivery) A complete system matching the following hardware requirements must be dedicated to the Kubuntu 7.04 or 8.04 operating system and the Caldera software: • Processor – Pentium 4 or AMD Athlon recommended 3 I N S T A L L A T I O N M A N U A L • Memory – 512 Mb RAM (extendable to 1 Gb). Note: 1 Gb is recommended for ReproShop • Hard Drive – 18 or 36 Gb SCSI Ultra Wide 3 – 10K rpm – SATA on Adaptec 29160 board LVD 160 compliant • Floppy – 3.5" (1.44 Mb) • Mouse – USB or PS/2 3 buttons • Video Board – ATI 32 Mb, Matrox G450/G550, Nvidia GeForce or any video board supported by Kubuntu 7.04/8.04 • Monitor – 17" or 19" (minimum resolution of 1280 x 1024) • CD-ROM – 52X, or DVD-ROM • Ethernet board – 100 MB – RJ 45 connector • I/O Ports – 2 serial ports, 1 parallel port, 2 USB ports • Dongle – Caldera Graphics dongle with 25 pin to 9 pin serial adapter, or USB dongle. Kubuntu 7.04 and 8.04 can handle a large number of hardware devices; however, this list is far too long to be quoted here. Software requirements The Caldera installation requires the system installation CDs (Mac OS X v 10.4, Mac OS X v 10.5, Mac OS v 10.6 or Kubuntu 7.04/8.04) and the Caldera Graphics installation DVD. Mac OS X v 10.4 Tiger Mac OS X v 10.5 Leopard • Mac OS X v 10.4 Install DVD. • Mac OS X v 10.4 Install DVD. • Caldera Graphics Software DVD. • Caldera Graphics Software DVD. Mac OS X v 10.6 SnowLeopard • Mac OS X v 10.6 Install DVD. • Caldera Graphics Software DVD. Kubuntu 7.04/8.04 (delivered with the Caldera Graphics package) • Kubuntu 7.04/8.04 Installation DVD • Caldera Graphics Software DVD 4 Installing Kubuntu 7.04/8.04 (included in the Caldera delivery) T his chapter describes the procedures to follow in order to install the Linux Kubuntu 7.04 “Feisty Fawn” or 8.04 “Hardy Heron” operating system. Overview If you do not have a Kubuntu operating system already installed, you will need to perform a new installation. To ensure that your Caldera Graphics software works properly, please only install the version of Kubuntu that comes with your package: indeed, it contains many presets and customized disk partitioning, and is easier to install than the original version. IMPORTANT: Any other distribution is not guaranteed to work. If you still wish to use the original Kubuntu 7.04 or 8.04 distribution, please download the Kubuntu-7.04-desktopi386.iso or Kubuntu-8.04-desktop-i386.iso file from the Kubuntu website at the following URL: http://www.kubuntu.com/download.php#latest. Do not download the AMD64 or DVD versions, which have not been tested and therefore may not work. Please also note that the Caldera software will NOT work on a standard Ubuntu system, since it requires the KDE window manager. Pre-installation requirements Before you perform the actual installation, ensure that your BIOS is set with the CD/DVDRom drive as the first item to be launched in the boot sequence. Installation procedures Here are the steps you have to follow to perform the Kubuntu 7.04/8.04 installation: 1. Use the Kubuntu 7.04/8.04 Installation DVD to boot your system. 2. System language selection 3. Time zone selection 4. Keyboard selection 5. Partitioning the hard disk 6. Creating the first user 7. Finalizing the installation. Boot the system To boot the system: 1. Insert the Kubuntu 7.04/8.04 Installation DVD into the DVD-Rom drive. 5 I N S T A L L A T I O N M A N U A L 2. Turn on the system. The system will automatically boot from the CD. After booting, the software will display the main installation window. 3. When the Kubuntu boot menu shows up, you can press F2 to change the language of the installation interface, and F3 to change the keyboard layout. This will not affect the system language and keyboard that will be installed later on. NOTE: For a Kubuntu 8.04 installation, this step is different. First you have to choose the language of the installation interface and press Enter. Then choose Install Kubuntu, and press Enter again. 4. Select Start or install Kubuntu and press Enter to begin the installation. NOTE: If you do not touch the keyboard, this step will be performed automatically after 30 seconds. 5. Wait for the Live System desktop to appear, then do a single-click on the Install icon in the top left corner. This will execute the installation process. NOTE: There are six steps to perform here. The current step is indicated in the bottom left corner of the installation window. System language selection 1. In the first window of the installation wizard, select the system language by highlighting the desired language. The system will automatically determine the appropriate language parameters. 2. Click Next. 6 I N S T A L L I N G K U B U N T U 7 . 0 4 / 8. 0 4 Time zone selection 1. Select the time zone by clicking on the map, or by directly selecting a city in the Selected city options list. 2. Click Next. Keyboard selection Select your keyboard layout. If you wish, you can even test special characters specific to your language to make sure that the new layout is working as intended. When this is done, click Next. 7 I N S T A L L A T I O N M A N U A L Partitioning the hard disk This is where the partitioning of the hard disk will be set up. The Caldera Kubuntu 7.04/8.04 CD features a fully automated partitioning process. You simply have to select the Guided – Use entire disk item in the list of available choices. This will create a 15 GB root partition and a swap partition, the size of which depends on the amount of RAM in your machine; as for the remaining disk space, it will be used for data storage. Warning: Using the automated partitioning process will erase all data previously stored on the disk. If you want to preserve one or more partitions and/or if you need to dual-boot your computer with another operating system, please use the Manual partitioning method instead. The same thing applies if you have more than one hard disk, since the guided partitioning will only use one of them. If you wish to use the Manual partitioning mode, make sure to follow these instructions: 1. Create a root partition with the following specificities: • Size: 15 GB • Filesystem: Ext3 • Mount point: / 2. Create a swap partition with the following specificities: 8 I N S T A L L I N G • K U B U N T U 7 . 0 4 / 8. 0 4 Size: 100% to 200% of the RAM of the machine 3. Create a data partition with the following specificities: • Size: As large as you can • Filesystem: Ext3 • Mount point: /home Click the Next button. Creating the first user 1. It is now time to enter some basic personal information and create a user who will have administration rights on your system. When using the Caldera Kubuntu CD, all the fields here are already filled. The user account that is created this way is caldera, and its password is caldera as well. You can modify them if you wish, but be aware that this could cause problems later on in case you would need the Caldera support team to help you with troubleshooting tasks. However, you can safely change the name of the computer itself, which will be necessary if you are installing more than one Caldera machine on your network. NOTE: The account created here will be considered a system administrator. In Kubuntu, the root account cannot be accessed directly, and only administrators can use its specific features. 9 I N S T A L L A T I O N M A N U A L 2. Click the Next button. Finalizing the installation 1. Click the Install button. The installation process will then begin; it may take a little while, so do not be surprised. 2. When the installation is complete, restart your computer. 3. The CD tray will open. Remove the CD, and press the Enter key to reboot the computer, as indicated on the screen. 4. After the computer has rebooted, log in with the account created at the Creating the first user step. The username and password are normally caldera. 10 Installing X11 without reinstalling Mac OS X T he Caldera Graphics software requires having X11 installed on your computer. If it is not the case, you will not be able to use our product. However, if you already have a Macintosh with OS X installed, it is very likely that you do not want to perform a reinstallation of your machine. Therefore, this chapter will explain how to install X11 without having to completely reinstall your operating system. Installing X11 To install X11 on your existing Mac OS X system, you must have the OS X DVD that was delivered with your computer. 1. Insert the DVD in the drive. 2. A window displaying the contents of the DVD will immediately open. Click in this window to make it active. 11 I N S T A L L A T I O N M A N U A L 3. While this window is selected, go in the Finder menu, and select Go, then Go to folder. 4. In the Go to the folder dialog box, type System/. 12 I N S T A L L I N G X 1 1 5. A hidden folder will then appear. 6. Browse to Installation… 7. …then to /packages. 13 W I T H O U T R E I N S T A L L I N G M A C O S X I N S T A L L A T I O N M A N U A L 8. Double-click the X11User.pkg icon to start installing X11. 14 Installing the Caldera Graphics software T his chapter provides procedures to successfully install Caldera Graphics software on Kubuntu and Mac OS X systems. The installation program can be run either in Simple or in Advanced mode. The Simple mode uses predefined default values for most configuration options. Nevertheless, it lets you choose products, printers, cutters and scanners to install. The Advanced mode allows you to configure more options, such as the installation directory and the license server. NOTE: When a procedure is part of the Advanced installation only, you will be warned about it, and invited to jump to the next step directly. Starting the installation To open the Installation program: On a Kubuntu workstation On a Macintosh workstation 1. First, log in as the “caldera” user that was created 1. If you are not already logged in, log in during the installation. Normally, username and with any account. password should both be caldera. 2. Double-click the CD-ROM icon, then the 2. Insert the Caldera Installation DVD. The Caldera.Install icon. system will then ask you what you want to do. Select Open in new window and click OK. This will open a Konqueror window displaying the contents of the disk. If it is empty, press F5 until the contents of the DVD are finally shown. 3. When asked for authentification, enter an 3. Click on the Install icon (not the one named administrator name and password. You need CalderaInstall.app). When asked, input your to enter this password, as the following password. The installation program should procedures will require the installation of start. some system files. NOTE 1: When you install the software for the NOTE: Admin appears by default in the first time, clicking the Install icon may Name field, since it is the first account that sometimes display a text editor instead. If this has been created after the installation. happens, do a right-click on the Install icon, then choose Action > Run as Root. NOTE 2: In case the system you have installed 15 I N S T A L L A T I O N M A N U A L is an official Kubuntu 7.04/8.04 release, you will be unable to start the installer script (instead, it will simply appear in a text editor). You will therefore need to perform the following steps: • Open a console terminal (K menu>System>Konsole (Terminal program)). • Type the following command: sudo If you do not have an X11 server, it will be mount -o remount, exec installed now. This procedure may last a few /media/cdrom. seconds. The installation wizard will then open. When prompted, enter your password (normally, it is caldera). • • Click the Install icon on the CD. NOTE: Whether you are running a Mac OS X v 10.4/10.5/10.6 or a Kubuntu 7.04/8.04 operating system, this installation will follow almost the same procedure. You will however be warned each time a difference is encountered. Language selection In the Language Selection window, choose the language in which you want your Caldera Graphics solution to be installed. Then click Select. 16 I N S T A L L I N G T H E C A L D E R A G R A P H I C S S OF T W A R E Starting window The next window is only the presentation screen. Here, click the right arrow (which stands for “Next”, the same way the left arrow stands for “Previous”) at the bottom of the window. Installation mode You can choose whether you want to perform a Simple or an Advanced Installation. Press the Next arrow button to continue. 17 I N S T A L L A T I O N M A N U A L NOTE: We recommend that you use the Simple Installation. The Advanced Installation will allow you to install the Caldera Graphics software packages when the key server is located on a separate workstation, and to customize some system services. System services selection 1. You will then be asked if you want to install some system services or not. These services are used by the Caldera Graphics software in order to be well integrated to a network environment. However, be aware that this may break your previous configuration in case you are installing on an already existing system and you were using these services. The concerned services are mainly the disk and printer shares, and web and FTP servers. On a newly installed system, you can press Yes without problems. 2. This step is part of the Advanced installation. If you're performing a Simple installation, jump directly to the next step. In Advanced mode, you can choose the system enhancements you wish to install: Public Folders (anonymous FTP), CUPS printing, Telnet server... 18 I N S T A L L I N G T H E C A L D E R A G R A P H I C S S OF T W A R E NOTE: Depending on your operating system, the services shown in the following screenshot may differ from those you will actually see on your screen when performing your installation. Product selection Highlight the product(s) that you want to install, and press the Next arrow button. 19 I N S T A L L A T I O N M A N U A L Advanced configuration The following steps are part of the Advanced installation only. If you're performing a Simple installation, please go directly to the next step (Printers selection). 1. On a Mac OS X system only: in case your system has multiple partitions or disks, you can put all data on a volume separated from the system. This is highly recommended. Choose the volume that you wish to use for your Caldera Graphics data, and click Next. By default, the appropriate directory is already selected. 20 I N S T A L L I N G T H E C A L D E R A G R A P H I C S S OF T W A R E 2. On a Kubuntu 7.04/8.04 system only, set up the installation directory (the place where all Caldera executables and data will be written) and the temporary directory (the place where all temporary data will be written when the software is running). 3. In the Key Server Host field, set up the name or the IP adress of the machine that will act as your key server. Type localhost for a local keyserver. 21 I N S T A L L A T I O N M A N U A L 22 I N S T A L L I N G T H E C A L D E R A G R A P H I C S S OF T W A R E Printers selection Here, you can choose the printers you want to install. Add as many printers as you need by using the Add button. You will have to specify some information, such as the number of servers to install or the name of the printer. Depending on the printer, you may also need to select the connection type. The example given here is for an HP Designjet 5000: 1. Select your printer and click Add. 23 I N S T A L L A T I O N M A N U A L 2. Type in the number of servers to install (corresponding to the number of printers) and click OK. 3. Name your printer. 4. Choose the printer connection type (you can keep the default connection). Then click OK. NOTE: In the case of a network device, you must type in its IP address. 24 I N S T A L L I N G T H E C A L D E R A G R A P H I C S S OF T W A R E Cutters selection In the Cutters window, you can select which cutters to install. The process is basically the same as for the printers. 1. Select your cutter and click the Add button. 2. Type in the number of servers to install and click OK. 25 I N S T A L L A T I O N M A N U A L 3. Name your server and click OK. Scanners selection Finally, the selection of scanners is the last step before installing all the files. 1. Select your scanner and click the Add button. 2. Type in the number of servers to install and click OK. 26 I N S T A L L I N G T H E C A L D E R A G R A P H I C S S OF T W A R E 3. Name your server and click OK. Summary screen This window shows a summary of the different products and options you have selected. If you agree with these choices, click the thumb icon to install. At the message: Are you ready to proceed?, click Yes. 27 I N S T A L L A T I O N M A N U A L The installation program will then copy the required files to the disk. Please wait until it is finished. Finishing the installation When the installation is complete, click OK... ...then Yes. Finally, log out and reboot your system. 28 Appendix - Registration & Licensing T his appendix provides procedures to register your Caldera Graphics software and to activate your license keys. Registration Registration occurs after the Caldera Graphics software is installed. After installation, the installer must perform the following tasks: 1. Complete the registration form located on the Caldera website (http://www.caldera.eu), in the Support > Product Registration part. To register, you will need the following information: • The product access number that was provided with the software • The serial number of the dongle, or the ID number of the computer • Necessary end user information (name, address...) • A valid e-mail address. This address will be used to send you keys, software updates, and so on. Please fill in the mandatory fields accordingly. NOTE: Be aware that the information you provide will be used to send you keys, software updates, etc. Therefore, please try to fill in all the information fields. After you register, you will receive confirmation via e-mail summarizing the information you have provided. 2. Caldera Graphics will check and process your request. You will then be able to download your key from our website (Support section), by inputting the access codes you are given in an e-mail. This key is a file that you must insert into your system. Your key remains valid for 60 days. This 60-day time period is your warranty period. During this time you can access Caldera Graphics' hotline by telephone, fax, or e-mail. When you contact the Caldera Graphics support, remember to always give your product access number. Installing the license key 1. To install your licence key, you must first retrieve the key file that has been provided to you. Warning: It is important to leave this file compressed, i.e. with its [.txt.gz] format! 29 I N S T A L L A T I O N M A N U A L On Kubuntu On Mac OS v 10.4 Tiger, v 10.5 Leopard & v 10.6 Snow Leopard a. If you downloaded your key, copy it in the If you have downloaded your key, drag and public directory on your hard drive (this drop it onto your Desktop area. directory is located in file:/home/public). This This key is a txt.gz file. key is a txt.gz file. b. If you received your key on a floppy disk, and not by e-mail, just insert the disk in your computer. The key file is located in the file: /mnt/floppy directory. 2. Open the Caldera Graphics software (Reproshop, VisualRIP, Copyshop, etc...) by doubleclicking its icon on the Desktop. 3. Open the Key Manager module. a. From a Visual product (Reproshop, VisualRip+...): Right-click the Application bar to display the Application menu and select the Key Manager entry (or alternatively, double-click the Key Manager icon in the Settings Tab). 30 A P P E N D I X – R E G I S T R A T I O N & LI C E N S I N G b. From a Copy product (CopyShop, CopyRip, etc...): Click the Settings button, then the Advanced Settings button, and finally the Key Manager button. 4. In the window that appears, you must now import the key file: On Kubuntu On Mac OS 10.3 Panther, v 10.4 Tiger & v 10.5 Leopard Click the PUBLIC button if you have Click the DESKTOP button if you saved the downloaded the keys (and if you saved the file key file on your desktop. in /home/public), or the FLOPPY button if you received a floppy. 31 I N S T A L L A T I O N M A N U A L NOTE: In case the key file is in another directory, click the OTHER button, select the file in the browser, then click Load: 5. Once you have processed and loaded the keys, the All Keys Are OK window will appear. Click OK. 6. In the Key Settings window, click Close. 7. Another window will then appear, with the following text: Save Licences before quitting? 32 A P P E N D I X – R E G I S T R A T I O N & LI C E N S I N G To save the license, click Yes. 8. In the next window, type the Caldera Graphics administration password, which should normally be caldera. 9. Click Yes, then OK to restart the key server. Within 10 to 12 days before the end of your warranty period, you will receive a final key, that you will also have to download. When you receive this final key, use the same procedure as previously described to import it into your system. NOTE: If you want to be able to access the Caldera Graphics hotline support beyond the initial 60-days warranty, you must subscribe to a maintenance service pack for your Caldera Graphics software package. This will also give you access to minor as well as to major releases. 33