1
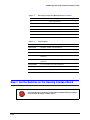
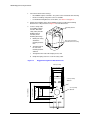
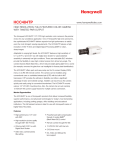
ACUIX™Series
Rugged Housing and Dome
Installation Guide
Document 800-02026 – Rev A – 08/08
Revisions
Issue
Date
Revisions
A
08/08
New document
2
ACUIX Rugged Housing and Dome Installation Guide
Explanation of Symbols
WARNING!
The exclamation point in a red octagon is a WARNING. Failure to take or
avoid a specific action could result in physical harm to a person or
irreparable damage to equipment.
Caution
The lightning flash with arrowhead symbol within an equilateral triangle alerts
the user to the presence of uninsulated "dangerous voltage" within the
enclosure of the product that may be of sufficient magnitude to constitute a
risk of electric shock to the person.
Caution
The exclamation point in a yellow equilateral triangle is a Caution. Failure to
take or avoid a specified action could result in loss of data or damage to
equipment and may contain important operating and maintenance servicing
information.
FCC Compliance Statement
Information to the User: This equipment has been tested and found to comply with the limits for a Class B digital
device. Pursuant to Part 15 of the FCC Rules, these limits are designed to provide reasonable protection against
harmful interference in a residential installation. This equipment generates, uses, and can radiate radio frequency
energy and, if not installed and used in accordance with the instruction manual, may cause harmful interference to
radio communications. However, there is no guarantee that interference will not occur in a particular installation.
If this equipment does cause harmful interference to radio or television reception, which can be determined by turning
the equipment off and on, the user is encouraged to try to correct the interference. For example, try orienting or
relocating the receiving antenna, increasing the separation between the equipment and receiver, or connecting the
equipment to an outlet on a different circuit.
Document 800-02026 Rev A
08/08
3
ACUIX Rugged Housing and Dome Installation Guide
Changes or modifications not expressly approved by the party responsible for compliance
could void the user’s authority to operate the equipment.
Users of the product are responsible for checking and complying with all federal, state and
local laws and statutes concerning the monitoring and recording of video and audio signals.
Honeywell Video Systems shall not be held responsible for the use of this product in violation
of current laws and statutes.
Canadian Compliance Statement
This Class B digital apparatus complies with Canadian ICES-003.
Cet appareil numérique de la classe B est conforme à la norme NMB-003 du Canada.
Manufacturer’s Declaration of Conformance
North America
The equipment supplied with this guide conforms to UL60065, CAN/CSA C22.2 No. 60065:03.
Europe
The manufacturer declares that the equipment supplied with this guide is compliant with the essential protection
requirements of the EMC directive 2004/108/EC and the Low Voltage Directive LVD 2006/95/EC, conforming to the
requirements of standards EN 55022 for emissions, EN 50130-4 for immunity, and EN 60065 for Electrical Equipment
safety.
Australia
This Class B digital apparatus complies with Australian Communications Authority (ACA) C-Tick standards, supplier
number N219.
Warnings and Cautions
Read the following cautions and warnings prior to installation and use of this product.
Document 800-02026 Rev A
08/08
4
ACUIX Rugged Housing and Dome Installation Guide
All installations and servicing must be performed by qualified technical personnel and
must be in accordance with all national and local mechanical and electric codes.
To prevent injury, this apparatus must be securely attached to the wall/ceiling in
accordance with the installation instructions.
To prevent damage to the interface board, follow standard industry precautions for
electrostatic discharge sensitive devices.
Consider using a UPS source to ensure satisfactory performance.
Using replacement parts or accessories other than the original manufacturers may invalidate the
warranty.
CAUTION
RISK OF ELECTRIC SHOCK
DO NOT OPEN
CAUTION: TO REDUCE THE RISK OF ELECTRIC SHOCK,
DO NOT REMOVE COVER (OR BACK).
NO USER-SERVICEABLE PARTS INSIDE.
REFER SERVICING TO QUALIFIED SERVICE PERSONNEL.
Important Safety Instructions
BEFORE OPERATING OR INSTALLING THE UNIT, READ AND FOLLOW ALL INSTRUCTIONS.
AFTER INSTALLATION, retain the safety and operating instructions for future reference
1.
HEED WARNINGS - Adhere to all warnings on the unit and in the operating instructions.
2.
INSTALLATION
•
•
•
•
Install in accordance with the manufacturer’s instructions.
Installation and servicing should be performed only by qualified and experienced technicians to conform to
all local codes and to maintain your warranty.
Do not install the unit in an extremely hot or humid location, or in a place subject to dust or mechanical
vibration. The unit is not designed to be waterproof. Exposure to rain or water may damage the unit.
Any wall or ceiling mounting of the product should follow the manufacturer’s instructions and use a
mounting kit approved or recommended by the manufacturer.
3.
POWER SOURCES - This product should be operated only from the type of power source indicated on the
marking label. If you are not sure of the type of power supplied to your facility, consult your product dealer or
local power company.
4.
HEAT - Situate away from items that produce heat or are heat sources such as radiators, heat registers, stoves,
or other products (including amplifiers).
Document 800-02026 Rev A
08/08
5
ACUIX Rugged Housing and Dome Installation Guide
5.
MOUNTING SYSTEM - Use only with a mounting system recommended by the manufacturer, or sold with the
product.
6.
ATTACHMENTS - Do not use attachments not recommended by the product manufacturer as they may result in
the risk of fire, electric shock, or injury to persons.
7.
ACCESSORIES - Only use accessories specified by the manufacturer.
8.
CLEANING - Do not use liquid cleaners or aerosol cleaners. Use a damp cloth for cleaning.
9.
SERVICING - Do not attempt to service this unit yourself as opening or removing covers may expose you to
dangerous voltage or other hazards. Refer all servicing to qualified service personnel.
10. REPLACEMENT PARTS - When replacement parts are required, be sure the service technician has used
replacement parts specified by the manufacturer or have the same characteristics as the original part.
Unauthorized substitutions may result in fire, electric shock or other hazards.
Warranty and Service
Subject to the terms and conditions listed on the Product Warranty Card, during the warranty period Honeywell will
repair or replace, at its sole option, free of charge, any defective products returned prepaid. In the U.S.A. and Canada,
call 1.800.796.2288.
In the event you have a problem with any Honeywell Video product, please call Customer Service for assistance or to
request a Return Merchandise Authorization (RMA) number. Be sure to have the model and serial number, and the
nature of the problem available for the technical service representative. Prior authorization must be obtained for all
returns, exchanges, or credits. Items shipped to Honeywell without a clearly identified Return Merchandise
Authorization (RMA) number may be refused.
WEEE (Waste Electrical and Electronic Equipment). Correct disposal of this product
(applicable in the European Union and other European countries with separate collection
systems). This product should be disposed of, at the end of its useful life, as per applicable
local laws, regulations, and procedures
Document 800-02026 Rev A
08/08
6
ACUIX Rugged Housing and Dome Installation Guide
Contents
About Using This Guide . . . . . . . . . . . . . . . . . . . . . . . . . . . . . .
Installation Overview . . . . . . . . . . . . . . . . . . . . . . . . . . .
Related Documents . . . . . . . . . . . . . . . . . . . . . . . . . . . .
Wiring and Power Cautions and Requirements . . . . . . . . . . . . . . . . . .
Wiring and Power Cautions. . . . . . . . . . . . . . . . . . . . . . . .
Recommended Wiring . . . . . . . . . . . . . . . . . . . . . . . . . .
Power Requirements . . . . . . . . . . . . . . . . . . . . . . . . . . .
Step 1: Set the Switches on the Housing Interface Board . . . . . . . . . . . . .
About RS485 Termination and Wiring on Switch SW1 . . . . . . . . . .
Setting the RS485 Control Data Termination on Switch SW1 . . . . . .
About Video Selection Switch Options on Switch SW2 . . . . . . . . .
Selecting Video Over Coaxial Cable or Unshielded Twisted Pair (UTP) .
Step 2: Set Switches on the Scan Assembly Circuit Board . . . . . . . . . . . .
Step 3: Mount the Rugged Housing Bracket . . . . . . . . . . . . . . . . . . .
Step 4: Mount the Housing to the Ceiling or Wall . . . . . . . . . . . . . . . . .
Step 5: Connect the Field and Terminal Block Wiring . . . . . . . . . . . . . . .
Step 6: Install the Scan Assembly into the Housing . . . . . . . . . . . . . . . .
Step 7: Install the Lower Dome onto the Housing . . . . . . . . . . . . . . . . .
Document 800-02026 Rev A
08/08
.
.
.
.
.
.
.
.
.
.
.
.
.
.
.
.
.
.
.
.
.
.
.
.
.
.
.
.
.
.
.
.
.
.
.
.
.
.
.
.
.
.
.
.
.
.
.
.
.
.
.
.
.
.
.
.
.
.
.
.
.
.
.
.
.
.
.
.
.
.
.
.
.
.
.
.
.
.
.
.
.
.
.
.
.
.
.
.
.
.
.
.
.
.
.
.
.
.
.
.
.
.
.
.
.
.
.
.
.
.
.
.
.
.
.
.
.
.
.
.
.
.
.
.
.
.
.
.
.
.
.
.
.
.
.
.
.
.
.
.
.
.
.
.
.
.
.
.
.
.
.
.
.
.
.
.
.
.
.
.
.
.
.
.
.
.
.
.
.
.
.
.
.
.
.
.
.
.
.
.
.
.
.
.
.
.
.
.
.
.
.
.
.
.
.
.
.
.
. 9
. 10
. 11
. 11
. 11
. 12
. 12
. 13
. 14
. 16
. 16
. 17
. 17
. 19
. 21
. 21
. 25
. 26
7
Figures and Tables
Figures
Figure 1-1
ACUIX Housing Interface Board Layout . . . . . . . . . . . . . . . . . . . . . . . . . . . 14
Figure 1-2
RS485 Daisy-Chain Wiring (up to 32 domes): Control at One End. . . . . . . . . . . . . . 15
Figure 1-3
RS485 Daisy-Chain Wiring (up to 32 domes): Control in the Middle . . . . . . . . . . . . . 15
Figure 1-4
Scan Assembly Circuit Board - DIP Switch Location . . . . . . . . . . . . . . . . . . . . . 18
Figure 1-5
Rugged Housing Bracket Hole Dimensions . . . . . . . . . . . . . . . . . . . . . . . . . 20
Figure 1-6
Rugged Housing Layout . . . . . . . . . . . . . . . . . . . . . . . . . . . . . . . . . . . 22
Figure 1-7
J4 Terminal Block Alarm Connection . . . . . . . . . . . . . . . . . . . . . . . . . . . . . 23
Figure 1-8
Rugged Housing Cable Access Hole . . . . . . . . . . . . . . . . . . . . . . . . . . . . . 24
Figure 1-9
Insert the Scan Assembly into the Housing. . . . . . . . . . . . . . . . . . . . . . . . . . 25
Figure 1-10
Rugged Housing - Lower Dome . . . . . . . . . . . . . . . . . . . . . . . . . . . . . . . 26
Tables
8
Table 1-1
Related Documents and External Links . . . . . . . . . . . . . . . . . . . . . . . . . . . . 11
Table 1-2
Recommended Video, Data, Power, Alarm and UTP Cabling . . . . . . . . . . . . . . . . . 12
Table 1-3
Wire Gauge Required for Maximum Distance to Dome . . . . . . . . . . . . . . . . . . . . 13
Table 1-4
Power Supplies . . . . . . . . . . . . . . . . . . . . . . . . . . . . . . . . . . . . . . . . . 13
Table 1-5
Recommended Lift Settings for Cable Lengths . . . . . . . . . . . . . . . . . . . . . . . . 17
Table 1-6
Recommended Gain Settings for Cable Lengths . . . . . . . . . . . . . . . . . . . . . . . 17
Table 1-7
DIP Switch SW5 ACUIX Protocol Settings . . . . . . . . . . . . . . . . . . . . . . . . . . . 18
Table 1-8
DIP Switch SW6 ACUIX Baud Rate Settings . . . . . . . . . . . . . . . . . . . . . . . . . . 18
Table 1-9
DIP Switch SW6 ACUIX Parity Settings. . . . . . . . . . . . . . . . . . . . . . . . . . . . . 19
Table 1-10
ACUIX Dome Addresses . . . . . . . . . . . . . . . . . . . . . . . . . . . . . . . . . . . . 19
Table 1-11
Terminal Strip Pins and Functions (J1, J4, J6 and J7) . . . . . . . . . . . . . . . . . . . . . 24
ACUIX Rugged Housing and Dome Installation Guide
ACUIX Rugged Housing and Dome
About Using This Guide
This guide provides instructions to install the ACUIX rugged dome.
ACUIX Terminology
Dome: the complete installed product
including the housing, mounting
bracket, lower dome, and the scan
assembly.
Scan Assembly: the combination of
firmware, electrical and mechanical
components including the camera. The
scan assembly is installed into the
housing and enclosed by a lower dome.
The scan assembly is a component of a
dome.
•
Camera: the particular model
camera purchased. The camera is
a component of the scan
assembly.
Housing: the in-ceiling, indoor or
outdoor pendant and surface mount
upper enclosure. Housing is a hardware
component of the dome.
•
The ACUIX Dome is comprised of:
Mounting bracket
Housing
Scan assembly
Trim ring
Lower dome
Mount: the hardware used to mount the housing to the applicable surface (for
example, a ceiling or wall). The mount is a hardware component used with a
specific type of housing.
Lower Dome: the clear or colored enclosure that covers the scan assembly and attaches
to the housing. With the rugged dome, it also includes the trim ring. The lower dome is a
hardware component of the dome.
Document 800-02026 Rev A
08/08
9
ACUIX Rugged Housing and Dome
Rugged Housing and Dome Model Numbers
For other model numbers and information on the Honeywell Video web site, see Related
Documents on page 11.
Housing
•
HDH00RA00: Rugged, white, analog
Lower Dome
•
•
HDB00R0CW: Rugged, clear lower dome, white trim ring
HDB00R0SW: Rugged, smoked lower dome, white trim ring
Installation Overview
For all outdoor installations, joints, bolts, and screws in the mount must be properly
sealed to prevent moisture from entering the housing.
A complete ACUIX system installation is a multi-step process and depends on individual
hardware configurations. Some of the information to complete the installation may be in
the manual associated with the hardware being installed. For related documentation and
the link to the Honeywell Video web site, see Related Documents on page 11.
A typical installation has the following steps. The order may be slightly different for each
type of installation.
1.
Set the RS485 termination and video selection switches on the housing interface
board, page 13. Also refer to both the ACUIX Indoor and Outdoor Housings
Installation Manual and ACUIX High Speed Dome User Guide for more information.
2.
Set the DIP switches for the protocol and address on the scan assembly circuit
board, page 17. Also refer to both the ACUIX Indoor and Outdoor Housings
Installation Manual and ACUIX High Speed Dome User Guide for more information.
3.
Mount the bracket to the ceiling, wall or other surface, page 19.
4.
Mount the housing, page 21.
5.
Connect the field and terminal block wiring, page 21.
6.
Install the scan assembly into the premounted housing, page 25.
7.
Install the lower dome to cover the scan assembly and enclose the housing,
page 26.
8.
Refer to the ACUIX High Speed Dome User Guide to complete these steps:
•
•
•
10
Test the installation and if required, troubleshoot.
If applicable, continue setting up and configuring privacy zones and preset
tours.
If required or applicable, proceed to user configurations based on other
hardware, for example, controllers and DVRs.
ACUIX Rugged Housing and Dome Installation Guide
Related Documents
Table 1-1
Related Documents and External Links
Document title or link
Part number
ACUIX High Speed User Guide
800-01023
ACUIX Indoor and Outdoor Housings Installation Manual
800-01760
ACUIX Quick Installation Guide
800-02219
Honeywell Video online literature
http://www.honeywellvideo.com/support/literature/index.html
Access PDF versions of data sheets, quick references, installation and user guides,
specifications, product notices and other useful material
Wiring and Power Cautions and Requirements
Wiring and Power Cautions
Document 800-02026 Rev A
08/08
•
To make good wire contact and ensure the wire does not short to adjacent
wires, fully insert the wire in the hole on the terminal strip.
•
A good earth ground must be connected at J1, pin 2. Surge suppression is not
provided if the unit is not connected to a good earth ground.
•
Ensure there are no bare wires touching or faulty operation may occur.
•
Ensure the cabling does not interfere with the rotation of the pan and tilt
assembly.
•
To maintain 24 VAC ± 10% at each dome, the proper wire size for the distance
and the number of domes must be determined.
•
For CE compliance, the power supply must be connected to a CE approved
240V UPS (uninterruptible power supply). See Table 1-4 for a list of the power
supplies which must be used to meet FCC and UL requirements.
11
ACUIX Rugged Housing and Dome
Recommended Wiring
Note
The terms shielded and unshielded are interchangable with screened and
unscreened, respectively.
Note
UTP is a general term for all cabling systems used for transmission of
unshielded data and providing connectivity on a network. A UTP cable can
contain multiple pairs of twisted cables. Commonly used for telephone
cabling and 10BaseT and 100BaseT networks.
See Table 1-2 for the recommended cable types for video, data, power, alarm, and UTP
including the maximum cable distances for proper operation of the dome. Where
applicable, use Category 5 (CAT5) cables or higher.
Table 1-2
Recommended Video, Data, Power, Alarm and UTP Cabling
Type
Recommended Cable
Maximum Distance
Video
Coaxial cable - RG59/U
1000 feet (305 meters)
Connector - BNC crimp on for RG59/U
Data
One shielded twisted pair, RS485
cable, can also be Cat5 or better
4000 feet (1219
meters)
Power
18 AWG 2-conductor, vinyl jacket
See gauge chart for
each unit
Alarm
Belden 8205
10,000 feet (348
meters)
Unshielded
Twisted Pair
(UTP) Video
Cat5 or better
1 twisted pair for data
1 twisted pair for video
1200 feet (366 meters)
Power Requirements
The outdoor ACUIX requires a 24 VAC power supply at 2.5A, measured at the dome.
Refer to Table 1-3 and Table 1-4 to determine the wire sizes and maximum distances for
one power source for one ACUIX and the required power supplies for CE compliance.
12
ACUIX Rugged Housing and Dome Installation Guide
Table 1-3
Wire Gauge Required for Maximum Distance to Dome
AWG
24 VAC Dome plus Heater & Blower (2.5A)
22
30 feet (9.1 meters)
20
47 feet (14.3 meters)
18
75 feet (22.9 meters)
16
120 feet (36.6 meters)
14
190 feet (58 meters)
12
302 feet (92 meters)
Table 1-4
Power Supplies
Model Number
Description
HPTV2416CB
16 output, 24 VAC, 8 A, SmartFused
HPTV2408CB
8 output, 24 VAC, 4 A, SmartFused
HPTV2404CB
4 output, 24 VAC, 4 A, SmartFused
HPTV2401WPZ
Single output, video, data and power protection, NEMA 4
enclosure
HPTV2401Z
Single output, video, data and power protection, indoor
enclosure
HPTVWPPMK2
2" pole mounting kit for HPTV2401WPZ
HPTVWPPMK3
3" pole mounting kit for HPTV2401WPZ
HPTVWPPMK4
4" pole mounting kit for HPTV2401WPZ
Step 1: Set the Switches on the Housing Interface Board
To prevent damage to the interface board, follow standard industry precautions
for electrostatic discharge sensitive devices.
Document 800-02026 Rev A
08/08
13
ACUIX Rugged Housing and Dome
Note
Also refer to both the ACUIX Indoor and Outdoor Housings Installation Manual
and ACUIX High Speed Dome User Guide for information.
Figure 1-1
ACUIX Housing Interface Board Layout
U3
SW2
UTP/coaxial selection
SW2 shown ON (with
UTP enabled)
J3
BNC connector
J7
Wiring access hole
J4
J1
If using alarm inputs,
also removable
terminal blocks on J4
Fan
Removable
terminal blocks on
J1 and J6
J6
SW1
RS485 termination switch
SW1 shown in ON
position (terminated)
About RS485 Termination and Wiring on Switch SW1
For the RS485 daisy chain wiring, the data cable shield should be carried through all
units by connecting the cable shields together. Connect the cable shield at the control
unit.
14
ACUIX Rugged Housing and Dome Installation Guide
RS485 communication is terminated using switch SW1, located near terminal strip J1, pin
3 on the housing interface board. See Figure 1-1.
•
•
•
One pair of shielded twisted pair RS485 wire or one pair of unshielded twisted pair
wire can be used for RS485 data.
Two domes can be home run connected to each control output with both domes
terminated. This is a daisy chain with two domes and on control output in the
middle.
The data lines can daisy-chain wired (see Figure 1-2 and Figure 1-3) from the
control output. Daisy-chain wiring consists of up to 32 domes per data run with the
control output at one end of the run or in the middle of the run.
• If the control output is at the end of the data run, the last dome on the end of the
data run must be terminated and all intermediate domes unterminated.
• If the control output is in the middle of the data run, the last dome on both ends
must be terminated, and all intermediate domes unterminated.
Note
Each RS485 port on the HDCC8TP must be treated individually as if each one
is on a separate piece of equipment.
Figure 1-2
RS485 Daisy-Chain Wiring (up to 32 domes): Control at One End
SW5 OFF
SW5 ON
SW5 OFF
Domes 3 to 31
Not terminated
Control equipment
Dome 1
Not terminated
Figure 1-3
SW5 ON
Dome 2
Not terminated
Last dome
Terminated
RS485 Daisy-Chain Wiring (up to 32 domes): Control in the Middle
SW5 OFF
Domes 3 to 31
Not terminated
SW5 ON
Control equipment
Dome 1
Terminated
Document 800-02026 Rev A
08/08
Dome 2
Not terminated
Last dome
Terminated
15
ACUIX Rugged Housing and Dome
Setting the RS485 Control Data Termination on Switch SW1
1.
Locate SW1 on the housing interface board. See Figure 1-1.
2.
Carefully place the switch in the required termination position:
•
•
Not terminated (default): Switch away from ON
Terminated in 120 Ohms: Switch ON
About Video Selection Switch Options on Switch SW2
Control Over Coaxial Cable
For control over coaxial cable, the ACUIX must be set to VCL Video Telemetry (control
over coax) protocol and must be controlled using an HMAX082 or HMAX162 control unit
with HKJMMTP joystick controller.
The control equipment adds the data signal to the video coaxial cable. In this case, there
are no connections made at Data+ and Data– on the terminal strip J1. See Figure 1-1 for
the location on the housing interface board.
Video Over Coaxial Cable
The video must be terminated in 75 Ohms at the last video device. If the video is not
terminated or is double terminated, the resulting picture is poor and ghosting is
displayed.
Video Over Unshielded Twisted Pair (UTP)
The video on the UTP wire cannot be daisy-chained.
If the UTP option is selected, the video is run on UTP wire and the BNC connector is not
used. The video is connected at terminal strip J7, pins 1 and 2.See Figure 1-1 for the
location on the housing interface board. A UTP-compatible receiver is required at the
monitor to view and/or record the images.
16
ACUIX Rugged Housing and Dome Installation Guide
The video lift and gain settings can be adjusted through the on-screen setup menus to
compensate for cable distances over UTP wiring. See Table 1-5 and Table 1-6 for lift and
gain settings for cable lengths. Refer to the ACUIX High Speed User Manual for details
about making the changes using the OSD.
Table 1-5
Recommended Lift Settings for Cable Lengths
Cable Length
Lift Setting
1200+ ft (365+ m)
100
900 ft (275 m)
80
600 ft (183 m)
40
300 ft (91 m)
25
Table 1-6
Recommended Gain Settings for Cable Lengths
Cable Length
Gain Setting
1200+ ft (365+ m)
55
900 ft (275 m)
42
600 ft (183 m)
35
300 ft (91 m)
25
Selecting Video Over Coaxial Cable or Unshielded Twisted Pair (UTP)
1.
Locate SW2 on the housing interface board. See Figure 1-1.
2.
Carefully place the switch in the required video selection position:
•
•
UTP video balun disabled, to be used with normal 75 Ohm coax video
operation (default): Switch away from ON.
UTP video balun enabled, to be used with 120 Ohm UTP video operation:
Switch ON.
Step 2: Set Switches on the Scan Assembly Circuit Board
Note
•
Document 800-02026 Rev A
08/08
The default settings are MAXPRO-mode protocol, 9600 baud, even parity.
Set the DIP switches on the scan assembly printed circuit board as required for your
system configuration. See Figure 1-4 and refer to the tables below. For specific
details about each switch, refer to the ACUIX High Speed Dome User Guide.
17
ACUIX Rugged Housing and Dome
Figure 1-4
Scan Assembly Circuit Board - DIP Switch Location
DIP
switches
Leave SW5-8 ON. Setting the DIP switch SW5-8 to OFF enables a user to change the
address, protocol, baud rate and parity from the OSD menu (which is not recommended
with most installations).
Table 1-7
DIP Switch SW5 ACUIX Protocol Settings
Switch Position
Protocol Name
1
2
3
4
5
6
7
8
IntelliBus™
OFF
OFF
OFF
OFF
OFF
OFF
OFF
ON
Diamond
ON
OFF
OFF
OFF
OFF
OFF
OFF
ON
MAXPRO Mode
OFF
ON
OFF
OFF
OFF
OFF
OFF
ON
VCL - RS485
ON
ON
OFF
OFF
OFF
OFF
OFF
ON
OFF
ON
OFF
OFF
OFF
OFF
ON
VCL Video Telemetry OFF
(Control over Coax)
Pelco P
ON
OFF
ON
OFF
OFF
OFF
OFF
ON
Pelco D
OFF
ON
ON
OFF
OFF
OFF
OFF
ON
Table 1-8
DIP Switch SW6 ACUIX Baud Rate Settings
Switch Position
Baud Rate
18
1
2
3
4
600
OFF
OFF
OFF
OFF
1200
ON
OFF
OFF
OFF
2400
OFF
ON
OFF
OFF
4800
ON
ON
OFF
OFF
9600
OFF
OFF
ON
OFF
ACUIX Rugged Housing and Dome Installation Guide
Table 1-8
DIP Switch SW6 ACUIX Baud Rate Settings
Switch Position
Baud Rate
1
2
3
4
19200
ON
OFF
ON
OFF
38400
OFF
ON
ON
OFF
57600
ON
ON
ON
OFF
115200
OFF
OFF
OFF
ON
Table 1-9
DIP Switch SW6 ACUIX Parity Settings
Switch Position
Parity
5
6
None
OFF
OFF
Even
ON
OFF
Odd
OFF
ON
Table 1-10
ACUIX Dome Addresses
Address
Value
SW1
Units digit
SW2
Tens digit
SW3
Hundreds digit
SW4
Thousands digit
Step 3: Mount the Rugged Housing Bracket
Note
Document 800-02026 Rev A
08/08
The mounting bracket can be at any angle from 0° to 90° with respect to the
housing. The housing must be positioned horizontally and parallel to the
floor.
19
ACUIX Rugged Housing and Dome
1.
Select the location for the housing.
•
•
•
Each ACUIX requires a 24 VAC ± 10% power source measured at the housing.
Ensure a 24 VAC @ 2.5A power source is available.
For maximum wiring distances to the dome, see Table 1-3 on page 13.
2.
Prepare the mounting surface by pre-drilling four holes to attach the mounting
bracket to the ceiling or wall. See Figure 1-5 for hole dimensions.
3.
Secure a safety cable
to a building support
structure. Attach the
safety cable (from the
building support
structure) to the
mounting bracket by:
a.
Mounting bracket
Routing the safety
around the
mounting bracket,
then
One of two bolts that
attach bracket to housing
b.
Through a hole in
the side of the
mounting bracket
and then
c.
Through the other side of the looping sleeve, and
d.
Crimp the looping sleeve to secure the safety cable.
Figure 1-5
Rugged Housing Bracket Hole Dimensions
3.9 in (100 mm)
3.5 in (89 mm)
2.6 in (67 mm)
20
2.6 in (67 mm)
3.5 in (89 mm)
4.1 in (105 mm)
6.5 in (165 mm)
0.21 in (5.3 mm)
diameter
0.31 in (8 mm)
diameter
ACUIX Rugged Housing and Dome Installation Guide
Step 4: Mount the Housing to the Ceiling or Wall
Note
With outdoor installations or a wet indoor area, the conduit and conduit fitting
must be water tight.
1.
Install a 0.75"(19 mm) conduit fitting in the hole on the housing.
2.
Place the supplied gasket between the hole in the housing and the conduit fitting to
prevent leakage. Tighten the conduit nut.
3.
Secure the housing to the mounting bracket, previously installed to a ceiling
support structure or wall support structure using the appropriate hardware for the
mounting surface.
Note
4.
The mounting bracket can be at any angle from 0° to 90° with respect to the
housing. The housing must be positioned horizontally and parallel to the
floor.
To change the orientation of the bracket:
a.
Loosen and remove the two bolts that secure the bracket to the housing.
b.
Slide the bracket along the slot to remove it from the housing.
Step 5: Connect the Field and Terminal Block Wiring
The wiring installation must be performed by qualified technical personnel and
must be in accordance with all national and local mechanical and electrical
codes.
Document 800-02026 Rev A
08/08
21
ACUIX Rugged Housing and Dome
Figure 1-6
Rugged Housing Layout
Housing
Interface board with
SW1 and SW2
switches and
terminal strips
Housing wiring
access hole
Note
The field wiring is connected to the housing interface board (see Figure 1-6).
Note
When connecting field wiring, connect to either J3 or J7, not to both at the
same time.
1.
a.
Through the field wiring access hole in the housing, and
b.
Through the access hole in the interface board installed in the housing.
2.
Remove the plug-in terminal blocks on terminal strips J1 and J6 (see Figure 1-1).
3.
To set up the alarm input terminal block:
4.
22
Route the field wiring (data, power, video, alarm):
a.
Remove the plug-in terminal block on terminal strip J4. (see Figure 1-1 and
Figure 1-7).
b.
Connect a twisted-pair cable from each peripheral alarm contact to each input
at the alarm number terminal and the alarm common terminal on terminal strip
J4. The alarm is a dry contact between the alarm terminal and the common
terminal. The alarms can be configured as normally open or normally closed.
c.
Note that the common terminals are doubled up, as shown in Figure 1-7. Refer
to the ACUIX User Manual to configure the alarms.
Loosen the screws on the terminal strip.
ACUIX Rugged Housing and Dome Installation Guide
Note
The alarm input is a dry contact between the alarm input and common and
that they can be configured as NO of NC.
Figure 1-7
J4 Terminal Block Alarm Connection
Alarm 2
Alarm 1
5.
Alarm 3
Alarm 4
Install the 24 VAC power wires, data wires, video wires (if UTP is selected) and alarm
wires on the correct positions on terminal strips J1, J4, J6, and J7. See Table 1-11
and Figure 1-1.
Note
Both terminal strips J1 and J6 accept 26–12 AWG wire. If larger or smaller
field-run wire is required, a 26–12 AWG wire must be spliced onto the field
wire for insertion into the terminal strip.
Note
You can connect the data cable shield to Pin 3 (SH) on terminal strip J1. Use
this connection for looping the shield through to the next dome in the daisy
chain. It is not connected to the analog interface board.
6.
Tighten the screw on the terminal strip to secure the wire.
7.
Plug the terminal strips into the respective connectors on the interface board. See
Figure 1-1.
8.
If you are using a coaxial cable for video, connect the field-run coaxial cable to J3 on
the interface board. See Figure 1-1.
9.
If applicable, secure the wires from the terminal strip and BNC connector together
with a wire tire to ensure the cabling does not interfere with the rotation of the pan
and tilt assembly. See Figure 1-1.
10. Feed extra wire and cable up through the hole in the housing and route it so that it
doesn't interfere with the pan and tilt unit when it is inserted. See Figure 1-1 and
Figure 1-8.
Document 800-02026 Rev A
08/08
23
ACUIX Rugged Housing and Dome
Table 1-11
Terminal Strip Pins and Functions (J1, J4, J6 and J7)
Terminal Strip J1
Function
Pin 1
24 VAC (AC)
Pin 2
Earth ground
Pin 3
24 VAC (AC)
Terminal Strip J4
Function
Pin 1
Alarm 1 (A1)
Pin 2
Alarm common (CM)
Pin 3
Alarm 2 (A2)
Pin 4
Alarm 3 (A3)
Pin 5
Alarm common (CM)
Pin 6
Alarm 4 (A4)
Terminal Strip J6
Function
Pin 1
Data + (D+)
Pin 2
Data – (D–)
Pin 3
Shield (SH)
Terminal Strip J7
Function
Pin 1
Video + (V+) (UTP wiring)
Pin 2
Video – (V–) (UTP wiring)
Figure 1-8
Rugged Housing Cable Access Hole
Mounting bracket
Pull wiring through
access hole
24
ACUIX Rugged Housing and Dome Installation Guide
Step 6: Install the Scan Assembly into the Housing
1.
Carefully remove the plastic lens cap from the scan assembly. Do not touch the
lens.
2.
Rotate and line up the scan assembly yellow label to the mounted housing yellow
label. See Figure 1-9.
3.
Gently push the scan assembly into the housing until the two guides on the scan
assembly lock/snap into the holes on the housing guides.
4.
Gently pull down on the assembly to ensure it has properly latched into place.
Figure 1-9
Insert the Scan Assembly into the Housing
Housing locking guide with holes
Up
Scan assembly locking guides
Housing locking
guide with holes
Rotate scan assembly yellow label to
align with the housing yellow label
Document 800-02026 Rev A
08/08
25
ACUIX Rugged Housing and Dome
Step 7: Install the Lower Dome onto the Housing
1.
Align the four screw holes on the lower dome with the four holes on the housing.
2.
Press the lower dome into the housing and turn the security screws using the
special hex key to secure to the housing.
Figure 1-10
Rugged Housing - Lower Dome
Security
screws
Trim ring
26
Honeywell Video Systems (Head Office)
2700 Blankenbaker Pkwy, Suite 150
Louisville, KY 40299, USA
www.honeywellvideo.com
℡ +1.800.796.2288
Honeywell Security UK
Aston Fields Road, Whitehouse Ind Est
Runcorn, Cheshire, WA7 3DL, UK
www.honeywell.com/security/uk
℡ +44.1928.756.999
Honeywell Security Australia Pty Ltd.
Unit 5, Riverside Center, 24-28 River Road West
Parramatta, NSW 2150, Australia
www.honeywellsecurity.com.au
℡ +61.2.8837.9300
Honeywell Video Systems Northern Europe
Netwerk 121
1446 WV Purmerend, The Netherlands
www.honeywell.com/security/nl
℡ +31.299.410.200
Honeywell Security Asia Pacific
33/F Tower A, City Center, 100 Zun Yi Road
Shanghai 200051, China
www.asia.security.honeywell.com
℡ +86 21.5257.4568
Honeywell Security Deutschland
Johannes-Mauthe-Straße 14
D-72458 Albstadt, Germany
www.honeywell.com/security/de
℡ +49.74 31.8 01.0
Honeywell Security Asia
Flat A, 16/F, CDW Building, 388 Castle Peak Road
Tsuen Wan, N.T., Hong Kong
www.asia.security.honeywell.com
℡ +852.2405.2323
Honeywell Security France
Parc Gutenberg, 8, Voie La Cardon
91120, Palaiseau, France
www.honeywell.com/security/fr
℡ +33.01.64.53.80.40
Honeywell Security South Africa
Honeywell House, Bekker Street
Truer Close, Waterfall Park
Midrand 1685, South Africa
www.honeywell.com/security/za
℡ +27.11.695.8000
Honeywell Security Italia SpA
Via della Resistenza 53/59
20090 Buccinasco
Milan, Italy
www.honeywell.com/security/it
℡ +39.02.4888.051
Honeywell Security Middle East
Honeywell Middle East FZE
Post Office Box 18530
LOB Building 08, Office 199
Jebel Ali, Dubai U.A.E.
www.honeywell.com/security/me
℡ +971.04.881.5506
Honeywell Security España
Mijancas 1. 3a planta
P. Ind. Las Mercedes
28022 Madrid, Spain
www.honeywell.com/security/es
℡ +34.902.667.800
www.honeywellvideo.com
+1.800.796.CCTV (North America only)
[email protected]
Document 800-02026 – Rev A – 08/08
© 2008 Honeywell International Inc. All rights reserved. No part of this publication may be reproduced by any means without written
permission from Honeywell Video Systems. The information in this publication is believed to be accurate in all respects. However,
Honeywell Video Systems cannot assume responsibility for any consequences resulting from the use thereof. The information contained
herein is subject to change without notice. Revisions or new editions to this publication may be issued to incorporate such changes.