1
LinuxFocus article number 368
http://linuxfocus.org
Professional Tex(t)Authoring with LyX
Abstract:
by Gerrit Renker
<gerrit.renker(at)gmx.de>
About the author:
Graduated in 2001 with a
degree in computer
networking. Various jobs
before and, if open source is
not here to stay, various jobs
thereafter.
This article is written for people who have a lot of text editing/authoring to
do and are primarily interested in getting a text edited in a fast, reliable,
well−formatted way without having to put in (a) lots of wordprocessor skills
or (b) guru−level LateX knowledge. The main tool that this article describes
is LyX, an extremely robust and powerful LATEX frontend based on a
client−server architecture.
The article is not so much an application overview, but rather concentrates
on the writing process and summarizes experiences of using LyX on a
day−to−day basis for five years. Other issues, such as versioning or which
graphics to use, are also discussed, as well as additional tools that are helpful
for document preparation.
_________________ _________________ _________________
Motivation
Imagine you have to hand in two texts until some close date in the very near future, a report describing your
recent work progress and a small user manual for a piece of software which has just matured. There won't be
extra credits for using cute layouts and flashy special fonts, in fact you are not worried about such issues. All
you want is to get over with writing the text, once it is done one could maybe jazz up the layout a bit, but that
is not of primary importance.
There are usually two choices, either one uses a GUI−based word processor or resorts to source − level LATEX
editing. The first has the advantage of direct control on the layout process − in fact it is more of a layout
program than an editing tool, which lead to the acronym WYSIWYG (what you see is what you get). The
second is very robust software with a very high print quality. It however follows a different paradigm,
1/10
WYSIS (what you see is source) and has some learning curve, especially for newcomers. As little as you
would care about fancy headings when writing a text, you are not likely to be enthusiastic about having to dig
into source code when the primary focus is the text itself, not its embellishments or markup. I was precisely in
this situation four years ago, I didn't know any LATEX, got production−ready within half a day and had a big
document with lots of illustrations and references ready quite soon afterwards, all thanks to LyX.
LyX is exactly in the middle of the above two paradigms, it is called WYSIWYM (what you see is what you
mean), quoting [1(see references)]:
"LyX is a program that provides a modern approach to writing documents with a computer by using a
markup language paradigm, an approach that breaks with the obsolete tradition of the 'typewriter concept.'
It is designed for authors who want professional output quickly with a minimum of effort without
becoming specialists in typesetting. The job of typesetting is done mostly by the computer, not the author;
with LyX, the author can concentrate on the contents of her writing."
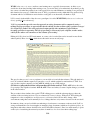
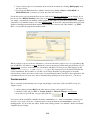
Editing in LyX is done in a GUI environment, no source code is needed (but can be inserted in extra blocks
when required). Have a look here which shows this article text at an early stage.
The gray box that you see is a cross−reference, you can click on it and edit the reference. This edit window is
not to be confused with the output, LyX generates a text file which can then be translated into LATEX. You
can view the complete output by pressing ALT−d, which pops up a DVI window
(DVI=device−independent−format, an intermediate file format used by LATEX), ALT−t does the same
for postscript. The capitalised variants ALT−D, ALT−T are used when you want to update changes you made
in the editor window.
The procedure is thus similar to the typical LATEX−editing process, with the advantage that you have the
structure of the text sitting in front of you, not cluttered by source code tags. With pure LATEX−editing the
temptation is often, comparable to word processors, to increase a little font size here, change a little
environment setting there and in summary do lots of things that have only remote relevance for the text itself.
In summary, when you need a reliable text authoring tool and want to concentrate on the text itself, LyX is a
strong recommendation. Its clear strengths are managing large documents (which can be split into pieces), its
integration with other software detailed below and its incredible robustness. Since less main memory is spent
on the cycle of actualising the current layout, there is much less of a slow−down when editing large
2/10
documents. I have heard about word processor programs crashing under large files (and producing irreparable
binary garbage). LyX is text−based and when forcefully aborted (e.g. power−down) leaves an emergency file;
even with the most bizarre settings and huge text lengths I could not witness a decrease in performance. I have
been using it during the last five years almost on a day−to−day basis and out of nearly 800 pages of authored
text, some huge, not lost more than half a paragraph. As a bonus, LATEX code can be sourced into LyX via the
reLyX(1) script.
If you really would prefer to do source−level editing of LATEX, a look at kile may be of interest, it is a KDE
editor especially for LATEX with additional features.
Getting started
This article differs from the earlier one in March 1998 (article 31) in that it provides less general introduction,
instead I will just point where to get the information and summarize how to get there. Instead of doing a
graphical walk−through here (as initially planned), if you have not seen LyX before, I highly recommend to
do the following tour through the editing process, it also describes how to get your hand on the first document
in a very nice manner: http://www.lyx.org/LGT/
Prerequisites
The first thing to do is to check whether LATEX is already fully installed on your system. In RedHat/Fedora
systems this is quite conveniently possible via the graphical package installer which has a single tick−box for
the entire LATEX distribution. You can manually check via
rpm −qa | grep tex
which should list the following packages (assuming you have the TeTEX implementation of LaTeX):
• tetex and tetex−latex (base packages)
• tetex−afm (a PostScript font converter for TEX)
• tetex−xdvi (for previewing .dvi files)
• tetex−doc
The last is very useful if you want to check out different packages, this documentation resides in
/usr/share/texmf/doc/index.html. As further prerequisites, check for aiksaurus (a thesaurus to
be used while editing) and, more importantly, for the spell−checker aspell. Aspell also has packages for
several non−English languages. In LyX this spell−checker is activated via F7 (screenshot).
Installation
LyX comes in two flavours now, the older x−forms variant (which at times was a little tricky to build) and the
modern Qt variant which I'd say is preferable. RPMs for both variants are available, under debian the
installation is as easy as
apt−get install
lyx
lyx−common
lyx−qt
## or lyx−xforms if you prefer
If you would like to build the sources yourself, these are at www.lyx.org. You might find the following build
script (build−lyx.sh) useful.LyX is a small coding masterpiece, everything is written in C++ and compiled
3/10
from scratch and the build process takes longer than building a kernel.
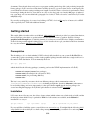
Configuration
LyX needs to check your installation first. Upon first editing, run Edit −> Reconfigure, which updates the
internal database. When changing anything to your LATEX installation, this step should also be re−run. The
results of this step can conveniently be browsed under Help −> LATEX Configuration which also tells you
where to get potentially missing packages. It pays to enable autosave under Edit −> Preferences, this is an
inexpensive and very useful option to take. The default viewer for output is xdvi, it is highly recommendable
to set this to kdvi, as shown in this screenshot; this will give you an easy−to−use viewer. Changed settings
are not applied until Modify is pressed.
3 Editing and producing output
Writing costs (i) inspiration (creativity) and (ii) transpiration (manual work). I found that it really pays off to
put in the effort and learn 10−finger ''touch''−typing. There are cheap books out with some exercises and after
a couple of weeks one is able to write without all these terrible two−finger search system typos. To make hard
work a fun game, check out ktouch which is made exactly for learning touch−typing. It starts, like play
station, with an easy level and you can go on to higher and higher levels. It is really nicely made, ships with
the kdeedu package or can be found on http://ktouch.sourceforge.net/.
For the inspirational part − getting a structure together before starting with th e work, there is a very helpful
article about text outliners and mind−mapping tools in [2(see references)].
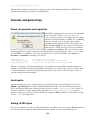
Basic editing
There is not much to say here since the interface is fairly self−explanatory, if you get stuck check out the
graphical tour mentioned above. Let's say you have some preliminary notes which sit in some textfile created
on your favourite hand−held. This can be imported via File−>Import (either line by line or as block) and so
there is a rough structure. This can now be converted into text segments, the listbox on the toolbar presents the
options allowed by the chosen style file. Usually one can set standard via ALT−p s and headings via ALT−p
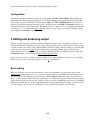
n where n is a number from 1..6, the smaller the number the bigger the heading. For things you don't want to
see in the output, you can use notes via ALT−i n, shown in the following figure as the blue area.
4/10
Once the text is ready you can use View and check it or export it (Latex, PDF, Ascii, HTML (see notes
further down), ...) via File−>Export.
References
LATEX fun starts with the excessive choices of section, subsection, page, image, table crossreferences plus the
external bibliographical data. To be able to reference something in the text, first a label needs to be created
via ALT−i l. Any text can be used for labeling, but spaces within are to be avoided. Having done that, this
label can be back (and forward) referenced anywhere in the text by simply inserting it via ALT−i r (for
reference), which gives you a choice of referencing modes. For quoting URLs within the text, use ALT−i u
instead.
With regard to bibliographical references there are two choices:
5/10
1. Create a bibliography section manually at the end of the document by selecting 'Bibliography' from
the style selector.
2. Use an external BiBteX database, which is referenced by putting in Insert −> Lists&TOC −>
BibTEX Reference (as many as you want, put at the end of the text).
For the first option you can check the first version of this article here (lyx_article.lyx) for an example. If you
have never seen a BibTeX database before, here is an example file (example_bibtex_database.bib). You see,
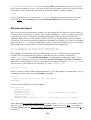
it is simply a standardised text−markup of bibliographical data. And it is not at all necessary to mess with that,
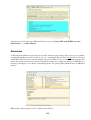
since there is a wonderful database tool called pybliographer. It allows the complete management of all such
databases including incremental multi−attribute text search and conversion into other formats, e.g. HTML.
Here is a screenshot showing an incremental search.
When you have set up one of the two alternatives, you can use the bibliographical references anywhere in the
text via ALT−i c (for citation), see here. But there is an even smarter way which shows the flexibility of LyX.
Pybliographer, as well as some other tools, can interface with the LyX server process. This happens via the
$HOME/.lyx/lyxpipe.in (and lyxpipe.out) pipes. The server protocol is described in detail in the
LyX documentation, here it suffices to say that you can simply hit 'Cite' on pybliographer to insert the
reference that you have just rediscovered as part of an incremental database search. For other applications, this
communication protocol opens ways such as automatically generating text from scripts and ... you choose.
Version control
This is especially useful when the text is longer and changed several times. LyX comes RCS−ready, it is
simple to set up.
1. create a directory named RCS in the same directory where you keep the LyX source
2. edit the LyX file and go to File −> Version Control −> Check In Changes (text dialogue)
3. next time you open the file, you get a dialog like this
You can use all the usual RCS commands from the commandline (man rcs or rcsintro). I usually just
use rcs −l to create a lock, co −l when I want to lock upon checkout and rcsclean to remove all
unchanged files. If you are the only author, disable strict locking via rcs −U <file>, which considerably
simplifies the proceedings.
6/10
Math stuff
If you need to edit many formulae then LyX/LATEX provides one of the best facilities for this purpose. To
check out math mode, enter it via ALT−m m (yes twice) and then you can pick any symbol from
Insert−>Math−>Math Panel. LyX recognizes when you type in LaTeX math commands − try for instance
ALT−m m and then the sequence \mathcal P then space then \frac (n−1) TAB 2.
Graphics
A variety of graphics formats can be used. Encapsulated postscript (.eps) is often the best option when
producing PS output, but .png, .jpg and .gif also work. You can put in images directly via ALT−i g
(graphics), but it is better for the layouting to use so−called floats, which are just a wrapper and allow several
placement options as well as a descriptive caption text. To produce a float, use ALT−i a and then 'Figure';
when right−clicking the outer frame you can force the position (to some extent, this is LaTeX, not a layouting
program).
Document settings and layout formats
I haven't spoken much about the layout format of the document, which is set via Layout−>Document.
Depending on what LyX has found during its test−run, there is normally a standard selection of formats such
as article, report, letter, book etc. By choosing one of these, the layout of the entire document is changed. This
directly affects the list of styles available on the left of the menu. Internally, these choices are LyX−layout
wrappers around the LaTeX document classes. Further below, I give a small example how to hack such a
layout (which is not too hard). But for the most purposes, one of the given formats should more than do, as
these can be complemented with additional, selectable features.
An interesting option are the use of templates, in particular the letter template. Templates are just text files
which can be modified, e.g. for your own letter format. Try File −> New from Template. This opens the
template view in /usr/share/lyx/templates. Very nice is for instance the g−brief (German
''Geschäftsbrief'' = business letter) which works for those envelopes which have a little transparent address
window on the left. The bright−blue text in a template is invisible for the output and just hints where to fill in
the text.
Generating output
LyX hides the internals of LATEX compilation away from you, it creates a temporary directory in /tmp which
you can look at:
ls −l /tmp/lyx_tmpdir*/lyx_tmpbuf[0−9]/*
This is useful to know when exporting to HTML. In all other formats (PS, PDF, Ascii, LATEX, DVI), LyX
simply creates the desired file in your current directory. With HTML, it copies the HTML page, but not the
images and style−files that come with it and are generated by latex2html − these can simply be copied
from the temporary compilation directory. Lastly, to produce output you don't even need the GUI, lyx(1) has a
number of commandline options, for instance to generate a PDF file from a given source file, simply type
7/10
lyx −e pdf my_lyx_source_file.lyx
which produces a fresh one. I use this for a larger repository of documentations where PS and PDF files are
generated automatically by a script from LyX input files.
Internals and general tips
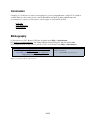
Errors, the preamble and hyperlinks
If the LaTeX compilation fails, an error box is produced like
the one on the left. Usually, context−sensitive error
location is quite good and you can jump to the error, which
is marked in your document by a red Error box, via ALT−g.
If that does not help, try to look at the stderror output
(assuming you have started LyX from some xterm) or try
View −> Latex Logfile. In some occasions you may be in
trouble because a certain document style was not included
(e.g. 'package xyz not found'). This can easily be fixed by
adding it in the Latex preamble, which serves the same purpose for Latex documents as the <head> section
does for HTML, i.e. declaration of style files, inclusions etc. To access the Preamble, select Layout −>
Document −> Preamble. For instance, you can add
\usepackage{url}
\usepackage{ae,aecompl}
\usepackage{hyperref}
%% for URLs (also in Bibtex)
%% generates nicer PDF output (better fonts)
%% best at the end, generates PDF with hyperlinks
The last one, hyperref, is well worth checking out. You probably know these PDF documents which have
clickable, colored links in them and a bookmarks section where you can choose the section you want to jump
to. Such documents are created by using the hyperref package. Just be sure to add it last in the list since it
overrides settings from other packages.
Useful paths
Apart from making emergency backups and auto−saving files, LyX also keeps a backup of every file in
$HOME/.lyx/backups. If you have accidentally deleted a LyX file, you can find the latest copy there.
This is also the place where user−defined style−files are kept ($HOME/.lyx/layouts). If you create one
or more style files for yourself, put them here rather than in /usr/share/lyx/layouts, since the
directory contents get erased on every new installation or update of RPMs. I found it a good habit to back up
$HOME/.lyx/ on a regular basis.
Adding LATEX styles
If you need to add new style−files for LyX (and LaTeX) to use, there is a two−way process. First the style file
needs to be placed in a directory where LaTeX can find it. Usually, you can use any subdirectory of
8/10
/usr/share/texmf/tex/latex/. To avoid that an RPM update accidentally clears this, it is a good
idea to create a subdirectory (e.g. my_style_files) and to back it up regularly. Once the new style file resides
in that directory, the LaTeX configuration needs to be updated, which is as simple as running
texhash
(as root). If you are curious, you can also try 'texconfig'. Required style files can in almost all cases be
found on CTAN. The second step involves to run Edit−>Reconfigure under LyX and then restart it.
Roll your own layout
Okay, this is the sixty second tutorial to defining your own document flavour. Since we are under Lunix, we
can exercise the classical virtues of software reuse to make something new. Suppose you are a professional
tourist and want to write a catalog entry about interesting holiday experiences. You would like to have
something which starts a new section with bold−face words like ''my exciting holiday experience number ...''.
LyX expects a text layout description file which tells it (a) which Latex packages to use (here we will simple
use the standard article package) and (b) what you want to support environment−wise in your document.
The first important bit are the top two second lines which should read something like:−
#% Do not delete the line below; configure depends on this
# \DeclareLaTeXClass[article]{article − about holiday stuff }
The argument in square brackets gives the LaTeX package(s) to use, you can insert several separated by
commata. The second argument tells LyX how to label this style; after you have saved the file in
$HOME/.lyx/layouts and run Edit−>Reconfigure, you will actually read the string ''article − about
holiday stuff'' (or whatever you choose to call it) under Layout −> Document −> Layout −> Document
Class. But we are not finished yet. First we simply import an existing layout called article.layout (no
paths necessary, LyX searches its layout directory or $HOME/.lyx/layouts)
Input article.layout
Next we construct a suitable LaTeX command which has to go into the preamble (document header). To put
something into the preamble we use the Preamble environment.
Preamble
\newtheorem{holiday}{My funniest holiday experience Nr. }
EndPreamble
Last we need to tell LyX how to use this command
Style My_Holiday
Margin First_Dynamic
LatexType Environment
LatexName holiday
AlignPossible Block, Left
LabelType Static
LabelString "Holiday Experience #. "
End
## this issues the Latex command
## this you will see in the document
After editing this file (a_modified_article.layout), store it in $HOME/.lyx/layouts, reconfigure, restart
and voilá − you now find an environment called ''My Holiday'' in the style selector. Here is an example
document which uses the new style (a_modified_article.layout) file. More information can be found in [3(see
references)].
9/10
Conclusion
Certainly, if you only have to write your shopping list or a two−paragraph memo, using LyX is somehow
overkill. But if you are looking at texts of more than 500 words where working with structure and
crossreferences is a must, you can expect a serious degree of work relief from LyX.
• LyX wiki
• LyX Mailing list
• Tips & Tricks
Bibliography
[1]''Introduction to LyX''. By the LyX Team. Available under Help −> Introduction.
[2]''Outliners and Mind Mapping". By Jimmy O'Regan. Linux Gazette Nr. 108, November 2004.
[3]''Customizing LyX: Features for the Advanced User''. LyX Team. Under Help −> Introduction.
Webpages maintained by the LinuxFocus Editor team
© Gerrit Renker
"some rights reserved" see linuxfocus.org/license/
http://www.LinuxFocus.org
2005−02−27, generated by lfparser_pdf version 2.51
10/10
Translation information:
en −−> −− : Gerrit Renker <gerrit.renker(at)gmx.de>