1
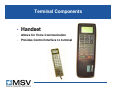
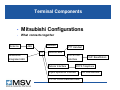
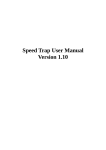
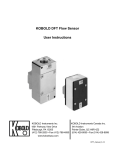
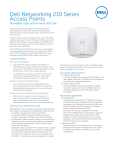
Mobile Satellite Ventures
Dealer Training Module 01
Westinghouse and Mitsubishi Terminals
September 2003
Module Contents
•
Terminal Components
•
Installation Tips
•
Commissioning Procedures
•
Troubleshooting
Terminal Components
Terminal Components
•
All Terminals Consist of:
•
Interface Device i.e. Handset
•
Transceiver Unit (TU)
•
Antenna Electronics Unit (AEU)
•
Antenna
•
Some terminals contain Integrated Components
Terminal Components
•
Handset
•
Allows for Voice Communication
•
Provides Control Interface to terminal
Terminal Components
•
Antenna
•
Enables RF L-band
Receive & Transmit
between the terminal
and the satellite
Terminal Components
•ADD
TU IMAGES - WEC+Mits
•
Transceiver Unit (TU)
•
Converts RF to Digital (RX) or Vice Versa (TX)
•
Contains Control, Power and Interface circuitry
Terminal Components
•
Antenna Electronics Unit (AEU)
•
Provides Amplification and Diplexing of RF energy that is
either received from or sent to the antenna.
Terminal Components
•
Integrated Terminal - ST251
•
Antenna In Terminal Lid
•
AEU and TU in body
Terminal Components
•
Mitsubishi Configurations
•
What connects together
Antenna
Handset
AEU
TU
PTT Handset
Junction Box
Antenna w/
CPI SV100
Integrated AEU
Interface
Tellular Interface
VHF BaseStation
POTS Telephone
Wysis SpaceFax Interface
PC for Circuit Switched Data
G3 Fax Machine
Terminal Components
•
Westinghouse Configurations
•
What connects together
GPS
Handset
Antenna
AEU
TU
CPI SV100
Interface
Tellular Interface
VHF BaseStation
POTS Telephone
FX-10 Board
Wysis SpaceFax Interface
G3 Fax Machine
Installation Tips
Installation
•
Westinghouse Terminals
•
Installation as per the North American Service Manual (applicable sections included in
this training module)
•
SpaceCom Antennas as per SpaceCom’s Installation Guide (also included in this
training module)
•
The TU and AEU require air circulation. Units are dustproof but ARE NOT
WEATHERPROOF
•
Do not place near sensitive electronic systems (ABS, Cruise Control, Fuel Injection
etc.)
•
Route cables together and away from high traffic areas
•
Seal all holes drilled with RTV or suitable silicone-based sealant
•
Main pow er (+ /-) must be connected directly to battery or power source.
•
Do not connect telephone equipment to the TU FAX port
•
Do not stretch, pull or pinch/kink cables
•
Leave a drip loop w hen connecting cable from antenna to AEU
Installation
•
Westinghouse Terminals
•
Basic Vehicle Wiring Connections
•
White (ignition sense) to Fuse Block protect w/ 3 amp fuse
•
Red to Battery +
•
Black to Battery -
•
Blue to horn alert relay (if used)
•
Basic Marine Wiring Connections
•
White and Red together. Connect to Battery + but protect w/ Fuse
•
Black to Battery -
•
Blue not used
Installation
•
Mitsubishi Terminals
•
Installation as per the ST200 series Technical Support Manual (applicable sections
included in this training module) available from http://www.melamsat.com
•
SpaceCom Antennas as per SpaceCom’s Installation Guide (also included in this
training module)
•
The TU and AEU require air circulation. Units are dustproof but ARE NOT
WEATHERPROOF
•
Do not place near sensitive electronic systems (ABS, Cruise Control, Fuel Injection
etc.)
•
Route cables together and away from high traffic areas
•
Seal all holes drilled with RTV or suitable silicone-based sealant
•
Main power (+/-) must be connected directly to battery or power source.
•
Do not stretch, pull or pinch/kink cables
•
Leave a drip loop when connecting cable from antenna to AEU
Commissioning
Commissioning
Mitsubishi Commissioning Guide
•
If commissioning a transportable unit, verify that the battery is
charged or optional AC adapter is connected. Turn on the main power
located on the face plate of the briefcase.
•
If installing in a vehicle with a dome antenna, ensure that the vehicle
is running and that the Beam Stirring Unit (BSU) is pointing upwards.
•
Press Power and wait 3 seconds (for wake up cycle to finish)
•
Press and hold CLR key and input 8761015. The wake up period is
about 3 seconds. You then have 7 seconds to input the above code.
•
The code is only valid for 20 programmings. Use 8991136 otherwise.
Commissioning
Mitsubishi Commissioning Guide
•
Press CLR If successful the display will read: MIN 000
•
Enter assigned MSAT phone # 0000000
Press
SEND
•
Display will read SecCode Enter 0000
Press
SEND
•
Display will read ENG. No Delete 911 and enter 000 Press SEND
•
Display will read AU type Select 03 for Omniquest, 05 for HG
transportable, 01 for Dome, 07 for Fixed site
Press SEND
•
Display will read ASK Enter 20 digit SASK code as assigned
•
NOTE: MELCO does not require the * every fifth digit
Commissioning
Mitsubishi Commissioning Guide
•
Press SEND Then Press STO/END The unit will now power down.
•
Power up the MT If the unit is not new press CLR and then (FCN) 9
and 4 The display will read: Enter PFC/CFC Press Function key
(FCN) then9 then 4 AGAIN
•
The display will read: AutoCom OFF Press # to toggle to AutoCom
ON Press STO/END key
•
Press (FCN) then 9 then 3 The display will read:PFC/CFC press 1
•
The display will read: PFC= Enter the Pilot Frequency then press
STO/END
Commissioning
Mitsubishi Commissioning Guide
•
The display will read: CFC= Enter the Comm Frequency then
•
press STO/END
•
The display will read: To SRCH push SND Press the SEND key for
1/2 second
•
The display will read:
BnnSMM
•
OK*/NG#
•
PWR NO SCV
Commissioning
Mitsubishi Commissioning Guide
•
The display will update to:
B00S24
OK*/NG#
PWR NO SCV
•
i.e. Translation to: B00 = Beam 00 (East beam)
S24 = Signal Strength (0 to 40)
•
Press * The display will read:
SAT SEARC
PWR NO SCV
Commissioning
Mitsubishi Commissioning Guide
•
The display will update:
SAT Signal Strength
-ONPWR NO SCV
•
When the unit has passed the commissioning process the NO SCV
will disappear. When this happens, press * and the commissioning
process is done.
Commissioning
Mitsubishi Commissioning Guide
•
If you should see:
Shut DWN
Push PWR
PWR NO SCV
•
Shut down the MT by pressing PWR and restart commissioning
•
Once the unit is operational dial 611 on your MSAT
communicator to receive your directory number.
•
If you experience problems with the commissioning process
please call 1-800-216-MSAT (6728) and a Customer Service
Representative will be available to help you.
Commissioning
Westinghouse Commissioning Guide
•
Power up the MT, if this is the first attempt at commissioning,
you should be automatically prompted for the Dealer password,
if not, press 4 & 6 simultaneously when you see Checking
appear on the handset display.
•
At the prompt, enter the dealer password: 332211 and press
STO
Commissioning
Westinghouse Commissioning Guide
•
Dealer/Install is displayed on the handset
Press RCL
•
Scroll through the install menu with the down arrow and ensure
that only the options you have subscribed to have a plus
symbol (+). To change a minus (-) to a plus (+), press
the RCL key
Press STO
•
Setup/Valid# is displayed
Press RCL
•
Valid#/SASK is displayed
Press RCL
•
Enter your SASK number (every five digits must be separated
by a * )
Press STO
•
Selection Updated is displayed
Press down arrow
Commissioning
Westinghouse Commissioning Guide
•
Valid#/Manfreq is displayed
Press RCL
•
Enter CFC# is displayed enter the CFC then Press STO
•
Enter PilotFc# is displayed enter the PFC then Press STO
•
Selection updated is displayed
•
Setup/Valid# is displayed
Press STO
Press down arrow
Commissioning
Westinghouse Commissioning Guide
•
Setup/OwnPh# is displayed
Press RCL
•
OwnPh#/Svoice is displayed
Press RCL
•
Enter phone number including "600" area code Press STO
•
Selection updated is displayed
•
If you have a data line, scroll down once to "ownph#/4800”
•
Press RCL Enter satellite data phone # then Press STO
•
Selection updated is displayed
Press STO
Commissioning
Westinghouse Commissioning Guide
•
Setup/OwnPh# is displayed
Press down arrow
•
Setup/Antenna is displayed
•
Scroll through menu until you find the antenna you are using
•
Press STO (for fixed antenna you will have a second options to
choose the size - scroll to the size antenna you have and
press STO
•
Selection updated is displayed
Press STO
•
Config valid is displayed
Press STO
•
Dealer/install is displayed
Press RCL
PressDown arrow TWICE
Commissioning
Westinghouse Commissioning Guide
•
Dealer/Commis is displayed
Press RCL
•
Scroll down to commis/CircSw
Press STO
•
Press STO TWICE
•
The display will show "Search for Sat Chan" then "Tune Ant" and power
reading. If you do not have adequate signal strength, retune your
antenna. If there is adequate signal, continue to the next step.
•
Tune Ant/PWR# is displayed
commissioning process will begin with a tone
•
You will see PVT (Performance Verification Test) followed by a pass or
fail message (MTS pass or MTS not commis). NOTE: this may take up to
five minutes to complete.
Press CLR and the
Troubleshooting
Troubleshooting
•
Equipment Powers Up
•
Is the unit displaying a Failure Code (WEC) or Check Code (Mitsubishi)?
•
What is the signal strength level? Is the unit stuck in “Searching for Sat
Channel” (WEC)? Check the antenna cable connections
•
Is the unit commissioned? Check the status with the NOC. Re-commission
if necessary
•
Ensure that sufficient power available for transmission - check the vehicle
circuitry.
Troubleshooting
•
Equipment Does Not Power Up
•
Check the power cable connections & fuses
•
Check that the feeder circuit is providing ~12 vDC
•
Check the handset connection.
•
Test Components Individually
Troubleshooting
•
Contact The MSV NOC.
•
Get the ESN of the TU (NOT THE AEU!!) before calling the NOC
•
WEC Tus: The S/N to the right of the DC in port is the ESN
ESN
•
Mits Tus: ESN is above
DC in port
Troubleshooting
•
Contact The MSV NOC.
•
Mits Tus: ESN is above the DC in port
ESN
Some Mitsubishi ESNs are in Hexadecimal. Here is how to decode them
The ESN on the TU has the format C6XXXX. Convert the XXXX to decimal
If you get a 5 digit number (YYYYY), the ESN is 198YYYYY.
If you get a 4 digit number (ZZZZ), the ESN is 1980ZZZZ.
Discussion & Followup
Contact Info:
MSV Network Operations Center (NOC)
1-800-261-MSAT (6728)
Boris Polianski
Services Technical Specialist
(613) 742-0010 x 4357
[email protected]