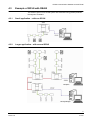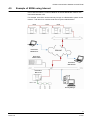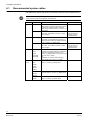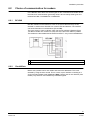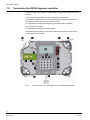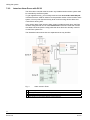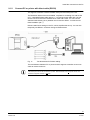
1
Bewator Entro Installation manual Version 5.3 Liefermöglichkeiten und technische Änderungen vorbehalten. Data and design subject to change without notice. / Supply subject to availability. © 2007 Copyright by Bewator AB, a Siemens Company Wir behalten uns alle Rechte an diesem Dokument und an dem in ihm dargestellten Gegenstand vor. Der Empfänger erkennt diese Rechte an und wird dieses Dokument nicht ohne unsere vorgängige schriftliche Ermächtigung ganz oder teilweise Dritten zugänglich machen oder außerhalb des Zweckes verwenden, zu dem es ihm übergeben worden ist. We reserve all rights in this document and in the subject thereof. By acceptance of the document the recipient acknowledges these rights and undertakes not to publish the document nor the subject thereof in full or in part, nor to make them available to any third party without our prior express written authorization, nor to use it for any purpose other than for which it was delivered to him. Contents 1 1.1 1.2 1.3 1.4 1.5 What is Bewator Entro? .........................................................................7 Network and Internet.................................................................................7 Reservation system...................................................................................7 DVR integration.........................................................................................7 Intrusion alarm system control ..................................................................7 Before commissioning the system ............................................................8 2 System components...............................................................................9 3 3.1 3.1.1 3.1.2 3.1.3 3.2 3.3 3.4 3.4.1 3.4.2 3.5 Communication with PC in Bewator Entro.........................................12 Local Area Network.................................................................................12 Directly connected – without LAN ...........................................................12 Directly connected – without LAN ...........................................................12 Local area network with InfoPoint IP810 or IP811..................................13 RS232 .....................................................................................................13 Modem ....................................................................................................13 System connections ................................................................................14 One computer .........................................................................................14 Several computers ..................................................................................14 Multi-user database ................................................................................15 4 4.1 4.2 4.3 4.3.1 4.3.2 4.4 4.5 Global communication between several SR34i .................................16 RS485 .....................................................................................................16 Ethernet with TCP/IP ..............................................................................16 Example of SR34i with RS485................................................................17 Small application – with one SR34i.........................................................17 Larger application – with several SR34i .................................................17 Example of SR34i used in Local Area Networks ....................................18 Example of SR34i using Internet ............................................................19 5 5.1 5.2 5.3 5.4 Dynamic IP-address (DHCP) and dynamic DNS ................................20 Background .............................................................................................20 Prerequisites ...........................................................................................21 Static IP-addresses .................................................................................21 Dynamic IP-addresses............................................................................22 6 6.1 6.2 6.2.1 6.2.2 6.2.3 Installation procedure ..........................................................................23 Recommended system cables................................................................24 Choice of communication for readers .....................................................25 BCLINK ...................................................................................................25 Clock&Data .............................................................................................25 Wiegand ..................................................................................................26 7 7.1 7.2 7.3 7.4 7.5 7.6 7.7 7.8 7.8.1 7.8.2 7.8.3 Wiring the system .................................................................................27 Entro Hardware components ..................................................................27 Housings .................................................................................................27 Using cable glands..................................................................................28 Installing door readers ............................................................................29 Installing the door controllers ..................................................................29 Installing PD30-EM or PD40-EM ............................................................29 Installing the segment controllers ...........................................................29 Connecting the SR34i Segment controller..............................................30 SR34i installations details .......................................................................31 IP-addresses ...........................................................................................31 Status information in the display .............................................................31 3 Bewator AB 03.2007 7.9 7.9.1 7.9.2 7.9.3 7.10 7.10.1 7.11 7.11.1 7.12 7.13 7.14 7.15 7.16 7.16.1 7.16.2 7.17 Connecting the DC22 Controller .............................................................32 DC22 installation details..........................................................................33 Intrusion Alarm Zones with DC22 ...........................................................34 Connecting Alarm Status Feedback in DC22 (ASF)...............................35 Connecting the DC12 controller ..............................................................36 DC12 installation details..........................................................................37 Connecting the IOR6 Relay central ........................................................38 IOR6 Installation details ..........................................................................39 Connecting the DC01 door controller......................................................40 Connecting the BC43 remote card reader ..............................................41 Connecting keypad M43 .........................................................................42 Connecting the BC18 remote card reader ..............................................42 Connection of other readers....................................................................43 Connection of 500-series proximity readers (BCLINK)...........................43 Connection of Hands-Free reader HF500 (Clock&Data) ........................43 Connecting DC800 controller ..................................................................44 8 8.1 8.2 8.3 8.3.1 8.3.2 Special installations..............................................................................45 Anti-pass back using BCLINK readers....................................................45 Anti-pass back using CLOCK&DATA and WIEGAND readers...............46 Installation of Interlock doors ..................................................................47 Access from Door A to Door B ................................................................47 Access from Door B to Door A ................................................................47 9 9.1.1 9.1.2 9.2 Install the connection to the PC ..........................................................48 Local Area Network to PC.......................................................................48 Connect PC or printer with direct cable (RS232) ....................................49 Installing USB-RIF/2................................................................................50 10 10.1 10.2 10.3 10.4 10.5 10.6 Power supplies and communication...................................................51 Central power supply ..............................................................................51 Local reader power supply for doors.......................................................52 Considerations concerning earthing & screening ...................................52 Check the communications circuit RS485 ..............................................53 Check the power supply..........................................................................53 Check communication.............................................................................53 11 Configuring ............................................................................................54 12 12.1 12.2 12.3 12.4 Bewator Entro Reservation ..................................................................55 Integrated Web server.............................................................................55 How the Reservation system is installed ................................................56 Installing the CF8 flash memory card .....................................................56 Connecting the InfoPoint IP811/IP810....................................................57 13 13.1 13.2 DVR Installation.....................................................................................58 Implementation in Entro ..........................................................................58 Planning and installing DVR and cameras..............................................58 14 14.1 14.2 14.3 14.3.1 14.3.2 14.3.3 Expanding and modifying the system ................................................59 RS485 .....................................................................................................59 Networking ..............................................................................................59 Installing another PC...............................................................................60 Prepare the existing database ................................................................60 Configure the new PC .............................................................................60 Installing another SR34i ..........................................................................61 4 Bewator AB 03.2007 14.4 14.5 14.6 14.7 Installing more readers ...........................................................................61 SR34i firmware control............................................................................62 Door controller firmware control..............................................................62 Printout of system configuration..............................................................62 15 15.1 15.1.1 15.1.2 15.2 15.3 15.4 Installing modem based systems........................................................63 Installing the modem based system........................................................64 Configuring a system equipped with TD35 modem (recommended) .....64 Configuring a system equipped with a custom modem ..........................64 Configuring the modem based system on site........................................65 Installing the modem...............................................................................67 Transferring the new system’s information to the central PC .................68 16 16.1 16.2 16.3 16.3.1 Integrating with external applications (BAPSI)..................................69 General ...................................................................................................69 What is BAPSI used for? ........................................................................69 Field applications ....................................................................................69 Application example - External Reservation system...............................70 17 Checklist ................................................................................................71 18 Technical information...........................................................................72 19 19.1 19.1.1 19.1.2 19.1.3 19.2 19.2.1 19.2.2 19.2.3 19.2.4 19.3 19.3.1 19.3.2 19.3.3 19.3.4 Appendix 1 – DVR models and settings .............................................76 SISTORE™ MX ......................................................................................76 MX Parameters .......................................................................................76 MX Live Viewer software ........................................................................76 Additional considerations for the MX ......................................................77 SISTORE AX...........................................................................................77 General ...................................................................................................77 AX Parameters........................................................................................77 Additional considerations for the AX .......................................................78 AX Live Viewer software .........................................................................78 SISTORE™ CX.......................................................................................78 General ...................................................................................................78 CX Parameters........................................................................................78 CX Live Viewer software.........................................................................79 Additional considerations for the CX.......................................................79 20 Keyword index.......................................................................................80 5 Bewator AB 03.2007 6 Bewator AB 03.2007 What is Bewator Entro? 1 What is Bewator Entro? Bewator Entro is an access control system. It is designed for use in both small companies and large ones; wherever there is a need to control which people should have access to the different doors and departments in the premises. There is an advanced function for reservation (e.g. in sports arenas, conference rooms etc). It works in co-operation with the access control functions. Next to the doors, card readers with keypads (optional) are installed. They are connected to segment controllers, which are then configured from a PC. If needed, Bewator Entro can control up to 10 000 access control systems installed in different buildings. The systems may be connected directly to the PC or be connected via a modem and/or local area network. 1.1 Network and Internet Bewator Entro has the ability to communicate between units via local or global networks and also the Internet. This document describes how the connections and addressing of Bewator Entro are done and assumes that the external network components (routers, switches etc) are configured correctly. NOTE It is very important that the IT-manager of the end-user has participated in and has approved of all aspects of this part of the installation. 1.2 Reservation system There is information on how to use Reservation together with the rest of the Bewator Entro Access Control System. 1.3 DVR integration The Entro system can be integrated with an external Siemens SISTORE™ DVR for camera recording. You can also playback recordings from the Entro program. There are no special components (for Entro) required to manage the DVR system because all information is communicated via TCP/IP network (which already is supported by the SR34i). 1.4 Intrusion alarm system control A common application for the Entro is, beside access control, to control an external intrusion alarm system by means of an access card. Read more about the installation requirements for this in the DC22 section – and in the User manual describing e g alarm zones. 7 Bewator AB 03.2007 What is Bewator Entro? 1.5 Before commissioning the system Before commissioning the Bewator Entro system, the installer should read and complete the checklist at the back of this manual. 8 Bewator AB 03.2007 System components 2 System components Bewator Entro consists of the following equipment: z The Bewator Entro software. The software runs on a Pentium 266 MHz PC with 64 Mbytes of RAM with Windows 2000/XP. It controls up to 512 doors and can manage 40 000 cards. When the software package is installed there is three program parts: – Installer program for setup of hardware. – Entro program for setup and administration. – Door Monitor program for status monitoring. z SR34i Segment controllers. Up to 16 segment controllers can be connected to the PC in a “daisy chain” configuration. Each segment controller can control 4, 8, 16 or 32 doors. The information you program in the PC is stored in all segment controllers. This has the advantage of being able to use the PC for other purposes or shut it off when it is not configuring or monitoring Entro. Each segment controller is delivered with 4 termination resistors (120 Ω). z Door controllers with remote card readers. The door controllers are con- nected to the segment controllers. A door controller controls one door where one or two (in/out) remote card readers can be installed. This combination (split installation) is designed for external doors or other doors with higher requirements on function and security, e.g. alarm by-pass and door control. 1. Magnetic card or proximity readers. 2. Proximity reader. 3. Hands-Free reader. 9 Bewator AB 03.2007 System components z Proximity Codoor PD30-EM/PD40-EM. Electromechanical unit equipped with a proximity reader for EM technology. Connects to the Segment controllers. PD30EM fits primary Scandinavian lock cases and PD40-EM the Eurostandard. z Door centrals without remote terminals. In some cases there is a need for monitoring or opening a door by time schedule. The DC01 can be used as a timer controlled relay or monitoring unit. Door central DC01 z Relay central. To control e g a lift the IOR6 can be used. Any reader can control which relays to activate. The IOR6 can be used in reservation applications. Version 5 also offers functions like Common alarm, Lift control, emergency opening and power failure monitoring. Relay central IOR6 z CF8. If Reservation is to be used a CF8 memory card must be installed in one of the SR34i segment controllers. CF8 Memory card 10 Bewator AB 03.2007 System components z Reservation terminal. An InfoPoint IP811 or IP810 can be used in a reservation system enabling reservation local to the object. Includes an integrated card reader function for identification. InfoPoint IP811 z Cards. Every person would use either a card or proximity tag. z Modem. If multiple Bewator Entro systems make up the installation, a modem may be connected for communication between the systems and the central PC. z Battery backup. One or more battery backup power supplies are needed for the system’s power. z Cables. See recommended cables on page 24. 11 Bewator AB 03.2007 Communication with PC in Bewator Entro 3 Communication with PC in Bewator Entro Bewator Entro SR34i offers three ways of communication with a PC computer. By default the software installation assumes that only one computer shall log on to the system. If several computers (users) shall log on at the same time more so called connections must be setup. Read more in the chapter System connections in this manual and in the User manual. 132H 3.1 X Local Area Network In this configuration, the Local Area Network (Ethernet 10/100 Mbit) is used for TCP/IP communication with the PC. See also Technical Information for more information. Note that the SR34i has an integrated network switch with two connectors (RJ45) where a PC and an SR34i can form a local area network without any extra equipment (except for the cable) 3.1.1 Directly connected – without LAN In this case the PC has static IP address and is connected directly to the SR34i as an alternative to RS232 where longer distance (<100 m) is required. 3.1.2 Directly connected – without LAN In this example the integrated network switch is also used to connect the PC onto the LAN. Integrated network switch 12 Bewator AB 03.2007 Communication with PC in Bewator Entro 3.1.3 Local area network with InfoPoint IP810 or IP811 The InfoPoint can be connected directly to the SR34i segment controller. 3.2 RS232 SR34i communicates with the PC via cable directly to the COM-port. 3.3 Modem The PC is used to control a remote site using a dial-up modem. The SR34i is also connected to a modem, which also can dial up the PC if necessary. 13 Bewator AB 03.2007 Communication with PC in Bewator Entro 3.4 System connections The concept Connections is used in Bewator Entro to define which computers, printers and/or modems that are used to send command or retrieve events to or from the system. The physical communication method (TCP/IP, RS232 or modem) must also be defined when setting up a connection. 3.4.1 One computer In some sites only one computer is enough to administrate an Entro system. This is also the default level when the software is installed (according to the User manual) which results in a very easy, rapid start-up as possible. Still a choice is done on the way of communication, e g TCP/IP. 3.4.2 Several computers In a multi-user environment where several computers are to be logged on simultaneously, e g to log on or delete cards, a setup must be performed in the software to make it possible to create more connections. You need software licenses for each computer that is connected. Otherwise there will be problems with event storing etc. Proceed like this: 1. Go to System and System settings in the Installer program. 2. Select Connections. 3. Check the tick box that several computers shall be used concurrently. A new window is displayed. 4. Click New and follow the wizard. See also the chapter Installing another PC at the end of this manual how to transfer an existing database to another computer. X13H X In the next chapter there is some concise information how the database is managed in systems with more computers. 14 Bewator AB 03.2007 Communication with PC in Bewator Entro 3.5 Multi-user database Every Entro system uses a database (with cards, time schedules etc.), which is stored in every segment controller and PC. The Entro version 5 database allows for multiple users to be working with the same database. The prerequisites for this are that the system knows which Users are using which computer. E g a Security manager can have their own PC (with a dedicated license) while a Receptionist has another PC (with another license). For every PC there must exist a ‘connection’ in Entro where the license number and communication ports are defined. At the same time the applied filter events will only be sent to each PC respectively. i.e. if the Security manager temporarily log on to the Receptionist’s PC no events will be received to this PC. For every new System user you create you have to specify also the connection and which event filter is to be used. The simplified illustration below shows how it works. PC – Security Manager Security Manager - Login TCP/IP Filter 1 - Events To/from ENTRO controllers PC - Receptionist Receptionist - Login TCP/IP Filter 2 - Events Optionally: Security Manager – Login No events received! Instead, if only one PC is used with several users the different filtered events will be stored in different folders on the PC (dependant of the user logged on). 15 Bewator AB 03.2007 Global communication between several SR34i 4 Global communication between several SR34i The global communication between several controllers can be done through two separate physical cables – twisted pair RS485 and/or Ethernet 10/100 Mbit. 4.1 RS485 Uses RS485 to communicate between a maximum of 16 SR34i controllers. Maximum distance is 1200 meters from the first SR34i to the last one. It is possible for one or more of these SR34i to use TCP/IP as described below. The controllers are then configured with an IP-address and proxy function (with SNTP). 4.2 Ethernet with TCP/IP Generally known as TCP/IP that uses the Ethernet connection (10/100 Mbit) that connects to the Local Area Network. TCP involves a controlled way of sending messages through a network. The maximum distance depends on the structure of the network itself. Requires that the SR34i is configured with its unique IP-address and having the Proxy function (with SNTP). This ensures that only the relevant units (SR34i or PC) receive the messages. See also Technical Information. In version 5 also dynamic IP addresses can be used for SR34i. See chapter Dynamic IP-address (DHCP) and dynamic DNS where the prerequisites are described. X134H X Notes when using SR34i and TCP Remember that any zones (e g Alarm zones) will work best if they reside in the same sub-net when several SR34i use TCP/IP (between related SR34i). 16 Bewator AB 03.2007 Global communication between several SR34i 4.3 Example of SR34i with RS485 This solution gives a more closed system with dedicated wiring (RS485) between the segment controllers. 4.3.1 Small application – with one SR34i 4.3.2 Larger application – with several SR34i Reception Security Manager 17 Bewator AB 03.2007 Global communication between several SR34i 4.4 Example of SR34i used in Local Area Networks This version of Bewator Entro gives the possibility that several SR34i can communicate through local area networks and the system can be software controlled from any PC on the network. No separate connections are needed between the controllers. Note that it is possible to connect the PC directly (RS232) - or via the network. Reception Security Manager 18 Bewator AB 03.2007 Global communication between several SR34i 4.5 Example of SR34i using Internet In this case the Internet, Local Area Network as well as RS485 are used for communication between units. For example, some PCs can be used only for login to a Reservation system via the Internet – and other PCs could be used also for system administration. Reservation Web Browser Reservation InfoPoint IP811 Reservation Web Browser Reservation Web server Security Manager 19 Bewator AB 03.2007 Dynamic IP-address (DHCP) and dynamic DNS 5 Dynamic IP-address (DHCP) and dynamic DNS Some network applications requires the SR34i to be able to use dynamic IPaddresses and where every controller is referred as a “name” and that the SR34i itself can login to the ISP. NOTE In the User manual you find more on how to set up and program these functions. 5.1 Background Dynamic IP-addresses In earlier versions of the Entro software, the Segment Controller is supposed to be addressed with a static IP-address – which is still the preferred method as long as the local area network (LAN) allow for this. (Think of a having the same telephone number all the time). Static IP-addresses are both faster and more secure. In some facilities only one Internet Service Provider (ISP) is contracted, offering only accounts and connections using DHCP (Dynamic Host Configuration Protocol). These means that the host environment (at the ISP) ”lease out” an IP-address e.g. Broadband connection. However that means the IP-address can be changed when the ISP renews the lease time. (We describe further on how this mechanism works in Entro). As IP-addresses are not static, there must be a function that refers to a fixed name which can be “translated” to a concept the Internet still can understand – i e IPaddresses. This function is generally called DNS (Domain Name Service) and can be seen as a “name directory” with IP-addresses. The directory normally resides with the ISP and will itself also be accessed through an IP-address (which normally is supported together with the leased IP-addresses. E g a web browser can use the name www.xyz.com instead of the IP-address to XYZ. This works as long as the www.xyz.com always have the same IP-address (i e the DNS supersedes the need for remembering the IP-address to XYZ home page). When DHCP is used – and the ISP often changes the connected users’/computers’ leased IP-address – also the DNS must be updated with new information. This is called dynamic DNS (DDNS) – and means that equipment can ”ask” this service for the latest IP-address for a specific name. Think of e g changing your telephone number sometimes (because the amount of telephone is limited and an own line with a fixed number is more expensive). Still your friends have to be informed about the change – the telephone directory must be updated – each time the name is changed. 20 Bewator AB 03.2007 Dynamic IP-address (DHCP) and dynamic DNS Login The Internet Service Provider (ISP) sometimes need to be sure that it is an authenticated user (SR34i) before any communication can be allowed. This requires a login with User name and Password. This is setup in each SR34i. Note that login procedures can be used/required even if static IP-addresses are used. 5.2 Prerequisites Following chapter describes the requirements needed to get different configurations working in a Bewator Entro system. See also further chapters how the installation is performed. The End Users’/Buyers’ IT-manager should always participate in the planning of a TCP/IP based Entro system. General knowledge about networking is also recommended. Simplified you can use handled IP-addresses in three different ways: z All SR34i’s have static IP-addresses (decided by IT-manager or ordered from ISP). z One SR34i has static IP-address (with name directory) – all others normally get leased, dynamic addresses (DHCP). z All SR34i’s gets dynamic addresses (DHCP). 5.3 Static IP-addresses Static IP-addresses can exist in both local area networks and/or where also Internet is used (e g for reservation functions). Some ISP’s unfortunately do not allow for using static IP-addresses. In a local area network environment in a company no special arrangements are needed. The only aspect is how ”isolated” the security system should be compared to an office network. I e if any routers, firewalls or similar separating the Bewator Entro from any other network equipment. Of course the same applies for an apartment building if using the same type of network. However, a company installation can use the advantage of the DHCP functions described in next section. E g a SR34 can get a fixed IP-address (from IT-manager) and act as a host for the other SR34i’s (leasing the IP from an internal DHCP-server in the company). 21 Bewator AB 03.2007 Dynamic IP-address (DHCP) and dynamic DNS 5.4 Dynamic IP-addresses At the moment few apartment/small office buildings have a complete local area network installed. Instead an ISP offers a connection e.g. broadband, cable or telephone modem and every tenant uses the Internet for communication to/from a home computer. To get Bewator Entro running in an environment where DHCP and Login are used – some prerequisites must be fulfilled. z At least one ISP account (and physical connection) must exist. The goal is that every SR34i shall be able to access the Internet as well as being accessed from outside. Depending on the ISP this can offered in different ways. z The function for ”dynamic” DNS (Dynamic Domain Name Service) must be es- tablished. The ”Name directory” can the be stored in one of two possible places: – One dedicated SR34i will act as ”Dynamic DNS” requiring a static IP-address (from ISP), so that other SR34i’s (and PC) knows where the name directory is. The chosen SR34i will still be able to control door environments. – An externally offered public service called DynDNS.org is used to store the di- rectory (with network identities and IP-addresses). In this case an account with User name and Password has to be requested from this organization. At the moment five different names are offered free-of-charge and five SR34i’s can immediately be used. If more SR34i’s are to be used additional 20 names can be ordered for approx $10 (Approx £5.50) annual fee (December 2004). 22 Bewator AB 03.2007 Installation procedure 6 Installation procedure Plan Planyour your installation. installation. Mount terminals, door drop centrals, drop Mount doordoor terminals, door centrals, boxes and segment controllers. boxes and segment controllers. Mountthe the power power supply. Mount supply. WireWire communication andpower power supply communication and supply for for one of the segment controllers. one of the segment controllers. Connect the segment controller’s units: Door terminals, door centrals and drop boxes. Measure the communications loop. Check that the segment controller communicates with each door terminal/door central. Yes More segment controllers? No Yes RS485 on global? Connect the segment controllers to each other. Measure the communications loop. No Check that the local network communicates. Connect the PC to one of the segment controllers (direct or via network) Install and start the installation software. Check that the system is on-line Configure segment controllers, door centrals and terminals according to the User manual 23 Bewator AB 03.2007 Installation procedure 6.1 Recommended system cables The table below shows what kind of connections could be done in Bewator Entro. Bewator will not warrant systems where other types of cable are used for these connections. Cable types must not be mixed in the different cable segments. From unit To unit Type of cable Maximum length (m) PC SR34i RS232 25 m Cable between PC/printer and segment controller. Maximum length: 25 meters. Specified cable: Straight screened cable (4 + screen), e.g. Belden 9534. SR34i SR34i SR34i Cat-5 cable, 10/100 Mbit. If in doubt - consult the IT-manager. Depends on the network structure but normally 100 m to router/switch/hub. RS485: 1200 m Network The ”global” circuit between the segment controllers. Specified cable: Pair twisted screened (1 pair + screen), e.g. Belden 9502. SR34i Network: Cat-5 cable, 10/100 Mbit. If in doubt - consult the IT-manager. SR34i DC22 DC12 IOR6 PD30-EM PD40-EM DC22 BC43 DC12 M43 Depends on the network structure but normally 100 m to router/switch/hub. RS485: The ”local” circuit between a segment 1200 m controller and its subordinate door readers/door controllers. Pair twisted screened (1 pair + screen), e.g. Belden 9502 or Cat-5 (communica2 tion) and 1.5mm (power) OR PAARFLEX CY (custom cable comprising communication and power in one cable). BCLINK: Specified cable: Straight screened cable (4 + screen), e.g. Belden 9534 100 m CLOCK&DATA: Specified cable: Straight screened cable (6 + screen), e.g. Belden 9536. 50 m WIEGAND: Specified cable: Straight screened cable (6 + screen), e.g. Belden 9536 50 m PR500 HD500 SP500 PM500 HF500 BC5511 BC5515 Wiegand readers 24 Bewator AB 03.2007 Installation procedure 6.2 Choice of communication for readers In the Bewator Entro there are several types of door controllers and readers where the method of communication (protocols) varies. We use mainly three types of interfaces BCLINK, CLOCK&DATA or WIEGAND. 6.2.1 BCLINK BCLINK enables several readers to exist on the same cable and they are addressed on another level. BCLINK can control LEDs and buzzers. The interface can send information in both directions (Tx and Rx). The most common case is a DC22, which has a main address in Bewator Entro. Two BC43 readers are mounted on each side of the door with cables in parallel. The readers are then addressed as ENTRY and EXIT – they have sub-addresses. 1. ENTRY Reader 2. EXIT Reader 6.2.2 Clock&Data Means every reader has its own cables and cannot be addressed. This is addressed by using the door central. This is a more “open” interface consisting of a clock signal and a data signal (Clock and Data). Data is sent in one direction (from reader). Any LEDs etc are controlled by hardware signals. 25 Bewator AB 03.2007 Installation procedure 6.2.3 Wiegand Uses the same interface as Clock&Data but the protocol differs. The most common formats are 26-bit and 32-bit but also 8-bit burst is used (e g for managing a PINcode). NOTE You need to install the door controllers DC22 or DC12, to use the Wiegand interface. 26 Bewator AB 03.2007 Wiring the system 7 Wiring the system 7.1 Entro Hardware components Entro version 5 means that SR32i is replaced with SR34i, DC21 with DC22 and DC11 with DC12. Note that all Segment controllers must be of type SR34i – whilst the door controllers can be mixed (e g when upgrading from an older system). 7.2 Housings The Entro components have designed housing offering an even easier and tidier installation. The different components have several nice features but the most important details are: z Special corner elements are designed to be removed but then again hiding and sealing the cable entry when re-fixed again. Also ideal when mounting via trunking-list. See figure 1. z The cable entry can be solved in many ways. There are knockouts in both the base and the corner elements. See figure 2. z Secured cable entry can easily be achieved by entering the cable over edge (be- fore the corner elements are re-fixed). See figure 3. z Integrated fixing details for securing the cables with cable ties. 1. With trunking-list. 2. Cable entry via knockouts. 3. Secured cable entry over edge 27 Bewator AB 03.2007 Wiring the system 7.3 Using cable glands In some cases it is desired to secure the cables via glands. The housing allows for using glands of M12 dimension (12 mm). When the controllers are shipped there are washers mounted at the screw holes to allow for different kind of screw types when fixing it to e g a wall (see item C in the picture). If glands instead shall be used, proceed like below: 1. Remove the default washer(s). 2. Place the gland bracket(s) (on the little location pin) to decide which knockout to cut out. There are two different positions of he bracket. 3. Cut out approx. 12-13 mm and mount the supplied gland bracket(s). 4. Place the gland in the big hole of the bracket and fix it with the nut. 5. The cable is then mounted through the outer sleeve and connected to the desired terminal blocks on the PCB. 6. Optionally fix the cable even further using cable ties and then fix the sleeve. In the picture below is shown how to mount the gland bracket. NOTE The glands are not supplied with the housing (only the brackets). 28 Bewator AB 03.2007 Wiring the system 7.4 Installing door readers Install the door readers at a height of 120–140 cm (from the floor to the bottom edge of the door reader). To adapt the installation to disabled people, a suitable height is approximately 95 cm (please contact Bewator for details on complying with the Disability Discrimination Act. 7.5 Installing the door controllers Install the door controllers within recommended distance from the unit/s to be controlled by the door controller (see the cable instructions). The door controllers may be installed above a false ceiling or in an adjacent riser cupboard. 7.6 Installing PD30-EM or PD40-EM These door units consist of both a controller- and reader-function and are mounted directly on the lock case. They also include a drop box to be installed above the door. How to mount it mechanically is also described in more details in the manual supplied with the unit. 7.7 Installing the segment controllers Install the SR34i segment controllers as centrally as possible to the door readers/door controllers to be connected to the SR34i. As with door controllers, a suitable place is above a false ceiling or in an adjacent riser cupboard. Note that there must approximately 70 mm free space around the SR34i to be able to open the front covers. If any of the segment controllers will be used for the reservation function it must be equipped with a memory card (see item H, page 31). 29 Bewator AB 03.2007 Wiring the system 7.8 Connecting the SR34i Segment controller In Entro version 5 the segment controller SR34i is used, which offers some nice features: z Only screw terminal blocks for local and global communication. z Integrated network switch (for LAN) with two RJ45 connectors for Ethernet. z RS232 connection through 9-in D-sub connector. z Configurable via keypad and display (e g for setting the IP-address). z No jumpers to configure. z Housing that protect the electronics parts. Note that the IOR6 relay unit now instead supports functions for Power failure warning and Common alarm. Fig. 1 SR34i overview. See next page for a more detailed information 30 Bewator AB 03.2007 Wiring the system 7.8.1 SR34i installations details A Lock to be opened with supplied special key. (The door is not shown). B1 The corner details can be lifted and are prepared with knockouts used for sealing or hiding cable entry. The position of these should not be changed (due to mechanical differences). They are numbered like this: B2 81284 (B1) = Lower left + upper right corner. 81285 (B2) = Upper left + lower right corner. C The box is fastened on the wall with four screws. Remember to leave approx. 70 mm space around the controller. D The cables can either be safely mounted (cable goes over the edge) - or via knockouts in the same edge). Prepared with fixing details for securing the cable with cable ties. E Local circuit (RS485). Power supply: Terminal 1 and 2. Communication: Terminal 3 and 4. Screen: Terminal 5. The controller can be disconnected without interrupting the global circuit. Do not forget to use termination resistors in the circuit ends. F Global circuit (RS485) Communication: Terminal 6 and 7. Screen: Terminal 8. G Three addressing knobs (001-016) H Socket for compact flash memory card. I RS232 connection for PC, modem or printer. J 1st RJ45 Ethernet connection. 10/100 Mbit/s. Note! Switch function (autosense) K 2nd RJ45 Ethernet connection. 10/100 Mbit/s. Note! Switch function (autosense). L Battery socket. Type CR2032. Note! Remove the isolating plastic band to activate the battery poles. 7.8.2 M Display used for configuring, address or error information. N Tamper switch. IP-addresses An SR34i, which is not yet configured, will at power-up automatically create its own IP-address 10.1.200.1xx, where xx is the physical address knobs. Example: 005 -> IP-address = 10.1.200.105. The IP address should always be checked and may have to be changed according to the IT-Manager. Remember that, as soon as the IP-address is chosen, it will be stored into the SR34i. If you then power it up again, it will still use the configured IP-address – not the default. 7.8.3 Status information in the display The SR34i have some messages (in English) that automatically – or by menu commands - can be displayed. E g that the database is not updated or that the communication does not operate properly. 31 Bewator AB 03.2007 Wiring the system 7.9 Connecting the DC22 Controller DC22 is a door controller with the following functions: z Separate terminal block for BCLINK readers e g the BC43, M43 or xx500 (xx=PR, SP, HD, PM). z Separate terminal block for CLOCK&DATA or WIEGAND readers. z Double relay outputs for locks. E g electric strikes and motor lock. z Separate outputs for door held waning and pre-warning alarm. Fig. 2 DC22 overview. Please see next page for details. 32 Bewator AB 03.2007 Wiring the system 7.9.1 DC22 installation details A Lock to be opened with supplied special key. (The door is not shown). B1 The corner details can be lifted and are prepared with knockouts used for sealing or hiding cable entry. The position of these should not be changed (due to mechanical differences). They are numbered like this: B2 81284 (B1) = Lower left + upper right corner. 81285 (B2) = Upper left + lower right corner. C The box is fastened on the wall with four screws. D The cables can either be safely mounted (cable goes over the edge) - or via knockouts in the same edge. Prepared with fixing details for securing the cable with cable ties. E Local circuit (RS485). Power supply: Terminal 1 and 2. Communication: Terminal 3 and 4. Screen: Terminal 5. The controller can be disconnected without interrupting the local circuit. Do not forget to use termination resistors in the circuit ends. F Opening relay. Voltage free contacts. Max load 2 A. The voltage output on 6 & 7 is always the same as power supply on 1 & 2 it is rectified. Max 1.4 A. G Connection of BCLINK type reader. The voltage output on 11 & 12 is always the same as power supply on no 1 & 2 it is rectified. H Connection of CLOCK&DATA or WIEGAND type reader. I Selection of power output to CLOCK&DATA or Wiegand reader. +5V or Vin = same as terminal 1 & 2 but rectified. J Remote opening input. For connection of an exit request button (push to make). K Door monitor input for door contact Indicates open or closed door. L Lock monitor input for locks with status contact. Must be closed within 15 seconds after the door connector (see K) input has been closed; otherwise the alert relay is activated. M Door held warning relay. Controlled by door monitor contact. Activated if the door is not closed when the door opening time has expired. N Alert relay. Activated if the door still open when the door held warning time has expired. O Voltage free motor lock control relay output. Only supported by Entro version 5. P Pre-warning signal activated during alarm control activation cycle. Only supported by Entro version 5. Q Input for activation of the alarm by-pass relay through closing (pulse). Used for activation of intruder alarm system from e.g. timers. Only in bistable mode and bistable pulse mode. R Alarm by-pass relay. Monostable (by-pass time = opening time + door held warning time), bistable or bistable pulse. Max load 2A. S Alarm Status Feedback signal (ASF). Used to synchronize Entro and e g an intruder alarm system. See separate section how to connect. T Input for external control of red LED on readers configured in a bistable alarm zone. Terminals 37 (+5V) and 38 (0V) can be used. U Set the door controller’s address by placing the link on the appropriate address range 1-16 or 1732 and the address on required number. Note! 2 door controllers connected to the same segment controller must not have the same address. V Display used for address and error information. Normally the address is displayed and the right dot is flashing. The display can be turned ON/OFF from software where the left dot lit. Error codes The display is alternating the address with any fault code = Autonomous mode (no comm. with Segment Controller) = Slow-poll state. Not yet any fast-poll (addressing). = Autonomous mode - but communication error = Messages are detected but unit is not yet on-line. = No address jumper detected. = Address conflict - used by another unit. = On-line - but communication error. = Downloading firmware. W Tamper switch 1. Alarm message is sent when the controller’s door is opened. X Tamper switch 2. Alarm message is sent when the housing is removed from the wall. Note! The mechanical parts must be ordered (and mounted) separately to make this function work 33 Bewator AB 03.2007 Wiring the system 7.9.2 Intrusion Alarm Zones with DC22 The DC22 door controller must be used if any bistable intrusion alarm system shall be controlled by the Entro system. To gain highest security, you normally install and use card readers with PIN-pad in all doors that are used for entrance to the particular section of the intrusion alarm system. You may then use the security level Card for turning ON the alarm and Card+PIN for turning OFF. If any section area of the intrusion alarm system includes several doors, the Entro must be configured with one or more Alarm zones. Each zone must then consist of at least one DC22 (with the relay) while the other doors can remotely control it via the Entro system bus. The illustration below shows how two separate zones may look like: Fig. 3 Alarm zones in Entro 1. Activation signal for Zone A (from DC22) 2. Status signal for synchronization between systems (to DC22). 3. Activation signal for Zone B (from DC22) 4. Status signal for synchronization between systems (to DC22) 34 Bewator AB 03.2007 Wiring the system 7.9.3 Connecting Alarm Status Feedback in DC22 (ASF) When the DC22 is used to synchronize Entro and an external intrusion controller a feedback signal from the intrusion system can be used. Depending on the status of the signal, the Entro recognize the intrusion system as activated or deactivated and perform relevant operations as e g “blocking” or locking doors. The connection between the systems can be done in two ways: z With a voltage signal. z With closing signal (voltage free). Below drawings shows the different methods which both controls the input (ASF). With voltage signal In this case the intrusion controller must send a voltage signal (maximum 24VDC) and a minus reference must be available. Controller Fig. 4 Voltage controlled ASF. With closing signal The intrusion controller makes the closing. Note that a jumper has to be installed in the DC22 between 35 & 37. Controller Fig. 5 Closing signal ASF. 35 Bewator AB 03.2007 Wiring the system 7.10 Connecting the DC12 controller DC12 is a door controller to be used in the Bewator Entro. DC12 can substitute and simulate the earlier DC11. The DC12 is designed to fulfill many practical issues as well as offering a nice and tidy installation. Fig. 6 DC12 Overview. Please see next page for details. 36 Bewator AB 03.2007 Wiring the system 7.10.1 DC12 installation details A Lock to be opened with supplied special key. (The door is not shown). B1 B2 The corner details can be lifted and are prepared with knockouts used for sealing or hiding cable entry. The position of these should not be changed (due to mechanical differences). They are numbered like this: 81284 (B1) = Lower left corner. 81285 (B2) = Upper left corner. C The box is fastened on the wall with four screws. D The cables can either be safely mounted (cable goes over the edge) - or via knockouts in the same edge). Prepared with fixing details for securing the cable with cable ties. E Local circuit (RS485). Power supply: Terminal 1 and 2. Communication: Terminal 3 and 4. Screen: Terminal 5. Do not forget termination resistors in the circuit ends. F Opening relay. Voltage free contacts. Max load 2 A. The voltage output on 6 & 7 is always the same as power supply on 1 & 2 but rectified. Max 1.4 A. G Connection of BCLINK type reader. The voltage output on 11 & 12 is always the same as power supply on no 1 & 2 - but rectified. H Connection of CLOCK&DATA or WIEGAND type reader. I Selection of power output to CLOCK&DATA or WIEGAND reader. +5V or Vin = same as terminal 1 & 2 but rectified. J Remote opening input. For connection of an exit request button (push to make). K Door monitor input for door contact. Indicates open or closed door. L Set the door controller’s address by placing the link on the appropriate address range 1-16 or 17-32 and the address on required number. Note! 2 door controllers connected to the same segment controller must not have the same address. M Tamper switch. Alarm message is sent when the controller’s door is opened. N Display used for address and error information. Normally the address is displayed and the right dot is flashing. The display can be turned ON/OFF from software where the left dot lit. Error codes The display is alternating the address with any fault code = Autonomous mode (no comm. with Segment Controller) = Slow-poll state. Not yet any fast-poll (addressing). = Autonomous mode - but communication error = Messages are detected but unit is not yet on-line. = No address jumper detected. = Address conflict - used by another unit. = On-line - but communication error. = Downloading firmware. 37 Bewator AB 03.2007 Wiring the system 7.11 Connecting the IOR6 Relay central In Bewator Entro, as well as the inputs & outputs in the door centrals DC22, DC12 or DC01, you can also use inputs & outputs in the IOR6 to control different functions (like doors). There are different ways to use them: z For lift control (button control) z For Reservation functions (door opening) z For Reservation functions (machine control) z For timer control (general). z Common alarm, emergency opening and power failure warning. Note that in lift control applications, up to 32 IOR6 relay centrals can be connected to the Bewator Entro system. Each IOR6 is addressed as per the other units. Mount the IOR6 as below and program it according to the User Manual. Fig. 7 IOR6 Overview – Please see next page for details. 38 Bewator AB 03.2007 Wiring the system 7.11.1 IOR6 Installation details A Lock to be opened with supplied special key. (The door is not shown). B1 B2 The corner details can be lifted and are prepared with knockouts used for sealing or hiding cable entry. The position of these should not be changed (due to mechanical differences). They are numbered like this: 81284 (B1) = Lower left corner. 81285 (B2) = Upper left corner. C The box is fastened on the wall with four screws. D The cables can either be safely mounted (cable goes over the edge) - or via knockouts in the same edge). Prepared with fixing details for securing the cable with cable ties. E Local circuit (RS485). Power supply: Terminal 1 and 2. Communication: Terminal 3 and 4. Screen: Terminal 5. Do not forget termination resistors in the circuit ends. F Power output. Max load: 500 mA. G Relay outputs. Voltage free contacts. Max load: 60V, 0,9A (30V, 2A). H Remote controlling inputs. For connection of push buttons for direct control of the relay outputs 1-4. Input 1 controls relay 1, input 2 controls relay 2 etc. I Tamper switch 1. Alarm message is sent when the relay central lid is opened. J Optional tamper switch 2. Alarm message is sent when the housing is removed from the wall. Note! The mechanical parts for this function have to be ordered separately (and mounted) to get this tamper work. K Extra relay outputs, switches parallel with each relay output. Can be used for controlling a light panel etc. L POWER: Green LED indicates power on/off. COM: Yellow indication LED. Flashes quickly when communication is working properly, slowly when interrupted (autonomous mode). M Choose the address for 1-16 or 17-32. N Set the relay central address by placing the link on the required number. Note! 2 relay central units connected to the same segment controller must not have the same address 39 Bewator AB 03.2007 Wiring the system 7.12 Connecting the DC01 door controller Fig. 8 DC01 Overview A Local circuit. Power supply: Terminal 1 and 2. Communication: Terminal 3 and 4. Screen: Terminal 5. Do not forget termination resistors in the circuit ends. B POWER: Green LED indicates power on/off. COM: Yellow indication LED. Flashes quickly when communication is working properly, slowly when interrupted (autonomous mode). C Choose the address for 1-16 or 17-32 D Set the door controller’s address by placing the link on the required number. Note! 2 door controllers connected to the same segment controller must not have the same address. E Remote opening input. For connection of an exit request button (push to make). F Door monitor input for door contact. Indicates open or closed door. Configured by the installer program. G Opening relay. Voltage free contacts. Max load 2 A. (----- = fail safe operation e.g. magnetic lock). H Power supply for electric locking device. Max 500 mA. I Tamper switch. Alarm message is sent when the controller’s lid is opened 40 Bewator AB 03.2007 Wiring the system 7.13 Connecting the BC43 remote card reader Fig. 9 BC43 Overview A Connection between door controller and BC43 remote card reader (max 100 m). B Set the link to ENTRY if BC43 is used for entrance. Set the link to EXIT if BC43 is used for exit. C Tamper switch control: Set the links to ”Internal” when BC43 is part of a Bewator Entro system. No connection on reader terminal 5 and 6 is then allowed. Two links are used. D Tamper switch. E Connect the screen in case of long distances or disturbing environment. 41 Bewator AB 03.2007 Wiring the system 7.14 Connecting keypad M43 Fig. 10 7.15 M43 Overview A Connection between door controller and M43 keypad (max 100m). B Set the link on ENTRY if M43 is used for entrance. Set the link on EXIT if M43 is used for exit. C Tamper switch. D Buzzer. E Connect the screen in case of long distances or disturbing environment. Connecting the BC18 remote card reader Fig. 11 BC18 Overview NOTE The J4 jumper in the door controller must be set to +5V before the door controller is powered, otherwise the reader may be damaged. 42 Bewator AB 03.2007 Wiring the system 7.16 Connection of other readers It is fully possible to connect other reader types, e.g. Entro range of proximity readers and Hands-Free readers. You will find instructions in the reader’s manuals. The following examples show shorthand information for some typical readers. Note that the DC22 & DC12 door controller supports Wiegand readers. 7.16.1 Connection of 500-series proximity readers (BCLINK) Note that there is an optional way of controlling the red LED in these readers. You may have it always lit when the door is locked. See more in the chapter Changing the red LED function on readers in the User manual. See page 45 for using these readers in Anti-pass back applications. X135H Fig. 12 7.16.2 X BCLINK connections for HD500, PM500, PR500 & SP500 Connection of Hands-Free reader HF500 (Clock&Data) This hands-free reader is connected to DC22/DC12 and is always mounted indoors. However - the reading distance permits both entry end exit functions in the same reader. NOTE The jumper J4 in the DC22/DC12 must be linked on +Vin. Fig. 13 Clock & Data connections for Hands-Free HF500 43 Bewator AB 03.2007 Wiring the system 7.17 Connecting DC800 controller The DC800 controller is a stand alone unit that also can be connected to an Entro system. Remember to set the jumper J3 on Entro (see item N) and address it in the range 1-8. The mechanical design is exactly as the DC12 (see page 37). See the table below for the electrical installation and setup. Fig. 14 DC800 Overview E Power in: Terminal block nos. 1 and 2. 10-40V DC or 8-28V AC F Opening relay. Voltage free contacts. Maximum load 2 A. G Relay for Warning, Monostable Alarm by-pass, Alert or Duress. Software controlled. When Alert is selected also the tamper switch will activate this relay. H RS485 connection for system communication Com A & Com B to USB-RIF/2 (Entro Lite), next DC800 or SR34i (Entro). I Input for door monitor contact. Indicates open or closed door. J Remote opening input. For connection of an exit request button (push to make). K Connection of card reader/keypad. Maximum load 300 mA. Maximum distance for BCLINK readers 100 m (dependant on cabling). Maximum distance for Clock & Data readers, e.g. proximity reader: 50 m L Jumper for output voltage selection to reader/keypad +5V or Vin= incoming supply. Warning! Make sure the setting is correct, otherwise readers may be damaged Default: +5V. M Jumper for interface selection - CLOCK & DATA, BCLINK or WIEGAND (26bit, 32bit or 8bit PIN code. Default: BCLINK. N Jumper for system configuration - Stand-Alone, Entro Lite or Entro. Default: Stand-Alone. O Jumper for address selection 1-8 for Entro Lite or Entro. Default: Address 1 P Tamper switch. Gives warning if the DC800 controller’s lid is opened. Note! Will also activate the relay in item G when this is setup as Alert. Q Keypad 0-9 plus A & B to configure the DC800. R The LEDs red, yellow & green (together with the buzzer) indicates the different steps in the configuring sequences. When the DC800 is in idle mode, the green LED will flash with approx. 5 seconds interval to verify that the DC800 is powered. 44 Bewator AB 03.2007 Special installations 8 Special installations 8.1 Anti-pass back using BCLINK readers When BCLINK readers are installed for anti-pass back function a sub-addressing technique is used. This means that e g in a PR500, for example; The ENTRY PR500 and the link for EXIT PR500 are controlled internally by the door controller that decides upon the direction. Wiring the door monitor contact and lock are done as usual. 1. EXIT reader 2. ENTRY reader 3 Door monitor contact 4. Electric lock 45 Bewator AB 03.2007 Special installations 8.2 Anti-pass back using CLOCK&DATA and WIEGAND readers If the readers do not support sub-addressing the door monitor contacts and opening relays be connected as follows: 1. ENTRY 2. EXIT 3. Power supply 4. Opening relay 5. Lock 6. Remote opening 7. Door contact 8. Opening relay. Note! Voltage free contacts 9. Reader Only connect the door contact on the ENTRY reader. Connect the EXIT reader’s opening relay with voltage free contacts to the ENTRY reader’s remote opening input. If needed, disable event registration of ”Valid access – Exit button” in Bewator Entro event filter settings. 46 Bewator AB 03.2007 Special installations 8.3 Installation of Interlock doors Bewator Entro offers the possibility for two doors to co-operate in order to form an interlock zone. This means that the first door has to be closed before the next door can be unlocked. To be able to monitor the status of the doors, both must be equipped with door monitor contacts. We strongly recommend that also some suitable mechanical, emergency opening equipment is mounted in the interlock zone (from within the interlock zone). Fig. 15 Example with two BCLINK readers PR500 1. Door monitor contacts. 2. Electric Lock. 8.3.1 Access from Door A to Door B When entering door A, which is then closed during the opening time, door B will be automatically unlocked. 8.3.2 Access from Door B to Door A Because the installation is the same in both doors the entrance will be work in the same way for both directions. 47 Bewator AB 03.2007 Install the connection to the PC 9 Install the connection to the PC It is possible to use either RS232 or Ethernet for communication between a PC and controllers. 9.1.1 Local Area Network to PC If Local Area Network (Ethernet 10/100 Mbit) is used for communication between PC and SR34i – you connect the network cable from the Ethernet connector in the SR34i to the Local Area Network. The distance to the PC depends on the cable configuration of the network itself (hubs, switches etc). You must confirm with the IT Manager the correct IPaddresses and installation settings for the system. It is also possible to form a dummy “local area network” which only consists of a directly connected SR34i and a PC. In this case you use a network cable between the PC and the network switch in the SR34i. NOTE If you connect a temporary PC with network cable direct to SR34i, we recommend that also the PC use a static IP-address. Preferably in the range 10.1.200.xxx (with Netmask 255.255.255.0) because the SR34i initially is set to an IP-address in this range. Fig. 16 Example of connecting a PC via Local Area Network. 48 Bewator AB 03.2007 Install the connection to the PC 9.1.2 Connect PC or printer with direct cable (RS232) The segment controller must be installed close (max 25 meters) to the PC. The illustration below shows an available, complete kit consisting of a wall socket (IF1), a standard RS232 cable (approx. 1.2 m) and 25 meter cable with one free end to connect to the screw terminal block of the wall socket. You can use the standard cable directly (alt. 2) between the PC and the SR34i - or make a more fixed installation (alt 1.). RS232 needs fewer settings in the PC, which simplifies the set-up. You can also temporally use RS232 – and then change to Ethernet later. Fig. 17 Two alternatives for RS232 cabling. The total distance between PC or printer and the segment controller must not exceed 25 meters maximum. NOTE The RS232 port can also be connected to a printer. Note that either a PC or a printer can be connected to a segment controller – not both. 49 Bewator AB 03.2007 Install the connection to the PC 9.2 Installing USB-RIF/2 In Entro, an enrolment reader can be connected directly to a PC via the reader interface USB-RIF/2. It can be used for: z Login of cards z Login to system software with card. z Fast search of card holders. USB-RIF/2 connects to a standard USB-port in the PC. It is supported of a software driver (USB-Agent) installed along with the Entro software is loaded when booting the computer. There are also Kits available with the proximity reader PR500 (Cotag or EM4102 technology) together with a desk stand. Fig. 18 USB-RIF/2 to PC. 50 Bewator AB 03.2007 Power supplies and communication 10 Power supplies and communication Connect the power supply according to the instructions below, but do not connect the power to outgoing cables. Apply power when you start the system (see the Check the communications circuit section on page 53) 136H 1. Power supply. 2. Mains 2 + earth. 3. Local bus (4 + screen). 4. Power supply failure connected to IOR6. The system cables screen can be earthed at the power supply. Connect the screen to protective earth, but remember that the system cables’ screen must be earthed at one point only in the system. Also remember that metal parts in doors or vehicle barriers can be in contact with earth. For readers installed on these surfaces, the screen must not be connected to the metalwork. 10.1 Central power supply If central power supply is used, you should take precautions against voltage drop. Dimension the power supply equipment and cables so that the voltage at the last door is not below the tolerance of the lock and reader. A 24V electric locking device has a tolerance of + -15% which is equivalent to 20,4V. A 12V electric locking device has a tolerance of + -10% which is equivalent to 10,8V. One way of reducing unnecessary voltage drop is to place the power supply equipment somewhere in the middle of the circuit. Thus, the load will be equal on each side of the power supply. If the distances or the load are too great, multiple power supply units are required. 51 Bewator AB 03.2007 Power supplies and communication 10.2 Local reader power supply for doors Whenever one or several readers are connected to a local power supply, remember to join the negative wires (0 volt) to avoid potential differences. See example below. 10.3 Considerations concerning earthing & screening The cable screens on each circuit must be connected to protective earth, but only in one place in the system (see picture). Also remember that metal parts in doors or vehicle barriers can be in contact with earth. For readers installed on these surfaces, the screen must not be connected to the metalwork. Avoid placing the cables close to heavy current installations, (e.g. lifts and power doors) since they may cause disturbance. 52 Bewator AB 03.2007 Power supplies and communication 10.4 Check the communications circuit RS485 When all units are connected (but with all removable terminal blocks disconnected in drop boxes and door controllers), check on reader block nos. 3 and 4 in drop boxes, door controllers and segment controllers that the resistance on the global and the local communication circuit respectively, is 60 Ω (ohm) plus the cable resistance. If the resistance is 120 Ω plus the cable resistance, one termination resistor is missing. If the resistance is much less than 60 Ω, there is a short circuit in the communications circuit. If the resistance is much greater than 120 Ω (open circuit), there is a break in the circuit or the termination is missing in both ends. 10.5 Check the power supply Connect the power supplies. Check that the voltage is approximately that of the power supply output and that + and – are in the right positions. Remember that a voltage drop (between the highest and lowest potential) larger than 5V between units may influence the quality of the RS485 communication. 10.6 Check communication Go to all units in the system and check that they are communicating. If using a LAN, check that all cables are correctly connected to the LAN. 53 Bewator AB 03.2007 Configuring 11 Configuring This manual only describes mounting and installation of different system components. Software installation and configuring is explained in the User Manual. The software consists of three main parts: Installer Normally the first program you use, to configure different type of functions related to physical units like door monitor contacts, alarm zones and connections to PC. Entro This program is used for managing access groups and card holders. It can be treated as main program because it is used for daily operations. Door and event monitor Used for status information and event logging but can also be used for unlocking doors via the PC. 54 Bewator AB 03.2007 Bewator Entro Reservation 12 Bewator Entro Reservation Bewator Entro includes reservation functions (e g in sports arenas, tennis courts, conference rooms etc) and works together with the integrated access control system. The System Administrator sets which objects (such as card readers/doors) are to be included and chooses the relevant reservation time schedules. The users wanting to reserve times can use an ordinary web-browser (such as Explorer or Netscape) and login to the SR34i containing the reservation system. Alternatively use his/her card in a reservation terminal (InfoPoint IP811/IP810) – depending on how the system is configured. 12.1 Integrated Web server The SR34i has an integrated (embedded) web server function, which is used for reservation applications. It requires that the dedicated SR34i have a permanent connection to the Internet (when Internet is used). NOTE At least one of the SR34i must be equipped with a Memory card for web reservation (see item H, page 31 – which will contain the reservation information. 55 Bewator AB 03.2007 Bewator Entro Reservation 12.2 How the Reservation system is installed First, all the doors and any IOR6 (for doors and machine control in the objects) are installed according to earlier sections. Afterwards the CF8 is mounted in the SR34i intended for reservations. Depending on how the reservation function is specified, one or more InfoPoint IP811, IP810 or touch-screen terminals can be connected to the system through the network. I e a combination of PC and these terminals is possible. Technically the entire reservation information is stored in an integrated website (in a SR34i) with its own IP-address on a network. NOTE Configuring is described the User Manual. The address to this website is http//xxx.xxx.xxx.xxx/login.html which should be notified to the users of the Reservation system. 12.3 Installing the CF8 flash memory card The CF8 memory acts similar to a hard disk unit for storing files. When delivered it contains the HTML-files used in the Reservation system. 1. Remove the power from the actual SR34i. 2. Install the CF8 card. 3. Reconnect the power to the SR34i. When all other necessary parameters and units for Reservation are configured, you can connect to the IP-address of the SR34i (http//xxx.xxx.xxx.xxx./login.html) – and the login page should be displayed. 56 Bewator AB 03.2007 Bewator Entro Reservation 12.4 Connecting the InfoPoint IP811/IP810 Fig. 19 Rear view of the InfoPoint terminal A Power supply input via RJ45 type connector. B Supplied cable with RJ45 type connector and free end. Length is 3 meters. C Polarity = 24V, = 0V. D Standard TCP/IP network connection. E Standard Cat-5 IP-cable for LAN connection F Reserved for external units. The InfoPoint IP811/IP810 is mounted local to the reservation object and works as a terminal with a simple, embedded web browser. You can mount it on the wall (using the supplied fixing parts) – or flush mount it in a separate box. In the terminal there are some keys to navigate on the screen as well as a card reader to identify the user. The InfoPoint has a TCP/IP interface which requires an IP-address to work (just like a PC). The installation manual supplied with the InfoPoint describes the steps to mount and set-up the terminal. High Voltage The InfoPoint housing does not normally need to be opened for proper operation. However – if needed be aware that the InfoPoint includes high voltage components. 57 Bewator AB 03.2007 DVR Installation 13 DVR Installation The Entro software can communicate with up to 16 DVR systems via TCP/IP. It supports DVR units in the Siemens SISTORE™ AX-, CX- and MX- range. We recommend that the installer have good knowledge about DVR system in general and SISTORE™ systems in particular before any DVR functionality is introduced into the Entro system. 13.1 Implementation in Entro The integration of DVR and Entro indeed consists of two separate hardware systems which are connected via TCP/IP and remote software functions. This means that you initially install software components for both systems in the same PC. When you then configure functions (like filtered and timed triggering to start recording) in the Entro, these are then sent to the DVR. When the conditions for a certain action then are met the DVR starts recording images. You may then replay these directly from the Entro Door monitor with some optional command options. 13.2 Planning and installing DVR and cameras The main procedure for using DVR in Entro is that all components for the DVR system (cameras, storage units, video cabling, power supply etc) are planned and installed separately according to its documentation. Remember to carefully document the IP-address, password etc for the DVR before any setup is performed in Entro. The numbering of cameras will also be needed to bring into the Entro. Some parameters must also be configured in the DVR to get communication work in Entro. See Appendix 1 – DVR models and settings for different models. X137H X When the DVR itself have been configured – please carry on with the installation by reading in the Entro User manual how to configure the Entro software. 58 Bewator AB 03.2007 Expanding and modifying the system 14 Expanding and modifying the system Expansion and modification of a Bewator Entro system can of course be performed in many ways. Sometimes more doors are needed (sometimes also requiring more SR34i controllers) – or more PCs are needed. In addition software updates and upgrades may apply. Naturally, an expansion needs at least one working PC connection to handle the necessary setup. If local area network is used, be sure to reset to the factory crypto key before any expansion is done. 14.1 RS485 In a system only using RS485 communication (RS232 for PC), just install new segment controllers and door centrals together with new cabling and power supplies. All units will start to communicate immediately. 14.2 Networking In a TCP/IP based system the segment controllers and PCs must be installed correctly with correct IP-addresses and encryptions keys. Door controllers and readers are installed as before. NOTE The easiest methods when expanding the system is to temporarily reset to the factory installed Default crypto key – and then change it later on when the system installation is finished. All controllers must be of type SR34i. I.e. the older SR32i (or SR32) cannot be used. If new SR34i controllers or PCs are to be connected to a TCP/IP based Bewator Entro system, they must be configured correctly. There are two ”channels” used for information: z Between PC and SR34i – through RS232, modem or TCP/IP. z Between SR34i and SR34i – through RS485 or TCP/IP. The basic rule is that if the communication is done via TCP/IP the crypto key must be loaded into all units. However, if RS232 is used instead for PC-communication, the controller can be reached. 59 Bewator AB 03.2007 Expanding and modifying the system 14.3 Installing another PC Entro 5.3 allows that several PCs concurrently can administrate the system: z Only one PC can be online (the tab Connection not displayed in Installer). z Several PC on-line concurrently (more Connections). Regardless of which above, the new PC must fulfill certain requirements: z A separate Bewator Entro software license must be available for this PC. z The Bewator Entro program should be installed on the PC, which also must have its own, valid IP-address for LAN connection. z The PC must have a valid crypto key installed – if used. We assume below that the system is reset to the factory installed Default crypto key before any new units are connected to the system and that no preparations for more connections are done. 14.3.1 Prepare the existing database Proceed as follows: 1. Start the Installer program on the existing working PC. 2. Go to the Connection tab in the System/System settings and select that several computers can be connected concurrently. 3. Click OK – and a new tab appears in the main window in the Installer. The default, earlier hidden connection is now displayed as #1. Change the name of it before going further. 4. Click the tab Connections and start the wizard by clicking New. 5. Select System administration and enter the parameters: – Name of the connection (any name) – Which SR34i – we recommend to use the same SR34i for all PCs unless a serial port (RS232) is to be used in the new PC. – License number – I e the number for the new computer. This is noted on the CD case for the new software license. – Type of communication – TCP/IP, RS232 (or modem). 6. You have now created a new connection for Entro and can exit the program in the existing PC. 14.3.2 Configure the new PC Because this PC does not yet have any database stored nor know the way of communicating with Entro, you have to create a connection. 1. Start the new PC and install the Bewator Entro software according to instructions in the User manual. Note! A separate software license is needed. 2. Start the Installer and select at login that a new connection shall be created. Follow the instructions on the screen (similar to above). You have now defined in which way the computer will communicate, entered the system name etc. 3. Exit and start Bewator Entro and Change Crypto key. 60 Bewator AB 03.2007 Expanding and modifying the system 14.3.3 Installing another SR34i There are several ways to configure an SR34i before connecting it to a system. Sometimes it is easiest to use the RS232 port. Remember that the SR34i have built-in menu commands for checking editing different parameters. It is important that the set-up is correct. This means: z Correct System name. z Correct network parameters (IP address, Netmask and Gateway). z Correct crypto key. – if used In some network solutions you will get help from the software to “find” a new SR34i (node). The condition for this is that it exists within the same “subnet” as the PC (which sends a request when starting the Installer program). If an SR34i is found you can add it and configure it like the other controllers. If the conditions for the above are not met - proceed as follows: 14.4 1. Be sure the PC has an updated database. 2. Change to Standard crypto key (temporarily) for the whole system. 3. Select the address on the new SR34i – and power it up. 4. Set up the networking parameters (e g IP address) using the keypad and display. (Eventually you must erase the memory of the SR34i.) 5. Connect the network cable and start Installer – and the new controller will be found by the software and is shown as **Cxx. The database and the crypto key are sent from the PC - to the controller. Note that firewalls etc may require that some SR34i have to be setup manually (no **Cxx displayed). 6. Change name and set-up the parameters for this controller. 7. Exit. 8. Start Bewator Entro and Change Crypto key. Installing more readers It is very easy to install more readers in the system. You only need the necessary cabling and ensure the following: z The DC12 or DC22 are available for the reader. (Does not apply for the PD30-EM/PD40-EM). z That the hosting SR34i does have enough addressing capacity. z That the power supply is enough. z That the bus termination resistors are installed properly. 61 Bewator AB 03.2007 Expanding and modifying the system 14.5 SR34i firmware control Sometimes when a system is expanded or upgraded there maybe need for patching the firmware in the segment controllers. In the Installer program there are improved functions for controlling the mechanism for patching the segment controllers. The status of the different units is displayed. In a system you are now able to use the same PC for updating all controllers at the same time. In addition you can indeed select which controller to update and which data file (“SR_firmware.hex”) to use. Also there is better information about the status of each updating process. You can actually see the estimated time. This applies for all controllers – not only the one connected to the PC. NOTE The download is using the current files stored in the Entro program folder. Proceed like this for the actions you want to do: 1. Start Installer and choose System/System information. 2. All controllers are listed on the screen showing the status for the different units (address, product, version, voltage level). If any controller fails to communicate there is a cross over the unit. 3. Click on Update firmware – and select which version to download (stored in the Entro program folder). It is possible to download an old version. 4. Click on Next and mark the SR to be updated. 5. Click on Finish. A progress bar is displayed for each controller showing the remaining time You cancel the process at any time by clicking Cancel update – no update is performed and the old version remains. 6. 14.6 Finished. Door controller firmware control If the door controllers DC12/DC22 and the PD40-EM/PD40-EM have firmware version 1.20 or later, the Installer program can download new firmware via the system bus. This requires that the units are on-line. NOTE During download the door is unlocked if this is defined in the Security level in off-line condition. All other selections results in a locked door. 14.7 Printout of system configuration In the Installer program you can generate a graphic view of installed components for easier control of e g current firmware versions etc. Proceed like this: 1. Start Installer and go to System/System information. 2. Click on Save as – as an image in JPG format is stored on disk. 62 Bewator AB 03.2007 Installing modem based systems 15 Installing modem based systems Up to 10 000 Bewator Entro systems may be controlled from one PC. If several systems are to be connected directly to a PC, the PC must have as many COM ports as there are Bewator Entro systems. PCs communicating with one system directly and with another via modem must have one COM port for connection of a segment controller and another for connection of a modem. Below is an example of a configuration where a PC has direct contact with one Bewator Entro system and modem contact with another. 1. System #1 2. System #2 63 Bewator AB 03.2007 Installing modem based systems 15.1 Installing the modem based system Having named the new Bewator Entro system and stated how it should communicate with the PC, you should complete a doors chart and install card readers, segment controllers etc according to the instructions given earlier in this manual. 15.1.1 Configuring a system equipped with TD35 modem (recommended) We strongly recommend to use the TD35 at the site when using modem communication because it has e g a watch-dog. If you have installed a modem TD35 at the remote site (and its telephone number is available) there is no need to do the configuring on site. You can connect the SR34i to the modem, hook on the line but do the configuring at the host computer instead (even if this may take longer time). See more in chapter Transferring the new system’s information to the central PC. X138H X However – if you still want to configure it on site, you do this through the RS232 link and then switch to modem when it is done. Proceed according to the chapter Configuring the modem based system on site. X139H 15.1.2 X Configuring a system equipped with a custom modem If another modem (not TD35) is used there may be a need of changing the init string of the modem and configured on site (via RS232). You should then, temporarily, connect a PC with the Bewator Entro software to one of the segment controllers to be able to configure the system (see the next chapter). When the configuring is finished you can disconnect the PC and connect the modem instead. Do not forget to test the communications circuit and the power supply according to the instructions on page 53. 64 Bewator AB 03.2007 Installing modem based systems 15.2 Configuring the modem based system on site You have now installed card readers, segment controllers and a PC. For the system to work you should also program information about doors and segment controllers. Configuring the new system should be done on location, i.e. with the PC connected (with RS232) to a segment controller in the new system. 1. Start Installer and click the tab New connection and you start a wizard to establish the connection between the PC and the controller. No login is needed because the system (database) is probably new and will use the default user name bewa and password pass. 2. Select New system and proceed. 3. Select RS232 and proceed. The software automatically detects the correct COM-port. 4. Enter a name for the new system in the Site name field, e.g. Oak lane. This name will be displayed in the Bewator Entro Login windows, for the user to choose whichever system he or she wants to work with. 5. Enter the system’s name in the System name field. This name must be unique and identical with the name you will be asked to enter when setting up the main computer (see page 68). X140H X It is very important that you make note of the system name. If the PC has to be replaced you must enter the same system name once again. 6. Exit the wizard by clicking Finish. Now the Installers main window is displayed. 7. You perform the set up of doors etc when you are on site according to the instructions given in the User manual. (Instead of later on via the modem connection). 8. Now the main configuring is done and you now prepare to connect the modem. 9. In Installer click on the Connection tab. 10. Mark the tick box Modem and a new tab is displayed. 11. Enter the modem telephone number. 12. A suggestion for the modem’s so called init string is automatically displayed in the Init string for SR34i modem field. This string means ”command echo disabled”, ”auto answer off”, and ”DTR disconnected”. The string can be modified if needed. 13. If the modem needs to be able to call the PC, enter the desired telephone number in the Telephone number to PC field. 65 Bewator AB 03.2007 Installing modem based systems 14. If the modem needs to be able to call the PC, you enter the name of the System user who shall dial up the PC (so that the PC know where to store the events). Set also for which circumstances. The following alternatives exist: – After (desired number) events. Means that the segment controller calls the PC following the desired number of events. – On every event set to alarm. Means that the segment controller calls the PC following each alarm event. – On database changes. Means that the segment controller calls the PC fol- lowing each modification in the database. This only applies if another PC is connected to any of the new system’s segment controllers. A call is made every 15 minutes if the database is modified. NOTE 1 Activation and deactivation of alarms as well as PIN code alterations are a database modification, which means that calls will be made every time this occurs. NOTE 2 Entroser must be running in the PC for Bewator Entro to be able to receive calls about database modifications. 15. Click OK. Now you have configured all the information about the new system. Disconnect the PC you have used for configuring the system and connect the modem instead (see next page). 66 Bewator AB 03.2007 Installing modem based systems 15.3 Installing the modem The illustration below shows how to connect a modem to the segment controller used for communication with the PC. When the modem is installed the installation is completed. The only thing remaining is to transfer the information configured for the new system to the central PC used to configure both systems. Minimum requirements for modem: – 9600 bit/s – Auto answer off – DTR disconnected – Command echo disabled Recommendation: The modem should have Watchdog built-in. Watchdog resets the modem automatically in case of an interrupted connection or power failure. NOTE If the modem runs on 12-24V, it can be powered by the system’s supply, in which case it will also make use of the system’s battery backup. 67 Bewator AB 03.2007 Installing modem based systems 15.4 Transferring the new system’s information to the central PC Go to the PC to be used for configuring and monitoring both systems. If this PC has not Bewator Entro Installed install it from the CD provided (see User manual – Installing Software). Then you will need to create an initial connection in the PC (to the modem) to be able to transfer the information. Later on you only have to select which system/connection, login and dial up as usual. 1. Start Bewator Entro Installer Note that if the PC has no system installed, the wizard starts automatically and you start the wizard directly (without login). 2. Enter the User name & Password. 3. Go to tab New connection and start the wizard. 4. Select Existing system and proceed. 5. Mark the modem choice and enter the telephone number of the modem. Now the connection is set up and you might proceed dialing up the remote site as below - or later you can log in and dial up. 6. Enter the Site name and System name. NOTE It is very important that you enter the same system name as when you installed the modem. If the PC has to be replaced you must enter the same system name once again. 7. Exit. The wizard will now try to connect (dial-up) the remote site. If this fails – proceed as below. 8. The Bewator Entro Installer main window is displayed. The name of the chosen system is displayed in the window’s title bar. Since you have not yet called the new system you are OFF-LINE. 9. Click the lifted handset symbol on the tool bar or choose Call on the Modem menu. A message is displayed while the system tries to establish a connection. When the connection is established the systems are in direct contact, i.e. the green ON-LINE indicator is lit. When all information is transferred (this may take a couple of minutes) the DB UP TO DATE indicator will also turn green. The new system is now ready to receive information about time schedules, persons, access groups and doors according to the User manual. NOTE Bewator Entro should always be ONLINE (connected via modem) when configuring a modemcontrolled system. This way information transfer will be quicker and safer. 68 Bewator AB 03.2007 Integrating with external applications (BAPSI) 16 Integrating with external applications (BAPSI) 16.1 General Normally access control system software is quite proprietary to its system components and is seldom open for customized applications. This is quite natural because it is also a security system to be used for controlling e g access to doors in different kind of facilities. Bewator Entro can use a well-defined configuring interface to communicate with other, external software packages (like Time & Attendance, Alarm control or similar). E g to import/export cards, get time stamps or events. An ordinary TCP/IP link is used for transferring the data between the different software components. The external software must be modified/completed according to the specification we call BAPSI. Remember, this not a program just guidelines to the programming interface. With BAPSI this is done in a specified and safe (encrypted) way that still keeps the access control system on a secure and integral level. The specification can be requested from Bewator. 16.2 What is BAPSI used for? Normally the User interface in access control software allows for functions like card registering, time schedule configuring and standard event logging (and searching). Using BAPSI, custom application software can take advantage of sending/receiving messages to/from the access control system – and easily add new functions into the overall system. This could be Time& Attendance, Reservation systems etc. 16.3 Field applications At the moment there are already systems running in the reservation applications area – using the BAPSI software interface. In this case the supplier of the external reservation software made a modification to their software module, which writes data into a file – and Bewator developed a special module that reads this file and forwards this information to the access control system 69 Bewator AB 03.2007 Integrating with external applications (BAPSI) 16.3.1 Application example - External Reservation system Bewator have, mainly for the Swedish market, developed an application (based on BAPSI) called BAPSER, which allows for sending data between Bewator Entro and external reservation software (at the moment Idavall-Fri and Argentum-Booking). The module is installed in the external PC that uses a TCP/IP link to send the reservations to Bewator Entro. If you intend to use BAPSI in some way the Bewator Entro must have some parameters set up. This is described in the documentation supplied with the BAPSER but you can invoke the menus by proceeding as follows: 1. Start the Installer program and click on Connections. 2. Click on New. 3. Select BAPSI – external application integration and proceed. 4. Enter the necessary parameters applying to the actual application. 5. Click OK 70 Bewator AB 03.2007 Checklist 17 Checklist The checklist below is a useful aid when installing Bewator Entro. It will also make sure the implementation will run smoothly. If you have questions, do not hesitate to contact technical support. The operating system in the system’s PC is: 2000 XP If RS232 is to be used - are there free serial COM ports (9/25-pin plug) in the system’s PC? Yes Is the wall socket (RS232) installed close to the system’s PC and connected to a suitable SR34i and is the total distance between PC and SR34i less than 25 meters? Yes If local area network is to be used – does the PC have a correct connection? Yes Have the SR34i got correct IP-addresses – authorized by the IT-Manager? Yes Have all connected segment controllers, readers and door controller’s proper addresses? Yes Is the reader connected to correct terminal block in DC22/DC12 and is the power link correctly fitted? Yes Is a 120-ohm resistor fitted at the end of each RS485 communication circuit? Yes Does the resistance in all communication circuits comply with the values recommended in the manual? Yes Is each circuit’s screen connected to earth in one place only? Yes Are the power supply equipment and cables properly dimensioned? Yes When Reservation is used – is at least one CF8 installed in an SR34i? Yes Is time and date properly set when the system is on-line? Yes 71 Bewator AB 03.2007 Technical information 18 Technical information Bewator Entro software z Software for control of up to 10 000 systems, each capable of managing up to – 512 doors – 40 000 cards – 240 time schedules – 480 access groups – 128 zones (alarm, anti pass back, roll call, interlock and entrance limitation zones) – 16 system users in 4 levels + installer level – 14 holidays, 7 half days and 4 holiday periods in each time schedule z Supplied on CD with accompanying manuals Reservation functions z 64 reservation objects (machine groups). z Maximum of 30 doors and/or IOR6 relays in each Reservation object. z 32 time schedules with 24 intervals in each. z Flexible interval reservation. z Maximum number of reservations is 6 100. Basic requirements for PC: z Pentium processor 266 MHz z 64 Mb RAM z At least 20 MB free hard disk space z CD-ROM drive z VGA color monitor z Serial port for connection of segment controller/modem z Local Area Network connection z Windows 2000 SP4, XP SP2 - or later z MS Internet Explorer 5.0 or Netscape 4.7 (or above) is recommended as Web browser. Basic requirements for network: z Twisted pair Ethernet 10/100 Mbit connection. z Communication between SR34i is done through TCP/IP. z We recommend static/permanent IP-address for every SR34i (In some cases also Netmask and Gateway is needed). z We recommend permanent, active Internet connection of SR34i (when Internet is used). Note - when Internet connection is used, the following ports have to be open (in fire-walls or similar) and configured as follows: z 4002 if communication is used between PC and the chosen SR34i. z HTTP (port 80) when using reservation via Internet. z 4011 for TCP when several SR34i communicates through LAN. 72 Bewator AB 03.2007 Technical information z SNTP (port 123) for fetching correct time, if SR34i uses TCP protocol between each other. SR34i Segment controller DVR integration z Maximum 16 DVR z Maximum 128 cameras InfoPoint IP811/IP810 z Reservation terminal for Bewator Entro. z Color screen with 400 x 200 resolution in 256 colors. z Integrated proximity reader. z Numeric keypad 0-9 (IP810) and 10 function keys. z Temperature range: +5 – 40 °C z Power supply: 10 – 35 V DC/AC. z Power consumption: 350 mA (24 V DC). z Dimensions: – InfoPoint: 154 x 350 x 52 mm (H x W x D). – Flush mount box: 211 x 388 x 43 mm (H x W x D). Cut out hole: 140 x 354 x 40 mm (H x W x D). Segment controller for 4, 8, 16 or 32 doors z Four built-in communication interfaces: – RS232 – for connection of PC, printer or modem. Max 25 m – RS485 global – for interconnection of up to 16 segment controllers – Two TCP/IP network connections 10/100 Mbit for communication via WAN/LAN – RS485 local – for connection of door readers z Integrated network switch with one ‘internal’ and two external ports. z Display and keypad for configuring. z Memory for 10 000 events. z Lockable housing for wall mounting z For installation inside in a dry environment only z Temperature range: 0 – 50 °C z Housing fitted with tamper switch z Dimensions: 182 x 248 x 66 mm (H x W x D) z Power supply: 8 – 40 V DC or 8 – 30 V AC z Power consumption: 100 mA, 24 V DC. z RS232 interface: – 9600 baud alt 57 600 baud. – No parity – 8 bits – 1 start bit – 1 stop bit – Printer output with hardware handshaking (character table ISO 8859-1) 73 Bewator AB 03.2007 Technical information DC22 Door controller z Door controller for 1 door and connection of up to two Entro readers. z 6 voltage free relay contacts. – Change over contact for control of electrical locking devices or similar. – Closing contact for control of a motor lock. – Change over contact for alarm by-pass, (Monostable, Bistable or Bistable pulse). – Closing contact for pre-warning during alarm activation cycle. – Closing contact for door held warning i.e. if a door remains open beyond the set time. – Alert relay for door alarm (e.g. when doors are forced open) or for motor lock control. z Maximum load over the relay contacts: 2 A, 30 V DC. z Opening time: 1 – 99 second. z Exit request input with delay. z Input for indication of intruder alarm status (red LED). z Input for alarm by-pass activation e.g. from a time clock or the Alarm status feedback signal (ASF). z Separate inputs for door & lock monitoring for closed/open door and locked/unlocked lock. z Maximum reader load: 500 mA. z Rectified DC output for door locks (input voltage less 1.5 volts at 500 mA maxi- mum. z Lockable housing for wall mounting. z For installation inside in a dry environment only. z Housing fitted with tamper switch. z Temperature range: –35 °C to +50 °C. z Dimensions: 182 x 248 x 55 mm (H x W x D). z Power supply: 8 – 40 V DC or 8 – 30 V AC. z Power consumption: Max 60 mA, 24 V DC (excl reader). DC12 Door controller z Door controller for 1 door and connection of up to two Entro readers. z Opening relay for control of electric locking device or similar. z Maximum load over the relay contacts: 2 A, 30 V DC. z Opening time: 1 – 99 seconds. z Exit request input with delay. z Input for door monitoring. Indicates closed/open door. z Maximum reader load: 500 mA. z Lockable housing for wall mounting. z For installation inside in a dry environment only. z Housing fitted with tamper switch. z Temperature range: –35° to +50 °C. z Dimensions: 128 x 250 x 54 mm (H x W x D). z Power supply: 8 – 40 V DC or 8 – 30 V AC. z Power consumption: Max 60 mA, 24 V DC (excl reader). 74 Bewator AB 03.2007 Technical information DC01 Door controller z Door controller for 1 door and control of door without reader. z Opening relay for control of electric locking device or similar. z Maximum load over the relay contacts: 2 A, 30 V DC. z Opening time: 1 – 99 seconds. z Exit request input with delay. z Input for door monitoring. Indicates closed/open door. z Lockable housing for wall mounting. z For installation inside in a dry environment only. z Housing fitted with tamper switch. z Temperature range: –35 °C to +50 °C. z Dimensions: 80 x 120 x 40 mm (H x W x D). z Power supply: 10 – 40 V DC or 8 – 30V AC. z Power consumption: 100 mA. IOR6 Relay central z Relay central for – Lift control – Reservation function or – Timer control – Common alarm – Emergency opening – Power failure warning z 6 voltage free relay outputs. z Maximum load over the relay contacts: 60 V, 0,9 A (30 V, 2 A). z 4 inputs. z In Lift Control applications, up to 32 IOR6 can be connected in a system. z Lockable housing for wall mounting. z For installation inside in a dry environment only. z Housing fitted with tamper switch. z Temperature range: –35 °C to +50 °C. z Dimensions: 140 x 200 x 60 mm (H x W x D). z Power supply: 8 – 40 V DC or 8 – 30 V AC. z Power consumption: 50 mA in standby mode, 200 mA with all relays activated. 75 Bewator AB 03.2007 Appendix 1 – DVR models and settings 19 Appendix 1 – DVR models and settings This appendix describes which parameters to set in the different SISTORE™ models and which additionally cautions to consider getting them work in the Entro environment. NOTE For all models - it is recommended to print the documentation on the CD (supplied with the DVR) before any configuration is done. 19.1 SISTORE™ MX There are some initial steps to carry out via the SISTORE™ MX software before any Entro software can communicate. Normally you probably install the whole MX software suite to be able to both control the detailed settings of the MX DVR - as well as viewing. It is however possible to only install the RemoteView module to view recordings from Entro. We recommend that the MX software is installed on the C-drive. 19.1.1 MX Parameters You must confirm (or re-configure) the use of and note down the following parameters in the MX type of DVR: Parameter Default value User name: Administrator Entro parameter Password: Administrator Entro parameter IP address <Not set> Port 40 N/A <Fixed in Entro> Port SR <-> DVR 8080 N/A <Fixed in Entro> Port range 1100 - 1109 N/A <Fixed in Entro> Camera no’s and names <Not set> Optional User Value: Comment Entro parameter Entro parameter NOTE It is a good idea to name the cameras equally in both the DVR and the Entro environment because otherwise it is a risk that the on-screen name differs from the name seen in the Entro event log. When the parameters are configured – enter them into the Entro Installer program when creating connections and cameras. Read more how to do in the Entro User Manual. 19.1.2 MX Live Viewer software If you only want to do the basic viewing from Entro, just install the RemoteView module on the actual PC where Entro is installed. Otherwise no view will be displayed 76 Bewator AB 03.2007 Appendix 1 – DVR models and settings 19.1.3 Additional considerations for the MX Following settings must be performed in the MX: z In the configuration "software trigger" has to be activated to start recording. You have to activate that at the MX itself. It's not possible with the remote configuration. z Continuous recording has to be activated. This can also only be activated at the MX itself. 19.2 SISTORE AX 19.2.1 General z Note that if you connect a VGA monitor to display the on-screen menus (and im- ages) – check that the rear selector switch are set to VGA. z You also install the supplied PC software for remote control of the AX in the ac- tual PC where Entro is installed. Otherwise no views will be displayed. z Although you will see the AX Admin, AX Watch and AX Search software com- mands in the PC – you should be careful using them when the Entro application is running. 19.2.2 AX Parameters You must confirm (or re-configure) the use of and note down the following parameters in the AX type of DVR. It is possible to use the buttons on the AX front panel to configure the basic parameters (e g the IP parameters) according to the AX Quick start guide. As soon as you have established a LAN connection to the AX you can optionally configure the parameters from the PC. Parameter Default value User name: <Not set> Entro parameter Password: 12345678 Entro parameter IP address 192.168.1.129 Entro parameter Gateway 192.168.1.254. Entro parameter Subnet mask 255.255.255.0 Optional User Value: Comment Entro parameter Port: SR <-> DVR 17655 N/A <Fixed in Entro> Port: Watch 8016 N/A <Fixed in Entro> Port: Admin 8200 N/A <Fixed in Entro> Port: Search 10016 N/A <Fixed in Entro> Port: Callback 8201 N/A Camera no’s and names <Not set> <Fixed in Entro> Entro parameter NOTE It is a good idea to name the cameras equally in both the DVR and the Entro environment because otherwise it is a risk that the on-screen name differs from the name seen in the Entro event log. 77 Bewator AB 03.2007 Appendix 1 – DVR models and settings 19.2.3 Additional considerations for the AX Following settings must be performed in the AX: z Continuous recording have to be activated z No recording configuration in the time laps recording setup. z AX 9/16: The REC button has to be activated at the AX device. When the parameters are configured – enter them into the Entro Installer program when creating connections and cameras. Read more how to do in the Entro User Manual. 19.2.4 AX Live Viewer software Note that only one live view window at a time can be displayed using the AX Watch remote software. This means e g that if Entro is displaying a view in the Installer when setting up a camera you cannot concurrently view an image in the Door Monitor (by clicking on a camera icon). 19.3 SISTORE™ CX 19.3.1 General The CX model uses PC software module for configuring and viewing. Read more in the Quick setup or the DVR Configuration manual. We recommend that the SX-CX software is installed on the C-drive. Note that the CX includes an integrated “homepage” which can be browsed for more information about the actual unit. As soon as the “device list” is configured it is possible to connect. 19.3.2 CX Parameters The DVR does not have any front panel buttons to re-configure e g its network settings locally. Therefore it is recommended to initially use a PC with the SX-CXConfig software installed (without any other network connected) and connect the network cables only to the DVR. As soon as the steps according to the DVR manual are done you then confirm (or re-configure) the use of and note down the following parameters in the CX type of DVR using the SX-CX Config program: Parameter Default value Optional User Value: Comment User name: admin Entro parameter Password: admin Entro parameter IP address 169.254.16.9 Entro parameter Subnet mask 255.255.0.0 Entro parameter Gateway 0.0.0.0 Port 12050 N/A Port SR <-> DVR 12050 N/A Camera no’s and names <Not set> Entro parameter <Fixed in Entro> <Fixed in Entro> Entro parameter 78 Bewator AB 03.2007 Appendix 1 – DVR models and settings NOTE It is a good idea to name the cameras equally in both the DVR and the Entro environment because otherwise it is a risk that the on-screen name differs from the name seen in the Entro event log. When the parameters are configured – enter them into the Entro Installer program when creating connections and camera settings. Read more how to do in the Entro User Manual. 19.3.3 CX Live Viewer software The software for remote viewing, currently named SX-CX Client, on the DVR must be installed in the actual PC where Entro is installed. Otherwise no view will be displayed. 19.3.4 Additional considerations for the CX The IVM rules (standard) have to be activated to get the pre- and post-recording functionality in the DVR to work. 79 Bewator AB 03.2007 Keyword index 20 Keyword index A F Alarm Status Feedback, 35 Alarm Zones, 34 Anti-pass back, 43, 45, 46 AX, 77 factory crypto key, 59 firmware, 62 B G glands, 28 BAPSI, 69 BC18, 42 BC43, 41 BCLINK, 25, 43 H C InfoPoint, 55, 57 init string, 65 interlock, 47 intrusion, 7, 34, 35 IOR6, 38 IP-addresses, 31 cables, 24 cameras, 58 central power supply, 51 CF8, 56 Clock&Data, 25 Common alarm, 38 Connection, 60 Connections, 14 crypto key, 61 Crypto key, 60 D database, 15, 60 DC01, 40 DC12, 36 DC22, 32 DC800, 44 DHCP, 20, 22 display, 31 DNS, 20 Door held warning, 33 door monitor contact, 45 Door monitor input, 33, 37 download, 62 DVR, 58, 76 dynamic DNS, 20 E encryptions, 59 enrolment, 50 ENTRY reader, 46 Ethernet, 16, 31, 48 EXIT reader, 46 HF500, 43 HTML, 56 I K knockouts, 27 L LED, 43 license, 15, 60 License, 60 lift control, 38 Local Area Network, 48 local power supply, 52 Lock monitor input, 33 M M43, 42 machine control, 38, 56 Memory card, 55 modem, 63, 64, 65 motor lock, 33 MX, 76 P Password, 68 patching, 62 power supply, 51 proximity, 43, 50 R readers, 61 reservation, 55 80 Bewator AB 03.2007 Keyword index RS232, 49 RS485, 16 S Sistore, 76 SISTORE, 58 software, 54 SR34i, 30 Static IP-addresses, 21 switch, 30 T termination resistor, 53 U USB-RIF/2, 50 User name, 68 V,W wall socket, 49 web server, 55 Wiegand, 26 voltage drop, 51, 53 TCP/IP, 16 81 Bewator AB 03.2007 Keyword index 82 Bewator AB 03.2007 Issued by Bewator AB © 2007 Copyright by Bewator AB, a Siemens company SE-171 24 Solna Sweden Data and design subject to change without notice. Supply subject to availability. www.bewator.com Document no. 81328-4 Edition 03.2007 .