1
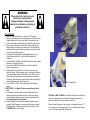
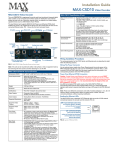
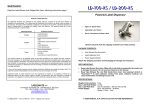
CSD10 Label Dispenser Switched HI-LOW Speed Adjustable Label Sensor For Opaque Labels CSD10 Label Dispenser Remove all parts from shipping container and verify contents. Package Contents CSD10 Label Dispenser AC-DC Adapter (Power Supply Module) User Manual (this document) IMPORTANT NOTES: 2629 Valley Pike, Dayton, OH 45404 USA (937) 237-2001 FAX (937) 237-1595 Toll-Free (800) 228-3606 in USA [email protected] www.centurysystems.com Not for transparent labels. Keep the Stripper Bar and Web Guide Bars clean. Use isopropyl alcohol or “Goo-Gone”™ to clean adhesive residue from parts. Adhesive buildup can cause malfunction and damage to your Unit. Do not use any chemicals on the Sensor or the Sensor Eye. Use only a cloth or paper towel moistened with water. Retain the Shipping Container and Packaging for Storage and Transport. • KEEP MANUAL IN A SAFE PLACE FOR FUTURE REFERENCE • WARNING This product is for indoor use only. Not for use in wet locations. Unplug unit before removing waste material or performing any cleaning or maintenance services. SET-UP AND USE 1. Make sure the Power Switch is in the center “OFF” position. 2. Set your Label Dispenser in place and plug the cord from the Power Supply Module into the Power Input Jack on the rear of the Unit. 3. Connect the Power Supply Module to a suitable AC power source. 4. Place your roll of labels on the Label Roll Holder & slide the Roll Edge Guide(s) to the width of your label web. The Label Web can be positioned from side to side as required to ensure that the label lines up with the reflective sensor. 5. Thread the label web between the Stripper Bar and the round Guide Rod directly above it. See the Label Threading Path illustration. 6. Pull the label web UNDER the round Web Guide and slide the width adjusters to the width of the web. 7. Loop the web UNDER the Wire Bail on the Take-Up Shaft as shown in the illustration. 8. Slightly loosen the Label Sensor Lock Knob, until you can just rotate the Sensor. Point the sensor up so it is pointing at the bottom of the Stripper Bar. Place the Power Switch in the “LOW” position. Slowly rotate the Sensor down until the label begins to advance. Continue to rotate the Sensor slowly until the desired label length is protruding. Retighten the Lock Knob securely. 9. Use the “HIGH” or “LOW” Switch setting to select the desired speed. 10. IMPORTANT – Pull labels UP when removing them not to the side. 11. If excess dust or dirt accumulates on the Label Sensor Eye the Dispenser may not sense labels correctly. Use a cloth or paper towel dampened with water to gently clean the Label Sensor. Do not use any chemicals on the sensor. 12. Optional Flanges for the inside and outside of the label roll are available. These Flanges are recommended for narrow or loosely wound labels that may have a tendency to fall off the roll. Order FLANGES-LD. Set of two Flanges. Label Threading Path OPTIONAL LABEL COUNTER: The optional Label Counter will add one count to the displayed number for each label that is dispensed. This Option is available only factory installed in new Units. When the Label Dispenser is first turned on, it may display a count of “1” or the number from the previous count. You can reset the Label Counter to zero (“0”) by pressing the “R” Reset Button.