1
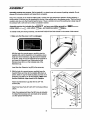
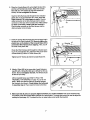
6. Place the Console Base (47) on the Right Handrail (72)
and the Left Handrail (not shown). Attach the Console
Base with four 314"Screws (2) (onlytwo Screws are
shown). Do not overtighten the Screws.
6
I
47
Insertthe Wire Harness (42) through the two indicated
plasticties on the Console Base (47). Next, touch the
Right Handrail (72) to discharge any static. Plug the
widest connectoron the Wire Harness intothe widest
connector on the back of the Console (43). If the connector does not fit easily, rotate it and then connect it.
Plugthe otherconnector on the Wire Harnessintothe
otherconnector on the Console.
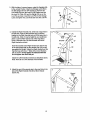
7. Insert the excess Wire Harness (42) intothe large hole in
the side of the Right Handrail (72). Securely tighten the
plastic ties on the bottom of the Console Base (47) to
prevent the Wire Harness from slipping. Then, cut off
the ends of the plasticties.
43
7
Ties
42 O_
Route the Wire Harness (42) through the indicatedopening in the Console Base (47). Attachthe Wire Cover to the
Console Base (47) with a 1/2" SilverScrew (48).
Tighten two 3/4" Screws (2) into the Console Base (47).
Ill\ "
8. Attach a Wheel (66) to the inner side of each Extension
Leg (63) with a Wheel Bolt(64) and a Wheel Nut (13) as
shown. Do not overtighten the Bolt. The Wheel should
be able to spinfreely.
Lift the treadmill frame (see HOW TO FOLD THE
TREADMILL FOR STORAGE on page 11), but do not
latch it. Make sure that the frame is centered between
the Handrails (not shown). Firmly tighten the boltsused
in assembly step 4. Then, lower the frame to the floor.
66
9. Make sure that all parts are property tightened before you use the treadmill. Note: Extra hardware may
be included. Keep the included allen wrenches in a secure place. The large allen wrench is used to adjustthe
walking belt (see page 14). To protectthe floor or carpet, place a mat under the treadmill.