1
®
I
E
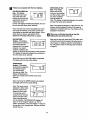
Model No. 831.297572
Serial No.
Wnte the serial number in the space
above for future reference.
_mber
Decal
tionslnlt_, ma_lo_ore
using
t_s equ_-Save
_ls mam:l
for future mlmm:e:_
USER'S MANUAL
TABLE OF CONTENTS
IMPORTANT PRECAUTIONS .....................................................
BEFORE YOU BEGIN ..............................................................
ASSEMBLY .....................................................................
HOW TO USE THE HEART RATE MONITOR ...............................................
OPERATION AND ADJUSTMENT .....................................................
HOW TO FOLD AND MOVE THE TREADMILL .............................................
MAINTENANCE AND TROUBLE-SHOOTING .............................................
CONDITIONING GUIDELINES .....................................................
PART LIST
...............................................................
ORDERING REPLACEMENT PARTS ..........................................
FULL ONE YEAR WARRANTY ................................................
2
4
5
6
7
17
18
20
22
Back Cover
Back Cover
Note. An EXPLODED DRAWING is attached at the center of thinmanual. Save the EXPLODED DRAWING for
future reference.
IMPORTANT
PRECAUTIONS
a= WAR NiNG: To.m.=the of
=
t=wann
m-
following Imporisnt_precautlona and Infamtaffml before operating the treaclmltl._
1. It is the respotn_bility of ff_e owner to ensure
that all uanm of this tree_lmlll ere adequately
Informed of all warnings and pre_mffonL
2. Uan the trudmlll
manual.
only an deanrlbed in this
3, Rscethe tllladmlll on a level surlace_ vdth
alght foat of clmirance baltlnd It, Do nof pisce
the tnmdmlll on any anrisce that blocks air
opaningL
,Toprotectme#ou_:
_ _
damage_ piscea _
u_
from
thel[z'andi_llL
4. Keep thetreadmIll I_
away _Wmmoll_mrs and dust. Do not putthe tl_admlll In s
garage or covered patlo,:or nanr watis,.'
5. DO not operate the fmedmlll where aet_0qml
produats are uud or _hefe oxygen is balng
admlnl_.
6. Keep shHdren under the age of 12 and pats
away '1_ the treadndll at all t_
7. The treadmill should not beueed by pefanns
weighing more than 250 pounds.
8. Never allow mrs than one person on the
treadmill at s UnNx
9.
Wear approprloteexerclse
clothing when
using the b, eadmllL Do not wear loom clothIng tdh,at could become ceugM in the beadmlll.
Athletic support clothes are recommended for
both men anct women. Always wathletlc
shoes. Never use.the:trmdmlll wlilh bare feet,
wuarlng only atoaldnge,-or In sandals.,
10. When _ne_lng
tt_ lXMer _rd (m HOW
TO PLUG:IN THE POWE_CORD on F_ge 7),
(not Included) and'_
_
sur_w0fo_ta_
1sot m_ =.p=. _
_|=_=,
I_'on them
•
alrcuit.
11. Use only as!t_le-0Wh_'surge
of 400 Vo_i.w-lm:
s_o.
should
'
suppressor
and _mlnlmum
surge dls-
of,4S0Jo=_'T_'=ume-=up_mr
_'
must be alectdcally
1sin
ratedfor 120 volts _
and
12. Ksep the power cord and the tmr_e suppran' anr away from hanted su_a_m_
is. Nevermo_ thewalkl.obeewhilothepower
is turned off._Do not opemfo the tmadmlll If,
the power c0_l or plug la damaged,- =r If the
trmdmm!s notwoddngproperly.(_e
BEFORE YOU BEGIN'on page 4 If the trandmill is not working'properly.)
14.NeverstarttheWmdmlllwhile
you am standIng on the walking i=elL Always hold_th_ handrails while using the treadmilL
15. The l:eedmlll' is capab_ of I_gh;speeds.
Adjust the speed in small Increments to avoid
sudden jumps In speed.
16. To reduce the possibility of the treadmill overheating, do not opermithelbreedml, €onOn_
ously for longer than one hour.'
17.Theheart
THE TREADMILL on page 17.) You must be
abis to rarely Im 45 pouedR (2o ko)in ord_
to raise, lower, or move the tnmdmlll.
20, When folding of moving,the trelldndll, make
sum that the storage latch is fully ©lmmd.
21. Inspect and tlghtan all.paris of the _reedmfll
every three months.
22. Never Insert any object Into any c_mni_.
23.TZler_rlU.=_"wt bem ,._fromtbe.
rate monHor isnot a_medJ_l de.
rear mller.-Removethe,key and isdldstthe
movemm_ may Miser the_
of hee_t
rattereedlng_ "rile Ilmwl_
monitc,_ _ I_.
tended only as an e_
ald In d_etanmlnlng
heart rate trends In ganeral.
18. Never leave the Vsodmmunattanded whl_ It
Is running. Always remove the Imy;unpisg
the power cord and move tbe o_off SWitch to
the "OfT positisn when'the _11
isnot In
use. (See the drawing on page4 for the location of the oWoffswl_h.}
24. Always unplug bm power €ord before pm'-
_nJng _u_e
..,inisnancea,_edJuSuannt
pro-_
eedurm descdbed in this nmllual:Never remove the m0t0r hood uhkw _
to do
soby.ananmorlz_ mk,vlctrep_,eeant_ve.•
Servicing other tben _e procedursoln this
manual should be pei'f(WnWd byan anthorizod
sorrY, represanisuveanly.
"U;._
19. Do not attempt to raise_ lower, olrmove the
treadmill until It is prope_ usand_d.
(See
ASSEMBLY on page 5, _indHOWTO MOVE
lreadmlH is _
tlor l_-homeuse
only. Do not use this.treedmlg In any commercial, rental, or Institutional setting.
SAVE THESE INSTRUCTIONS
WAR NING
or
any
exer se
program,
consult
your
phyMcisn. This
is es_ally]mporisntfor!_s;oym'lhe*egeof35°orpkmmmlwlth_isUng
n_a.
!ns_r._ons _:_
damage sus_ln_l
W or throu_
SEARS
m,um_ nomspo,.,_myforpe_,
the u_of
_
_IX
oblems-
_.ry, orproperty
tliis i:m:_:lu,=t.
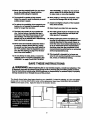
The decals shown below have been placed on your treadmill. If a decal is missing, or if it Is not legible,
please call our toil-free HELPLINE to order a free replacement decal (sea ORDERING REPLACEMENT
PARTS on the back cover). Apply the decal In the location shown.
BEFORE YOU BEGIN
Thank you for selecting the IMAGE* 10.6Q treadmill.
The IMAGE®10.6Q treadmill combines advanced technologywith innovativedesign to let you enjoy an effective form of cardiovascularexercise in the convenience
and privacy of your home. And when you're not exercising,the unique IMAGE®10.6Q can be folded up, requiringlessthan half the floor space of othertreadmills.
1-800-736-6879, Monday through Saturday, 7 a.m.
until7 p.m. Central Time (excluding holidays).To help
us assist you, please note the productmodel number
and serial number before calling. The model number of
the treadmill is 831.297572. The serial number can be
found on a decal attached to the treadmill (see the
front cover of this manual for the location).
For your benefit, read this manual carefully before
using the treadmill. If you have questionsafter reading the manual, please call our toll-free HELPLINE at
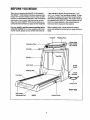
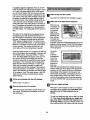
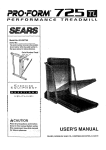
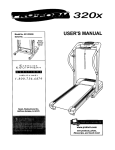
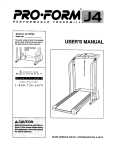
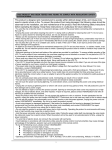
Before reading further, please review the drawing
below and familiarize yourself with the parts that are labeled.
Console
Reading Rack
Water Bottle
(Bottle
not included)
AccessoryTray
Handrail-
Upright
Lock Knob
On/Off
Switch
Walking
Circuit
Foot
Power Cord
RIGHT SIDE
_rRoller
Adjustment Bolt
BACK
Cushion Knob
4
ASSEMBLY
Assembly requires two people. Set the treadmill in a cleared area and remove all packing materials. Do not
dispose of the packing materials untilassembly is completed.No tools are required for assembly.
1. With the help of a second person, carefully raise the
Uprights (115) untilthe treadmill is in the positionshown.
2. Press the Lock Knob Sleeve (100) intothe left Upright
(115).
115
Remove the Lock Knob (99) from the Lock Pin (103).
Make sure that the Lock Pin Collar (102) and the Spring
(101) are on the Lock Pin. Insert the Lock Pin intothe left
Upright (115) and tighten the Lock Knob onto the Lock
Pin.
3. Remove the backing from the Adhesive Clip (94). Press
the Adhesive Clip onto the base of the Uprights (115) in
the indicated location. Press the Allen Wrench (95) into
the Adhesive Clip.
//
/101
99
3
4. Make sure that all parts are tightened before you use the treadmill. Place s mat under the treadmill to
protect the floor or carpet,
5
HOW TO USE THE HEART RATE MONITOR
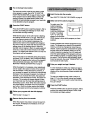
HOW TO PUT ON THE HEART RATE MONITOR
use, it may remain activated longerthan necessary,
draining the battery prematurely.
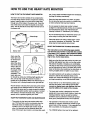
The heart rate monitorconsistsof two components:
the chest strap and the sensorunit (see the drawing
below). Insertthe tab on one end of the chest strap
throughone of the holes in the sensor unit. Press the
end of the sensor unit under the buckle on the chest
strap. The tab shouldbe almost flush with the front of
the sensor unit.
_Chest
• Store the heart rate monitorin a warm, dry place.
Do not store the heart rate monitorin a plasticbag
or other container that may trap moisture.
• Do not expose the heart rate monitorto direct
sunlightfor extended periods of time; do not expose
it to temperatures above 122= Fahrenheit (50 =
Celsius) or below 14 ° Fahrenheit (-10° Celsius).
• Do not excessively bend or stretch the sensor unit
when using or stodng the heart rate monitor.
Strap
• Clean the sensor unit using a damp cloth--never
use alcohol, abrasives, or chemicals. The chest
strap may be hand washed and air dried.
Tabs_
_ _kle
HEART RATE MONITOR TROUBLE-SHOOTING
Sensor Unit
The Instructions on the following pages explain
how the heart rate monitor Is used with the console.
If the letters "PLB" appear In the PULSE/CALORIES
display or If the displayed heart rate Is excessively
high or low, try the steps below.
Tab
Next, wrap the
heart rate monitor around your
chest and
attach the other
end of the chest
strap to the sensor unit. Adjust
the length of the
chest strap, if
necessary. The
heart rate monitor should be under your clothing,tight against your
skin, and as high under the pectoral muscles or
breasts as is comfortable. Make sure that the logo on
the sensor unit is facing forward and is right-side-up.
• Make sure that the heart rate monitoris under your
clothing,tight against your skin, and as high under
the pectoral muscles or breasts as is comfortable.
The logo on the sensor unitmust be facing forward
and be right-side-up.Note: If the heart rate monitor
does not functionwhen positionedas described, try
moving it slightlylower or higheron your chest.
• Use saline solution such as saliva or contact lens
solution to wet the two electrode areas on the
sensorunit. If heart rate readings do not appear until
you begin perspiring,re-wet the electrode areas.
• As you walk or run on the treadmill,positionyourself near the center of the walking belt. For the
console to display heart rate readings, the user
must be within arm's length of the console.
Pull the sensor unit away from your body a few inches
and locate the two electrode areas on the inner side.
The electrode areas are the areas covered by shallow
ridges. Using saline solutionsuch as saliva or contact
lens solution,wet both electrode areas. Return the
sensor unitto a positionagainst your chest.
• The heart rate monitoris designedto work with
people who have normal heart rhythms. Heart rate
reading problems may be caused by medical
conditionssuch as premature ventricularcontractions (pvcs), tachycardia bursts,and arrhythmia.
HEART RATE MONITOR CARE AND MAINTENANCE
• Thoroughlydry the heart rate monitorafter each
use. The heart rate monitoris activated when the
electrode areas are wetted and the heart rate
monitoris put on; the heart rate monitorshuts off
when it is removed and the electrode areas are
dried. If the heart rate monitor is not dried after each
• The operation of the heart rate monitorcan be
affected by magnetic interferencecaused by high
power lines or other sources. If it is suspected that
this is a problem, try relocatingthe treadmill.
• The CR2032 battery may need to be replaced.
6
OPERATION
AND ADJUSTMENT
THE PERFORMANT LUBE TM WALKING BELT
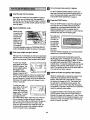
This productis for use on a nominal 120-volt circuit,
and has a groundingplug that looks hke the plug illustrated in drawing 1 below. A temporary adapter that
looks hkethe adapter illustratedm drawing2 may be
used to connect the surge suppressorto a 2-pole
receptacle as shown in drawing 2 if a properly
groundedoutlet is not available.
Your treedmdlfeatures a walking belt coated with
PERFORMANT LUBE TM, a high-performancelubricant.
IMPORTANT: Never apply silicone spray or other
substances to the walking belt or the walking pierform. Such substances will deteriorate the walking
belt and cause excessive wear.
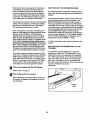
HOW TO PLUG IN THE POWER CORD
_Grounded
Outlet Box
DANGER:
the eq rou
Check with a qualified _e_drlckm_or smvlceGrounding
"'p_
meplugprov ed
p uct-n
nwm
Grounded Outlet
(_roundingPlug_"_
not fit the outlet, haye arproFer outlet
Instetledby a qualmed eteetdclan,
l_--Grounded Outlet Box
/11 _J I
( "_" _1
Your treadmill, like any other type of sophisticated
electronicequipment, can be seriouslydamaged by
sudden voltage changes in your home's power.
Voltage surges, spikes, and noise interference can
result from weather cond_honsor from other apphances
being turned on or off. To decrease the possibility of
your treadmill being damaged, always use a surge
suppressor with your treadmill (see drawing 1 at
the right).
Adapter
^
Surge _uppressor
Metal Screw
Surge suppressors are sold at most hardware stores
and department stores. Use only a single-outletsurge
suppressorthat is UL 1449 listedas a transientvoltage
surge suppressor (TVSS). The surge suppressor must
have a UL suppressed voltage rating of 400 volts or
less and a minimum surge dissipationof 450 joules.
The surge suppressor must be electricallyrated for
120 volts AC and 15 amps.
The temporary adapter should be used only untda
properly groundedoutlet (drawing 1) can be installed
by a qualified electrician.
The green-colored rigidear, lug, or the like extending
from the adapter must be connected to a permanent
ground such as a properly groundedoutlet box cover.
Whenever the adapter m used it must be held m place
by a metal screw. Some 2-pole receptacle outlet box
covers are not grounded. Contact a qualified electrician to determine If the outlet box cover Is
grounded before using an adapter.
This product must be grounded. If it should malfunction or break down, groundingprovidesa path of least
resistancefor electric currentto reduce the risk of electric shock. This product is equipped with a cord having
an equipment-groundingconductorand a grounding
plug Plug the power cord Into a surge suppressor,
and plug the surge suppressor Into an approprlete
outlet that Is properly Installed and grounded In
accordance with all local codes and ordinances.
7
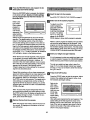
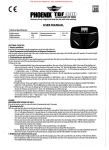
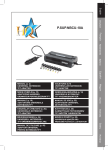
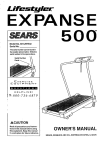
DIAGRAM OF THE CONSOLE
A
B
ii
C
--
.
"--'-_\\
Jl_,_l_l_=mlmm
D
E
,
_
_
_o
_
_
H
I
O00OO01
_
o.........
0000000000ooo
Doooooq
--'---_.\\
F
°_tb
G
._o
oooooooooo _
o_*._f
_
J
K
L
M
O0000000C
N
IMACIE_
Ill,P
o Ill-
I
J/!_l:'_'_,'_/-'- I
.........
_oooooooo
000000000
,_o
_
P
--
m
m
Q
Note: If there is a thin sheet of clear plastic
on the face of the console, remove it.
-,ACAUTION: To
of
FEATURES OF THE CONSOLE
The treadmillconsole offers an impressivearray of
features designedto make your workoutsmore effectnve.
tum g'or,
mep0w , uu,,ru mo
waHmmbeP.
• Alum
mr
ml!Lltfit_.key
tht €l_ (rampart "O"ln the
is pu,ed_frgm ffm €onsole ,
When the console is in the manual mode, the speed and
reclineof the treadmill can be changed with a touchof a
button As you exercise, the console will display instant
exercise feedback--you can watch your progresson the
LED "track," while the four dnsplaysshow your heart rate,
the number of calories burned, the incline,workout time,
speed, pace, dnstance,and laps completed.
tt_ v,_l_nguen v_ulsto_:
Adjustthesp_l
l_smal_Incmment_.
• The hea_ n_e monitor I_ not = m_llcal device. Various fa_m
may alfe_ the accu-
raWof he=t ratema_ng=;Thehemtrote
m_
Eight preset programsare also offered" three inclineprograms automatncallycontrolthe reclineof the treadmillas
they guide you through effectiveworkouts;three speed
programsautomaticallycontrolthe speed of the treadmill;
and two pulse driven programsautomaticallycontrolthe
speed and the incline of the treadmillto keep your heart
rate within a predeterminedrange duringyour workouts.
_ hr_mde_only*zi_)_lr exercise aid
inUmn_._m_r_rite
tmnu_tn_enem.
• ff you.have heart proll,ms,
or ff you ere
The console also features two custom programsthat
allow you to create your own workoutprogramsand store
them in the console'smemory for future usa.
overeOyem,_meand.ha_,e,u=m
five, doxml_.u_the
_WO-puhiedrlvenpro-
• farly,_tYoUrp_s_an:toflnd
•_t_w. tl_ _
exe_dsehea_ rat_
- TO reduce ttle riskof e_
:
,,,_IIaffect your
Mu_
kee_
the _:.nsole. imd uamonly _ sealed water
bottle.
To use the manual mode, followthe stepsbeginningon
page 10. To use an Incline program or a speed program, see page 12. To use a pulse driven program, see
page 13. To create a custom program, see page 14. To
use a custom program, see page 15.
Note: The console can displayspeed and distance in
eithermiles or kilometers (see SPEED/PACE DISPLAY
on page 11). For snmplicity,all instructionsin thussection
refer to mdes.
8
DIAGRAM OF THE CONSOLE
K
SET WEIGHT buttons--These buttonsare used to
enter yourweight into the console.
Refer to the drawing on the opposite page.
L. SET AGE buttons--These buttonsare used to enter
your age into the console.
A. Workout profiles--These profilesshow how the
inclineof the treadmillwdl change during inclineprograms, how the speed will change during speed programs, and how your heart rate will change
during pulse driven programs.
B
M INCLINE buttons--These buttonsare used to
change the inclineof the treadmdl.The tnclinerange
is 0% to 12%. Note. The inclinecan be adjusted
only while the walktngbelt is moving.
Mode indtcators--Theso indicatorsshow whether
the manual mode is selected or whetherone of the
eight preset programs is selected.
N. START button--This button ts used to startthe
walking belt when the manual mode, a preset
program,or a custom program ts selected
C. PULSE/CALORIES display--This displayshowsboth
your heart rate (if the heart rate monitoris worn) and
the approxtmate number of calories you have
burned. The display wdl alternate between one number and the other every seven seconds. This display
is also used to enter yourwetght intothe console.
O. Key wtthclip--The key turnsthe console on and off.
The clipis worn on the waistband of your clothes.
P
D. INCLINE/TIME dtsplay--This display shows boththe
inclineof the treadmilland the elapsed time (If a
preset program or a custom programis selected, the
displaywill show the time remainingin the program.)
The displaywill altemate between one number and
the other every seven seconds This display is also
used to enter your age intothe console.
Q STOP button--Thts button ts used to pause or stop
the walking belt when the manual mode, a preset
program, or a customprogram is selected.
HOW TO TURN ON THE POWER
E. LED matrix--When the manual mode is selected,this
matrixshowsyour progresson an LED track.When a
preset programor a customprogramis selected,the
matrtxshowsthe program'sworkoutprofile.
DRugand indtcatorson
in the power the
cord
(see page flash
7). Allonce
dtsplays
consolewdl
and
then darken. Note: If the key is in the console when
the power cord is plugged in, the letters =PO"will
flash m the SPEED/PACE dtsplay. If thts occurs,
remove the key.
F. SPEED/PACE dtsplay--This display shows both the
speed of the walking belt and your current pace
(minutesper mile). The displaywtllalternatebetween
one number and the other every seven seconds.
sure that the
la Make
on/off switch
locatedon the
frontof the treadmdl is in the "on"
position.
G. DISTANCE/LAP display--This d_splayshows both
the dtstance you have walked and the number of
laps you have completed (one lap equals 114mile).
The displaywillalternate between one number and
the other every seven seconds.
J.
J
on the foot
B Stand
railsof the tread-
H. CUSTOM PROGRAM buttons--These buttonsare
used to select custom programs1 and 2.
I.
SPEED buttons--These buttonscontrolthe speed
of the walking belt. The speed range ts 0.5 mph to
12 mph Note: When the START buttonts pressed,
the walking belt wdl begin to move at 1.0 mph.
mill and insertthe
m
key intothe console. After a moment, the MANUAL indicatorwdl
light,the letters
=LbS"will appear in the PULSE/CALORIES display, the letters "AGE" will appear in the INCLINE/
TIME d=splay,and the LED track in the center of
the console will light.Every few seconds, the words
"PRESS STAR'r" willscroll acrossthe LED matrix.
RECORD button--Th=s buttonis used to create
customprograms
PROGRAM SELECT button--Thts buttonts used to
select the manual mode and the eightpreset programs. Note: Ifthe walking belt ts movingwhen the
SELECT PROGRAM button is pressed, the walking
belt will slow to a stop and the d=splayswillbe reset
In eddthon, the treadmillmay automattcallyadjust to
the lowest inclinelevel
9
Lq
Put on the heart rate monitor
B
If desired.
For the PULSE/CALORIES display to show your
heart rate, the heart rate monitormust be worn. To
put on the heart rate monitor, see HOW TO USE
THE HEART RATE MONITOR on page 6.
Insert the key into the console.
See HOW TO TURN ON THE POWER on page 9.
Note: When you are familiar with the operation of
the console, you may go directly to step 5 if desired.
The first time you use the console, please read and
follow all steps.
!:1Press the START button.
Press the START button to startthe walking belt.
The LED track in the center of the console will
disappear in a counterclockwise direction.One
flashing indicatorwill then re-appear and the
walking belt will begin to move at 1.0 mph. Hold the
handrails and step onto the walking belt.
la Select the MANUAL mode.
When the key
is inserted, the
manual mode
will automatically be selected and the
MANUAL indicator will light.
If a program
has been selected, press the PROGRAM SELECT
button repeatedly to select the manual mode again.
The LED track
represents 1/4
of a mile. As
oooeooooooooooeoooo
ooeooooooooooooeoo
you exercise,
O00000000000000eO0
"
O000000000000000eO00
ooooeeeee'eeeeeoooo_
the indicators
O00000000_O000eO000
00000000
eeeeoooo
will light one
•
/
at a time until
the entire
track is lit.
The track will then disappear in a countemlockwisa
direction and a new lap will begin.
la Enter your weight and age If desired.
Although it is not necessary to enter your weight and
age to use the manual mode, the CALORIES display
will be more accurate if these numbers are entered.
To enter your weight,
press either of the SET
WEIGHT buttons. The
current weight setting
will appear in the
PULSE/CALORIES
display. Press the SET
WEIGHT buttons again to enter your weight. Each
time one of the buttons is pressed, the weight setting will change by I pound. If one of the buttons is
held down, the weight settingwill change in increments of 5 pounds.
To stop the walking belt momentarily,press the
STOP button once. All displayswill pause and the
INCLINE/TIME displaywill begin to flash. To restart
the walking belt, press the START button as described above. To stop the walking belt and reset all
displays, hold down the STOP buttonfor two seconds. The console will then be in the same state as
if the key had just been inserted.
!"4Adjust the Incline and speed of the treadmill.
To enter your age,
press either of the SET
AGE buttons.The
current age settingwill
o o_Ncle_
r_=- o
t
appear in the INCLINE/
TIME display. To enter
your age, press the
SET AGE buttons again. Each time one of the buttons is pressed, the age settingwill change by 1
year. It one of the buttons is held down, the age setting will change in increments of 5 years. Note:
Once you have entered your weight and age, the
numbers will be saved in the console'smemory,
even if the power cord is unplugged.
lO
While the walking belt is moving,the inclineof the
treadmill can be adjusted with the INCLINE
buttons. Each time one of the buttons is pressed,
the inclinewill change by 0.5%. The buttons can
be held down to change the inclinequickly.The
inclinerange is 0% to 12%. Note: After the buttons
are pressed, it may take a moment for the treadmillto
reach the selected inclinesetting.
To adjustthe speed of the walking belt, press the
SPEED buttons. Each time one of the buttons is
pressed, the speed will change by 0.1 mph. The buttons can be held down to change the speed in incrementsof 0.5 mph. The speed range of the walking
belt is 0.5 mph to 12.0 mph.
B Follow your progress with the four displays.
DISTANCE/LAP display--This display
shows both the distance you have walked
and the number of laps
you have completed
(one lap equals 114
mile). The displaywill altemate between one number
and the other every seven seconds.
PULSE/CALORIES disshows both your heart
play--This display
o{U,,E/3;A o._. o
rate (if the heart rate
\
monitoris worn) and the
approximate number of
calories you have
burned. The displaywill alternate between one number and the other every seven seconds.
\\
Note: The heart rate monitorwill sample your heart
rate every few seconds;it may take up to ten seconds before an accurate heart rate is shown. If your
heart rate is not shown, see HEART RATE
MONITOR TROUBLE-SHOOTING on page 6.
Note: If the speed is displayed in miles per hour,the
distancewill be displayed in miles; if the speed is
displayedin kilometersper hour, the distancewill be
displayedin kilometers.
B
INCLINE/TIME
0 INCUNE
TIME •
display--This display
shows both the inclineof
the treadmilland the
I--i • LI
elapsed time. (if a preset
programor a custom
program is selected, the
display willshow the time remaining in the program.)
The display willalternate between one number and
the other every seven seconds.
[/,-,.,1,_,,
I
Note: Each time the INCLINE buttonsare pressed,
the displaywill show the inclinesetting.
SPEED/PACE
display--This display
shows both the speed of
the walking belt and
your current pace
(minutesper mile).The
display willalternate between one number and the other every seven
seconds.
Note: Each time the SPEED buttons are pressed,
the display will show the speed setting.
Note: The speed can be
O sH_
_¢£ O
displayed in either miles
per hour (mph) or kilometers per hour (kph).
To check the unitof
measurement, first hold
down the STOP button
while insertingthe key
intothe console.The SPEED/PACE display will
show an "E" for "English" (miles) or an "M" for
"Metric" (kilometers). Press the SPEED %" button to
change the unit of measurement. Remove and then
reinsert the key.
IE
I
11
When you are finished exercising, stop the
walking belt and remove the key.
Step ontothe foot rails, press the STOP button, and
remove the key from the console. Stere the key in a
secure place. In addition,press the on/off switchto
the "off" position.(See the drawing near the bottom
of page 9.)
trlPut on the heart rate monitor If desired.
For the PULSE/CALORIES displayto show your
heart rate, the heart rate monitormust be worn. To
put on the heart rate monitor, see HOW TO USE
THE HEART RATE MONITOR on page 6.
Insert the key into the console.
See HOW TO TURN ON THE POWER on page 9.
la Press the START button.
Select one of the Incllne or speed programs.
Pressthe START buttonto start the program.After
a moment,the walking belt willbegin to move. Hold
the handrails and begin walking.
When the key
is inserted, the
manual mode
will automatically be selected and the
MANUAL indicator will light.
To select one
If an Incline program Is selected: When the
START button is pressed, the walkingbelt will begin
to move at 1.0 mph and the incline willadjustto the
inclinesettingshown in the firstcolumn of the LED
matrix.After one minute (or 90 secondsif a thirtyminuteprogram is selected), the second columnof
the LED matrixwill begin to flash and the inclinewill
adjust to the inclinesettingshown in the secondcolumn. After another minute (or 90 seconds), the third
column will beginto flash and the inclinewill adjust
to the settingshown in the thirdcolumn. The program will continue in this way until the twentieth column isflashing and no time remainsin the TIME display. The walking belt will then slow to a stop.
of the inclineor speed programs, press the PROGRAM SELECT button repeatedly until the desired
INCLINE or SPEED indicatorlights. Note: The first
incline program and the first speed programare
twenty-minute programs. All other preset programs
are thirty-minuteprograms.
When an incline or speed
O00000QO000000000000
program is seO0000000000QO00000
O000000QO000000000
'
lected, the
O0000010000011000000
LED matrix will
O00000000=,_QOOOQO000
OOQOOOOQ
_0000000
show all of the
inclineor
speed settings
of the program.
Each incline program has twenty inclinesettings,
and each speed program has twenty speed settings. One settingis shown in each vertical column
of the LED matrix.The first column will be flashing.
Note: Every few seconds, the words "PRESS
START" will scrollacross the LED matrix.
loooooooo oooooooo
in
The speed of the walking belt can be adjusted during
the inclineprogramwith the SPEED buttons.To stop
the program momentarily,press the STOP button
once. All displayswill pause and the INCLINE/TIME
display will begin to flash. To restart the program,
press the START button.To end the program before it is completed, hold down the STOP button for
two seconds. The console willthen be in the same
state as if the key had just been inserted.
Enter your weight and age If deslmd.
Althoughit is not necessary to enter your weight
and age to use an inclineprogramor a speed program, the CALORIES displaywill be more accurate
if these numbers are entered.
To enter you weight and age, refer to step 3 on
page 10. If you have already entered your weight
and age, or if you do not want to enter this information, go to step 4.
12
While the inclineprogram is in progress,the difficulty level of the program can be adjusted, if desired, with the INCLINE buttons. Pressthe INCLINE
%" button once. The letters "MAX" will appear in the
LED matrix, and the INCLINE/TIME display will
show the maximum inclinethat the treadmillwill
reach during the program. This informationwill be
displayedfor three seconds. Press the INCLINE "+"
button again. Each time the button is pressed, the
maximum inclinesettingand all other settingsof the
programwill increase slightly.The INCLINE "-" button can be used in the same way to decrease the
difficultylevel of the program. Note: The profile
shown in the LED matrix will not change; the profile
shows relative inclinesettings.
ff a speed program Is selected: When the START
button is pressed, the walking belt will begin to move
at 1.0 mph, the speed settingshown in the first column of the LED matrix.After one minute (or 90 seconds if a thirty-minute program is selected), the second column of the LED matrix will beginto flash and
the speed will adjustto the speed settingshown in
the secondcolumn. After another minute(or 90 seconds), the third column will begin to flash and the
speed will adjustto the setting shownin the third column. The programwill continuein this way untilthe
twentiethcolumn isflashingand no time remains in
the TIME display.The walking belt willthen slowto a
stop.
B
See HOW TO TURN ON THE POWER on page 9.
la Select one of the pulse driven programs.
When the key
is inserted,the
manual mode
will automatically be selected and the
MANUAL indicator will light.
To select one
of the pulsedriven
programs, press the PROGRAM SELECT button repeatedly until the desired PULSE DRIVEN indicator
lights.Note: Both pulse driven programs are thirtyminuteprograms.
The inclineof the treadmillcan be adjusted during
the speed programwith the INCLINE buttons.To
stop the program momentarily, press the STOP button once. All displayswill pause and the INCLINE/
TIME display will begin to flash. To restart the program, press the START button. To end the program
before it is completed, hold down the STOP button
for two seconds. The console will then be in the
same state as if the key had just been inserted.
The pulse
driven
OOOOOOOOOOOOOOOO$OO
programs
000000000000000000
,_
OOOOOOOOOOOeOOOOOO
automatically
OOOOOOOOOOOOO$eOOOOO
O0000000O_O00000000_
control the
oooeo$ooo_oooooeO0o
O000000000eO0000
speed and
J
inclineof the
"-""_
i
_F
treadmillto
keep your
heart rate near predetermined settings during your
workout. When one of the pulse driven programs is
selected, the LED matrix will show all of the heart
rate settingsof the program. Each program has
twenty heart rate settings. One setting is shown in
each verticalcolumn of the LED matrix.The first
column will be flashing. Note: Every few seconds,
the words =ENTER AGE" will scrollacross the LED
matrix.
While the speed program is in progress,the difficulty
level of the program can be adjusted, if desired, with
the SPEED buttons. Press the SPEED "+"button
once. The letters KMAX"will appear in the LED matrix, and the SPEED/PACE display will show the
maximum speed that the treadmillwill reach during
the program. This informationwill be displayedfor
three seconds. Press the SPEED %" buttonagain.
Each time the button is pressed, the maximum
speed setting and all other settings of the program
will increase slightly.The SPEED =-" button can be
used in the same way to decrease the difficultylevel
of the program. Note: The profileshown in the LED
matrix will not change; the profileshows relative
speed settings.
Follow your progress with the LED dlspleys.
Refer to step 7 on page 11.
Remove the key from the console.
Insert the key Into the console.
B
Enter your weight and age.
Although it is not necessary to enter your weight to
use a pulse driven program, you must enter your
age before one of these programs can be
started.
When the program has ended, remove the key from
the console.All displays and indicatorson the console will darken.
To enter you weight and age, refer to step 3 on page
10. If you have already entered your weight and
age, press either of the SET AGE buttons to verIfy the age setting. The words=PRESS START" will
then scroll across the LED matrix every few seconds.
13
[]
Put on the heart rate monitor.
The heardrate monitormustbe wornwhen a pulse
dnven programis used. See HOW TO USE THE
HEART RATE MONITOR on page 6. Note: A pulse
driven programcan be startedwithouta heart rate
reading;however, the speed and/or inclineof the
treadmillwill automaticallydecrease ifyour heart rate
is not detected duringthe program.
O
1
Ell
See HOW TO TURN ON THE POWER on page 9.
I_
While the first column of the LED matrix is flashing,
the walking belt will move at 1.5 mph. After 90 seconds, the second column of the LED matrix will
begin to flash. As the program progresses, the
speed and/or inclineof the treadmill will change at
any time to keep your heart rate near the heart rate
setting shown in the flashingcolumn. When the
twentiethcolumn begins to flash, the walkingbelt will
move at 1.5 mph until no time remainsin the TIME
display. The walking belt will then slow to a stop and
the program will be completed.
If your heardrate is not detected during the program,
the letters "PLS" will flash in the PULSE/CALORIES
display and the speed and/or incline of the treadmill
will automaticallydecrease. See HEART RATE
MONITOR TROUBLE-SHOOTING on page 6.
Custom programsare workout programsthat you
create. The programs are stored in the console's
memory, and can be changed as many times as
desired. Custom programscontrol both the speed
and the inclineof the treadmill. When one of the
custom programs is selected, the LED matrix will
show the speed settingsof the program (until you
have created a program, all speed settingswill be
the same). The first column will be flashing. Note:
Every few seconds,the words=PRESS START_ will
scrollacross the LED matrix.
lZlEnter your weight and age If desli%_d.
While the programis in progress,minor adjustments
can be made to the speed or inclineof the treadmill
with the SPEED or INCLINE buttons. However, if
you increase the speed, the inclinewill automatically
decrease; if you decrease the speed, the inclinewill
increase. If you increase the incline, the speed will
decrease; if you decrease the incline, the speed will
increase. The console will always attempt to keep
your heardrate near the heart rate settingshown in
the flashing column. Note: When the incline reaches
the lowest setting, the speed cannot be increased
any further. When the inclinereaches the highest
setting, the speed cannot be decreased any further.
Follow your progress with the LED dlspleys.
Refer to step 7 on page 11.
B
Select one of the custom programs.
To select one of the
custom pmgrams,
press the CUSTOM
PROGRAM 1 or
CUSTOM PROGRAM
2 button.The letters
"CP 1" or "CP 2" will
appear in the SPEED/
PACE display to show which program you have
selected.
Press the START button.
Pressthe START button to start the program. After a
moment, the walking belt will begin to move. Hold
the handrails and begin walking.
r_
Insert the key Into the console.
1
Remove the key from the console.
When the program has ended, remove the key from
the console. All displays and indicatorson the console willdarken.
14
It is not necessary to enter your weight and age to
create a custom program;however, the CALORIES
display will be more accurate if these numbers are
entered.
To enter you weight and age, refer to step 3 on
page 10. If you have already entered your weight
and age, or if you do not want to enter this information, go to step 4.
Press the START button.
Press the START buttonto startthe program. After a
moment, the walking belt will begin to move. Hold
the handrails and begin walking.
_'.'._ Press the RECORD button and program the deslred speed and Incline settlngs.
When the RECORD button is pressed, the indicator
on the button will light.Speed and Incline setUngs
can be programmed only when the Indicator on
the button is lit.
B
Insert the key Into the console.
See HOW TO TURN ON THE POWER on page 9.
Refer to the
B
LED matrix.
000000000(_300000000¢
O000000000000000000C
Each custom
000000000000000000
_,00000000000000000_
program is
O000000000000000000C
divided into
one-minute
segments. One
speed setting
and one incline
setting can be programmed for each one-minute
segment. The speed settingof the first segment is
shown in the flashing column of the LED matrix.
(The inclinesettings are not shown in the LED matrix.) To program the desired speed and incline settings for the first segment, simplyadjust the speed
and incline of the treadmill to the desired levels with
the SPEED and INCLINE buttons. Every few times
the SPEED "+" or "-" button is pressed, an additional
LED will lightor darken in the flashingcolumn.
Select one of the custom programs.
When the first one-minute segment of the program
is completed, the current speed settingand the current inclinesetting will be stored in memory. All
columns in the LED matrix will then move one position to the left, and the speed setting of the second
segment will be shown in the flashing column.
Program speed and incline settingsfor the second
segment as described above.
It is not necessaryto enter yourweight and age to use
a custom program;however, the CALORIES display
will be more accurate if these numbers are entered.
To select one of the
custom programs,
o,_o
_,c_
o
PROGRAM
1 or
press the CUSTOM
[: F'|
_l
CUSTOM PROGRAM
2 button.The letters
"CP 1"or "CP 2" will
appear in the SPEED/
PACE display to show which program is selected.
When a customprogram is selected,the LED matrix
willshow the speed settingsof the program. If the
programis more than twenty minuteslong,only the
first nineteen settingswill be shown. The first column
willbe flashing. Note: Every few seconds,the words
"PRESS STAR'[" will scrollacross the LED matrix.
laEnter your weight and age If desired.
Repeat this procedure until you have programmed
speed and incline settingsfor as many segments as
desired. Custom programs can have from one to
forty segments. When you are finished, hold down
the STOP buttonfor two seconds. The speed and incline settingsyou programmed and the number of
segments will then be stored in memory.To usethe
programagain, see HOW TO USE A CUSTOM PROGRAM at the right.
To enter you weight and age, refer to step 3 on
page 10. If you have already entered your weight
and age, or if you do not want to enter this information, go to step 4.
LqPress the START button.
Pressthe START buttonto start the program. After a
moment, the walking belt will begin to move. Hold
the handrails and begin walking.
Refer to the
LED matrix.
Each custom
program is divided intooneminute segments. One
speed setting
and one in-
Note: To pause the program temporarilywhile you
are programmingspeed and inclinesettings, press
the STOP buttononce. All displayswillpause and the
TIME displaywill begin to flash. To restart the program, press the START button.
r_
looooooo
00000000000000000000
O00000001000000000
000000000000000000
00000000000000000000
"
OOQO00000_O0000000
O00000QO
,__O00000QO
cline setting are programmed for each segment.The
speed settingof the firstsegment is shownin the
flashing column of the LED matrix. The speed settings of the next six segments are shown in the six
columns to the right.(The incline settingsare not
shown in the program display.)
Remove the key from the console.
When the program has ended, remove the key from
the console.All displays and indicatorson the console willdarken.
15
HOW TO SELECT THE INFORMATION MODE
When the first one-minute segment of the program
is completed, all columns of the LED matrix will
move one positionto the left, the speed setting of
the second segment will be shown in the flashing
column, and the speed of the treadmillwill change
accordingly.The inclinewill also change according
to the settingsthat you programmed previously.
The console features an informationmode that keeps
track of the total time and distance accumulated on the
treadmill.
The programwill continuein this way untilthe speed
setting of the last segment is shown in the flashing
column and no time remains in the TIME display.
The walking belt will then slow to a stop.
Note: If the program is too easy or too difficult,the
speed or inclinesettingof the currentsegment can be
adjusted with the SPEED or INCLINE buttons.
Adjustmentswill notbe storedin memory.To reprogram the speed or inclinesetting of the currentsegment, press the RECORD button.The indicatoron the
buttonwill light.Speed end Incline settings can be
programmed only when the Indicator on the button
Is llt. Adjustthe speed or inclinesetting of the current
segmentwith the SPEED or INCLINE buttons.After
the segment iscompleted, pressthe RECORD button
again. The new settingwillthen be stored in memory.
To access the informationmode, hold down the STOP
button while insertingthe key intothe console. The
INCLINE/TIME display will show the total number of
hours accumulated on the treadmill. The DISTANCE/
LAP display will show the number of miles accumulated
(ifthe total numberof miles exceeds 999, the thousands
and ten thousands digitswill be shown in the right half
of the SPEED/PACE display). The left half of the
SPEED/PACE displaywill show which unitof measurement is currentlyselected: an "E"for =English" (miles) or
an "M" for =Metric" (kilometers).To change the unitof
measurement, press the SPEED %" button.
To exit the informationmode, remove the key from the
console.
HOW TO ADJUST THE CUSHION LEVEL OF THE
TREADMILL
The treadmill is speciallydesigned to cushionthe
impact as you walk or run. The cushion level is controlled with the knobon the right side of the treadmill.
For a softer cushionlevel, turn the knob counterclockwise. For a firmer cushionlevel, turn the knob clockwise. Note: The faster you runon the treadmill, the
firmerthe cushion level shouldbe. If the cushion level is
too soft, the treadmill may bounce
excessively.
To stop the program momentarily, press the STOP
button once. All displayswill pause and the INCLINE/
TIME display will begin to flash. To restart the program, press the START button.To end the program
before it is completed, hold down the STOP button
for two seconds. The console willthen be in the
same state as if the key had just been inserted.
Follow your progress wlth the LED dlspleys.
Refer to step 7 on page 11.
Remove the key from the console.
When the program has ended, remove the key from
the console.All displays and indicatorson the console will darken.
16
HOW TO FOLD AND MOVE THE TREADMILL
HOW TO FOLD THE TREADMILL
FOR STORAGE
Before foldingthe treadmill, unplug the power cord. CauUon:
You must be able to safely lift 45 pounds (20 kg) In order
to raise, lower, or move the treadmill.
/"
1. Hold the treadmill with your hands in the locationsshown
at the right.To decrease the poealblllty of Injury, bend
your legs and keep your back straight. As you raise
the treadmill, make sure to lift with your legs rather
than your back. Raise the treadmill about halfway to the
vertical position.
2. Move your right hand to the position shown and hold the
treadmillfirmly. Hold the lock knob with your left hand
and pull it to the side. Raise the treadmill untilthe lock
knob is aligned with the catch. Slowly release the knob.
Make sure that the pin on the lock knob Is Inside of
the catch.
To protect the floor or carpet from damage, place e
mat under the treadmill. Keep the treadmill out of
direct sunlight. Do not leave the treadmill In the storage position In temperatures above 85" Fahrenheit.
ill
jKnob_
Pin
HOW TO MOVE THE TREADMILL
Before moving the treadmill, convert the treadmillto the storage positionas described above. Make sure that the pin
on the lock knob Is Inside of the catch.
1. Hold the handrails and place one foot on the base as
shown.
2. Tilt the treadmillback until it roilsfreely on the front
wheels. Carefully move the treadmillto the desired location. Never move the treadmill without Upping It back.
To reduce the dsk of Injury, use extreme caution
while moving the treadmill. Do not move the treadmill
over an uneven surface.
3. Place one foot on the base and carefully lower the treadmill until it is resting on the base.
_Base
•Front Wheels
HOW TO LOWER THE TREADMILL FOR USE
1. Refer to drawing 2 above• Hold the upper end of the treadmill with your right hand as shown. Hold the lock
knob with your left hand and pull it to the side. Pivot the treadmill down a few inches.
2. Refer to drawing 1 above. Hold the treadmillfirmly with both hands, and lower the treadmillto the floor. To
decrease the possibility of Injury, bend your legs and keep your back straight.
17
MAINTENANCE
AND TROUBLE-SHOOTING
Most treadmill problems can be solved by following the simple steps below. If further aeslstance Is
needed, call our toll-free HELPUNE at 1-800-736-6879, Monday through Saturday, 7 a.m. until 7 p.m.
Central Time (excluding holidays).
PROBLEM: The power does not turn on
SOLUTION: a. Make sure that the power cord is plugged into a surge suppressor,and that the surge suppressor
is plugged intoa properlygrounded outlet (see page 7). Use only a single-outletsurge suppressor that is UL 1449 listed as a transient voltage surge suppressor('I-VSS). The surge suppressor
must have a UL suppressedvoltage rating of 400 volts or less and a minimumsurge dissipation
of 450 joules. The surge suppressor must be electricallyrated for 120 volts AC and 15 amps.
b. After the power cord has been plugged in, make sure that the key is fully inserted intothe console. (See step 3 on page 9.)
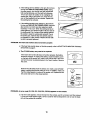
c. Check the circuit breaker located on the treadmill
near the power cord. If the switch protrudesas
shown, the circuit breaker has tripped. To reset the
circuit breaker, wait for five minutes and then press
the switch back in.
c
Tripped
Reset
TdDDed
d. Check the on/off switch located at the front of the
treadmill near the power cord, The switchmust be
in the "on" position.
d
Reset
Position
"On"
PROBLEM: The power turns off during use
SOLUTION: a. Check the circuitbreaker located on the treadmillframe near the power cord (see 1. c. above). If
the circuit breaker has tripped,wait for five minutes and then press the switch back in.
b. Make sure that the power cord is plugged in.
c. Remove the key from the console. Reinsert the key fully into the console. (See step 3 on page 9.)
d. Make sure that the on/off switch is in the "on" position.(See 1. d. above.)
e. If the treadmill stillwill not run, please call our toll-free HELPLINE.
PROBLEM: The welklng belt slows when walked on
SOLUTION: a. Use only a single-outletsurge suppressorthat is UL 1449 listed as a transient voltage surge suppressor (TVSS). The surge suppressor must have a UL suppressed voltage rating of 400 volts or
less and a minimum surge dissipation of 450 joules. The surge suppressor must be electrically
rated for 120 volts AC and 15 amps.
b. If the walking belt stillslows when walked on, please call our toll-free HELPLINE.
PROBLEM: The walking belt Is off-center when walked on
a. If the walking belt has shiftedto the left, first remove
the key and UNPLUG THE POWER CORD. Using
the allen wrench, turn the left rear rolleradjustment
bolt clockwise, and the right bolt counterclockwise,
1/4 of a turn each. Be careful not to overtightenthe
walking belt. Plug in the power cord, insertthe key
and run the treadmillfor a few minutes. Repeat until
the walking belt is centered.
18
b. If the walking belt has shiftedto the right,first remove
the key and UNPLUG THE POWER CORD. Using
the allen wrench, turn the left rear roller adjustment
boltcounterclockwise, and the right bolt clockwise,
1/4 of a turn each. Be careful not to overtightenthe
walking belt. Plug in the power cord, insertthe key
and run the treadmill for a few minutes. Repeat until
the walking belt is centered.
c. If the walking belt slips when walked on, first remove
the key and UNPLUG THE POWER CORD. Usingthe
allen wrench, turn both rear rolleradjustmentbolts
clockwise, 1/4 of a turn. When the walking belt is correctly tightened, you shouldbe able to lifteach side of
the walking belt 3 to 4 inchesoff the walking platform.
Be careful to keep the walking belt centered. Plug in
the power cord, insertthe key and carefullywalk on
the treadmillfor a few minutes. Repeat untilthe walking belt is properly tightened.
PROBLEM: The heart rate monitor does not function properly
a. If the heart rate monitordoes not functionproperly,refer to HEART RATE MONITOR TROUBLESHOOTING on page 6.
b. The CR 2032 battery may need to be replaced.
If the heart rate monitorstilldoes not functionpreperly, the battery
should be changed. To replace the battery, locate the battery cover
on the back of the sensor unit. Insert a coin into the slot in the cover
and turn the cover counterclockwise to the "open" position.Remove
the cover.
Remove the old battery from the sensor unit. Insert a new CR 2032
battery, making sure that the writing is on top. In addition, make sure
that the rubber gasket is in place in the sensor unit. Replace the battery cover and turn itto the closed position.
Q
I
(_G
Battery
Rubber
asket
PROBLEM: An error code (El, E20, E21, E22, E23, OR E24) appears on the console
a. If an error code appears, remove the key from the console, wait for a moment, and then reinsert
it. If the error code appears again, call our Customer Service Department. Do not use the treadmill untilthe problem is corrected.
19
CONDITIONING
GUIDELINES
Burning Fat
A WARNING: :e, n
this or any ox-m_chmprognn, €onpu_ your
physician, This io especlilly I_
for Individuals over the Sge of 35 or IndMduals
wnh pre-exhmemhealth problems.
To burn fat, you must exercise at a low intensitylevel
for a sustained periodof time. During the first few
minutes of exercise, your body uses easily accessible
carbohydratecaloriesfor energy. Only after the firstfew
minutesof exercise does your bodybegin to use stored
fat calories for energy. If your goal is to burn fat, adjust
the intensityof your exercise untilyour heart rate is
near the low end of yourtrainingzone as you exercise.
The followingguidelines will help you to plan your exercise program. Remember--these are general guidelines. For more detailed informationabout exercise,
obtain a book or consultyour physician
a= WARNING:
mo.
toti=, or=
In-
EXERCISE INTENSITY
Whether your goal is to burn fat or strengthenyour cardlovascularsystem, the key to achieving the desired
results is to exercise with the proper intensity.The
proper intensity level can be found by usingyour heart
rate as a guide. For effectiveexercise, your heart rate
should be maintained at a level between 70% and 85%
of your maximum heart rate as you exercise. This is
known as your trainingzone.
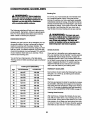
You can find yourtraining zone in the table below.
Training zones are listed accordingto age and physical
condition.
Training Zone(Beats/Mln.)
monltor Is _
_
as an_
ald In
deten.l,dngheadratetmnds_ gen_L
Aeroblc Exercise
If your goal ts to strengthenyour cardiovascular system, your exercise must be =aerobic,"Aerobic exercise
is activity that requires large amounts of oxygen for
prolonged periodsof time. This increases the demand
on the heart to pump bloodto the muscles, and on the
lungs to oxygenate the blood For aerobic exercise,
adjustthe intensityof your exercise until your heart
rate is near the middle of yourtraining zone.
WORKOUT GUIDELINES
Age
Uncondltloned
Condltloned
20
138-167
133-162
25
136-166
132-160
30
135-164
130-158
35
134-162
129-156
40
132-161
127-155
45
131-159
125-153
50
129-156
124-150
55
127-155
122-149
60
126-153
121-147
Tralnlng Zone Exerclse
65
125-151
119-145
70
123-150
118-144
75
122-147
117-142
80
120-146
115-140
After warming up, increase the intensityof your exercise until your heart rate is in your trainingzone for 20
to 60 minutes. (During the first few weeks of your exercise program, do not keep your heart rate in your traming zone for longerthan 20 minutes.) Breathe regularly
and deeply as you exercise--never hold your breath.
85
118-144
114-139
Each workout should includethe followingthree important parts. (1) a warm-up, (2) training zone exercise,
and (3) a cool-down
Warm-up
Warming up prepares the body for exemise by increasing cimulation,deliveringmore oxygen to the muscles,
and raisingthe body temperature. Begin each workout
with 5 to 10 minutes of stretchingand light axemise to
warm up (see SUGGESTED STRETCHES on page 21).
2O
Cool-down
tween workouts.After a few months,you may complete up to five workoutseach week if desired.
Finish each workout with 5 to 10 minutes of stretching
to cool down. This will increase the flexibility of your
muscles and will help to prevent post-exercise problems.
The key to success is to make exercise a regular and
enjoyable part of your everyday life.
Exercise Frequency
To maintain or improve your condition,complete three
workouts each week, with at least one day of rest be-
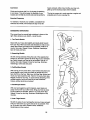
SUGGESTED STRETCHES
The correct form for several basic stretches is shown at the
right. Move slowlyas you stretch--never bounce.
1.ToeTouchStr_ch
Stand with your knees bent slightlyand slowlybend forward
from your hips. Allow your back and shouldersto relax as you
reach down toward your toes as far as possible. Hold for 15
counts, then relax. Repeat 3 times. Stretches: Hamstrings,
back of knees and back.
2. Hamstring Stretch
Sit with one leg extended. Bringthe sole of the oppositefoot
toward you and rest it against the inner thigh of yourextended
leg. Reach toward yourtoes as far as possible. Hold for 15
counts, then relax. Repeat 3 times for each leg. Stretches:
Hamstrings, lower back and groin.
3. CalflAchllles Stretch
With one leg in front of the other, reach forward and place your
hands against a wall. Keep your back leg straight and your
back foot flat on the floor. Bend your front leg, lean forward and
move your hips toward the wall. Hold for 15 counts, then relax.
Repeat 3 times for each leg. To cause further stretchingof the
achilles tendons, bend your back leg as well. Stretches:
Calves, achilles tendons and ankles,
4, Quadrlcepa Stretch
With one hand against a wall for balance, reach back and
grasp one foot with yourother hand. Bringyour heel as close
to your buttocksas possible. Hold for 15 counts, then relax.
Repeat 3 times for each leg. Stretches: Quadriceps and hip
muscles.
5. Inner Thigh Stretch
Sit with the soles of your feet together and your knees outward.
Pull your feet toward your groin area as far as possible. Hold
for 15 counts, then relax. Repeat 3 times. Stretches:
Quadriceps and hip muscles.
21
5
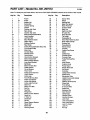
PART LIST--Model
No. 831.297572
Rt0gSA
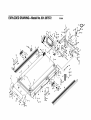
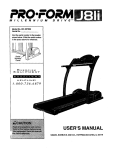
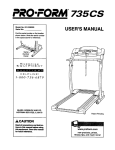
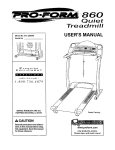
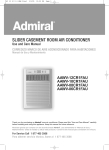
Note: To identifythe parts listedbelow, refer to the EXPLODED DRAWING attached at the center of this manual.
Key No.
Qty.
1
2
3
4
5
6
7
8
9
10"
11
12
13
14
15
16
17
18
19
20
21
22
23
24
25
26
27
28
29
30
31
32
33
34
35
36
37
38
39
40
41
42
43
44
45
46
47
48
49
50
51
52
1
34
5
4
2
2
2
8
2
1
1
1
2
2
1
1
4
1
4
1
5
2
2
3
3
3
2
2
1
1
1
1
1
1
1
9
2
3
4
1
2
1
2
2
2
1
2
2
1
1
1
1
DescrlpUon
Frame
Screw
Isolator Nut
Spring Bolt
Cushion Spring
Isolator
Cushion Adj. Rack
Rack Screw
Cushion Adj. Gear
Motor/PulleylFlywheellFan
Latch Housing
Left Foot Rail
Rear PlatformScrew
Roller Guard
Walking Platform
Rear Roller
Incline Pivot Bolt/InclineMotor Nut
Front Roller/Pulley
Motor Bolt
Console Base
Bracket Screw
Hood Anchor
Hood Anchor Bracket
Motor Bracket Bolt
Motor Bracket Washer
Long Hood Bracket
Belt Guide
Motor Tension Bolt
Outlet Bracket
CircuitBreaker
Power Cord
Power Cord Grommet
On/Off Switch
Incline Leg
Front Roller Adj. Bolt
Roller Adj. Washer
Incline Leg Spacer
InclineLeg Pivot Nut
Motor Nut
Motor Pivot Bolt
Roll Pin
Key/Clip
Flange Nut
Motor Tension Washer
Small Nut
4" Wire Tie
Small Bolt
Sensor
Speed Sensor Bracket
Speed Disk
Motor Belt
Warning Decal
22
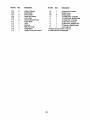
Key No.
Qty.
53
54
55
56
57
58
59
60
61
62
63
64
65
66
67
68
69
70
71
72
73
74
75
76
77
78
79
80
81
82
83
84
85
86
87
88
89
9O
91
92
93
94
95
96
97
98
99
100
101
102
103
104
2
2
1
8
5
1
1
1
5
1
1
1
2
1
2
1
1
1
19
9
Description
Sensor Wire
Shock
Walking Belt
Belly Pan Spacer
Motor Pivot Nut
Cushion Shaft
Belly Pan
Right Foot Rail
8" Cable Tie
Motor Bracket
Tie Holder
Releasable tie
Short Rear Roller Adj. Bolt
Rear Roller Endcap
Endcap Pad
Pulse Monitor
Monitor Strap
Console
Upright Cap Screw
Motor
Upright Cap
Console Screw
Console Plate
Pulley/Flywheel/Fan
Hood
Hood Screw
Cushion Knob
Power Board
Plastic Stand-Off
Set Screw
Controller
Upright Wire Harness
IsolatorBolt
ElectronicsPlate
UprightCover (right inside)
UprightCover
PlatformScrew (front)
Wheel Bolt
Front Wheel
8" Ground Wire
Wheel Nut
Adhesive Clip
Allen Wrench
UprightCap
Handrail Foam
Handrail Endcap
Lock Knob
Lock Knob Sleeve
Lock Knob Spring
Lock Pin Collar
Lock Pin
Pin Clip
Key No.
105
106
107
108
109
110
111
112
113
114
115
116
Qty.
2
1
2
2
1
2
1
1
1
1
1
1
DescrlpUon
Key No.
PlatformWasher
Stop Bracket
Incline Decal
Small Star Washer
Incline Disk
Console Bracket Screw
Incline Motor
I-Bolt
Receiver
Belly Pan Hinge
Upright/Base
Upright Cover (left outside)
117
1
Console Wire Harness
118
1
Battery Cover
119
2
Spring Spacer
#
1
14"White Wire, 2 Female
#
1
14"White Wire, Male/Female
#
1
14" Blue Wire, 2 Female
#
1
8" Blue Wire, 2 Female
#
1
9" Black Wire, MalelFsmale
#
1
8" Red Wire, Male/Female
#
1
User's Manual
* Includes all parts shown in the box
# These parts are not illustrated
23
Qty.
Description
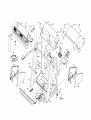
EXPLODED
DRAWING--
Model No. 831.297572
R1098A
2
25
12
_47
119
2
85
67
2
2
107
65
56
57
73
7O
78
75
42
107
113
98
99
116
96
9O
114
112
17
47
SEARS
The model number and serial number of your IMAGE®10.6Q treadmillare listedon a decal attached to the frame. See the front cover
of this manual to findthe locationof the decal.
Model No. 831.297572
QUESTIONS?
All replacement parts are available for immediate purchase or
special order when you visit your nearest SEARS Service Center.
To request service or to order parts by telephone, call the toll-free
numbers listed at the left.
If you flnd that:
• you need help assembllng or
operatlng the IMAGE" 10.6Q
treadmlU
• a part Is mlsslng
When requesting help or service, or ordering parts, please be prepared to providethe followinginformation:
• The NAME OF THE PRODUCT (IMAGE* 10.6Q treadmill)
• or you need to schedule repair
service
call our toll-free HELPLINE
1-800-736-6879
Monday-Saturday, 7 am-7 pm
Central Tlme (excludlng holidays)
• The MODEL NUMBER OF THE PRODUCT (831.297572)
• The PART NUMBER AND DESCRIPTION OF THE PART (see
the PART LIST on page 22 and the EXPLODED DRAWING attached in the center of this manual)
REPLACEMENT
PARTS
If parts become worn and need
to be replaced, call the following
toll-f_=e number
1-800-FON-PART
(1-800-366-7278)
FULL ONE YEAR WARRANTY
For one year from the date of purchase, if failure occurs due to defect in material or workmanship in this
SEARS TREADMILL EXERCISER, contact the nearest SEARS Service Center throughoutthe United
States and SEARS will repair or replace the TREADMILL EXERCISER, free of charge.
This warranty does not apply when the TREADMILL EXERCISER is used commerciallyor for rentalpurposes.
This warrantygives you specificlegal rights,and you may also have other rights which vary fromstate
to state.
SEARS, ROEBUCK AND CO., DEPT. 817WA, HOFFMAN ESTATES, IL 60179
Part No. 148934 H03534-C R1098A
Printed in USA @ 1998 Sears, Roebuck and Co.