1
Where Is
THE Search Utility
Version 3.0
User Manual
Copyright © 1999-2006, abego Software GmbH
All rights reserved.
http://www.abego-software.de
2
Where Is User Manual
http://www.abego-software.de
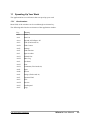
1
Contents
1 CONTENTS........................................................................................................................................................3
2 ABOUT „WHERE IS“.......................................................................................................................................5
3 INSTALLING „WHERE IS“............................................................................................................................5
4 WORKING WITH „WHERE IS“....................................................................................................................5
4.1 P REPARATIONS......................................................................................................................................................5
4.2 B ASIC STEPS.........................................................................................................................................................6
4.3 MORE TIPS............................................................................................................................................................6
5 THE APPLICATION WINDOW.....................................................................................................................6
5.1 T HE PREFIX FIELD.................................................................................................................................................7
5.2 T HE „FIND WORDS IN ...“ SECTION.........................................................................................................................8
5.3 T HE INDEX LIST....................................................................................................................................................8
5.4 T HE „LIST ITEMS“ BUTTON....................................................................................................................................8
5.5 T HE DATABASE SECTION........................................................................................................................................8
5.6 T HE RESULT AREA................................................................................................................................................9
5.7 T HE FILE VIEW.....................................................................................................................................................9
5.8 T HE LOGICAL VIEW.............................................................................................................................................12
5.9 T HE PREVIEW BUTTON.........................................................................................................................................13
5.10 T HE FIND HISTORY...........................................................................................................................................13
5.11 T HE „ALT. FILES“ FIELD...................................................................................................................................13
5.12 T HE FILENAME FIELD.........................................................................................................................................13
5.13 T HE CONTEXT FIELD.........................................................................................................................................13
5.14 T HE PREVIEW WINDOW.....................................................................................................................................13
5.15 T HE „ALT. FONT“ FIELD...................................................................................................................................14
5.16 T HE „FIND SELECTION“ BUTTON.........................................................................................................................14
5.17 T HE COPY BUTTON...........................................................................................................................................14
5.18 T HE SAVE BUTTON...........................................................................................................................................15
5.19 T HE „SHOW LOG“ BUTTON................................................................................................................................15
5.20 T HE „INFO...“ BUTTON......................................................................................................................................15
5.21 T HE „BEHAVIOR“ BUTTON.................................................................................................................................15
5.22 T HE „SINGLE CLICK ON INDEX LIST“ FIELD (IN THE BEHAVIOR DIALOG)..................................................................15
5.23 T HE „SINGLE CLICK ON ITEM LIST“ FIELD (IN THE BEHAVIOR DIALOG)....................................................................15
5.24 T HE „OPEN IN EDITOR“ FIELD (IN THE BEHAVIOR DIALOG)....................................................................................15
5.25 T HE „TOPMOST WND“ FIELD (IN THE BEHAVIOR DIALOG)......................................................................................15
5.26 T HE „RESCAN...“ BUTTON ................................................................................................................................15
6 THE SETTINGS DIALOG.............................................................................................................................16
6.1 T HE „APPLICATION WINDOW“ SECTION.................................................................................................................16
6.2 T HE SEARCH SECTION..........................................................................................................................................17
6.3 T HE EDITOR SECTION..........................................................................................................................................18
7 THE RESCAN DIALOG.................................................................................................................................20
8 THE INFO DIALOG.......................................................................................................................................20
9 THE TIPS DIALOG........................................................................................................................................20
10 DATABASES..................................................................................................................................................22
11 SPEEDING UP YOUR WORK....................................................................................................................23
11.1 ACCELERATORS.................................................................................................................................................23
http://www.abego-software.de
Where Is User Manual
3
11.2
11.3
11.4
11.5
DEFAULT BUTTON.............................................................................................................................................24
DOUBLE CLICKS................................................................................................................................................24
SHORTCUTS.......................................................................................................................................................24
AUTO-ACTIVATION OF PREFIX FIELD.....................................................................................................................25
12 DE-INSTALLATION....................................................................................................................................26
13 APPENDIX.....................................................................................................................................................27
13.1 MANUALLY STOPPING A CONTEXT.........................................................................................................................27
13.2 CUSTOMIZE THE NUMBER OF LINES IN THE INDEX LISTBOX.......................................................................................28
4
Where Is User Manual
http://www.abego-software.de
2
About „Where Is“
Where Is is a visual tool for fast searches in text files. It is especially designed for software
developers that frequently have to look up words in C/C++/Basic/Java source files. But it is also very
useful when searching in any other kind of (ASCII) text file.
When you are using programs like „grep“, „FindInFiles“ etc. a lot Where Is can help saving time in
your daily work. Beside searching for words it gives you (sorted) lists of words contained in the files,
summarizes and ranks the findings, provides context information for the findings and supplies
additional features to work more efficiently and simplifies common tasks.
Where Is is designed to improve your overall performance. Shortcuts and commands for often used
activity are supplied for quick access. Other applications like „Microsoft Visual Studio“ can be
integrated in the work with Where Is.
3
Installing „Where Is“
Installing Where Is is simple: extract the file 'WhereIs Install.zip' into a directory of your choice.
No further installation steps are necessary. You can directly use the application by starting the
'WhereIs.exe' program in the main directory.
For easier access you may want to add the application to the Windows Start menu.
4
Working with „Where Is“
IMPORTANT: Before you start working with Where Is please read the Licence Agreement stored
in the file "Licence.txt". Only when you agree to that Licence you may use the software.
This chapter gives you a brief overview of the work with Where Is. For details please refer to the
reference part below.
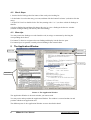
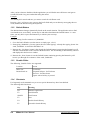
4.1
Preparations
You can start the application by double clicking the Where Is application icon or a Where Is
database file (see Chapter „Databases“). While the application starts the startup picture is displayed.
When you start Where Is the first time the „Tips“ Dialog appears. After reading the dialog you
should close it.
The Application Window will appear.
Initially you need to specify what files need to be searched. You do this in the „Settings“ Dialog that
pops up when clicking the „Settings...“ button.
After the files are specified they are scanned, all words are extracted and stored in a database. This
allows fast subsequent searches because there is no need to scan the files again as long as they are no
changed.
http://www.abego-software.de
Where Is User Manual
5
4.2
Basic Steps
1. Into the Prefix field type the first letters of the word you're looking for.
2. In the Index List select the entry you want, and then click the button 'List Items' (or double click the
entry.)
3. In the File View List double click a 'file' line (starting with '+' or '-') to show or hide all findings in
that file.
4. Select a finding line and then click button 'Preview' to view a finding in the Preview window.
(Double clicking a finding will directly show that finding.)
4.3
More tips
You may restrict the findings to words found in code, in strings or comments by checking the
corresponding check boxes.
Use button 'To Next' to navigate to the next finding and display it in the Preview pane.
Use button 'Open' to open the currently selected finding in the external editor.
5
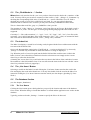
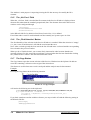
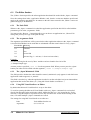
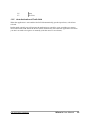
The Application Window
Prefix Field
Filename Field
Context Field
Index List
Preview Window
Result Area
Result Item List
Picture 1: The Application Window
The Application Window is the main window you interact with.
You may resize and reposition the Application Window. The window is restored at that size and
position with the next application start.
The different parts of the Application Window are now described in detail.
6
Where Is User Manual
http://www.abego-software.de
5.1
The Prefix Field
In the Prefix field you type the beginning of the word you are looking for. Automatically the Index
List displays the existing words that start with the entered text (ignoring the case of the letter). The
first word in the Index List is automatically selected.
The words you looked for are remembered (see also „Search History“). You can access them through
the drop down window of the Prefix Field. This also reselects the word in the Index List.
5.1.1
Finding Substrings using the Prefix Field
Entering a prefix in the form "*<text>" into the prefix field lists all items in the index list that contain
"<text>", ignoring the case of the text. It also finds occurances of the text "in the middle" of the item.
Example:
Typing
"*context"
in the Prefix field may list
"contextStart"
"GetContext"
"inGlobalContext"
"itemContext"
"m_context"
"m_contextEnd"
...
You may even use the wildcard character ‘*’ in the middle of the text you enter in the Prefix field.
And even multiple wildcards can be specified. All words are returned that match the given text with
any characters matching the ‘*’.
Example:
When searching for all items that start with "Get" and contain "String" one would specify
"Get*String". This would result in a list like this:
GetProfileString
GetStringEnd
GetSubString
GetValueAsString
http://www.abego-software.de
Where Is User Manual
7
5.2
The „Find Words in ...“ Section
Where Is not only searches for the „raw“ text you have chosen but also checks the „container“ of the
word. You may restrict your search to occurances of the word in „Code“, „Strings“ or „Comments“ by
checking the corresponding fields in the „Find Words in...“ section. When the "Level 0" field is
checked only words at "level Zero" (global level) are listed. E.g. one gets (global) functions
definitions but no function calls. Of cause you may also select any combination of these fields.
This is a feature that tools like „grep“ or „FindInFiles“ don’t provide.
The meaning of „Code“, String“ or „Comment“ varies from file type to file type. By default a word is
assumed to be in „Code“. For file types of certain (programming) languages the other kinds are also
supported.
Currently C++ files (with extensions ".c", ".cpp", ".cxx", ".h", ".hpp", ".inl", ".inc"), Java files (with
extension “.java”) and Visual Basic Files (with extensions ".bas", ".cls", ".frm") are scanned in detail
and words will be differentiated between „Code“, „String“ and „Comment“.
5.3
The Index List
The Index List displays a sorted list of existing words, beginn with the first word that starts with the
text entered in the Prefix field.
Only words that match the setting in the „Find Words in...“ section are displayed. E.g. when only
„Strings“ is selected only words that are used somewhere in a string are displayed.
Tip: When the prefix of a word is typed into the Prefix field and the word becomes visible in the
Index List but is not selected but somewhere below the selection one can simply use the "cursor
down" key to select the desired line.
(Normally the "cursor down" key would select the next item in the listbox of the combobox, because
the combobox is the field with the focus. You can still select the items in the list box with the "cursor
down" key when the list box is popped up.)
5.4
The „List Items“ Button
Selecting a word from the Index List and clicking the „List Items“ button searches the word in the
files and display the result in the Result area. You may also double click the word in the Index List
instead of clicking the „List Items“ button to start the search (see also chapter „Speeding Up Your
Work“).
5.5
The Database Section
(see also chapter „Databases“)
5.5.1
The New Button
Clicking the New button opens a dialog that lets you specify the location and name of the database
file to create. When the dialog is closed that database is created and the application now works on that
database.
Typically you then select the „Settings...“ button to specify the files to be browsed.
8
Where Is User Manual
http://www.abego-software.de
5.5.2
The Open Button
Clicking the Open button opens a dialog that lets you select the database (master file) you want to
open. The most recently opened databases are listed for easy selection. You may use the „Browse...“
button to browse for the database file.
After closing the dialog the database is opened and the application now works on that database.
(Don’t mix up this „Open“ button with the one in the Result Area that opens selected files.)
5.6
The Result Area
The Result Area contains the result of the last search and buttons that can be used to work with the
result.
You may choose between two differerent views on the result: the File View and the Logical View.
Depending on the chosen view the Result Item List will display the found occurances of the word
differently.
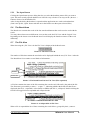
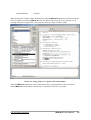
5.7
The File View
When choosing the „File View“ tab the File View is displayed in the Result Area.
Picture 2: The File View Tab
The number of files that contain the searched word is displayed behind the text „File View“ in the tab.
The Result Item List contains several kinds of information:
File
Context
Found Line
Picture 3: The Result Item List in a File View (File expanded)
A File line contains the name of the file containing the search word, followed by the path of the file.
The file name is preceded by a minus ‘-’ or plus ‘+’, indicating whether the details for that file are
displayed (the file is „expanded“) or the details are hidden (the file is „collapsed). Double clicking the
file line will toggle between expanded and collapsed mode.
Picture 4: A collapsed file in File View
When a file is expanded the list of lines containing the word follows, grouped by their „context“.
http://www.abego-software.de
Where Is User Manual
9
5.7.1
The Context
To make it easier for you deciding whether the found line is relevant for your work the Result Item
List displays a line’s context beside the line itself.
The context depends on the kind of file and the location of the line within that file. In general you can
think of the context as the next higher level/component the found word is in. E.g. when a word is in
the body of the function the function header is displayed as the context, or the class name is displayed
for words in class declarations.
When no „context“ is displayed the word is in „global“ context.
The context varies from file type to file type. Not for all file types the context is supported. In those
cases all lines are in global context.
Currently C++ files (with extensions ".c", ".cpp", ".cxx", ".h", ".hpp", ".inl", ".inc"), Java files (with
extension “.java”) and Visual Basic Files (with extensions ".bas", ".cls", ".frm") display a context.
Note: Because no preprocessor commands are evaluated when C++ files are scanned the context may
be wrong/missing when preprocessor commands are used in some special ways. Some problems can
be solved by using the approach described in the chapter „Manually stopping a context“, given in the
appendix.
5.7.2
The AutoExpand Field
When the AutoExpand field is checked all files in the Result Item List will be expanded automatically
after a search. When the field is unchecked the files are initially collapsed after a search and must be
expanded „manually“, either by double clicking the file line or using the „Expand All“ button.
Picture 5: Result Item List with Collapsed Files
Because expanding files will take some time, especially when there are a lot of files found, you may
uncheck this field to speed your work and only expand the files of interest.
When a word is found in too many files the AutoExpand field is ignored and the files are all displayed
in collapsed mode to avoid long waiting times.
5.7.3
The „Globals First“ Field
When the „Globals First“ field is checked the first line in global context is selected after a search.
Subsequent use of the Next button will select the next global line. After all global lines are visited
„Next“ continues with the non-global lines.
When the field is unchecked the first found line in the list is selected after a search and subsequent
use of the Next button will just move to the next found line, independent of the context.
Most time the global lines are the ones that are „most interesting“. E.g. a function definition will be in
global context and its usage/calls are in concrete contexts.
10
Where Is User Manual
http://www.abego-software.de
5.7.4
The „Expand All/Collapse All“ Buttons
Pressing the „Expand All“ button will expand all files in the Result Item List.
Pressing the „Collapse All“ button will collapse all files in the Result Item List.
5.7.5
The Next Button
The Next button moves the selection in the Result Item List to the next found line and shows that line
in the Preview window.
(See also „The Globals First Field“)
The „End of Index List“ Beep
When the Next buttom is clicked and all items in the item list have been visited (i.e. the last item is
selected) the first item is selected and a beep notifies the user that "all items are visited and we are
starting again at the top".
The sound that is played can be configured (e.g. switched off) through the standard Windows
"Sounds" control panel. The sound is defined by the event "WhereIs: End of index list reached" in the
"Windows" section of the "Sounds" control panel.
5.7.6
The Open Button
Beside the Preview window an external editor can be used to browse through the findings and
navigate through the found lines. Before an external editor can be used the path to the editor
application and the parameters for the invokation must be specified in the settings dialog (see „The
Settings Dialog“).
The Open button opens the selected file using the external editor setup in the „Settings“ dialog and
selects the found line in the editor.
Some editors may not be able to select the found line.
http://www.abego-software.de
Where Is User Manual
11
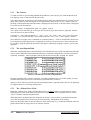
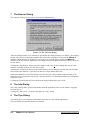
5.8
The Logical View
When choosing the „Logical View“ tab the Logical View is displayed in the Result Area.
Picture 6: The Logical View Tab
The Logical View looks very similar to the File View but the file lines are omitted. In addition the
lines are sorted in a special way. The list starts with the „global“ lines, followed by the lines with
concrete contexts. These groups are separated with a dashed line („-------------“).
C++ class and enum definitions are displayed first in the item list. So when you are searching for a
name that also is a class or enum name the class or enum definition will be selected first. This is very
useful e.g. when looking for the possible values of an enum or the members of a class that you know
the name of. (This does not work for nested definitions but only for global ones.)
Picture 7: The Logical View
For certain kinds of files special groups may follow the global group. E.g. in a C++ environment the
lines in „class contexts“ will directly follow the global group. After the class contexts group the group
with the remaining contexts will follow.
5.8.1
The „Only Calls“ Field
When the Only Calls Field is checked only the calls to a function with the searched name are reported
in the item list.
The list is ordered by the type of the receiver of the call.
This view is very useful when working with "polymorhic" functions. E.g. a function "GetName" may
be defined in several classes. Using this view one can quickly identify the locations in the code that
are calling a specific class.
Note: This feature will only work well for C++ sources. The current implementation does not
implement a complete C++ "compiler" for the necessary analysis to create the view but uses some
simplifications. This implies that some calls may not be associated correctly. Especially "overloading"
of methods is not handled.
12
Where Is User Manual
http://www.abego-software.de
5.8.2
The „Find Context“ Button
The Find Context button looks for the last identifier in the currently selected item's context and search
that identifier.
This feature is useful e.g. when searching a „call tree“ backwards, i.e. „who called the function in this
line“.
5.8.3
The Open Button
(See „The Open Button“ in the chapter „The File View“.)
5.9
The Preview Button
The Preview button displays the file of the item currently selected in the Result Item List in the
Preview window (either a context or a found line) and selects the found line in the Preview window.
(see also „The Open In Editor Field“)
5.10
The Find History
The application maintains a history of the identifiers searched for.
One can move back and forward in that history. When moving in the history the former searches are
repeated and the last selected item for that item is re-selected.
This feature is very useful when following "call trees" etc..
Note: When using the Find History one should avoid switching between "File View" and "Logical
View" because the remembered item might not be found accurately in that case.
5.10.1
The <- (Back in History) Button
Moves back in the search history (to the previous search).
5.10.2
The -> (Forward in History) Button
Moves forward in the search history. This is only useful when one moved back in the history earlier.
5.11
The „Alt. Files“ Field
When the „Alt. Files“ field is checked only files are searched that match the extensions specified in
the „Alternative WildCards“ field of the Settings Dialog. When the field is unchecked the
„WildCards“ field is used instead.
(See also „The „Alternative WildCards“ Field“ in the chapter „The Settings Dialog“.)
5.12
The Filename Field
The Filename field displays the filename of the file currently displayed in the Preview window.
5.13
The Context Field
The Context Field displays the context of the last finding that was displayed in the Preview window.
5.14
The Preview Window
The Preview Window is used to display the currently selected file’s contents and select the found line.
http://www.abego-software.de
Where Is User Manual
13
The window’s main purpose is inspecting/viewing the file but one may also modify the file’s
contents.
5.15
The „Alt. Font“ Field
When the „Alt Font“ field is checked the file contents in the Preview Window is displayed in an
alternate font rather than the standard (proportional) font. The alternate font used in the Preview
window can be configured through
[Settings]
AltFontName=Courier New
AltFontSize=12
in the WhereIs.INI file. By default a fixed font (Courier New, 12) is defined.
Fixed fonts make it easier to read indented texts but normally use up more space in a line.
5.16
The „Find Selection“ Button
The first identifier of the selection in the Preview Window is searched. When the selection is "empty"
(i.e. just a caret) "Find Selection" will find the word around the caret.
Note: After a search typically the first item in the list of found items is selected and the corresponding
line selected in the preview window.
When you do a "Find Selection" you are most likely interested in other locations that the one
currently selected. For this reason the second item is selected when the first item found after clicking
the „Find Selection“ button is the same that started the search.
5.17
The Copy Button
The Copy button copies the current selection of the Preview Window into the clipboard. It adds an
extra line containing a reference to the origin of the selected text.
This feature is useful when source code is analysed and the analysis must be documented.
Example:
Pressing the Copy button in the following situation:
Picture 8: A Copy Example
will lead to the following text in the clipboard:
// D:/Programme/Microsoft Visual Studio/VC98/MFC/SRC/OLEDLGS3.CPP(89)
m_op.lpPS->hwndParent = PreModal();
int iResult = MapResult(::OleUIObjectProperties(&m_op));
PostModal();
If you don't want that extra line with the reference you may switch it off with the following setting in
the WhereIs.INI file:
[Settings]
AddCopyComment=0
14
Where Is User Manual
http://www.abego-software.de
5.18
The Save Button
The "Save" button can be used to save changes done to the file in the Preview window.
5.19
The „Show Log“ Button
The application maintains a log file that contains information about errors that occured, e.g. when
files are scanned.
The Show Log button displays this log file’s contents in the Preview Window.
You should have a look at the log file, especially after you have specified new directories/files to
scan.
5.20
The „Info...“ Button
The „Info...“ button opens the „Info“ dialog (see chapter „The Info Dialog“).
5.21
The „Behavior“ Button
The „Behavior“ button opens the „Behavior“ dialog to edit some preferences.
5.22
The „Single Click on Index List“ Field (in the Behavior dialog)
When the “Single Click on Index List” field is checked a single click (rather than a double click) on
an item in the Index List will automatically start the search and update the Result list.
5.23
The „Single Click on Item List“ Field (in the Behavior dialog)
When the “Single Click on Item List” field is checked a single click (rather than a double click) on an
item in the Result List (either in “File View” or “List View” will automatically open the selected
item in the Preview window.
5.24
The „Open In Editor“ Field (in the Behavior dialog)
When the Open In Editor field is checked every time a found line is previewed (either automatically
or by pressing the Preview button) the file is also displayed in the external editor and the found line is
selected, as described in chapter „The Open Button“.
5.25
The „Topmost Wnd“ Field (in the Behavior dialog)
When the "Topmost Wnd" field (read: „Topmost Window“) is checked the application window of
Where Is will always be "above" other application windows. This can be very useful especially
when using Where Is together with an external editor (see chapter „The Settings Dialog“).
5.26
The „Rescan...“ Button
The „Rescan...“ button opens the Rescan Dialog (see chapter „The Rescan Dialog“).
http://www.abego-software.de
Where Is User Manual
15
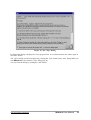
6
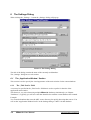
The Settings Dialog
When clicking the „Settings...“ button the „Settings“ dialog will pop up.
Picture 9: The Settings Dialog
The title of the dialog contains the name of the currently used database.
The „Settings“ dialog has several sections.
6.1
The „Application Window“ Section
This section is used to specify the visual appearance of the main window for the current database.
6.1.1
The „Title Prefix“ Field
A text may be specified in the „Title Prefix“ field that is used as a prefix for the title of the
application main window.
This feature is very nice when using multiple Where Is databases simulatiously (see Chapter
"Databases"). Typically you will use a title that identifies the stuff the current database has scanned.
Example:
You created a database that scans the MFC source directory for quickly browsing that sources. You
will set the "Application Window Prefix" in the Settings dialog to "MFC" for that database.
16
Where Is User Manual
http://www.abego-software.de
The database with "your" source you may associate with the sources "My Sources".
When you later start "both" applications you can quickly identify the different databases through the
titles (even in the task bar).
6.1.2
The Icon Field
In addition to the Application Window Title Prefix the user can select the color of the application icon
to be displayed when running the application on a specific database. So you can identify the „correct“
database with a quick view (without reading any title).
Example:
(see also example for „Title Prefix“)
For your MFC database you may choose the red and for „My Sources“ the green icon.
6.2
The Search Section
This section is used to specify the files to be searched.
6.2.1
The „Directories to search“ Field
The directories to be searched are specified in the „Directories to search“ field.
You may use the „Browse...“ button that allows you to choose a directory in a „Choose Directory“
dialog. But you may also type in the directory path directly.
When specifying a directory the files in this directory and all its subdirectory are selected.
You may also specify more than one directory in this field by separating them with semicolons (‘;’).
For example „C:\Scribble; d:\MyProjects“ will search for files in the directories „C:\Scribble“ and
„d:\MyProjects“ and all their subdirectories.
The directories you entered are remembered by the application. Later you may re-select the most
recently used entries through the drop down window of the field.
6.2.2
The WildCards Field
This specifies the extensions of the files to be searched for.
This restricts the files to be searched to those that have an extension listed in this field.
An extension is specified in the form ‘*.xxx’. You may specify more than one extension in this field
by separating them with semicolons (‘;’). For example „*.c; *.cpp“ will search for all C or C++
source files in the directories given in the „Directories to search“ field. The wildcard „*.*“ selects all
files.
You may choose some commonly used wildcard selections from the drop down box of the field.
6.2.3
The „Alternative WildCards“ Field
In addition to the wildcards specified in the WildCards field you may specify a second, alternative set
of wildcards in the Alternative WildCards field. These extensions are used when the „Alt. Files“ field
in the Result area is checked. It restricts the files to be searched to those that have an extension listed
in this field.
Typically you will specify two different set of wildcard in the two wildcard field. E.g. you may
specify all source file extensions in the WildCards field and all header file extensions in the
Alternative WildCards field. So you can later restrict your searches easily to just the header files by
checking the „Alt. Files“ field. (See also chapter „The „WildCards“ field“)
http://www.abego-software.de
Where Is User Manual
17
6.3
The Editor Section
The „Editor“ Section specifies the editor application that should be used with the „Open“ command.
Note: the settings done in the „Application Window“ and „Search“ section are database specific and
apply to the currently open database. In contrast to this the values entered in the „Editor“ section are
global and apply to all databases.
6.3.1
The Path Field
Whenever the „Open“ command is invoked the application specified in this field is called with the
parameters given in the „Arguments“ fields.
You may use the „Browse...“ button that allows you to choose an application in a „Choose File“
dialog. But you may also type in the path directly.
6.3.2
The Arguments Field
The arguments specified here will be passed to the editor application whenever the „Open“ command
is invoked. Placeholders can be used that are substituted with the actual values for every „Open“.
Placeholder Meaning
%1
filename
%2
line
%3
text to find
%4
activate flag (1 = activate, 0 = don’t activate editor)
Example:
You are searching for the word „CRect“ and the word was found in line 342 of file
„c:\Sample\Sample.cpp“.
Assume you have specified „-L%2 %1“ for the Arguments field. When you now press the „Open“
button your editor will be called with the argument „-L342 c:\Sample\Sample.cpp“.
6.3.3
The „Open Minimized“ Field
The field specifies whether the editor should be started „minimized“ (only appears in task bar but no
application window appears) or „normal“.
This field is checked e.g. when the application invoked is not the real editor but just an intermediate
application that invokes the editor (see „Using MS Visual Studio as an Editor“.)
6.3.4
Using MS Visual Studio as an Editor
By default the Microsoft Visual Studio is set up as the editor.
To avoid re-opening the Microsoft Visual Studio with every „Open“ command it is not invoked
directly but through a helper application called „MSDevInvoker.exe“. It is located in the „Tools“
directory. Using this helper it is possible to have only one Microsoft Visual Studio running all the
time, even when multiple „Open“ commands are issued.
The settings for using MS Visual Studio as an editor are:
18
Path:
Tools\MSDevInvoker.exe
Arguments:
%1 %2 %3 %4
Where Is User Manual
http://www.abego-software.de
Open Minimized:
Checked
Tip: Checking the "Topmost Wnd" field and narrowing the Where Is application window to hide the
Preview window (and moving Where Is to the left) has been proven to be a very efficient way of
working with the two applications. (You may also check the „Open in Editor“ field).
Picture 10: Using „Where Is“ together with Visual Studio
When the Where Is application is not needed temporarily or may disturb the work with Visual
Studio Where Is can be hidden (/minimized) very quickly with an "Esc" keystroke.
http://www.abego-software.de
Where Is User Manual
19
7
The Rescan Dialog
The „Rescan“ Dialog lets you start a rescan in two different ways.
Picture 11: The "Rescan" Dialog
After the directories/files to be scanned are specified in the Settings Dialog (see chapter „The Settings
Dialog“) the files are scanned immediately and some index information is stored in the Where Is
database. When the files are changed it is necessary to re-scan the files to update the Where Is
database to the current state. Otherwise it may happen that words added to the files since the last scan
are not found.
Clicking the „Full Rescan“ button clears the database and scans all files, adding their words to the
database. Typically 'Full Rescan' will take a while.
Clicking the „Fast Rescan“ button scans all files that have been changed since the last scan and adds
their words to the database. Typically 'Fast Rescan' is faster than 'Full Rescan'.
Because the database is not cleared when using 'Fast Rescan' it may contain words/files that are no
longer used. So 'Fast Rescan' may lead to a growing database. To shrink the database use 'Full Rescan'
from time to time.
Clicking the Cancel button will close the Rescan dialog without doing any rescan.
8
The Info Dialog
The „Info“ Dialog shows general information about the application, like version number, copyright
notice and so on.
Clicking the „Show Tips...“ button will display the „Tips“ dialog.
9
The Tips Dialog
This dialog gives you some major information necessary to work with the application.
For more details you should read this user manual.
20
Where Is User Manual
http://www.abego-software.de
Picture 12: The "Tips" Dialog
By default this dialog is displayed on every program start. To avoid this uncheck the „Show again on
next start“ button.
The „Tips“ Dialog can also be displayed by clicking the „Tips“ button in the „Info“ dialog.When you
start Where Is the first time the „Tips“ dialog pops up.
You can close the dialog by clicking the „OK“ button.
http://www.abego-software.de
Where Is User Manual
21
10
Databases
When the files are scanned index information is extracted to speed up future searches. This index
information is stored in a database.
When you open Where Is the first time a default database is used. This database („SymDB“) is
located in your „temp“ directory (typically called 'c:\temp\' or 'c:\tmp\').
Using only one database may be sufficient for most cases. But you may also create additional
databases that can be used in parallel. E.g. you may create a database for a large set of sources that is
stable (like from a framework or library, e.g. the MFC sources). This database will not need any
rescans. In addition you create a database for your sources. You can now search for things either in
the „MFC sources“ or in „your code“ without mixing up things. And when your sources changed and
you do a rescan this will be fast because you don’t need to rescan the MFC sources.
A Where Is database consists of two parts: a master file with the extension „.whe“ (e.g.
„MySources.whe“) and a directory with additional files located in the same directory as the master
file and named as the masterfile without extension (e.g. „MySources“). You may doubleclick the
master file to open the database. In this case the Where Is application starts up and lets you work on
that database.
You may start multiple Where Is databases at a time and work on them in parallel. For each database
a separate application will start with its own application window. You may switch between the
applications as usual, e.g. using the task bar etc..
You can not work on the same database with two applications.
The name of the currently used database is displayed in the „Settings“ dialog.
When you de-install Where Is you have to delete the database master files and database directories
manually.
22
Where Is User Manual
http://www.abego-software.de
11 Speeding Up Your Work
The application has several features that can speed up your work.
11.1
Accelerators
Most fields of the windows can be reach through accelerator key.
The following table lists the accelerators of the application window:
Key
Meaning
Alt-1
Prefix
Alt-2
Item List
Alt-A
Expand All/Collapse All
Alt-C
Code (Find words in)
Alt-D
Find Context
Alt-E
Settings
Alt-F
Find Selection
Alt-I
Open in editor
Alt-G
Globals first
Alt-H
Show Log
Alt-L
List Items
Alt-N
Next
Alt-O
Comments (Find words in)
Alt-P
Open
Alt-R
Rescan
Alt-S
Strings (Find words in)
Alt-T
Topmost Wnd
Alt-V
Save
Alt-W
Preview
Alt-X
AutoExpand
Alt-Y
Copy
http://www.abego-software.de
Where Is User Manual
23
After you have become familiar with the application you will find it more efficient to navigate to
certain field with a key press rather than using the mouse.
Example:
You already did a search and now you want to search for a different word.
Pressing „Alt-1“ will move your cursor to the Prefix field and you can directly start typing the new
word (without the hands leaving the keyboard).
11.2
Default Button
The Default button changes dynamically based on the actual situation. The application tries to find
out what the next „most likely“ action may be and makes that button the Default button. I.e. most
times you only have to press the Return key to initiate your next step.
Example:
You are looking for all occurances of „DoModal“.
1. Go to the Prefix Window (use the mouse or simply type „Alt-1“)
2. Start typing „DoModal“ (you may ignore the cases when typing). Already after typing „domo“ the
word „DoModal“ is selected in the Index List.
3. Because the „List Items“ button is the already the Default button just pressing the Return key will
start the search and the result is listed in the Result area. The first finding is automatically selected
and displayed in the Preview window.
4. Because the „Next“ button is now the Default button continuing pressing the Return key will
browse you through all occurances of the word „DoModal“.
11.3
Double Clicks
The following „Double Clicks“ are supported:
11.4
Location
Action
Index List
„List Items“
Result Item List
„Expand/Collapse“ for File Items
„Preview“ for other Items
„Open“ when Ctrl-key is pressed
Shortcuts
For frequently used commands easy to access special shortcut keys have been defined.
The following table lists them:
24
Key
Meaning
Esc
Minimize application
F2
Find Selection
Shift-F2
Find Context
F3
Next
F4
Back in Search History
F5
Forward in Search History
Where Is User Manual
http://www.abego-software.de
11.5
F6
Open
F7
Alt. Files
Auto-Activation of Prefix field
When the application is activated the Prefix Field automatically gets the input focus, with all text
selected.
Background: typically you will activate the application to search for a new word that you want to
enter in the Prefix field. When the Prefix field is automatically activated after application activation
you don’t not need to navigate to it manually (with the mouse or accelerator).
http://www.abego-software.de
Where Is User Manual
25
12
De-Installation
To de-install Where Is you simply need to remove the installation directory and the file
„WhereIs.ini“ from the Windows directory.
When you have added the application to the Windows Start menu you need to remove it manually.
In addition you should remove the Where Is databases that consists of the database master file with
the extension „.whe“ and the database directory with the same name as the master file but without
extension (for details see chapter „Databases“).
26
Where Is User Manual
http://www.abego-software.de
13
13.1
Appendix
Manually stopping a context
When C++ macros are used to extend the language it may happen that the build-in algorithm to
determine a context fails (see section „The Context“ in chapter „The File View“). Typical examples
are the "BEGIN_MESSAGE_MAP/END_MESSAGE_MAP" blocks used in Microsoft MFC. In this
case the first function following such a block is reported to be in the "BEGIN_MESSAGE_MAP"
context.
Example:
BEGIN_MESSAGE_MAP(CAboutDlg, Cdialog)
//{{AFX_MSG_MAP(CAboutDlg)
// No message handlers
//}}AFX_MSG_MAP
END_MESSAGE_MAP()
// App command to run the dialog
void CDevToolsApp::OnAppAbout()
{
CAboutDlg aboutDlg;
aboutDlg.DoModal();
}
When searching for OnAppAbout the context
"BEGIN_MESSAGE_MAP(CAboutDlg, CDialog)"
is displayed for "void CDevToolsApp::OnAppAbout()", not the global context. Even searching for
"aboutDlg" (the local variable in "CDevToolsApp::OnAppAbout()") will return the wrong context.
To avoid these problems one can define a list of "End Context Words" in the INI file that will
automatically close any context when read. The INI file is called „WhereIs.ini“ and is located in the
Windows directory.
Example:
[EndContextWords]
size = 2
0=END_MESSAGE_MAP
1=END_DISPATCH_MAP
The context is closed (i.e. set to "global") when END_MESSAGE_MAP or END_DISPATCH_MAP
is found.
Notice: "size" must give the number of items in the list. The items are numbered starting with 0.
(For your convenience these two entries are automatically added to the WhereIs.INI file when you
start Where Is the first time.)
http://www.abego-software.de
Where Is User Manual
27
13.2
Customize the number of lines in the Index Listbox
The maximal number of lines displayed in the index listbox can be configured through the
[Settings]
MaxIndexListLen=200
in the WhereIs.INI file.
28
Where Is User Manual
http://www.abego-software.de