1
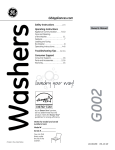
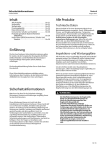
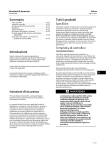
Joto AutoClam Press Manual
Model No.: E-HP-JAR-1515 / E-HP-JAR-1620
OPERATOR’ S MANUAL
TM
Bringing images to life
TM
Safety Instructions
)RU8VH%\4XDOL¿HG3HUVRQQHO2QO\
:KHQXVLQJ\RXU+HDW3UHVV
EDVLFSUHFDXWLRQVVKRXOGDOZD\VEHIROORZHG
LQFOXGLQJWKHIROORZLQJ
5HDGDOOLQVWUXFWLRQV
8VHKHDWSUHVVRQO\IRULWVLQWHQGHGXVH
.HHSWKHKHDWSUHVVGU\DWDOOWLPHV'RQRWJHWWKHKHDWSUHVVZHWWRUHGXFHWKHULVNRIHOHFWULF
VKRFN'RQRWVWRUHKHDWSUHVVLQDZHWRUGDPSDUHD
1HYHUSXOOFRUGWRGLVFRQQHFWWKHSRZHUJUDVSSOXJDQGSXOOWRGLVFRQQHFWIURPSRZHURXWOHW
3URWHFWWKHSRZHUFRUGE\NHHSLQJLWDZD\IURPKRWVXUIDFHV'RQRWDOORZREMHFWVWRVLWRQWRSRI
WKHFRUG7KLVFRXOGFDXVHGDPDJHWRWKHFRUGDQGFRXOGEHFRPHD¿UHKD]DUGULVN
'RQRWRSHUDWHKHDWSUHVVZLWKDGDPDJHGFRUGRULIWKHHTXLSPHQWKDVEHHQGDPDJHG'RQRW
GLVDVVHPEOHRUDWWHPSWWRUHSDLUWKHKHDWSUHVVWRSUHYHQWULVNVWRLQMXU\&DOORUWDNHLWWRD
TXDOL¿HGVHUYLFHSHUVRQIRUH[DPLQDWLRQDQGUHSDLU,QFRUUHFWDVVHPEO\RUUHSDLUFRXOGLQFUHDVHWKH
ULVNRI¿UHHOHFWULFVKRFNRULQMXU\WRSHUVRQVZKHQWKHHTXLSPHQWLVXVHG
6XSHUYLVLRQLVQHFHVVDU\IRUDQ\KHDWSUHVVEHLQJXVHGE\RUQHDUFKLOGUHQ'RQRWOHDYHHTXLSPHQW
XQDWWHQGHGZKLOHFRQQHFWHG
0HWDOSDUWVRQWKHSUHVVFDQEHFRPHKRW%XUQVPD\RFFXUZKHQWRXFKLQJKRWPHWDOSDUWV7DNH
FDXWLRQZKHQXVLQJWKHKHDWSUHVV
7RUHGXFHWKHOLNHOLKRRGRIFLUFXLWRYHUORDG,WLVUHFRPPHQGHGWRXVHDGHGLFDWHGFLUFXLWLISRVVLEOH
&DUHVKRXOGEHWDNHQWRDUUDQJHWKHFRUGVRWKDWLWFDQQRWEHSXOOHGRUWULSSHGRYHU
7RUHGXFHWKHOLNHOLKRRGRIFLUFXLWRYHUORDGGRQRWRSHUDWHRWKHUKLJKYROWDJHHTXLSPHQWRQWKH
VDPHFLUFXLW
,IDQH[WHQVLRQFRUGLVQHFHVVDU\WKHQDDPSHUDJHUDWHGFRUGVKRXOGEHXVHG&RUGVUDWHGIRU
OHVVDPSHUDJHPD\RYHUKHDW&DUHVKRXOGEHWDNHQWRDUUDQJHWKHFRUGVRWKDWLWFDQQRWEHSXOOHGRU
WULSSHGRYHU
1RWH7KLVKHDWSUHVVVKRXOGQRWEHVHWWRH[FHHG&6HWWLQJWKHSUHVVWHPSHUDWXUHWRDERYH
&PD\FDXVHD¿UHKD]DUG
%HFDUHIXORIWKH$XWR5HOHDVHIHDWXUH3UHVVKDQGOHFDQLQMXUHERG\SDUWVZKHQDXWRUHOHDVLQJ
6WDQGFOHDURIDXWRUHOHDVHSDWK
2
&RQJUDWXODWLRQVRQ\RXUSXUFKDVHRID-RWR$XWR&ODP+HDW3UHVV,QRUGHUWRZRUN
SURIHVVLRQDOO\ZLWKWKHPDFKLQHDQGVWDUWSURGXFWLRQSOHDVHPDNHVXUH\RXUHDGWKLVPDQXDO
FDUHIXOO\5HSURGXFWLRQRIWKLVPDQXDOUHTXLUHVZULWWHQFRQVHQWIURP-RWR(UURUVDQG
DPHQGPHQWVRIWHFKQLFDOGHWDLOVH[FHSWHGDOOULJKWVUHVHUYHG-RWRLVQRWOLDEOHIRUDQ\GLUHFWRU
LQGLUHFWGDPDJHVFDXVHGE\WKHXVHRIWKLVSURGXFW
7DEOHRI&RQWHQWV
Safety
,QWURGXFWLRQ3
0DFKLQH3DUWV'LDJUDP4
6HWWLQJ8S<RXU+HDW3UHVV 5
2SHUDWLQJ,QVWUXFWLRQV6
+HDW3UHVV2YHUYLHZ7
Maintenance8
-RWR6XEOLPDWLRQ7UDQVIHU9LQ\O*XLGH 8
&LUFXLW'LDJUDP
([SDQGHG9LHZ11
&RQWDFW
3
0DFKLQH3DUWV'LDJUDP
1
3
5
4
6
(OHFWULFDO&DVH
*<'LJLWDO&RQWUROOHU
7
/LPLW6ZLWFK
(OHFWURPDJQHWLF6XFN3ODWH
3UHVVXUH$GMXVW.QRE
(PHUJHQF\6WRS%XWWRQ
3RZHU6ZLWFK
+DQGOH*HDUIRU([FKDQJH
8QGHU3ODWH
4
8
6HWWLQJ8S<RXU+HDW3UHVV
7XUQLQJ2Q<RXU+HDW3UHVV
Turn the Main Power Switch on. The
Main Power Switch is at the right side
of the heat press.
Current temperature, set temperature,
current time, set time will display.
+RZWR5HDG7KH'LVSOD\
1.) Right side PV value = Current Temperature
2.) Left side PV value = Current Time
3.) Right side SV value = Set Press Temperature
4.) Left side SV value = Set Press Time
6HWWLQJ3UHVV7HPSHUDWXUH
Press OK to start. Use the up and down
arrows to choose to display in °F or °C.
°F stands for Fahrenheit
°C stands for Celsius
Once selection is made, press ok to save
*UHHQVHWWHPSHUDWXUHYDOXHZLOOÀDVK
Use the up and down arrows to set
press temperature value. Press ok to save
1RWH6HWWLQJWKHSUHVVWHPSHUDWXUHWRDERYH&PD\FDXVHD¿UHKD]DUG
6HWWLQJ3UHVV7LPH
*UHHQ6HW7LPH9DOXHZLOOÀDVK
Use the up and down arrows to change
the value.
Press ok to save the value.
Wait until the current
temperature is the same as the set temperature
before using. The press will beep once set temperature
is reached. Close and open the press to stop the beeping
5
2SHUDWLQJ,QVWUXFWLRQV
3UHVVLQJD7VKLUW
1.)
Turn on the Main Power Switch
2.)
Set the appropriate Press Temperature, and Time as per your transfer vinyl
or sublimation instructions.
3.)
Place your t-shirt on the heat press.
5.)
Set the pressure. Press the blank shirt to ensure there is adequate pressure
before placing transfer materials on top of the shirt.
Adjust the pressure knob accordingly
6.)
Wait until current temperature is the same as the set temperature. Once the
press has reached set temperature, place transfer material on the shirt. For
Sublimation, place the paper with the image face down. For cuttable transfer
vinyl, place the matte side with the tranparent carrier backing facing the heat
platen. If unsure, please refer to the instructions you recieved with your
transfer materials.
7.)
Once Press is closed the current time value will start counting down. Once the
timer reaches the last 2 seconds before reaching 0, it will start to beep to warn
you. It is recommended to stand clear of the press and let the auto-open
IHDWXUHZRUNZLWKRXWREVWUXFWLRQ2QFHWLPHUHDFKHV]HURWKHSUHVVZLOORSHQ
8.)
6
Note: Once the press is closed, it cannot be opened manually until the timer
UHDFKHV]HUR,QDQHPHUJHQF\\RXPD\SUHVVWKHUHGHPHUJHQF\VWRSEXWWRQ
to force open the press. When pressing the red emergency stop button, the
press will open immediately without warning. Keep hands on the heat press
handle at all times during and after pressing the emergency stop button. Not
securing the handle with your hands may cause injury.
For most sublimation and transfer vinyl, the peel is hot. If unsure, refer to the
instructions that came with your transfer materials.
+HDW3UHVV2YHUYLHZ
7HFKQLFDO6SHFV
Model No.:
E-HP-JAR-1515
E-HP-JAR-1620
Machine Type:
Auto Release Clam Shell
Auto Release Clam Shell
0DFKLQH6L]H
748mm x 480mm x410mm
748mm x 480mm x410mm
15” X 15”
16” X 20”
Exchangeable
Exchangeable
GY-06 Digital Controller
GY-06 Digital Controller
Up to 5mm Thickness
Up to 5mm Thickness
Voltage:
120V/220V
120V/220V
Power:
1750W/1800W
1750/1800W
Time Range:
Maximum Temp:
0-999 Seconds
491°F (225°C)
0-999 Seconds
491°F (225°C)
3DFNLQJ6L]H
540mm x 880mm x 570mm
540mm x 880mm x 570mm
Gross Weight:
60kg
60kg
+HDWSODWHQ6L]H
Under Plate:
Controller
Printable Materials:
Note: This heat press should not be set to exceed 200C. Setting the press temperature to
DERYH&PD\FDXVHD¿UHKD]DUG
7
Maintanence
*HQHUDO0DLQWHQDQFH
Please switch off the machine and unplug the power cord when the machine is not
in use.
To protect the heat platen, do not allow any hard surface objects to be in direct conWDFWZLWKWKHSODWHQ7KLVLQFOXGHV]LSSHUVEXWWRQVPHWDOVXEOLPDWLRQLWHPV:KHQ
pressing these items, place a protective sheet between the platen and the objects.
The heat platen will cool down to the room temperature, if heat press stays un-use
for more than 30 minutes.
The heat-releasing fan will automatically starts when the temperature of heat platen
reaches 80 degree C (176 degree F). It helps to reduce the temperature of electrical
parts and prolong the service life of them.
Please add the lubrication oil regularly on the joints. to prolong the life of your heat
press. The frequency will depend on how often you use your machine.
1RWH7KLVKHDWSUHVVVKRXOGQRWEHVHWWRH[FHHG&6HWWLQJWKHSUHVV
WHPSHUDWXUHWRDERYH&PD\FDXVHD¿UHKD]DUG
+HDW3UHVVLQJ*XLGH
8
0XOWL&XW8OWUD0DWWH
0XOWL&XW3UHPLXP
Temperature: 320F
Time: 20 seconds
Peel: Hot
Temperature: 320F
Time: 10 seconds
Peel: Hot
0XOWL&XW)ORFN3UHPLXP
0XOWL&XW/XVWUH
Temperature: 320F
Time: 20 seconds
Peel: Hot
Temperature: 310-330F
Time: 15-20 seconds
Peel: Hot to Cold
0XOWL&XW1\ORQ
0XOWL&XW6W\OH
Temperature: 345F
1st Press Time: 3 seconds
2nd Press Time: 10 seconds
Temperature: 310-330F
Time: 15-20 seconds
Peel: Hot to Cold
+HDW3UHVVLQJ*XLGHFRQWLQXHG
6XEOLPDWLRQ,WHPV
6XEOLPDWDEOH&HUDPLF7LOHV
Unisub Metals
Temperature: 400F
Time: 360-420 seconds
Peel: Hot
Method: Substrate face down
Image face up
Temperature: 400F
Time: 60 seconds
Peel: Hot
Method: Substrate face up
Image face down
3RUFHODLQ2UQDPHQWV
8QLVXE3ODVWLFV
Temperature: 400F
Time: 180-240 seconds
Peel: Hot
Method: Substrate face down
Image face up
Temperature: 400F
Time: 75-80 seconds
Peel: Hot
Method: Substrate face up
Image face down
0RXVH3DGV&DQ&RROHUV
8QLVXE:RRG
Temperature: 400F
Time: 35-45 seconds
Peel: Hot
Method: Substrate face up
Image face down
Temperature: 400F
Time: 75-80 seconds
Peel: Hot
Method: Substrate face up
Image face down
&RDVWHUV)DEULF3X]]OHV
8QLVXE3ODTXHV
Temperature: 400F
Time: 35-45 seconds
Peel: Hot
Method: Substrate face up
Image face down
Temperature: 400F
Time: 75-80 seconds
Peel: Hot
Method: Substrate face up
Image face down
3KRQHFRYHULQVHUWV
Temperature: 360F
Time: 120 seconds
Peel: Hot
Method: Substrate face down
Image face up
9
&LUFXLW'LDJUDP
10
([SDQGHG'LDJUDP
1.) Machine Foot
11.) Pressure Adjust Knob
21.) Power Cord
2.) Under Plate Fitting
12.) Handle Bar Grip
22.) Power Swtich
3.) Handle Gear for
Exchange Under Plate
13.) Handle Frame
23.) Serpentuator
4.) Under Plate
14.) Handle Connect Piece
24.) Electrical Parts Bracket
5.) Heat Platen
15.) Electromagnet
25.) Sprint Connect Piece
6.) Heat Platen Metal Cover
16.) GY-06 Digtial Controller
26.) Gas Spring
7.) Anti-scald Protect Cover
17.) Limit Switch
27.) Machine Frame
8.) Heat Platen Adaptor Plate
18.) Electronic Case
28.) Welded Plate
9.) Emergency Stop Button
19.) Back Cover
10.) Davit Arm
20.) Fuse Holder
11
TM
Bringing images to life
TM
ZZZMRWRSDSHUFRP
7HO
)D[
&RTXLWODP%&_0LVVLVVDXJD21
%ODLQH:$_/DV9HJDV19_1DVKYLOOH71_$NURQ2+