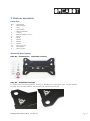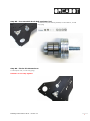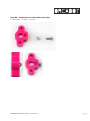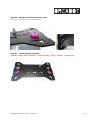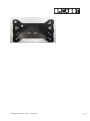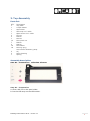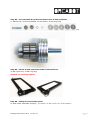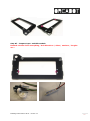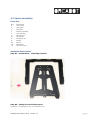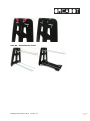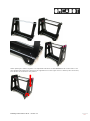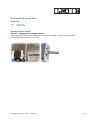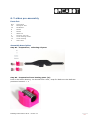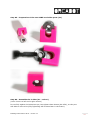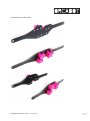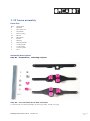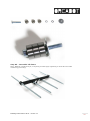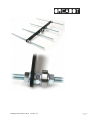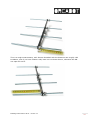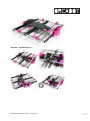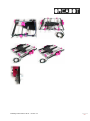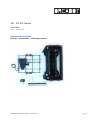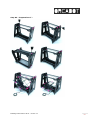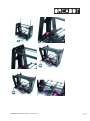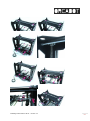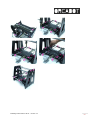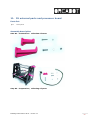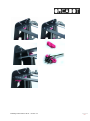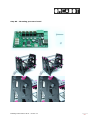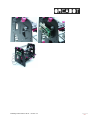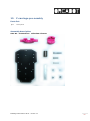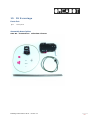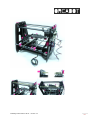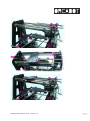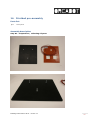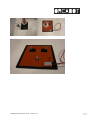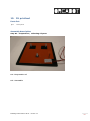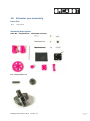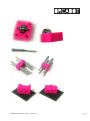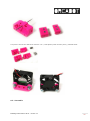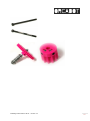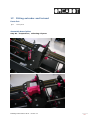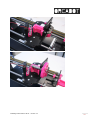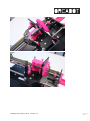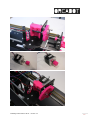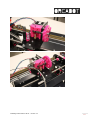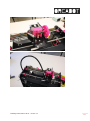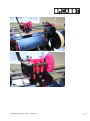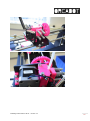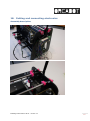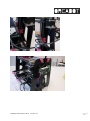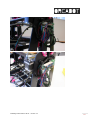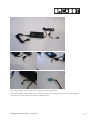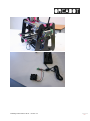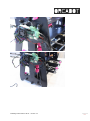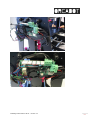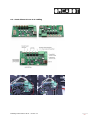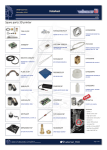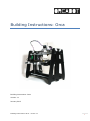
1
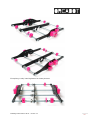
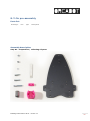
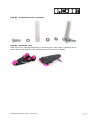
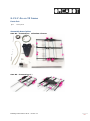
Building Instructions: Orca Building instructions: Orca Version 1.1 January 2013 Building Instructions: Orca - version 1.1 1 Building Instructions: Orca - version 1.1 2 1. Introduction This document contains the information to build your own Orca 3D-printer. On our website you can also find our user manual. In this manual you can find the instructions how to start you printer and how to operate. Copyright © All rights reserved. Apart from the legally laid down exceptions, no part of this publication may be reproduced, stored in an automated databank, or made public in any shape or form, be it electronically, mechanically, by photocopying, filming, or in any other manner, without prior written permission from ORCABOT 3D Print technology BV, in Helmond (NL). Disclaimer The influence of the builder of the printer is dominant, thus making him fully responsible for accuracy and safety. We are always developing and improving our products. This can result that some pictures in this manual can have small differences from the parts you received. When in use, some parts of the Orca will have high temperatures. Be careful that you will not touch these parts during printing or at least within a period of 10 minutes after printing. Building Instructions: Orca - version 1.1 3 2. Bottom assembly Parts list: QTY 1 2 8 2 2 8 8 6 4 1 11 22 5 Description Bottom Orca Ring Axle Holder Bearing 6000ZZ (26mm) Bearing 624ZZ M3 nut M3x8 M4x16 M4x20 M4x30 M4 nylock nut M4 washers M4 ring (big) (18mm) Assembly description: Step 01 - Preparation / collecting all parts Step 02 - Assemble bearings 1x Bottom Orca, 2x bearing 6000zz, 2x ring, 6x Bolt M4x16, 6x M4 nylock nuts, 12x M4 washers (on both side). Put the washers with the flat side towards the bearings Building Instructions: Orca - version 1.1 4 Step 03 - Pre-assemble the Z-belt tensioner (1x) 1x M4x30 bolt, 2x bearing 624ZZ, 2x M4 washer, 4x M4 ring (big) Step 04 - Fit the Z-belt tensioner 1x M4 nylock nut, 1x M4 ring (big). Remark: do not fully tighten! Building Instructions: Orca - version 1.1 5 Step 05 - Preparation of axle holder parts (8x) 1x Axle holder, 1x M3x8 , 1x M3 nut. Building Instructions: Orca - version 1.1 6 Step 06 - Fitting the axle holder parts (2x) 2x M4x20 , 2x M4 nylock nut, 4x M4 washer. Step 07 – Check Bottom assembly Remark: double check everything / bolt directions / sides / washers / lengths etc.! Building Instructions: Orca - version 1.1 7 Building Instructions: Orca - version 1.1 8 3. Top Assembly Parts list: QTY 1 1 1 1 1 2 2 1 10 7 4 19 18 2 2 1 Description Top plate Z-opto holder LED holder LED strip incl. cable Opto sensor incl. cable M3 nut M3x20 M4 nut M4 nylock nut M4x20 M4x30 M4 washer M4 ring (big) Axle holder assembly (Step 01) Nylon bearing Spring Assembly description: Step 01 - Preparation / collecting all parts Step 01 - Preparation a. Glue a M3 nut in the opto holder. b. Put the LED strip on the LED holder. Building Instructions: Orca - version 1.1 9 Step 02 - Pre-assemble the X-belt tensioner & 2x X-belt endpoints 1x M4x30 bolt, 2x bearing 624ZZ, 2x M4 washer, 5x M4 ring (big). (x3) Step 04 - Fit the X-belt endpoints & the X-belt tensioner 3x M4 nylock nut, 3x M4 ring (big) Remark: do not fully tighten! Step 06 - Fitting the axle holder parts 2x Axle holder assemble (Step 01), 2x M4x20, 4x M4 nylock nut, 8x M4 washer Building Instructions: Orca - version 1.1 10 Step 07 – Prepare Opto- and LED-module Remark: double check everything / bolt directions / sides / washers / lengths etc.! Building Instructions: Orca - version 1.1 11 Put 2 bolts M4x20 and 1 M4x30 according to the picture. Put the spring over the middle bolt and attach the optoholder with bolt. By turning on the middle bolt, you can adjust the height of the optoholder. Step 07 – Check Top assembly Remark: double check everything / bolt directions / sides / washers / lengths etc.! Building Instructions: Orca - version 1.1 12 4. Frame assembly Parts list: QTY 4 2 1 1 1 5 16 8 8 20 20 10 Description Axle holder Side plate Mid plate Bottom assembly Top assembly M8 x410mm M4 washer M4 Nylock nut M4x20 M8 nut M8 washer Plastic nut cap Assembly description: Step 01 - Preparation / collecting all parts Step 02 - Fitting the axle holder parts 4x M4x20 , 4x M4 Nylock nut, 4x M4 washer (2x) Building Instructions: Orca - version 1.1 13 Step 03 - Assemble the frame Building Instructions: Orca - version 1.1 14 When putting the frame together it is important that there is NO TORSION at all in the frame. You can release the torsion by turning on the opposite nut. If the right corner is lifted up due to torsion, turn at the nu as shown in the picture. Building Instructions: Orca - version 1.1 15 Finish the assembly by putting on the plastic nut caps. Building Instructions: Orca - version 1.1 16 5. Preparation motors Parts list: QTY 4 Description Stepper Motor Assembly description: Step 01 - Preparation of stepper motors (note: best is to tape off the shaft/axle hole with some tape or clay to prevent metal swarfs entering the motor (=magnet). Building Instructions: Orca - version 1.1 17 6. Y-sides pre-assembly Parts list: QTY 16 32 8 8 2 2 10 10 2 Description M4 Nylock bolt M4 Washer M4x30 M4x35 AMCE nut Driven Z-nut trap Linear bearing holder Linear bearing Side frame Assembly description: Step 01 - Preparation / collecting all parts Step 02 - Preparation linear bearing parts (2x) Push in the lm8uu bearing. You should hear a click / snap fit. Make sure the balls are positioned crossed -> X Building Instructions: Orca - version 1.1 18 Step 03 - Preparation of the two ACME nut holder parts (2x) Step 04 - Assemble the Y sides (2x – mirror) (note: there is a left and a right version) Do not fully tighten the bolts/nuts yet, but tighten them almost (90-95%), so they are still able to move a bit (fully tightening will be done later in the frame). Building Instructions: Orca - version 1.1 19 Put washers on both sides. Building Instructions: Orca - version 1.1 20 7. YZ frame assembly Parts list: QTY 4 1 2 7 37 40 1 3 6 1 1 1 2 Description M8x300 M4 nylock nut M4 washer M4 ring (big) M8 nut M8 washer M4x35 Bearing Bearing 624ZZ Y-opto holder Y-rod holder Y-motor plate Tool Assembly description: Step 01 - Preparation / collecting all parts Step 03 - Pre-assemble the Z-belt tensioner 1x M4x30 bolt, 2x bearing 624ZZ, 2x M4 ring (small), 6x M4 ring (big) Building Instructions: Orca - version 1.1 21 Step 03 – Assemble YZ-frame Note: Nothing is tightened yet, everything is hand-tight, tightening is done after accurate measuring (next step). Building Instructions: Orca - version 1.1 22 Building Instructions: Orca - version 1.1 23 This is a rough measurement, with 300mm threaded rods the distances are roughly 128 & 168mm, note if you have 330mm rods, best is to cut them shorter, otherwise the M8 nut caps will not fit. Building Instructions: Orca - version 1.1 24 Everything is only hand-tightened in these pictures. Building Instructions: Orca - version 1.1 25 8. Y-fin pre-assembly Parts list: Drawingnr. Rev. QTY Description Assembly description: Step 01 - Preparation / collecting all parts Building Instructions: Orca - version 1.1 26 Step 02 - Preparation of the Y optoflag Step 03 - Assemble Y-Fin Note: Only the Y optoflag is tightened, everything else is hand-tight, tightening of the lm8uu holders will be done once assembled in the YZ frame (next step). Building Instructions: Orca - version 1.1 27 9. Fit Y-fin on YZ frame Parts list: QTY Description Assembly description: Step 01 - Preparation / collecting all parts Step 02 - Preparation of … Building Instructions: Orca - version 1.1 28 Step 03 - Preparation of … Building Instructions: Orca - version 1.1 29 Building Instructions: Orca - version 1.1 30 10. Fit YZ-frame Parts list: QTY Description Assembly description: Step 01 - Preparation / collecting all parts Building Instructions: Orca - version 1.1 31 Step 02 - Preparation of … Building Instructions: Orca - version 1.1 32 Building Instructions: Orca - version 1.1 33 Building Instructions: Orca - version 1.1 34 Building Instructions: Orca - version 1.1 35 11. Fit external parts and processor board Parts list: QTY Description Assembly description: Step 01 - Preparation / collecting all parts Step 02 - Preparation / collecting all parts Building Instructions: Orca - version 1.1 36 Building Instructions: Orca - version 1.1 37 Step 03 – Mounting processor board Building Instructions: Orca - version 1.1 38 Building Instructions: Orca - version 1.1 39 12. Y-carriage pre-assebly Parts list: QTY Description Assembly description: Step 01 - Preparation / collecting all parts Building Instructions: Orca - version 1.1 40 Step 02 - Preparation Step 03 - Assemble Building Instructions: Orca - version 1.1 41 13. Fit X-carriage Parts list: QTY Description Assembly description: Step 01 - Preparation / collecting all parts Building Instructions: Orca - version 1.1 42 Step 02 - Preparation Step 03 - Assemble Building Instructions: Orca - version 1.1 43 Building Instructions: Orca - version 1.1 44 Building Instructions: Orca - version 1.1 45 Building Instructions: Orca - version 1.1 46 14. Printbed pre-assembly Parts list: QTY Description Assembly description: Step 01 - Preparation / collecting all parts Building Instructions: Orca - version 1.1 47 Building Instructions: Orca - version 1.1 48 15. Fit printbed Parts list: QTY Description Assembly description: Step 01 - Preparation / collecting all parts 02 - Preparation of 03 - Assemble Building Instructions: Orca - version 1.1 49 Building Instructions: Orca - version 1.1 50 Building Instructions: Orca - version 1.1 51 Building Instructions: Orca - version 1.1 52 Building Instructions: Orca - version 1.1 53 16. Extruder pre-assembly Parts list: QTY Description Assembly description: Step 01 - Preparation / collecting all parts 02 - Preparation of Building Instructions: Orca - version 1.1 54 Building Instructions: Orca - version 1.1 55 This picture shows the difference between v10 / v10B plastic parts and the pulley / hobbed shaft: 03 - Assemble Building Instructions: Orca - version 1.1 56 Building Instructions: Orca - version 1.1 57 17. Fitting extruder and hotend Parts list: QTY Description Assembly description: Step 01 - Preparation / collecting all parts Building Instructions: Orca - version 1.1 58 Building Instructions: Orca - version 1.1 59 Building Instructions: Orca - version 1.1 60 Building Instructions: Orca - version 1.1 61 Building Instructions: Orca - version 1.1 62 Building Instructions: Orca - version 1.1 63 Building Instructions: Orca - version 1.1 64 Building Instructions: Orca - version 1.1 65 Building Instructions: Orca - version 1.1 66 18. Cabling and connecting electronics Assembly description: Building Instructions: Orca - version 1.1 67 Building Instructions: Orca - version 1.1 68 Building Instructions: Orca - version 1.1 69 The power adapter for the heated bed (150W) should be set at 24V. The power adapter for the electronics (70W) should be set at 12V. In the box of the power adapter you can find a small insert to change the voltage to 12V. Building Instructions: Orca - version 1.1 70 Building Instructions: Orca - version 1.1 71 Building Instructions: Orca - version 1.1 72 Building Instructions: Orca - version 1.1 73 Building Instructions: Orca - version 1.1 74 19. Firmware updating and settings 01 - Firmware values and uploading Firmware values table: Setting machine / extruder type value X&Y Orca 0.4x 32.05 Z Orca 0.4x (ACME 10x3 + T2.5 alu pulleys 20 & 36 teeth) 960 E Orca 0.4x + extruder v10B 169.00 The table below shows the settings for ‘older’ models. Setting machine / extruder type value X&Y Mendel v2 40.05 X&Y Orca 0.2 40.05 X&Y Orca 0.30 40.05 Z Mendel v2 (M8 + T5 pulleys (8 & 21 teeth)) 3360 Z Orca 0.2 (M8 + T5 pulleys (8 & 21 teeth)) 3360 Z Orca 0.30 (M8 + T5 pulleys (8 & 21 teeth)) 3360 Z Orca 0.4x (M10 + T5 pulleys (8 & 21 teeth)) 2800 E Mendel v2 + extr v9 67-76 E Orca 0.2 + extr v9 67-76 E Orca 0.30 + extr v9 67-76 E Orca 0.4x + extr v10 136.50 Building Instructions: Orca - version 1.1 75 02 - Gen6 deluxe & Orca 0.4x cabling Building Instructions: Orca - version 1.1 76