1
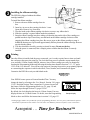
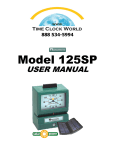
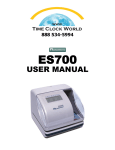
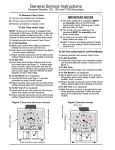
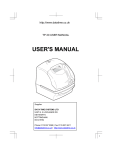
0
ì
8 t
r
1
a
P St
S
k
c
E ui
Unpacking and inspection
Open the shipping carton and carefully remove
the contents:
• ESP180
• 2 keys
• Power cable
• Ribbon
• User Manual
• 3 screws
Print Bar
Q
(press anywhere)
Ribbon
Access Door
Back of ESP180
Day of Week
Wall Mount Bracket
Date
Time
Card Stop
16
MO
AM
Keyhole
Key Holder
í
Card Shelf
Digital Display
Note: This is the normal display in the
idle prompt. Your display may appear
different based on the settings you
chose when programming the clock.
Connecting power
The ESP180 may be wall-mounted or placed on a table or
desktop. Before installing the ESP180, connect the power
cord. Before connecting the power cord, you must remove the
wall-mounting bracket on the back of the unit:
1. Use the key to unlock the bracket from the bottom.
2. Insert the key into the keyhole on the bottom.
3. Turn it 1/4 turn counterclockwise.
4. Slide the bracket down and away from the unit.
5. Remove the key.
The power cable is inserted into the recessed area on the
bottom of the clock. Push the cable into the convertor in the
clock until the connector is snug.
Install the bracket, being careful not to pinch the power cord.
AM or PM
Clips
î
Ribbon
Access
Door
Installing the ribbon cartridge
The ESP180 is shipped without the ribbon
cartridge installed.
Knob
Printhead
To install the ribbon cartridge:
1. Remove the new ribbon cartridge from its
Tab
box.
2. Insert key in access door, turning clockwise ¼ turn.
Ribbon
Open door. Remove key from door.
3. Turn the knob on the ribbon cartridge clockwise to remove any ribbon slack.
4. Slide the cartridge’s exposed ribbon under the printhead.
5. Snap the ribbon cartridge into place taking care that the pins on the side of the cartridge are
pushed into their clips. If necessary, turn the knob on the ribbon cartridge clockwise while
snapping the ribbon cartridge into place. Be sure to press on the ribbon cartridge to snap it
behind the bottom two clips located approximately halfway down the ribbon cartridge. Remove
any slack in the ribbon.
6. The door should be closed by pressing on it until it snaps. Do not use the key.
7. After the power is connected, take a sample print to confirm that the ribbon is correctly
installed.
ï
Printing
Once the ribbon is installed and the power connected, you’re ready to print. Insert a time card until
the card stops, then press the print bar. The clock has been preset to print the current month, date,
year, and time (12-hour format, AM/PM, minutes.) Any of these settings can easily be changed by
entering the Programming Mode and following the instructions found in Sections 2.13 - 3.5, pages
15-22 of the User Manual*. You will have the option of choosing from twelve preset printing options
or customizing the sequence in which order Date, Time, Number, and Comment will appear.
Customize the ESP180 to suit your individual needs.
Sample print
Your ESP180 comes preset to Eastern Standard Time. You may
change the time by referring to the User Manual, Section 2.10, pages
13-14*. Daylight Savings Time is turned on. If you need to turn off
the feature, enter the Programming Mode (see 2.9, page 13) and
follow the steps through Section 3.6, pages 22-24*.
By default, the clock displays the hours in 12-hour format. You may
display the time in a 24-hour format. To do this, enter the Programming
Mode as above and follow the instructions in section 2.12, page 15*.
SU MO
AM
16
Sample display
* Although page numbers are provided for specific programming functions, each is a part of a mechanical sequence
which must be followed in order. Please review the entire User Manual, from start to finish, at your convenience.
Acroprint … Time for Business™
06-0255-000 Rev. A