1
1 (60)
ALVAR – A Library for Virtual and Augmented Reality
User’s Manual (v.2.0)
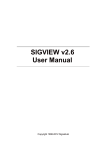
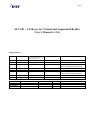
Change history
Version
Date
Status
Author(s)
Remarks
First draft created.
Background info added to Ch 9.3
New screen shots from doc,
FAQs, installation step-by-step
Content to sections 9.3.x
GNU LGPL license
Changes caused by the new
ALVAR distribution packages
Screen dumps from v.2.0.0
Add FAQ entries.
(draft/proposal/updated /to be
reviewed/ approved)
0.1
0.2
0.3
21.11.2011
12.12.2011
15.12.2011
Draft
Draft
Draft
TTERAK
TTERAK
TTERAK
0.4, 0.5
0.6
0.7
25.01.2012
29.02.2012
25.05.2012
Draft
Draft
Draft
TTERAK
TTERAK
TTERAK
1.0
1.1
30.05.2012
13.12.2013
Final
Update
TTERAK
ABALAIN
Name
Kari Rainio
Written by
Reviewed by Alain Boyer
Approved by
Position
TK8036
TK8035
Date
Signatures
30.05.2012
30.05.2012
ALVAR v.2.0 User’s Manual
2 (60)
Contents
1
2
3
4
5
6
7
8
Introduction ......................................................................................................................................... 4
1.1 Purpose of the Document ............................................................................................................. 4
1.2 Other Documents .......................................................................................................................... 4
1.3 Introduction to Augmented Reality (AR) and VTT AR Team .................................................... 4
1.4 Introduction to ALVAR – A Library for Virtual and Augmented Reality .................................. 6
1.4.1 ALVAR Desktop License ..................................................................................................... 7
ALVAR Features ................................................................................................................................ 7
2.1 Other AR Technologies, NOT in ALVAR (yet…) ...................................................................... 8
ALVAR Packages and Requirements ................................................................................................. 8
3.1 The 3 ALVAR Packages .............................................................................................................. 8
3.2 ALVAR Requirements ................................................................................................................. 9
Istalling and Using Alvar .................................................................................................................... 9
4.1 Test ALVAR Only (Bin package) ................................................................................................ 9
4.2 Basic ALVAR Usage (Sdk package) ......................................................................................... 10
4.3 Compiling the Alvar Samples (Sdk package) ............................................................................ 10
4.4 Advanced: Compile the ALVAR Source Code (Src package)................................................... 11
4.5 ALVAR Directories ................................................................................................................... 11
4.6 Installing ALVAR: Step by Step ................................................................................................ 11
ALVAR Sample Code ...................................................................................................................... 18
5.1 SampleCamCalib ........................................................................................................................ 19
5.2 SampleCvTestbed ....................................................................................................................... 19
5.3 SampleFilter ............................................................................................................................... 20
5.4 SampleIntegralImage.................................................................................................................. 21
5.5 SampleLabeling .......................................................................................................................... 22
5.6 SampleMarkerCreator ................................................................................................................ 23
5.7 SampleMarkerDetector .............................................................................................................. 23
5.8 SampleMarkerHide .................................................................................................................... 24
5.9 SampleMarkerlessCreator .......................................................................................................... 25
5.10
SampleMarkerlessDetector ..................................................................................................... 25
5.11
SampleMultiMarker ................................................................................................................ 26
5.12
SampleMultiMarkerBundle .................................................................................................... 27
5.13
SampleOptimization ............................................................................................................... 28
5.14
SamplePointcloud ................................................................................................................... 28
5.15
SampleTrack ........................................................................................................................... 29
Demo Programs: Using ALVAR with OpenSceneGraph ................................................................. 31
6.1 Demo Programs for ALVAR Core Features .............................................................................. 31
6.1.1 Model2Marker .................................................................................................................... 31
6.1.2 MarkerHide ......................................................................................................................... 32
6.1.3 MarkerField ......................................................................................................................... 32
6.2 Demo Programs for ALVAR Advanced Features ...................................................................... 33
6.2.1 OsgSfM ............................................................................................................................... 34
6.2.2 OsgFern ............................................................................................................................... 34
6.2.3 Osg3DMarkerField ............................................................................................................. 35
ALVAR Utility Programs ................................................................................................................. 36
7.1 SampleCamCalib.exe ................................................................................................................. 36
7.2 SampleMarkerCreator.exe .......................................................................................................... 37
ALVAR HTML Help ........................................................................................................................ 39
8.1 File List....................................................................................................................................... 40
ALVAR v.2.0 User’s Manual
9
3 (60)
8.2 Class List .................................................................................................................................... 42
ALVAR Source Code ....................................................................................................................... 45
9.1 Code highlights: Most important ALVAR concepts, FAQs ...................................................... 45
9.1.1 How the capture system (and plugins) works ..................................................................... 45
9.1.2 How the marker detection works ........................................................................................ 45
9.1.3 How the margins work ........................................................................................................ 46
9.1.4 How the multimarkers (i.e. marker fields) work ................................................................. 46
9.1.5 Encoding data (integer, text, URL) into ALVAR markers ................................................. 46
9.1.6 FAQ: I compiled my ALVAR program with VC++, but I cannot run the program in
another computer............................................................................................................................... 47
9.1.7 FAQ: Using PsaTracker, i.e. motion flow tracking ............................................................ 47
9.1.8 FAQ: Contents of the ALVAR Sdk distribution package ................................................... 48
9.1.9 FAQ: Cannot complete the first steps of doc/compiling.txt ............................................... 49
9.1.10 FAQ: Cannot follow the last steps of doc/compiling.txt .................................................... 49
9.1.11 FAQ: ALVAR sample reports “Could not find any capture plugins” ................................ 50
9.1.12 FAQ: SampleCamCalib reports “Could not initialize the selected capture backend” ........ 51
9.1.13 FAQ: SampleCamCalib reports “Could not find any capture devices” .............................. 51
9.1.14 FAQ: ALVAR on Windows Vista/7 ................................................................................... 51
9.1.15 FAQ: Using ALVAR with DirectX .................................................................................... 51
9.1.16 FAQ: How to get the pose of a detected marker in ALVAR .............................................. 52
9.1.17 FAQ: How to use text string (ascii) markers ...................................................................... 52
9.1.18 FAQ: Problems with CvMat ............................................................................................... 53
9.1.19 FAQ: ALVAR seems to produce inaccurate results with a widescreen camera ................. 53
9.1.20 FAQ: Optimal set of ALVAR markers (minimize chance of improper detection)............. 54
9.1.21 ALVAR Main Core Features .............................................................................................. 54
9.1.22 ALVAR Main Advanced Features ...................................................................................... 59
9.1.23 Appetizer: Features Not Yet in ALVAR ............................................................................. 60
ALVAR v.2.0 User’s Manual
4 (60)
1 Introduction
1.1
Purpose of the Document
This document contains instructions for the users of the ALVAR open-source software
library, published by VTT Technical Research Centre of Finland.
1.2
Other Documents
The VTT AR Team web page: http://www.vtt.fi/multimedia
AR Team web pages contain many useful documents of Augmented Reality in general and
ALVAR in particular:
Description of AR (slide show, pdf),
Videos of team’s AR applications,
Downloadable AR demo applications,
PowerPoint presentation of ALVAR, ALVAR User’s Manual (this document),
ALVAR downloads (bin, sdk, src – see later).
1.3
Introduction to Augmented Reality (AR) and VTT AR Team
In Augmented Reality the user looks at a live video image of reality. The video image is
real-time and interactive, i.e. the user can choose where (s)he looks and move around. Often
head-up displays are employed for this, or tablet PCs (with cameras), or smart mobile
phones.
ALVAR v.2.0 User’s Manual
5 (60)
The live video in analyzed by a computer, which deduces from the image features where the
user is and which way (s)he looks. This way the computer can insert virtual objects to the
scene so that they are displayed in the correct size and angle, i.e. the virtual objects seem to
be “glued” to the reality.
There are lesser forms of Augmented Reality, e.g. displaying informative texts near the real
objects of the scene, but VTT AR team in conserned with the most demanding form of
Augmented Reality, where the goal is to insert virtual 3D objects to the real scene
seamlessly.
AR Team web pages (http://www.vtt.fi/multimedia) contain many useful documents of
Augmented Reality:
Description of AR (slide show, pdf),
Videos of team’s AR applications, and
Downloadable AR demo applications.
A large part of the team’s AR know-how (but not all of it) is embodied in the Alvar opensource AR library: A Library for Virtual and Augmented Reality.
ALVAR v.2.0 User’s Manual
1.4
6 (60)
Introduction to ALVAR – A Library for Virtual and Augmented Reality
ALVAR can be downloaded from the AR Team web pages:
http://www.vtt.fi/multimedia/alvar.html
ALVAR is a software library for creating virtual and augmented reality applications.
ALVAR has been developed by the VTT Technical Research Centre of Finland.
The current version of the library mainly supports marker-based augmented reality
applications, but also includes tools for markerless augmented reality.
ALVAR is designed to be as flexible as possible. It offers high-level tools and methods for
creating augmented reality applications with just a few lines of code. The library also
includes interfaces for all of the low-level tools and methods, which makes it possible for the
user to develop their own solutions using alternative approaches or completely new
algorithms.
ALVAR is currently provided on Windows and Linux operating systems and requires only
one third party library (OpenCV). ALVAR is independent of any graphical libraries and can
be easily integrated.
On the other hand, this implies that ALVAR itself contains no support for 3D graphics or 3D
models – these must be implemented using other software libraries.
There are separate demo programs (binaries and source code) that use OpenSceneGraph for
3D graphics.
ALVAR v.2.0 User’s Manual
1.4.1
7 (60)
ALVAR Desktop License
ALVAR Desktop license is GNU LGPL v.2.1. Thus ALVAR Desktop is free for both
commercial and non-commercial use.
ALVAR 2.0 is distributed under the terms of the GNU Lesser General Public License
(LGPL) version 2.1 or later. See http://www.gnu.org/licenses/old-licenses/lgpl-2.1.html for
the license terms. By downloading Alvar 2.0, you agree to be bound by the terms of the
GNU LGPL version 2.1 or later.
Other versions of ALVAR (e.g. ALVAR Mobile) are commercial.
2 ALVAR Features
Detecting and tracking 2D markers. Currently two types of square matrix markers are
supported. Custom marker types can easily be added. ALVAR keeps the marker pose
estimation as accurate as possible. Furthermore, ALVAR uses some tracking heuristics to
identify markers that are "too far" and to recover from occlusions in the multimarker case for
example.
Using a setup of multiple markers for pose detection. The marker setup coordinates can be
set manually or they can be automatically deduced using various methods.
Tools for calibrating a camera. Distorting and undistorting points, projecting points and
finding exterior orientation using point-sets.
Hiding markers from the view.
Several basic filters: average, median, running average, double exponential smoothing.
Kalman filters for sensor fusion: Kalman filter, extended Kalman filter and unscented
Kalman filter.
Several methods for tracking using optical flow.
ALVAR v.2.0 User’s Manual
8 (60)
Markerless tracking using the SfM and Fern’s algorithms.
Summary of ALVAR main core features:
Capture video from USB camera, Firewire camera or AVI file (using plugins).
Detecting Markers and predefined MultiMarkers. Marker types: ALVAR,
ARToolkit, custom
Filters for data sequences
Tracking image features
Camera/Homography methods: Calibrate, Distort, Undistort,
CalcExteriorOrientation, ProjectPoints
Further utils: Threads, Mutex, Histogram, Serialization, Image Labeling, Drawing,
HideTexture, …
Types: Point, Line, Rotation, Pose, Bitset
Summary of ALVAR main advanced features:
Methods to deduce/optimize MultiMarker setups
SimpleSfM: Structure for motion to use features in addition to markers. Pose update
optimization.
External container versions of several methods
Non-linear optimization using Gauss-Newton, Levenberg-Marquardt and Tukey mestimator
Kalman filter, EKF, Unscented Kalman filter
More methods for tracking image features
Further utils: Container3d, Ransac, TrifocalTensor, IntegralImage, IntegralGradient,
…
Fern’s classification framework to enable markerless tracking
2.1
Other AR Technologies, NOT in ALVAR (yet…)
Other Demonstrations of the AR Team (not yet in ALVAR):
3D-model based tracking
Image database e.g. for tracking init/recovery
Photorealistic rendering
Plugin interface for external sensors
(e.g. inertial measurement unit).
3 ALVAR Packages and Requirements
3.1
The 3 ALVAR Packages
There are three different ALVAR distribution packages, which all can be freely downloaded:
Bin – for those who only want to test AR and ALVAR; contains precompiled binary
versions of the ALVAR samples and OSG demos; no C++ compiler nor 3rd-party libraries
are required
ALVAR v.2.0 User’s Manual
9 (60)
Sdk – for those who want to build their own AR applications using ALVAR; contains
ALVAR header files, precompiled ALVAR libraries, and HTML documentation; a C++
compiler and 3rd-party libraries are required
Src – for those who want to compile ALVAR themselves; contains the raw source code
of ALVAR; a C++ compiler and 3rd-party libraries are required
Please note that the 3 distributions are NOT subsets of each other, e.g. HTML
documentation is in the Sdk distribution only. The ALVAR Presentation and the User’s
Manual (this document) must be downloaded separately.
3.2
ALVAR Requirements
ALVAR has been tested with the following environments: Windows XP 32-bit, Microsoft
Visual Studio 2005, 2008 and 2010 (versions 8, 9 and 10). Linux
ALVAR core library requires the following 3rd party library: OpenCV 2.4.0
ALVAR sample code requires: GLUT 3.7.6, CMake 2.8.3
The separate demo programs require: OpenSceneGraph 2.8.4
4 Istalling and Using Alvar
4.1
Test ALVAR Only (Bin package)
If you only want to find out what AR and ALVAR is all about, download and install the Bin
distribution package for your operating system. You can execute the binary versions of the
ALVAR Samples and Demos without having to compile anything.
ALVAR v.2.0 User’s Manual
4.2
10 (60)
Basic ALVAR Usage (Sdk package)
Those users who want to develop their own C++ applications using the ALVAR libraries
should download and install the ALVAR Sdk distribution package.
Ensure that you have a suitable development environment. Currently the library has been
used with the following.
Microsoft Visual Studio 2005, 2008 and 2010
Linux 32-bit and 64-bit; gcc versions 4.3, 4.4 and 4.5
Install the required 3rd party libraries: OpenCV 2.4.0, CMake 2.8.3, GLUT 3.7.6 (needed
only in Samples), OSG 2.8.4 (needed only in Demos).
Install the ALVAR library (Sdk package).
Develop your application. Include the needed ALVAR headers in your source directory and
link to the ALVAR library matching your development environment (e.g.
bin/msvc90/alvar.lib).
Copy the OpenCV (and GLUT) runtime libraries where your application can find them (e.g.
the exe-directory).
4.3
Compiling the Alvar Samples (Sdk package)
The most up-to-date instructions of how to compile ALVAR applications are in the
‘compiling.txt’ file in the doc folder. Please refer to that file for more thorough instructions,
this section presents just a brief summary.
Ensure that you have a suitable development environment.
Install the required 3rd party libraries: OpenCV, GLUT, CMake.
Install the ALVAR library.
Note that the CMake binary directory must be in your system’s PATH environment variable.
Generate the development environment to build the samples by running the generate-script
of your choice (e.g. build/msvc90/generate.bat).
Fill in the missing information for CMake (e.g. GLUT_ROOT_PATH).
Do NOT change the ’where to build binaries’ directory.
Use the generated development environment to compile the samples.
(The Demo programs using OpenSceneGraph for 3D graphics are compiled the same way,
but in addition OSG 2.8.4 must be downloaded.)
ALVAR v.2.0 User’s Manual
4.4
11 (60)
Advanced: Compile the ALVAR Source Code (Src package)
For those (advanced) users who want to compile the ALVAR source code themselves there
is the Src distribution package. The HTML Help is generated from the source code using the
Doxygen 3rd-party tool.
4.5
ALVAR Directories
bin - The compiled binaries will appear in a subdirectory matching the selected build
subdirectory
build - The building environment is in a matching subdirectory. See the
‘compiling.txt’ file in the doc folder.
data – Data files used by some of the Samples and Demos (however, the markers are
in the Alvar.pdf file, which is in the doc directory).
demo – Demo applications using OpenSceneGraph for 3D graphics.
doc - Documentation. Generated using Doxygen (e.g. "make doc"). Also contains
sample markers in the Alvar.pdf file.
include - contains the ALVAR C++ header files (Sdk package only).
sample - Samples that demonstrate how to use the library.
src - Sources for the ALVAR library (Src package only). Note that Alvar.h is
different from the others; it is generated separately for each build environment based
on Alvar.h.cmake.
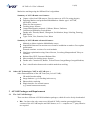
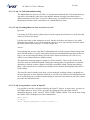
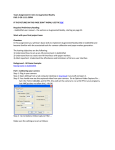
4.6
Installing ALVAR: Step by Step
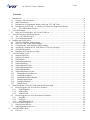
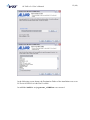
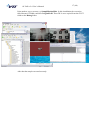
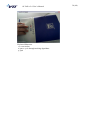
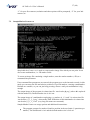
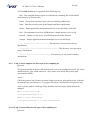
The installation package alvar-2.0.0-sdk-win32-vs2008.exe was executed.
First there is a welcome screen, then a license acceptance screen, and then the user is
prompted for installation location:
ALVAR v.2.0 User’s Manual
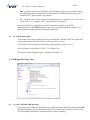
12 (60)
In the following screen dumps, the Destination Folder of the installation was set to:
D:\Tools\ALVAR 2.0.0 sdk win32 vs2008
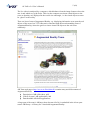
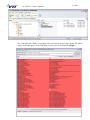
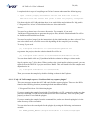
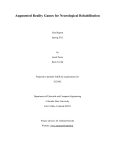
In subfolder build the script generate_vs2008.bat was executed.
ALVAR v.2.0 User’s Manual
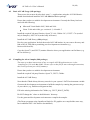
13 (60)
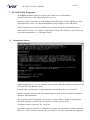
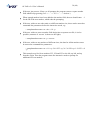
The *.bat starts the CMake 2.8 program. The user must enter the proper paths. The initial
values are usually good, so the first thing to do is to press the button Configure.
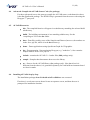
ALVAR v.2.0 User’s Manual
14 (60)
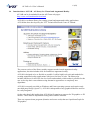
The following sceen dumps of this section were generated with an earlier VTT internal
development version called 2.0.0.794e832. This ALVAR version used earlier versions of the
3rd-party libraries, namely CMake 2.8, OpenCV 2.3, GLUT 3.7, and OpenSceneGraph 2.8.0.
The example PC had Windows XP operating system, MS Visual Studio 2008 SP1. CMake
2.8, OpenCV 2.3, GLUT 3.7, and OpenSceneGraph 2.8.0 had been installed earlier.
Also the Destination Folder of the installation was different, it was set to:
D:\Projects\Alvar 2.0.0
(Please remember that the current version of the 3rd-party libraries are: CMake 2.8.3,
OpenCV 2.4.0, GLUT 3.7.6, and OpenSceneGraph 2.8.4.)
ALVAR v.2.0 User’s Manual
15 (60)
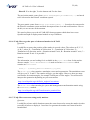
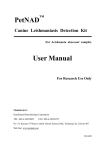
GLUT 3.7 path had to be entered (search for entries …-NOTFOUND in the right-hand
column). The entries were clicked and the proper paths were entered. After that a new click
of button Configure.
And now we are this far, the Alvar installation folder was detected correctly. So now the
button Generate can be pressed.
A new subfolder to folder build was generated: build_vs2008_release
ALVAR v.2.0 User’s Manual
16 (60)
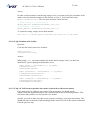
In this subfolder there is the batch file Alvar.sln.bat, which is used to start Visual Studio
2008. Do not start Alvar.sln directly, or the correct environment variables are not set up.
Then enter the menu command Build – Build Solution.
ALVAR v.2.0 User’s Manual
17 (60)
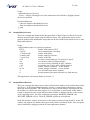
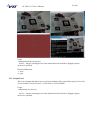
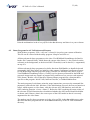
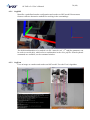
Print markers, try to execute e.g. SampleMarkerHide. In this installation the execution
failed because VS2008 could not find glut32.dll. These DLLs were copied from the GLUT
folder to the Debug folder.
After that the sample executed correctly.
18 (60)
ALVAR v.2.0 User’s Manual
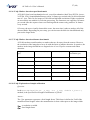
5 ALVAR Sample Code
ALVAR sample code requires GLUT 3.7.6 and CMake 2.8.3.
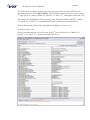
The following table presents a summary of the sample code:
Sample
SampleCamCalib
SampleCvTestbed
SampleFilter
SampleIntegralImage
SampleLabeling
SampleMarkerCreator
SampleMarkerDetector
SampleMarkerHide
SampleMarkerlessCreator
SampleMarkerlessDetector
SampleMultiMarker
SampleMultiMarkerBundle
SampleOptimization
SamplePointcloud
SampleTrack
Description
This is an example of how to use ProjPoints and Camera classes to perform
camera calibration using a chessboard pattern.
This is an example of how to use the CvTestbed, CaptureFactory and Capture
classes in order to make quick OpenCV prototype applications.
This is an example of how to use various filters: FilterAverage, FilterMedian,
FilterRunningAverage, FilterDoubleExponentialSmoothing, Kalman, KalmanEkf
and FilterArray.
This is an example of how to use the IntegralImage and IntegralGradient
classes for image gradient analysis.
This is an example of how to label images using LabelingCvSeq.
This is an example that demonstrates the generation of MarkerData (or
MarkerArtoolkit) markers and saving the image using SaveMarkerImage.
This is an example that shows how to detect MarkerData markers and
visualize them using GlutViewer.
This is an example that shows how to detect MarkerData markers, visualize
them using GlutViewer and hide them with BuildHideTexture and DrawTexture.
This is an example of how to use the FernImageDetector class to train a Fern
classifier for markerless image-based tracking.
This is an example of how to use the FernImageDetector and
FernPoseEstimator classes to detect and track an image and visualize it using
GlutViewer.
This is an example that demonstrates the use of a preconfigured MultiMarker
setup.
This is an example that automatically recognises and optimizes MultiMarker
setups using MultiMarkerBundle.
This is an example of how to use the Optimization class by fitting curves of
increasing degree to random data.
This is an example showing how to use SimpleSfM for tracking the
environment using features in addition to MultiMarker.
This is an example that shows how to perform tracking of the optical flow using
TrackerPsa, TrackerPsaRot, TrackerFeatures, TrackerStat or TrackerStatRot.
All 15 sample programs use the header file Shared.h, which defines the functions
outputEnumeratedPlugins (print plugins to console), outputEnumeratedDevices (print
devices to console), and defaultDevice (find index of highgui device). Many of the sample
program projects contain files GlutViewer.h and GlutViewer.cpp, which define the class
Drawable and 20 functions in namespace GlutViewer.
Many of the sample programs also define function videocallback which is called for each
video frame by GLUT. Some sample programs also define function keycallback to handle
the keyboard presses.
The main program of most samples prints the usage instructions, processes the commandline parameters, sets the videocallback function to be called, enumerates the available
plugins, enumerates the available capture devices (and selects one of them to be used), and
ALVAR v.2.0 User’s Manual
19 (60)
initializes the capture. After this the camera calibration is loaded, if available, and the video
processing is started. The simplest sample program demonstrating this structure is
SampleCvTestbed.
Next there is a more thorough presentation of each sample program with screen shots.
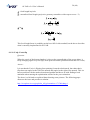
5.1
SampleCamCalib
This is an example of how to use ProjPoints and Camera classes to perform camera
calibration using a chessboard pattern. Point the camera to the chessboard calibration pattern
(see Alvar.pdf) from several directions until 50 calibration images are collected. A 'calib.xml'
file that contains the internal parameters of the camera is generated and can be used by other
applications that require a calibrated camera.
Usage:
samplecamcalib.exe [device]
device = integer selecting device from enumeration list (default 0); highgui capture
devices are prefered
Keyboard Shortcuts:
q: quit
This application is discussed further in section 7.1.
5.2
SampleCvTestbed
This is an example of how to use the CvTestbed, CaptureFactory and Capture classes in
order to make quick OpenCV prototype applications. The CaptureFactory can create
Capture objects from many different backends (see SampleCvTestbed.cpp). You can also
show/hide the first ten images created using CvTestbed using the number keys. In this
example you can use key '0' to show/hide a grayscale version of the captured image.
ALVAR v.2.0 User’s Manual
20 (60)
Usage:
samplecvtestbed.exe [device]
device = integer selecting device from enumeration list (default 0); highgui capture
devices are prefered
Keyboard Shortcuts:
0: show/hide grayscale image
q: quit
5.3
SampleFilter
This is an example of how to use various filters: FilterAverage, FilterMedian,
FilterRunningAverage, FilterDoubleExponentialSmoothing, Kalman, KalmanEkf and
FilterArray. First the example shows unfiltered test data with outliers. The data is then
filtered using the various filters. Press any key to cycle through the filters.
ALVAR v.2.0 User’s Manual
21 (60)
Usage:
samplefilter.exe
Keyboard Shortcuts:
any key: cycle through filters
q: quit
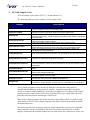
5.4
SampleIntegralImage
This is an example of how to use the IntegralImage and IntegralGradient classes for image
gradient analysis. The vertical (green) and horizontal (red) whole image projections are
computed using IntegralImage::GetSubimage and shown in the SampleIntegralImage
window. The gradients of the image edges are shown in the Gradient window. The edges are
detected using the Canny edge detector where t1 and t2 are parameters for the Canny
algorithm. The gradients are drawn in red and their local normals are drawn in blue.
Usage:
sampleintegralimage.exe [device]
device = integer selecting device from enumeration list (default 0); highgui capture
devices are prefered
ALVAR v.2.0 User’s Manual
22 (60)
Keyboard Shortcuts:
0: show/hide gradient image
1: show/hide grayscale image
2: show/hide vertical image
3: show/hide horizontal image
4: show/hide canny image
q: quit
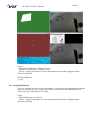
5.5
SampleLabeling
This is an example of how to label images using LabelingCvSeq. Blobs are detected in the
image and if the blobs have four corners, the edges between the corners are visualized.
ALVAR v.2.0 User’s Manual
23 (60)
Usage:
samplelabeling.exe [device]
device = integer selecting device from enumeration list (default 0); highgui capture
devices are prefered
Keyboard Shortcuts:
+: Increase adaptive threshold block size.
-: Decrease adaptive threshold block size.
q: quit
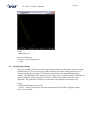
5.6
SampleMarkerCreator
This is an example that demonstrates the generation of MarkerData (or MarkerArtoolkit)
markers and saving the image using SaveMarkerImage. This application can be used to
generate markers and multimarker setups that can be used with SampleMarkerDetector and
SampleMultiMarker.
Usage:
samplemarkercreator.exe [options] argument
65535
marker with number 65535
-f 65535
force hamming(8,4) encoding
-1 "hello world"
marker with string
-2 catalog.xml
marker with file reference
-3 www.vtt.fi
marker with URL
-u 96
use units corresponding to 1.0 unit per 96 pixels
-uin
use inches as units (assuming 96 dpi)
-ucm
use cm's as units (assuming 96 dpi) <default>
-s 5.0
use marker size 5.0x5.0 units (default 9.0x9.0)
-r 5
marker content resolution -- 0 uses default
-m 2.0
marker margin resolution -- 0 uses default
-a
use ArToolkit style matrix markers
-p
prompt marker placements interactively from the user
This application is discussed further in section 7.1.
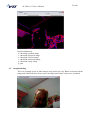
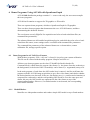
5.7
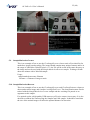
SampleMarkerDetector
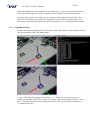
This is an example that shows how to detect MarkerData markers and visualize them using
GlutViewer. In the SampleMarkerDetector window, various debug information is shown
about the detected markers. The coordinate axes and a virtual cube are superimposed onto
the markers to visualize the detected pose. For each marker, a small image of the marker
content is displayed at the origin and the marker number is displayed at one of the corners.
At the opposing corner, the error estimation percentages 'MARGIN_ERROR' and
'DECODE_ERROR' (red) or 'TRACK_ERROR' (dark red) are displayed.
In the AR window, squares are drawn over the marker positions using OpenGL. In the VR
window, the squares are drawn with respect to the camera coordinate frame. The viewpoint
can be modified by dragging with the left and right mouse buttons.
ALVAR v.2.0 User’s Manual
24 (60)
Usage:
samplemarkerdetector.exe [device|filename]
device = integer selecting device from enumeration list (default 0); highgui capture
devices are prefered
filename = string specifying a media file as input
Keyboard Shortcuts:
q: quit
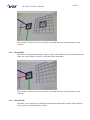
5.8
SampleMarkerHide
This is an example that shows how to detect MarkerData markers, visualize them using
GlutViewer and hide them with BuildHideTexture and DrawTexture.
Usage:
samplemarkerhide.exe [device]
device = integer selecting device from enumeration list (default 0); highgui capture
devices are prefered
Keyboard Shortcuts:
q: quit
ALVAR v.2.0 User’s Manual
5.9
25 (60)
SampleMarkerlessCreator
This is an example of how to use the FernImageDetector class to train a Fern classifier for
markerless image-based tracking. The image should contain many unique features and be in
the range of 200x200 to 500x500 pixels. A '*.dat' file will be saved in the same directory as
the image and can be used with the SampleMarkerlessDetector sample. Training will take
about one minute with a 200x200 sample.
Usage:
samplemarkerlesscreator filename
filename = filename of image to train
5.10 SampleMarkerlessDetector
This is an example of how to use the FernImageDetector and FernPoseEstimator classes to
detect and track an image and visualize it using GlutViewer. The classification must first be
trained with the SampleMarkerlessCreator sample and the resulting file passed as an
argument to this sample.
For optimal results, a high quality USB camera or a Firewire camera is necessary. It is also
advised to calibrate the camera using the SampleCamCalib sample. It should be noted that
the size of the trained image will affect the optimal distance for detection.
ALVAR v.2.0 User’s Manual
26 (60)
Usage:
samplemarkerlessdetector filename [device]
filename = the filename of classifier (.dat)
device = integer selecting device from enumeration list (default 0); highgui capture
devices are prefered
Keyboard Shortcuts:
q: quit
5.11 SampleMultiMarker
This is an example of how to use the MultiMarker class to detect preconfigured multi-marker
setup (see multimarker.pdf). A large cube is drawn over the detected multi-marker even
when only some of the markers are visible.
Usage:
samplemultimarker.exe [device]
device = integer selecting device from enumeration list (default 0); highgui capture
devices are prefered
ALVAR v.2.0 User’s Manual
27 (60)
Keyboard Shortcuts:
v: switch between three debug visualizations
l: load marker configuration from mmarker.txt
d: toggle the detection of non-readable markers
q: quit
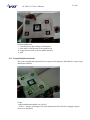
5.12 SampleMultiMarkerBundle
This is an example that automatically recognises and optimizes MultiMarker setups using
MultiMarkerBundle.
Usage:
samplemultimarkerbundle.exe [device]
device = integer selecting device from enumeration list (default 0); highgui capture
devices are preferred
ALVAR v.2.0 User’s Manual
28 (60)
Keyboard Shortcuts:
v: switch between three debug visualizations
l: load marker configuration from mmarker.txt
s: save marker configuration to mmarker.txt
r: reset marker configuration
p: add measurement
o: optimize bundle
q: quit
5.13 SampleOptimization
This is an example of how to use the Optimization class by fitting curves of increasing
degree to random data.
Usage:
sampleoptimization.exe
Keyboard Shortcuts:
any key: cycle through datasets
q: quit
5.14 SamplePointcloud
This is an example showing how to use SimpleSfM for tracking the environment using
features in addition to MultiMarker. To get this example work properly be sure to calibrate
your camera and tune it to have fast framerate without motion blur.
There are two possible approaches: Update() and UpdateRotationsOnly(). By default the
Update() is used but you can easily uncomment the other one if needed.
ALVAR v.2.0 User’s Manual
29 (60)
Usage:
samplepointcloud.exe [device]
device = integer selecting device from enumeration list (default 0); highgui capture
devices are prefered
Keyboard Shortcuts:
r: reset
q: quit
5.15 SampleTrack
This is an example that shows how to perform tracking of the optical flow using TrackerPsa,
TrackerPsaRot, TrackerFeatures, TrackerStat or TrackerStatRot.
Usage:
sampletrack.exe [device]
device = integer selecting device from enumeration list (default 0); highgui capture
devices are prefered
ALVAR v.2.0 User’s Manual
Keyboard Shortcuts:
r,t: reset tracker
n,space: cycle through tracking algorithms
q: quit
30 (60)
ALVAR v.2.0 User’s Manual
31 (60)
6 Demo Programs: Using ALVAR with OpenSceneGraph
ALVAR Sdk distribution package contains C++ source code only, the users must compile
their own programs.
ALVAR itself contains no support for 3D graphics or 3D models.
There are separate demo programs, which use OpenSceneGraph for 3D graphics.
There are three demo programs that demonstrate the core ALVAR features, and three
demonstaring the advanced features.
The core demos use only HighGui for acquisition and refer to hard-coded data files (no
command-line parameters).
The advanced demos use all installed acquisition plug-ins, and while they also refer to hardcoded data file names, some settings can be overridden with command-line parameters.
The command-line parameters of the advanced demos are: webcam index, camera
calibration file, and app-specific option.
6.1
Demo Programs for ALVAR Core Features
With all three programs, if file ‘calib.xml’ is found, it is used as your camera calibration.
This file can be created with the utility program ‘SampleCamCalib.exe’.
All three core demo programs use the class CVideoBG (defined in header file
CommonUtils.h), which draws the current video frame (i.e. the picture from the webcam) as
the background, so the desired OSG 3D model(s) can be drawn (i.e. augmented) on top of it.
In the main program of each demo the OSG render loop is entered. And for each frame the
program calls the ALVAR image acquisition (to get a new video frame) and checks whether
the tracked markers are detected. If they are, the marker pose (i.e. position and orientation) is
computed for each marker, and the corresponding OSG model is set to the same pose and
drawn; this way the OSG models are augmented to the video frame on top of the
corresponding markers. However, if a tracked marker is not detected, the corresponding
OSG model is hidden.
6.1.1
Model2Marker
Identifies two independent markers and renders simple OSG model on top of both markers.
ALVAR v.2.0 User’s Manual
32 (60)
Print markers 5 and 10 in the Alvar.pdf file in the doc directory and show them to your
webcam.
6.1.2
MarkerHide
Identifies two independent markers, renders simple OSG model on top of both markers and
hides one of the markers using ALVAR hide-texture generation.
Print markers 5 and 10 in the Alvar.pdf file in the doc directory and show them to your
webcam.
6.1.3
MarkerField
Identifies a set of markers in predefined configuration and renders a single OSG model as
long as any one of the markers is visible.
ALVAR v.2.0 User’s Manual
33 (60)
Print the multimarker in the Alvar.pdf file in the doc directory and show it to your webcam.
6.2
Demo Programs for ALVAR Advanced Features
With all three programs, if file ‘calib.xml’ is found, it is used as your camera calibration.
This file can be created with the utility program ‘SampleCamCalib.exe’.
All three advanced demo programs use the class ViewWithBackGroundImage (defined in
header file CommonUtils.h), which draws the current video frame (i.e. the picture from the
webcam) as the background, so the desired OSG 3D model(s) can be drawn (i.e. augmented)
on top of it.
All three advanced demo programs also define functions PickHandler (to handle keyboard
commands), InitVideoCapture (to initialize video capture), InitImages (to allocate memory
for one RGB image and one grayscale image), InitOSG (to initialize OSG and to create a
ViewWithBackGroundImage object), CleanUp (to free memory allocated for the RGB and
grayscale images and stop capture at program end), and Process (to process each captured
video frame). Besides, each of the three advanced demo programs has a function that is
specific to that program: InitALVAR, InitFernClassifier, or GetMultiMarkerPose.
The main program of each demo prints the usage instructions, processes the command-line
parameters, and calls the Init* functions. If the initializations succeed, the Process function is
called, which captures a video frame, calls the relevant ALVAR functions, and calls the
OSG rendering function “viewer->frame()”. Before the OSG rendering the return values of
the relevant ALVAR functions have determined whether the OSG model should be hidden
or shown; and if shown, what is the correct pose of the OSG model so that it is correctly
augmented to the video frame.
The markers used by these programs are in the Alvar.pdf file in the doc subdirectory; other
data files that these programs use are in the data subdirectory of the ALVAR installation
directory.
ALVAR v.2.0 User’s Manual
6.2.1
34 (60)
OsgSfM
Identifies a predefined marker configuration and renders an OSG model. Reconstructs
features with two alternative methods for tracking in the surroundings.
The default multimarker to be tracked is in file ‘mmarker.xml’ (3rd cmd-line parameter can
be used to override this), which refers to multimarker in the Alvar.pdf file. Some keyboard
commands are available, see the command window.
6.2.2
OsgFern
Uses an image as a marker and renders an OSG model. Uses the Fern’s algorithm.
ALVAR v.2.0 User’s Manual
35 (60)
The default image file to be tracked is in ‘AlvarSlide.jpg’. Use the 3rd cmd-line parameter to
enter some other image to be used as a marker, its size should be about 200x200 pixels.
First time the program is executed for a new image, it must train the Fern classifier. This
takes about one minute, after which the program saves the classifier training results. For
subsequent executions the program uses the results data file, so no training period is needed.
6.2.3
Osg3DMarkerField
Deduces the spatial configuration of a 3D marker field, then renders an OSG model on top of
the selected marker in this 3D marker field.
Create a 3D marker field using Alvar markers 0 - 11. Marker 0 is required (its pose is
reported as the marker field pose), others are optional. Enter another marker index (1-11) as
the 3rd cmd-line parameter to use another pose marker. The size of all the used markers 0 –
11 should be the same.
ALVAR v.2.0 User’s Manual
36 (60)
7 ALVAR Utility Programs
In the Bin distribution package of Alvar you’ll find two ALVAR utilities:
SampleCamCalib.exe and SampleMarkerCreator.exe.
Actually, SampleCamCalib.exe is the SampleCamCalib sample of ALVAR library, while
SampleMarkerCreator.exe is the SampleMarkerCreator sample of ALVAR library.
SampleCamCalib.exe is used to calibrate your webcam, using the chessboard pattern.
SampleMarkerCreator.exe is used to create marker image files which you can print. It can
also create multimarkers, i.e. 2D marker fields.
7.1
SampleCamCalib.exe
SampleCamCalib.exe is used to calibrate your webcam, using the chessboard pattern (in the
Alvar.pdf file in the doc directory).
Print the slide containing the chessboard pattern. Attach the print to a level surface.
Start the program, and show the chessboard pattern to your webcam in different positions,
distances, and orientations.
The program acquires 50 samples, about once a second. When a sample is acquired (the
chessboard pattern is visible), the found pattern is shortly shown in red.
Calibration result is written to file ’calib.xml’.
By default, SampleCamCalib.exe calibrates the default camera using the default resolution.
However, if either of these is not the one you intend to use, enter command-line argument
ALVAR v.2.0 User’s Manual
37 (60)
“1” for your first camera (resolution and other options will be prompted), “2” for your 2nd
camera, etc.
7.2
SampleMarkerCreator.exe
SampleMarkerCreator.exe is used to create marker image files which you can print. It can
also create multimarkers, i.e. 2D marker fields.
To create an image file containing a single marker, enter the marker number (=ID) as a
command-line parameter.
If no command-line parameters are entered, the program goes to the interactive mode; in this
mode you can enter the IDs and relative positions of several markers, creating a multimarker.
Defaults are sensible, so you can just keep pressing <Enter> until your multimarker is big
enough.
The output image of the program is written into file ‘markerdata_0.png’ (where 0 is replaced
with the marker id). Default marker size is 9x9 cm.
The output image of a multimarker employing e.g. markers 0, 1, 2, and 3 is written into file
‘markerdata_0_1_2_3.png’, whereas the XML definition of this multimarker is written into
‘markerdata_0_1_2_3.xml’ (very long file names are truncated).
SampleMarkerCreator.exe usage options and additional instructions:
The program prompts for marker id and its position in the used units (3 questions per
marker). The default unit is 'cm' and the default marker size is 9x9 cm
ALVAR v.2.0 User’s Manual
38 (60)
If the user just presses <Enter> to all prompts, the program creates a square marker
field which keeps growing (2x2 => … => 3x3 => … => 4x4 etc.)
When enough markers have been added to the marker field, the user should enter -1
for the ID of the next marker, which ends the prompting
If the user wishes to use other units or a different marker size, these can be entered as
command-line parameters before the interactive mode, e.g.:
> samplemarkercreator.exe -uin -s 1.0 –p
If the user wishes to enter a marker field design into a separate text file, it is also
possible (contents of ‘test.txt’ is shown to the right):
> samplemarkercreator.exe -p < test.txt
If the user wishes to use markers of different sizes, the data for all the markers must
be entered as command-line parameters:
> samplemarkercreator.exe -s 18 -xy -36 0 255 -xy -36 -36 254 -xy 0 -36 253 -s 9
–p
This example sets 18x18 cm markers 255, 254 and 253 to the left, up-left, and up
from the origin. Then the program enters the interactive mode to prompt for
additional 9x9 cm markers.
ALVAR v.2.0 User’s Manual
39 (60)
8 ALVAR HTML Help
This chapter presents a summary of ALVAR HTML Help, which have been generated
automatically from the source code comments using Doxygen. The documentation entry is
the file \doc\html\index.html, there should be a shortcut for this in the Start menu.
The most important locations in the ALVAR HTML Help are the Classes list (click text
‘Classes’) and the header Files list (click text ‘Files’). In both the Classes list and Files list
you can get more detailed information by clicking the class/header file name. Through the
detailed information you can navigate from a class name to the corresponding header file and
from a header file to the class(es) defined in that file.
ALVAR v.2.0 User’s Manual
8.1
40 (60)
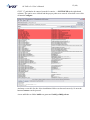
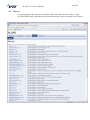
File List
For easy reference, this section presents the header Files list (click text ‘Files’) of the
ALVAR HTML Help, while the next section presents the Classes list (click text ‘Classes’).
ALVAR v.2.0 User’s Manual
41 (60)
ALVAR v.2.0 User’s Manual
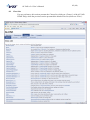
8.2
42 (60)
Class List
For easy reference, this section presents the Classes list (click text ‘Classes’) of the ALVAR
HTML Help, while the previous section presented the header Files list (click text ‘Files’).
ALVAR v.2.0 User’s Manual
43 (60)
ALVAR v.2.0 User’s Manual
44 (60)
ALVAR v.2.0 User’s Manual
45 (60)
9 ALVAR Source Code
This chapter presents a summary of ALVAR source code. The source code files were listed
in section 8.1, and the ALVAR classes in section 8.2. In this chapter some of the most
important classes and concepts are presented in more detail, as well as some Frequently
Asked Questions.
9.1
Code highlights: Most important ALVAR concepts, FAQs
Please note that the best way to learn ALVAR is to examine the ALVAR Sample Code
(chapter 5) and the ALVAR Demo Programs (chapter 6). The remaining sections should be
read only after those sections.
9.1.1
How the capture system (and plugins) works
ALVAR uses the services of OpenCV libraries for video capture. OpenCV in turn contains
three alternative capture libraries: HighGui, CvCam, and CMU. Not all webcams can be
accessed with all 3 libraries, and the 3 different libraries have different advantages and
disadvantages, so therefore this “embarrassment of riches”. HighGui is the easiest to use, so
if your webcam can be accessed using HighGui, we recommend using it.
After your webcam has captured a video frame, the captured image data is stored into an
image in computer memory. This image is accessed by ALVAR libraries (to determine the
poses of the visible markers, for example), and this image is usually used as the background,
when the augmented content is drawn.
OpenCV callback functions are often used for video frame acquisition and image processing.
The beginning of chapter 5 explains the callback function structure of sample code, whereas
sections 6.1 and 6.2 explain the callback functions of the demo programs.
9.1.2
How the marker detection works
Here we assume that a video frame has been captured and stored into a memory image as
described in the previous subsection.
First the color image is converted into a grayscale image. Then this image is converted into a
bitonal (only two colors: black and white) image using an adaptive threshold. From this
image edges are searched, producing a number of lines. Then sets of four intersecting lines
(i.e. quadrangles) are searched, and these are potential markers. Then it is verified that the
outside of the quadrangle is white, and the inside is black (i.e. we are indeed seeing the
border stripe of a marker). And finally the inside of the marker borders can be interpreted as
bits, and the bit pattern is a valid marker. From the four corner points of the detected marker
the program can compute the pose (i.e. location and orientation) of the marker in camera
coordinates.
The best position accuracy is achieved when the marker is close to the camera, because then
the relative error caused by one pixel inaccurary in the image is smaller. However, the
detection algorithm has some built-in limits, so very large targets (i.e. markers very close to
ALVAR v.2.0 User’s Manual
46 (60)
the camera) are eliminated, i.e. not detected at all. And conversely, very small targets (i.e.
markers very far from the camera) are also eliminated.
The best orientation accuracy is achieved when the marker plane is in a 45 degree angle with
the camera line of sight. When the marker plane normal is parallel with the camera line of
sight the orientation accuracy is lower, because small marker angle changes do not cause
significant changes in the detected marker image. And when the marker plane normal is
almost perpendicular with the camera line of sight the orientation accuracy is lower, because
some of the marker corners are seen in almost same position of the image.
For further background information about this subject one can turn to ARToolkit
documentation. The detection principles of ARToolkit are similar than that of ALVAR, so
many descriptions of ARToolkit principles apply to ALVAR also. A web search of
“ARToolkit marker detection” is a good place to start. Here are a few links that this web
search produces:
http://www.hitl.washington.edu/artoolkit/Papers/ART02-Tutorial.pdf
http://www.hitl.washington.edu/artoolkit/documentation/
http://www.artoolworks.com/support/library/Category:ARToolKit_Professional
9.1.3
How the margins work
There must be enough white (paper) around the black marker edges, so edges can be
detected in the beginning of the algorithm.
9.1.4
How the multimarkers (i.e. marker fields) work
Several markers working together. Pose can be computed even if only one of the markers is
visible.
2D multimarkers: a XML file is required, which specifies the relative positions and sizes of
the component markers; the component markers can have different sizes, but they must all
be in the same plane.
3D multimarkers: relative positions and orientations of the component markers are
automatically computed, when the configuration has been seen from various angles. All
component markers must have the same size.
The advantage of the 3D multimarker over the 2D is that it is more robust: there is a higher
probability that at least one of the component markers is seen in an advantageous angle (i.e.
high orientation accuracy, close to 45 degrees with the camera line of sight). The
disadvantage is that a separate initialization stage is needed, and the camera must be moved
around during this stage.
9.1.5
Encoding data (integer, text, URL) into ALVAR markers
A number of bits are available in the ALVAR markers depending on the size of the marker.
The larger the marker size, the more bits it can contain, but the more unreliable the detection
ALVAR v.2.0 User’s Manual
47 (60)
(i.e. distinguishing between the different markers) becomes. Some bits must be fixed, so that
marker orientation can be deduced, but other bits can be used for any purpose.
Usually the bits are interpreted as numbers, but this is not necessary. E.g. groups of seven
bits can be used to encode ASCII characters, and groups of eight bits can be used to encode
the extended ASCII character set. If there is no need for punctuation, numbers or uppercase
letters, five bits are sufficient for all English letters.
See also subsection 9.3.16.
9.1.6
FAQ: I compiled my ALVAR program with VC++, but I cannot run the program in
another computer
All recent versions of VC++ require that the run-time libraries (specifit to that version of
VC++) are installed in the system directory. Otherwise the programs compiled with VC++
will not run. Naturally the Visual Studio installation program installs these libraries; for
computers without Visual Studio one must run the so-called "Microsoft Visual C++
<version> Redistributable Package (x86)", which installs the required libraries. This is true
for ALVAR also.
So if you are using Visual Studio 2008 SP1 for example, do a web search of “visual c++
2008 sp1 redistributable package”, which should take you to a Microsoft web page, where
you can download the Redistributable Package. Download the program and execute it once
in the computer you intend to use your ALVAR program. Then your program should work.
Also if you use a newer version of Visual Studio than what ALVAR 2.0 supports, you may
be able to compile your ALVAR programs with the new version of VS, but you must first
install the Redistributable Package of the VS version that was used to compile the ALVAR
DLLs.
9.1.7
FAQ: Using PsaTracker, i.e. motion flow tracking
First, we are basically talking about image plane tracking. That is the movement of the
image in the horizontal and vertical directions. We can use this image plane tracking to
implement some quick hacks that produce a better experience when doing AR.
When is this needed?
The image plane tracking is meant to kick in when the marker is not detected for a few
frames or when the marker starts to move out of the field of view of the camera (moves to
the edge of the image when panning). Usually, you have two options: leave the model where
it is or stop rendering it completely. This leads to flickering and weird behaviour when the
marker moves out of the view of the camera. This motion flow tracking solves this.
How is it done?
The hard part is already done. You can find the TrackerPsa class in ALVAR that implements
image plane tracking. To see how to use this class, you can look at the SampleTrack sample.
Now the tricky part is using the horizontal and vertical motion to update the pose of the
marker. I will describe how this is done using pseudo code.
ALVAR v.2.0 User’s Manual
48 (60)
Camera camera;
camera.SetCalib(...);
MarkerDetector markerDetector;
// markerDetector initialization
TrackerPsa trackerPsa;
// no initialization required
double fovX = camera.GetFovX();
double fovY = camera.GetFovY();
...
IplImage *frame;
// get a new frame from the camera
Pose pose;
// this pose must persist across frames, make it a class member
markerDetector.Detect(frame, camera, ...);
// iterate over markers, when id matches update the pose
trackerPsa.Track(frame);
// only update the pose with the image plane movement when no marker is
found
if (numberOfMarkersDetected == 0) {
double x = -trackerPsa.xd * fovX / frame->width;
double y = -trackerPsa.yd * fovY / frame->height;
CvMat *p;
CvMat *r;
// create p and r, 3x3
pose.GetMatrix(p);
// initialize r as a rotation matrix with x rotation around x-axis and y
rotation around y-axis
// p = r * p
pose.SetMatrix(p);
// release p and r
}
...
// render model using pose as usual
9.1.8
FAQ: Contents of the ALVAR Sdk distribution package
The ALVAR Sdk library is distributed in binary form only. This means that the source files
of the library (files in src directory) are not distributed. Only the binary libraries (DLLs in
bin directory) are distributed, along with the headers (files in include directory).
In order to compile the sample applications, you must follow each of the steps in
doc/Compiling.txt.
ALVAR v.2.0 User’s Manual
49 (60)
ALVAR Sdk installation is organized in the following way:
* bin – The compiled binaries appear in a subdirectory matching the selected build
environment (e.g. /bin/msvc80).
* build – The build environment tools, also in a matching subdirectory.
* data – Data files used by some of the Sample and Demo applications.
* demo – Demo applications that demonstrate how to use the library with OSG.
* doc – Documentation as well as API Reference, sample markers in Alvar.pdf.
* include – Headers for the Alvar, AlvarPlatform and AlvarPro libraries.
* sample – Sample applications that demonstrate how to use the library.
* src – Sources for the Alvar core library (This directory is not present in binary
distributions).
* src/platform – Sources for the AlvarPlatform library (This directory is not present in
binary distributions).
* src/pro – Sources for the AlvarPro library (This directory is not present in binary
distributions).
9.1.9
FAQ: Cannot complete the first steps of doc/compiling.txt
Question:
The generate.bat file in the msvc90 folder doesn't seem to do anything special for me. I have
installed opencv, glut, cmake and alvar. Also, cmake is located in the system's path
environment variable.
Answer:
Check the generate.log file that is generated when you run the generate.bat script. It should
be located in the same directory. (C:\program files\alvar 2.0.0\build\msvc90\generate.log).
Also verify the paths in Cmakegui. They should be set correctly by default and not be
changed.
Where is the source code:
C:/Program Files/Alvar 2.0.0
Where to build the binaries:
C:/Program Files/Alvar 2.0.0/build/msvc90/build
9.1.10 FAQ: Cannot follow the last steps of doc/compiling.txt
Question:
ALVAR v.2.0 User’s Manual
50 (60)
I completed the 6 steps of compiling.text file but I cannot understand the following step.
7. Open ./build/[target]/build/Alvar.sln.bat and build the solution.
The batch file will ensure that paths to DLLs are properly configured.
If it shows the the ALVAR path then there is no such folders and solution file. My path is
C:\Program Files\ Alvar 2.0.0\build and it has no Alvar.sln.bat file.
Answer:
You need to go down into a few more directories. For example, if you used
./build/msvc90/generate.bat to generate the project files, then the solution batch file will be
in ./build/msvc90/build/Alvar.sln.bat.
You need to replace [target] (in the instructions) by the platform that you have selected. You
can select either msvc, msvc80 or msvc90 depending on the compiler you are using.
To recap, if you used:
[1] C:\Program Files\Alvar 2.0.0\build\msvc90\generate.bat
to generate the project, then the solution batch file will be in:
[2] C:\Program Files \Alvar 2.0.0\build\msvc90\build\Alvar.sln.bat
You can then double click on [2] and then build the solution in debug or release mode.
Step 8 requires step 7 do be done. When you have the visual studio solution opened, you can
right click on the INSTALL project and select 'Build'. This will install all of the samples and
dependencies in:
[3] C:\Program Files\Alvar 2.0.0\bin\msvc90\
Then you can run the samples by double-clicking on them in the Explorer.
9.1.11 FAQ: ALVAR sample reports “Could not find any capture plugins”
This error message means that ALVAR can't find the capture plugins. These are the DLLs
found at the following location (assuming default installation folder):
C:\Program Files\Alvar 2.0.0\bin\alvarplugins
If you are running the sample from inside Visual Studio (via F5), you need to make sure that
you have launched VS with Alvar.sln.bat (notice the 'bat' extension). This sets up the paths
properly so that VS can find the plugins.
If you are running the sample from the command line, make sure that alvarplugins is in the
same directory as the executable.
You can also force the search path for the plugins by setting the following environment
variable:
set ALVAR_PLUGIN_PATH=C:\Program Files\Alvar 2.0.0\bin\alvarplugins
ALVAR v.2.0 User’s Manual
51 (60)
9.1.12 FAQ: SampleCamCalib reports “Could not initialize the selected capture backend”
That error message can mean a few things.
1. No compatible camera is attached to the computer.
2. The camera capture system failed to initialize a connection to the camera.
3. The camera does not support accessing image data but provides a video stream.
9.1.13 FAQ: SampleCamCalib reports “Could not find any capture devices”
Check the following things.
1. Do the other samples that require a camera work? For example, does SampleCvTestbed
work for you?
2. Does your camera provide access to the raw pixel data? Some cameras only provide an
encoded video stream that Alvar can not process.
3. Make sure that the alvarplugins directory is located in the directory that contains the main
ALVAR dynamic libraries (DLL). This should be the case if running the samples from
within Visual Studio.
9.1.14 FAQ: ALVAR on Windows Vista/7
Although ALVAR is not officially supported on Windows Vista/7, it should work on these
platforms.
If there are any problems, they are most likely file access permission problems. The easy
solution is to install ALVAR in your user directory. The ALVAR team has tried that on a
Windows 7 machine and everything worked as expected, after following the instructions in
doc/Compiling.txt
9.1.15 FAQ: Using ALVAR with DirectX
Unfortunately, ALVAR does not support DirectX and nobody on ALVAR team is familiar
with the particularities of the DirectX platform. We can only offer some insight as follows.
Source: http://www.toymaker.info/Games/html/matrices.html
There are three matrix used by Direct3D to transform your 3D models into the final 2D
image you see on the screen. They are the World Matrix, the View Matrix and the Projection
Matrix. Note: If you are coming from an OpenGL background OpenGL combines the first
two together.
Also, the coordinate systems are different.
- OpenGL: X to the right, Y to the top and Z to the back.
ALVAR v.2.0 User’s Manual
52 (60)
- DirectX: X to the right, Y to the bottom and Z to the front.
The projection matrix comes from camera.GetOpenglProjectionMatrix(...) and needs
to be converted to the DirectX coordinate system.
The pose matrix comes from marker.pose.GetMatrixGL(...). It needs to be converted to
the DirectX coordinate system and then decomposed into view and world matrices. How to
do this, we are not sure at the moment.
We can also direct you to the ALVAR OSG demo programs which show how to use
OpenSceneGraph to display actual models on top of markers.
9.1.16 FAQ: How to get the pose of a detected marker in ALVAR
Question:
I would like to extract the position of the marker in several values. The values are X, Y, Z,
A, B, C, where X = Translation in X direction, Y = Translation in Y direction, Z =
Translation in Z direction; and A = Rotation around Z axis, B = Rotation around Y axis, C =
Rotation around X axis. Is it possible ?
Answer:
The information you are looking for is available in the alvar::Pose class. In the marker
detector sample, alvar::MarkerDetector is used to find an alvar::Marker which
contains an alvar::Pose.
Pose p = (*(marker_detector.markers))[i].pose;
The alvar::Pose class contains a translation vector and a quaternion. The translation vector
will give you X, Y and Z. The rotation will give you the angles. However, there are many
conventions for rotation angles, for example Tait-Bryan vs Euler angles. You will need to
interpret the quaternion depending on your conventions.
http://en.wikipedia.org/wiki/Euler_angles#Conventions
The alvar::Pose class can also give you a 4x4 homogenous transformation matrix using
the GetMatrix() method.
http://en.wikipedia.org/wiki/Transformation_matrix#Uses
9.1.17 FAQ: How to use text string (ascii) markers
Question:
I would like to know which function extract the const char used to create the marker in order
to modify it before to display it. I used Ascii to generate the marker and I want it back in
hexadecimal.
ALVAR v.2.0 User’s Manual
53 (60)
Answer:
In order to detect markers created using strings (ascii), you must specify the resolution of the
marker since the default resolution in the detector is set to 5. You can do this using
Marker::SetMarkerSize(). The size auto-detection works fine here.
// detect markers of resolution 11
marker_detector.SetMarkerSize(marker_size, 11);
// auto-detect resolution
marker_detector.SetMarkerSize(marker_size, 0);
To extract the string, simply use the data member.
std::cout << (*(marker_detector.markers))[i].data.str << std::endl;
9.1.18 FAQ: Problems with CvMat
Question:
Code like this causes an access violation:
CvMat rotation;
p.GetEuler(&rotation);
Answer:
When using CvMat, you must initialize the matrix before using it. Since you have not
initialized it, you are getting invalid pointer errors.
CvMat *euler = cvCreateMat(3, 1, CV_64FC1);
p.GetEuler(euler);
cvReleaseMat(&euler);
CvMat *quaternion = cvCreateMat(4, 1, CV_64FC1);
p.GetQuaternion(quaternion);
cvReleaseMat(&quaternion);
CvMat *rodriques = cvCreateMat(3, 1, CV_64FC1);
p.GetRodriques(rodriques);
cvReleaseMat(&rodriques);
9.1.19 FAQ: ALVAR seems to produce inaccurate results with a widescreen camera
First, make sure you calibrate your camera. This means that you should run the
SampleCamCalib application and use the calibration when you are detecting markers. This
will ensure that you have a correct model-view matrix.
Second, you need to make sure that you are properly setting up your projection matrix. This
should take into account the width and height of the camera as well as the camera calibration
from the previous step.
ALVAR v.2.0 User’s Manual
54 (60)
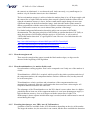
9.1.20 FAQ: Optimal set of ALVAR markers (minimize chance of improper detection)
ALVAR markers have built-in error correction and in most cases, there should be no
problems with mismatches. However, if you are paranoid about robustness and reliability,
please read the following explanation.
This question seems to be asked many times. Is there a set of ALVAR markers that minimize
the chance of improper detection? This is usually asked when we are choosing markers for a
particular large scale application (ex: not a demo). In these cases, we also want "pretty"
markers. The following explains how to select markers that meet these requirements.
When talking about markers, beauty is often equated with symmetry. The following is a list
of all symmetric 5x5 ALVAR markers.
000 - 00000000
004 - 00000100
011 - 00001011
015 - 00001111
064 - 01000000
068 - 01000100
075 - 01001011
079 - 01001111
176 - 10110000
180 - 10110100
187 - 10111011
191 - 10111111
240 - 11110000
244 - 11110100
251 - 11111011
255 - 11111111
From this set, we can extract a subset of marker ids that minimize the chance of improper
detection. The simplest approach is to select ids that differ by 2 or more bits. The optimal
subset is as follows.
000 - 00000000
011 - 00001011
068 - 01000100
079 - 01001111
176 - 10110000
187 - 10111011
255 – 11111111
9.1.21 FAQ: How to interpret a pose
Question:
ALVAR v.2.0 User’s Manual
55 (60)
When the ALVAR library calculates the position of the markers, it also calculates the pose.
As a result, a matrix is returned with a whole lot of information. Problem is that we do not
know how to interpret the data in this matrix or the way to use it. Is there any documentation
on this matrix and how to use it? Or can you supply me more detailed information?
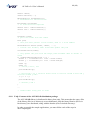
Answer:
You say that when ALVAR computes the position of a marker it also computes a pose.
Those two are the same thing. A pose contains a translation (position and direction) as well
as an orientation (rotation). These are the two members of the Pose class. Although you have
access to these two member via GetTranslation() and GetQuaternion(), it is typical to return
a "3d transformation matrix" [1] via GetMatrix(). This matrix essentially contains a
translation and a rotation in homogeneous coordinates [2]. A 3d transformation matrix can
be decomposed into the following, where P is a 4x4 transformation matrix, R is a 3x3
rotation matrix, T is a 3x1 translation matrix and the 1 is for the homogeneous coordinate.
This allows you to easily project points in the marker coordinate frame to the image plane. If
X is a 3D point in marker coordinates and x is a 2D point in image plane coordinates.
[1] http://en.wikipedia.org/wiki/Transformation_matrix
[2] http://en.wikipedia.org/wiki/Homogeneous_coordinates
9.1.22 FAQ: Marker position in image coordinates
Question:
How I can get the real position of the marker in my image?
Answer:
If you want the position of the marker in image coordinates, you have to project the origin of
the marker into the camera reference frame using the given pose. Here is the code.
CvPoint2D64f imagePoint;
camera.ProjectPoint(cvPoint3D64f(0, 0, 0), &pose, imagePoint);
The values in imagePoint will be in pixels and correspond to the center of the marker in the
image coordinates.
You can also access the pixel locations of the four corners of the marker directly from the
marker object. They can be found in the Marker::marker_corners_img vector.
ALVAR v.2.0 User’s Manual
56 (60)
9.1.23 FAQ: ALVAR and multithreading
The MarkerDetector class in ALVAR is re-entrant and not thread-safe. This means that you
can safely call methods of the class from multiple threads as long as each thread uses a
different instance of the class. To put it in other words, you should be fine if you have two
threads that each have their own instance of a MarkerDetector class.
9.1.24 FAQ: FernImageDetector does not track very well
Question:
I am using ALVAR to track a planar object, but the system doesn't track very well when the
camera is far from the object.
I tried to tune some of the parameters as well, but the result does not improve very much.
Basically the tracking is very robust when the camera is close, but it deeply decreases when
the frame planar object takes up ~1/4 of the image area.
Answer:
I'm assuming that you are using the FernImageDetector to track a natural feature image and
not a fiducial marker. If you are seeing these problems with MarkerDetector then we have a
bug or you are not using the library correctly since marker detection in ALVAR is very
robust even at farther distances (within reason).
The markerless tracking support is based on a Ferns classifier. The way this works is the
classifier must be trained beforehand. During the training phase, the parameters essentially
determine a working volume (distance and angle) around the image. During the tracking
phase, if the camera moves outside this training volume, then the tracking basically fails to
work reliably.
The classifier data is already quite large, so increasing the working volume is probably not
the best approach. A nicer approach would be to use the Ferns classifier for initialization and
recovery but then rely on feature-based tracking or structure from motion to track the camera
pose after the initial detection.
9.1.25 FAQ: Using another version of OpenCV
It is possible to use the version provided by the OpenCV project. In some cases, you have to
tell CMake where to find it. You can do this by setting the root path of the OpenCV
installation directory to the "OpenCV_ROOT_DIR" CMake variable. This can be done using
the CMake GUI (cmakegui) or on the command line.
mkdir build
cd build
cmake -DOpenCV_ROOT_DIR=c:\path\to\opencv ..\
57 (60)
ALVAR v.2.0 User’s Manual
9.1.26 FAQ: Marker detection speed benchmark
ALVAR 2.0 has been benchmarked on a 4 year old workstation (Intel Xeon X5550, 4 cores,
2.67GHz, 3Gb). SampleMarkerDetector ran at 30 frames per second with 30-40% utilization
rate of 1 core. This was for images of 320x240 and 640x480 resolutions. Higher resolutions
are most likely not suitable for real-time processing. The framerate was capped at 30 frames
per second since the capture classes are blocking and the camera only produces 30 frames
every second.
Of course, the more visually cluttered the scene, the more time it takes to analyze all of the
detected blobs. Depending on your setup, you can increase the blob size threshold and only
process the larger blobs.
9.1.27 FAQ: Marker detection distance benchmark
ALVAR can detect small markers or markers that are far away from the camera. However,
the resolution of the image has a lot to do with the limits of marker detection. In practice, the
markers in the image should have a diagonal size of over 25px for accurate and robust
detection.
Image Resolution
(px)
Marker Size (cm)
Distance (m)
Diagonal Marker
Resolution (px)
320x240
2.5
0.4
21-22
320x240
5.0
0.8
21-22
320x240
10.0
1.5
23-24
640x480
2.5
0.8
21-22
640x480
5.0
1.5
21-22
640x480
10.0
2.8
23-24
9.1.28 FAQ: Explanation of simple calibration
Question:
In the SetSimpleCalib(int _x_res, int _y_res, double f_fac=1.)
method, is the specified focal length in millimeters or pixels?
Answer:
The f_fac parameter represents a focal length factor. This factor is defined as "half of the
normalized focal length" where the normalization is done with respect to the image width.
: x resolution or width
: focal length factor
ALVAR v.2.0 User’s Manual
58 (60)
: focal length in pixels
: noramlized focal length (projective geometry normalizes with respect to xres / 2)
in
This focal length factor is probably not the best API for this method, but the above describes
what is currently implemented in ALVAR.
9.1.29 FAQ: Z-axis flip
Question:
When the z-axis of the detected marker is close to the perpendicular of the screen plane, it
keeps changing signal very fast (flips from point forward to point backwards and vice-versa).
Answer:
It is not that the Z axis is flipping from pointing forwards to backwards, but rather that it
flips between angled to the left of the normal and angled to the right of the normal. This is a
known problem with the marker detection algorithm and has to do with finding a local
minimum when running the optimization routine for the pose estimation.
The above is a bit hard to explain without drawing some pictures. The following paper
discusses the issue and provides a solution.
http://ieeexplore.ieee.org/xpls/abs_all.jsp?arnumber=1717461&tag=1
ALVAR v.2.0 User’s Manual
9.1.30 ALVAR Main Core Features
9.1.31 ALVAR Main Advanced Features
59 (60)
ALVAR v.2.0 User’s Manual
60 (60)
9.1.32 Appetizer: Features Not Yet in ALVAR
These techniques have been demonstrated by VTT AR Team, but they have not yet been
incorporated into ALVAR...