1
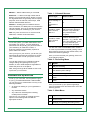
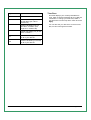
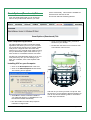
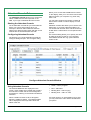
Table of Contents
IP-PBX
User Manual
Version 20090401
IP-PBX User Manual
Table of Contents ............................................ 1
Your IP-PBX ..................................................... 2
Who Should Read this Manual ........................ 2
PBX Basic Features ......................................... 2
PBX Optional Features .................................... 2
Terminology ..................................................... 2
Your PBX Account ........................................... 3
Message Center Set Up and Use ..................... 3
Table 1 - Message Center Access ................. 3
Table 2 - Recording Menu .............................. 3
Table 3 - Main Menu ...................................... 3
Accessing the Message Center ....................... 4
Table 4 - Message Center Menu (1 of 2) ........ 4
Table 5 - Message Center Menu (2 of 2) ........ 4
Other Useful PBX Features ............................. 4
Login to Your PBX VCP ................................... 5
Forgot Your Password? .................................. 5
Managing Your Account .................................. 6
Suggested Order of Use .................................. 7
Account Tab ..................................................... 7
Call Activity Tab ............................................... 8
Messages Tab ................................................ 10
CallBlast Tab .................................................. 11
CallBlast to IP Phones ................................. 12
CallBlast to a Different Extension ................. 12
To Set up CallBlast ...................................... 12
CallBlast Configuration Examples ................ 12
Speed Dial Tab ............................................... 13
Speed Dial Considerations ........................... 13
Using Speed Dial ......................................... 13
Features Tab .................................................. 14
Caller ID Settings ......................................... 15
7-Digit Calling .............................................. 15
Message Delivery Options ........................... 15
Call Handling Options .................................. 15
Table 6 - * Key Options Menu ...................... 15
Time Zone ................................................... 16
Great Options (Downloads) Tab .................... 17
Video Softphone Application ........................ 17
Installing VSP on your Computer ................. 17
Table 7 - VSP Keys ..................................... 18
Attendant Console Tab .................................. 19
Starting the Attendant Console .................... 19
Configuring Attendant Console .................... 19
Using Attendant Console ............................. 19
911 Emergency Calling .................................. 20
For Further Information ................................. 20
Page 1 of 20
Your IP-PBX
Congratulations! Your company has chosen an
Internet-based, hosted Private Branch Exchange
(PBX) to serve its telecommunications needs. To
use the PBX, you will use the touch pad of your
telephone and the PBX VoIP Control Panel (VCP)
- a web interface that allows you to easily manage
your PBX account.
Who Should Read this Manual
This manual describes the user features of the
PBX and VCP and how to use them. The manual
is intended for end users who want to manage
their existing PBX account.
Note: PBX Administrators should consult the IPPBX Administrator Manual for more advanced
functionality and provisioning instructions.
PBX Basic Features
•
Call transfer (blind and supervised)
•
CallBlast – intelligent combination of “find me /
follow me” and call forwarding
•
3-way conferencing
•
Call waiting
•
Caller ID and call waiting Caller ID
•
Caller Name (if supported by your phone)
•
Customizable call allow/restrict rules per
extension
•
Video Softphone (VSP) can be used as a
“roaming” extension anywhere on the planet
•
Full 911 coverage in US and Canada
•
Both broadcast and direct intercom - direct
intercom can be public or private (devices
must have a speakerphone)
•
Auto-attendant (company directory configured
by first or last name)
•
Custom prompts on auto-attendant
•
Multi-level prompt menus
•
Conference bridges
•
Operator console with unlimited extensions in
a busy-lamp field (BLF) as a software
dashboard for any allowed extension or up to
100 extensions as a physical Enterprise IP
phone with an expansion module
•
Browser-based VoIP Control Panel (VCP) for
managing all features
•
Voicemail sent to email as MP3 attachment
•
Voicemail notification sent to alpha pager or
SMS-enabled mobile phone
•
Voicemail access from email, VCP, any phone
or via RSS feed
•
Toll-free numbers ring to any extension
•
Videomail as MPEG4 attachment (if caller has
a compatible video device or video softphone)
•
Inbound faxes sent to email as PDF
attachment
•
Message-waiting indicator (MWI)
•
•
Direct Inward Dial (DID) numbers with any
desired area code or even many different
countries for any or all extensions
Outbound faxes sent from any Windows
application
•
Call Groups (either Ring or Hunt)
•
Automatic Call Distribution (ACD) queues and
reports
•
Custom messaging or music on hold for
individual ACD queues or Call Groups
•
Any number of DIDs per user all ring to the
same extension
•
Unlimited, free extension-to-extension dialing
anywhere in the world
•
Music on hold
•
Call park/Call pick-up
•
Do not disturb (DND)
•
Multiple call appearances on multi-line phone
•
MultiPresence – same number rings to
multiple phones
•
Local time zone management
IP-PBX User Manual
PBX Optional Features
Terminology
The following terms are important to know when
using the PBX and VCP.
Account — Where basic information is stored
(e.g., name, password, phone number(s), and
feature set).
Page 2 of 20
Mailbox — Where callers leave you voicemail.
Extension — A three to six-digit number that is
linked to your physical phone(s). Shorter, one and
two-digit extensions are generally used for special
purposes, such as Call Park, Call Groups, ACD
Queues and Broadcast Intercom.
Numbers – Existing phone numbers that have
been transferred, new DIDs (even from outside the
US and Canada), and new or transferred Toll-free
numbers (TFNs) can all belong to your account.
Note: Any user can have one or more accounts,
mailboxes, numbers and/or extensions.
Your PBX Account
To use the system, your PBX administrator must
first create your account. You are assigned a
permanent user ID (usually your phone number or
your extension), an extension number, a
temporary password, and possibly a personal
phone and/or fax number.
Once you log in to your account, you will use your
permanent ID and temporary password to access
your voicemail box on both your phone and the
VCP.
You can also access your voicemail as well as
change settings and greetings from any IP,
landline, or even mobile telephone regardless of
where that phone is on the planet.
Next, we’ll go through all the details of how to set
up and use your voicemail.
Table 1 - Voicemail Access
Access Type
Number to Dial
Your assigned IP
Phone residing on
your
organization’s
PBX
00
A landline, mobile
phone or PDA,
Method 1
A landline, mobile
phone or PDA,
Method 2
You are now in the voicemail Main menu. Press 2
to create a personalized voicemail greeting. Follow
the prompts to record your first and last name, and
internal and external greetings.
Once you have recorded your greeting, select one
of the following options.
Table 2 - Recording Menu
Key
Option
1
Play the recording.
4
Cancel the custom recording and return to
the default system settings.
7
Redo the recording.
Voicemail Set Up and Use
*
To set up your voicemail, use the password given
to you by your PBX administrator. With the PBX
you can set up your voicemail box from any of the
following handsets:
•
An IP Phone residing on your organization’s
IP-PBX
•
Any external IP Phone
•
Any internal or external phone including
mobile phones or PDAs.
Choose how you will set up voicemail from the
options in the following table and dial the
appropriate number.
IP-PBX User Manual
Dial your full 10-digit number.
Wait for the auto attendant,
press the * key and enter
your password when
prompted.
Dial your main PBX number,
and then dial 00 and your
extension – e.g., 00xxxx. Wait
for the auto attendant, press
the * key and enter your
password when prompted.
#
Cancel the recording and return to the Main
menu.
Use the recording and return to the Main
menu.
Once you have set up your personal greetings,
return to the Main menu and select from one of the
following options.
Table 3 - Main Menu
Key
Option
1
Enter the Message Center (Message
Center menu).
2
Change your greeting (Recording menu).
Page 3 of 20
3
Change your password.
4
Change your name (Recording menu).
5
Enter the Features menu.
#
End the call.
Note: We recommend that you press 3 and
change your temporary password when you
initially configure your voicemail.
Accessing the Message Center
The Message Center allows you to listen to your
current, saved and deleted messages. Select
option 1 from the Main menu to enter the Message
Center. Then select from the following options.
Table 4 - Message Center Menu (1 of 2)
Key
Option
1
Listen to your messages (Message menu
for regular messages).
2
3
Listen to your saved messages (Message
menu for saved messages).
Listen to your deleted messages (Message
menu for deleted messages).
*
Return the voicemail Main menu.
#
End the call.
Once you listen to your message, select from the
following options.
Table 5 - Message Center Menu (2 of 2)
Key
Option
1
Listen to the previous message.
3
5
7
Listen to the next message.
Repeat the message.
Delete the message (not available for
previously deleted messages).
9
Save the message (not available for
previously deleted and saved messages).
Forward the message to a mailbox.
Return to the Main menu.
End the call.
00
*
#
IP-PBX User Manual
Other Useful PBX Features
Extension-to-extension dialing — Enables you
to reach anyone else on your PBX just by dialing
their three-to-six digit extension.
Call transfer — Enables you to transfer a call
from one phone to another. You can transfer calls
in two ways:
•
Blind transfer — when you do not wait for the
person to whom you are transferring the call to
answer the call before you transfer it.
•
Supervised transfer -- when you wait for the
person to whom you are transferring the call to
answer so that you can announce the call.
Three-way calling — Enables you to talk with two
other people at a time.
Call waiting — Enables you to put a caller on hold
while you answer another.
Call park — Enables you to transfer the call in
progress to a special Call Park extension (usually
99). The call can then be picked up by anyone
else on the PBX.
Broadcast and direct intercom — Enables you
to make an announcement to a group of
extensions by dialing the special broadcast
intercom extension number, or to intercom
someone directly by dialing 01 and their extension
number (e.g., 01xxxx). The device(s) must have a
speakerphone and cannot be on another call when
intercommed.
Star key (*) features – For information on how to
use these features from your phone, consult the
Quick Reference Guide that accompanied your
device or contact your PBX Administrator.
Page 4 of 20
Login to Your PBX VCP
Once you have set up your voicemail, you manage
your account with the PBX VCP, a browser-based
interface. To access your VCP, contact your PBX
administrator for the web address.
Note: The VCP is best used with Microsoft
Internet Explorer 6.0 and higher, with Apple Safari
browser 3.0 and higher, or with Firefox browser
3.0 and higher.
The first thing that appears is the login screen:
VCP Login Screen
To login to your VCP:
•
Enter your User ID (your main VoIP phone
number).
•
Enter the Password you chose or had
assigned to you.
•
Click the Enter button.
remember this new one going forward or change it
using the appropriate page in your VCP.
Forgot Your Password?
If you have forgotten your Password, click the
Password Recovery link, then enter your User ID
and account email address, and a new Password
will be emailed to you immediately.
Note: The Password Recovery process changes
your password completely, so you’ll have to
IP-PBX User Manual
Page 5 of 20
Managing Your Account
Once you successfully login, you’ll see the VCP
Main Screen, as shown below. This screen has a
series of tabs, each designed to give you
information about and control over your account.
Account — change your account information or
password.
Call Activity — view and/or export the calls you
have made and received.
Messages — listen to, save, or delete your
voicemail.
CallBlast — enter up to four different phone
numbers that will ring whenever your VoIP number
is dialed.
Speed Dial — enter up to 20 numbers that will be
called whenever you dial the corresponding code
from your VoIP device.
Features — send voicemail as an MP3
attachment to your email address, and/or get
voicemail notification to an alphanumeric pager or
mobile phone via SMS; manage enhanced
features, such as Caller ID, Call Waiting and DND
or change your current time zone so that your calls
and voicemails will be appropriately time-stamped.
Downloads (or Great Options) -- order and
download add-ons and products that enhance
VoIP functionality. This manual is also found
there.
Phonebook / Attendant Console — organize
your own phone book or setup an Attendant
Console for monitoring the status of the PBX.
VCP Account Tab
IP-PBX User Manual
Page 6 of 20
Suggested Order of Use
We suggest that you follow the order below when
using the VCP:
• Change your password, if you want to, using the
Account tab.
• Set up and manage your CallBlast from the
CallBlast tab.
• View and manage your voicemail using the
Messages tab
• View and export all your calls from the Call
Activity tab.
Account Tab
The Account tab appears by default when you
login to the VCP. It has three areas.
•
Change Your Account Name and Password.
Here you can modify your account name
and/or password. Enter the new information
and then click the Update Account button. A
password must be between 4-10 characters
and should be numeric because you will also
use it to retrieve voicemail via a telephone
keypad.
•
Account Summary. The Account tab also
provides a Summary of Account details
including: Account Name, Account Number,
and all Numbers and Extensions in your
account.
•
Contact Information. The Contact
Information comprises Name, Email address
and Time Zone.
IP-PBX User Manual
Page 7 of 20
Call Activity Tab
The Call Activity tab allows you to view all calls
you placed or received over the past period of
time. You can also search through your call history
using call type and date criteria. Clicking on the
Call Activity tab brings up the screen below.
Call Activity Tab
Call data includes Call Date and Time, From
Number, To Number, call Duration and Type
(Incoming, Outgoing, Missed).
• Choose the Start Date, which is the date up to
(and including) which the search will take into
account.
From this page you can review particular calls by
the following process:
• Choose End Date – the time period from one
day to one month that you wish to search.
• Choose what Account Code you want to
view.
• Choose what Call Type you want to view - All,
Incoming, Outgoing or Missed.
IP-PBX User Manual
• Select the desired Format Type – Default will
show the results on your screen, whereas
Excel and CSV will export the results as an
XLS or CSV format file, respectively.
• Click Search.
Page 8 of 20
On-screen results are displayed 100 records to a
page (if more than 100 were found in your
Search).
IP-PBX User Manual
Page 9 of 20
Messages Tab
The Messages tab displays your voicemail
information, allows you to listen to your voicemail,
and allows you to change message delivery
settings.
Note: You must set up your voicemail via a
telephone, not from this Messages tab in your
VCP.
Voicemail Tab
The Messages tab allows you to:
• Listen to your voicemail from the VCP with an
MP3 player, such as Windows Media Player or
iTunes.
• Save voicemail messages indefinitely within
the VCP. You can save messages to your
local computer if you have chosen the email
option, or by saving the MP3 file that’s played.
• Delete unwanted voicemail messages (they
will disappear overnight).
• Set up delivery of messages to your email as
an MP3 attachment or via RSS feed, or
notification of voicemail to an alpha pager or
via SMS to your mobile phone
IP-PBX User Manual
The voicemail table has the following fields for
each record:
• Listen, clicking which plays the Voicemail.
• Status – New, Played, Deleted or Saved.
• From Number – who left the voicemail
• Date, Time and Duration
• Checkbox – used to select voicemails to be
Saves or Deleted. Click the upper right
checkbox to select all voicemail records.
The capacity of your voicemail box and the length
of time unsaved messages are kept are noted at
the bottom of the screen.
Page 10 of 20
CallBlast Tab
The CallBlast feature gives you the option to route
your incoming calls to up to four different phone
numbers simultaneously and/or sequentially so
that you can answer the call from wherever you
may happen to be.
Any phone can be used as a destination - your
home phone, another VoIP phone, your mobile
phone, even a PDA or computer with a Softphone,
regardless of where the device is located.
Examples of different CallBlast setups – Typical,
Simultaneous, Sequential, Overlap, and
International - are on the CallBlast tab, as shown
below.
CallBlast Tab
The above CallBlast configuration would work like
this:
•
Ring the Primary VoIP line of extension 4708
for 6 rings before going to voicemail.
•
If the Primary line hasn’t been answered after
one ring, begin ringing 6306406317, and ring
that for 4 rings before stopping.
•
If neither phone has picked up after two rings,
begin ringing 5039141310 and ring that for 3
IP-PBX User Manual
rings before stopping (if this Phone 2 were
Active).
Warning: if any of your CallBlast phones has
voicemail that picks up before the call is answered
or goes to VoIP voicemail, your voicemails will all
be on that other phone’s messaging system! In
addition, if the total of Rings Delay plus # of Rings
on any of the CallBlasted phones is greater than
that same total for your Primary VoIP phone, the
call will be handed off to the Phone with the
Page 11 of 20
longest total, and thus will not go to your VoIP
Voicemail.
This means, for example, if your mobile phone is
set to 0 rings and you have it turned off, many of
your calls may go to your mobile phone voicemail.
Or if your mobile phone Rings Delay and # of
Rings totals 8 in the example above, then an
unanswered incoming call will simply die instead
of going to your Primary VoIP voicemail, since that
only totaled 6 rings.
We recommend having at least 2 Rings Delay for
your mobile phone, which will mean that your VoIP
phone will ring roughly 3 times before your mobile
phone begins to ring since it takes 1-2 rings on
your VoIP for a CallBlasted phone to begin ringing
even if you have the Rings Delay set to 0. And
make sure that your mobile phone will stop ringing
at least 2 rings before your VoIP phone sends the
call to voicemail.
CallBlast to IP Phones
To include an IP phone as one of your CallBlast
numbers, enter the IP Device ID, which is usually
in the form of a URI. A SIP URI is the ID and
network address of the IP phone and may bear no
resemblance to a “normal” telephone number.
CallBlast to a Different Extension
To include a different extension on your PBX as
one of your CallBlast numbers, enter the extension
number – e.g., 4906 or 5520 – as an extension is
a valid dialable number.
4. Last, set the # of Rings for each device, after
which the CallBlast call to that device will be
stopped. When a call is answered on any of
the devices, CallBlast automatically stops
ringing all other numbers. If the call is still
unanswered after the # of Rings for the
Primary VoIP line, the call is delivered to your
VoIP voicemail.
5. Click on the Update CallBlast button to save
all changes.
6. Make a test call to your VoIP number to make
sure it works as expected.
Note: If your mobile phone is a CallBlast number
and you turn off the mobile phone, all your calls
will go to your mobile phone’s voicemail. Also, if
you immediately push the Ignore Call button on
your mobile, the call goes to the mobile’s
voicemail and not the primary VoIP voicemail.
Warning: If any of phones one through four has
voicemail set up and their voicemail picks up
before the call is answered or goes to you primary
VoIP voicemail, your voicemails will be on one of
the non-primary phone’s message systems.
CallBlast Configuration Examples
The CallBlast tab provides five different sample
CallBlast configurations. Look on the left side of
the CallBlast screen and click on the button for the
type of setup you want. A pop-up window appears
and describes the configuration and its results.
To Set up CallBlast
1. Enter your mobile, home or other numbers in
the Phone 1 thru Phone 4 fields as shown.
2. You make the number active by checking the
Active checkbox, or take it out of CallBlast by
unchecking the box. If you want calls to go
directly to voicemail, you can either turn on the
DND feature by pressing *78 on your phone,
or you can enter 0 for the number of rings on
your Primary VoIP phone, or you can make
your Primary VoIP phone not active. You can
also enable the DND feature by clicking the
Features tab and selecting the DND checkbox.
3. Next, set the Rings Delay, which is the
number of rings on your Primary VoIP line that
CallBlast waits before launching a call to the
CallBlasted number(s). Zero is recommended
for your Primary VoIP phone. Note: It takes
1-2 rings for a mobile phone to begin ringing
even if you have the Rings Delay set to 0.
IP-PBX User Manual
Page 12 of 20
Speed Dial Tab
The Speed Dial tab allows you to dial up to 20
frequently called numbers by pressing only one or
two keys. Enter who or what is being called in the
Description field, the one or two digit speed dial
shortcut in the Code field, and the number or
extension you want to call in the Number Dialed
field. Then click on Update Speed Dial to save
your entries and/or changes.
Speed Dial Tab
Speed Dial Considerations
To speed dial an international number, enter the
international access code (011 or 00) followed by
the country code and number.
You can enter numbers in US or Canada either
with or without the “1” in front of the number.
If you enter any alphabetic characters, they will be
changed to the corresponding number on a phone
keypad. For example, 1-800-GOF-ORIT would be
changed to read 18004636748.
Using Speed Dial
To use Speed Dial, simply press the keys on your
phone or softphone keypad that is the Code
corresponding to the number you wish to call. To
speed the call on its way, you can then press the #
key or the Dial key or whatever your phone has
that triggers an outbound call.
As a side note – # is a universal “launch this call
now” key on all telephones. Use it whenever you
dial an international call, for example, to save
yourself 4-5 seconds of post dial delay.
Note: Using code 99 would prevent parking calls if
your PBX has 99 as the Call Park code.
IP-PBX User Manual
Page 13 of 20
Features Tab
The Features tab allows you to further customize
various settings and features including 7-Digit
Calling set up, Voicemail Settings, Enhanced
IP-PBX User Manual
Services Settings (e.g., Do Not Disturb or Disable
Call Waiting) and the Time Zone used to timestamp your calls and voicemails.
Clicking the Features tab brings up the following
window:
Page 14 of 20
Caller ID Settings
This is where you choose which of the numbers on
your account, including the main number of your
PBX, will be used as Caller ID on all your
outbound calls. Make your selection and then click
the Apply button in the Caller ID Settings area.
You can come back and change this at any time,
and the change is immediately effective.
7-Digit Calling
If you make a high percentage of your calls within
a single area code of US or Canada, you can save
yourself some key presses by leaving the country
code field set to 1 and entering that area code in
the second field.
It may be the area code of your VoIP phone
number or it may be completely different.
Whenever you dial just 7 digits, we automatically
prepend these two fields (1 + area code) to the
number you dialed. Click Apply to save your
choice.
Message Delivery Options
In addition to retrieving voicemail from any phone
or through the VCP, you can have the full
voicemail sent to your email address as an MP3
attachment. This is also the easiest way to save
your voicemail to your local computer. The email
address field here identifies where voicemails (and
faxes if you have IP-Fax service on a separate
phone number) are sent.
You can also have a notification of each voicemail
sent to your mobile phone via SMS or to an
alphanumeric pager. Pager and SMS notifications
are sent to an address in the appropriate field just
below the email field.
Changing your email address redirects your
voicemail. This might be useful if you are traveling
and don’t have access to your regular email
account.
Once set up is complete, click the Apply button
and leave yourself a test voicemail to make sure it
works as desired.
• Block Caller ID for all outbound calls.
• Do not accept calls from anonymous callers
(no Caller ID).
• Enable Do Not Disturb
• Disable Call Waiting on all incoming calls on a
fax or modem line.
Click on the checkbox in front of the option or
options you desire and then click the Apply
button. To reverse the option, uncheck the box
and click Apply.
You can also access these and additional call
handling options by using the * key on your phone.
See the following table for key information.
Note: Do not enter the voicemail system before
using these numbers. Lift the handset and dial
them.
Table 6 - * Key Options Menu
Key
Option
*69
Place a call to the number from
which you were last called.
*72<number>
Forward all calls to the number
entered after 72.
*73
Cancel forwarding of all calls.
*92<number>
Forward all busy or
unanswered calls to the
<number> entered after 92.
*93
Cancel forwarding of all busy or
unanswered calls.
*67
*82
*67<number>
*82<number>
*77
Call Handling Options
This section area allows you to use checkboxes to
turn on and off certain star key (*) options, such
as:
Block Caller ID for all outbound
calls.
Unblock Caller ID for all
outbound calls.
Block Caller ID for single call to
<number>.
Unblock Caller ID for single call
to <number>.
Don’t accept calls from
anonymous callers (no Caller
ID).
*87
Accept calls from anonymous
callers (no Caller ID).
• Forward all incoming calls to a specific
number.
*78
Turn on Do Not Disturb (all calls
go directly to voicemail).
• Forward all unanswered incoming calls to a
specific number.
*79
Cancel Do Not Disturb.
*56
Enable Call Waiting on all calls
IP-PBX User Manual
Page 15 of 20
Key
Option
for this device.
*57
Disable Call Waiting on all calls
for this device (for a fax or
modem line).
*70<number>
Disable Call Waiting only for
this call to <number> (for a
single fax or modem call).
*76<number>
Enable Call Waiting only for this
call to <number>.
*31
Enable Call Waiting on all calls
for all of your devices.
*30
Disable Call Waiting on all calls
for all of your devices.
IP-PBX User Manual
Time Zone
This area displays your currently selected time
zone, which is used to timestamp all your calls and
voicemails. To change your time zone, select a
new time zone from the drop down menu and click
Apply.
You can also see your time zone on the Account
tab, but cannot change it from there.
Page 16 of 20
Great Options (Downloads) Tab
From the Great Options tab you can download
add-ons and products that enhance your VoIP
service functionality. This manual is available for
download from this tab, as well.
This screen will look something like this:
Great Options (Downloads) Tab
Video Softphone Application
Our Video Softphone (VSP) is a Window-based
application that allows you to turn your computer
into a VoIP device and serve as a globally mobile
VoIP phone. It supports video and voice calls,
which ring on your computer when VSP is running,
and you will be able to place calls wherever you
have access to a broadband Internet connection.
• Once you have installed VSP, you’ll see a
shortcut on your desktop.
• Double-click the shortcut icon to launch VSP.
The interface is shown here:
All calls and voice/videomails will show up in your
VCP just as they do if you were sitting at your
desk. For full details, refer to the separate VSP
manual.
Installing VSP on your Computer
• Click on the Great Options tab in the VCP.
• Click on the Video Softphone download link.
The following screen appears:
• Click Save to save the software installer to
your preferred directory or click Run to the run
the software installer immediately.
Use VSP as you would your ATA or IP phone. Use
the mouse or your keyboard to dial the numbers you
wish to call. See the following table for information
on VSP keys and features.
• Run the installer and follow the prompts to
install and configure VSP.
IP-PBX User Manual
Page 17 of 20
Table 7 - VSP Keys
Key
A
B
C
D
E
F
G
Function
Click here to get a dial tone or to make a
call if you have already entered the
number you wish to call.
Click here to use line one out of a possible
two.
Click here to use line two out of a possible
two.
Click here to adjust the microphone
volume. This is the volume at which the
outside caller hears you speak.
Click here to mute your voice so that the
outside caller cannot hear you.
Click here to dial numbers, and the * and #
keys.
Click here to turn off either your computer
speakers or the USB phone speakers. If
you use this option, you will not be able to
hear the outside caller speak.
H
Click here to adjust the volume at which
you hear the outside caller speak.
I
Click here to show and configure device
settings.
J
Click here to launch the VCP.
K
Click here to show your call list.
L
Click here to end the call.
M
Click here to redial the last dialed number.
N
Click here to clear the last dialed digit.
O
Click here to close the VSP application.
P
Click here to display version information
about the Softphone application.
IP-PBX User Manual
Page 18 of 20
Attendant Console Tab
The Attendant Console allows you to monitor the
status of Mailboxes and intercept calls on the
PBX, if your login credentials allow this access.
Starting the Attendant Console
On the Attendant Console tab you must select the
device you want to direct calls to when you
intercept or dial from within Attendant Console.
Clicking the “Start Console” button will open a new
window with the actual Attendant Console.
Configuring Attendant Console
The first time you use the Attendant Console the
Configure dialog will open. The Configure dialog
allows you to choose which Mailboxes to include
on the display, allow you to choose to monitor their
status and have your computer ‘ring’ when they
have a call.
You may also configure the number of Caller ID
lines and the number of calls to display for each
Mailbox.
Attendant Console also allows you to see the Call
Park queue. If you have Call Park enabled, you
can set the Park Timeout which will cause the call
to flash after a call has been on hold past the time
you set.
The Volume setting allows you to specify how loud
to make the ringing sounds on your computer
when Mailboxes with the ‘ring’ option selected
receive a call.
Configure Attendant Console Window
Using Attendant Console
The selected Mailboxes are displayed on the
screen. Each mailbox has a header that contains
the extension number and the name assigned to
that extension. Clicking on the header will dial that
extension.
When a mailbox receives a call, it will appear
below the mailbox’s header. The Caller ID fields
will be displayed and the style will indicate the
status of the call.
IP-PBX User Manual
•
Green – Call in progress
•
Red – Call active
•
Blinking Red – Call is ringing
•
Blinking Pink – Call is on hold
If a call is ringing or on hold (flashing red or pink)
you may click on the call to have it transferred to
your phone.
Page 19 of 20
You may rearrange the order of the mailboxes by
clicking and dragging them to the order you desire.
Attendant Console also has a dialing feature. You
can enter a phone number in to the input box next
to the ‘Dial’ button and then press the ‘Dial’ button.
Your phone will then dial the number.
Note: If you have a Phone Book tab then the
Attendant Console feature is not enabled. Ask
your administrator for details.
Note: When a call is directed to your phone some
devices will start the call right away while others
may require you to pick up the handset. A few
devices do not support this feature.
Attendant Console Window
911 Emergency Calling
Your PBX Administrator is responsible for setting
your extension up to be able to dial 911 if an
emergency arises.
Warning: 911 dialing is NOT automatic with
your IP-PBX service. If your address has never
been entered or you move and your
Administrator does not change your 911
address, a 911 call from your IP-PBX phone
may be significantly delayed or misrouted.
You can always call 911 from a regular phone
or from a mobile phone.
For Further Information
If you have other questions about your IP-PBX
service, please contact your PBX Administrator.
IP-PBX User Manual
Page 20 of 20