1
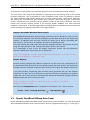
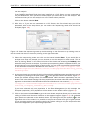
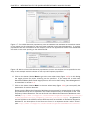
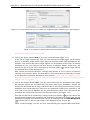
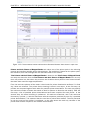
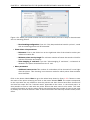
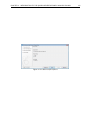
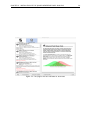
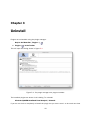
QIAGEN GeneRead
Panel Analysis Plugin
USER MANUAL
User manual for
QIAGEN GeneRead Panel Analysis Plugin
Windows, Mac OS X and Linux
November 19, 2015
This software is for research purposes only.
CLC bio, a QIAGEN Company
Silkeborgvej 2
Prismet
DK-8000 Aarhus C
Denmark
Contents
1 Introduction to the QIAGEN GeneRead Panel Analysis Plugin
1.1 Specify GeneRead DNAseq Gene Panel
4
. . . . . . . . . . . . . . . . . . . . . . .
5
1.2 How to run the QIAGEN GeneRead Panel Analysis ready-to-use workflow . . . . . .
7
1.3 Trim primers and their dimers of mapped reads . . . . . . . . . . . . . . . . . . .
15
2 Installation of the QIAGEN GeneRead Panel Analysis
20
3 Uninstall
22
3
Chapter 1
Introduction to the QIAGEN GeneRead
Panel Analysis Plugin
The QIAGEN GeneRead Panel Analysis Plugin is a ready-to-use workflow that can identify and
annotate variants in Targeted Amplicon Sequencing data generated with GeneRead DNAseq Gene
Panels. The GeneRead DNAseq Gene Panels can either be standard panels focused on a specific
set of genes or can be customized to include genes tailored to specific research interests.
The QIAGEN GeneRead Panel Analysis Plugin is bundled with target primers and target regions
from QIAGEN GeneRead DNAseq Gene Panels 2.0, but it is also possible to use the QIAGEN
GeneRead Panel Analysis Plugin if you are working with customized gene panels.
Also included is a tool for trimming primers and their dimers. This tool is described in section 1.3.
The QIAGEN GeneRead Panel Analysis ready-to-use workflow and the Trim Primers and their
Dimers of Mapped Reads tool are installed in the toolbox as illustrated in figure 1.1.
Figure 1.1: The workflow and tool are found in the toolbox.
The QIAGEN GeneRead Panel Analysis ready-to-use workflow covers all steps from read mapping
4
CHAPTER 1. INTRODUCTION TO THE QIAGEN GENEREAD PANEL ANALYSIS PLUGIN
5
to annotation of the variants and therefore performs both secondary and tertiary analysis.
The first step in the ready-to-use workflow is mapping of the sequencing reads to the human
reference sequence. This is followed by a local realignment step, which is included to improve
the variant detection that follows directly after a primer trimming step. After variant detection,
the variants are annotated with gene names, exon numbers, amino acid changes, conservation
scores, information from clinically relevant variants present in the ClinVar database, and information from common variants present in the common dbSNP, HapMap, and 1000 Genomes
database. Furthermore, a detailed target regions mapping report is created that allows inspection
of the coverage and mapping specificity in the target regions.
Adapters and QIAGEN GeneRead Panel Analysis
The QIAGEN GeneRead Panel Analysis Plugin assumes that the sequences used as input
do not contain adapters. The removal of adapters is often done directly on the sequencing
machine. If adapters have not been trimmed off, please do so before proceeding with
your analysis. The presence of adapters will lead to misleading results.
If you are working with sequences that still have adapters present, they can be trimmed
using the tools provided in the "Prepare Raw Data" folder in the toolbox.
For a description of how to trim off adapter sequences, please see the Biomedical
Genomics Workbench manual that can be found here:
http://clcsupport.com/biomedicalgenomicsworkbench/current/index.
php?manual=Adapter_trimming.html
Illumina Adapters
Illumina recently changed their adapter sequences and this may have consequences for
the downstream data analysis if the new adapter sequences were used for the sequencing
analysis and the old adapter sequences were used for trimming off the adapter sequences.
If you have Illumina sequencing data that have been generated with the new adapter
sequences and have not been trimmed or have been trimmed incompletely, the adapter
sequences can be removed within the Biomedical Genomics Workbench using the Illumina
adapter sequences that can be found here:
http://support.illumina.com/downloads/illumina-customersequence-letter.html
and the tool Trim Sequences that is available in the Toolbox in the "Tools" section:
Toolbox | Tools | Preparing Raw Data (
1.1
) | Trim Sequences (
)
Specify GeneRead DNAseq Gene Panel
Before running the QIAGEN GeneRead Panel Analysis ready-to-use workflow, you must first specify
which GeneRead DNAseq Gene Panel has been used for targeted sequencing. To do this go to:
CHAPTER 1. INTRODUCTION TO THE QIAGEN GENEREAD PANEL ANALYSIS PLUGIN
Toolbar | Data Management (
6
)
This will open the wizard shown in figure 1.2.
Figure 1.2: Open the Data Management and download QIAGEN GeneRead Panels hg19.
Select QIAGEN GeneRead Panels hg19 and click on the button labeled Download. Two extra folders are now in the CLC_References/homo_sapiens folder: "target_primers" and "target_regions"
(see figure 1.3). Each folder contains elements specific to each commercially available QIAGEN
GeneRead Panels kit.
Figure 1.3: The folders "target_primers" and "target_regions" are available in your CLC_References
data folder.
To create a Reference Data Set specific to one panel in particular, click on Create Custom Set.
This opens a pop up window where both "Target Primers" and "Target Regions" are represented
by a drop down menu (figure 1.4). Select the option "Custom" to open another window where
you can select the relevant panel from the CLC_References folder.
It is possible to select multiple target primers or target regions simultaneously if you work with
multiple GeneRead DNAseq Gene Panels. Similarly, if you are using customized GeneRead
CHAPTER 1. INTRODUCTION TO THE QIAGEN GENEREAD PANEL ANALYSIS PLUGIN
7
Figure 1.4: Select the relevant target primers and target regions and click "OK".
DNAseq Gene Panels you can choose your customized primers and target regions provided that
you had saved them before in your Navigation Area. In any case, remember that only the gene
panels that are selected under "Data Management" will be available when you run the QIAGEN
GeneRead Panel Analysis ready-to-use workflow.
Once you have selected the target primers and regions, do not forget to edit the name of your
Custom Data Set before saving it. The new data set now appears under the Custom Reference
Data Set tab of the Data Management window (figure 1.5). Click on Apply before you close the
"Manage Reference Data" wizard. You can always go back and make changes if necessary.
Figure 1.5: The newly created Custom Reference Data Set can be seen under the Custom Reference
Data Set tab. Do not forget to edit the data set'a name and to apply it before starting the workflow.
1.2
How to run the QIAGEN GeneRead Panel Analysis ready-to-use
workflow
The QIAGEN GeneRead Panel Analysis ready-to-use workflow can be found in the toolbox under
"Targeted Amplicon Sequencing":
Toolbox | Ready-to-Use Workflows | Targeted Amplicon Sequencing (
GeneRead Panel Analysis ( )
) | QIAGEN
1. Double-click on the QIAGEN GeneRead Panel Analysis ready-to-use workflow (figure 1.1) to
CHAPTER 1. INTRODUCTION TO THE QIAGEN GENEREAD PANEL ANALYSIS PLUGIN
8
run the analysis.
If the QIAGEN GeneRead Plugin has been installed on a CLC Server you are connected to
via your Workbench, then you will be asked where you would like to run the analysis. We
recommend that you run the analysis on a CLC Server when possible.
Click on the button labeled Next.
2. After this, or if you are not connected to a CLC Server, the first wizard step you will be
presented with is the step where you can select the sequencing reads that should be
analyzed (figure 1.6).
Figure 1.6: Select the sequencing reads by double-clicking on the file name or by clicking once on
the file name and then on the arrow pointing to the right hand side.
3. Select the sequencing reads and click on the button labeled Next. If you would like to
analyze more than one sample you can choose to run the analysis in batch mode. This is
done by ticking "Batch" in the lower left side of the wizard and selecting the folder(s) that
holds the data you wish to analyze. If you have your sequencing data in separate folders, you
should choose to run the analysis in batch mode. You can learn more about batch analysis
in the Biomedical Genomics Workbench user manual http://www.clcsupport.com/
biomedicalgenomicsworkbench/current/index.php?manual=Batching_result_
handling.html.
4. In the next wizard you can specify which of the available 1000 Genomes populations to use in
the analysis by clicking on the plus symbol ( ) in the right-hand side of the wizard. Figure 1.7
shows the default settings where all three available 1000 Genomes populations are selected. This is the default setting if all three populations have been selected under Data Management as described in the Biomedical Genomics Workbench user manual (http://www.
clcsupport.com/biomedicalgenomicsworkbench/current/index.php?manual=
Download_configure_reference_data.html).
If you have selected only one population in the Data Management (in this example the
European population), this population will be shown as the default choice (figure 1.8).
5. Click on the button labeled Next to go to the next wizard step that allows you to restrict the
calling of InDels and Structural Variants to the targeted regions (figure 1.9). All available
gene panels are selected as the default choice. By clicking on the plus symbol ( ) in the
right-hand side of the wizard it is possible to adjust the number and type of gene panels
to use as target regions and thereby restrict the variant calling to only the sequences that
have been targeted in your sequencing experiment.
CHAPTER 1. INTRODUCTION TO THE QIAGEN GENEREAD PANEL ANALYSIS PLUGIN
9
Figure 1.7: The 1000 Genomes population(s) that are selected and available as the default choice
in the wizard are the population(s) that have been selected under Data Management. To remove
populations that are not relevant for this analysis, click on the populations that is to be deselected
and click on the arrow pointing to the left-hand side.
Figure 1.8: Which of the 1000 Genomes populations to use in the analysis can be specified at this
step. In this example we have chosen to use only the European population.
6. Click on the button labeled Next to go to the next wizard step (figure 1.10). In this dialog
the target primers for primer trimming can be specified. If you would like to add more
GeneRead DNAseq Gene Panel target primers, this can be done using "Data Management"
as described in section 1.1.
7. Click on the button labeled Next. In the next wizard step (figure 1.11) you can specify the
parameters for variant detection.
Please see the Biomedical Genomics Workbench user manual for a description of the different parameters that can be adjusted in the variant detection step. A description of the "Low
Frequency Variant Detection" tool can be found in the Biomedical Genomics Workbench user
manual (http://www.clcsupport.com/biomedicalgenomicsworkbench/current/
index.php?manual=Low_Frequency_Variant_Detection.html). As general filters are applied to the different variant detectors that are available in Biomedical Genomics
Workbench, the description of the filters are found in a separate section called "Filters"
(see http://www.clcsupport.com/biomedicalgenomicsworkbench/current/
CHAPTER 1. INTRODUCTION TO THE QIAGEN GENEREAD PANEL ANALYSIS PLUGIN
10
Figure 1.9: In this wizard step you can specify the targeted regions matching your read mapping.
Figure 1.10: Select the primer track from the drop-down list.
index.php?manual=Filters.html).
8. Click on the button labeled Next to go to the next wizard step (figure 1.12).
In the "QC for Target Sequencing" step, you must specify your target region. As the default
choice, all available target region tracks that were selected under Data Management are
selected. The number and kind of target regions can be adjusted at this step. As already
described for the "Trim Primers and their Dimers of Mapped Reads" wizard step, the
options you get in the list that is accessed via the plus symbol ( ) are the target regions
you selected under "Data Management".
Next, specify the desired Minimum coverage and whether or not to ignore non-specific
matches and/or broken pairs. All parameters in this wizard step are described in detail
in the Biomedical Genomics Workbench user manual http://www.clcsupport.com/
biomedicalgenomicsworkbench/current/index.php?manual=Running_QC_Target_
Sequences_tool.html.
9. Click on the button labeled Next. The next two wizard steps are annotation steps where
the detected variants are annotated with information from known databases. Actually the
variants are annotated with a range of different data in this ready-to-use workflow, but only
databases that provide data from more than one population needs to be specified by the
user. This is the case for HapMap and the 1000 Genomes Project. First, the variants are
annotated with information from the 1000 Genomes Project (see figure 1.13).
From the list that can be accessed by clicking on the plus symbol ( ) you can choose the
population that matches the population your samples are derived from. Please note that the
populations available from the drop-down list can be specified with the Data Management
( ) function found in the top right corner of the Workbench (see section ??).
Under "Locked settings" you can see that "Automatically join adjacent MNVs and SNVs"
CHAPTER 1. INTRODUCTION TO THE QIAGEN GENEREAD PANEL ANALYSIS PLUGIN
11
Figure 1.11: In this wizard step the parameters for variant detection can be adjusted.
Figure 1.12: Specify your target regions and adjust the parameters if desired.
has been selected. The reason for this is that many databases do not report a succession
of SNVs as one MNV as is the case for the Biomedical Genomics Workbench, and as a
consequence it is not possible to directly compare variants called with Biomedical Genomics
Workbench with these databases. In order to support filtering against these databases
anyway, the option to Automatically join adjacent MNVs and SNVs is enabled. This means
that an MNV in the experimental data will get an exact match, if a set of SNVs and MNVs
in the database can be combined to provide the same allele.
Note! This assumes that SNVs and MNVs in the track of known variants represent the
same allele, although there is no evidence for this in the track of known variants.
10. Click on the button labeled Next and do the same to annotate with information from
HapMap (figure 1.14).
CHAPTER 1. INTRODUCTION TO THE QIAGEN GENEREAD PANEL ANALYSIS PLUGIN
12
Figure 1.13: Select the relevant population from the list or use all three populations that have
already been selected.
Figure 1.14: Select the relevant population from the list or use all populations that have already
been selected.
11. Click on the button labeled Next to go to the last wizard step (shown in figure 1.15).
Pressing the button Preview All Parameters allows you to preview all parameters. At
this step you can only view the parameters, it is not possible to make any changes (see
figure 1.16). Choose to save the results and click on the button labeled Finish.
Output from the QIAGEN GeneRead Panel Analysis
The QIAGEN GeneRead Panel Analysis tool produces six different outputs:
1. Target region reads track with the locally realigned trimmed reads (
2. Target region coverage track (
3. Coverage report (
)
4. Annotated variant track (
5. Genome Browser View (
6. Log table (
)
)
)
)
)
CHAPTER 1. INTRODUCTION TO THE QIAGEN GENEREAD PANEL ANALYSIS PLUGIN
13
Figure 1.15: Check the selected parametes by pressing "Preview All Parameters".
Note! We advise you to not delete any of the produced files individually as some of them are
linked to each other. If you would like to delete an experiment, please always delete all of
generated files from one experiment at the same time.
When looking at the results of the analysis, a good place to start is the target region coverage
report ( ) to see whether the coverage is sufficient in the regions of interest (e.g. >30 ). Please
also check that at least 90% of the reads are mapped to the human reference sequence and
that the majority of the reads map to the targeted region.
Open the Genome Browser View file (
) to get an overview of the identified variants (see 1.17).
The Genome Browser View includes the annotated variants in context to the human reference
sequence, genes, transcripts, coding regions, targeted regions, mapped sequencing reads,
clinically relevant variants in the ClinVar database as well as common variants in common
dbSNP, HapMap and 1000 Genomes databases. Finally, a track with conservation scores shows
the level of nucleotide conservation around each variant.
The conservation scores are based on a multiple alignment with a range of different vertebrates.
The conservation in the region around each variant is particularly relevant when you consider the
potential importance of the individual variants. A high conservation score could indicate that the
variant is located in a region of the genome that is of great importance.
The annotated variant track can also be shown in table view. To open the table, double-click on the
name of the variant track in the left side of the Genome Browser View (when opened in the View
Area). The annotated variant table includes all variants and the added information/annotations
(see 1.18).
In figure 1.19 the annotated variant table and the Genome Browser View are shown in split
view. The annotated variant table and the Genome Browser View are connected and when
selecting a variant from the table by clicking on a row in the table, the Genome Browser View
will automatically put the selected variant into focus. In figure 1.19 the "Zoom to base level"
function ( ), marked with a red arrow in the lower right corner of the View area, has been used
to zoom in on the variant.
CHAPTER 1. INTRODUCTION TO THE QIAGEN GENEREAD PANEL ANALYSIS PLUGIN
14
Figure 1.16: Preview all parameters. At this step it is not possible to introduce any changes, it is
only possible to view the settings.
The added information can support identification of candidate variants for further research. For
example can common genetic variants (present in the HapMap database) or variants known to
play a role in drug response or other clinical relevant phenotypes (present in the ClinVar database)
easily be seen.
Identified variants that are unknown in the ClinVar database, can for example be prioritized based
on amino acid changes. A high conservation level on the position of the variant between many
vertebrates or mammals can also be a hint that this region could have an important functional
role, and variants with a conservation score of more than 0.9 (PhastCons score) should be
prioritized higher. Filtering of the variants based on their annotations can be facilitated using the
table filter in the top right side of the table.
CHAPTER 1. INTRODUCTION TO THE QIAGEN GENEREAD PANEL ANALYSIS PLUGIN
15
Figure 1.17: Genome Browser View to inspect identified variants in the context of the human
genome and external databases.
Figure 1.18: The annotated variant track opened in table view from the Genome Browser View. The
table makes it easier to inspect identified variants in detail.
Please note that in case none of the variants are present in ClinVar, or dbSNP, the corresponding
annotation column headers are missing from the result.
1.3
Trim primers and their dimers of mapped reads
The Trim Primers and their Dimers of Mapped Reads tool is used in the QIAGEN GeneRead Panel
Analysis ready-to-use workflow. It is also provided as a separate tool to be used for targeted
amplicon sequencing experiments with many targets (and as a consequence many primers). Like
the other primer trimming tool in the toolbox, the Trim Primers of Mapped Reads tool, the Trim
CHAPTER 1. INTRODUCTION TO THE QIAGEN GENEREAD PANEL ANALYSIS PLUGIN
16
Figure 1.19: The annotated variant table and the Genome Browser View shown in split view.
Primers and their Dimers of Mapped Reads tool makes use of the primer pairs in the trimming
process and predicts possible primer dimerizations. The prediction is based on the primer pairs,
the reference, and user settings that are described later in this section.
Trim Primers and their Dimers of Mapped Reads is based on the Trim Primers of Mapped Reads
tool with the extension that the Trim Primers and their Dimers of Mapped Reads tool not only
trims off primers but also takes into account the situation where primers have formed dimers
that have been used for target amplification.
First, the tool trims primers of the reads. It then looks for primer dimerization artifacts; if it finds
any, these are trimmed. The primer dimer trimming is done in two steps. In the first step, all
primers are compared against each other for possible primer dimerization. The user may specify
the minimum number of bases that needs to bind for primers to dimerize and amplify. After the
first step, a list of possible primer dimerizations have been compiled for each primer. In the
second step, the actual trimming is performed. All reads are examined, and if the read was
trimmed by a primer, p, and the read starts with the sequence predicted by one of p's possible
primer dimerizations, it is assumed that the read has a primer-dimer artifact. The tool proceeds
to trim the read so the artifact is unaligned. In the case where the read only consists of the
primer-dimer artifact sequence, the read will be discarded.
CHAPTER 1. INTRODUCTION TO THE QIAGEN GENEREAD PANEL ANALYSIS PLUGIN
17
Compared to the Trim Primers of Mapped Reads tool, the primer trimming in this tool has been
extended, so the user can specify the fraction of the primer that must overlap with a read's
aligned bases in order to record a primer hit.
Another difference between the two tools is that primers are trimmed slightly differently with the
Trim primers and their dimers of mapped reads tool compared to trimming performed with the
Trim Primers of Mapped Reads tool. The Trim primers and their dimers of mapped reads is
more strict regarding primer position. If a primer begins after the read at the 5' end, the primer is
not considered by the Trim primers and their dimers of mapped reads tool. The read's unaligned
bases are taken into account, e.g. if the primer begins two positions before the read's first
aligned base and the read has three unaligned bases, the primer is said to begin after the read.
Similarly, a primer that ends before the read at the 3' end is not considered. Again unaligned
bases are taken into account.
Removal of primers and their dimers from the mapped reads ensures that no bias is introduced
in the variant calling as would be the case if the primers and dimers were considered to be part
of the sequencing reads. To be able to trim off the primers used in your sequencing experiment
you must know the primer sequences as you will need to specify which target primer sequence
file to use. The tool will trim off the primer dimers it predicts based on the primer pairs, the
reference, and user settings.
The Trim Primers and their Dimers of Mapped Reads can be found in the toolbox:
Toolbox | Resequencing Analysis (
Reads ( )
) | Trim Primers and their Dimers of Mapped
This will open the wizard shown in figure 1.20. In the first wizard step you are asked to select
the read mapping. If you would like to analyze more than one read mapping, you can choose to
run the analysis in batch mode by ticking the "Batch" box in the lower left corner of the wizard
and then selecting the folder that hold the read mappings you want to analyze.
Figure 1.20: Select files to import.
Click on the button labeled Next to go to the next wizard step (see figure 1.21).
• Primer trim parameters
Primer track Click on the folder icon on the right-hand side of the wizard to select your
primer location file.
Minimal primer overlap fraction Specifies the fraction of the primer that must overlap
with the read's aligned bases in order to record a primer hit. Setting the fraction to
0.0 will disable this requirement.
CHAPTER 1. INTRODUCTION TO THE QIAGEN GENEREAD PANEL ANALYSIS PLUGIN
18
Figure 1.21: Select your primer location file and choose whether you want to keep or discard reads
with no matching primers.
Read handling configuration If you tick "Only keep reads that have hit a primer", reads
with no matching primers will be discarded.
• Primer dimer trim parameters
Reference Click on the folder icon on the right-hand side of the wizard to select your
reference location file.
Minimum primer overlap length The minimum number of bases that needs to bind for
primers to dimerize and amplify.
Allow dangling 3' end base If you tick "Allow dangling 3' end base", a mismatch is
allowed in the primer dimerization at the 3' end.
• Other parameters
Additional bases to trim This number of nucleotides will be trimmed off a read right
after the primer. This trimming is not done on reads for which primer dimer artifacts
were identified.
Click on the button labeled Next to go to the wizard step shown in figure 1.22. Choose to save
the result of the primer trimming and click on the button labeled Finish. The output corresponds
to the input with the only difference that the primers and their dimers have been trimmed off
and that the output file has "trimmed reads" appended to the name. In the wizard step it is
also possible to save a track with the primer dimers that were used to trim reads. The track
contains information on why the primer dimer was predicted and the number of times it was used
to partially trim a read or remove a read. A read is removed if the read only consists of the primer
dimer.
CHAPTER 1. INTRODUCTION TO THE QIAGEN GENEREAD PANEL ANALYSIS PLUGIN
Figure 1.22: Select output options.
19
Chapter 2
Installation of the QIAGEN GeneRead
Panel Analysis
The QIAGEN GeneRead Panel Analysis is installed as a plugin. Plugins are installed using the
plugin manager1 :
Help in the Menu Bar | Plugins... (
or Plugins (
)
) in the Toolbar
The plugin manager has two tabs at the top:
• Manage Plugins. This is an overview of plugins that are installed.
• Download Plugins. This is an overview of available plugins on CLC bio's server.
To install a plugin, click the Download Plugins tab. This will display an overview of the plugins
that are available for download and installation (see figure 2.1).
Clicking a plugin will display additional information at the right side of the dialog. This will also
display a button: Download and Install.
Click the QIAGEN GeneRead Panel Analysis and press Download and Install. A dialog displaying
progress is now shown, and the plugin is downloaded and installed.
If the QIAGEN GeneRead Panel Analysis is not shown on the server, and you have it on your
computer (e.g. if you have downloaded it from our web-site), you can install it by clicking the
Install from File button at the bottom of the dialog. This will open a dialog where you can browse
for the plugin. The plugin file should be a file of the type ".cpa".
When you close the dialog, you will be asked whether you wish to restart the Biomedical Genomics
Workbench. The plugin will not be ready for use until you have restarted.
1
In order to install plugins on Windows, the Workbench must be run in administrator mode: Right-click the program
shortcut and choose "Run as Administrator". Then follow the procedure described below.
20
CHAPTER 2. INSTALLATION OF THE QIAGEN GENEREAD PANEL ANALYSIS
Figure 2.1: The plugins that are available for download.
21
Chapter 3
Uninstall
Plugins are uninstalled using the plugin manager:
Help in the Menu Bar | Plugins... (
or Plugins (
)
) in the Toolbar
This will open the dialog shown in figure 3.1.
Figure 3.1: The plugin manager with plugins installed.
The installed plugins are shown in this dialog. To uninstall:
Click the QIAGEN GeneRead Panel Analysis | Uninstall
If you do not wish to completely uninstall the plugin but you don't want it to be used next time
22
CHAPTER 3. UNINSTALL
23
you start the Workbench, click the Disable button.
When you close the dialog, you will be asked whether you wish to restart the workbench. The
plugin will not be uninstalled until the workbench is restarted.