1
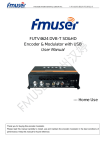
The Preface
For the sake of your more comfortable and easier operation to the MP3 player,we herein present
specific user manual for your acquisition on product instruction, usage guidance. Please seriously
study the guidance attached so as to use the player correctly.
The liability of private data loss and damage or all relevant indirect loss due to individual
misapplication to software or hardware, product disassembly, battery replacing, or any other
suddenness should be not on our company. Besides, user’s misunderstanding to this manual is out of
our control, hereby, we are not obligated to the third party demanding compensation due to the product
application.
Once any alteration to this manual, excuse for the notification’s disregard.
Attention:
Do not use this product in an extremely hot, cold, dusty or humid environment.
Confirm the HOLD key unlocked before usage.
Care should be taken so that the player will not be hit by any hard objects, or else it may cause
broken surface, or slippage of the battery, or damage to other hardware components。
The player need to be recharged in following conditions:
a) Unprompted Power off for low battery power
b) Power on disabled.
c) No response to key operation, it needs to be discharged by RESET key and then
recharged.
To avoid static electricity, do not operate this player in an extremely dry environment.
Do not disconnect the player when formatting, uploading, or downloading is proceeding, or else
it may result in errors of the program.
When this player is used as a portable hard drive. Follow the correct file operating procedures to
store and export files, for any incorrect operations may lead to the files lost. The manufacturer
shall not be liable for such problems.
Special Statement: Study this manual prudently before the usage to the player, if any data loss
due to personal operational reasons or Force Majeure incidents, the liability should be not on
our company.
Figure Introduction:
(1) PLAY/ON/OFF/
PAUSE/STOP
(2)Power Switch
(3)MIC embedded
(4)Record Key
(5)Volume (6)Volume +
(7)Clasp
(8)Earphone Socket
(9)MODE Key
(10)FF Key
(11)REW Key
(12)USB Socket
(13)LCD Display
To power on
Push the power switch to “ON” into power on, and push to another side into power off.
Functions Operation (Push Mode button)
1
2
3
4
5
6
7
8
9
10
11
12
1. Music Playing Mode
1) Push the power switch to “ON”, then click PLAY/PAUSE/STOP key into STOP status. It
indicates the length of the current song at the left top corner in “03-33” format, and the ID
information of this song at the bottom.
2) Click PLAY/PAUSE/STOP key again into playing status. The lyrics of the song displays at the
bottom of the screen so long as the song was edited to be with lyrics. Click FF key or REW key
to skip to a next song or a previous song; click volume+, volume- to increase or decrease the
volume. Each click decrease volume by one level, and total 32 levels.
3) In playing status, click MODE key to set EQ effects, Repeat, Backlight, Language and Playing
Speed. Refer to relevant parts in this manual for detailed operation. Click RECORD key into
“A-B” repeat mode, click again to confirm point “A”, and click more once to confirm point “B”,
then it repeats the fragment A-B. Click RECORD key again to exit to normal playing mode.
4) In playing status, click PLAY/PAUSE/STOP key to pause; press PLAY/PAUSE/STOP key for
1 second to stop.
2. Voice Playing Mode:
1) Select voice mode and click PLAY/PAUSE/STOP key to replay record, click again PLAY key
to pause; press PLAY/PAUSE/STOP key for 1 second to stop.
2) In playing mode, click FF key and REW key to skip to a next track or a previous track; click
volume+ or volume- to increase or decrease volume level, each click for one level shift; click FF
key or REW to play a next record fragment or a previous one.
3) In playing status, click MODE key to set EQ effects, Repeat, Backlight, Language and Playing
Speed. Refer to relevant parts in this manual for detailed operation.
3. Record Mode
1)Select Record Mode to set high-quality processing (SP) or low-quality processing (LP), and
click MODE key to confirm to be ready in recording mode.
2) As playing status, click PLAY key to pause; press PLAY for 1 second to stop and shift to
voice playing status.
3)In stop status, press RECORD key to record availably.
4. EQ setup
6 effects: Normal; DBB; Pop; Rock; Classic; Jazz.
5. Repeat setup
4 modes: Normal; Repeat 1, Repeat All, Preview playing
6. Backlight Setup
Backlight: 0-60s adjustable, click (FF) key and (REW) key to change.
7. Language:
3 language versions optional: English; Simple Chinese; Complex Chinese; or to install a new
font library.
8. Memory Information:
Check the capacity of the memory, left capacity; High speed formatting or low-level formatting
(recommended if high-speed formatting failed).
9. Files deletion:
Delet music files or record files.
10. Different speed playing:
5 levels speed: Normal; Slow 1; Slow 2; Fast 1; Fast 2.
11. Game
PLAY key to exit, any other keys shoot.
12. FM Radio
1) Click MODE key to shift scanning mode / listening mode
2) Click PLAY key to save channels; click +/- to tune the frequency
3) Click FF key and REW key to select channel
4) Click MODE key to exit FM Radio.
Note: MODE key acts as a menu key and confirmation key; in menu status, click any key to exit.
USB Mode
1. Check the USB port in the computer.
2. Connect the USB socket in the player to the computer’s USB port through the attached USB
cable.
3. If connected, the player displays the connection symbol,
4. For WIN98 computer operation system, the compatible software must be installed before the
connection between the player and computer. Put the driver CD into CD-ROM driver then open
the executive file “setup.exe”.
•
IBM compatible personal computer
•
CPU:PENTIUM 166MHZ above
•
Operation system:WIN98、ME、2000、XP
•
USB( Universal serial bus) port
•
32MB system memory or above(64MB recommended for WINDOWS2000)
•
20MB available hard disk space or above
•
4X speed CD-ROM or above
•
Sound Card (Optional)
5. When uploading or downloading data, it displays a real line arrow and can be used just like a
USB disk.
6. Do not disconnect the player when formatting, uploading, or downloading is proceeding, or else
it may result in errors of the program.
7. Do save the music files into the MUSIC folder special for music storage.
8. Confirm the correct connection to PC before the formatting.
Open My Computer folder, click Mobile Disk folder by clicking mouse right key, select
Formatting option to proceed the formatting. After the proceeding, the computer displays OK,
disconnect and then connect again, the disk generate two folders automatically (a DVR folder
and a MUSIC folder).
Warning: Formatting will delete all data in the memory
Note: Warning:Once the USB cable connected to PC, do not disconnect or pull out the player
to avoid the damage to the player, the data lost or PC halted.
Communication with PC
1. Driver program installation:
A. Note:Driver software installation needless above WIN98 operation system
B. Select the attached CD, run the setup.exe file, click “NEXT” button in each dialog, then it
appears in the screen as follows:
C. It automatically installs the software of the player management and basic driver into the
player. After the installation, it reminds to restart the computer, then press “OK” to restart
and take effect the software.
2. Connect to PC
Connect to PC, it appears a disk icon in MY COMPUTER folder.
3. Upload and Download data
So long as the driver software is installed correctly, connect the player to a computer, then the
player is used as a mobile hard disk for uploading and downloading data
Special statement: Do not disconnect the player during uploading or downloading, or
else it may cause the data lost or damaged and the player malfunctioned.
Special warning: Do uninstall USB device in Windows ME ,Windows2000 or Windows XP
systems, or else it may cause the data lost or damaged, the details as follows:
A. Double click the icon “pull hardwares out” in the right bottom of the computer(the
icon “safely uninstall hardwares” in Windows XP system), as below:
B. Click Stop button in the pop-up dialog, as below:
C.Click OK in the next pop-up window, as below:
D. Click OK in the next pop-up window, as below:
After the above procedures, the player can be pull out safely from the USB port.
PC software usage
(1) The software of ID3 information and synchronous lyrics edit:
The player supports standard MP3 TAG (ID3V1.0 –ID3V2.3) display, while prior
ID3V1.1. Make use of the attached file or downloaded ID3 edit software from Internet to
edit the ID3 TAG on the MP3 or WMA files. Notice the system language in PC on editing.
The player displays ID3 information in songs information mode, while displays the file
name if no valid ID3 information.
The player displays the synchronous text information (ex. lyrics) , if no valid ones, it’s
display is the same as songs information mode.
ID3 TAG edit
The software opens a MP3/WMA file and appears its ID3 information for edit. Save the changes
after the alteration. Click lyrics edit to enter into editing dialog.
ID3 Lyrics edit
If the current song or voice file doesn’t include synchronous lyrics, download the lyrics from
Internet or edit it by yourself. The editing format is as follows:
[mm:ss] lyrics…..(Enter)
and [mm:ss] must be inputted in English status, no space.
Usage of the AC charger
1. Power on the charger, the red light lightens indicating power on.
Plug the charger’s USB port into the socket of the player, the red lamp lights always
indicating it’s charging, if the green one lights, it shows power’s full.
2. The charger is used for the player only.
3. Charging is also processing when the player is connected to PC by USB cable (If PC is power
on)
Remark: The power switch must be put the position “ON” to process the charging.
Questions:
1. No display after Power key pressed
Answer: Battery low power, connect to PC to recharge.
2. No sound when playing:
Answer: Too low volume level, tune the volume level to be normal, or the play is connected to
PC, or no music files saved in the player
3. Connected to PC, but incapable of downloading music files:
Answer: No installation of the management software attached, or the software damaged after the
installation and needs to be installed again, or the mainboard no supporting to USB port and its
driver software needs to be updated.
4. Compacted MP3 file by yourself can’t be player in the player:
Answer: Due to the different compacting formats and rates popular, at present the player only
supports those standard compacting format but not to those non-standard. Compact the music
into a standard format but not Layer I or Layer II.
5. Why is it different capacity in the computer displaying from the player capacity claimed to be?
Answer: Because the firmware holds a little capacity, the displaying capacity in the computer is
less than the capacity reputed, but indeed it does measure up.
6. Why does the running of the player become slow?
Answer: After a long time usage or frequently deleting files, so there are some chips generated
in the flash memory which leads to the slow running. Solution: Format the player.
7. Messed time display during some songs playing
Answer: When those MP3 files compacted by VBR format are playing, time display maybe
seems like abnormal due to the play rate, but music playing is no problem. Please compact the
music again in a firm rate, then solve the display problem.
8. The player is incapable of playing some MP3 songs
Answer: Strictly speaking of MP3 format, it’s in MPEGI, MPEGII, LAYER 3 standard
compacted. Most MP3 songs are in this format at present, but there are MPEGI LAYER 1 and
MPEGI LAYER 2 as earlier formats. The player is compatible to many formative files including
WMA, but not to MPEG I LAYER 1, LAYER II formats. The player skips to a next song to play
but not play this kind of formative song. The solutions are as follows:
1) Delete the incompatible songs to implement the normal functions of the player
2) Choose MPEG I LAYER3 format when compacting by yourself
a) Compatible formats: MPEG I MPEG 2 LAYER 3, WMA
b) Supporting MP3 compact rate range: 32Kbps----384Kbps
c) Supporting WMA compact rate range: 64Kbps----128Kbps
In case music playing is abnormal, response rate is very late, or earphone noises and so on, probably
the song format is incompatible to the player or the compact rate of the song is out of the range of
the player processing. In case of this situation, please delete this song or compact it into a standard
format by relevant software.
Note: A method to confirm the format, it’s to connect the player to PC and check the
information of the file by the software “WINAMP”.
Parameter
Capacity
Battery
Measurement
Signal-Noise rate
Output Distortion
Signal separability
Earphone output power
Output frequency range
Record sampling frequency
Music format
Recorded format/length
Compact rate
64/128/256MB
A integrated 3.6Voltage Li-ion battery
80mmX28mmX15mm
90dB
<0.1%
>80dB
5mw +5mw
20HZ-20KHZ
8KHZ
MP3 ; WMA
LP 40 hours; SP 8 hours(128MB)
32Kbps-384Kbps