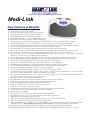
1
MEDI-LINK INSTALLATION MANUAL Medi-Link Installation Manual Rev1.1 “A division of NESS CORPORATION PTY LTD” Medi-Link New Features & Benefits Inbuilt real time clock & full calendar Automatic daylight savings & leap year adjustment Visual time and day clock for client convenience Totally designed and manufactured in Australia Inbuilt ADSL line filters to combat ADSL interference Automatic line balancing circuitry (reduces distortion) Programmable data timing & line sensitivity to combat NBN & Fibre to Node attenuation problems Complete 240 internal event log accessible from any computer local and or remote worldwide Local & remote programming/control from any computer worldwide over telephone or wireless networks Large backlit, high intensity LCD Display for full visual description of events Programmable loud sounding ringer on incoming phone calls (For hearing impaired) Extra-large speaker for increased sound clarity and volume with ability to add another remote speaker Six phone numbers with ability to send different alarms through to several call centre locations Programmable voice annunciation (Daily,weekly,monthly,yearly etc) of Events, Daily tasks, Medication reminders, System tests etc.) (OEM versions available) System away function to pause reminder messages locally by client and or remote from call centre GPRS/GSM versions available (Wireless IP over mobile phone network with both voice and data) Fully programmable medication and test reminders with voice annunciation Heavy duty rechargeable battery with inbuilt dynamic battery testing software Programmable ring tunes for door/call bell options (Allows door bells to be connected) In-built data ports for interfacing Telemedical health monitoring devices over phone Dementia monitoring capabilities as well as inactivity monitoring Special OEM customised software available upon request for specific criteria 16 wireless Radio Devices (Blow switches, PIRs, Reeds, Smoke, Inactivity, Dementia, Fall, Wireless lights, Sounders, vibrating pendants etc. (OEM expandable upon request) Four additional hardwired inputs and 3 hard wired control outputs for remote SmartHouse control features (e.g. Remote/local control of lights, doors, appliances) Automatic two-way voice contact in emergencies Programmable Contact ID, Ademco or British standard communication formats Answers incoming telephone calls remotely via pendant “Hands Free” Automatic system tests, power fail and low battery reporting Ability to remotely control auto answer from control centre Automatic communication path failure alarm Programmable cancel button with ability to send manual daily test calls if required In-built range test function with full audio and visual verification Automatic busy ring detect Backlit Help & Cancel button with programmable brightness levels Programmable volume control on annunciator (e.g. pre alarm, line fail etc.) Supervised and low battery device reporting Waterproof pendants (Interchangeable for around the neck, wrist or wall mounted) Supports separate codes for group (multi-client) identification Latest SMS technology (Available only in GPRS/GSM units) allowing section program upgrades/revisions remotely as well as “Group Emergency Bush Fire Evacuation” messages (OEM and upon request) Bluetooth interface available for wireless TeleMedical monitoring (Weight, Blood pressure etc.) Extended battery backup kit conversion or OEM production available “Extends up to 300 hrs.” (12 days) TABLE OF CONTENTS 1. INTRODUCTION....................................................................................................... 3 2. QUICK SETUP GUIDE............................................................................................. 3 3. MEDI-LINK FEATURES.......................................................................................... 4 4. PROGRAM MODE.....................................................................................................6 4.1 PRODUCT PROGRAMMING (DEFAULT = MEDI-LINK ADEMCO)......................... 6 4.2 PROGRAMMING OPTIONS......................................................................................... 6 4.3 PROGRAMMING RULES.............................................................................................. 6 5. PROGRAMMING OPTIONS................................................................................... 7 5.1 PROGRAMMING MAIN MENU OPTIONS................................................................ 7 5.2 PROGRAMMING SUB MENU OPTIONS................................................................... 8 5.2.1 PROGRAM CLIENT ACCOUNT......................................................................................... 8 5.2.2 PROGRAM PHONE NUMBERS.......................................................................................... 8 5.2.3 PROGRAM PENDANTS....................................................................................................... 9 5.2.4 PROGRAM DETECTORS...................................................................................................11 5.2.5 PROGRAM INPUTS............................................................................................................13 5.2.6 PROGRAM OUTPUTS........................................................................................................13 5.2.7 PROGRAM PREFERENCES...............................................................................................14 5.2.8 PROGRAM EVENTS...........................................................................................................17 5.2.9 PROGRAM SYSTEMS........................................................................................................18 5.2.10 PROGRAM DAYLIGHT................................................................................................... 20 5.2.11 PROGRAM TIMERS......................................................................................................... 20 5.2.12 PROGRAM REPORTS...................................................................................................... 22 5.2.13 PROGRAM MELODY.......................................................................................................24 5.2.14 EXIT PROGRAM........................................................................................................... 24 6. SYSTEM EVENTS....................................................................................................25 6.1 RADIO PENDANT/DETECOR ALARMS.................................................................. 25 6.1.1 RADIO PENDANT ALARM (DISPLAY “PENDANT NO.1 TO NO.8”).............................. 25 6.1.2 RADIO DETECTOR ALARM (DISPLAY “DETECTOR NO.1 TO NO.8”).......................... 26 6.2 UNIT HELP (RED) BUTTON....................................................................................... 26 6.3 INPUTS NO.1 TO NO.4................................................................................................. 26 6.4 MAINS FAIL (MAINS ON LIGHT FLASHING)............................................................... 26 6.5 UNIT LOW BATTERY (BATTERY LOW LIGHT FLASHING).......................................26 6.6 PRE-ALARM, ENTRY TIME AND EXIT TIME........................................................ 27 6.7 ALARM LOCKOUT...................................................................................................... 27 6.8 INACTIVITY ALARM.................................................................................................. 27 6.9 SYSTEM CALL (AUTO SYSTEM ANNOUNCEMENTS)....................................... 27 6.10 TEST CALL TIME (AUTO TEST CALL)................................................................ 27 6.11 PILL REMINDER (OVERDUE TIMER).................................................................. 27 1 Medi-Link Installation Manual Rev1.1 7. DIALLER REPORTING..........................................................................................28 7.1 ADEMCO HIGH SPEED EXTENDED REPORTING.............................................. 28 7.2 CONTACT ID REPORTING........................................................................................ 29 7.3 BRITISH DTMF (UNIVERSAL ) REPORTING........................................................ 30 8. REMOTE AUXILARY OUTPUTS CONTROL................................................... 31 9. OPERATION MODE............................................................................................... 32 9.1 NORMAL/DISARM MODE.......................................................................................... 32 9.2 ARM MODE.................................................................................................................... 32 9.3 HOME MODE (NOTE: CONTACT ID VERSION ONLY)................................................ 32 10. 1 VOICE ANNUNCIATOR..................................................................................... 33 10.1 “HANDS FREE” PHONE OPERATION...................................................................33 10.2 AUTO ANSWER AND REMOTE VOICE CONTROL........................................... 33 10.2.1 AUTO ANSWER............................................................................................................ 33 10.2.2 REMOTE VOICE CONTROL........................................................................................33 10.3 VOICE ONLY REPORTS “PHONE NO. 5 AND NO. 6 MOBILE”...............................34 10.4 BRITISH DTMF (UNIVERSAL MODE) VERSION ONLY................................... 34 11. 1 SETTING THE TIME/DATE...............................................................................34 12. 1 SPECIAL FUNCTIONS........................................................................................ 35 12.1 MAINS FAIL................................................................................................................. 35 12.2 PILL REMINDER (OVER DUE TIMER)................................................................. 35 12.3 SYSTEM AWAYMODE.............................................................................................. 35 12.4 SYSTEM CALL REMINDER..................................................................................... 35 13. 1 UP/DOWNLOAD PROGRAMMING................................................................. 36 13.1 PROGRAMMING VIA DB9 PROGRAMMING LEAD USING DIRECT CONNECT.............. 36 13.2 PROGRAMMING VIA MODEM/PHONE LINE USING FAX DEFEAT DIAL....................... 36 14. 1 USING MEDI-LINK..............................................................................................37 14.1 NORMAL OPERATION............................................................................................. 37 14.2 TO CALL FOR HELP..................................................................................................37 15. 1 DISPLAYS AND WARNINGS.............................................................................38 16. 1 SPECIFICATIONS................................................................................................ 39 Medi-Link Installation Manual Rev1.1 2 1. INTRODUCTION Your Medi-Link unit has been designed to provide you with the freedom and peace of mind in that, should you need assistance or HELP, it is available to you 24 hour a day with the simple press of a Button. The modern design of the Medi-Link unit allows it to be installed unobtrusively anywhere and is ready when you need help. HELP can be summonsed by pressing a Button on your personal Pendant (Neck-Chain or Wristwatch), which you can wear both inside your home or outside in the garden, ready for any emergency, giving you the freedom you enjoy for total control at all times. The Medi-Link unit has been built to the highest of technical standards for the protection of people and property and manufactured to Australian and International quality standards. Your Medi-Link unit can be supplied with additional fixed or portable Radio Key Pendants, which can be worn or placed around the home as needed. Please contact your supplier for more information. 2. QUICK SETUP GUIDE There are four simple steps to setting up a basic SmartLink Medi-Link Unit: 1. Connect the Telephone Line to “LINE IN” underside the Medi-Link Unit. 2. Supply Power to the Medi-Link Unit by: Connecting the AC Plug Pack to a Power outlet and connect the Plug to “POWER” underside the Medi-Link Unit. Sliding the Battery ON/OFF Switch to the ON position underside the Medi-Link Unit. 3. While in Program Mode, enter the 4 digits Client Account Code and the Primary Phone Numbers. 4. After exiting Program Mode, set the Time and Date by following the instructions found on Page 34. of this Manual. ATTENTION: The correct Time and Date MUST be SET in order for the Medi-Link Unit to function to its full potential and specifications. This can be done either via the Up/Download Programmer Software or via the Red and Green Buttons after exiting Program Mode. 3 Medi-Link Installation Manual Rev1.1 3. MEDI-LINK FEATURES 12V 800mAH Rechargeable Battery Lead Acid (Part No. 142-014) Lead Assy Medi AUX Lead Assy Serial Cable DB9 (Part No. 450-230) (Part No. 450-185) Auxiliary In/Out Port: DB9 Programming Lead Medi-Link Installation Manual Rev1.1 4 RADIO KEY PENDANTS Wristwatch, Neck Chain or Fixed Waterproof Pendants 2 Way Long Range Pendants (Part No. 102-635) New Wall Mounted Call Points RKP Wireless Keypad (Part No.100-821-WM-xx) (Part No.100-001) (Part No. 100-794) Man-Down/Fall Pendant (Part No.100-698) Dementia Key (Part No. 100-677) NB: for 2 Way Long Range Medi Diallers Only. RADIO DETECTORS Radio Smoke Detector (Part No. 106-043) LUX PIR with inbuilt LED Night Light Universal Transmitter (3rd Party Interface) (Part No. 106-174) (Part No. 100-529) WIRELESS RADIO SIREN & STROBE LIGHT Wireless Radio Siren with Battery Backup (Part No. 106-088) 5 Mini Siren/Strobe Light (Part No. LD95) Medi-Link Installation Manual Rev1.1 4. PROGRAM MODE To enter one of the Programming Modes, the Medi-Link unit must be turned Off by unplugging the Mains and the Battery Switch must also be Off. There are two types of Programming Modes: 1. Product Programming - which programs Medi-Link unit to a different Product Type. 2. Programming Options - which programs Medi-Link unit Menu Options. 4.1 PRODUCT PROGRAMMING (Default = Medi-Link ADEMCO) The Product Type is programmed by entering the Special Code on the Medi-Link unit. This will reset all Programming Options and will have to be completely reprogrammed again in the new mode. If the code is unknown then the Medi-Link unit will default to the previous Product Type and it’s Option Programming will be maintained. The Medi-Link unit will remain in this Mode for only 5 minutes if the code hasn’t been entered. To enter Product Programming: 1. Hold down the CANCEL (Green) and HELP (Red) Buttons and Power up the Medi-Link unit. 2. The Medi-Link unit will Chime and then Beep Once while PRODUCT TYPE is displayed to indicate that it is in Product Programming. 3. Using the CANCEL (Green) and HELP (Red) Buttons, a Code may be entered as follows: a. MEDI-LINK “ADEMCO” - Press CANCEL, CANCEL, CANCEL, HELP b. MEDI-LINK “BRITISH DTMF” - Press HELP, HELP, CANCEL, HELP - Press CANCEL, HELP, CANCEL, HELP c. MEDI-LINK “CONTACT ID” 4. 4.2 Press the CANCEL (Green) and HELP (Red) Buttons at the same time to acknowledge end of Product Programming. The Medi-Link unit will Beep Once to indicate that it is now in Options Programming. PROGRAMMING OPTIONS NOTE: If NO Buttons on the Medi-Link unit or the Radio Key Pendants have been pressed within 5 minutes, the Medi-Link unit will revert back to Normal Operation Mode (NB: A Client Account No. and at least one Phone No. must be programmed in for the Medi-Link unit to Exit Program Mode and enter Normal Operation Mode). To enter Options Programming: 1. Turn the Battery Switch to On and plug in the Mains. 2. The Medi-Link unit will Chime, Beep once and then display the Product Type and Version Number to indicate that it is in Programming Options. SMARTLINK Tomorrows Technology Today ADEMCO 1.0 1.CLIENT ACCOUNT 4.3 PROGRAMMING RULES The easiest way to program the Medi-Link unit is to use the large CANCEL (Green) Button and the HELP (Red) Button on the Medi-Link unit. 1 Press the CANCEL (Green) Button on the Medi-Link unit to scroll through the Main Menu Options or the Sub Menu Options. 2 Press the HELP (Red) Button on the Medi-Link unit to view the programmed value for that option. The values will be displayed flashing. To step through values, press the HELP (Red) Button again. 3 To store an option selected, press the CANCEL (Green) and HELP (Red) Buttons at the same time. The Medi-Link unit will beep twice while flashing the display to acknowledge that the option has been selected. Medi-Link Installation Manual Rev1.1 6 5. PROGRAMMING OPTIONS 5.1 PROGRAMMING MAIN MENU OPTIONS Note: The easiest way to program the Medi-Link unit is to use the large CANCEL (GREEN) Button and the HELP (RED) Button on the Medi-Link unit. Press the CANCEL (Green) Button to scroll through the Main Menu Options. Option Description Page ADEMCO 1.0 1. CLIENT ACCOUNT Program CLIENT ACCOUNT 8 ADEMCO 1.0 2. PHONE NUMBERS Program PHONE NUMBERS 8 ADEMCO 3. PENDANTS 1.0 Program PENDANTS 9 ADEMCO 4. DETECTORS 1.0 Program DETECTORS 11 ADEMCO 5. INPUTS 1.0 Program INPUTS 13 ADEMCO 6. OUTPUTS 1.0 Program OUTPUTS 13 ADEMCO 1.0 7. PREFERENCES Program PREFERENCES 14 ADEMCO 8. EVENTS 1.0 Program EVENTS 17 ADEMCO 9. SYSTEMS 1.0 Program SYSTEMS 18 ADEMCO 10. DAYLIGHT 1.0 Program DAYLIGHT 20 ADEMCO 11. TIMERS 1.0 Program TIMERS 20 ADEMCO 12. REPORTS 1.0 Program REPORTS 22 ADEMCO 13. MELODY 1.0 Program MELODY 24 EXIT PROGRAM Mode 24 ADEMCO 1.0 14. EXIT PROGRAM 7 Medi-Link Installation Manual Rev1.1 5.2 PROGRAMMING SUB MENU OPTIONS The Sub Menu Options are displayed for each particular Main Menu Option. 5.2.1 Program CLIENT ACCOUNT Option Description ADEMCO 1.0 1. CLIENT ACCOUNT 1. CLIENT CCOUNT ↑↓ Client Account Note: ADEMCO & CONTACT ID Versions - 4 Digits maximum. BRITISH DTMF Version only - up to 12 Digits maximum. 1. “1. CLIENT ACCOUNT” is displayed. Press the HELP Button. 2. Press the HELP Button twice to view programmed Client Account Number. 3. Pressing the HELP Button again to step through the digits 0, 1, 2, 3, 4, 5, 6, 7, 8, 9 & -. To STORE each digit, press the CANCEL and HELP Buttons at the same time. The Medi-Link unit will beep 3 times to acknowledge that the digit has been programmed. Repeat this process until all digits are programmed. Client Account ↑↓ - Note: programmed a “ - ” as the first digit will delete the Client Account No. 4. Press the CANCEL Button to move to the next Program Option. 5.2.2 Program PHONE NUMBERS NOTE: This reporting is used to transmit alarms from a subscriber’s site to a Monitoring Centre via the telephone line. The Medi-Link unit will dial initially 10 times alternating between phone numbers. These initial dials are only 5.5 seconds apart if dialling two different numbers, and 30 seconds apart if dialling the same number. After this another dial will be performed 5 minutes later and then every hour until 20 dials have been reached in total. The Medi-Link unit will attempt to dial again only if there is a new alarm to transmit. Phone No. 1 to Phone No. 4 Reporting DATA to the Monitoring Centre. Phone No. 5 & Phone No. 6 Reporting VOICE/AUDIBLE to Mobile Phone or Land Line. Option ADEMCO 1.0 2. PHONE NUMBERS Description (Note: up to 30 Digits Maximum) “2. PHONE NUMBERS” is displayed. Press the HELP Button. Phone No. 1 & No. 2 Primary (Monitoring Centre) 2. PHONE NUMBERS ↑↓ Ph.1 Primary 1. “Ph.1 Primary” is displayed. Press the HELP Button. 2. Pressing the HELP Button again to step through the digits 1,2,3,4,5,6,7,8,9,0, * Star, # Hash, and – Pause. To Store each digit, press the CANCEL and HELP Buttons at the same time. The Medi-Link unit will beep 3 times to acknowledge that the digit has been programmed. Repeat this process until all digits are programmed. Ph.1 Primary ↑↓ - NOTE: programmed a “ - ” as the first digit will delete the Phone Numbers. 3. Press the CANCEL Button to move to the next Program Option. 2. PHONE NUMBERS ↑↓ Ph.3 Secondary Phone No. 3 & No. 4 Secondary (Monitoring Centre) 2. PHONE NUMBERS ↑↓ Ph.5 Mobile Phone No. 5 & No. 6 Mobile Phone (Reporting Voice/Audible) “Ph.3 Secondary” is displayed. Press the HELP Button. “Ph.5 Mobile” is displayed. Press the HELP Button. Default – Erases all Programmed PHONE NUMBERS 2. PHONE NUMBERS ↑↓ default Press the CANCEL and HELP Buttons at the same time. The Medi-Link unit will beep 3 times to acknowledge that ALL the Programmed PHONE NUMBERS has been Erased. Press the CANCEL Button to move to the next Program Option. Medi-Link Installation Manual Rev1.1 8 5.2.3 Program PENDANTS Option Description (Note: ADEMCO & BRITISH DTMF) ADEMCO 3. PENDANTS 1.0 “3. PENDANTS” is displayed. Press the HELP Button. Pendant No.1 Programming 3. PENDANTS ↑↓ Pendant No.1 Pendant No.1 ↑↓ Unprogrammed Pendant No.1 ↑↓ Help 1. “Pendant No.1” is displayed. Press the HELP Button. 2. “Unprogrammed” is displayed. Press any Button on a NEW Pendant 3 times. The Medi-Link unit will beep with each Button press and on the third Button press, beep 3 times to acknowledge that the Pendant is programmed. The status display will also display and flash “Help” to indicate that the Pendant is programmed. NOTE: If the Medi-Link unit gives a long beep on Button presses and displays “Unprogrammed” it indicates that the Pendant has already been programmed into the Medi-Link unit. 3. Press the CANCEL Button to move to the next Program Option or Pressing the HELP Button again to step through Help, Call, Help/Call, Call/Help, Security, Answer, Dementia, Doorbell No.1, Doorbell No.2, Doorbell No.3 and Erase. To Store an option selected, press the CANCEL and HELP Buttons at the same time. The Medi-Link unit will beep 3 times to acknowledge that the option has been selected. ON PENDANT Options: PANIC OFF Help Call Help/Call Call/Help Security Answer Dementia Door Bell No. 1 Door Bell No. 2 Door Bell No. 3 Erase 3. PENDANTS ↑↓ Pendant No.2 Where: PANIC = Call ON = Call OFF = Call Where: PANIC = Emergency ON = Emergency OFF = Restores Where: PANIC = Emergency ON = Call OFF = Restores Where: PANIC = Call ON = Emergency OFF = Restores Where: PANIC = Call ON = Arm OFF = Disarm/Restores 1 Button Pendant where PANIC-Initiates Call or if rings are detected will answer the incoming Phone Call. 1 Button Blue Pendant initiates Call on inactivity. 1 Button Pendant where PANIC-Initiates Door Bell Tune 1. 1 Button Pendant where PANIC-Initiates Door Bell Tune 2. 1 Button Pendant where PANIC-Initiates Door Bell Tune 3. Remove previously Programmed Radio Key. Pendant No.2 Programming To 3. PENDANTS ↑↓ Pendant No.8 Pendant No.8 Programming Default – Erases all Programmed Pendants No.1 to No.8 3. PENDANTS ↑↓ default 9 Press the CANCEL and HELP Buttons at the same time. The Medi-Link unit will beep 3 times to acknowledge that ALL the Programmed PENDANTS has been Erased. Press the CANCEL Button to move to the next Program Option. Medi-Link Installation Manual Rev1.1 Option CONTACT ID 3. PENDANTS Description (Note: CONTACT ID Version only) 1.0 “3. PENDANTS” is displayed. Press the HELP Button. Pendant No.1 Programming 3. PENDANTS ↑↓ Pendant No.1 Pendant No.1 ↑↓ Unprogrammed Pendant No.1 ↑↓ Security 1. “Pendant No.1” is displayed. Press the HELP Button. 2. “Unprogrammed” is displayed. Press any Button on a NEW Pendant 3 times. The Medi-Link unit will beep with each Button press and on the third Button press, beep 3 times to acknowledge that the Pendant is programmed. The status display will also display and flash “Secuirty” to indicate that the Pendant is programmed. NOTE: If the Medi-Link unit gives a long beep on Button presses and displays “Unprogrammed” it indicates that the Pendant has already been programmed into the Medi-Link unit. 3. Press the CANCEL Button to move to the next Program Option or Pressing the HELP Button again to step through Security, Medical, Duress, Delayed Panic, Panic, Answer, Dementia, Doorbell No.1, Doorbell No.2, Doorbell No.3 and Erase. To Store an option selected, press the CANCEL and HELP Buttons at the same time. The MediLink unit will beep 3 times to acknowledge that the option has been selected. ON OFF PENDANT Options: PANIC Security Where: PANIC = Panic (120) ON = Arm OFF = Disarm/Restores Medical Where: PANIC = Delay Panic (120) ON = Arm OFF = Disarm/Restores Duress Where: PANIC = Silent Panic (121) ON = Arm OFF = Disarm/Restores Delay Panic Where: PANIC = Delay Panic (120) ON = Arm OFF = Disarm Panic Where: PANIC = Panic (120) ON = Arm OFF = Disarm Answer 1 Button Pendant where PANIC-Initiates Panic (120) or if rings are detected will answer the Phone Call. Dementia 1 Button Blue Pendant initiates Panic (130) on inactivity. Door Bell No.1 1 Button Pendant where PANIC-Initiates Door Bell Tune 1. Door Bell No.2 1 Button Pendant where PANIC-Initiates Door Bell Tune 2. Door Bell No.3 1 Button Pendant where PANIC-Initiates Door Bell Tune 3. Erase Remove previously Programmed Pendant. 3. PENDANTS ↑↓ Pendant No.2 Pendant No.2 Programming To 3. PENDANTS ↑↓ Pendant No.8 Pendant No.8 Programming Default – Erases all Programmed Pendants No.1 to No.8 3. PENDANTS ↑↓ default Press the CANCEL and HELP Buttons at the same time. The Medi-Link unit will beep 3 times to acknowledge that ALL the Programmed PENDANTS has been Erased. Press the CANCEL Button to move to the next Program Option. Medi-Link Installation Manual Rev1.1 10 5.2.4 Program DETECTORS Option Description (Note: ADEMCO & BRITISH DTMF) ADEMCO 1.0 4. DETECTORS “4. DETECTORS” is displayed. Press the HELP Button. Detector No.1 Programming 4. DETECTORS ↑↓ Detector No.1 Detector No.1 ↑↓ Unprogrammed Detector No.1 ↑↓ Fire 1. “Detector No.1” is displayed. Press the HELP Button. 2. “Unprogrammed” is displayed. Trigger a NEW Detector (3 transmissions must be detected). The Medi-Link unit will beep with each transmission and on the third transmission beep 3 times to acknowledge that the Detector is programmed. The status display will also display and flash “Fire” to indicate that the Detector is programmed. NOTE: If the Med-Link unit gives a long beep on the first transmission and displays “Unprogrammed” it indicates that the Detectors has already been programmed into the Medi-Link unit. 3. Press the CANCEL Button to move to the next Program Option or Pressing the HELP Button again to step through Fire, Alarm, Inactivity, Doorbell No.1, Doorbell No.2, Doorbell, No.3 and Erase. To Store an option selected, press the CANCEL and HELP Buttons at the same time. The Medi-Link unit will beep 3 times to acknowledge that the option has been selected. DETECTOR Options: Fire 24 hour Alarm, always Active (initiates Emergency). Alarm In-active when DISARMED, Active when ARMED (initiates Emergency). Inactivity Alarms if un-active when DISARMED (initiates Emergency on Channel 7 only), Inactive when ARMED. Doorbell No.1 Sounds the programmed Door Bell tune when in DISARMED Mode, acts like a Alarm Detector when in ARMED Mode (initiates Emergency). Doorbell No.2 Sounds the programmed Door Bell tune when in DISARMED Mode, acts like a Alarm Detector when in ARMED Mode (initiates Emergency). Doorbell No.3 Sounds the programmed Door Bell tune when in DISARMED Mode, acts like a Alarm Detector when in ARMED Mode (initiates Emergency). Erase Remove previously Programmed Detector. 4. DETECTORS ↑↓ Detector No.2 Detector No.2 Programming To 4. DETECTORS ↑↓ Detector No.8 Detector No.8 Programming Default – Erases all Programmed Detectors No.1 to No.8 4. DETECTORS ↑↓ default 11 Press the CANCEL and HELP Buttons at the same time. The Medi-Link unit will beep 3 times to acknowledge that ALL the Programmed DETECTORS has been Erased. Press the CANCEL Button to move to the next Program Option. Medi-Link Installation Manual Rev1.1 Option CONTACT ID 1.0 4. DETECTORS Description (Note: CONTACT ID Version only) “4. DETECTORS” is displayed. Press the HELP Button. Detector No.1 Programming 4. DETECTORS ↑↓ Detector No.1 Detector No.1 ↑↓ Unprogrammed Detector No.1 ↑↓ Fire 1. “Detector No.1” is displayed. Press the HELP Button. 2. “Unprogrammed” is displayed. Trigger a NEW Detector (3 transmissions must be detected). The Medi-Link unit will beep with each transmission and on the third transmission beep 3 times to acknowledge that the Detector is programmed. The status display will also display and flash “Fire” to indicate that the Detector is programmed. NOTE: If the Med-Link unit gives a long beep on the first transmission and displays “Unprogrammed” it indicates that the Detectors has already been programmed into the Medi-Link unit. 3. Press the CANCEL Button to move to the next Program Option or Pressing the HELP Button again to step through Fire, Alarm, Home, Silent, Inactivity, Doorbell No.1, Doorbell No.2, Doorbell, No.3 and Erase. To Store an option selected, press the CANCEL and HELP Buttons at the same time. The Medi-Link unit will beep 3 times to acknowledge that the option has been selected. DETECTOR Options: Fire 24 hour Alarm, always Active (133). Alarm In-active when DISARMED, Active when ARMED (130). Home In-active when DISARMED, Active when ARMED & in HOME Mode. Silent In-active when DISARMED, Active when ARMED (Silent Alarm). Inactivity Alarms if un-active when DISARMED (initiates 130 on Zone 15 only), In-active when ARMED. Door Bell No.1 Sounds the programmed Door Bell tune when in DISARMED or in HOME Mode, acts like an Alarm Detector when ARMED. Door Bell No.2 Sounds the programmed Door Bell tune when in DISARMED or in HOME Mode, acts like an Alarm Detector when ARMED. Door Bell No.3 Sounds the programmed Door Bell tune when in DISARMED or in HOME Mode, acts like an Alarm Detector when ARMED. Erase Remove previously Programmed Detector. 4. DETECTORS ↑↓ Detector No.2 Detector No.2 Programming To 4. DETECTORS ↑↓ Detector No.8 Detector No.8 Programming Default – Erases all Programmed Detectors No.1 to No.8 4. DETECTORS ↑↓ default Press the CANCEL and HELP Buttons at the same time. The Medi-Link unit will beep 3 times to acknowledge that ALL the Programmed DETECTORS has been Erased. Press the CANCEL Button to move to the next Program Option. Medi-Link Installation Manual Rev1.1 12 5.2.5 Program INPUTS Option Description: ADEMCO 5. INPUTS 1.0 “5. INPUTS” is displayed. Press the HELP Button. Input No.1 Programming (default = Unprogrammed) 5. INPUTS ↑↓ Input No.1 1. “Input No.1” is displayed. Press the HELP Button. 2. “Unprogrammed” is displayed. Pressing the HELP Button again to scroll through. ADEMCO & BRITISH DTMF Options are: Help, Call, Answer, Doorbell No.1, Doorbell No.2, Doorbell No.3 and Disable. Input No.1 ↑↓ Unprogrammed CONTACT ID Options are: Security, Medical, Duress, Answer, Doorbell No.1, Doorbell No.2, Doorbell No.3 and Disable. Input No.1 ↑↓ Help 3. To Store an option selected, press the CANCEL and HELP Buttons at the same time. The Medi-Link unit will beep 3 times to acknowledge that the option has been selected. 5. INPUTS ↑↓ Input No.2 Input No.2 to No.4 Programming (default = Unprogrammed) 4. Press the CANCEL Button to move to the next Program Option. Default – Disable all the Inputs No.1 to No.4 5. INPUTS ↑↓ default Press the CANCEL and HELP Buttons at the same time. The Medi-Link unit will beep 3 times to acknowledge that ALL the Programmed INPUTS has been Disabled. Press the CANCEL Button to move to the next Program Option. 5.2.6 Program OUTPUTS Option Description: ADEMCO 6. OUTPUTS 1.0 6. OUTPUTS ↑↓ Output No.1 “6. OUTPUTS” is displayed. Press the HELP Button. Output No.1 Programming (default = Disabled) 1. “Output No.1” is displayed. Press the HELP Button. 2. “Disable” is displayed. Pressing the HELP Button again to scroll through. EVENT Options: Disable, Activate, Help/Alarm, Call and Disable. Output No.1 ↑↓ Disabled ID Options: Unit, Pendant No.1 – No.8, Detector No.1 – No.8, Input No.1 - No.4 and Any. EVENT STATE Options: Disabled, Toggle, ON for 1 – 9 minutes. Output No.1 ↑↓ Act.,Any ,3 m 3. To Store an option selected, press the CANCEL and HELP Buttons at the same time. The Medi-Link unit will beep 3 times to acknowledge that the option has been selected. 4. Press the CANCEL Button to move to the next Program Option. 6. OUTPUTS ↑↓ Output No.2 Output No.2 to Output No.3 Programming (default = Disabled) 6. OUTPUTS ↑↓ Radio Radio Default – Disable all the Outputs No.1 to No.3 and Radio 6. OUTPUTS ↑↓ default 13 Press the CANCEL and HELP Buttons at the same time. The Medi-Link unit will beep 3 times to acknowledge that ALL the Programmed INPUTS has been Disabled. Press the CANCEL Button to move to the next Program Option. Medi-Link Installation Manual Rev1.1 5.2.7 Program PREFERENCES Option Description: ADEMCO 1.0 7. PREFERENCES “7. PREFERENCES” is displayed. Press the HELP Button. Unit Help (Red) Button 1. 7. PREFERENCES ↑↓ Unit 2. “Unit” is displayed. Press the HELP Button. “Call Ch(6)” is displayed. Pressing the HELP Button again to scroll through. ADEMCO Version only (default = Call Ch6) Options are: Call (Ch 1-8) = initiates EMERGENCY & Help (Ch 1-8) = initiates CALL CONTACT ID Version only (default = Panic) Options are: Unit ↑↓ Call Ch(6) Panic, Answer, Security, Medical, Duress, Delayed Panic & Panic. 3. To Store an option selected, press the CANCEL and HELP Buttons at the same time. The Medi-Link unit will beep 3 times to acknowledge that the option has been selected. 4. Press the CANCEL Button to move to the next Program Option. Exit Time (default = 60 Seconds) 7. PREFERENCES ↑↓ Exit Time 1. “Exit Time” is displayed. Press the HELP Button. 2. “60” is displayed. Pressing the HELP Button again to scroll through 10, 20, 30, 40, 50 and 60 Seconds. To Store an option selected, press the CANCEL and HELP Buttons at the same time. The Medi-Link unit will beep 3 times to acknowledge that the option has been selected. 3. Press the CANCEL Button to move to the next Program Option. Entry Time (default = 10 Seconds) CONTACT ID ONLY 1. “Pre-Alarm” is displayed. Press the HELP Button. 7. PREFERENCES ↑↓ Entry Time 2. “10” is displayed. Pressing the HELP Button again to scroll through 0, 10, 20, 30, 40, 50 and 60 Seconds. To Store an option selected, press the CANCEL and HELP Buttons at the same time. The Medi-Link unit will beep 3 times to acknowledge that the option has been selected. 3. Press the CANCEL Button to move to the next Program Option. Pre-Alarm Time (default = 10 Sec) ADEMCO & BRITSH DTMF 1. “Pre-Alarm” is displayed. Press the HELP Button. 7. PREFERENCES ↑↓ Pre-Alarm 2. “10” is displayed. Pressing the HELP Button again to scroll through 0, 10, 20, 30, 40, 50 and 60 Seconds. To Store an option selected, press the CANCEL and HELP Buttons at the same time. The Medi-Link unit will beep 3 times to acknowledge that the option has been selected. 3. Press the CANCEL Button to move to the next Program Option. Lockout (default = Enable) 1. “Lockout” is displayed. Press the HELP Button. 7. PREFERENCES ↑↓ Lockout 2. “Enable” is displayed. Pressing the HELP Button again to toggle between Enable and Disable. To Store an option selected, press the CANCEL and HELP Buttons at the same time. The Medi-Link unit will beep 3 times to acknowledge that the option has been selected. 3. Press the CANCEL Button to move to the next Program Option. Supervision (default 0 = Disable) 7. PREFERENCES ↑↓ Supervision 1. “Supervision” is displayed. Press the HELP Button. 2. “0” is displayed. Pressing the HELP Button again to scroll through 0 to 24 Hours. To Store an option selected, press the CANCEL and HELP Buttons at the same time. The Medi-Link unit will beep 3 times to acknowledge that the option has been selected. 3. Press the CANCEL Button to move to the next Program Option. Medi-Link Installation Manual Rev1.1 14 Option Description: Inactivity (default 0 = Disable) 1. “Inactivity” is displayed. Press the HELP Button. 7. PREFERENCES ↑↓ Inactivity 2. “0” is displayed. Pressing the HELP Button again to scroll through 0-200 (Hours) and 201-255 (Minutes). To Store an option selected, press the CANCEL and HELP Buttons at the same time. The Medi-Link unit will beep 3 times to acknowledge that the option has been selected. 3. Press the CANCEL Button to move to the next Program Option. Phone Priority (default = 0) 1. “Phone Priority” is displayed. Press the HELP Button. 7. PREFERENCES ↑↓ Phone Priority 2. “0” is displayed. Pressing the HELP Button again to toggle between 0 (Alternates between the programmed Phone Numbers) and 1 (Priority to Base Stations Phone No.1 to No.4). To Store an option selected, press the CANCEL and HELP Buttons at the same time. The Medi-Link unit will beep 3 times to acknowledge that the option has been selected. 3. Press the CANCEL Button to move to the next Program Option. Answer Call (default 6 = 6 Minutes) 1. “Answer Call” is displayed. Press the HELP Button. 7. PREFERENCES ↑↓ Answer Call 2. “0” is displayed. Pressing the HELP Button again to scroll through 3, 6 and 9 (Minutes). To Store an option selected, press the CANCEL and HELP Buttons at the same time. The Medi-Link unit will beep 3 times to acknowledge that the option has been selected. 3. Press the CANCEL Button to move to the next Program Option. Call Back Pendants No.1 – No.8 (default E = Enable) 1. “Call Back (Pen)” is displayed. Press the HELP Button. 7. PREFERENCES ↑↓ Call Back (Pen) 2. “E” is displayed. Pressing the HELP Button again to toggle between D (Disabled) and E (Enabled). To Store an option selected, press the CANCEL and HELP Buttons at the same time. The Medi-Link unit will beep 3 times to acknowledge that the option has been selected. 3. Press the CANCEL Button to move to the next Program Option. Call Back Detectors No.1 – No.8 (default E = Enable) 1. “Call Back (Det)” is displayed. Press the HELP Button. 7. PREFERENCES ↑↓ Call Back (Det) 2. “E” is displayed. Pressing the HELP Button again to toggle between D (Disabled) and E (Enabled). To Store an option selected, press the CANCEL and HELP Buttons at the same time. The Medi-Link unit will beep 3 times to acknowledge that the option has been selected. 3. Press the CANCEL Button to move to the next Program Option. Call Back etc (default E = Enable) 1. “Call Back (etc)” is displayed. Press the HELP Button. 7. PREFERENCES ↑↓ Call Back (etc) 2. “E” is displayed. Pressing the HELP Button again to toggle between D (Disabled) and E (Enabled). To Store an option selected, press the CANCEL and HELP Buttons at the same time. The Medi-Link unit will beep 3 times to acknowledge that the option has been selected. 3. Press the CANCEL Button to move to the next Program Option. PABX Tone (default = Enable) 1. “PABX Tone” is displayed. Press the HELP Button. 7. PREFERENCES ↑↓ PABX Tone 2. “Enable” is displayed. Pressing the HELP Button again to toggle between Disabled and Enabled. To Store an option selected, press the CANCEL and HELP Buttons at the same time. The Medi-Link unit will beep 3 times to acknowledge that the option has been selected. 3. Press the CANCEL Button to move to the next Program Option. 15 Medi-Link Installation Manual Rev1.1 Option Description: Rings Detected (default 2 = 2 Rings) 1. “Rings Detected” is displayed. Press the HELP Button. 7. PREFERENCES ↑↓ Rings Detected 2. “2” is displayed. Pressing the HELP Button again to scroll through 2, 3, 4, 5, 6, 7, 8 and 9 (Incoming Rings). To Store an option selected, press the CANCEL and HELP Buttons at the same time. The Medi-Link unit will beep 3 times to acknowledge that the option has been selected. 3. Press the CANCEL Button to move to the next Program Option. Country Dial (default 5 = Force DTMF) 1. “Country Dial” is displayed. Press the HELP Button. 7. PREFERENCES ↑↓ Country Dial 2. “5” is displayed. Pressing the HELP Button again to scroll through 1 (Australia), 2 (New Zealand), 3 (Singapore, USA & Canada), 4 (UK & Europe) and 5 (Force DTMF). To Store an option selected, press the CANCEL and HELP Buttons at the same time. The Medi-Link unit will beep 3 times to acknowledge that the option has been selected. 3. Press the CANCEL Button to move to the next Program Option. Remote Access (default 1 =Enabled all the time & DTMF Enable) 1. “Remote Access” is displayed. Press the HELP Button. 2. “1” is displayed. Pressing the HELP Button again to scroll through 0, 1, 2 and 3. To Store an option selected, press the CANCEL and HELP Buttons at the same time. The Medi-Link unit will beep 3 times to acknowledge that the option has been selected. 7. PREFERENCES ↑↓ Remote Access Where: 0 = Enabled only in Program Mode and DTMF Disabled 1 = Enabled all the time and DTMF Enabled 2 = Enabled only in Program Mode and DTMF Enabled 3 = Enabled all the time and DTMF Disabled 3. Press the CANCEL Button to move to the next Program Option. RS232 Baud Rate (default = 9600) 1. “RS232 Baud” is displayed. Press the HELP Button. 7. PREFERENCES ↑↓ RS232 Baud 2. “9600” is displayed. Pressing the HELP Button again to scroll through 9600, 19200, 38400, 57600, 115200 and Disable. To Store an option selected, press the CANCEL and HELP Buttons at the same time. The Medi-Link unit will beep 3 times to acknowledge that the option has been selected. NOTE: Set Baud Rate to 115200 when updating the Firmware/Bootware. 3. Press the CANCEL Button to move to the next Program Option. Default – Default all the PREFERENCES Programming Options 7. PREFERENCES ↑↓ default Press the CANCEL and HELP Buttons at the same time. The Medi-Link unit will beep 3 times to acknowledge that ALL the Preferences Programming Options has been Defaulted. Press the CANCEL Button to move to the next Program Option. Medi-Link Installation Manual Rev1.1 16 5.2.8 Program EVENTS Option Description: ADEMCO 8. EVENTS 1.0 8. EVENTS ↑↓ Activate “8. EVENTS” is displayed. Press the HELP Button. Activate 1. “Activate” is displayed. Press the HELP Button. 2. “Flags-DD” is displayed. Pressing the HELP Button. Activate ↑↓ Flags - DD 3. “Flags-Display” is displayed. Press the Help again to toggle between Disable and Enable. To Store an option selected, press the CANCEL and HELP Buttons at the same time. The Medi-Link unit will beep 3 times to acknowledge that the option has been selected. Press the CANCEL Button to move to the next Program Option. Flags - Display ↑↓ Disable 4. “Flags-Sound” is displayed. Press the Help again to toggle between Disable and Enable. To Store an option selected, press the CANCEL and HELP Buttons at the same time. The Medi-Link unit will beep 3 times to acknowledge that the option has been selected. Flags - Sound ↑↓ Disable EVENT Flags: 5. Press the CANCEL Button to move to the next Program Option. Restore SerialPort Ph. Primary Ph. Secondary Ph. Mobile No. of Reports E D E E E 48 Display Sound Activate D D Help/Alarm E E Call E E E D E E E 48 Auto Exclude E D E D E D E 48 E E E D E D E 48 E E E E E D E D E 48 Low Battery E E E D E E D 48 Mains Fail E E E D E E D 48 Line Fail E E Port Fail E D Pre-Alarm E E E E Exit Delay E E Arm D E E E E D E D E 48 Report Fail E E Supervision E E E D E D E 48 Inactivity E E E D E D E 48 Auto Exclude - (Contact ID) Trouble Trouble: - (Contact ID) Entry Delay: - (Contact ID) Arm: - (Contact ID) 0 Default – Default all the EVENTS Programming Options 8. EVENTS ↑↓ default 17 Press the CANCEL and HELP Buttons at the same time. The Medi-Link unit will beep 3 times to acknowledge that ALL the EVENTS Programming Options has been Defaulted. Press the CANCEL Button to move to the next Program Option. Medi-Link Installation Manual Rev1.1 5.2.9 Program SYSTEMS Option Description: ADEMCO 9. SYSTEMS 1.0 “9. SYSTEMS” is displayed. Press the HELP Button. Light Dim (Green/Cancel Button & LCD Display) 2 = Bright 1. “Light Dim” is displayed. Press the HELP Button. 9. SYSTEMS ↑↓ Light Dim 2. “2” is displayed. Pressing the HELP Button again to scroll through 0 (Off), 1 (Dim)and 2 (Bright). To Store an option selected, press the CANCEL and HELP Buttons at the same time. The Medi-Link unit will beep 3 times to acknowledge that the option has been selected. 3. Press the CANCEL Button to move to the next Program Option. Listen Pin (default = Enable) 1. “Listen Pin” is displayed. Press the HELP Button. 9. SYSTEMS ↑↓ Listen Pin 2. “Enable” is displayed. Pressing the HELP Button again to toggle between Disable and Enable. To Store an option selected, press the CANCEL and HELP Buttons at the same time. The Medi-Link unit will beep 3 times to acknowledge that the option has been selected. 3. Press the CANCEL Button to move to the next Program Option. Microphone (default = 3 Sensitivity) 1. “Microphone” is displayed. Press the HELP Button. 9. SYSTEMS ↑↓ Microphone 2. “3” is displayed. Pressing the HELP Button again to scroll through 0, 1, 2, 3, 4, 5, 6 and 7. To Store an option selected, press the CANCEL and HELP Buttons at the same time. The Medi-Link unit will beep 3 times to acknowledge that the option has been selected. 3. Press the CANCEL Button to move to the next Program Option. Speaker Volume (default = 5) 1. “Speaker Volume” is displayed. Press the HELP Button. 9. SYSTEMS ↑↓ Speaker Volume 2. “5” is displayed. Pressing the HELP Button again to scroll through 0, 1, 2, 3, 4, 5, 6 and 7. To Store an option selected, press the CANCEL and HELP Buttons at the same time. The Medi-Link unit will beep 3 times to acknowledge that the option has been selected. 3. Press the CANCEL Button to move to the next Program Option. Line Balance (default = 1061) 9. SYSTEMS ↑↓ Line Balance 1. “Line Balance” is displayed. Press the HELP Button. 2. “1061” is displayed. Pressing the HELP Button again to scroll through. To Store an option selected, press the CANCEL and HELP Buttons at the same time. The Medi-Link unit will beep 3 times to acknowledge that the option has been selected. 3. Press the CANCEL Button to move to the next Program Option. Line In Level (default = Normal) 1. “Line In Level” is displayed. Press the HELP Button. 9. SYSTEMS ↑↓ Line In Level 2. “Normal” is displayed. Pressing the HELP Button again to scroll through Normal, High and Custom. To Store an option selected, press the CANCEL and HELP Buttons at the same time. The Medi-Link unit will beep 3 times to acknowledge that the option has been selected. 3. Press the CANCEL Button to move to the next Program Option. Medi-Link Installation Manual Rev1.1 18 Option Description: Line Out Level (default = Normal) 1. “Line Out Level” is displayed. Press the HELP Button. 9. SYSTEMS ↑↓ Line Out Level 2. “Normal” is displayed. Pressing the HELP Button again to scroll through Normal, High and Custom. To Store an option selected, press the CANCEL and HELP Buttons at the same time. The Medi-Link unit will beep 3 times to acknowledge that the option has been selected. 3. Press the CANCEL Button to move to the next Program Option. Report Pre Time (default = 10 x 10mS) Note: V2.2 Onwards 1. “Rpt Pre Time” is displayed. Press the HELP Button. 9. SYSTEMS ↑↓ Rpt Pre Time 2. “10” is displayed. Pressing the HELP Button again to scroll through 1 through to 250. To Store an option selected, press the CANCEL and HELP Buttons at the same time. The Medi-Link unit will beep 3 times to acknowledge that the option has been selected. 3. Press the CANCEL Button to move to the next Program Option. Report Tone Time (default = 4 x 10mS) Note: V2.2 Onwards 1. “Rpt Pre Time” is displayed. Press the HELP Button. 9. SYSTEMS ↑↓ Rpt Tone Time 2. “4” is displayed. Pressing the HELP Button again to scroll through 1 through to 250. To Store an option selected, press the CANCEL and HELP Buttons at the same time. The Medi-Link unit will beep 3 times to acknowledge that the option has been selected. 3. Press the CANCEL Button to move to the next Program Option. Report Quiet Time (default = 4 x 10mS) Note: V2.2 Onwards 1. “Rpt Quiet Time” is displayed. Press the HELP Button. 9. SYSTEMS ↑↓ Rpt Quiet Time 2. “4” is displayed. Pressing the HELP Button again to scroll through 1 through to 250. To Store an option selected, press the CANCEL and HELP Buttons at the same time. The Medi-Link unit will beep 3 times to acknowledge that the option has been selected. 3. Press the CANCEL Button to move to the next Program Option. Report Between Time (default = 100 x 10mS) Note: V2.2 Onwards 1. “Rpt Betwn Time” is displayed. Press the HELP Button. 9. SYSTEMS ↑↓ Rpt Betwn Time 2. “100” is displayed. Pressing the HELP Button again to scroll through 1 through to 250. To Store an option selected, press the CANCEL and HELP Buttons at the same time. The Medi-Link unit will beep 3 times to acknowledge that the option has been selected. 3. Press the CANCEL Button to move to the next Program Option. Test Radio (Check signal strength of Pendants/Detectors) 1. “Test Radio” is displayed. Press the HELP Button. 9. SYSTEMS ↑↓ Test Radio 2. “ ” is displayed. Press the PANIC Button (Programmed Pendant/Detector). The MediLink will sound 1 to 10 beeps depending on signal strength and “100% Pendant” is displayed. 3. Repeat step No.2 until you’re happy with the signal strength. 4. Press the CANCEL Button to move to the next Program Option. Default – Default all the SYSTEMS Programming Options 9. SYSTEMS ↑↓ default 19 Press the CANCEL and HELP Buttons at the same time. The Medi-Link unit will beep 3 times to acknowledge that ALL the SYSTEMS Programming Options has been Defaulted. Press the CANCEL Button to move to the next Program Option. Medi-Link Installation Manual Rev1.1 5.2.10 Program DAYLIGHT Option Description: ADEMCO 10. DAYLIGHT 1.0 “10. DAYLIGHT” is displayed. Press the HELP Button. DLS – Begin (default = 1st Sun Oct) 1. “DLS - Begin” is displayed. Press the HELP Button. 2. “1st Sun Oct” is displayed. Pressing the HELP Button again to scroll through Disable, Fixed, 1st, 2nd, 3rd, 4th and Last. To Store an option selected, press the CANCEL and HELP Buttons at the same time. The Medi-Link unit will beep 3 times to acknowledge that the option has been selected. 10. DAYLIGHT ↑↓ DLS - Begin 3. Press the CANCEL Button to move to the next Program Option. DLS – End (default = 1st Sun Apr) 1. “DLS - End” is displayed. Press the HELP Button. 10. DAYLIGHT ↑↓ DLS - End 2. “1st Sun Apr” is displayed. Pressing the HELP Button again to scroll through 2nd, 3rd, 4th, Last, Disable and Fixed. To Store an option selected, press the CANCEL and HELP Buttons at the same time. The Medi-Link unit will beep 3 times to acknowledge that the option has been selected. 3. Press the CANCEL Button to move to the next Program Option. Default – Default all the DAYLIGHT Programming Options 10. DAYLIGHT ↑↓ default Press the CANCEL and HELP Buttons at the same time. The Medi-Link unit will beep 3 times to acknowledge that ALL the DAYLIGHT Programming Options has been Defaulted. Press the CANCEL Button to move to the next Program Option. 5.2.11 Program TIMERS Option Description: ADEMCO 11. TIMERS 1.0 “11. TIMERS” is displayed. Press the HELP Button. System Call (default = Disable) 11. TIMERS ↑↓ System Call 1. “System Call” is displayed. Press the HELP Button. 2. “1 Disable” is displayed. Pressing the HELP Button again to scroll through 1 Monday, 1 Tuesday, 1 Wednesday, 1 Thursday, 1 Friday, 1 Saturday, 1 Sunday and 1 Everyday. To Store an option selected, press the CANCEL and HELP Buttons at the same time. The Medi-Link unit will beep 3 times to acknowledge that the option has been selected. System Call ↑↓ 1 Disable System Call ↑↓ 1 Every, Annunciate “(Chime) Your unit is now due for testing. Please activate your unit to notify us all is well”. 3. Pressing the HELP Button again to scroll through 0 to 24 (Hours). To Store an option selected, press the CANCEL and HELP Buttons at the same time. The Medi-Link unit will beep 3 times to acknowledge that the option has been selected. 9:15 4. Pressing the HELP Button again to scroll through 0 to 59 (Minutes). To Store an option selected, press the CANCEL and HELP Buttons at the same time. The Medi-Link unit will beep 3 times to acknowledge that the option has been selected. 5. For System Call 2, System Call 3 & System Call 4 - Repeat Step No.2 to No.4 6. Press the CANCEL Button to move to the next Program Option. Medi-Link Installation Manual Rev1.1 20 Option Description: Test Call Time (default = 1 Sun, 1:00) Note: Random after 1:00am. 1. “Test Call Time” is displayed. Press the HELP Button. 11. TIMERS ↑↓ Test Call Time Test Call Time ↑↓ 1 Sun, 1:00 2. “1 Sun, 1:00” is displayed. Pressing the HELP Button again to scroll through 1 Monday, 1 Tuesday, 1 Wednesday, 1 Thursday, 1 Friday, 1 Saturday, 1 Sunday and 1 Everyday. To Store an option selected, press the CANCEL and HELP Buttons at the same time. The Medi-Link unit will beep 3 times to acknowledge that the option has been selected. 3. Pressing the HELP Button again to scroll through 0 to 24 (Hours). To Store an option selected, press the CANCEL and HELP Buttons at the same time. The Medi-Link unit will beep 3 times to acknowledge that the option has been selected. 4. Pressing the HELP Button again to scroll through 0 to 59 (Minutes). To Store an option selected, press the CANCEL and HELP Buttons at the same time. The Medi-Link unit will beep 3 times to acknowledge that the option has been selected. 5. For Test Call Time 2 to Test Call Time 4 - Repeat Step No.2 to No.4. 6. Press the CANCEL Button to move to the next Program Option. Pill Reminder (default = Disable) 11. TIMERS ↑↓ Pill Reminder Pill Reminder ↑↓ 1 Disable Pill Reminder ↑↓ 1 Every, 9:00 Annunciate “(Chime) This is a personal task reminder from your unit. I repeat, this is a personal task reminder from your unit”. 1. “Pill Reminder” is displayed. Press the HELP Button. 2. “1 Disable” is displayed. Pressing the HELP Button again to scroll through 1 Monday, 1 Tuesday, 1 Wednesday, 1 Thursday, 1 Friday, 1 Saturday, 1 Sunday and 1 Everyday. To Store an option selected, press the CANCEL and HELP Buttons at the same time. The Medi-Link unit will beep 3 times to acknowledge that the option has been selected. 3. Pressing the HELP Button again to scroll through 0 to 24 (Hours). To Store an option selected, press the CANCEL and HELP Buttons at the same time. The Medi-Link unit will beep 3 times to acknowledge that the option has been selected. 4. Pressing the HELP Button again to scroll through 0 to 59 (Minutes). To Store an option selected, press the CANCEL and HELP Buttons at the same time. The Medi-Link unit will beep 3 times to acknowledge that the option has been selected. 5. For Test Call Time 2 to Test Call Time 4 - Repeat Step No.2 to No.4. 6. Press the CANCEL Button to move to the next Program Option. System Repeat - for System Call (default = 3 Repeats) 1. “Syst. Repeat” is displayed. Press the HELP Button. 11. TIMERS ↑↓ Syst. Repeat 2. “3” is displayed. Pressing the HELP Button again to scroll through 0 to 20 (Number of Repeats). To Store an option selected, press the CANCEL and HELP Buttons at the same time. The Medi-Link unit will beep 3 times to acknowledge that the option has been selected. 3. Press the CANCEL Button to move to the next Program Option. System Interval - for System Call (default = 30 Seconds Interval) 1. “Syst. Interval” is displayed. Press the HELP Button. 11. TIMERS ↑↓ Syst. Interval 2. “30” is displayed. Pressing the HELP Button again to scroll through 1 to 255 Seconds. To Store an option selected, press the CANCEL and HELP Buttons at the same time. The Medi-Link unit will beep 3 times to acknowledge that the option has been selected. 3. Press the CANCEL Button to move to the next Program Option. System AwayMode - (default = Disable) Note: V2.2 Onwards 1. “System.AwayMod” is displayed. Press the HELP Button. 11. TIMERS ↑↓System.AwayMod 2. “Disable” is displayed. Pressing the HELP Button again to toggle between Disable and Enable. To Store an option selected, press the CANCEL and HELP Buttons at the same time. The Medi-Link unit will beep 3 times to acknowledge that the option has been selected. 3. Press the CANCEL Button to move to the next Program Option. 21 Medi-Link Installation Manual Rev1.1 Option Description: Default – Default all the TIMERS Programming Options 11. TIMERS ↑↓ default Press the CANCEL and HELP Buttons at the same time. The Medi-Link unit will beep 3 times to acknowledge that ALL the TIMERS Programming Options has been Defaulted. Press the CANCEL Button to move to the next Program Option. 5.2.12 Program REPORTS Option Description: ADEMCO 12. REPORTS 1.0 “12. REPORTS” is displayed. Press the HELP Button. Phone Primary Start Time (default = 0) 1. “Ph.Prim. Start” is displayed. Press the HELP Button. 12. REPORTS ↑↓ Ph.Prim. Start 2. “0” is displayed. Pressing the HELP Button again to scroll through 0 to 23 (Hours). To Store an option selected, press the CANCEL and HELP Buttons at the same time. The Medi-Link unit will beep 3 times to acknowledge that the option has been selected. 3. Press the CANCEL Button to move to the next Program Option. Phone Primary Stop Time (default = 24) 12. REPORTS ↑↓ Ph.Prim. Stop 1. “Ph.Prim. Stop” is displayed. Press the HELP Button. 2. “24” is displayed. Pressing the HELP Button again to scroll through 0 to 24 (Hours). To Store an option selected, press the CANCEL and HELP Buttons at the same time. The Medi-Link unit will beep 3 times to acknowledge that the option has been selected. 3. Press the CANCEL Button to move to the next Program Option. Phone Secondary Start Time (default = 0) 12. REPORTS ↑↓ Ph.Sec. Start 1. “Ph.Sec. Start” is displayed. Press the HELP Button. 2. “0” is displayed. Pressing the HELP Button again to scroll through 0 to 23 (Hours). To Store an option selected, press the CANCEL and HELP Buttons at the same time. The Medi-Link unit will beep 3 times to acknowledge that the option has been selected. 3. Press the CANCEL Button to move to the next Program Option. Phone Primary Stop Time (default = 24) 12. REPORTS ↑↓ Ph.Sec. Stop 1. “Ph.Sec. Stop” is displayed. Press the HELP Button. 2. “24” is displayed. Pressing the HELP Button again to scroll through 0 to 24 (Hours). To Store an option selected, press the CANCEL and HELP Buttons at the same time. The Medi-Link unit will beep 3 times to acknowledge that the option has been selected. 3. Press the CANCEL Button to move to the next Program Option. Manual Test (default = Disable) 1. “Manual Test” is displayed. Press the HELP Button. 12. REPORTS ↑↓ Manual Test 2. “Disable” is displayed. Pressing the HELP Button again to toggle between Disable to Enable. To Store an option selected, press the CANCEL and HELP Buttons at the same time. The Medi-Link unit will beep 3 times to acknowledge that the option has been selected. 3. Press the CANCEL Button to move to the next Program Option. Auto Test Call (default = Ph. Primary) 12. REPORTS ↑↓ Auto Test Call 1. “Auto Test Call” is displayed. Press the HELP Button. 2. “Ph.Primary” is displayed. Pressing the HELP Button again to scroll through Ph.Primary, Ph.Secondary, Disable and SerialPort. To Store an option selected, press the CANCEL and HELP Buttons at the same time. The Medi-Link unit will beep 3 times to acknowledge that the option has been selected. 3. Press the CANCEL Button to move to the next Program Option. Medi-Link Installation Manual Rev1.1 22 Option Description: Mains Delay (default = 3 Hours Delay) 1. “Mains Delay” is displayed. Press the HELP Button. 12. REPORTS ↑↓ Mains Delay 2. “3” is displayed. Pressing the HELP Button again to scroll through 0 to 24 (Hours). To Store an option selected, press the CANCEL and HELP Buttons at the same time. The Medi-Link unit will beep 3 times to acknowledge that the option has been selected. 3. Press the CANCEL Button to move to the next Program Option. Mains Repeat (default 0 = No Repeats) 1. “Mains Repeat” is displayed. Press the HELP Button. 12. REPORTS ↑↓ Mains Repeat 2. “0” is displayed. Pressing the HELP Button again to scroll through 0 to 24 (Number of Repeats). To Store an option selected, press the CANCEL and HELP Buttons at the same time. The Medi-Link unit will beep 3 times to acknowledge that the option has been selected. 3. Press the CANCEL Button to move to the next Program Option. Low Battery Unit (default 1 = Report Low Battery Unit Once) 1. “Low Batt.Unit” is displayed. Press the HELP Button. 12. REPORTS ↑↓ Low Batt.Unit 2. “1” is displayed. Pressing the HELP Button again to scroll through 0 (No Low Battery Reporting), 1 (Report Low Battery Once) and 2 (Report Low Battery Daily). To Store an option selected, press the CANCEL and HELP Buttons at the same time. The Medi-Link unit will beep 3 times to acknowledge that the option has been selected. 3. Press the CANCEL Button to move to the next Program Option. Low Battery Radio Pendants/Detectors (default = Enable) 1. “Low Batt.Radio” is displayed. Press the HELP Button. 12. REPORTS ↑↓ Low Batt.Radio 2. “Enable” is displayed. Pressing the HELP Button again to toggle between Disable and Enable. To Store an option selected, press the CANCEL and HELP Buttons at the same time. The Medi-Link unit will beep 3 times to acknowledge that the option has been selected. 3. Press the CANCEL Button to move to the next Program Option. Default – Default all the REPORTS Programming Options 12. REPORTS ↑↓ default 23 Press the CANCEL and HELP Buttons at the same time. The Medi-Link unit will beep 3 times to acknowledge that ALL the REPORTS Programming Options has been Defaulted. Press the CANCEL Button to move to the next Program Option. Medi-Link Installation Manual Rev1.1 5.2.13 Program MELODY Option Description: ADEMCO 13. MELODY 1.0 “13. MELODY” is displayed. Press the HELP Button. Doorbell No.1 (Tune default = 75629026759) 1. “Doorbell No.1” is displayed. Press the HELP Button. 13. MELODY ↑↓ Doorbell No.1 Doorbell No.1 ↑↓ Note Time 2. “Note Time” is displayed. Pressing the HELP Button again. 3. “50” is displayed. Press the HELP Button to scroll through 0 to 100. To Store an option selected, press the CANCEL and HELP Buttons at the same time. The Medi-Link unit will beep 3 times to acknowledge that the option has been selected. 4. “Tune” is displayed. Pressing the HELP Button again to step through the digits 1,2,3,4,5,6,7,8,9,0, * Star, # Hash, and – Pause. To Store each digit, press the CANCEL and HELP Buttons at the same time. The Medi-Link unit will beep 3 times to acknowledge that the digit has been programmed. Repeat this process until all digits are programmed. Tunes : Doorbell No.1 ↑↓ Tune 0=Pause, 1=C4 (Middle C), 2=D4, 3=E4, 5=G4, 6=A5, 7=B5, 8=Halves the duration of the previous tune, 9=Doubles the duration of the previous tune, *=The tune is scaled up by an octave. #=Sharp 5. Press the CANCEL Button to move to the next Program Option. 13. MELODY ↑↓ Doorbell No.2 Doorbell No.2 (Tune Default = 39199039199) 13. MELODY ↑↓ Doorbell No.3 Doorbell No.3 (Tune Default = 593919905939199) 13. MELODY ↑↓ Incoming Ring Incoming Ring (default = 0) Default – Default all the MELODY Programming Options 13. MELODY ↑↓ default Press the CANCEL and HELP Buttons at the same time. The Medi-Link unit will beep 3 times to acknowledge that ALL the REPORTS Programming Options has been Defaulted. Press the CANCEL Button to move to the next Program Option. 5.2.14 EXIT PROGRAM Option Description: ADEMCO 1.0 14. EXIT PROGRAM “14. EXIT PROGRAM” is displayed. Press the HELP Button. NOTE: FOR THE MEDI-LINK UNIT TO EXIT PROGRAM MODE. “CLIENT ACCOUNT” AND “PHONE NUMBER” MUST BE PROGRAMMED/ENTERED. Medi-Link Installation Manual Rev1.1 24 6. SYSTEM EVENTS 6.1 RADIO PENDANT/DETECOR ALARMS Alarms turn on the HELP (Red) Button to maximum brightness and after the reset time, the HELP (Red) Button will turn OFF or back to the soft glow. The Auxiliary Outputs “OUTPUT NO. 1 TO 3” will be Enabled and remain for their individual reset times. If this individual reset time is programmed to “TOGGLE” then the particular Auxiliary Output is latched and will only be Disabled when the alarm has been restored. Ademco and British DTMF Versions: Press the Medi-Link unit CANCEL (Green) Button or the OFF Button on a Radio Key Pendant (any programmed Pendant with options “SECURITY”) to Cancel any alarms and put the Medi-Link unit into the DISARM state. Auxiliary Outputs and the HELP (Red) Button will turn OFF if still active. The OFF Button (Ademco Version Only) on a Radio Key Pendant (any programmed Pendant with options “HELP”, “CALL”, “HELP/CALL”, “CALL/HELP” or “RESTORE”) will only Cancel a Call or Help sent by that transmitter. The HELP (Red) Button will continue to flash when there is any outstanding Call or Help. Contact ID Version: Press the OFF Button on a Radio Key Pendant (any programmed Pendant with options “PANIC”, “DELAY PANIC” or “URESS” to Cancel any alarms and put the Medi-Link unit to DISARM state. Auxiliary Outputs and the HELP (Red) Button will turn OFF if still active. NOTES: Alarms are restored first if voice is in progress. If program option “RESTORES” in the EVENTS Flags (Ademco & Contact ID) is Disabled, the Medi-Link unit will return to NORMAL or DISARM MODE when the Monitoring Centre has received the alarm. No Restores are sent to the Monitoring Centre. Tamper Alarms on Detectors do not turn on the Open Collector Outputs (Auxiliary Outputs) when in NORMAL/DISARM MODE. This will allow for changing Batteries. No Reports are sent to the Monitoring Centre. 6.1.1 RADIO PENDANT ALARM (Display “Pendant No.1 to No.8”) 6.1.1.1 “Help”, “Call”, “Help/Call” or “Call/Help” Pendant Alarms (Ademco & British DTMF Version) Press any Button (on a programmed Pendant with an option “HELP”) or the PANIC/ON Button (on a programmed Pendant with an option “CALL”, “Help/Call” or “Call/Help”) to initiate a Call alarm. The speaker will beep rapidly for the amount of time selected in the “PRE-ALARM” TIME Option. During this pre-alarm condition, the alarm may be aborted by pressing the CANCEL (Green) Button. At the end of the pre-alarm warning, the Medi-Link unit will dial the Monitoring Centre. The HELP (Red) Button will flash once every 4 seconds. The Medi-Link unit will beep 7 times and the Auxiliary Outputs will be Enabled and remain enabled for their individual reset times as confirmation that the Monitoring Centre has received the alarm. The Voice Annunciation circuits are Enabled. NOTES: If the option “CALL” (Ademco only) is Enabled then the PANIC Button will initiate a Help alarm. The Medi-Link unit will dial the Monitoring Centre straight away. The HELP (Red) Button will flash once every 4 seconds. The Medi-Link unit will beep 7 times as confirmation that the Monitoring Centre has received the alarm. 6.1.1.2 “Panic”, “Delay Panic” and “Security” Pendant Alarms (Contact ID Version only) Press PANIC Button on a programmed Radio Key Pendant to initiate Panic alarm. Panic alarm may also be initiated by pressing the HELP (Red) Button on the Medi-Link unit. 6.1.1.3 “Duress” Pendant Alarm (Contact ID Version Only) Press PANIC Button on a programmed Radio Key Pendant to initiate Duress (Silent) alarm. NOTE: A Duress alarm is only reported to the Monitoring Centre. The Open Collector Outputs (Auxiliary Outputs) and HELP (Red) Button are not activated. 6.1.1.4 “Dementia” Key A Dementia Key will send supervision signals at regular intervals. If the Medi-Link unit doesn’t receive a supervision signal within the programmed interval, an Inactivity alarm will occur. The Medi-Link unit will beep depending on the time selected (option “PRE-ALARM TIME” or “ENTRY TIME”) and at the end it will report an inactivity event. 25 Medi-Link Installation Manual Rev1.1 6.1.2 RADIO DETECTOR ALARM (Display “Detector No.1 to No.8”) When disarming after an alarm, the Medi-Link unit will indicate if a Detector alarm has occurred. The speaker will beep rapidly for 5 seconds. This warning may indicate that an intruder is still present. The source of the alarm is then flashed on the status display. The OFF Button clears the display. Pressing the OFF Button again will redisplay the alarm. Alarm memory is cleared when ARM or HOME mode is entered. The Alarm display “Detector No.1” – “Detector No.8” will turn off 5 minutes after a Mains Fail is detected and will remain Off until Mains is Restored. If any subsequent alarms occur for a particular Detector (except those that have a “FIRE” or an “INACTIVIY” option) and the “Lockout” programmed option is Enabled, they will be locked out for the remainder of this ARMED session. A maximum of 3 reports (program option “Lockout” is Disabled) per Radio Detector will be reported in any one ARMED session, so that if a Radio Detector malfunctions, telephone calls will be minimized. If the “INACTIVITY” Option has been set then an inactivity alarm will occur if a device has not sent a signal to the Medi-Link unit during that time. As soon as the inactivity timer has expired the Medi-Link unit will beep for 15 seconds and at the end it will report an inactivity event. 6.2 UNIT HELP (RED) BUTTON The alarm is processed exactly the same as the Radio Key Pendant Alarms. Ademco Version - The HELP (Red) Button initiates an Emergency or Call Alarm. Contact ID Version - The HELP (Red) Button initiates a Panic (120) Alarm. British DTMF Version – The Help (Red) Button initiates a Code 1. 6.3 INPUTS NO.1 TO NO.4 The Inputs “Input No.1 to No.4” are normally open and when one becomes shorted to common it generates an alarm. Ademco Version – Inputs No.1 to No.4 initiates an Emergency or Call Alarm with the exception that Inputs No.1 to No.4 will be displayed and reported to Monitoring Centre on Channels 5, 6, 7 and 8. Contact ID Version - Inputs No.1 to No.4 initiates a Panic (120) Alarm with the exception that Inputs No.1 to No.4 will be displayed and reported to Monitoring Centre on Zone 21, 22, 23 and 24. British DTMF Version - Inputs No.1 to No.3 initiates a Code * or E and Input No.4 initiates a Code 3. 6.4 MAINS FAIL (Mains On Light Flashing) When a MAINS FAIL is detected, the MAINS ON Light will flash. When a Mains Fail of duration greater than 10 seconds is detected, the Medi-Link unit will annunciate an AC power fail message. The message is “(chime) Power to your unit is disconnected. Please check powerpoint connections and switch.” The message will be repeated again in 20 seconds if Mains Fail persists. When the Mains Fail is Restored, the Medi-Link unit will annunciate an AC power restore message. The message is “(chime) Power to your unit has been has been restored. Thank you.” If Mains failure persists for more than 3 hours (“Mains Fail Delay” option), a Mains Fail will be reported at random within the next hour. Extra Mains Fail reports may be reported depending on “Mains Fail Repeat” option. Within the first MAINS FAIL hour a Battery test will be performed. When a MAINS FAIL has ceased, a Mains Restore is sent to the Monitoring Centre at random within the next 1 hour, provided a Mains Fail was reported (Ademco and Contact ID Versions). System timing is derived from 50/60 Hz on the mains. During MAINS FAIL, the Medi-Link unit derives its timing from the on board crystal. 6.5 UNIT LOW BATTERY (Battery Low Light Flashing) NORMAL/DISARM MODE - The LOW BATTERY Light will flash when a Low Battery is detected. A Low Battery alarm is sent to the Monitoring Centre. A Restoral is sent to the Monitoring Centre when a good battery condition is detected. ARMED MODE - The LOW BATTERY Light will NOT flash when a Low Battery is detected (ie Power consumption). A Low Battery alarm is sent to the Monitoring Centre. A Restoral is sent to the Monitoring Centre when a good battery condition is detected. Depending on the programmed option “Low Battery Unit” on how the Medi-Link unit reports to the Monitor Centre. Dynamic battery tests are done when Mains Fail is detected, when the CANCEL (Green) Button is pressed or every 24 hours. During Mains Fail a static battery voltage test is done at similar intervals as Line Fail. NOTE: When replacing the Medi-Link unit batteries, Mains should be left ON or else the timers will be reset. Medi-Link Installation Manual Rev1.1 26 6.6 PRE-ALARM, ENTRY TIME and EXIT TIME “PRE-ALARM TIME” allows a time between a Radio Pendant/Detector triggering and Medi-Link unit alarming. “ENTRY TIME” allows a time from activating a detector till DISARM. During Entry Delay the siren will chirp once a second. When the OFF Button is pressed the speaker beeps 3 times to indicate DISARMED. If the OFF Button is not pressed within the Entry Delay, an alarm is generated. “EXIT TIME” allows a time from pressing the ON Button on a Radio Key Pendant until ARMED. The speaker will beep once when the ON Button on a Radio Key Pendant is pressed to indicate Exit Delay start and beep once at exit delay end to indicate ARMED. 6.7 ALARM LOCKOUT The Medi-Link unit inhibits multiple activations of the same alarm. ie. the Open Collect Outputs (“OUTPUTS No.1” – “OUTPUTS No.3”) will not turn on again or the Medi-Link unit will not report same alarm during the particular ARMED session when “LOCKOUT” programming option is Enabled. NOTE: Lockout does not apply to “PANIC”, “DURESS” or “DEMENTIA” alarms or any Detectors with the “FIRE” or “INACTIVITY” option. Lockout will also effect the Radio transmitted message as well. 6.8 INACTIVITY ALARM The Medi-Link unit has an optional INACTIVITY ALARM (1-200=1-200 Hours and 201-255=1-55 Minutes). If the option (“INACTIVITY TIMER”) is Enabled, then the Inactivity Timer will be reset by the CANCEL (Green) Button. Inactivity Detectors and Dementia Keys reset the Inactivity Timer if the timer has not expired. If the CANCEL (Green) Button is not pressed or no movement is detected or no signals from Dementia Keys for the programmed INACTIVITY TIME, the Medi-Link unit will produce warning beeps and flash the HELP (Red) Button. PREALARM TIME “PA” (0-60 Seconds) before the programmed Inactivity Timer and an alarm is sent to the Monitoring Centre. Depending on the program option “Ir” INACTIVITY RESTORE, if Enabled the inactivity will restore when an activity message is received, otherwise it will not restore until the CANCEL (Green) Button is pressed. 6.9 SYSTEM CALL (AUTO SYSTEM ANNOUNCEMENTS) The voice message is announced when one of the programmed times (ie. Timers>System Call>…) has been reached. The message is “(Chime) Your unit is now due for testing. Please activate your unit to notify us all is well”. If the Help (Red) Button or the Red Button on the Pendant is not pressed, the voice message will be repeated additional 3 times (30 seconds apart). This will stop either another programmed time is reached or Help (Red) Button or the Red Button on the Pendant is not pressed. 6.10 TEST CALL TIME (AUTO TEST CALL) The “Auto Test Report” option is reported when one of the programmed times (ie. Timers>Auto Test Call>…) has been reached. NOTE: The Auto Test Call is Eabled/Set to Sunday 1:00am. However, a timer is set to expire depending on the Client Account Number programmed. When this expires, it will report the Test Call message. For example: 1. Client Account 0001 – Multiply the Client Account Number by 15 seconds which will report on Sunday 01:00:15 am. 2. Client Account 0002 – Multiply the Client Account Number by 15 seconds which will report on Sunday 01:00:30 am. 6.11 PILL REMINDER (OVERDUE TIMER) The voice message is announced when one of the programmed times (ie. Timers>Pill Reminder>…) has been reached. The message is “(Chime) This is a personal task reminder from your unit. I repeat, this is a personal task reminder from your unit”. Flashes the CANCEL (Green) Button for 5 minutes and displays Pill Reminder. You can stop the warning by pressing the CANCEL (Green) Button. NOTE: There is no Help message sent to your Monitoring Centre, the warning is a reminder for you only. If you do not press the CANCEL (Green) Button, the Pill Reminder will stays on the LCD display. Timer will deactivate and it will not start until the CANCEL (Green) Button is pressed again. 27 Medi-Link Installation Manual Rev1.1 7. DIALLER REPORTING 7.1 ADEMCO HIGH SPEED EXTENDED REPORTING This reporting is used to transmit alarms from a subscriber’s site to a Monitoring Centre via the telephone. The transmission is done using DTMF tones. 14 digits are sent to report an alarm. The format is as follows: SSSS QQQQQQQQ Q E SSSS 4 digit subscriber ID (Client Account Number). Q Event qualifier (9 Channels). Channels 1-8 indicate the status of the 8 reporting channels. Each channel may have the following values: 1 - New alarm 3 - Restore 5 - Normal 6 - Previously reported event Channel 9 indicates the type of event. Channel 9 may have the following values: 1 - Extra Alarms 5 - Zone Trouble 6 - System Alarms 7 - Zone Alarm 9 - Test Therefore, Channel 9 determines what channels 1-8 mean. E Error check Channel 9 1* 5 6 7 9 Channel 1 DET1/HELP P1 LOW BATT P1 AC POWER CALL P 1 none Channel 2 DET2/HELP P2 LOW BATT P2 LOW BATT CALL P 2 none Channel 3 DET2/HELP P3 LOW BATT P3 none CALL P 3 none Channel 4 DET4/HELP P4 LOW BATT P4 none CALL P 4 none Channel 5 DET5/HELP P5 / IN1 LOW BATT P5 none CALL P 5 none Channel 6 DET6/HELP P6 / IN2 LOW BATT P6 none CALL P 6 none Channel 7 DET7/HELP P6/IN3/INACTIVITY LOW BATT P7 none CALL P 7 none Channel 8 DET8/HELP P8 / IN4 LOW BATT P8 none CALL P 8 none *Note: Depending upon the program option in the System “S_” Main Menu Option and the Medi-Link Help (Red) Button Reporting Channel “HE” the main unit HELP will double up on the same Channel of a programmed Radio Key HELP. Medi-Link Installation Manual Rev1.1 28 7.2 CONTACT ID REPORTING This reporting is used to transmit alarms from a subscriber’s site to a Monitoring Centre via the telephone. The transmission is done using DTMF tones. 14 digits are sent to report an alarm. The format is as follows: SSSS 18 Q XYZ GG CCC E SSSS 4 digit subscriber ID (Client Account Number). 18 Uniquely identifies this format as Contact ID. Q Event qualifier: 1 - New alarm 3 - Restore XYZ Event code, see table. GG Group code (always 00). CCC Zone or sensor number or user ID for Open/Close reports. E Error check. Program Option Event Code (XYZ) Zone Number (CCC) Detector Alarm Option - “Alarm” 130 Burglary 9 – 16 Detector Home Mode Option - “Home” 131 Perimeter 9 – 16 Detector Fire Option - “Fire” 133 24 hour 9 - 16 Detector Silent Option - “Silent” 130 Burglary 9 - 16 383 Tamper 9 - 16 Help Button on Medi-Call unit 120 Panic Alarm 6 Hardwired Inputs No.1 to No.4 120 Panic Alarm 21 - 24 Radio Keys Option - “Panic” or “Answer” 120 Panic Alarm 1-8 Radio Keys Option – “Delay Panic” 100 Medical Alarm 1-8 Radio Keys Option – “Duress” 121 Duress Alarm 1-8 Supervision Option - “Supervisory” 355 9 - 16 Inactivity Detectors Option - “Inactivity” 130 15 Dementia Keys Option - “Dementia” 130 1-8 Mains Fail 301 AC Loss 0 Main unit Low Battery 302 Low System Battery 0 Detectors Low Battery 384 RF Transmitter Low Battery 9 - 16 Radio Keys (Pendants) Low Battery 384 RF Transmitter Low Battery 1-8 Open/Close Reports 401 O/C by user 1-8 Auto Exclude (Reed Switch only) 380 Sensor Bypass (Trouble) 9 – 19 Test Call 602 Period test report 0 Detector Alarms Tamper Alarms Detector Tamper Panic Alarms Other Alarms 29 Medi-Link Installation Manual Rev1.1 7.3 BRITISH DTMF (UNIVERSAL ) REPORTING This reporting is used to transmit alarms from a subscriber’s site to a Tunstall Base Station via the telephone line. The transmission is done using DTMF tones. 24 digits are sent to report an alarm. The format is as follows: BBBB E A SSSSSSSSSSSS HHHH CC BBBB Beginning of message tones - Always D#20 E Equipment type: 0 Tunstall Piper Portal 1 Tunstall Piper Premier A Alarm Types (See Table Below) SSSSSSSSSSSS 12 digit Subscriber ID HHHH Hard wired alarm EE Error check 1. The Tunstall Base Station will transmit a trigger message, DTMF digits ‘DB’, to signal to the Medi-Link unit to start its transmission. 2. The Tunstall Base Station will transmit a kiss off message, DTMF digits ‘DB’, to signal to the Medi-Link unit that it has received the message. 3. After the kiss off message is received the Medi-Link unit will stay on line with voice Enabled, microphone on low sensitivity. 4. If the DTMF digit ‘C’ is received (press TALK button at the Base Station), the Base Station is in talk mode. The Medi-Link unit should be set to voice Enabled, microphone on low sensitivity. 5. If the DTMF digit ‘*’ is received (release TALK button at Base Station), the Base Station is in listen mode. The MediLink unit should be set to enhance only if increased volume has previously been selected. 6. If the DTMF digit ‘1’ is received (INC-VOL button), the Base Station has requested volume increase. The Medi-Link unit should be set to enhance mode when the Base Station is in listen mode. Enhance mode will time out after 15 seconds. 7. If the DTMF digit ‘2’ is received (DEC-VOL button), the Base Station has requested volume decrease. The Medi-Link unit should be set to microphone/speaker when in listen mode. 8. If the DTMF digit ‘#’ is received (CANCEL button), the Base Station has cancelled. The Medi-Link unit should hang up and restore the alarm. 9. The Medi-Link unit remain on line for 5 minutes with voice communications Enabled. When a valid DTMF DIGIT is received (C, *, 1 or 2) the timer will restart with 3 minutes. 10. When the call is terminated, the voice circuits are Enabled for another 3 minutes so that any incoming call within this 3 minutes time will be automatically answered as a further emergency back up. ALARM DESCRIPTIONS Medi-Link unit Help Button DTMF 7 CODE 1 6 2 8 3 Mains Fail Radio Keys Pendant with Low Battery (Pendants No.1 to No.8) 9 4 4 5 Medi-Link unit Low Battery Inactivity Alarm (“Inactivity” Detectors and “Dementia” Radio Keys) 0 5 6 7 Test Call (“Manual Test”, “Auto Test Call” and “Test Call Time”) 2 8 Intruder Detectors (Detectors No.1 to No.8 programmed “Alarm”) 3 9 Radio Keys Pendant Help (Pendant No.5 to No.8) Hardwire Inputs No.1 to No.3 11 * or E Radio Keys Pendant Help (Pendants No.1 to No.4) Smoke Alarm (Detectors No.1 to No.8 programmed as “Fire”) Hardwire Input No.4 Medi-Link Installation Manual Rev1.1 30 8. REMOTE AUXILARY OUTPUTS CONTROL The Medi-Link unit is capable of remotely controlling the Auxiliary Outputs by using DTMF codes. Auxiliary “Outputs No.1 to No.3” can be remotely controlled in all modes except Program Mode. The Auxiliary “Outputs No.1 to No.3” can be controlled by ringing the Medi-Link and using the Fax defeat, similar to REMOTE PROGRAMMING. Lead Assy Medi AUX (Part No. 450-230) The communication will proceed as follows: Auxiliary In/Out Port Pinouts 1. Ring the telephone number of the Medi-Link unit, wait for 4 ring tones and then hang up. 2. Ring again in 10 seconds and the Medi-Link unit will answer as soon as a call back ring is detected. You will hear various Fax tones then silence while it waits for a DTMF signal. Now proceed to step 3. 3. Enter the 4 digit Client Account Number. The Medi-Link unit will verify Client Account Number and respond with two short beeps or it will hang up if incorrect or if no DTMF signal is received within 15 seconds. 4. The Command line consists of three digits. The first digit represents which Auxiliary “Outputs No.1 to No.3” to Control. The 2nd digit Command is what it is to do, and 3rdrd digit is the time related to how long, just On or Off. DIGIT 1 (MAIN UNIT OR OUTPUTS) DIGIT 2 (COMMAND) DIGIT 3 (TIME) 0 – MAIN UNIT 1 – EVERYTHING OFF 0 – STRAIGHT AWAY 1 – Auxiliary “Output No.1” 3 – EVERYTHING ON 1 – 1 MINUTE 2 – Auxiliary “Output No.2” 5 – ON FOR…. 2 – 2 MINUTES 3 – Auxiliary “Output No.3” 6 – ON IN……. | 7 – OFF FOR… | 8 – OFF IN…... 9 – 9 MINUTES 5. The Medi-Link unit acknowledges the command by responding with one long beep. 6. If the same Output is used in more than one command line only the last command will be processed. 7. To hang up, press the * Key (Star) twice on the telephone. FOR EXAMPLE: COMMAND LINE a. To Arm the Medi-Link unit. 050 b. To Disarm the Medi-Link unit. 070 c. To Enable Auxiliary Output No.1 Straight away. 130 d. To Disable Auxiliary Output No.1 Straight away. 110 e. To Enable Auxiliary Output No.2 Straight away. 230 f. To Disable Auxiliary Output No.2 Straight away. 210 g. To Enable Auxiliary Output No.2 for 9 minutes. 259 h. To Disable Auxiliary Output No.2 Straight away. 210 i. To Enable Auxiliary Output No.3 Straight away. 330 j. To Disable Auxiliary Output No.3 Straight away. 310 k. To Enable Auxiliary Output No.3 in 3 minutes. 363 l. To Disable Auxiliary Output No.3 in 5 minutes. 385 31 Medi-Link Installation Manual Rev1.1 9. OPERATION MODE 9.1 NORMAL/DISARM MODE Ademco and British DTMF Versions: Press the Medi-Link unit CANCEL (Green) Button to DISARM or the OFF Button on a Radio Key Pendant (any programmed Pendant with option SECURITY). Speaker beeps 3 times and status display “DISARM” for 4 seconds. NOTE: If the option MANUAL TEST (Ademco Version only) is Enabled, then the Medi-Link unit CANCEL (Green) Button send a non valid Ademco Manual Test Call (NNNN/ 5555555 / 7) when pressed. Contact ID Version: Press OFF Button on a Radio Key Pendant (any programmed Pendant with options PANIC, DELAY PANIC or DURESS) to DISARM. Speaker beeps 3 times and status display “DISARM” for 4 seconds. The Medi-Link unit will not be Disarmed from HOME Mode if the Medi-Link unit is in Voice Report or Hands Free operations. First Voice Report and Hands Free operations must be completed and then the Medi-Link unit can be Disarmed. In Disarmed Mode, the CANCEL (Green) Button will flash once every 4 seconds to indicate the Medi-Link unit is functioning normally. 9.2 ARM MODE Press ON Button on a Radio Key Pendant (any programmed User Key with options “SECURITY”, “DELAY PANIC” or “DURESS”) to ARM. The exit delay time is programmed in as an option EXIT TIME. During exit delay time “ARMED” will be displayed. Speaker will give one beep at the start of exit delay time. At the end of exit time the display extinguishes and the speaker gives a single beep to indicate that the Medi-Link unit is fully ARMED. If the option ARM in the EVENTS (Contact ID Version) is Enabled then Open/Close reports are sent to the Monitoring Centre. Tampers will cause the Medi-Link unit to Alarm and will be reported to the Control Centre. Rapid chirps for during EXIT DELAY TIME indicates a Reed Switch is unsealed. “D1” – “D8” will indicate the unsealed Detector. Detector Trouble (Contact ID Version) will be reported, if Reed Switch is still unsealed at the end of exit time. NOTES: All Detectors in ARM and HOME Mode will alarm when Medi-Link unit is in this mode. ARM mode may only be entered if at least one Detector is programmed with an option ALARM, HOME or SILENT. The Medi-Link unit must be in DISARMED mode before entering ARM mode. 9.3 HOME MODE (Note: Contact ID Version Only) Press ON Button 2 times on a Radio Key Pendant within 3 seconds to enter HOME mode (any programmed Radio Key Pendant with options “PANIC”, “DELAY PANIC” or “DURESS”). Speaker beeps 5 times and status display shows “HOME”. At the end of exit time the display extinguishes and the speaker gives a single beep to indicate that the Medi-Link unit is ARMED. The CANCEL (Green) Button will flash once every 0.5 seconds to indicate the Medi-Link unit is in HOME mode. HOME mode has the same Entry and Exit Times as ARMED mode. Rapid chirps during EXIT DELAY TIME indicates a Reed Switch, that is programmed to “HOME” option, is unsealed. “D1” – “D8” will indicate the unsealed Detector. Detector Trouble will be reported if Reed Switch is still unsealed at the end of exit time. NOTE: Only Detectors programmed with a “HOME” option will alarm in HOME mode. If there are no current alarms and an OFF Button or the CANCEL (Green) Button on the Medi-Link unit has been pressed, hands free voice will be initiated. Pressed the OFF Button or the CANCEL (Green) Button on the Medi-Link again, will clear the hands free voice mode. Medi-Link unit will not disarm from home mode until hands free voice mode has been cleared. Medi-Link Installation Manual Rev1.1 32 10. VOICE ANNUNCIATOR 10.1 “HANDS FREE” PHONE OPERATION Ademco and British DTMF Versions: Uses the Medi-Link CANCEL (Green) Button to answer or hang up an incoming telephone call. Uses the PANIC Button (Keys programmed with “ANSWER” option) or the OFF Button (Keys programmed with “SECURITY” option) to answer or hang up an incoming telephone call. Contact ID Version: Uses the Medi-Link CANCEL (Green) Button to answer or hang up an incoming telephone call. Uses the OFF Button (any Keys programmed with “PANIC”, “DELAY PANIC” or “DURESS” option) to answer or hang up an incoming telephone call. 10.2 AUTO ANSWER AND REMOTE VOICE CONTROL 10.2.1 AUTO ANSWER When an alarm is sent to the Monitoring Centre, the voice circuits are enabled for the amount of minutes programmed in the “ANSWER CALL” option. (Any incoming call within this time will be automatically answered). The MediLink unit will then output tones and or annunciate “Alarm” to indicate the phone has been answered. The originator (Monitoring Centre) of the call back must press the # Key on their telephone within 30 seconds of the Medi-Link unit answering, establishing a 3 minute voice connection between both parties. Failure to press the # Key will result in the Medi-Link unit disconnecting. Time can be extended in 3 minute blocks by pressing the # Key within 30 seconds after the warning tones (every 2 minutes and 30 seconds). When a call is terminated the voice circuits are enabled for the time period programmed in the “ANSWER CALL”, so that any incoming call during this time will be automatically answered again. Press the CANCEL (Green) Button on the Medi-Link unit or any OFF Button (Radio Key Pendants) to immediately hang up the call and inhibit any more Auto Answering for that alarm. Ademco and British DTMF Versions: The program option “CALL BACK ON CHANNEL 1 – 8” effect the Ademco Channel. For example if “C7” is Disabled then call back will not be available on INACTIVITY, CALL7, INPUT3 and HELP7 alarms, basically any alarm sent on Channel 7. Contact ID Version: If a Radio Key Pendant is programmed with the “DURESS” option or a Detector with the “SILENT” option, Medi-Link unit will override the option and assume the option was Enabled. The call would have been answered in a Listen Mode Only where the speaker is Disabled. The program option “CALL BACK ON CHANNEL 1 – 8” only effects alarms of individual Detectors. For example, “C2” option is Disabled so call back will not be available on any alarm generated by Detector 2. 10.2.2 REMOTE VOICE CONTROL Enhance Microphone Sensitivity: Press 3 Key The Medi-Link unit may be enhanced during an emergency call so that quiet or distant voices may be detected. Pressing the 3 Key on the Monitoring Centre’s telephone will increase microphone sensitivity and the Medi-Link unit speaker will be Disabled. Pressing the 3 Key again will Disable the enhanced mode (Toggles back and forth). The Medi-Link unit will respond with 2 beeps to indicate the beginning of enhanced mode and 1 beep to indicate dropping out of enhanced mode. Hang Up: Press * (Star) Key Twice Pressing * (Star) Key twice on the telephone will terminate the call. The voice circuits will remain Enabled for 6 minutes (as programmed in the “ANSWER CALL”) so that any incoming call within this time will be automatically answered. Hang Up: Press * (Star) and # (Hash) Key Pressing * (Star) Key and then # (Hash) Key on the telephone will terminate the call. The voice circuits will be Disabled and Medi-Link unit will not auto answer any incoming call. NO RESTORE message will be sent to the Monitoring Centre. 33 Medi-Link Installation Manual Rev1.1 10.3 VOICE ONLY REPORTS “Phone No. 5 and No. 6 Mobile” When an alarm is to be sent, the Medi-Link unit will dial the programmed Phone No. 5 & No. 6 Mobile eg: mobile phone etc. Beeps will be heard on the receiving phone every 5 seconds. The person receiving the call must answer the phone and press # (Hash) Key on their phone within 2 minutes to acknowledge the call. Direct voice contact will be Enabled after acknowledging the call. If the # (Hash) Key is not pressed, the Medi-Link unit will hang up and then try to ring the next number in sequence until it successfully rings a voice only report number. The call can continue in 3 minute packets whereby every 2 minutes and 30 seconds, the Medi-Link unit outputs a tone so that the person who receives the call has to press the # (Hash) Key to continue the call for another three minutes. To Hang Up, Press * (Star) Key twice on the telephone. The voice circuits will remain Enabled for 6 minutes (as programmed in the “ANSWER CALL”) so that any incoming call within this time will be automatically answered. 10.4 BRITISH DTMF (UNIVERSAL MODE) VERSION ONLY When a Panic/Duress or Detector alarm is sent to a Tunstall Monitoring Centre, the Medi-Link unit will remain on line for 5 minutes with voice communications Enabled. This can be suppressed for Detector alarms if the specific “CALL BACK ON CHANNEL 1 – 8” option is Disabled. With every tone sent from the Tunstall Monitoring Centre, the voice circuits are Enabled for the amount of minutes programmed in the “ANSWER CALL” option. The Medi-Link unit will accept the following commands from a Tunstall Monitoring Centre: TALK, LISTEN, INCREASE VOLUME, DECREASE VOLUME and CANCEL. When the call is terminated successfully by pressing the CANCEL Button (Tunstall Monitoring Centre), the voice circuits will be Disabled. If however the call is terminated unexpectedly by running out of time or recognising that the Tunstall Monitoring Centre has hung up, the voice circuits are Enabled for another time (as programmed in the “ANSWER CALL”) so that any incoming call within this time will be answered. 11. SETTING THE TIME/DATE The Medi-Link unit has an inbuilt Clock and Calendar that is backed up by the system battery and will remain even in the event of a power failure. If you require the time and day to be changed for any reason then perform the following steps: Mon, 1. While the Medi-Link unit is in standard operation mode, press and hold down the CANCEL Button for 10 seconds until “Set Time” is displayed. 2. Press the HELP Button until the correct hour is displayed. Once the hour is set, press the CANCEL Button to begin setting the minutes. In a similar fashion press the HELP Button until the correct minutes are displayed. After the minutes have been set, press the CANCEL Button to move onto setting the Year, Month and Day. 3:00 Set Time 09:25 3. 4. While in the “Set Date” menu, press the HELP Button until the correct year is selected. After the year has been set, press the CANCEL Button to move onto setting the month. Press the HELP Button until the correct month is selected. After the month has been set, press the CANCEL Button to move onto setting the day. Press the HELP Button until the correct day is selected. 5. Finally, press the CANCEL Button to Exit the Menu and save changes. Note: the Medi-Link unit will automatically exit (drop out) of the Set Time & Date Menu if the Cancel or Help Button had not been pressed within 5 Minutes. Set Date 02-Jun-08 Mon, 9:25 Medi-Link Installation Manual Rev1.1 34 12. SPECIAL FUNCTIONS Your Medi-Link unit may have been programmed with one or more special features by your installer, these are described below, check with your Monitoring Company if you have any queries about these or other features. 12.1 MAINS FAIL MAINS FAIL Mon, 3:00 Your Medi-Link unit also has a special feature designed to alert you if the power outlet has been knocked out of the socket accidentally. Within 10 seconds of the power outlet being removed, your Medi-Link unit will give 2 warnings (Voice Prompt “(Chime) Power to your unit is disconnected. Please check powerpoint connections and switch”) advising that the power has been interrupted or disconnected and needs to be reconnected. 12.2 PILL REMINDER (OVER DUE TIMER) Pill Reminder Mon, 9:00 Your Medi-Link unit has an inbuilt Clock and Calendar that is backed up by the system battery and will remain even in the event of a power failure. Your Medi-Link unit can be programmed to produce regular warning (Voice Prompt) such as a Medication reminder at a specific time. When the Pill Reminder Timer is active, it will be pre-set by your Installer to provide a warning (Voice Prompt “(Chime)This is a personal task reminder from your unit. I repeat, this is a personal task reminder from your unit”), flashes the CANCEL (GREEN) BUTTON for 5 minutes and displays Pill Reminder as a reminder to take your Medication. You can stop the warning by pressing the CANCEL (GREEN) BUTTON. NOTE: There is no Help message sent to your Monitoring Centre; the warning is a reminder for you only. If you do not press the CANCEL (GREEN) BUTTON, the Pill Reminder will stays on the LCD display. Timer will de-activate and it will not re-start until the CANCEL (GREEN) BUTTON is pressed again. You can use this as a useful feature if you wish to change the timer to commence at a different time. If you wish to change the timer to a different interval e.g. Monday, Tuesday, Wednesday, Thursday, Friday, Saturday, Sunday to Everyday, then your Monitoring Centre may be able to change this time over the phone or your Installer can change it for you. 12.3 SYSTEM AWAYMODE Your Medi-Link unit also has a special feature “System AwayMode”. You can use this as a useful feature if you’re going away (Not going to be home for a period of time). To Enable this special feature, Press and Hold down the CANCEL Button for 5 Seconds until a beep is heard and “System.AwayMode” is displayed. System.AwayMode Mon, 9:00 NOTE: While this feature “System AwayMode” is displayed, the “System Call voice Reminder” is DISABLED. NB: There is no Help message sent to your Monitoring Centre when going into this mode as the message is only displayed locally for user interaction and feedback. To Disable this special feature, Press and Hold down the CANCEL Button for 5 Seconds until “System.AwayMode” disappears. Pressing the DAILY CALL Button or any Pendant will also Disable the “System.AwayMode”. 12.4 SYSTEM CALL REMINDER Your Medi-Link unit also has a System Call Reminder designed to alert you, however should you forget to test your MediLink unit. When the System Call Timer is active, it will be pre-set by your Installer to remind you. (Voice Prompt “(Chime) Your unit is now due for testing. Please activate your unit to notify us all is well.”). If you wish to change the timer to a different interval e.g. Monday, Tuesday, Wednesday, Thursday, Friday, Saturday, Sunday to Everyday, then your Monitoring Centre may be able to change this time over the phone or your Installer can change it for you. 35 Medi-Link Installation Manual Rev1.1 13. UP/DOWNLOAD PROGRAMMING Apart from programming the Medi-Link unit via the Cancel and Help Buttons, the unit may also be programmed by the Up/Download Programmer Software. The Up/Download Programmer Software can communicate to the Medi-Link unit either via Direct Connection via using DB9 Programming Lead or Fax Defeat Dial via Telephone modem link . 13.1 Programming via DB9 Programming Lead using Direct Connect To Program directly via COM Port, the Medi-Link unit must connected to a PC via DB9 Programming Lead (Part Number 450-185). If the Client Account number of the Medi-Link unit is known then the unit can be programmed without having to be put in Program Mode. However if the Client Account number is not known, then the Medi-Link must be put into Program Mode. Once connection is established, All PROGRAMMING OPTIONS may be programmed through the Up/Download Programmer Software. Lead Assy Serial Cable DB9 (Part No. 450-185) 13.2 Programming via Modem/Phone Line using Fax Defeat Dial Remote programming is Enabled when in Program Mode and if the “Remote Access” option is Enabled (Enabled all the time). The Medi-Link unit can be placed in Program Mode as described in PROGRAM MODE. The Medi-Link unit uses an answering technique called fax defeat. Fax defeat is done by calling the Medi-Link unit, hanging up and calling back. The Medi-Link unit will automatically answer the phone as soon as the call back ring is detected. Note that the Client Account Number of the unit must be entered for the Modem to establish communication. All PROGRAMMING OPTIONS may be remotely programmed through the Up/Download Programmer Software package. The Medi-Link unit will remain online while data is being transferred from the Up/Download Programmer Software via the modem. The unit will automatically disconnect after any 3 minute period of idle activity (this ensures communication failures will not leave the Medi-Link unit in PROGRAM MODE). The Up/Download Programmer Software will automatically sequence dial the Medi-Link unit through any computer provided that the Client Account Number in the Software matches the Medi-Link unit to allow access to remote programming. All Programming Options are available both through Manual Programming or Up/Download Software Programming. Refer to the SmartLink Up/Download Programmer Software User Manual for more informations. Medi-Link Installation Manual Rev1.1 36 14. USING MEDI-LINK 14.1 NORMAL OPERATION Your Medi-Link unit will normally look like this: The MAINS ON Light and the CANCEL (GREEN) BUTTON should be ON. The current Day and Time is also display on the LCD display. 14.2 TO CALL FOR HELP You can make your Medi-Link Call for Help by either: Pressing the HELP (RED) BUTTON on the Medi-Link unit. 1 2 OR Pressing the Large HELP (Panic) BUTTON on your Pendant for 2 Seconds. OR Pressing the Front or Side Lever HELP (Panic) Button(s) on your Box Style Pendant for 2 Seconds. 37 The HELP (RED) BUTTON will FLASH rapidly and the Medi-Link unit will start beeping. This is a Pre-Alarm warning, while this is sounding you can Cancel the Help alarm by pressing the CANCEL (GREEN) BUTTON on the Medi-Link unit. If the CANCEL (GREEN) BUTTON is not pressed within the pre-alarm time (10 seconds), then your Medi-Link unit will dial your Monitoring Centre using the telephone line. 3 Medi-Link Installation Manual Rev1.1 (NOTE: Your Medi-Link unit will cut off your telephone for the duration of the call to ensure that there is no interference to the call, this will normally take about 15 seconds). When your Monitoring Centre has received the Help Call, your Medi-Link unit will beep 7 times to let you know that the call has been received. The HELP (RED) BUTTON will now FLASH slowly every 4 seconds to indicate that your Medi-Link unit has called for Help. 15. DISPLAYS AND WARNINGS HELP (RED) BUTTON FLASHING QUICKLY WHILE BEEPING Your Medi-Link unit is about to send a Help message to your Monitoring Centre. HELP (RED) BUTTON FLASHING SLOWLY Your Medi-Link unit has sent a Help message to your Monitoring Centre and is waiting to send the I’m O.K message. The CANCEL (GREEN) BUTTON will need to be pressed to send the I’m O.K message. FAULT DISPLAYS MAINS FAIL Mon, 3:00 Mains/AC Power Fail - Check and make sure that the MAINS Power Pack is plugged in and turned ON at the Power Point. LOW BATTERY Unit Power has been OFF for too long and Battery is Low/Faulty or the Battery Switch has been Switched OFF - Contact your Installer or Monitor Centre. LOW BATTERY Pendant No.1 Pendant No.1 to No.8 Low Battery - Contact your Installer or Monitoring Centre. LOW BATTERY Detector No.1 Detector No.1 to No.8 Low Battery - Contact your Installer or Monitoring Centre. REPORT FAIL Unit LINE FAIL Mon, 3:00 Failed to send a message to your Response Centre - Check and make sure that the telephone lead is plugged in and all normal telephones are working. Contact your Installer or Monitoring Centre. The Telephone Line has failed - Check and make sure that the telephone lead is plugged in and all normal telephones are working (Your Medi-Link Unit will also beep for 25 seconds). Contact your Installer or Monitoring Centre. Medi-Link Installation Manual Rev1.1 38 16. SPECIFICATIONS Medi-Link Unit Dimensions Weight Quiescent Current AC Plug Pack (Part No. 840-030) Battery Backup (Part No. 142-014) Radio Receiver Sensitivity Range 235 x 95 x 150 mm 1300gms (including battery) 5mA 17V AC 300mA with integral earth 12V 800mAH (Sealed Rechargeable Lead Acid Battery) Superheterodyne > -110dbm 50 to 100 metres open air (Subject to environmental conditions) Transmitter Type Frequency SAWR stabilised 304 MHz (Australia & New Zealand) 315 MHz (Singapore, USA & Canada) 434 & 868 MHz (UK & Europe) < 100 uW (or various international compliances) Power Output Conforming Standards IS09001/2000 AS4607 AS/ACIF S002 2005 PTC200 AS/ACIF S004 PSTN1 TBR21 AS2201.4 (C2) AS4268 AS/NZSCISPR22 FCC 47 Part 15 EN301 489-3 EN55022 Class B EN300 220-1 V1.3.1 EN60950 AS/NZS60950.2003 + A1 CE TIA/EIA/IS-968 IC CS-03 Issue 8 Part 1 International Quality manufacturing Standards Personal Response Systems PSTN Interworking (Australia) PSTN Interworking (New Zealand) Voice Frequency Performance (Australia) Public Switched Telephone Network (Singapore) Public Switched Telephone Network (UK & Europe) Intruder Alarm Systems - Wireless Emissions (Australia & New Zealand) EMC (Australia & New Zealand) Emissions FCC (USA, Canada & Singapore) Emissions EMC (UK & Europe) EMC (EU) Radio Device RF Performance (UK & Europe) Safety Requirements (UK & Europe) Electrical Safety (Australia & New Zealand) UK Standards US FCC Dialler Approvals Canadian Dialler Approvals WARNING: For safety reasons, only connect equipment with a telecommunications compliance label. This includes customer equipment previously labelled permitted or certified. “A division of NESS CORPORATION PTY LTD” © Copyright SmartLink November 2015 Unit 4/56 Norcal Rd, Nunawading VIC 3131 Australia Telephone: +61 3 9875 6400 Facsimile: +61 3 9875 6422 Email: [email protected] Web Site: www.smartlink.com.au To the best of our knowledge, the information contained in this manual is correct at the time of print. SmartLink “A division of NESS CORPORATION PTY LTD” reserves the right to make changes to the features and specifications at any time without prior notice in the course of product development. 39 Medi-Link Installation Manual Rev1.1