1
Technical Note
Local Slideshow
This document is divided into 5 sections aimed at different categories of users;
•
Section 1 is intended for anyone who wants to know more about the MultiQ local
slideshow system
•
Section 2 describes the daily handling of the slideshow system (intended for the staff at
the site)
•
Section 3 describes how to install the system in a standalone media player (intended for
installers)
•
Section 4 describes how to install the system in a centrally managed system (intended for
system administrators)
•
Section 5 describes how to build your own templates (intended for template
developers/web designers)
The reader is presumed to have prior knowledge of software development and it is desired to also
have knowledge of Linux and Linux systems in general.
This guide applies to products with firmware version 2.10.X.
Important!
MultiQ Products AB provides no guarantee that any of the examples shown in this
document will work for any particular application or that the descriptions will be valid for
future firmware or product versions.
MultiQ Products AB cannot and will not be held liable for any damage inflicted to any
product as a result of the examples or instructions mentioned in this document.
MultiQ Products AB reserves the right to make changes to this document and to product
specifications without prior notice.
MultiQ Products AB provides NO support for application development of any kind. The information here is provided
"as is", and there is no guarantee that any of the examples shown will work in your particular application.
MultiQ Products AB provides NO support for application development of any kind. The information here is provided
"as is", and there is no guarantee that any of the examples shown will work in your particular application.
Table of Contents
1
5T
Revision history ..................................................................................................................3
5T
U5T
2
5TU
5T
Introduction.........................................................................................................................4
5T
5TU
U5T
2.1
2.2
5TU
5TU
U5T
5TU
3
U5T
5T
Local input and central control ......................................................................................................... 4
Handling multiple media players ...................................................................................................... 5
5TU
U5T
U5T
To use the “slideshow” system in everyday operation ..............................................8
5T
5TU
U5T
3.1
3.2
3.3
3.4
3.5
3.6
3.7
3.8
5TU
5TU
U5T
5TU
5TU
U5T
5TU
U5T
5TU
U5T
5TU
U5T
5TU
U5T
5TU
U5T
4
U5T
5T
To login to the local server in the media player ............................................................................ 8
To find the IP address of the media player .................................................................................... 8
Using widescreen templates .......................................................................................................... 12
Building a multi slide slideshow ..................................................................................................... 14
Adding a second slide to the slideshow ...................................................................................... 17
To set the duration of the slides in the slideshow ..................................................................... 19
Adding a slide with a locally uploaded image............................................................................. 19
Editing the “List of existing slides” ................................................................................................ 21
5TU
U5T
U5T
5TU
U5T
5TU
U5T
5TU
U5T
5TU
U5T
5TU
U5T
5TU
U5T
Slideshow installation when using a media player in standalone operation ..... 22
5T
5TU
U5T
4.1
4.2
4.3
4.4
4.5
5TU
5TU
U5T
5TU
5TU
U5T
5TU
U5T
5TU
U5T
5
U5T
5T
Uploading the “slideshow” zip file to the management server................................................ 22
Defining the “slideshow” local web site as a media spot ........................................................ 26
Associating the channel with the media player .......................................................................... 28
Font installation .................................................................................................................................. 29
Local computer slideshow management preparation ............................................................... 30
5TU
U5T
U5T
5TU
U5T
5TU
U5T
5TU
U5T
Slideshow installation when using a central management server ....................... 31
5T
5TU
U5T
5.1
5.2
5TU
5TU
U5T
5TU
5T
6
U5T
Font installation .................................................................................................................................. 36
Local computer slideshow management preparation ............................................................... 38
5TU
U5T
U5T
To build your own templates........................................................................................ 39
5T
5TU
U5T
6.1
6.2
6.3
6.4
6.5
6.6
6.7
6.8
U5T
5TU
5TU
U5T
5TU
5TU
U5T
5TU
U5T
5TU
U5T
5TU
U5T
5TU
U5T
5TU
U5T
Template system basics................................................................................................................... 39
To create the background image ................................................................................................... 40
To create a thumbnail ....................................................................................................................... 41
To create the html document defining the template ................................................................. 42
To create “editable” text boxes ...................................................................................................... 44
Finding the coordinates to get the text in the right places ...................................................... 45
Using fonts .......................................................................................................................................... 47
Sets of templates and templates that allow for locally uploaded images ............................ 47
5TU
U5T
U5T
5TU
U5T
5TU
U5T
5TU
U5T
U5T
5TU
5TU
U5T
5TU
Technical Note – Local slideshow, Version 1, 14/10/2010
U5T
2
MultiQ Products AB provides NO support for application development of any kind. The information here is provided
"as is", and there is no guarantee that any of the examples shown will work in your particular application.
1
Revision history
This version of the User Requirements Specification becomes effective on the date of final
approval. If changes are made that affect the document’s content or approach, a revised, complete
document must be issued for re-approval by the roles of the approvers of the original document or
their designated representatives. A description of those changes with revision number will be noted
in the revision log below:
Version
Date
Comments
1.00
2010-10-15
Initial version
Technical Note – Local slideshow, Version 1, 14/10/2010
3
MultiQ Products AB provides NO support for application development of any kind. The information here is provided
"as is", and there is no guarantee that any of the examples shown will work in your particular application.
2
2.1
Introduction
Local input and central control
In many cases you may wish to let the local staff in stores and at other sites add and edit text or
even add an image to a sign. However, in most cases there is a need to control the profile of the
signs when it comes to background images with logos etc. Also there is a need to control the fonts
and where the text is located on the screen.
In addition to this you probably want to control when and how the local messages are inserted into
playlists in order to mix global and local messages. And of course you want to be able to schedule
the local messages or even let them be initiated by interactive commands.
The local messages may be a part of a full screen application or fill just a specified region on the
screen. It is possible to let the local message consist of just one image or you may expand it to a
complete slideshow with as many slides that you need.
Finally it has to be simple for the local staff to handle the local insertion of text and images.
The MultiQ Local Message Slideshow system does all this and more.
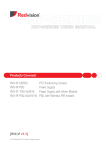
Figure 1. The background images, the fonts and the layout of the signs are centrally controlled while text
content can be controlled locally. If desired, even local images can be uploaded to the system.
The MultiQ Local Message Slideshow system can be used in centrally controlled systems as well
as in media players operating in standalone mode without access to a central server.
Technical Note – Local slideshow, Version 1, 14/10/2010
4
MultiQ Products AB provides NO support for application development of any kind. The information here is provided
"as is", and there is no guarantee that any of the examples shown will work in your particular application.
Local management can be done using any computer, such as a laptop. If only text is to be edited,
an iPhone, iPod, iPad or any other intelligent hand held terminal with a web browser may be used. If
you have MultiQ media monitors in the store you can also use one of them to edit the text on the
local signs.
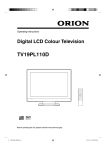
Figure 2. Local messages are stored in the web server of the media player. You can use a media monitor
or any computer such as a PC, a mobile phone with web browser or an iPod or iPad.
The unique feature that makes the MultiQ media players and media monitors do this is because
they include a web server, a SQLite database, and PHP support. This makes it possible to store
locally controlled messages in the media players.
2.2
Handling multiple media players
It is possible for a media player to retrieve local information from other media players at the same
site. This means that it is possible to update local content on several monitors at the same location
by just editing the local content in one of them. The media players need to be on the same subnet
to allow for multiple media player local control.
Technical Note – Local slideshow, Version 1, 14/10/2010
5
MultiQ Products AB provides NO support for application development of any kind. The information here is provided
"as is", and there is no guarantee that any of the examples shown will work in your particular application.
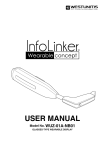
Figure 3. Local messages can be retrieved from other media players at the same site.
The local content is based on templates that are centrally generated and controlled. This assures
full control of the profile of the messages. The content may be edited by a local user that login to
the password protected local web server. Editing is simple by filling out desired text messages in an
input form. There is also an option to upload local images.
Figure 4. It is easy to change the local content by filling out an input form that is generated by the
template used.
The slideshow is addressed as a media spot in the management system. This means that the local
message slideshow can be added as a part of any playlist and mixed with centrally managed
content.
Technical Note – Local slideshow, Version 1, 14/10/2010
6
MultiQ Products AB provides NO support for application development of any kind. The information here is provided
"as is", and there is no guarantee that any of the examples shown will work in your particular application.
Figure 5. The local message slide can be played in sequence with centrally managed content.
Figure 6. The local message slide can be played in a separate region of a monitor that has centrally
managed global content in other regions.
You can have several “slideshow” local messages web sites in a media player to be used for
different areas or purposes. You just need to give them individual names.
Technical Note – Local slideshow, Version 1, 14/10/2010
7
MultiQ Products AB provides NO support for application development of any kind. The information here is provided
"as is", and there is no guarantee that any of the examples shown will work in your particular application.
3
To use the “slideshow” system in everyday operation
The “slideshow” system enables you to change text and to add images locally to pre-defined
templates. You can choose to use one or more slides and you are also free to choose the duration
of each slide. However the maximum allowed duration of a slideshow has been set in the central
management server and the slideshow will restart from the first slide when this time period has
elapsed.
If you have never logged in to the system a default slide is shown.
3.1
To login to the local server in the media player
To be able to login to the local server you need to have a computer with a web browser connected
to the same subnet as the media player. If you just want to edit text and do not intend to add any
images to your slides you can also use handheld devices such as iPhones, iPods, iPads or other
handheld intelligent devices with a web browser. These devices, however, require that the LAN has
wireless access (WiFi).
3.2
To find the IP address of the media player
To login to the system you must know the IP address of the media player. If the system is managed
by a central system you can get this information in the “Status” tab of the media player (the
administrator of the system is able to find this information). In a standalone media player or media
monitor you need to login to the local management system and find the IP address under the
“Status” tab (if you do not know how to do this, ask the person in charge of the media monitor).
To login to the local server add (where “xxx.xxx.xxx.xxx” is the IP address of the media player)
http://xxx.xxx.xxx.xxx/lsf/slideshow/show.php to the web browser address box.
5TU
U5T
The “slideshow” web site comes with a selection of templates. You will now get to the login page of
the “slideshow” system. At first startup the password is blank, so leave the password box empty and
press “Login”.
Figure 7. At first login the initial password is blank.
Technical Note – Local slideshow, Version 1, 14/10/2010
8
MultiQ Products AB provides NO support for application development of any kind. The information here is provided
"as is", and there is no guarantee that any of the examples shown will work in your particular application.
The password can be changed by selecting the “Change password” menu. This should be done
before starting to use the slideshow system.
The main menu contains a “List of existing slides” which is a playlist to where you can add or delete
slides. At first startup there is a default slide in the list. This slide is intended for a resolution of
1280x1024 pixels (SXGA) in landscape mode. If presented in portrait mode or on a monitor with
different resolution the slide will become stretched in relation to what is shown in figure 8.
Figure 8. The default slide is shown on first startup (SXGA 1280x1024 pixels).
Figure 9. Click the “edit” link on the “List of existing slides” menu.
By clicking the “edit” link you get into the “edit” menu where there is an editable version of the
template. Text that can be changed is indicated by text boxes. Change the content of the upper
text box to “My first slide”, the box in the middle to “My first text” and the text box at the bottom to
“Large red text”.
Technical Note – Local slideshow, Version 1, 14/10/2010
9
MultiQ Products AB provides NO support for application development of any kind. The information here is provided
"as is", and there is no guarantee that any of the examples shown will work in your particular application.
Figure 10. Edit the text boxes and then click on the “Save slide” button to get back to the “List of existing
slides” menu.
When back in the “list of existing slides menu” you will find that the name of the slide has now been
changed to the text that was entered in the upper text box.
Figure 11. In the “List of existing slides menu” the name of the slide has now changed to the text you
entered in the upper (title) text box.
Technical Note – Local slideshow, Version 1, 14/10/2010
10
MultiQ Products AB provides NO support for application development of any kind. The information here is provided
"as is", and there is no guarantee that any of the examples shown will work in your particular application.
Figure 12. After a while the updated slide is visible on the screen.
The next step may be to remove the slide and to add some others based on some of the other
templates. To delete the slide, click the “delete” hyperlink.
Figure 13. To delete a slide, click the “delete” hyperlink.
When the slide has been removed this is confirmed in the menu.
Technical Note – Local slideshow, Version 1, 14/10/2010
11
MultiQ Products AB provides NO support for application development of any kind. The information here is provided
"as is", and there is no guarantee that any of the examples shown will work in your particular application.
Figure 14. Slide removed confirmation.
3.3
Using widescreen templates
The next two examples use templates intended for Full HD (or HDReady) display (1920x1080
pixels). If the monitor is set to less resolution, only the upper right part of the screen content will be
displayed.
In the first example we will use a template intended for a possible conference center. On an
everyday basis the text telling what company is in what conference facility is to be updated.
In this example we will choose the “HawadaC” template which requires that a Full HD compatible
widescreen monitor is used with a media player set to “Full HD” in landscape mode.
Figure 15. Click the “New slide” button to get into the “Add new slide” menu.
Technical Note – Local slideshow, Version 1, 14/10/2010
12
MultiQ Products AB provides NO support for application development of any kind. The information here is provided
"as is", and there is no guarantee that any of the examples shown will work in your particular application.
Figure 16. To select a template click on its thumbnail, Here the “Hawada Beach Resort Conference
Center” template.
Once a template has been selected, the next thing to do is to fill out the textboxes related to each
part of the screen. In this case there is a background image that is decided by the template. The
only thing to edit is the text to the upper right date and year and what companies occupy the
facilities.
Figure 17. How to fill out the Hawada Beach Resort Conference Center template.
Technical Note – Local slideshow, Version 1, 14/10/2010
13
MultiQ Products AB provides NO support for application development of any kind. The information here is provided
"as is", and there is no guarantee that any of the examples shown will work in your particular application.
Figure 18. The “Hawada Beach Resort” application is a way to display what companies are using the
different conference facilities at the conference center at Hawada.
A similar template is the “Nippon Sushi Restaurant” application which requires a Full HD
widescreen monitor in portrait position. Otherwise this template works the same way as the
“Hawada Beach Resort” application.
Figure 19. The “Nippon Sushi Restaurant” template is an example on how to use the system to display
restaurant menus.
3.4
Building a multi slide slideshow
In the previous exercises only one slide has been included in each slideshow. However it is possible
to add more slides using the same or other templates to the slideshow.
Technical Note – Local slideshow, Version 1, 14/10/2010
14
MultiQ Products AB provides NO support for application development of any kind. The information here is provided
"as is", and there is no guarantee that any of the examples shown will work in your particular application.
The next example includes a slideshow intended for an SXGA (1280x1024 pixels) monitor in
SXGA mode.
This is more advanced application with several slides and the possibility to add local images. The
intention is to build a “Power Point” look alike slideshow with the three most common elements of
such a slideshow; the title slide, a slide with a list of items and a slide with a heading and an image
that is uploaded locally.
The templates include a background image on top of which text and images can be inserted locally.
In this case we need to use a PC or MAC to be able to upload files to the media player. First
remove any slides from the “Lists of existing slides” to start with an empty list. Next click “Add slide”
to get into the “Add new slide” menu.
Figure 20. Click the MultiQ_0 presentation “title” template.
Technical Note – Local slideshow, Version 1, 14/10/2010
15
MultiQ Products AB provides NO support for application development of any kind. The information here is provided
"as is", and there is no guarantee that any of the examples shown will work in your particular application.
Figure 21. Fill out the title text box in the template.
Figure 22. The title slide is now visible in the list.
Technical Note – Local slideshow, Version 1, 14/10/2010
16
MultiQ Products AB provides NO support for application development of any kind. The information here is provided
"as is", and there is no guarantee that any of the examples shown will work in your particular application.
3.5
Adding a second slide to the slideshow
Click “New Slide” once more and now select the MultiQ “items list” template.
Figure 23. Select the MultiQ_1 presentation “list” template.
Fill out the title- and the items text boxes with suitable text. Leave text boxes not needed empty.
Leaving them empty will hide these entries. Do not forget to save the slide before returning to the
“List of existing slides” menu.
Technical Note – Local slideshow, Version 1, 14/10/2010
17
MultiQ Products AB provides NO support for application development of any kind. The information here is provided
"as is", and there is no guarantee that any of the examples shown will work in your particular application.
Figure 24. Fill out the title- and items text boxes. Leave boxes not needed empty (which will make these
entries invisible).
Now, the “List of existing slides” includes two slides.
Figure 25. The “List of existing slides” now include two slides and you can change the duration in
seconds of each slide. Press the “Update times” button to activate change in duration for each slide.
Technical Note – Local slideshow, Version 1, 14/10/2010
18
MultiQ Products AB provides NO support for application development of any kind. The information here is provided
"as is", and there is no guarantee that any of the examples shown will work in your particular application.
With two slides in the slideshow it may be interesting to change the duration of each slide. The
default duration is 15 seconds but can be set individually for each slide. The change is activated by
pressing the “Update times” button.
Figure 26. There are now two slides in the list that are played in a loop.
3.6
To set the duration of the slides in the slideshow
The total duration of the list in figure 26 is 20 seconds. In the central server as well as in the
management of a media player operated in standalone mode there is a setting for the duration of
the slideshow. This is set by the administrator of the system. The setting makes the slideshow to
restart at certain intervals. I.e. that if this interval had been set to 5 seconds then only the first slide
would have been shown. To show the entire slideshow the duration of the slideshow must be set to
at least 20 seconds. To get the slideshow to behave in the way expected the interval should be the
same as for the slideshow (or an integer multiple of the slideshow duration). Before you edit the
duration of your slideshow, be certain to be informed about what length of the slideshow has been
set in the management server.
3.7
Adding a slide with a locally uploaded image
If desired, several slides based on the MultiQ_1 presentation “list” template can be added and the
slideshow can contain an unlimited number of slides as long as the maximum length of the
slideshow is not exceeded.
However the third slide will be created from a third template, the MultiQ_2 “image” slide. The
special thing about this slide is that an image be locally to the slide.
Technical Note – Local slideshow, Version 1, 14/10/2010
19
MultiQ Products AB provides NO support for application development of any kind. The information here is provided
"as is", and there is no guarantee that any of the examples shown will work in your particular application.
Figure 27. Select the MultiQ_2 presentation “image” template.
Fill out the template and browse for the desired image. The MultiQ_2 presentation “image”
template is intended to be used with images having the aspect ratio 16:9. If other aspect ratios are
chosen, then the image will get stretched either horizontally or vertically. Allowed image formats are
jpg and png.
Figure 28. Fill out the title text box and browse to the image to be used.
Technical Note – Local slideshow, Version 1, 14/10/2010
20
MultiQ Products AB provides NO support for application development of any kind. The information here is provided
"as is", and there is no guarantee that any of the examples shown will work in your particular application.
Figure 29. The slideshow now include 3 slides made with 3 different templates.
3.8
Editing the “List of existing slides”
With three slides in the list it becomes interesting to be able to move the slides to new positions.
Using the arrows to the left makes it possible to move a slide to the preferred position. In figure 30
a fourth slide has been added by using the MultiQ_2 “images” template a second time.
Figure 30. It is possible to move a slide to a preferred position by clicking the arrows to the left of the list.
Technical Note – Local slideshow, Version 1, 14/10/2010
21
MultiQ Products AB provides NO support for application development of any kind. The information here is provided
"as is", and there is no guarantee that any of the examples shown will work in your particular application.
4
Slideshow installation when using a media player in
standalone operation
The best way to get acquainted with the local messages slideshow system is to install it on a player
and to try out the templates.
The system is stored in a website named “slideshow”. This can be downloaded as a zip-file from the
Developer’s section in the MultiQ website. You can use this zip file with the templates included or
you can add more templates according to the instructions in the “6 Add your own templates”
section.
To use the local messages system the local storage web site, included in the “slideshow.zip” file
needs to be installed on the media player to be used. Installation can be done in media players
controlled by a management server or in a media player operating in standalone mode.
To make the installation, basic knowledge in how to handle the MultiQ digital signage system is
needed.
In the Getting stated guides for the media players and media monitors you will find information on
how to configure the units for standalone operation (can be downloaded from the Service &
Support) tab of the MultiQ website. Further information on how to define units, create and edit
channels and playlists can be found in the MultiQ DSMS 3 User’s manual (also to be found at the
MultiQ website).
Before proceeding your media monitor should be configured as a standalone unit. Instructions on
how to set up the unit in standalone mode is to be found in the “Getting started guide” that came
with your media player. The guide can also be downloaded from the “Service and Support” section
of the MultiQ website.
http://multiq.com/doc/support/multiq_quick_start_guide_media_monitor_2_00.pdf
5TU
U5T
4.1
Uploading the “slideshow” zip file to the management server
To be able to upload the “slideshow” zip file to the standalone media player it is necessary to login
to the unit from a separate computer. To be able to do login from an external device the external
web server access need to be enabled.
Start by logging in to the management system of your standalone media player or media monitor by
attaching a USB keyboard and pressing “Ctrl+Alt+Del”. If you use a media player without a touch
screen you will also need a mouse to maneuver the management system.
In the management system, go to the “Security” menu and enable remote access to the web server.
Technical Note – Local slideshow, Version 1, 14/10/2010
22
MultiQ Products AB provides NO support for application development of any kind. The information here is provided
"as is", and there is no guarantee that any of the examples shown will work in your particular application.
Figure 31. In the “Security” menu, tick the “Enable remote access to web server” checkbox and click
“Save”.
Next you need to know the IP address of the media player. A way to find this is to is to go to the
“Status” menu by clicking the “Status” icon at the bottom left. Make a note of the IP address.
To be able to login to the media player, your computer need to be on the same network as the
media player.
Figure 32. In the “Status” menu you can find the IP address of your media player (In this case
192.168.5.196).
Next, press the “Done” button on the top right of the management menu. The media player will now
reboot and after that the unit is accessible from your external computer.
You are now ready to login to the media player from your computer.
In the address line of your web browser, write the IP address and you will get to the login page. In the
case above: “192.168.5.196”.
Insert the username “admin” and password “admin” or the password that you have selected.
Technical Note – Local slideshow, Version 1, 14/10/2010
23
MultiQ Products AB provides NO support for application development of any kind. The information here is provided
"as is", and there is no guarantee that any of the examples shown will work in your particular application.
Figure 33. Login to the media player using your computer.
Now upload the “slideshow” zip file to the media player.
Go to the “Extensions” menu by pressing the “Extensions” icon. Look up the “Local Storage Files”
section and press the “Add” button.
Browse to the “slideshow.zip” file, select the file and press “Open”. Then press the “Upload” button.
The “slideshow.zip” file is now visible in the “Local Storage File” section of the management system.
Now the “slideshow.zip” can be downloaded to any of the media players in the system.
Figure 34. In the “Extensions” menu, go to the “Local Storage Files” section and click “Add”.
Technical Note – Local slideshow, Version 1, 14/10/2010
24
MultiQ Products AB provides NO support for application development of any kind. The information here is provided
"as is", and there is no guarantee that any of the examples shown will work in your particular application.
Next step is to download the “slideshow.zip” file to the local storage of the specific media player to
be used. This is done by adding the “slideshow.zip” file to the “Local Storage Files” section of the
“Settings” tab of the media player.
Figure 35. Browse to the “slideshow.zip” file and select and upload the file.
Figure 36. When the “slideshow.zip” has been selected, click the “Upload” button.
Figure 37. Finally the “slideshow.zip” file visible in the “Local Storage Files” section of the “Extensions”
menu.
Technical Note – Local slideshow, Version 1, 14/10/2010
25
MultiQ Products AB provides NO support for application development of any kind. The information here is provided
"as is", and there is no guarantee that any of the examples shown will work in your particular application.
4.2
Defining the “slideshow” local web site as a media spot
To be able to address the “slideshow” local website, it has to be addressed in the Media Bank.
Select “Add External” in the Media Bank and define the media spot in the “Html” section.
Figure 38. Define the link to the “slideshow” system in the Media Bank by clicking the “Add External”
button.
The address (URL) to the “slideshow” is http://127.0.0.1/lsf/slideshow/show.php. Don’t forget to
scroll down to the bottom of the page and press “Save”.
5TU
U5T
Figure 39. Define the link to the locally stored website.
The IP address “127.0.0.1” always refers to the computer or media player itself “Local Host””.
Finally the “slideshow” media spot needs to be added to a channel or a playlist that is used by the
media player. In this case the “slideshow” spot is inserted as a part of a channel named “Channel 1”.
Figure 40. The “slideshow” media spot needs to be inserted into a channel or a playlist that is associated
to your media player. Therefore, click the “Channels” icon and create a new channel named “Channel 1”
Technical Note – Local slideshow, Version 1, 14/10/2010
26
MultiQ Products AB provides NO support for application development of any kind. The information here is provided
"as is", and there is no guarantee that any of the examples shown will work in your particular application.
Figure 41. Define the new channel as “Channel 1”.
Figure 42. The new channel is empty. To add the “slideshow” media spot click “Add”.
Figure 43. Tick the “slideshow” checkbox and add the media spot to the channel.
Note that the duration of the spot to be played must exceed the duration of the slideshow that you
define when using the local “slideshow” system. This is critical since the “slideshow” media spot will
be reloaded at the interval indicated in figure 44. The ideal duration of the “Display Time” is to
select it equal to the length of the slideshow. A good way of handling the “Display Time” issue is to
set a specific length of the “Display Time” and then to inform the users of the system about what
length of slideshow should be used.
Technical Note – Local slideshow, Version 1, 14/10/2010
27
MultiQ Products AB provides NO support for application development of any kind. The information here is provided
"as is", and there is no guarantee that any of the examples shown will work in your particular application.
Important
Figure 44. Select the “Display time” to be the same or longer than the planned duration for each
slideshow.
4.3
Associating the channel with the media player
The final step is to associate “Channel” one to the media player. To associate the channel to the
media player “Primary” field on the screen, click the “Area Schedule” icon.
Figure 45. Select the “Area Schedule” icon and then click “Add” in the “Media from channels section”.
Figure 46. Tick the “Channel 1” checkbox and then click “Add Channel”.
After a while the default slideshow slide will appear on your media player or media monitor screen.
The system is now installed in the media player.
Technical Note – Local slideshow, Version 1, 14/10/2010
28
MultiQ Products AB provides NO support for application development of any kind. The information here is provided
"as is", and there is no guarantee that any of the examples shown will work in your particular application.
Figure 47. The default slideshow slide appears on the screen as soon as the system is installed.
Since we have already enabled the media player for local access, the slideshow system is now
ready for the staff at the site for local input from a laptop, an iPhone, iPod, iPad or other computer
(see “3 To use the “slideshow” system in everyday operation”).
5TU
4.4
U5T
Font installation
The templates may address different fonts. However it is essential that the media player has the
fonts required. If not, a standard replacement font will be used and the final appearance of the text
may not be as intended. It is essential to know what fonts are used in the templates. The templates
should be delivered along with instructions on what fonts are required to obtain the desired result.
The media player includes the following set of standard fonts that will be applied if no other fonts
are uploaded to the system.
If additional fonts are to be uploaded (*.otf or *.ttf) these files are uploaded to the “Extensions”
menu. Once uploaded to the “Extensions” menu, the font is available in all media players on that
account.
Figure 48. Specific fonts are uploaded to the “Fonts” section of the “Extensions” menu.
Technical Note – Local slideshow, Version 1, 14/10/2010
29
MultiQ Products AB provides NO support for application development of any kind. The information here is provided
"as is", and there is no guarantee that any of the examples shown will work in your particular application.
Figure 49. Here an *.otf font file is uploaded to the system.
4.5
Local
computer slideshow management preparation
At the location of the media player the slides and the slideshow will be edited by the local staff.
However this requires that the staff has the possibility to login to the server in the media player. To
do this the IP address of the media player needs to be known and the correct link needs to be used
to login.
Therefore it is necessary to use a known IP address at the local site. This address can be set as a
fixed IP address in the media player. Another (in many cases more practical) way, is to use the
DHCP address reservation table in the local router.
If the IP address is set to xxx.xxx.xxx.xxx the full path to the slideshow application will become:
http://127.0.0.1/lsf/slideshow/
5TU
U5T
In many cases the local staff needs some help to put this address as a favorite in the web browser
of the computer to be used. (See “3 to use the “slideshow” system in everyday operation”.)
5TU
U5T
In this example the name of the local template based system is “slideshow” however this name is
not mandatory. You may use local websites with other names (see “6 To build your own slideshow
templates”).
5TU
U5T
Technical Note – Local slideshow, Version 1, 14/10/2010
30
MultiQ Products AB provides NO support for application development of any kind. The information here is provided
"as is", and there is no guarantee that any of the examples shown will work in your particular application.
5
Slideshow installation when using a central management
server
The best way to get acquainted with the local messages slideshow system is to install it on a player
and to try out the templates.
The system is stored in a website named “slideshow”. This can be downloaded as a zip-file from the
Developer’s section in the MultiQ website. You can use this zip file with the templates included or
you can add more templates according to the instructions in the “6 Add your own templates”
section.
5TU
U5T
To use the local messages system the local storage web site, included in the “slideshow.zip” file
needs to be installed on the media player to be used. Installation can be done in media players
controlled by a management server or in a media player operating in standalone mode.
To make the installation, basic knowledge in how to handle the MultiQ digital signage system is
needed. Further information on how to define units, create and edit channels and playlists can be
found in the MultiQ DSMS 3 User’s Guide.
Start by uploading the “slideshow” zip file to the management server.
Go to the “Extensions” menu by pressing the “Extensions” icon. Look up the “Local Storage Files”
section and press the “Add” button.
Browse to the “slideshow.zip” file, select the file and press “Open”. Then press the “Upload” button.
The “slideshow.zip” file is now visible in the “Local Storage File” section of the management system.
Now the “slideshow.zip” can be downloaded to any of the media players in the system.
Technical Note – Local slideshow, Version 1, 14/10/2010
31
MultiQ Products AB provides NO support for application development of any kind. The information here is provided
"as is", and there is no guarantee that any of the examples shown will work in your particular application.
Figure 50. Add the “slideshow.zip” file to the “Local Storage Files” section of the “Extensions” menu of the
management system.
Next step is to download the “slideshow.zip” file to the local storage of the specific media player to
be used. This is done by adding the “slideshow.zip” file to the “Local Storage Files” section of the
“Settings” tab of the media player. Figure 51 shows how this is done: first select the settings tab of
the unit you wish to use (1 and 2). Then click “Add” in the “Local Storage Files in use” section (3).
Tick the checkbox for the “slideshow.zip” file and then click the “Add” button (4 and 5).
Technical Note – Local slideshow, Version 1, 14/10/2010
32
MultiQ Products AB provides NO support for application development of any kind. The information here is provided
"as is", and there is no guarantee that any of the examples shown will work in your particular application.
Figure 51. Add the “slideshow.zip” file to the “Local Storage Files” section of the “Settings” tab of the
management system.
To be able to address the “slideshow” local website, it has to be addressed in the Media Bank (1).
Select “Add External” (2) in the Media Bank and define the media spot in the “Html” section (3) and
press “Save” (4) at the button of the page.
The address (URL) to the “slideshow” is http://127.0.0.1/lsf/slideshow/show.php.
5TU
U5T
Figure 52. Define the link to the “slideshow” system in the Media Bank.
Technical Note – Local slideshow, Version 1, 14/10/2010
33
MultiQ Products AB provides NO support for application development of any kind. The information here is provided
"as is", and there is no guarantee that any of the examples shown will work in your particular application.
Finally the “slideshow” media spot needs to be added to a channel or a playlist that is used by the
media player. In this case the “slideshow” spot is to be inserted as a part of a channel named
“Channel 1”.
Figure 53. The “slideshow” media spot needs to be inserted into a channel or a playlist that is associated
to your media player.
Note that the duration of the spot to be played must exceed the duration of the slideshow that you
define when using the local “slideshow” system. This is critical since the “slideshow” media spot will
be reloaded at the interval indicated in figure 54. The ideal duration of the “Display Time” is to
select it equal to the length of the slideshow. A good way of handling the “Display Time” issue is to
set a specific length of the “Display Time” and then to inform the users of the system about what
length of slideshow should be used.
Important
Figure 54. Ideally the length of the “Display Time” should be set the same as the duration of the slideshow
(here 150 seconds).
Technical Note – Local slideshow, Version 1, 14/10/2010
34
MultiQ Products AB provides NO support for application development of any kind. The information here is provided
"as is", and there is no guarantee that any of the examples shown will work in your particular application.
Figure 55. Finally see to that the channel (Channel 1) is connected to the media player.
After a while the default slideshow slide will appear on your media player or media monitor screen.
The system is now installed in the media player.
Figure 56. The default slideshow slide appears on the screen as soon as the system is installed.
There is one remaining thing to be done before it is possible to handle the slideshow system locally
and that is to enable the local web server for remote access.
Technical Note – Local slideshow, Version 1, 14/10/2010
35
MultiQ Products AB provides NO support for application development of any kind. The information here is provided
"as is", and there is no guarantee that any of the examples shown will work in your particular application.
Figure 57. In the “Settings” menu of the media player, check the “Enable remote access to web server”
box and then click “Save”.
The media player will now reboot and then it is possible to login to the media player web server
locally and to use the “slideshow” system.
5.1
Font installation
The templates may address different fonts. However it is essential that the media player has the
fonts required. If not, a standard replacement font will be used and the final appearance of the text
may not be as intended. It is essential to know what fonts are used in the templates. The templates
should be delivered along with instructions on what fonts are required to obtain the desired result.
The media player includes the following set of standard fonts that will be applied if no other fonts
are uploaded to the system.
If additional fonts are to be uploaded (*.otf or *.ttf) these files are uploaded to the “Extensions”
menu. Once uploaded to the “Extensions” menu, the font is available in all media players on that
account.
Technical Note – Local slideshow, Version 1, 14/10/2010
36
MultiQ Products AB provides NO support for application development of any kind. The information here is provided
"as is", and there is no guarantee that any of the examples shown will work in your particular application.
Figure 58. Specific fonts are uploaded to the “Fonts” section of the “Extensions” menu.
Figure 59. Here an *.otf font file is uploaded to the system.
Technical Note – Local slideshow, Version 1, 14/10/2010
37
MultiQ Products AB provides NO support for application development of any kind. The information here is provided
"as is", and there is no guarantee that any of the examples shown will work in your particular application.
5.2
Local
computer slideshow management preparation
At the location of the media player the slides and the slideshow will be edited by the local staff.
However this requires that the staff has the possibility to login to the server in the media player. To
do this the IP address of the media player needs to be known and the correct link needs to be used
to login.
Therefore it is necessary to use a known IP address at the local site. This address can be set as a
fixed IP address in the media player. Another (in many cases more practical) way, is to use the
DHCP address reservation table in the local router.
If the IP address is set to xxx.xxx.xxx.xxx the full path to the slideshow application will become:
http://127.0.0.1/lsf/slideshow/
5TU
U5T
In many cases the local staff need some help to put this address as a favorite in the web browser
of the computer to be used. (see “3 To use the “slideshow” system in everyday operation”.)
5TU
U5T
In this example the name of the local template based system is “slideshow” however this name is
not mandatory. You may use local websites with other names (see “5 To build your own slideshow
templates”).
Technical Note – Local slideshow, Version 1, 14/10/2010
38
MultiQ Products AB provides NO support for application development of any kind. The information here is provided
"as is", and there is no guarantee that any of the examples shown will work in your particular application.
6
6.1
To build your own templates
Template system basics
Most local messages consist of a background image on top of which some text or even locally
inserted images are added. The background image is a part of the template and cannot be altered
by the local editor of the page. Also the fonts and font sizes along with the placement of text is
decided by the template.
Figure 60. A local message usually consists of a background image on top of which some text or locally
inserted images are added.
We will now take a closer look at the “slideshow.zip” file to learn how to make templates that are
adapted to the applications. Start by extracting the “slideshow” folder.
Figure 61. The “slideshow” folder consists of a number of subfolders. The only ones you need to deal with
are the “templates” and “img” folders.
Technical Note – Local slideshow, Version 1, 14/10/2010
39
MultiQ Products AB provides NO support for application development of any kind. The information here is provided
"as is", and there is no guarantee that any of the examples shown will work in your particular application.
In the “slideshow” folder there are two sub folders that are used when building templates: the
“templates” folder and the “images” folder. Three files are needed to build a template; the
background image file, a thumbnail image file and an html document defining the content of the
template.
Figure 62. Each template consists of three parts; the full resolution background image, a low resolution
thumbnail and the html document defining the template.
The templates to be found in the “slideshow” folder can be modified to a specific application.
However before distributing a modified “slideshow” folder it is advisable to remove templates that
are not supposed to be used in the application. This simplifies the handling of the system for the
local staff and also prevents unintended templates from being used.
If a background image is to be used, it is wise to start the project by creating that image. This image
will decide where to put the text on the screen and we need to know the coordinates of the text
before being able to write the html document defining the template.
6.2
To create the background image
The background image should be created using the native resolution of the monitor. If a Full HD
monitor is to be used in landscape mode such as in the example above the resolution is
1920x1080 pixels. The image can be in “jpg” or “png” format. Note that if the resolution of the
background image is larger than the resolution of the monitor, only the upper left part of the image
will be shown. The background image should be placed in the “img” folder.
Technical Note – Local slideshow, Version 1, 14/10/2010
40
MultiQ Products AB provides NO support for application development of any kind. The information here is provided
"as is", and there is no guarantee that any of the examples shown will work in your particular application.
Figure 63. First create the background image leaving areas that are to be edited locally empty.
6.3
To create a thumbnail
In order to recognize the template in the template system, a thumbnail version of the background
image is needed. Of course you do not need to use the exact background image for this but you
can create the thumbnail as you like. What’s essential is that it is easy for the local staff to find the
template when setting up a slideshow.
The thumbnail must be in “jpg” format and it is advisable to shrink the background image to
somewhere in the range of 150x150 pixels. A suitable size of a thumbnail for the “Hawada”
template (above) might be 179x100 pixels (to keep the proportions).
To make it simple to keep things together it is suggested to use the same name for the
background image as well as the thumbnail and the html document (below). The background image
and the thumbnail may use the same name since they are located in different folders. Finally place
the thumbnail image in the “templates” folder.
Technical Note – Local slideshow, Version 1, 14/10/2010
41
MultiQ Products AB provides NO support for application development of any kind. The information here is provided
"as is", and there is no guarantee that any of the examples shown will work in your particular application.
Figure 64. Create a thumbnail in the range of 150x150 pixels in “jpg” format.
6.4
To create the html document defining the template
The best way to learn how to build the html document defining the template is to examine the html
code.
It is recommended to use Notepad++ that can be downloaded from http://notepad-plus-plus.org/ .
5TU
U5T
Figure 65 (below) explains the html document. An easy way to build an html document is to use
one of the already existing html documents and to modify the code. By investigating the “Hawada”
code we can see that the code can be modified quite easily.
Technical Note – Local slideshow, Version 1, 14/10/2010
42
MultiQ Products AB provides NO support for application development of any kind. The information here is provided
"as is", and there is no guarantee that any of the examples shown will work in your particular application.
<html>
<head>
<!-- Add slide title -->
<title>%%title%%</title>
<!-- Remove scrollbars, in edit mode they will be displayed -->
<style type="text/css">
body {
overflow: hidden;
font-family: "Times New Roman", serif;
}
p{
margin: 60px;
}
</style>
</head>
Removes scrollbars
Defines position and size of
background image
<body>
<!-- Define background image as part of template, please note the absolute path to the image -->
<div style="background-color: #000000; color: white; position: absolute; left: 0px; top: 0px; width: 1920px; height:
1080px; padding: 0px; padding-right: 0px;"><img src="/lsf/slideshow/img/HawadaC.jpg"></div>
Background image
search path
Defines the position of the control panel in the input form
<!-- Place the edit mode controlpanel in the top left corner-->
%%controlpanel(10,10)%%
<!-- Insert slide heading (Local input)-->
<div style="z-index: 1;position: absolute; left: 37px; top: 54px; background-color: none;
width: 400px; height: 60px; padding: 15px; font-family: Arial; Defines the first line (title)
font-size: 48px; Color: white; font-weight: bolder;
name of slide in the list of
"><b>%%title%%</b></div>
that also defines
existing slides
<!-- Insert text (Local input)-->
Define “text_1 through “text_6”
<div style="z-index: 1;position: absolute; left: 37px; top: 124px; background-color: none;
width: 392px; height: 60px; padding: 15px; font-family: Arial; font-size: 48px; Color: white;
font-weight: bolder; ">%%text_1%%</div>
<div style="z-index: 1;position: absolute; left: 481px; top: 277px; background-color: none;
width: 1369px; height: 120px; padding: 15px; font-family: Arial; font-size: 96px; Color: white;
font-weight: bolder; ">%%text_2%%</div>
<div style="z-index: 1;position: absolute; left: 481px; top: 439px; background-color: none;
width: 1369px; height: 120px; padding: 15px; font-family: Arial; font-size: 96px; Color: white;
font-weight: bolder; ">%%text_3%%</div>
<div style="z-index: 1;position: absolute; left: 481px; top: 596px; background-color: none;
width: 1369px; height: 120px; padding: 15px; font-family: Arial; font-size: 96px; Color: white;
font-weight: bolder; ">%%text_4%%</div>
<div style="z-index: 1;position: absolute; left: 481px; top: 754px; background-color: none;
width: 1369px; height: 120px; padding: 15px; font-family: Arial; font-size: 96px; Color: white;
font-weight: bolder; ">%%text_5%%</div>
<div style="z-index: 1;position: absolute; left: 481px; top: 910px; background-color: none;
width: 1369px; height: 120px; padding: 15px; font-family: Arial; font-size: 96px; Color: white;
font-weight: bolder; ">%%text_6%%</div>
</body>
</html>
Figure 65. The “Hawada” template html code.
Technical Note – Local slideshow, Version 1, 14/10/2010
43
MultiQ Products AB provides NO support for application development of any kind. The information here is provided
"as is", and there is no guarantee that any of the examples shown will work in your particular application.
The html code can be divided into separate parts that can be reused in other templates. By editing,
copying and deleting sections of the code, it may be adapted to any project.
Looking at the code in figure 65 we can see that the first portion contains the code “overflow
hidden”. This is to disable the scrollbars on the screen in case the image should be too large.
(Scrollbars are initiated automatically as the content on the webpage exceeds the size of the
screen.)
Next code section is the location and size of the background image. In this case the image is to
cover the entire screen. Coordinates are measured in pixels in relation to the upper left corner. The
upper left corner of the image should be located at coordinates x=0 and y=0. The width of the
image is 1920 pixels and the height of the image is 1080 pixels.
Then follows a short code section defining where the control panel buttons on the input form are to
be located. The control panel includes the “Go back” and “Save slide” buttons. The control panel is
only visible on the input form used when editing the slide.
Next is the size, font and location of the “title” text. This text is different to the other text portions in
the template because it will not only be shown on the screen but also used as the title of the slide
in the “List of existing slides” of the user interface when editing the slideshow.
Figure 66. The “title” text is used both on the screen and to name the slide in the local management
interface.
For the “title” as well as for the other “text” entries there are separate portions of code defining the
location, size and fonts to be used.
6.5
To create “editable” text boxes
The editable text boxes are created by defining the title text box as %%title%% and %%text1%%,
%%text2%% and so on. The use of this code will automatically create the input text boxes required
Technical Note – Local slideshow, Version 1, 14/10/2010
44
MultiQ Products AB provides NO support for application development of any kind. The information here is provided
"as is", and there is no guarantee that any of the examples shown will work in your particular application.
in the input form used in the local slideshow editing interface. You can add as many input text
boxes as you need.
Figure 67. The %%textX%% code will create input boxes in the local slideshow editing interface.
6.6
Finding the coordinates to get the text in the right places
To get the text on the right location on top of the background image, the coordinates of the upper
left corners of the text boxes need to be known. It is preferable to use some kind of WYSIWYG tool
for this purpose. With some practice you will probably be able to produce the templates with your
favorite web development tool. However a way to get hold of the coordinates is to load the full
resolution background image into Photoshop.
In Photoshop, set the “Units” settings in the “Units & Rulers” portion of the “Preferences” settings to
pixels. Then the “Info” window can provide you with the x- and y coordinates of the curser on top of
the background image. These coordinates are measured in relation to the top left corner of the
image.
Use the x- and y coordinates obtained from the “Info” window to modify the html code.
Technical Note – Local slideshow, Version 1, 14/10/2010
45
MultiQ Products AB provides NO support for application development of any kind. The information here is provided
"as is", and there is no guarantee that any of the examples shown will work in your particular application.
Figure 68. Using the “Info” window in Photoshop is one way of knowing the coordinates at different
locations of the background image.
By running the html code in your web browser on your computer you will see where the text will
occur.
Figure 69. By running the html document in your web browser you get an indication of what the final
result will look like.
However you will not see the text on top of the background image since the computer does not
know the search path to the image. The text will not show on top of the background image until the
template is used in the media player.
If you wish to see the text on top of the background image while developing the template you can
temporarily change the search path of the background image to the absolute path to the location
where the image is stored on your computer. However you must not forget to change the path back
to the original search path before you distribute the template to the installers of the system.
Technical Note – Local slideshow, Version 1, 14/10/2010
46
MultiQ Products AB provides NO support for application development of any kind. The information here is provided
"as is", and there is no guarantee that any of the examples shown will work in your particular application.
6.7
Using fonts
The templates may address different fonts. However it is essential that the media player has the
fonts required. If not, a standard replacement font will be used and the final appearance of the text
may not be as intended. The media players have a set of standard fonts (listed in table 5.1).
Standard fonts available in the media players
Serif
Clean
ClearlyU
Courier
Fixed
Helvetica
Lucida
LucidaBright
LucidaTypewriter
Luxi Mono
Luxi Sans
Luxi Serif
New Century Schoolbook
Times
Utopia
Table 1 Standard fonts available in the media players.
If other fonts than the ones defined in table 5.1 are used in the templates it is essential to add
information on what fonts are used (along with font files) to make sure that the person installing
the system sees to that the needed fonts are available in the media players.
6.8
Sets of templates and templates that allow for locally uploaded
images
In the “slideshow” folder there is a set of templates that can be used to build a Power Point
lookalike application intended to be shown on an SXGA (1280 x 1024 pixels) monitor in landscape
mode. There are three templates available that may be used for different parts of a presentation.
Technical Note – Local slideshow, Version 1, 14/10/2010
47
MultiQ Products AB provides NO support for application development of any kind. The information here is provided
"as is", and there is no guarantee that any of the examples shown will work in your particular application.
Figure 70. Templates used to build a Power Point lookalike presentation.
“MultiQ_0” is a template used to make a “title” slide for a presentation. “MultiQ_1” is a slide to list a
number of items. Finally “MultiQ_2” is an image slide where a slide heading (title) is combined with
and image that can be uploaded locally. All three templates have a background image including the
Logo and other graphical elements that are to be used on each slide.
These three templates is an example of a set of templates that can be used by the local staff to
create an entirety. A slideshow can include several slides based on one template or slides based on
several templates.
We will now take a closer look at the “MultiQ_2” template to see how it is possible to build
templates that allow for local upload of images.
Figure 71. The “MultiQ_2” template is based on a background image with a local slide heading and an
image for local upload.
Looking closer at the code you will find the same code portions as in the previous example. The
difference is the size of the background image and the fact that there is only one text entry which
is the “title” entry that will be listed as the name of the slide in the “List of existing slides” when
editing the slideshow locally. This is practical since the slide heading is probably quite a good
description of the image used on the same slide.
Technical Note – Local slideshow, Version 1, 14/10/2010
48
MultiQ Products AB provides NO support for application development of any kind. The information here is provided
"as is", and there is no guarantee that any of the examples shown will work in your particular application.
The last portion of the code describes the local image. First there is the location of the image (in
relation to the upper left corner of the slide) and the size of the image (both in pixels). The final part
of the code section is perhaps the most interesting:
%%image(608,1080)%%
This will force the image to be displayed with the height=608 pixels and width=1080 pixels. In this
case this is an image with an aspect ratio of 16:9. If an image with a different aspect ratio is used,
then the image will get stretched to this size. I.e. that the image to be used can be any size but the
aspect ratio is critical.
If several images are to be used in the same template they are to be numbered the same way as
text, i.e. %%image_1%%, %%image_2%% etc. Figure 72 shows the code.
<html>
<head>
<!-- Add slide title -->
<title>%%title%%</title>
<!-- Remove scrollbars, in edit mode they will be displayed -->
<style type="text/css">
body {
overflow: hidden;
font-family: "Times New Roman", serif;
}
p{
margin: 60px;
}
</style>
</head>
<body>
Removes scrollbars
Defines position and size
of background image
<!-- Define background image as part of template, please note the absolute path to the image -->
<div style="background-color: #000000; color: white; position: absolute; left: 0px;
top: 0px; width: 1280px; height: 1024px; padding: 0px; padding-right: 0px;
"><img src="/lsf/slideshow/img/MultiQ_1.jpg"> </div>
Background image
<!-- Place the edit mode controlpanel in the top left corner-->
%%controlpanel(10,10)%%
Defines the position
search path
of the control panel in the input form
<!-- Insert slide heading (Local input)-->
<div style="z-index: 1;position: absolute; left: 100px; top: 75px; background-color: none;
width: 800px; height: 100px; padding: 15px; font-family: Arial;
font-size: 70px; Color: black; font-weight: bolder;
Defines the first line (title)
"><b>%%title%%</b></div>
that also defines
name of slide in the list of existing slides
<!-- Insert image (Local input, the image should have aspect ratio 16:9)-->
<div style="background-color: #000000; color: white; position: absolute; left: 100px;
top: 200px; height: 608px; width: 1080; padding: 0px; padding-right: 0px;
">%%image(608,1080)%%</div>
Defines the position and size of a local input image
</body>
</html>
Figure 72. The html code includes a section defining an image for local upload.
Technical Note – Local slideshow, Version 1, 14/10/2010
49