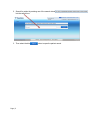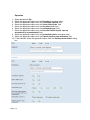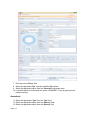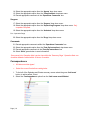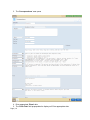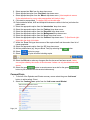
1
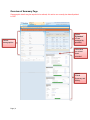
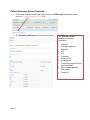
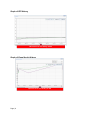
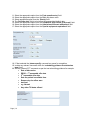
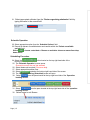
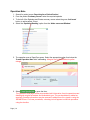
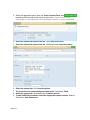
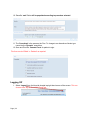
OpenEyes Programme Office OpenEyes Clerical for Clinical Staff (User Manual) Published by OpenEyes Programme Office Document version 0.2 Date: 12th Dec 2014 www.openeyes.org.uk V Document published by OpenEyes Programme Office In case of any query please contact OPO team – Ext 4752 Source – IT PMO_L drive /OPO documents repository/TrainjngMaterials Colour Key: OpenEyes Form links, OpenEyes navigation links, Notes, Field names Aims This session is designed to introduce delegates to OpenEyes by presenting Healthcare professionals to the technology to be able to document the clinical journey of patients under their care. The session aims to give the best practices on better patient care and management. This course is designed for all Clinical Staff who need to perform administrative tasks within OpenEyes. The following features are included in this course: Contents Aims........................................................................................................................................... 1 Contents .................................................................................................................................... 1 Documentation History ............................................................................................................... 3 Document Status .................................................................................................................... 3 Logging on and Getting Started ................................................................................................. 3 Searching for a Patient............................................................................................................... 4 Overview of Summary Page....................................................................................................... 6 .................................................................................................................................................. 6 .................................................................................................................................................. 6 .................................................................................................................................................. 6 .................................................................................................................................................. 6 .................................................................................................................................................. 6 .................................................................................................................................................. 6 Patient Summary Screen Overview............................................................................................ 7 Graph of IOP History .............................................................................................................. 8 .................................................................................................................................................. 8 Graph of Visual Acuity History ................................................................................................ 8 Visual Fields History ............................................................................................................... 9 .................................................................................................................................................. 9 .................................................................................................................................................. 9 .................................................................................................................................................. 9 Episode Details ...................................................................................................................... 9 Page | 1 .................................................................................................................................................. 9 Prescription ...............................................................................................................................10 Operation Booking ....................................................................................................................12 Diagnosis ................................................................................ Error! Bookmark not defined. Operation ..............................................................................................................................13 Schedule Operation ...............................................................................................................15 Scheduling Procedure ...........................................................................................................15 Operation Note..........................................................................................................................16 Anaesthetic ...........................................................................................................................17 Surgeon.................................................................................................................................18 Pre – Operative Drugs ...........................................................................................................18 Comments .............................................................................................................................18 Correspondence .......................................................................................................................18 Consent Form ...........................................................................................................................20 Logging Off ...............................................................................................................................22 Page | 2 Documentation History Date Version number Revision details Written by Approved by 05/10/2014 0.1 First draft of document Victoria Aina OpenEyes Programme Office 12/12/2014 0.2 Second draft of document Victoria Aina OpenEyes Programme Office Correspondence element updated. Document Status This is a controlled document. This document version is only valid at the time it is retrieved from controlled file store, after which a new approved version will replace it. On receipt of a new issue, please destroy previous issues (unless a specified earlier issue is base lined for use throughout the programme. Logging on and Getting Started The OpenEyes login page is case sensitive. 1. Select the clinical services link within the intranet. 2. The remote desktop pop up box opens, select the grey ‘connect’ button situated within the box. a. REMOTE DESKTOP POP UP BOX 1 Page | 3 3. Within the Window Security pop up box enter ‘Password.’ WINDOWS SECURITY POP UP BOX 2 4. Select Clinical services folder (for the live environment). 5. Select the Training folder (Training environment). 1. Launch Open Eyes by selecting (double clicking) the 2. Enter Username and Password then select Icon. . Searching for a Patient Scan barcode on notes if scanners present 1. Select site and/or firm from the pop up box then the green confirm button. Page | 4 2. Search for patient by entering one of the search criteria into the search box. 3. Then select the blue Page | 5 button to open the patient record. Overview of Summary Page Demographic details may be required to be altered, this action can currently be altered/updated in PAS. Patient demographics Patient ‘Episode/s’ of care arranged by speciality’ Links takes you to last event recorded. Patient Clinical Summary and History. Page | 6 Patient Summary Screen Overview 1. On the right hand side of the main screen under the ‘All Episodes’ subheading select the blue ‘Create episode/add event’ link. 2. The ‘Episodes and Events’ summary screen opens. The ‘Summary Screen’ displays the following information: Page | 7 Overview Principal Diagnoses Refraction CCT IOP Comments Clinic Interval Investigations Visual Field progression and last Visual fields Glaucoma Management Plan extracts Target IOP Graph of IOP History Move the bar to view history of data Graph of Visual Acuity History Move the bar to view history of data Page | 8 Visual Fields History Select image to zoom into detail view Move the bar to view history of data Episode Details View episode details View episode status Page | 9 Prescription Ensure Episode and Events Screen is Open prior. Allergies are highlighted within the warning bar. When a drug is inadvertently prescribed that the patient is allergic to the prescribed drug is highlighted in red. 1. To the left of the Episodes and Events summary screen select the green ‘Add event’ button, to add a patient Event 2. Select the ‘Prescription’ option from the ‘Add a new event Window’ Page | 10 3. The ‘Prescription’ form opens. Prescriptions can be: Saved as draft Selecting the ‘Save and Print’ green button shows Print Preview. Button only appears if there is a previous prescribing history. 4. Enter the required event date. 5. Select the appropriate option from the ‘Add Item’ drop down menu. 1. If required option not found within list, select a SNOMED CT term by typing into the dynamic text box 2. Select the appropriate option from the ‘Add standard set’ drop down menu. 3. Select the appropriate option from the ‘Filtered by’ drop down menu. 4. Select the appropriate ‘administration’ options from the grey area of the form. Page | 11 5. Record any relevant comments in the ‘Comments’ box. Comments will be visible on prescription. 6. Select the green ‘Save and Print’ button to print prescription. All printed prescriptions: Must be signed. Any future prescriptions to be continued with the GP must ensure the following box/es are ticked as appropriate. Operation Booking 1. Search for patient as per ‘Searching for a Patient Section’. 2. From the patient ‘Summary Screen’ select the required episode. 3. To the left of the Episodes and Events summary screen select the green ‘Add event’ button, to add a patient Event 4. Select the ‘Operation Booking’ option from the ‘Add a new event Window’. 5. Enter date booking created Page | 12 Operation Select appropriate ‘Eye’. Select the appropriate option from the ‘Procedure’ dropdown menu. Select the appropriate option from the’ Consultant required’ field. Select the appropriate option from the ‘Senior fellow to do’ field. Select the appropriate option from the ‘Any other to do’ field. Select the appropriate option from the ‘Anaesthetic type’ field. Select the appropriate option from the ‘Does the Patient require a pre-op assessment by an anaesthetist’ field. 8. Select the appropriate option from the’ Anaesthetic choice’ dropdown menu. 9. Select the appropriate option from the ‘Patient needs to stop medication’ field. 10. If ‘Yes’ selected, select the appropriate option from the ‘Please provide details’ dialog box. 1. 2. 3. 4. 5. 6. 7. Page | 13 11. Select the appropriate option from the ‘Post-operative stay’ field. 12. Select the appropriate option from the ‘Site’ drop down menu. 13. Select appropriate option from the ‘Priority’ field. 14. The ‘Decision date’ field is to be left as the prepopulated default date. 15. Select the appropriate option from the ‘Suitable for high volume (Fast track)’ field. 16. Select the appropriate option from the ‘Admission discussed with patient’ field. 17. Select the appropriate option from the ‘Special equipment requirement’ field. 18. If ‘Yes’ selected the ‘please specify’ comment box opens for completion. 19. Include any relevant comments within the ‘scheduling guidance for admissions team’ field 20. Add any relevant RTT comments as per the trust scheduling guidance for example: Date of discussion. EROD – 1st reasonable offer date 2nd reasonable offer date Date the patient is available from Reason why the offers were declined e.g. Abroad Any other TCI dates offered Page | 14 21. Select appropriate clinician from the ‘Doctor organising admission’ field by typing the name in the search field. Schedule Operation 22. Select appropriate option from the ‘Schedule Options’ field. 23. Record all relevant unavailable dates and reasons within the ‘Patient unavailable periods’ field. Select > choose a start date > Choose an end date> choose a reason from drop down menu. Scheduling Procedure 24. Select the button located on the top right hand side of the booking screen. 25. The ‘Schedule Operation’ screen opens. Ensure the correct firm and site selected. 26. Select theatre slot required (Choose a date). 27. Select appropriate session time. 28. Select located at the bottom right hand side of the screen. 29. The ‘Operation booking (Scheduled)’screen will open. 30. Select from the pane located at the top right hand side of the ‘Operation booking screen.’ 31. Select from the pane located at the top right hand side of the ‘operation booking screen.’ 32. Select home to exit Screen. Page | 15 Operation Note 1. Search for patient as per ‘Searching for a Patient Section’. 2. From the patient ‘Summary Screen’ select the required episode. 3. To the left of the Episodes and Events summary screen select the green ‘Add event’ button, to add a patient Event. 4. Select the ‘Operation Booking’ option from the ‘Add a new event Window’. 5. The operation area of OpenEyes opens. Select the appropriate option from below the ‘Create Operation Note’ blue subheading. Allergies are visible besides the yellow triangle. 6. Select to open the form. The Operation Note page will be pre-populated with information from the operation event detailing the surgical procedure and anaesthetic type. This can be deleted or added as required. Operation procedures may be removed or added from list or typed in using the SNOMED term. For some procedures, a drawing tool will appear to draw the procedure using the doodles. Page | 16 7. Enter the correct ‘Event’ date. 8. Select the appropriate ‘Eye’ from the available ‘Eye’ options. 9. Select the appropriate option from the ‘Procedure’ drop down menu. 10. If required option not found within list, select a SNOMED CT term by typing into the dynamic text box Anaesthetic 11. Select the appropriate ‘Type’ from the ‘Type’ field. 12. Select the appropriate option from the ‘Given by’ field. 13. Select the appropriate option from the ‘Delivery’ field. Page | 17 14. Select the appropriate option form the ‘Agents’ drop down menu. 15. Select the appropriate option form the ‘Complications’ drop down menu. 16. Record appropriate comments in the ‘Operations Comments ‘box. Surgeon 17. Select the appropriate option form the ‘Surgeon’ drop down menu. 18. Select the appropriate option form the ‘Supervising Surgeon’ drop down menu. Only complete if required. 19. Select the appropriate option form the ‘Assistant’ drop down menu Pre – Operative Drugs 20. Select the appropriate option form the ‘Drugs’ drop down menu. Comments 21. Record appropriate comments within the ‘Operations Comments ‘box. 22. Select the appropriate option form the ‘Post-Op Instructions’ drop down menu. 23. Record appropriate comments in the ‘Post-Op Instructions ‘box 24. Select ‘Save’ green button to save information. Once saved, the ‘Operation Note’ can be view within the ‘Summary Page’. Operation Note can be either deleted or edited within 24 hours of creation. Correspondence All letters must be signed. Select the correct firm before creating letter. 1. To the left of the Episodes and Events summary screen select the green ‘Add event’ button, to add a patient Event 2. Select the ‘Correspondence’ option from the ‘Add a new event Window’ Page | 18 3. The ‘Correspondence’ area opens 4. Enter appropriate ‘Event’ date. 5. The ‘Clinic Date’ field prepopulated to display null. Enter appropriate date. Page | 19 6. Select appropriate ‘Site’ from the drop down menu. 7. Select appropriate option from ‘Recipient’ drop down menu. 8. Select appropriate option from the ‘Macro’ drop down menu. (Use template in macros for the selected service, macro date prepopulated with today’s date). 9. Clinic date is prepopulated. To change click into the date area. 10. Patient address details, NHS and Hospital Numbers are visible in the box just below the patient name. 11. Select the appropriate option from the ‘Introduction’ drop down menu. 12. Select the appropriate option from the ‘Findings’ drop down menu. 13. Select the appropriate option from the ‘Diagnosis’ drop down menu. 14. Select the appropriate option from the ‘Management’ drop down menu. 15. Select the appropriate option from the ‘Drugs’ drop down menu. 16. Select the appropriate option from the ‘Outcome’ drop down menu. To Spell check rightclick within the body of the letter. 17. Within the ‘From’ field type the surname of the required staff and then select from list of names populated. 18. Select the appropriate option from the ‘CC’ drop down menu. 19. Add any attachments (eg: Xrays or Blood Tests) by selecting the button. 20. Select to print one copy 21. Select to print all letters including copies. 22. Select the Edit tab to make any changes after the document has been saved. Letters can only be edited by the creator of the document. Letters can only be deleted once the reason 23. Select the green button to save document as a draft or the green button to print and save the document simultaneously. Consent Form 1. To the left of the Episodes and Events summary screen select the green ‘Add event’ button, to add a patient Event 2. Select the ‘Consent Form’ option from the ‘Add a new event Window’ Page | 20 3. Select the appropriate option from the ‘Create Consent Form’ area select located top left hand side of the screen to open form.(‘Create Consent Form’ functionality, is now available for the ‘Unbooked procedures’ in all the specialities). 4. Select the appropriate option from the ‘Type’ drop down menu. 5. Select the appropriate option from the ‘Leaflets provided’ drop down menu. 6. 7. 8. 9. Select the appropriate ‘Eye’ from the options. The procedure/s is automatically populated in the ‘Procedures’ fields. Select the appropriate ‘Anaesthetic type’ from the options. To add additional procedures select the appropriate option from the ‘Select a Subsection’ drop down menu. Page | 21 10. ‘Benefits’ and ‘Risks’ will be populated according to procedure selected. 11. The ‘Consultant’ is the same as the Firm. To change to an alternative clinician type name into the ‘Dynamic’ search box. 12. Save and Print the ‘Consent Form’ for patient to sign. The form can be ‘Edited’ or ‘Deleted’ as required. Logging Off 1. Select ‘Logout’ from the blue tab located top right hand corner of the screen. This can be seen from any screen within OpenEyes. Page | 22